2006 MX-5 2.0 Option Pack
Discussion


A new air and oil filter turned up today. I purchased some oil a while ago as part of a deal but hadn't got around to getting a filter to go with it. I'm undecided if I'll change the oil before or after Anglesey, the current oil went in just before The Ring but still looks quite clean.
I changed the air filter when I purchased the car 11k ago, but I wasn't planning to keep it beyond our trip to Italy in it so I stuck the cheapest ECP filter in at the time. I went for Mann this time...

Mann seem to produce filters all over the place, but these two are from Germany...


Quite reasonably priced too, I think the air filter was £12 and the oil filter £5. The old air filter was surprisingly grubby for 11k miles.

Very different construction on the Mann filter, more like the K&N filter than the OE https://www.mx5parts.co.uk/filter-mk3-35-p-1300.ht... will be interesting to see if there's any noticeable difference.
Edit Jan 2020 - Fix image links
I changed the air filter when I purchased the car 11k ago, but I wasn't planning to keep it beyond our trip to Italy in it so I stuck the cheapest ECP filter in at the time. I went for Mann this time...
Mann seem to produce filters all over the place, but these two are from Germany...
Quite reasonably priced too, I think the air filter was £12 and the oil filter £5. The old air filter was surprisingly grubby for 11k miles.
Very different construction on the Mann filter, more like the K&N filter than the OE https://www.mx5parts.co.uk/filter-mk3-35-p-1300.ht... will be interesting to see if there's any noticeable difference.
Edit Jan 2020 - Fix image links
Edited by Accelebrate on Friday 24th January 11:50
I fitted a new thermostat today. The coolant temperature seemed to be fluctuating more than it probably should, and the heater took ages to kick in.
MX5Parts suggest there are two types of thermostat for the NC, the 'long' and the 'short' model and that you should match up to what's currently fitted. The internet seems to suggest the short model is a flawed design superseded by the long model, and that you can fit either.
The price of thermostats also seems to vary massively. Genuine parts are £80ish, Gates want £50. I ordered a Mahle stat for £12 delivered from Opie Oils

It looks like it might be an OE part with a FoMoCo logo ground off. Hopefully, it's suspiciously cheap because they're supplying loads of them to Ford.

I followed HorneyMX5's very handy guide:
http://mighty5s.com/thread/1301/mk3-nc-thermostat-...
It's a fairly easy job, with the exception of two of the three bolts on the thermostat. You can hardly see them and there's minimal room for spannering.

The short 1/4" wrench in my Halfords set came in handy.

I took the opportunity to clean the throttle body whilst it was off. It was a bit grubby!


Here's the old next to the new. The old stat was fully closed and appeared to actuate as expected when placed in boiling water. Maybe it was opening too soon or sticking sometimes

I didn't have any issues fitting the existing hose to the longer thermostat. Here's the shiny throttle body back in place...


All back together. Having changed the coolant recently I used the second bottle of FL22 I'd purchased topped up with a bit of the coolant that was already in there. That should have now given it a good flush.
I haven't had a chance to give it a road test yet, but the heater seemed to kick in sooner whilst I was bleeding.
Edit Jan 2020 - Fix image links
MX5Parts suggest there are two types of thermostat for the NC, the 'long' and the 'short' model and that you should match up to what's currently fitted. The internet seems to suggest the short model is a flawed design superseded by the long model, and that you can fit either.
The price of thermostats also seems to vary massively. Genuine parts are £80ish, Gates want £50. I ordered a Mahle stat for £12 delivered from Opie Oils
It looks like it might be an OE part with a FoMoCo logo ground off. Hopefully, it's suspiciously cheap because they're supplying loads of them to Ford.
I followed HorneyMX5's very handy guide:
http://mighty5s.com/thread/1301/mk3-nc-thermostat-...
It's a fairly easy job, with the exception of two of the three bolts on the thermostat. You can hardly see them and there's minimal room for spannering.
The short 1/4" wrench in my Halfords set came in handy.
I took the opportunity to clean the throttle body whilst it was off. It was a bit grubby!
Here's the old next to the new. The old stat was fully closed and appeared to actuate as expected when placed in boiling water. Maybe it was opening too soon or sticking sometimes
I didn't have any issues fitting the existing hose to the longer thermostat. Here's the shiny throttle body back in place...
All back together. Having changed the coolant recently I used the second bottle of FL22 I'd purchased topped up with a bit of the coolant that was already in there. That should have now given it a good flush.
I haven't had a chance to give it a road test yet, but the heater seemed to kick in sooner whilst I was bleeding.
Edit Jan 2020 - Fix image links
Edited by Accelebrate on Friday 24th January 11:50
A quick update on some of the recent changes now that I've had a chance to commute in the Mazda a few times.
The lower seating position is great. My wife also seems happy with the seat height, which was a concern. The only downside seems to be that the seatbelt retainer on the shoulder of the seat now traps the seatbelt if you lean forward at junctions. Easily solved by hooking the belt out of the seat retainer. Mazda have released an updated retainer design, it looks like it might not pinch the belt as easily. I'll order one as soon as MX5Parts get them back in stock.
The thermostat was a great decision. I was undecided if it needed doing as the car seemed ok before, the coolant temp fluctuated a bit at speed but not to extremes. With the new thermostat in place and once up to temp the needle sits bang in the middle and never fluctuates. The heater is a lot hotter and the car gets up to temp much quicker. I should have changed it sooner. I'm curious to see if MPG improves, I suspect it will.
Might just be placebo, but the cars seems a bit more lively with a clean air filter and throttle body.
I've also fitted a new battery:

Not really necessary just yet, but I had some cashback burning a hole in my PayPal account. There was a company in France selling the Yuasa for about £20 less than UK suppliers delivered, so I figured I'd order one whilst I didn't really need it. It arrived within about four days, well packaged, no issues.
Out with the old budget 'Powerline'...
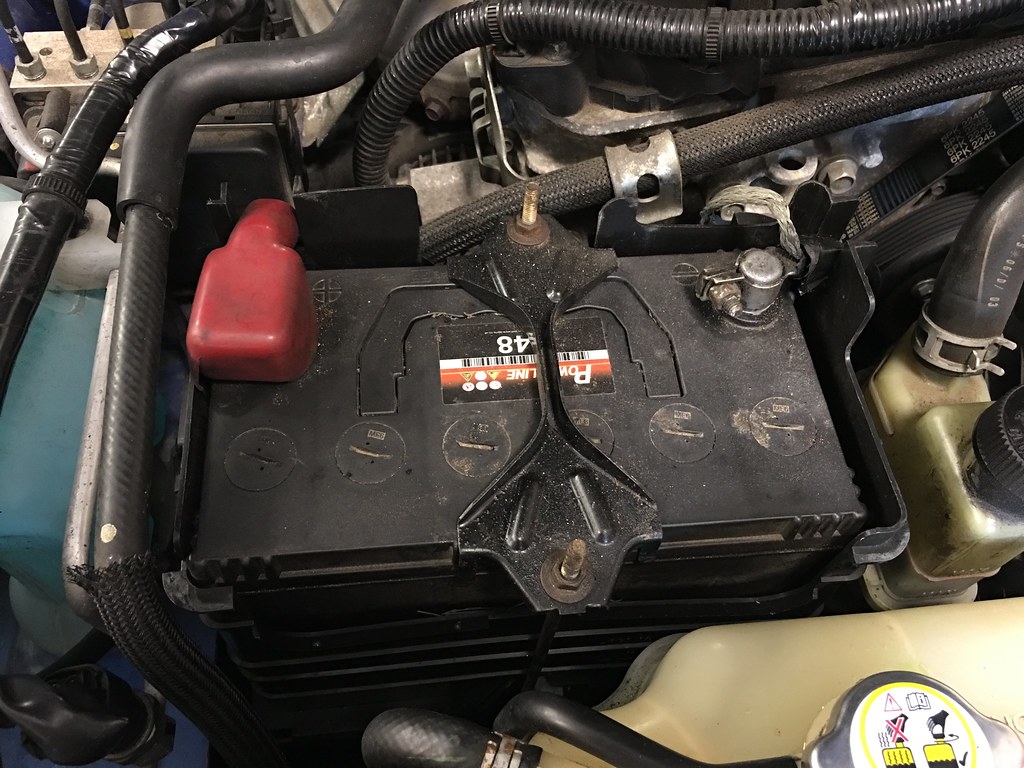


The Yuasa seems to have the best spec out of all the regular battery options for the NC.
Edit Jan 2020 - Fix image links
The lower seating position is great. My wife also seems happy with the seat height, which was a concern. The only downside seems to be that the seatbelt retainer on the shoulder of the seat now traps the seatbelt if you lean forward at junctions. Easily solved by hooking the belt out of the seat retainer. Mazda have released an updated retainer design, it looks like it might not pinch the belt as easily. I'll order one as soon as MX5Parts get them back in stock.
The thermostat was a great decision. I was undecided if it needed doing as the car seemed ok before, the coolant temp fluctuated a bit at speed but not to extremes. With the new thermostat in place and once up to temp the needle sits bang in the middle and never fluctuates. The heater is a lot hotter and the car gets up to temp much quicker. I should have changed it sooner. I'm curious to see if MPG improves, I suspect it will.
Might just be placebo, but the cars seems a bit more lively with a clean air filter and throttle body.
I've also fitted a new battery:
Not really necessary just yet, but I had some cashback burning a hole in my PayPal account. There was a company in France selling the Yuasa for about £20 less than UK suppliers delivered, so I figured I'd order one whilst I didn't really need it. It arrived within about four days, well packaged, no issues.
Out with the old budget 'Powerline'...
The Yuasa seems to have the best spec out of all the regular battery options for the NC.
Edit Jan 2020 - Fix image links
Edited by Accelebrate on Friday 24th January 11:50
It's been a quiet year for MX-5 fettling so far. I've been cheating on the Mazda with other cars.
We've managed to collectively Whatsapp-peer-pressure Roshan (the guy who learned to drive so that he could join us at the Nurburgring) into buying a cheap 350z as his first car. This didn't go entirely smoothly as it died on collection day due to water ingress into the body control module and was abandoned on my driveway awaiting recovery whilst a disheartened Roshan got the train back to London.
With the initial foibles fixed he returned a few weeks later as I'd spotted that the auxiliary and aircon belts didn't look too clever.

The aux belt was cracked...

The air con belt was crumbling to bits!

I fitted a nice new set of Gates belts. The 350z has manually adjusted belt tensioners, I much prefer the spring loaded tensioner on the Mazda.

Roshan was also joined by Alex, who we met at the Ring. He's recently emigrated from Germany and imported his Fiesta ST with a view to keeping it as a track car.

I fitted H&R springs, a couple of Powerflow bits and EBC discs to the Fiesta.


It made a pleasant change to work on something that wasn't corroded. Everything comes apart like those California YouTube how-to videos
I haven't completely neglected the Mazda, the soft top was looking a bit grey so I treated it with an Autoglym kit.

It's a two stage kit with a cleaner and a protector. The protector beads water impressively well.

I've picked up some new pads that I'll fit before the next track day at Anglesey. I went for StopTech Sport pads, they were about £65 from 'Tarmac Sportz' in Derby.

I've also been sorting out the peeling lacquer on the wheels I picked up over Christmas. It was so loose that a pressure washer removed nearly all the old lacquer.

I have spotted a slight buckle in one of the wheels. Luckily they came as a set of 5 with one unused rim, I'll have to get the tyre moved over. All part of the fun of buying cheap secondhand wheels.

I had a fun week of commuting to Egham every day last week, featuring a good three hours stationary on the M25 on the evening of valentines day whilst a burning coach was extinguished. I used the Mazda a couple of times to break up the monotony. Here it is looking unusually clean and presentable in Waitrose Egham.

Edit Jan 2020 - Fix image links
We've managed to collectively Whatsapp-peer-pressure Roshan (the guy who learned to drive so that he could join us at the Nurburgring) into buying a cheap 350z as his first car. This didn't go entirely smoothly as it died on collection day due to water ingress into the body control module and was abandoned on my driveway awaiting recovery whilst a disheartened Roshan got the train back to London.
With the initial foibles fixed he returned a few weeks later as I'd spotted that the auxiliary and aircon belts didn't look too clever.
The aux belt was cracked...
The air con belt was crumbling to bits!
I fitted a nice new set of Gates belts. The 350z has manually adjusted belt tensioners, I much prefer the spring loaded tensioner on the Mazda.
Roshan was also joined by Alex, who we met at the Ring. He's recently emigrated from Germany and imported his Fiesta ST with a view to keeping it as a track car.
I fitted H&R springs, a couple of Powerflow bits and EBC discs to the Fiesta.
It made a pleasant change to work on something that wasn't corroded. Everything comes apart like those California YouTube how-to videos
I haven't completely neglected the Mazda, the soft top was looking a bit grey so I treated it with an Autoglym kit.
It's a two stage kit with a cleaner and a protector. The protector beads water impressively well.
I've picked up some new pads that I'll fit before the next track day at Anglesey. I went for StopTech Sport pads, they were about £65 from 'Tarmac Sportz' in Derby.
I've also been sorting out the peeling lacquer on the wheels I picked up over Christmas. It was so loose that a pressure washer removed nearly all the old lacquer.
I have spotted a slight buckle in one of the wheels. Luckily they came as a set of 5 with one unused rim, I'll have to get the tyre moved over. All part of the fun of buying cheap secondhand wheels.
I had a fun week of commuting to Egham every day last week, featuring a good three hours stationary on the M25 on the evening of valentines day whilst a burning coach was extinguished. I used the Mazda a couple of times to break up the monotony. Here it is looking unusually clean and presentable in Waitrose Egham.
Edit Jan 2020 - Fix image links
Edited by Accelebrate on Friday 24th January 11:51
No, I haven't been on track. It looks like the other front caliper has started sticking:

I replaced the slider pins when I replaced the other front caliper, so it'll probably be a corroded piston again. I've ordered a new/recon Budweg caliper from brakesint. £75 with next day delivery, very reasonable.
I feel like I should probably replace the only remaining original rear caliper now, presumably it'll probably follow tradition and seize up soon.
Edit Jan 2020 - Fix image links
Edited by Accelebrate on Friday 24th January 11:51
Some evening spannering this week. Brakesint delivered a nice shiny new front left caliper next day...

I could have rebuilt the caliper with a new piston and seals for about half the cost, but the Budweg calipers come nicely zinc coated and pristine and I haven't got an easy way to block off a hemorrhaging brake line now that the lines are braided and won't clamp. I guess a nut, bolt and a couple of washers through the banjo connector might work.

I popped in the new Stoptech pads whilst I was at it. The Brembo pads I fitted in July were about half worn after 4k and 20 ring laps.

The new pads came with a complete new fixing kit, I also took my time cleaning and regreasing the slider pins on both sides.


The old piston didn't look too clever. I couldn't get it to pop all the way out with the 110psi from my compressor.

I followed the Stoptech bedding in procedure - http://www.stoptech.com/technical-support/technica...
15 hard lots of braking from 50 to 5mph. It's a good job we don't live in a town! The initial bite of the pads seems good, I haven't noticed any noise yet. Will be interesting to see how they cope on track.
I've noticed the floormats seem a little damp if the car has sat outside in rain. This is hopefully down to a common issue with the fixings that hold the scuttle trim in place. Here's a handy guide - http://myroadtrip.net/mazda-mx-5-fixing-a-leak-und...

Wipers off, two screws removed and some clips. Nothing too fiddly.

I believe these foam pads originally create a seal with an adhesive. Like most mine were dried out and brittle.

I used Puraflex 40, just because I already had a tube open (cheap from Toolstation).


I'd say this looked messy, although if it was painted I'm not sure it would be much worse than factories effort next to it. It is of course completely covered by the scuttle trim.
Supposedly the caps that cover the trim screws always break when removed. MX5 Parts sell replacements, I also noticed that someone has gone to the trouble of creating a 3D printable replacement on Thingiverse - https://www.thingiverse.com/thing:2237341
I printed a couple in advance. Of course I then removed both of the originals without any damage. But I fitted the low-res replacements regardless. Because 3D printer

Edit Jan 2020 - Fix image links
I could have rebuilt the caliper with a new piston and seals for about half the cost, but the Budweg calipers come nicely zinc coated and pristine and I haven't got an easy way to block off a hemorrhaging brake line now that the lines are braided and won't clamp. I guess a nut, bolt and a couple of washers through the banjo connector might work.
I popped in the new Stoptech pads whilst I was at it. The Brembo pads I fitted in July were about half worn after 4k and 20 ring laps.
The new pads came with a complete new fixing kit, I also took my time cleaning and regreasing the slider pins on both sides.
The old piston didn't look too clever. I couldn't get it to pop all the way out with the 110psi from my compressor.
I followed the Stoptech bedding in procedure - http://www.stoptech.com/technical-support/technica...
15 hard lots of braking from 50 to 5mph. It's a good job we don't live in a town! The initial bite of the pads seems good, I haven't noticed any noise yet. Will be interesting to see how they cope on track.
I've noticed the floormats seem a little damp if the car has sat outside in rain. This is hopefully down to a common issue with the fixings that hold the scuttle trim in place. Here's a handy guide - http://myroadtrip.net/mazda-mx-5-fixing-a-leak-und...
Wipers off, two screws removed and some clips. Nothing too fiddly.
I believe these foam pads originally create a seal with an adhesive. Like most mine were dried out and brittle.
I used Puraflex 40, just because I already had a tube open (cheap from Toolstation).
I'd say this looked messy, although if it was painted I'm not sure it would be much worse than factories effort next to it
. It is of course completely covered by the scuttle trim.Supposedly the caps that cover the trim screws always break when removed. MX5 Parts sell replacements, I also noticed that someone has gone to the trouble of creating a 3D printable replacement on Thingiverse - https://www.thingiverse.com/thing:2237341
I printed a couple in advance. Of course I then removed both of the originals without any damage. But I fitted the low-res replacements regardless. Because 3D printer
Edit Jan 2020 - Fix image links
Edited by Accelebrate on Friday 24th January 11:52
Thanks both 
I visited Skuzzle Motorsport yesterday, HorneyMX5 was running a dyno day and BBQ. As previously discussed in this thread I also had a set of RX-8 ARBs to collect from him.
I like Horney's approach to BBQing...

It seemed rude to not have a go on the dyno whilst I was there. I wasn't expecting anything impressive as it is essentially a standard NC, but I figured it would be interesting to see what effect age and mileage had had on the car.

The best result after three runs was 132.9 HP at the wheels. Skuzzle reckons that you can add around 20% to that to give the flywheel figure, which equates to the car still having the 160ish BHP it left the factory with 12 years and 105k ago. I was quite pleased with that.

The next car on the dyno was another NC, but fitted with a straight centre section (removing one of the two cats) and Skuzzle's own intake system.

The red car made 135 HP, not a major difference in peak HP. However, Nick plotted our cars together to show the difference in mid-range torque that the intake provides, my car is in green:

I've never really paid much attention to intake changes on the NC as internet wisdom has always suggested that the stock system is fine. I might need to re-evaluate that.
Edit Jan 2020 - Fix image links
I visited Skuzzle Motorsport yesterday, HorneyMX5 was running a dyno day and BBQ. As previously discussed in this thread I also had a set of RX-8 ARBs to collect from him.
I like Horney's approach to BBQing...
It seemed rude to not have a go on the dyno whilst I was there. I wasn't expecting anything impressive as it is essentially a standard NC, but I figured it would be interesting to see what effect age and mileage had had on the car.
The best result after three runs was 132.9 HP at the wheels. Skuzzle reckons that you can add around 20% to that to give the flywheel figure, which equates to the car still having the 160ish BHP it left the factory with 12 years and 105k ago. I was quite pleased with that.
The next car on the dyno was another NC, but fitted with a straight centre section (removing one of the two cats) and Skuzzle's own intake system.
The red car made 135 HP, not a major difference in peak HP. However, Nick plotted our cars together to show the difference in mid-range torque that the intake provides, my car is in green:
I've never really paid much attention to intake changes on the NC as internet wisdom has always suggested that the stock system is fine. I might need to re-evaluate that.
Edit Jan 2020 - Fix image links
Edited by Accelebrate on Friday 24th January 11:52
As previously mentioned I collected a set of RX-8 'Yellow Dot' ARBs at the weekend. All RX-8 bars are a straight fit on the MX-5, there are three grades with yellow being the middle option.
Here's a good post explaining the options:
https://www.mx5oc.co.uk/forum/yaf_postsm387826_Mk3...
Observant readers will remember that I've replaced the rear droplinks twice recently (doh!) so the rear links unbolted easily. I hadn't touched the fronts because I have a receipt in the history file for replacement front droplinks in 2012 from a Mazda dealership (for silly ££). Luckily they hadn't corroded too much since then so I was able to unbolt them without the aid of nut splitters.
The rear bar is super easy to remove, the front is a little tricky as you have to negotiate a couple of tie rods and slide the bar through a small opening between the engine, steering rack and radiator. It helps to leave the steering lock off so that you can move the rack/tie rods around and get the front of the car quite high so that you can angle the bar down for the final removal. It's fiddly but probably took me no more than 20 minutes of wiggling to get the old bar out and the new one in.
Here are the original bars and the replacments (MX-5 rear, RX-8 rear, MX-5 front, RX-8 front):

I treated the new bars to some wire wheeling and Hammerite first. I quite like this stuff for under body components, it's £5 for a big can from Screwfix:

It was all going quite smoothly, but the Japanese corrosion gods had other ideas...

I managed that with a light press on a short 1/4" wrench! Luckily it only attaches a small bracket that supports an ABS sensor cable.

I made a brief attempt to extract the remnants of the bolt but it wasn't interested in moving. I ended up removing the lower wheel arch liner to gain access and then drilling it out.

There was just about enough room to get a spanner on either side so I reattached the bracket with a flange bolt and nut. Some sort of captive nut would have been better, but it's not something I've got any plans to remove again.


Front yellow dot bar in place with new droplinks...

...and the rear (I reused the not-very-old Febi links)...

Someone had previously fitted Powerflex bushings to my old ARBs, the RX-8 bars came with a set of rubber bushings that I've fitted for now. I can't quite bring myself to spend the £80 Powerflex want for a set of RX-8 ARB bushes so I've ordered a much cheaper set, from Russia! They were only £20 delivered from http://siberianbushing.com . I suspect it'll be a month or so before they arrive but it's worth a punt at that price.
At what point do you have to admit that you've got a wheel problem?

I've only had the chance for a brief test drive, on semi slicks, in the snow. Initial signs look promising, definitely less body roll and everything suddenly felt a lot sharper and more responsive. Some people report a slight tendency to understeer with the yellow/yellow combination and suggest moving to the stiffer orange rear bar (not that easy to find). Assuming it's not rained or snowed off I shall put this to the test at Anglesey soon.
Edit Jan 2020 - Fix image links
Here's a good post explaining the options:
https://www.mx5oc.co.uk/forum/yaf_postsm387826_Mk3...
Observant readers will remember that I've replaced the rear droplinks twice recently (doh!) so the rear links unbolted easily. I hadn't touched the fronts because I have a receipt in the history file for replacement front droplinks in 2012 from a Mazda dealership (for silly ££). Luckily they hadn't corroded too much since then so I was able to unbolt them without the aid of nut splitters.
The rear bar is super easy to remove, the front is a little tricky as you have to negotiate a couple of tie rods and slide the bar through a small opening between the engine, steering rack and radiator. It helps to leave the steering lock off so that you can move the rack/tie rods around and get the front of the car quite high so that you can angle the bar down for the final removal. It's fiddly but probably took me no more than 20 minutes of wiggling to get the old bar out and the new one in.
Here are the original bars and the replacments (MX-5 rear, RX-8 rear, MX-5 front, RX-8 front):
I treated the new bars to some wire wheeling and Hammerite first. I quite like this stuff for under body components, it's £5 for a big can from Screwfix:
It was all going quite smoothly, but the Japanese corrosion gods had other ideas...
I managed that with a light press on a short 1/4" wrench! Luckily it only attaches a small bracket that supports an ABS sensor cable.
I made a brief attempt to extract the remnants of the bolt but it wasn't interested in moving. I ended up removing the lower wheel arch liner to gain access and then drilling it out.
There was just about enough room to get a spanner on either side so I reattached the bracket with a flange bolt and nut. Some sort of captive nut would have been better, but it's not something I've got any plans to remove again.
Front yellow dot bar in place with new droplinks...
...and the rear (I reused the not-very-old Febi links)...
Someone had previously fitted Powerflex bushings to my old ARBs, the RX-8 bars came with a set of rubber bushings that I've fitted for now. I can't quite bring myself to spend the £80 Powerflex want for a set of RX-8 ARB bushes so I've ordered a much cheaper set, from Russia! They were only £20 delivered from http://siberianbushing.com . I suspect it'll be a month or so before they arrive but it's worth a punt at that price.
At what point do you have to admit that you've got a wheel problem?
I've only had the chance for a brief test drive, on semi slicks, in the snow. Initial signs look promising, definitely less body roll and everything suddenly felt a lot sharper and more responsive. Some people report a slight tendency to understeer with the yellow/yellow combination and suggest moving to the stiffer orange rear bar (not that easy to find). Assuming it's not rained or snowed off I shall put this to the test at Anglesey soon.
Edit Jan 2020 - Fix image links
Edited by Accelebrate on Friday 24th January 11:53
Yellow things.
The cheap polybushes for the RX8 ARBs turned up surprisingly quickly from Russia.


They seem very good for the little that they cost.


I've also purchased some new shocks...


They're Koni Sports with adjustable rebound damping. I bought them on a bit of a whim as they were going cheap (not much over £200 delivered) and almost new (apparently 4k miles old, manufactured 23rd week of 2017). It's essentially this set, but without springs:
http://www.bbrgti.com/product/bbr-suspension-packa...
I currently have 30mm lowering springs fitted to the original black/standard Mazda springs. What I didn't realise before purchasing the Konis is that they will lower the car a further 10mm due to holding a lower gas pressure. I'm a little dubious about this as I'm quite happy with the current ride height. We shall see.
Edit Jan 2020 - Fix image links
The cheap polybushes for the RX8 ARBs turned up surprisingly quickly from Russia.
They seem very good for the little that they cost.
I've also purchased some new shocks...
They're Koni Sports with adjustable rebound damping. I bought them on a bit of a whim as they were going cheap (not much over £200 delivered) and almost new (apparently 4k miles old, manufactured 23rd week of 2017). It's essentially this set, but without springs:
http://www.bbrgti.com/product/bbr-suspension-packa...
I currently have 30mm lowering springs fitted to the original black/standard Mazda springs. What I didn't realise before purchasing the Konis is that they will lower the car a further 10mm due to holding a lower gas pressure. I'm a little dubious about this as I'm quite happy with the current ride height. We shall see.
Edit Jan 2020 - Fix image links
Edited by Accelebrate on Friday 24th January 11:56
RenesisEvo said:
Interesting, looking forward to seeing how you get on with those upgrades. I don't think I could tolerate lower than -30mm - I've seen lower, but at that point the car looks like it's been lowered, rather than simply sitting at a sensible height. I do wonder what it will end up like - depends how much the strut contributes to the total static stiffness I guess.
I'm dubious, and if I'd done more research I might not have purchased the Konis. I put in a bid as I was boarding a flight not really expecting to win them for that price. I think I'll end up with a 40mm drop, so similar to the H&R springs:https://www.mx5parts.co.uk/sports-spring-mk3-p-945...
Which doesn't immediately look terrible.
My first track day of the year was at Anglesey on Saturday. It was also my first time there. The trip didn't go entirely smoothly:
The journey over on Friday evening took over six hours due to roadworks and some accidents around Birmingham.
At some point between setting off and arriving in Wales someone caused quite a lot of damage to Charlie's previously immaculate DC2. Looks like they scraped down most of the nearside whilst parking alongside it. No notes left, of course.
The forecast was for light rain, it was heavy. I foolishly fitted the R888Rs for the weekend.
The whole day was nearly called off just before lunch when a corpse washed up on the beach next to the track. It put a rather grim tone on proceedings, but amazingly the track reopened in the time it took us to head to Holyhead and back for fuel.
Our motley collection of conveyances...


Excuse the photo overload. Circuit Days are very generous with their 'photos of your day included in the price' policy. The photos were in my inbox before I'd even got back to the house we were staying in on the island. Very impressive service and a well organised day once again (we used them for a ring trip last year).


Anglesey is a great circuit. I didn't really appreciate the elevation changes from watching YouTube laps before we left. The scenery certainly adds to the experience as you're lapping.
I did wish I'd fitted road tyres, but it all added to the challenge. I'm no master of car control, so the opportunity to explore the limits at lower speeds was actually quite welcome. Sloppy tank-slapper at the end of this video aside!
https://youtu.be/hKn67Fmfs9M
The rest of our group seemed to get on quite well. It was the first track outing for Roshan's 350Z, he handled it well but I think the weight came as a bit of a shock after previously only hiring or borrowing lighter cars for track days.

Alex's lightly enhanced Fiesta was easily the quickest car from our group. I went out for a few passenger laps and it was amazingly composed and chuckable in the wet. His newly fitted PS4s were a good choice on a soggy day.

Charlie's Integra - you can just about make out the battle scars down the side the rubber on the side skirt isn't so bad, but I would imagine the crease above the Type-R sticker and the dent and paint removal just behind the door will be a pricey repair. It was sublime on track, as always.

I'm not sure it was a great test of my recent changes with the weather being so wet, but:
For the first time ever on a track day I had no brake judder and the brakes felt great. So the combination of better fluid, braided lines and Stoptech pads seems good. Although I would imagine that the spray and less aggressive wet braking will have helped to keep brake temps down.
The RX8 ARBs definitely helped with the roll through corners. I did have some understeer when the track was completely soaking but I think that was mostly down to the Toyos struggling to disperse water.
The lower seat is good, my helmet is below the roofline for the first time in track photos.
Edit Jan 2020 - Fix image links
The journey over on Friday evening took over six hours due to roadworks and some accidents around Birmingham.
At some point between setting off and arriving in Wales someone caused quite a lot of damage to Charlie's previously immaculate DC2. Looks like they scraped down most of the nearside whilst parking alongside it. No notes left, of course.
The forecast was for light rain, it was heavy. I foolishly fitted the R888Rs for the weekend.
The whole day was nearly called off just before lunch when a corpse washed up on the beach next to the track.
It put a rather grim tone on proceedings, but amazingly the track reopened in the time it took us to head to Holyhead and back for fuel.Our motley collection of conveyances...
Excuse the photo overload. Circuit Days are very generous with their 'photos of your day included in the price' policy. The photos were in my inbox before I'd even got back to the house we were staying in on the island. Very impressive service and a well organised day once again (we used them for a ring trip last year).
Anglesey is a great circuit. I didn't really appreciate the elevation changes from watching YouTube laps before we left. The scenery certainly adds to the experience as you're lapping.
I did wish I'd fitted road tyres, but it all added to the challenge. I'm no master of car control, so the opportunity to explore the limits at lower speeds was actually quite welcome. Sloppy tank-slapper at the end of this video aside!
https://youtu.be/hKn67Fmfs9M
The rest of our group seemed to get on quite well. It was the first track outing for Roshan's 350Z, he handled it well but I think the weight came as a bit of a shock after previously only hiring or borrowing lighter cars for track days.
Alex's lightly enhanced Fiesta was easily the quickest car from our group. I went out for a few passenger laps and it was amazingly composed and chuckable in the wet. His newly fitted PS4s were a good choice on a soggy day.
Charlie's Integra - you can just about make out the battle scars down the side
the rubber on the side skirt isn't so bad, but I would imagine the crease above the Type-R sticker and the dent and paint removal just behind the door will be a pricey repair. It was sublime on track, as always.I'm not sure it was a great test of my recent changes with the weather being so wet, but:
For the first time ever on a track day I had no brake judder and the brakes felt great. So the combination of better fluid, braided lines and Stoptech pads seems good. Although I would imagine that the spray and less aggressive wet braking will have helped to keep brake temps down.
The RX8 ARBs definitely helped with the roll through corners. I did have some understeer when the track was completely soaking but I think that was mostly down to the Toyos struggling to disperse water.
The lower seat is good, my helmet is below the roofline for the first time in track photos.
Edit Jan 2020 - Fix image links
Edited by Accelebrate on Friday 24th January 11:57
I've spent some time in a Mazda dealership recently acquiring parts that I couldn't source online. Mrs. Accelebrate has got a week in the US with work soon so I'm planning to get the following done:
. We shall see.
Mazda dealerships are a bit thin on the ground near where I live and work. I actively avoid the Oxford dealership as there never seems to be a convenient time to get in and out of the Botley Road. I've recently discovered Lodge Garage in Aylesbury, their parts department have been very helpful and although further in mileage it's a lot quicker for me to get to. They have some good stock too...

I've picked up an updated version of the seatbelt retainer whilst I was there. Since I lowered the seat I've found that the belt gets stuck within the clip section of the retainer if I lean forwards at junctions. The temporary solution was to unhook it. I think the update part is mainly to encourage the belt to retract on its own, NC belts have a habit of not retracting. I think the new design will also help with the height issue.

New vs. old, quite a difference in height!


I also tried another trick to help the belt retract smoothly that I'd seen online. With some trim removed I cut the small lip of plastic off the buckle that the belt passes through to increase the area that it passes through slightly.


It doesn't appear to have helped oh well.
Edit Jan 2020 - Fix image links
- Fit the Koni shocks
- Replace the perished rear spring mounts
- Polybush the perishing front upper wishbones and replace the ball joint dust covers
- Replace any other ball joint covers that need replacing
- Oil and filter change
- Replace the clutch slave cylinder
. We shall see.Mazda dealerships are a bit thin on the ground near where I live and work. I actively avoid the Oxford dealership as there never seems to be a convenient time to get in and out of the Botley Road. I've recently discovered Lodge Garage in Aylesbury, their parts department have been very helpful and although further in mileage it's a lot quicker for me to get to. They have some good stock too...
I've picked up an updated version of the seatbelt retainer whilst I was there. Since I lowered the seat I've found that the belt gets stuck within the clip section of the retainer if I lean forwards at junctions. The temporary solution was to unhook it. I think the update part is mainly to encourage the belt to retract on its own, NC belts have a habit of not retracting. I think the new design will also help with the height issue.
New vs. old, quite a difference in height!
I also tried another trick to help the belt retract smoothly that I'd seen online. With some trim removed I cut the small lip of plastic off the buckle that the belt passes through to increase the area that it passes through slightly.
It doesn't appear to have helped
oh well.Edit Jan 2020 - Fix image links
Edited by Accelebrate on Friday 24th January 11:57
A long day of cursing the Mazda whilst fitting the Konis today.

I removed the upper wishbones as the bushes don't look too clever.

Removing the wishbones took quite a while, and I made quite a mess of the ball joint dust covers with a pickle fork. Luckily I'd ordered replacements from Mazda.

Next up was pressing out the bushes. This worked reasonably well...

I applied heat and eventually, the old bushes popped out...

There's then a metal sleeve that needs to be removed. I hacksawed through the sleeves and then chiseled them out.


The replacement polybushes came from Strongflex in Poland. I went for their red 'OEM hardness' option, rather than the harder yellow sport bushes.

They pressed into the wishbones with the supplied horrible black grease easily enough.

Onto the dampers, you can probably see why I was keen to replace the originals. British salt has not been kind, I'm sure they're on borrowed time.


All assembled, I reused the Vogtland springs I fitted a year ago.

I took the opportunity to apply some rust converter and a coat of underseal whilst the shocks and wishbones were out.

It's looking rather colourful in the wheelarches now!

The rebound on the shocks can be adjusted using the supplied tools. Much easier at the front than the rear!

The rear shocks are thankfully a lot easier to fit than the fronts. I replaced some of the ball joint boots that were starting to perish on the suspension arms. I also replaced the rubber spring seats on both sides as they'd split.


I took measurements form the hub centres to the top of the wheel arches before and after. As predicted the Konis have dropped the ride height by a further 10mm giving a total of 40mm drop. A shame, as I was quite happy with the previous ride height but it doesn't look excessive to my eyes.


I've set the rebound to full stiffness initially. It's amusingly rigid and will probably become quite tiresome. I'll dial it back over the coming weeks. I should probably book another alignment as well.
Edit Jan 2020 - Fix image links
I removed the upper wishbones as the bushes don't look too clever.
Removing the wishbones took quite a while, and I made quite a mess of the ball joint dust covers with a pickle fork. Luckily I'd ordered replacements from Mazda.
Next up was pressing out the bushes. This worked reasonably well...
I applied heat and eventually, the old bushes popped out...
There's then a metal sleeve that needs to be removed. I hacksawed through the sleeves and then chiseled them out.
The replacement polybushes came from Strongflex in Poland. I went for their red 'OEM hardness' option, rather than the harder yellow sport bushes.
They pressed into the wishbones with the supplied horrible black grease easily enough.
Onto the dampers, you can probably see why I was keen to replace the originals. British salt has not been kind, I'm sure they're on borrowed time.
All assembled, I reused the Vogtland springs I fitted a year ago.
I took the opportunity to apply some rust converter and a coat of underseal whilst the shocks and wishbones were out.
It's looking rather colourful in the wheelarches now!
The rebound on the shocks can be adjusted using the supplied tools. Much easier at the front than the rear!
The rear shocks are thankfully a lot easier to fit than the fronts. I replaced some of the ball joint boots that were starting to perish on the suspension arms. I also replaced the rubber spring seats on both sides as they'd split.
I took measurements form the hub centres to the top of the wheel arches before and after. As predicted the Konis have dropped the ride height by a further 10mm giving a total of 40mm drop. A shame, as I was quite happy with the previous ride height but it doesn't look excessive to my eyes.
I've set the rebound to full stiffness initially. It's amusingly rigid and will probably become quite tiresome. I'll dial it back over the coming weeks. I should probably book another alignment as well.
Edit Jan 2020 - Fix image links
Edited by Accelebrate on Friday 24th January 11:58
RenesisEvo said:
HorneyMX5 said:
A cracking update as always.
+1Had the car settled in the 'after' pictures?
Renesis - I forgot to reply to your speaker email, apologies, we should arrange something.
Jonstar said:
Good update, but more importantly how does it handle?!
I'm far from being the best-versed driver to critique a suspension setup but the Konis are definitely an improvement over the tired 'black' stock shocks, but I suspect they were well past their best. Dan Trent and Richard Meaden seem to rate them (although apparently re-valved and paired with the BBR springs) - http://www.bbrgti.com/product/bbr-suspension-packa...I've been putting some miles on them this week before alignment, although it's been soaking wet so not really the weather to push hard. I turned the rebound up to maximum stiffness yesterday, which was amusingly flat through the bends but a bit too hard on the road. I went for the opposite today, full soft, still harder than OE and less roll but a lot more compliant over bumps. I suspect that a turn or so from full soft will be a nice balance. I'll probably end up running the rear a little stiffer than the front to offset the yellow dot ARBs tendency to introduce understeer.
No noises from the polybushes at the moment either, which was my other concern. I've got another track day booked in a couple of weeks, so I'll be better placed to contrast and compare after a (hopefully) dry day with a properly aligned car.
Edited by Accelebrate on Tuesday 10th April 10:01
I finished off the other couple of tasks I'd got planned last night - can you tell my wife is away at the moment?
First up was a new slave cylinder.

There was nothing immediately wrong with the old slave, but I had a couple of reasons for replacing it. It looked a bit crusty and a genuine replacement was only about £30 in the MX5Parts Easter sale. I'm keen to replace anything that's cheap and has the potential to ruin a track day and I'm conscious that other rubber bits on the car are starting to show their age.
It was also a task to prove a point. The point being how stupid a younger version of myself was. The slave cylinder on my first car gave up without warning. Being rather naive and possessing next to no mechanical knowledge or ability I called the AA who towed me to the nearest main dealer. The main dealer kept the car for a couple of weeks and charged me over £500 to replace the failed part. Big money today, even more 13 years ago, and as a student more money than I had to my name.
The slave cylinder on the NC is near the oil filter. Just two bolts and the connection to a hard line to remove and it slides right out.


It bled easily enough with the cheap compressor powered brake bleeder that I picked up recently.
Here's the old part in pieces, you can buy rebuild kits for even less from MX5Parts.

I also carried out an oil change whilst I was under the car. I did say I was going to move to 5W-40 to see if it reduces oil consumption on track, but I forgot and ordered more 5W-30 during a particularly decent ECP sale a while ago. Next time.

I did remember to try the trick of using a freezer bag whilst removing the old filter, resulting in an almost mess-free removal.

Edit Jan 2020 - Fix image links
First up was a new slave cylinder.
There was nothing immediately wrong with the old slave, but I had a couple of reasons for replacing it. It looked a bit crusty and a genuine replacement was only about £30 in the MX5Parts Easter sale. I'm keen to replace anything that's cheap and has the potential to ruin a track day and I'm conscious that other rubber bits on the car are starting to show their age.
It was also a task to prove a point. The point being how stupid a younger version of myself was. The slave cylinder on my first car gave up without warning. Being rather naive and possessing next to no mechanical knowledge or ability I called the AA who towed me to the nearest main dealer. The main dealer kept the car for a couple of weeks and charged me over £500 to replace the failed part. Big money today, even more 13 years ago, and as a student more money than I had to my name.
The slave cylinder on the NC is near the oil filter. Just two bolts and the connection to a hard line to remove and it slides right out.
It bled easily enough with the cheap compressor powered brake bleeder that I picked up recently.
Here's the old part in pieces, you can buy rebuild kits for even less from MX5Parts.
I also carried out an oil change whilst I was under the car. I did say I was going to move to 5W-40 to see if it reduces oil consumption on track, but I forgot and ordered more 5W-30 during a particularly decent ECP sale a while ago. Next time.
I did remember to try the trick of using a freezer bag whilst removing the old filter, resulting in an almost mess-free removal.
Edit Jan 2020 - Fix image links
Edited by Accelebrate on Friday 24th January 11:59
On Sunday I went to Snetterton for the first time. Unlike Anglesey, the weather gods were on our side this time.


Snetterton is a funny mix, big long straights and some tighter stuff in the infield. This exaggerated the effect of larger quicker stuff disappearing in a straight line, only to reel them back in through the twistier bits of the course.
I did a few laps in Roshan's 350z. He'd picked up a non-staggered set of wheels and some R888s the day before. Nice(er) noise and a welcome amount of extra power, although on stock suspension it felt big and unwieldy in the bends.


The new shocks are an improvement. It's amusing to compare a cornering photo from the first day I did at Bedford to the latest photos:

Obviously, not the same track or corner but things have definitely changed:

I've held off getting the car aligned as I found an issue with the wishbone polybushes. Strongflex have revised the part and are shipping a new set out to me. Good that they've owned up and hopefully resolved the issue quickly, but annoying as I feel a bit like I'm doing their R+D for them and I'll have to remove the front struts again to fit. My fault for going with the cheapest option. I was testing the water with the wishbones as I'd like to move onto the lower arms next, so I guess I've learnt something.
Snetterton is hard on brakes:

The StopTech pads were great though, no fading, no juddering, not too much wear and hardly any dust. For £60 a set they're phenomenal. My Brembo rear pads weren't quite so good, down to the squealer pins by the end of the day. I should have replaced them beforehand, I think they went in before the ring.

I've done four days on the R888Rs now, they're holding up quite well. Not quite sure what I'll get next, maybe AD08Rs, my track day budget probably doesn't stretch to the regular Toyo price of £600ish a set (I paid £300 fitted).
Edit Jan 2020 - Fix image links
Snetterton is a funny mix, big long straights and some tighter stuff in the infield. This exaggerated the effect of larger quicker stuff disappearing in a straight line, only to reel them back in through the twistier bits of the course.
I did a few laps in Roshan's 350z. He'd picked up a non-staggered set of wheels and some R888s the day before. Nice(er) noise and a welcome amount of extra power, although on stock suspension it felt big and unwieldy in the bends.
The new shocks are an improvement. It's amusing to compare a cornering photo from the first day I did at Bedford to the latest photos:
Obviously, not the same track or corner but things have definitely changed:
I've held off getting the car aligned as I found an issue with the wishbone polybushes. Strongflex have revised the part and are shipping a new set out to me. Good that they've owned up and hopefully resolved the issue quickly, but annoying as I feel a bit like I'm doing their R+D for them and I'll have to remove the front struts again to fit. My fault for going with the cheapest option. I was testing the water with the wishbones as I'd like to move onto the lower arms next, so I guess I've learnt something.
Snetterton is hard on brakes:
The StopTech pads were great though, no fading, no juddering, not too much wear and hardly any dust. For £60 a set they're phenomenal. My Brembo rear pads weren't quite so good, down to the squealer pins by the end of the day. I should have replaced them beforehand, I think they went in before the ring.
I've done four days on the R888Rs now, they're holding up quite well. Not quite sure what I'll get next, maybe AD08Rs, my track day budget probably doesn't stretch to the regular Toyo price of £600ish a set (I paid £300 fitted).
Edit Jan 2020 - Fix image links
Edited by Accelebrate on Friday 24th January 11:59
Gassing Station | Readers' Cars | Top of Page | What's New | My Stuff