Audi S5 full fat version
Discussion


ok, what's the next head scratcher then.... well I don't like the red illumination on the climate control panel.... I want it to match the white illumination on the dash....
thank fully others have already attempted this so having read up, then read some more and then read again... I've hatched a plan...!!!
It'll be a cold day in hell before I let an Audi "technician" plug anything into my car, so that ruled out any form of component protection removal, as I don't have the facility myself, as it can't (yet) be done via VCDS.
So a face lift climate panel has been sourced and my plan is to disassemble and modify my existing one using the LED's and white diffuser panel, thankfully I have PCB/LED soldering experience and the tools for it... Just hope the eyesight is up to it....!!!
FL panel should be here this week.... watch this space
i'm also tempted at some point to do the matching colours on the MMI panel as detailed on the AudiEnthusiast site but that won't be just yet
http://www.audienthusiasts.com/Project_MMILED.html
well as it's part of the VAG family I may as well post in my thread...
something a little bit different for the weekend???
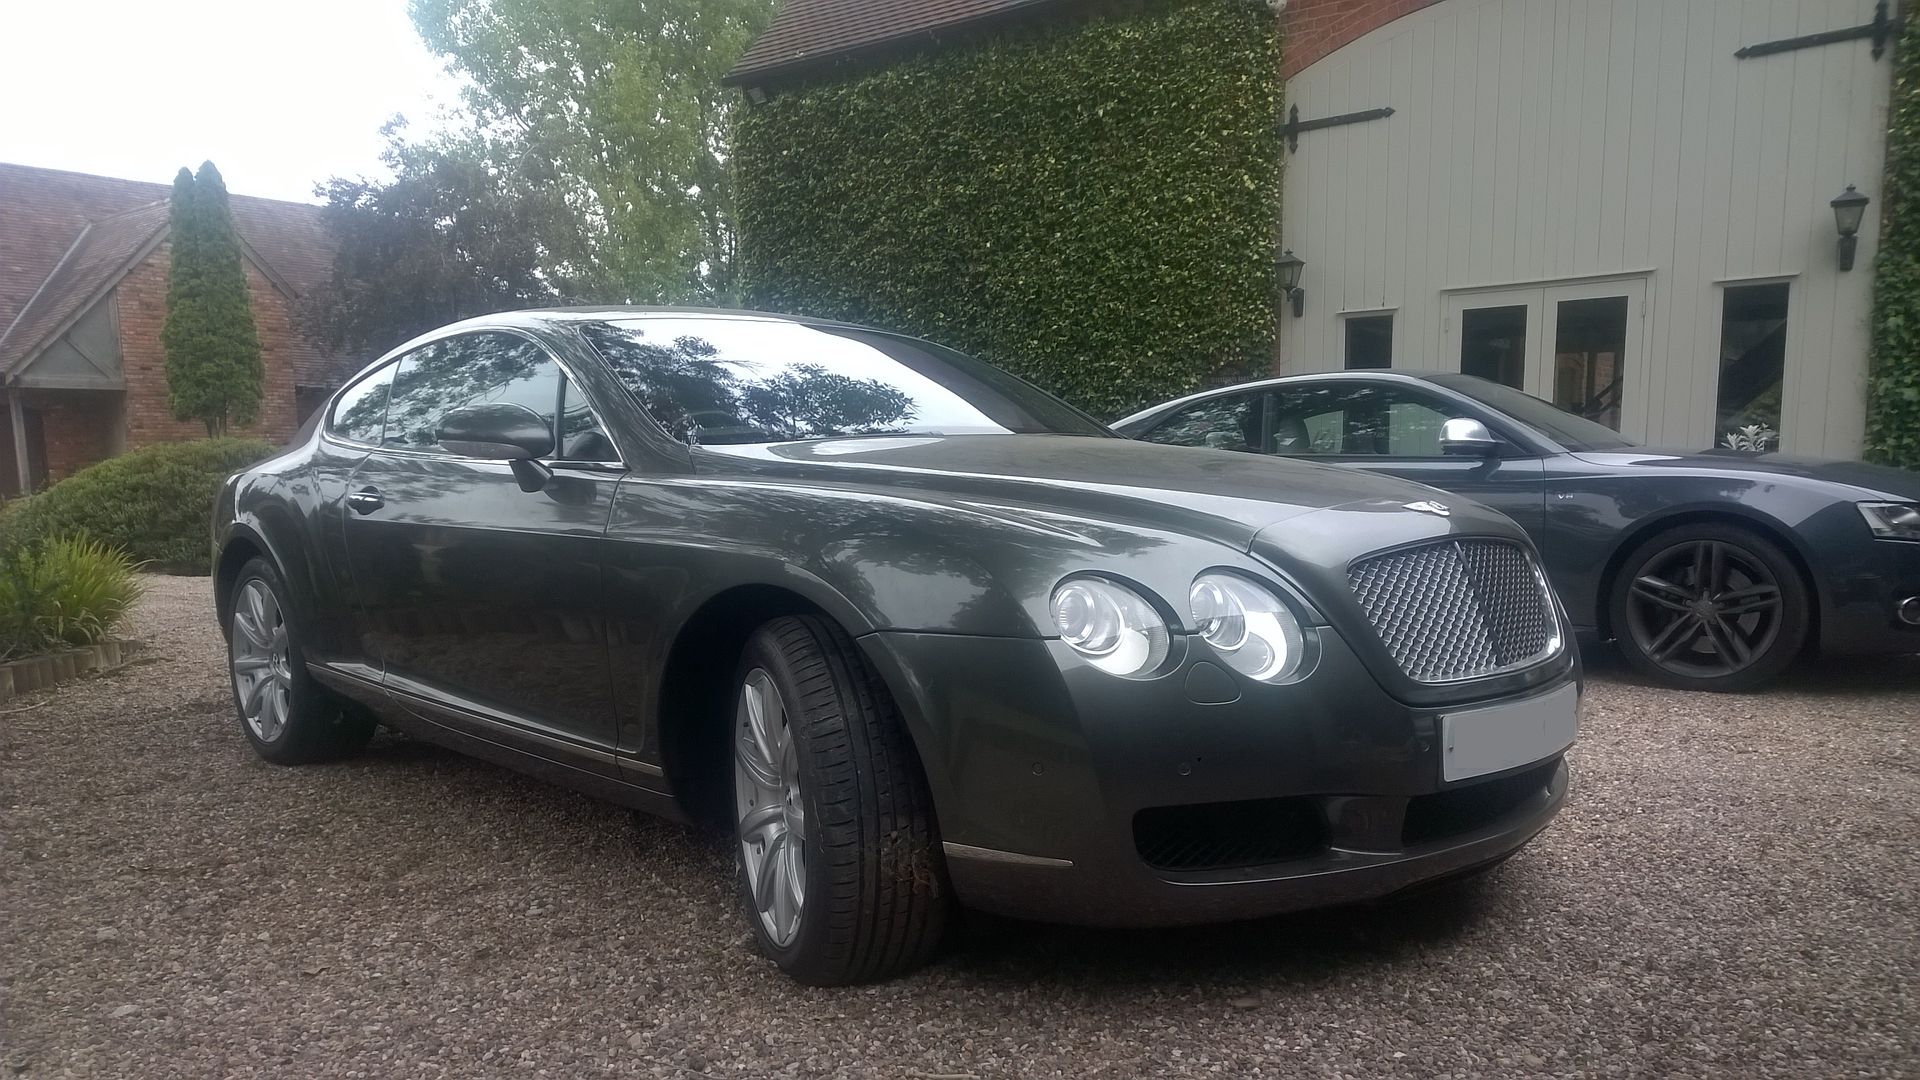
under the skin it's basically a 6.0 W12 VW Phaeton, which makes getting parts cheaper than adding the Bentley tax
late 2003, with only 67,500 miles..... not been used in 3 years, more lights on the dash than Oxford Street at Christmas, tyres in good condition as at least it's been rolled back and forth and had a battery conditioner on it....
Interior was mouldy and had more penicillin than Boots the Chemist....
Main faults are it needs 2 new Bosch MAF's, hopefully that's cure the EGT and Lambda faults.... all lights turned off enough to get her MOT'd this morning and taxed so can at least drive the poor thing.
then this afternoon is deep cleanse time, more cobwebs than an Indiana Jones stage set.....!!!
something a little bit different for the weekend???
under the skin it's basically a 6.0 W12 VW Phaeton, which makes getting parts cheaper than adding the Bentley tax
late 2003, with only 67,500 miles..... not been used in 3 years, more lights on the dash than Oxford Street at Christmas, tyres in good condition as at least it's been rolled back and forth and had a battery conditioner on it....
Interior was mouldy and had more penicillin than Boots the Chemist....
Main faults are it needs 2 new Bosch MAF's, hopefully that's cure the EGT and Lambda faults.... all lights turned off enough to get her MOT'd this morning and taxed so can at least drive the poor thing.
then this afternoon is deep cleanse time, more cobwebs than an Indiana Jones stage set.....!!!
finally the new climate panel arrived, so whipped the original one out for a comparison
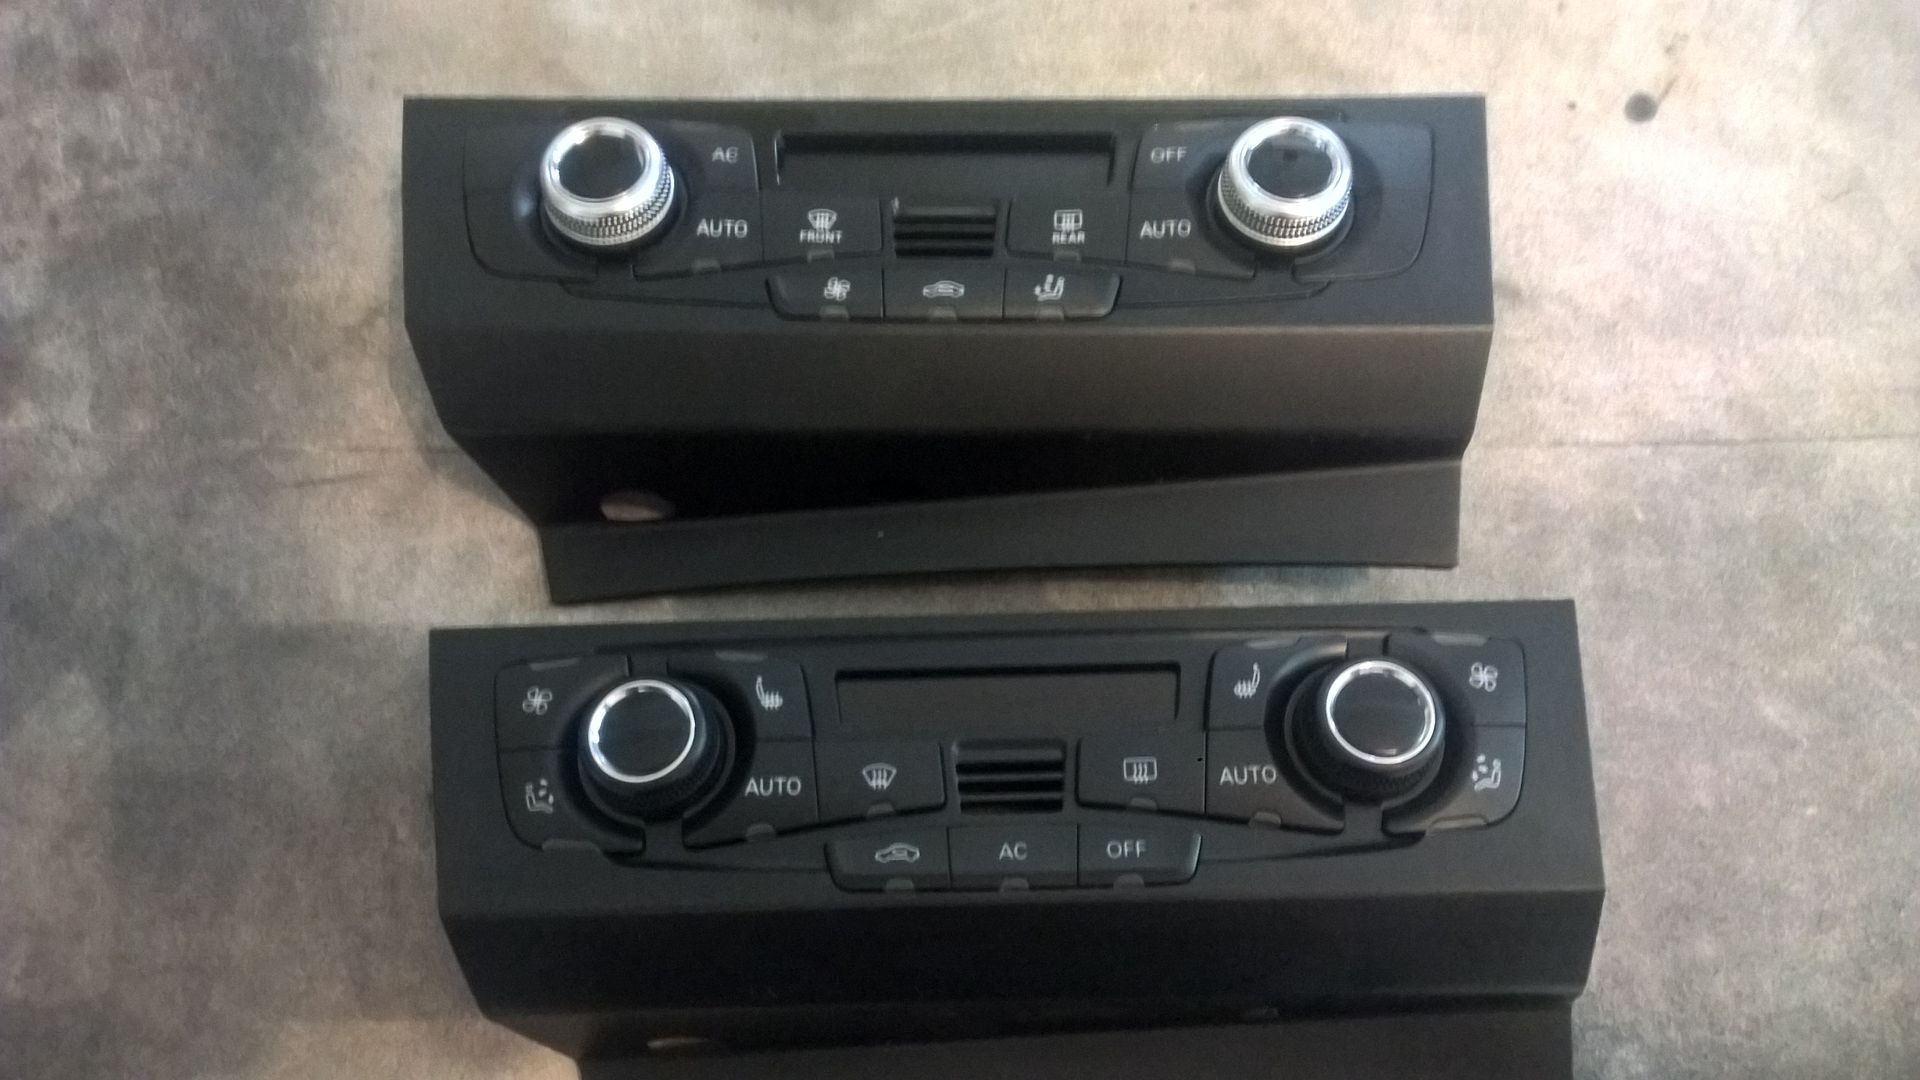
initial observations are it is the correct FL version, in that the panel has the white on black display I am after.
time to take it to bits to see what's inside

I had hoped I could use the newer fascia panel and put the control buttons from my old panel into the newer panel... sadly they are not cross compatible, the clips which retain them are in different positions.
So my next thought was to take the chrome knobs and put them on the older panel.... nope different on the inside also....
so all i'll be able to swap over are the white LED's and diffuser and have my original panel but with the display I want.
My other option is to find a newer control panel with all of the buttons which match mine and go for Component Protection removal.....
Saturday will see me going blind looking at the TINY LED's and desoldering them and putting them into my original panel....
initial observations are it is the correct FL version, in that the panel has the white on black display I am after.
time to take it to bits to see what's inside
I had hoped I could use the newer fascia panel and put the control buttons from my old panel into the newer panel... sadly they are not cross compatible, the clips which retain them are in different positions.
So my next thought was to take the chrome knobs and put them on the older panel.... nope different on the inside also....
so all i'll be able to swap over are the white LED's and diffuser and have my original panel but with the display I want.
My other option is to find a newer control panel with all of the buttons which match mine and go for Component Protection removal.....
Saturday will see me going blind looking at the TINY LED's and desoldering them and putting them into my original panel....
well what have we learned today.
the LED's on the facelift panel are a different polarity, with being a 4pin variety (strangely a similar aged S5 who had done the same mod his PCB and LED's were a 2pin type... no idea why mine are different but anyway).
You can rotate the 4 pin but it illuminates red as the originals are as it is reversed.
So 4pin white emitting LED's of the correct polarity are now on order.
Other observations are the white and red diffuser are subtly different, height and pin locations
1 step forward and all that...…
Edited by 89forever on Saturday 25th August 14:33

Well to compare the two...
Power wise the Bentley definitely has it, at 590 ish bhp against the S5's 355bhp, different league. However the Bentley is very much the heavier beast and you can tell....
Whilst they share very similar underpinning (the Bentley is a VW W12 Phaeton, so has quattro too) the S5 has it beat on handling and driver involvement.
Whether it's because of the weight, or the huge tyres, the Bentley lacks steering feedback.... But it is wonderful to drive though.
They do both share the same ridiculous eye watering fuel consumption though haha
so the LED's from the newer board didn't work as the polarity was wrong, so order the correct polarity LED's

so, the new white LED's arrived, so today I set too.... I disassembled and soldered one on to test it illuminated white, it did.... perfectly, so set about desoldering the remaining ones and disaster struck, one of the PCB boards pads which the pins solder too came off (it was the pad which I had experimented with last weekend repeatedly taking off/putting on of the LED and it finally gave way...
So, I need a new board, one is on order... so if I have the same part number but another board...…
getting there slowly.....
Edited by 89forever on Monday 20th April 14:47
Edited by 89forever on Monday 20th April 14:47
After many failed attempts to get the LED's to work, I bought yet another FL climate panel, this time the spec I needed (seat heating etc.)
Trawling the net to see how to remove component protection I stumbled upon a name, Jack Kirby. So I started googling...
I found his skype address and started chatting, he advised on what software and tools were need (VAS5054a) and he needed remote access of my pc to do the CP removal....
A picture paints a thousand words....

a few coding tweaks so the fan speed worked as it should and all is done....
I am messaging Rosstech to see if they can assist with the codings to get the display and modules all communicating back to as it should.....
Certainly wasn't a cheap exercise to get the white on black but at least it is possible to fit a FL climate panel to a preFL car and have it function correctly.
Trawling the net to see how to remove component protection I stumbled upon a name, Jack Kirby. So I started googling...
I found his skype address and started chatting, he advised on what software and tools were need (VAS5054a) and he needed remote access of my pc to do the CP removal....
A picture paints a thousand words....
a few coding tweaks so the fan speed worked as it should and all is done....
I am messaging Rosstech to see if they can assist with the codings to get the display and modules all communicating back to as it should.....
Certainly wasn't a cheap exercise to get the white on black but at least it is possible to fit a FL climate panel to a preFL car and have it function correctly.
Edited by 89forever on Monday 20th April 14:48
some may remember earlier in the thread I am slowly designing and making my own exhaust.
So, I love to try new things and I wanted to try laser cutting the bird beak cuts for the X-pipe, the cuts are very similar as if you were making an exhaust collector, the old school way is to cut them on a vertical bandsaw and then linish the edges until all the pieces match.
As this way (this is the collector I made for my motorbike as an example of the old school way)
2 cuts to produce the joints, very laborious and time consuming
the angles of cut are critical depending the amount of ports
4 tubes, lots of cuts and linishing to get the finished results
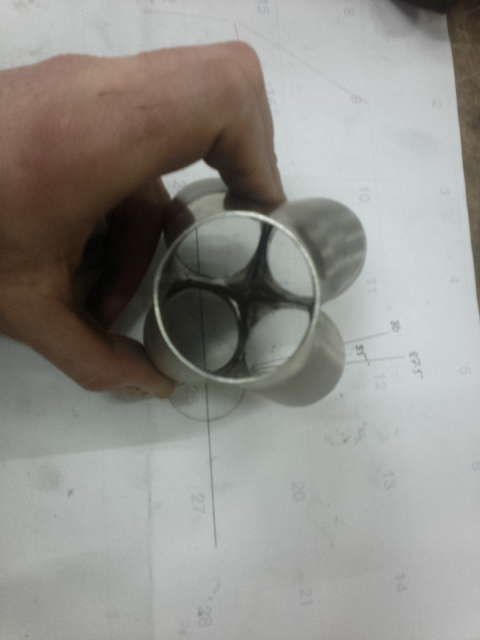
Now with the X-pipe it is the same principle but all cuts are on a flat plane as it isn't a merge collector as above but 2 in/2 out arrangement.
So I drew it all up in CAD
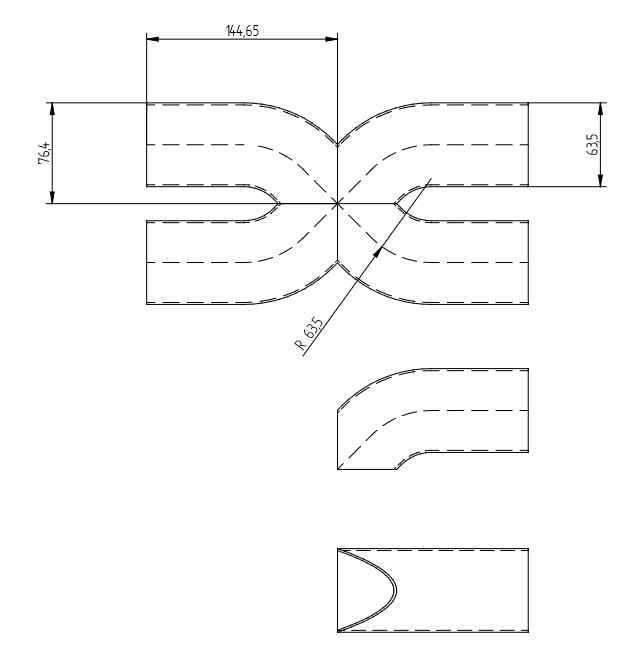
which allowed me to create a digital file the laser cutting machine could read.
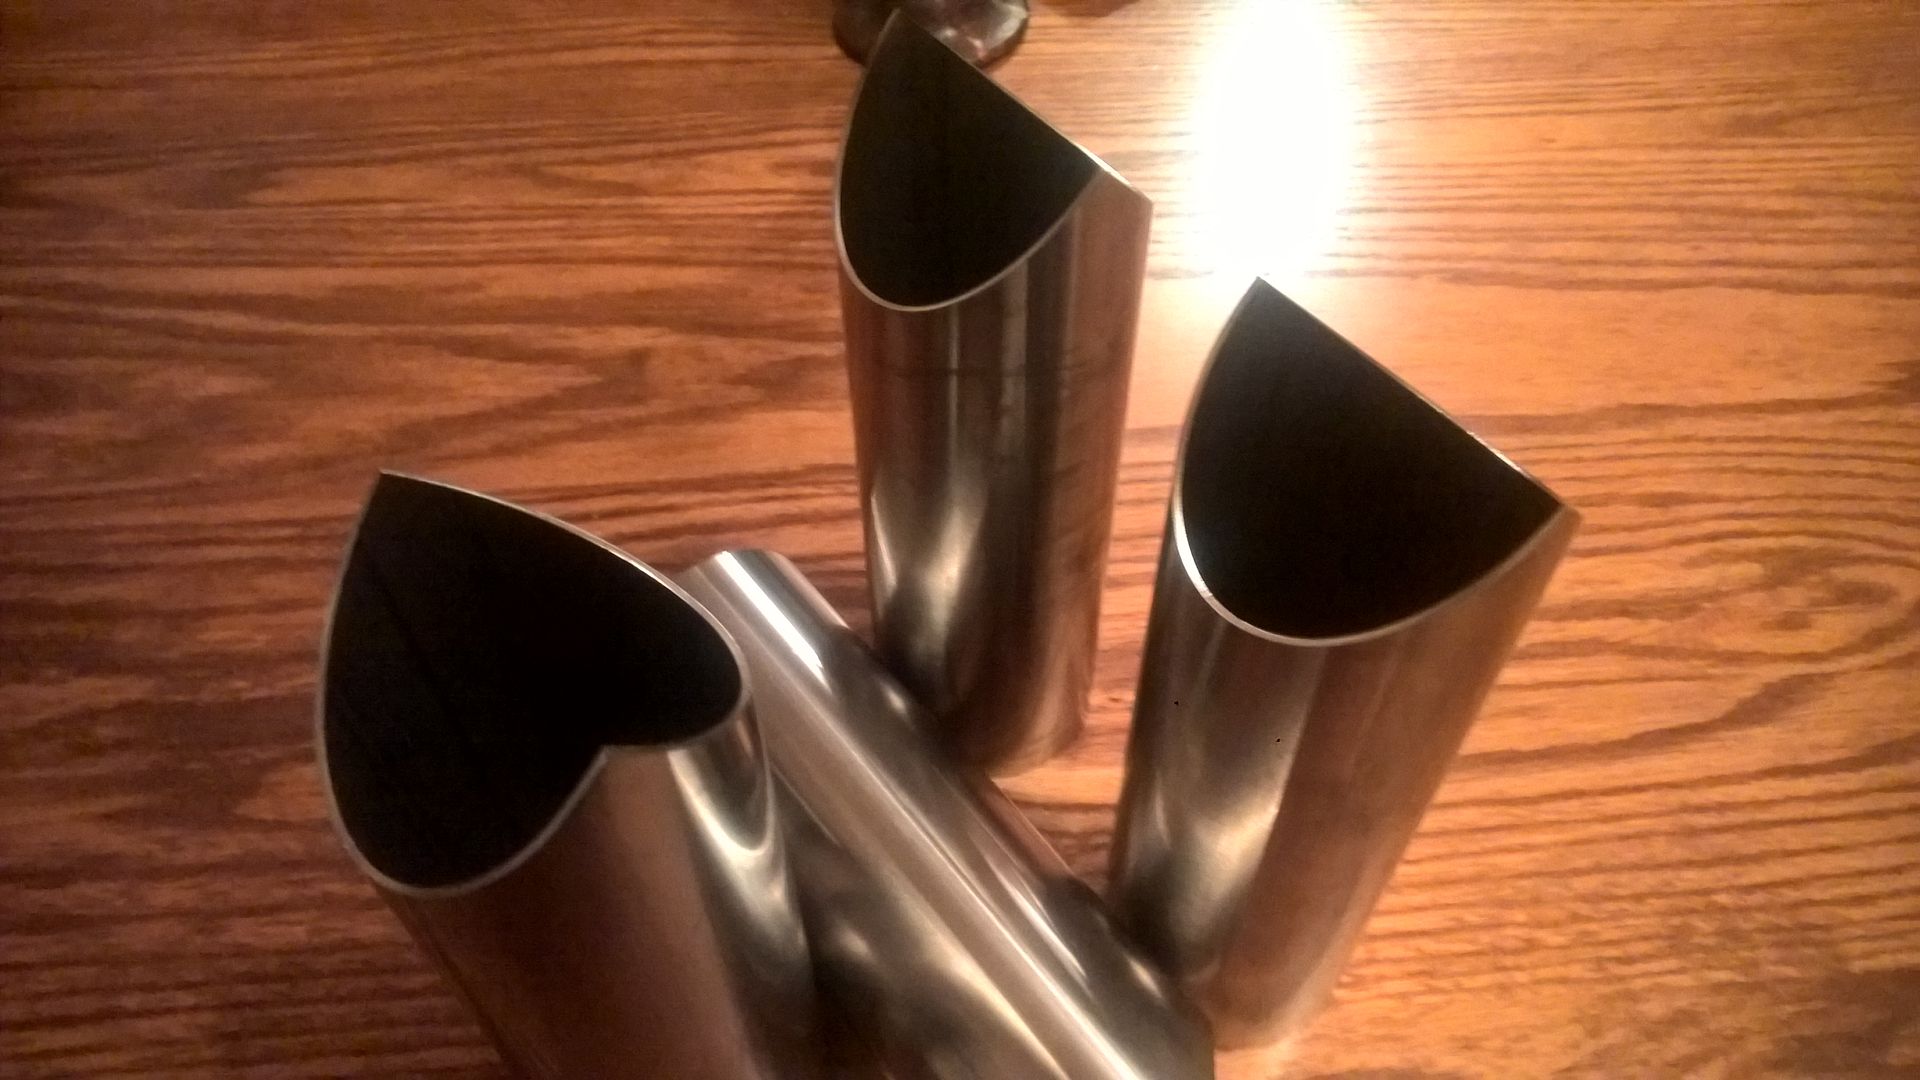
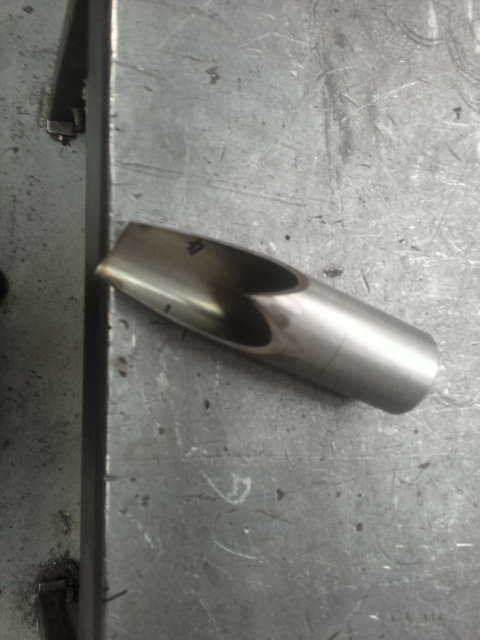
4 number bird beak cuts, in 1 hit with no linishing required and I've got perfect joints. Before I weld it all together I need to mandrel bend these pieces 45 degrees
This is the joint

The exhaust is moving ever forward.....
So, I love to try new things and I wanted to try laser cutting the bird beak cuts for the X-pipe, the cuts are very similar as if you were making an exhaust collector, the old school way is to cut them on a vertical bandsaw and then linish the edges until all the pieces match.
As this way (this is the collector I made for my motorbike as an example of the old school way)
2 cuts to produce the joints, very laborious and time consuming
the angles of cut are critical depending the amount of ports
4 tubes, lots of cuts and linishing to get the finished results
Now with the X-pipe it is the same principle but all cuts are on a flat plane as it isn't a merge collector as above but 2 in/2 out arrangement.
So I drew it all up in CAD
which allowed me to create a digital file the laser cutting machine could read.
4 number bird beak cuts, in 1 hit with no linishing required and I've got perfect joints. Before I weld it all together I need to mandrel bend these pieces 45 degrees
This is the joint
The exhaust is moving ever forward.....
Tommie38 said:
Genuinely interested in the answer to this. Ignoring for a moment the issue of hype, are the direct injection engines more resilient than the earlier ones? I know that the earlier S4 had the issue with chains. I understand that these can have issues with coking that results on them being down power but that is far better than a catastrophic failure.
My understanding is that the engine in this car is direct injection. I may be completely wrong...
do your homework, I can only speak from my experiences.....My understanding is that the engine in this car is direct injection. I may be completely wrong...


deebs said:
 Thanks for the reply, point taken. I've a couple of cars so I guess the switching between them and me only driving it every so often is slowing down the process.
 Be good to hear if you've done much else to yours?
mine is currently in bits having it's suspension refreshed and cleaned to within an inch of it's life, bit of a rolling restoration without the rolling bit.... safe guarding for the future as it where. I will at some point get around to the exhaust.....
Having used PI Springs for years on numerous high performance Audi's they were my first choice again.
I don't intend to do track days every weekend so spending a stupid amount of money on a coilover setup is pointless for me.
All stripped very easily, just worked my way around each corner....
This was over the course of a few weekends, 1 corner at a time

and fitted

in my excitement I didn't get any front in bits images...!!!
but all finished and down on the ground


it'll settle some more over the coming weeks
Very happy with how it looks....
I don't intend to do track days every weekend so spending a stupid amount of money on a coilover setup is pointless for me.
All stripped very easily, just worked my way around each corner....
This was over the course of a few weekends, 1 corner at a time
and fitted
in my excitement I didn't get any front in bits images...!!!
but all finished and down on the ground
it'll settle some more over the coming weeks
Very happy with how it looks....
Edited by 89forever on Monday 20th April 14:46
In between the rain showers today i started to do my S5's 10k service. As the weather was pants today i just did what was accessible from the top.
Spark Plugs and air filter changed, fluids will be next week.

Strip down 1 bank at a time. It always amazes me how tight the loom is and the awkwardness of getting to the plugs.
Condition of the plugs was ok
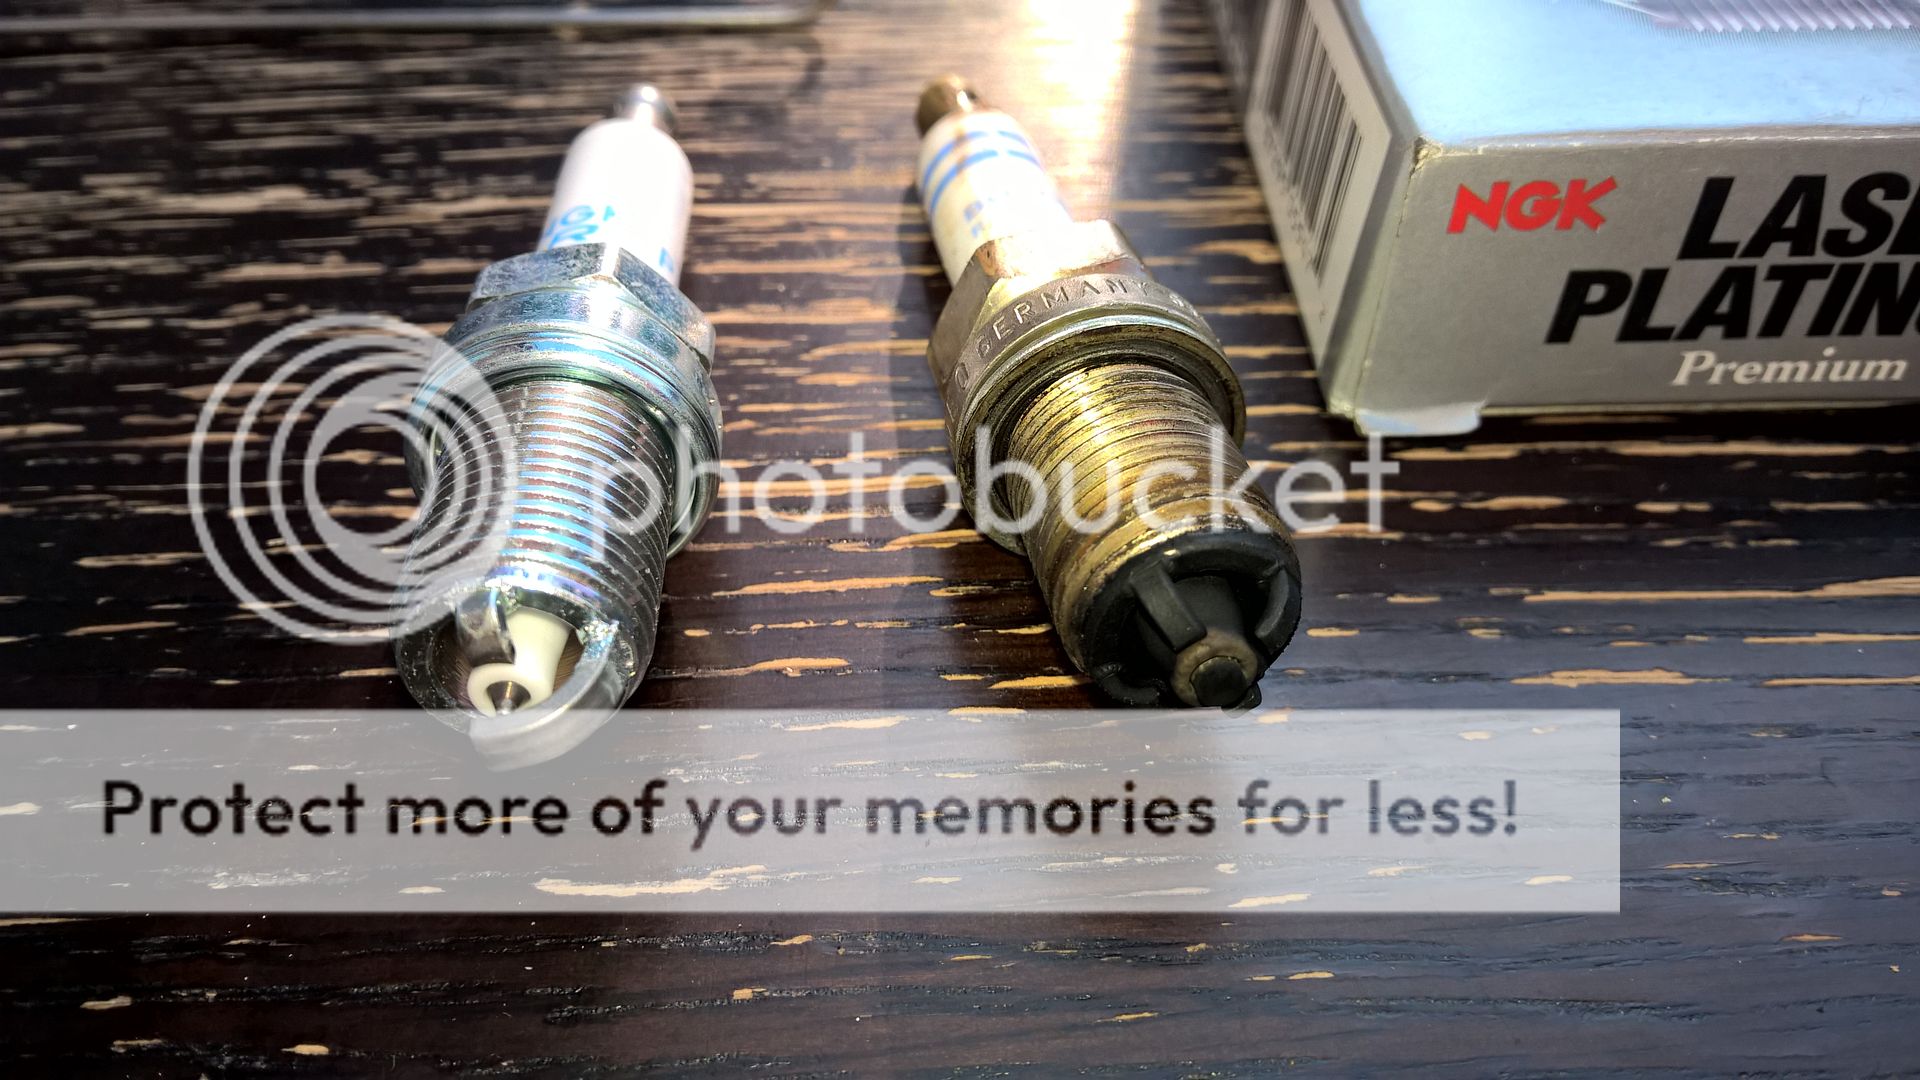
Non were particularly tight which was a concern.
Passenger side bank, rear the coil had clearly seen a bit of leakage but thankfully no damage.....
All plugs fitted dry, and properly torqued up.... Will check then in a 1000 miles....
Spark Plugs and air filter changed, fluids will be next week.
Strip down 1 bank at a time. It always amazes me how tight the loom is and the awkwardness of getting to the plugs.
Condition of the plugs was ok
Non were particularly tight which was a concern.
Passenger side bank, rear the coil had clearly seen a bit of leakage but thankfully no damage.....
All plugs fitted dry, and properly torqued up.... Will check then in a 1000 miles....
Edited by 89forever on Monday 20th April 14:55
This morning went underneath and finished off the oil change service, first time I've had the undertray off in my ownership and was quite shocked h0w corroded the sump pan is... will order new oil pan bolts and will remove at next oil change and strip and powdercoat the sump... Another job on the list....
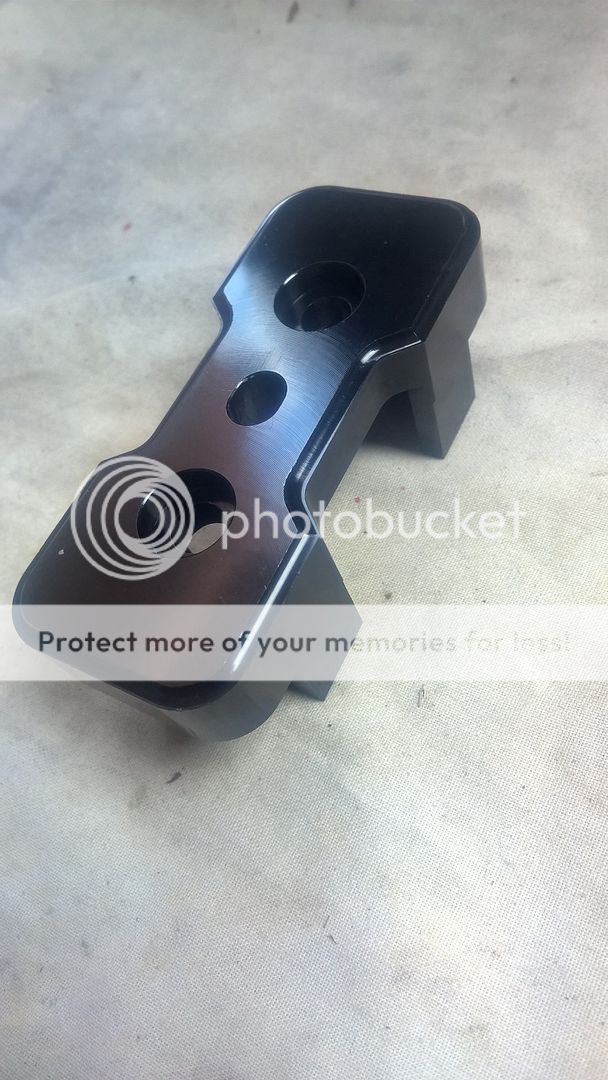
Whilst under there, ages ago I purchased a billet transmission insert but had not got around to fitting it...
Bought off of Ebay for the princely sum of £23, brand new... nicely machined and a decent anodised finish.
I bought mine from here (no affiliation)
https://www.ebay.co.uk/itm/AUDI-B8-BILLET-ALUMINIU...
Fitting was easy, locate the mount underneath

Remove the 2no M10 triple square bolts and the metal channel (discard the channel as not needed)

Insert the billet insert and tighten the bolts to 25ft/lbs
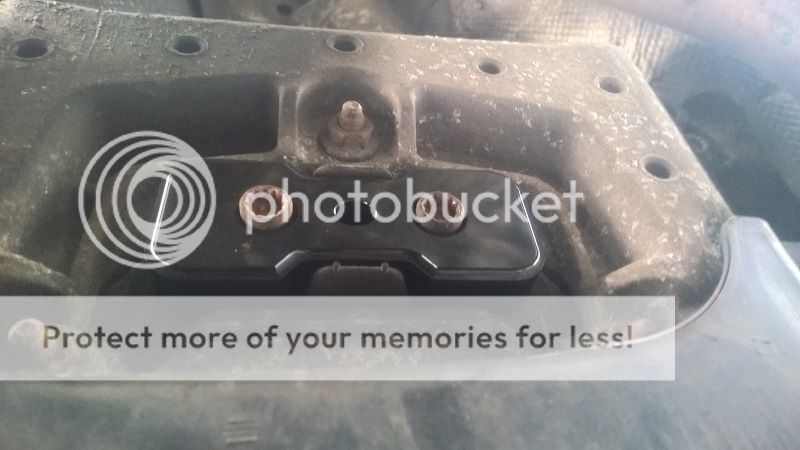
then bask in the enjoyment of a less sloppy gearbox...
Then the rain killed play
Whilst under there, ages ago I purchased a billet transmission insert but had not got around to fitting it...
Bought off of Ebay for the princely sum of £23, brand new... nicely machined and a decent anodised finish.
I bought mine from here (no affiliation)
https://www.ebay.co.uk/itm/AUDI-B8-BILLET-ALUMINIU...
Fitting was easy, locate the mount underneath
Remove the 2no M10 triple square bolts and the metal channel (discard the channel as not needed)
Insert the billet insert and tighten the bolts to 25ft/lbs
then bask in the enjoyment of a less sloppy gearbox...
Then the rain killed play
Gassing Station | Readers' Cars | Top of Page | What's New | My Stuff