1985 Rover 3500 Vitesse
Discussion


After a trouble free outing to Longbridge I was feeling brave!
My pride is still a little bruised from my last attempt to make it to Bicester Heritage, this time i wasn't going to be beaten.
Journey was actually lovely, car cruises so nicely and arrived just in time to nab a prime spot in the technical centre.

Got parked up next to a lovely Quattro of the same vintage, I would love to add one to the garage they make a lovely pair.
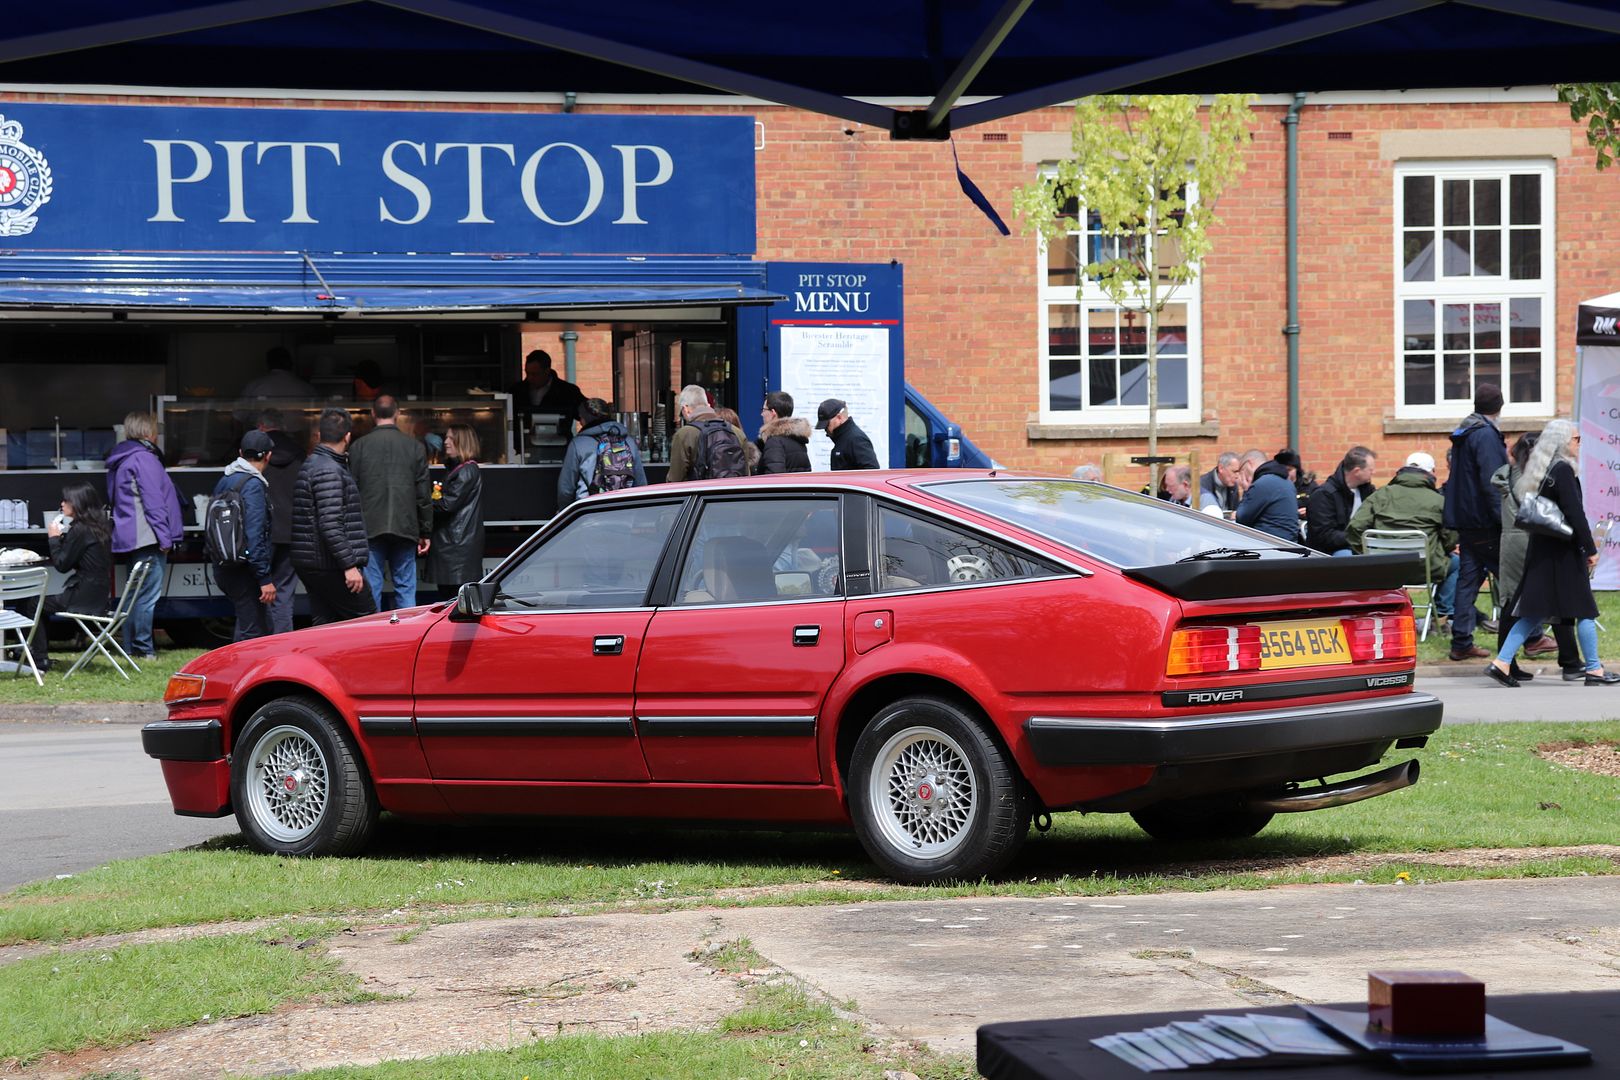
Tried to get all arty taking photos, it really is a special event, so much to see and some really stunning cars.

I'll eventually get around to uploading some of the better pictures I took and put them on their own thread.
I loved it in January, but it was a bit more special with my own car on display. Lots of nice comments too.
Car was faultless and I had a lovely day.
If I'm not so heavy footed it doesn't smoke that much either!
But I've got a plan in motion to solve that...
Joe
Edited by 1275 GT on Friday 21st June 22:32
Mr Tidy said:
Your car looks great. 
Definitely deserves a special parking space!
Thankyou Definitely deserves a special parking space!

yonex said:
Looks great, shame I missed it at the Scramble.
There was so much to see! Definitely one of the best shows I've been too.
Well after having such a good time at the Sunday Scramble surrounded by some amazing cars the desire to match the Rovers bark to a bit more bite was at a very high level.
Driving it normally it behaves perfectly, but pressing on the leggy RR lump really isn't up to much.
So what to do...

.78

So I've got a turn key car that's reliable but a little lack lustre, and doesn't have its original engine.
I've also finally got the engine bay to how I wanted it...

Insert original numbers matching Vitesse motor.
During the previous owners first few weeks of ownership the engine suffered from quite bad detonation causing both piston and liner damage.
I've since found the issue and have got the injection system running well on the replacement motor.
It was always the intention to reunite the two, and I'm finally in a position to do something with it now.
After doing a lot of research I made a call to J E Developments and took the motor over for John to have a look at.
The aim is to build the nicest road engine that I can, and with that aim we began to draw up a spec.
A general overview of the spec is going to be:
A complete overhaul with top hat liners, pistons, performance camshaft, mild head work, fully balance rotating assembly with lightened flywheel, and built to a short engine with me doing final assembly.
The time-frame for this was actually a lot shorter than I though,and I now needed the front pulley and flywheel to balance the new motor!
So a future project of improving the car turned into a teardown...

First off came the bonnet

Then radiator, aircon condensor, shroud and fans.
Lots of unbolting disconnected and then after some wiggling...

It's dirty but all the ancillaries will clean up nicely

Perfect opportunity to sort out some gearbox leaks too!


Engine bay is good, but will definitely need some tidying before a fresh engine goes in.
Brackets will be repainted and scabby bits of the engine bay will be repainted.
The aim is to get it as nice as possible while the motor is out. I don't intend on pulling it again!


Headlight and grill brackets have held up so nicely, still look like new.
I hopefully should be getting back the short motor this week so lots of work to do!
Joe
Edited by 1275 GT on Friday 21st June 23:09
Well I collected the Vitesse's engine today from JE Developments!
Definitely knew I was in the right place!
Very exciting day talking through the final spec with John. Really happy with what I've seen so far. Can't wait to get stuck i and get it back together.
Engine bay is also almost ready for the new engine, I'll sort pictures of what was involved in that, it needed some work.


All loaded up and ready to come home finally.
Joe
Definitely knew I was in the right place!
Very exciting day talking through the final spec with John. Really happy with what I've seen so far. Can't wait to get stuck i and get it back together.
Engine bay is also almost ready for the new engine, I'll sort pictures of what was involved in that, it needed some work.

All loaded up and ready to come home finally.
Joe
Edited by 1275 GT on Friday 17th July 21:42
PorkRind said:
Oh wow. That's a beast. Will it take much to get the ac working!?
The AC systems on these are not renowned for reliability, or being that good when they were new! The previous owner assured me that the compressor seized and was working before. So I'll try the new compressor, but I think it'll also need a new receiver as they don't like being exposed to the atmosphere. The rest of the vacuum system is working correctly.
Joe
While the engine was away I carried on with the prep to make sure the engine bay was worthy of a fresh engine.
The engine bay is almost untouched, and has taken a bit of a beating over the years. Lots of paint missing and general tattyness.

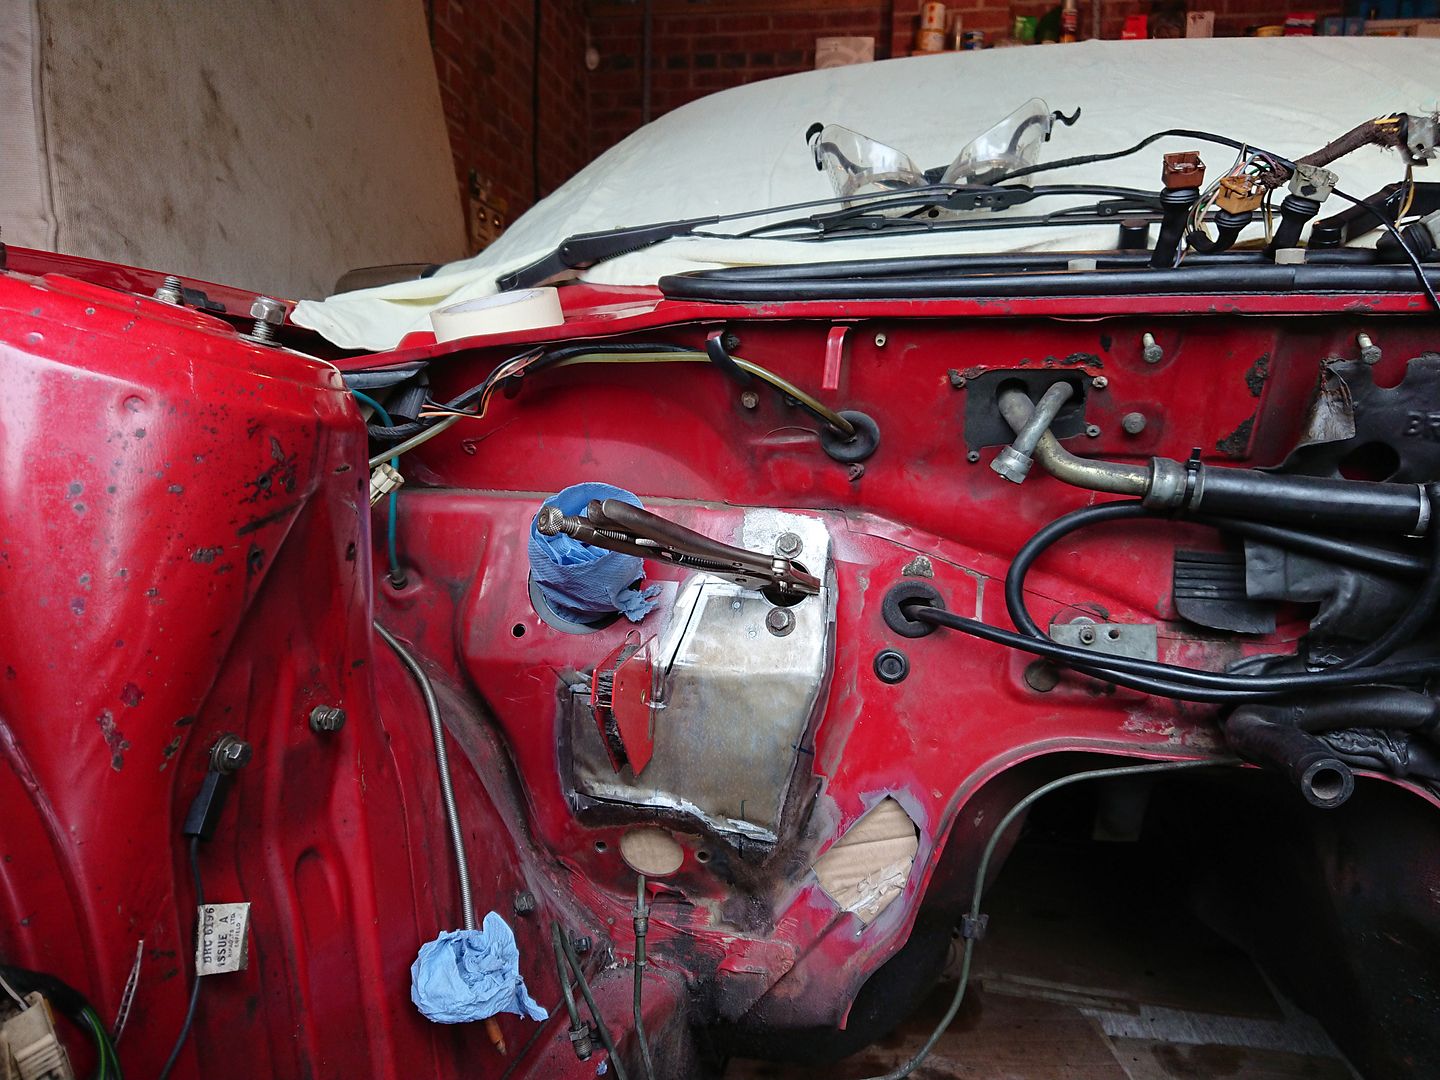
One thing I did want to address with the engine out was inspect the bulkhead, as when I had the carpets out I did notice some crusty bits, but I thought nothing for alarm.

Well bugger, that was a lot worse than I was expecting, I didn't think I'd find a crack!
I didn't think I'd have to get the welder out, but needs must.
I had to remove a lot more rotten metal than I'd have liked due to a previously leaking clutch master (it's in the service history that it was changed a few years back) But I eventually got back to clean undamaged metal and formed my repair.
The bulkhead is NLA so it's fully fabricated from sheet steel.
The reinforcing plate behind was still intact, so instead of removing it entirely and loosing the reference position, I left it in place and de-skinned the bulkhead from it.

Using the reinforcing panel as a reference I could then line everything up and bolt the repair to the panel to keep everything in place.
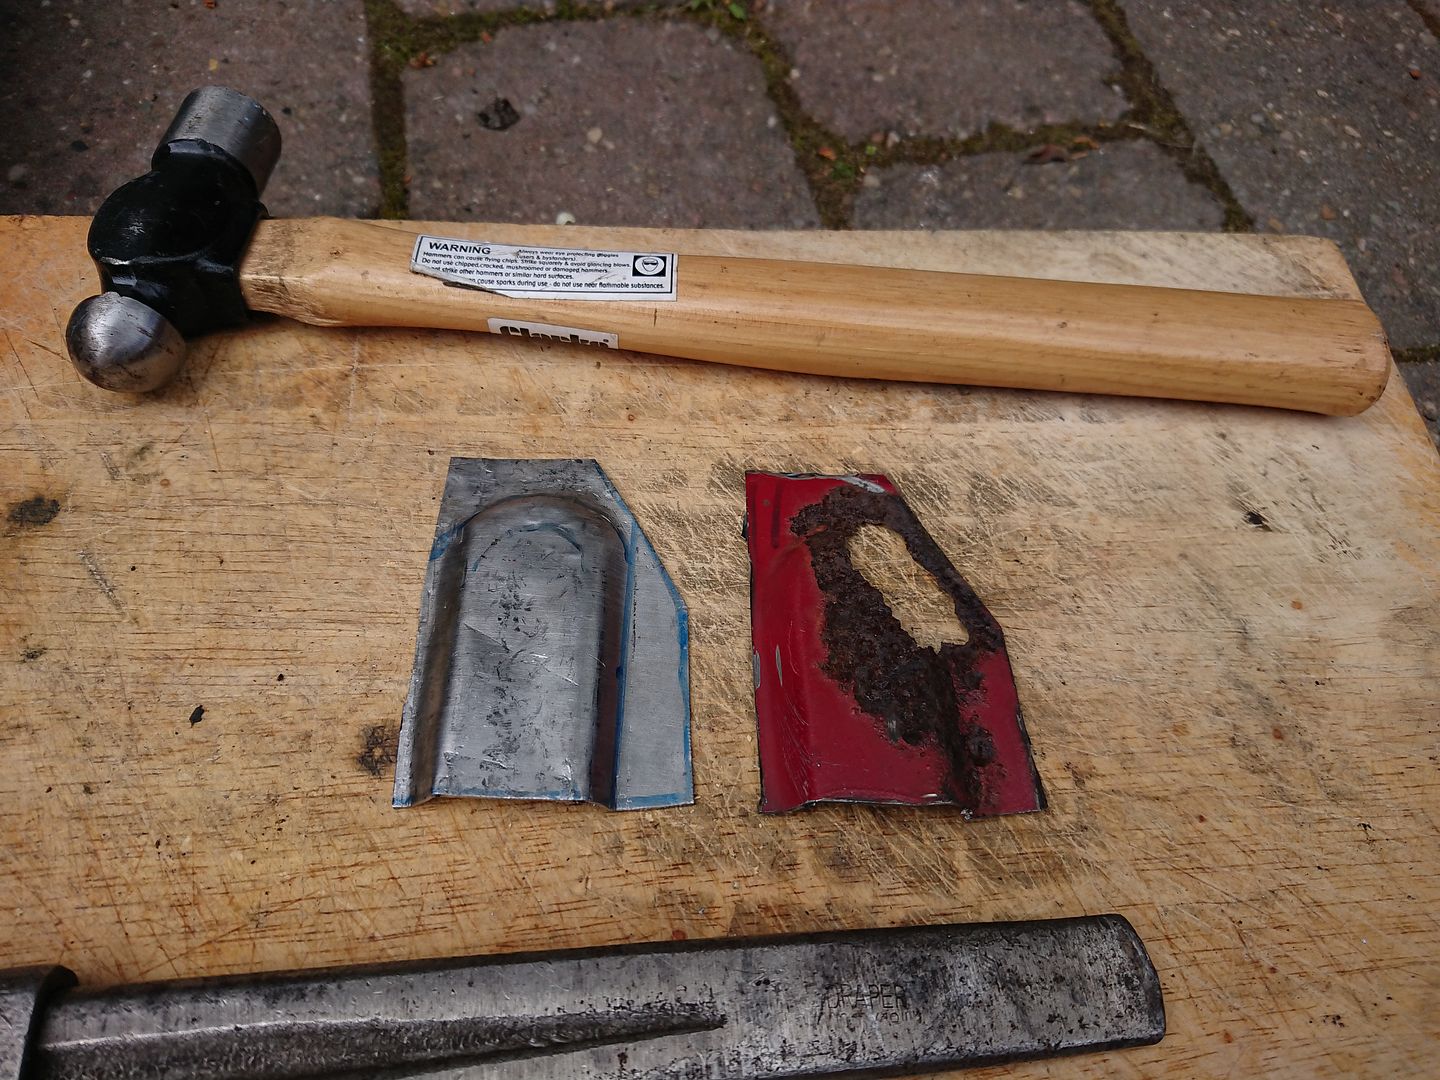
Usual process of some serious fabrication to remake the missing part(s) of the bulkhead that I had to remove.

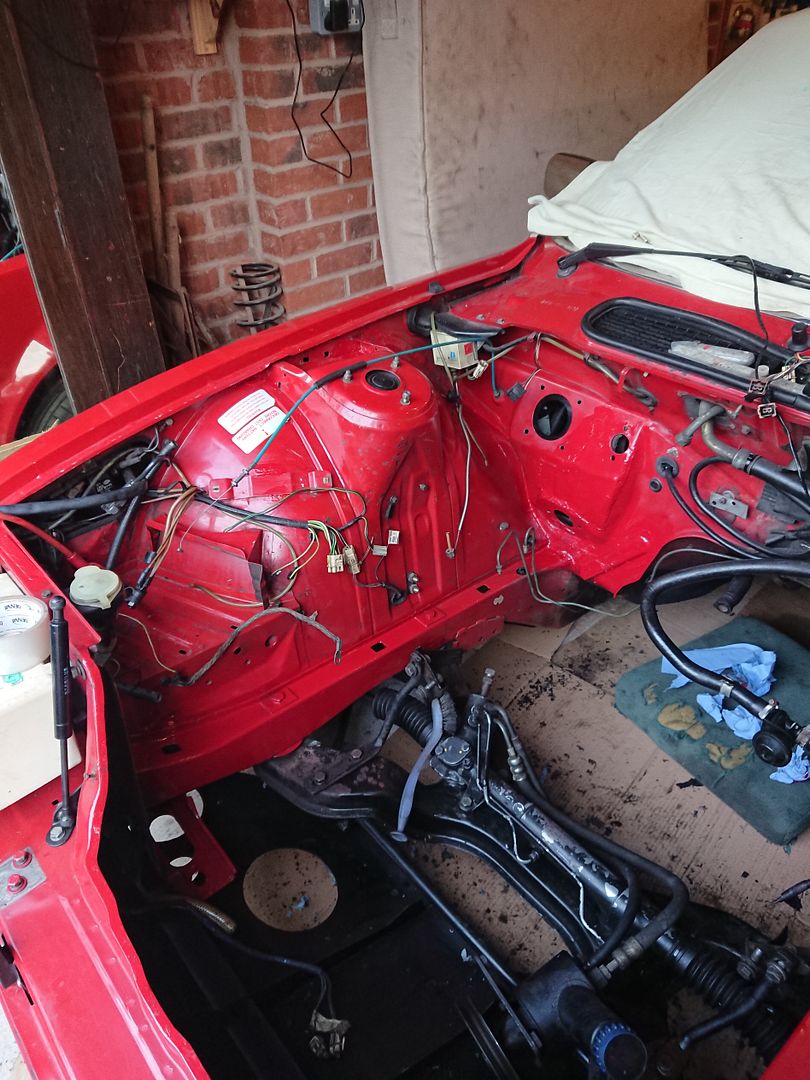
After some welding and seam sealing I was pretty happy with the results.
And after removing all the remaining surface corrosion from the engine bay and priming in Bilt Hamber Electrox paint, some red makes a massive improvement!

Joe
The engine bay is almost untouched, and has taken a bit of a beating over the years. Lots of paint missing and general tattyness.

One thing I did want to address with the engine out was inspect the bulkhead, as when I had the carpets out I did notice some crusty bits, but I thought nothing for alarm.

Well bugger, that was a lot worse than I was expecting, I didn't think I'd find a crack!
I didn't think I'd have to get the welder out, but needs must.
I had to remove a lot more rotten metal than I'd have liked due to a previously leaking clutch master (it's in the service history that it was changed a few years back) But I eventually got back to clean undamaged metal and formed my repair.
The bulkhead is NLA so it's fully fabricated from sheet steel.
The reinforcing plate behind was still intact, so instead of removing it entirely and loosing the reference position, I left it in place and de-skinned the bulkhead from it.

Using the reinforcing panel as a reference I could then line everything up and bolt the repair to the panel to keep everything in place.


Usual process of some serious fabrication to remake the missing part(s) of the bulkhead that I had to remove.

After some welding and seam sealing I was pretty happy with the results.
And after removing all the remaining surface corrosion from the engine bay and priming in Bilt Hamber Electrox paint, some red makes a massive improvement!


Joe
bodgerben said:
Dropping in to say thanks for this thread of an iconic car and your work, the rebuilt engine will give the old girl a nice bit of get up and go.
Shame about the bulkhead, but you've got that sorted and now looking good.
Like so many others I'd love a SD1, but very much doubt I'll ever get one, so its great so see the love this ones been getting.
My own V8 fix is mum's old SE6a now with a Lexus 1UZFE, I suppose I should do a readers cars thread on that sometime (she's in for a full strip down and respray next month).
Thanks that means a lot! Yes I wasn't happy to find the state that the bulkhead had gotten into, but glad to get it solid again. Shame about the bulkhead, but you've got that sorted and now looking good.
Like so many others I'd love a SD1, but very much doubt I'll ever get one, so its great so see the love this ones been getting.
My own V8 fix is mum's old SE6a now with a Lexus 1UZFE, I suppose I should do a readers cars thread on that sometime (she's in for a full strip down and respray next month).
I do love a SE6a such a well preportioned car, and with that motor I bet it's a bit of a weapon! A friend did keep proposing that engine for mine, but it had to keep its RV8 for me.
Well I've been busy so It'd be rude not to share!
First port of call was my removed sound deadening. Sadly it crumbled into dust when i removed it. When speaking to John about this he told me to throw it in the bin and forget about it!
But it would just look odd without it, and one evening while puroosing the various facebook groups I stumbled on something. It was already sold, but worth a message if it fell through.

A mint OS bulkhead pad. It's from an earlier car, but the difference is minor.
It needed a little "modifiing" aka a big hole cutting in it for the air con, and it went on nicely.

Behind is now lovely paint, and should protect it from any corrosion in the future.
I also reinstalled all the brake lines and bias valve. The master is still out as it needs a bit of refurbishment.
Next up was the gearbox.
The car still retains its original 28A prefix "suffix D" LT77, but its filthy!


Many hours and quite a bit of degreaser and I'm happy with it, its not immaculate but it's not a million miles off. I've got new seals and remote buses on the way.
Joe
In the background I've also been refurbishing all the various brackets and ancillaries.

The engine as removed looked ok, but lots of crusty bits that could be improved.
First up was the manifolds.
I bought some Deox-C rust removing solution and left them to soak along with all the other corroded brackets.

Very happy with the results, all the rust gone and perfect base for some paint.
Decided to go a little risky with the manifolds and try out VHT flameproof coating.
Went on really well and I think they'll look a lot better than the rustyness that came off!

Next up was the downpipes....


This wasn't so successful, some nasty holes and some very suspect welding to try and repair the corrosion.
The rest of the system is a full sport stainless system and I didn't want to go to tubular manifolds, they're too far gone to repair,so I had to open the wallet.

I'm glad I did though, they'll look so much nicer than what came off, and just a nice subtle shine deep down in the engine bay.
I also couldn't resist giving the rocker covers a going over.

I'd previously stripped them down when I did a top end rebuild on the donor V8, but leaving them in bare aluminium soon gives a dusting of aluminium oxide which isn't appealing. But this does leave a perfect base for painting them.
I also stripped and prepped the plenum at this point, as I figured matching would be the best look.

I went again with VHT but this time their engine enamel, I picked the "iron" effect as I really just wanted a darker grey to get as close to the factory bare aluminium as I could. The aim is to be not too "blingy" and not stray too far from a factory finish and I think this meets that nicely.
I think they came out really well.
Joe
Peanut Gallery said:
I think they came out very well!
Looking really good!
Thankyou, they look even better now with the rocker cover stickers on them.Looking really good!
Sford said:
I saw this in the flesh when you took it to C&M, my father-in-law and I pounced on you as soon as you parked up.
The car looked lovely and it was a great addition to the eclectic mix of things I've seen up there!
yes, it was really nice chatting with both of you, thankyou, glad you enjoyed it. The car looked lovely and it was a great addition to the eclectic mix of things I've seen up there!
Was a brilliant day I absolutely love that place, I'll be back once its back together.
Joe
Well this is where things get interesting...

With all the useful parts removed it was time to unmount the RR lump from the engine stand and say goodbye.
Well I say that but it'll now just sit wrapped up in my shed!

And then time to mount the fresh block on the stand ready for assembly.

I'd had a good look over it at JE, but it's even more special when its on your engine stand ready to go back together!

Here you can see the fatter top hat liners, no liner slip for me.

I do love the original touches you find when the block is super clean.
The cylinder heads are equally as clean.

Both have been machined for proper valve stem seals, bigger valves, and a deflash of the intake and exhaust ports. They should compliment the short block beautifully.

The bottom end really is lovely, with new main studs, original rods, original crank, and the whole lot fully balanced.

Baffle plate and oil pick-up installed correctly with the support that was missing from the car when I bought it!

And sump on, I also flattened out the sump face to ensure a good seal as well as using new fixings and giving it a good coat of paint.
Next up it was time to get the heads on.


The engine has been built to use composite head gaskets and give a true 9.75:1 compression.
Original 30A engine number was a must for me!
Here you can also see the NOS pistons, some of the coating has come off, but this does not affect performance. They've also been valve recessed for the hotter cam.

Heads on, cam lubed up with assemby lube, new hydraulic lifters, and rocker gear re-installed.

Finally the refreshed rocker covers went on, new valley gasket and seals, and the inlet manifold placed on for now.


Finally the exhaust manifolds went on, again with new fixings. I think that'll go very nicely in an SD1 engine bay!
Joe
rickygolf83 said:
A work of art there!
Mr Tidy said:
Absolutely stunning.
Biker's Nemesis said:
Threads like this make me happy.
Thankyou for the kind words, it means a lot! LewG said:
That looks amazing, brings back fond memories of building the V8 for my Chimaera. Funnily enough I saw a slightly modded green SD1 Vanden Plas today on the way back from work, with the American spec 4 individual round headlights, it did look to be in lovely condition! Yours is pretty much just the spec I would want, it looks great
I've always loved a Chimera, the underbonnet exhaust set up always looked bonkers to me. Very interesting spot, I think i can count the number of SD1's I've ever seen on the road on one hand.
I have to admit I never liked the NAS headlights, although I know some people go mad for them!
Thankyou, my dad had a vandenplas V8, but it's got to be a vitesse for me, it's all about the spoilers! But I always sway between which Vitesse colour is my favourite, my dad had a moonraker blue car, I really wanted a black car, but red probably suits the car best in the end.
Well I've been carrying on with the Rover, one thing I didn't like was the rust trail down the brake servo...
So with the assembly off to sort the bulkhead it was silly not to rebuild the master cylinder.

relatively simple system and apart from the outside not looking too nice, it was an ideal candidate for a seal kit and freshen up.

I also stripped all the paint off the servo and repainted it back to gloss black.
It's now all back in the car and I'll bleed it up before the engine goes back in.
While I had the paint out I also gave the lightened flywheel a quick coat to keep any corrosion at bay. It's had a fair chunk taken out of it so that should waken everything up even more.

One thing I did also want to do was reinstall the air conditioning components.

When I bought the car they'd all been removed but where included.
A dry fit was required to work out where everything goes.
With everything worked out its back off to completely strip, and recoat all the components.


Much better!
Finally I finished the job I'd started a little while ago re-coating the original engine looms in new loom tape.
I've gone with modern fabric loom tape, which i think gives the best appearance.

Gearbox loom all checked, re-secured and coated.
Quite difficult to photograph well, but the rest of the engine loom recived the same treatment and looks so much better in my opinion.

Joe
wormus said:
Threads like this make me jealous! Love this car and the attention to detail. It’s a real credit to you. Makes me miss my old SD1.
If it's any consolation it's taking up most of my evenings when I get back from work!My time driving mine I was so impressed at its road manners. I'm already missing driving it, can't wait to get it back together now.


Progress has been slow, and the engine is not in yet sadly.
I have carried on with the air con components which has taken some time to work out what was left over from the RR, and which bits where original SD1.
I got there in the end and worked out the bracket and compressor arrangement and aligned the idler wheel to the crank and compressor. I also finished painting and assembling the support brackets.
No pictures but I've also bled the brake system after almost fully draining the system to removed the master cylinder and engine bay lines, it was definitely needed, the fluid was gross!
The engine bay is now ready for the engine! I'm hoping to get it in within the next few days so stand by!
Joe
So I've been very quiet on here, but luckily for you guys I've been busy!
The engine looked pretty on the stand, but it couldn't stay there could it.


The Rocker Covers came off to avoid any damage during fitment
While it was nice and accessable I did pack the oil pump as per the work shop manual.

No lack of oil pressure for me!
With the engine and gearbox ready it was off the stand for the flywheel and clutch fitment.
I clingfilmed the cylinderheads to prevent any contamination or dropped fixings while it was being worked on.
With all the work done it would have been silly to not replace the clutch, despite the one on it looking fine.
So a new genuine clutch from JE went on.


Gearbox mounting went smoothly, and the whole assembly could hang together again.

Mounted up my re-taped gearbox loom, and you can also see the new mounts and gearbox output seal (larger suffix D of course) It is a vitesse after all.

Engine bay empty for hopefully the last time, and looking very nice.
After quite a bit of wiggling ( yes I did refit with the gear stick in place) It was in!
I also dropped the rocker covers back on for safe keeping.


The original engine returned to BCK after almost 3 years apart.
Lots still to go back but a massive step forward
Joe
gforceg said:
As ever, massive "hats off" to you. Great work and thread upkeep. Enjoy every minute you have with it.
Thankyou I do enjoy working on it and especially driving it! surveyor said:
Forgot to reply to this.
The car behaved pretty well. Nathan was pleased with it.
The manifolds sounds good, although I'd not heard it without. They did f k his engine up though with various broken studs It was touch and go for a while as to whether he would need to replace it...
I'll definitely need to get together with Nathan once mines MOT'd to see the difference. The car behaved pretty well. Nathan was pleased with it.
The manifolds sounds good, although I'd not heard it without. They did f
k his engine up though with various broken studs It was touch and go for a while as to whether he would need to replace it...wormus said:
I’ve still got a lovely dry garage for this one if you ever decide you hate it.
A beautiful, very cool car.
Thankyou A beautiful, very cool car.
but I think it'll be a little while before I hate it, especially with how it sounds now...But we'll get to that.
So with the engine and box back in it was reassembly time!

In the light of day it still looked good, but lots of things to connect.
First was the propshaft and new exhaust downpipes.

Needed a trip out for some new stainless hardware, but definitely worth it. Everything looks so much cleaner as well, worth the time spent cleaning everything.
I didn't really want to, but in the end I'm glad I had to replace the downpipes.
Next up was the oil system.
After having so many problems priming the first time I was a little apprehensive!

Original cleaned rockershafts installed to the corrrect sides, you can also see the updated valve stem seals.


Making sure all the rockers are thoroughly lubricated, and the engine is nice and full of oil before priming the system.
Primed almost immediately with the priming tool, and made lovely pressure.
I did spend the next 10 minutes checking for leaks, but nothing so far!

Rocker covers on for hopefully the last time, and looking lovely.

Inlet manifold on next, It was of coursed cleaned as much as possible without too much disassembly.I didn't want to disturb too much as the car ran well before.

I am enjoying the painted plenum, hopefully it'll suit the car. Reassembled with the throttle linkage and TPS.


It definitely looks like it should be there, just need to hear it run now!
Joe
One downside of taking a car to pieces is you can't put back dirty and non-functioning parts when reassembling, well I can't atleast.

I'd tried previously to get the aircon fans to spin over with little sucess so I knew they needed some attention.


Disassembly was relatively simple, although the fans are seized to the motor spindles, and one of the motors casing bolts sheered.
There was nothing wrong with the motor brushes, and the windings where intact, so a little bit of investigation found a broken corroded lead to one of the motors disabling both. The wire was replaced and re-soldered and both motors swang into action.
Everything was de-rusted and freshly painted, one casing was much more corroded, leading me to thing one motor has already been replaced.
The sheared motor housing bolt did present an issue, as they run through the entire motor, and to replace I'd have to removed the unmovable fans...

So sunken SS fixings will have to do! I don't like deviating from what should be, but in this case it'll do.

There's a little mix of fixings to suit shimming to fans to the condenser, but it's much nicer than before.
Joe
SamR380 said:

That car is lucky to have you. My SD1 has rust holes covered by aluminum tape and black paint.
I do think I've done it justice. That' scary, I was presently surprised at the condition of this one, nothing really major.Is yours a series 1 or 2? I know the series ones suffered a little worse to say the least.
With the summer continuing on I really wanted to get the car at least running. I had a soft deadline of the second week in August, but that was not going to happen.


Fresh NGK plugs for the new motor of course.
Next was the flushed radiator and aircon assembly.

Fresh SS fixings replace cable ties in holding the aircon assembly in (I'm sadly not joking)

and with the aircon shroud on, and the radiator shroud, again now with all correct fixings.
It looks like it should run now....
It did briefly! but not before the ignition amplifier died, and it just didn't sound right.. there was a metallic noise, and chugging from the exhaust.
The amplifier I had a hunch about and I'd previously changed the distributor, but the replacement doesn't fit with the vitesse aircon set up.
Amplifier changed it fired back into life.
The chug and click remained.
Initially I just assumed the exhaust system wasn't quite tight enough, but after a good check I couldn't see anything a miss.

Then I saw it, soot on my nice clean manifolds....
I couldn't actually believe it, but the upgraded manifold gaskets that I used where slightly larger to accommodate tubular manifolds, and it would also seem uncovers a redundant dowel hole on standard cast manifolds. So on that exhaust port it's now been returned back to standard gaskets! No leaks now.
The metallic noise was even easier, I'd located the TDC pointer too close to the crank pulley!

Now was the difficult part, with less than 10 seconds on the engine it was time to breaking in the new cam.
It went well, and burped the coolant system at the same time. varying the rpm between 1.5-2.5k. luckily the EFI system has quite a fast idle cold so I'm happy with how it all went.
It sounds bloody brilliant, I can't wait to get it out on the road!
Next step is to get it out and run the bugger in.

Jaffers said:
Well done! that's excellent progress and a beautiful car. It's amazing to see one so clean and fresh.
I know how you felt when you were starting the car up and then breaking the cam in - I've had the heads off mine a couple of times and the start up after re-assembly is always a heart in mouth moment as I panic that I've forgotten something critical or put something in backwards or not noticed that I'd dropped a washer down an inlet port or something! Fortunately it's always gone very smoothly and my Vitesse runs like a dream. Just got back last night from a round trip from Liverpool to London fully laden (and I mean up to the roof including the back seat) to take my daughter down to her student digs.
I've really enjoyed this thread - thanks for taking all the trouble to post all these wonderful pictures.
It really was a nerve wracking moment, especially with the metallic noise the TDC indicator was giving! I know how you felt when you were starting the car up and then breaking the cam in - I've had the heads off mine a couple of times and the start up after re-assembly is always a heart in mouth moment as I panic that I've forgotten something critical or put something in backwards or not noticed that I'd dropped a washer down an inlet port or something! Fortunately it's always gone very smoothly and my Vitesse runs like a dream. Just got back last night from a round trip from Liverpool to London fully laden (and I mean up to the roof including the back seat) to take my daughter down to her student digs.
I've really enjoyed this thread - thanks for taking all the trouble to post all these wonderful pictures.
Brilliant to hear you're using yours properly, put some pictures up I always love to see another Vitesse!
Yogioes said:
Just adding my thanks for your thread.
It's a great encouragement to keep going.
Thankyou It's a great encouragement to keep going.
glad you've enjoyed my ramblings! In the interest of doing things properly it was really bugging me that I still hadn't replaced the radio after I killed the last one. I removed it to see if I could get it reconditoned and it's been radio-less ever since!
I'd missed out on an original radio, but I eventually got lucky on an OEM looking Philips unit, it even still had the original rists connectors on it so i definitely was of Rover origin.

As my Dad had spent so long restoring the original wiring it was plug and play. But as with all old ebay purchases it did not work very well. It turned on, but the speaker output was pretty poor. I tried it with some radio speakers to rule out the car, but the results were the same. I then tried with the speaker wires and it came through crystal clear.

The original wiring had some continuity problems, so I remade the loom with new speaker connectors. the spare rist connectors and crimper definitely comes in useful!

It is a little sad but the devil is in the detail.

Just looks right

The car does look good back outside, but very odd without a bumper...

For this the car was moved to it's new home, where I'd also been storing the bumper.

Much better, the bonnet also went on at this point, but I didn't take many pictures as it's definitely a 2 people 4 hand job!
With the car finally complete I had missed the MOT expiry so to get out and run the engine in I needed a fresh ticket!

So I began to do my usual checks. After the bulkhead work it already had fresh brake and clutch fluid so just a over-check of the bleeding. I also took the opportunity to drain and refill the cooling system to ensure the flushing had got everything. I also adjusted the handbrake as I know this is an SD1 weak point so it had a nice bite at 3 clicks.
The MOT raised another problem, I was happy that the car broke in ok, and sounded lovely, I'd checked the fuelling and timing was set as per JE's instructions, oil pressure is beautifully strong, but I needed to trust whoever was going to test it to not rev it or abuse it on such a fresh engine.
My preferred mechanic had left my local garage early last year, and I didn't have a positive experience with my Mini at the same garage after...
Which left me in a difficult position to pick a new Tester for my varied collection of cars.
Luck would have it I met a guy at a local car show late last year, the day I'd MOT'd my 1275GT, and while chatting (moaning about the MOT experience) he mentioned that he ran Lutterworth MOT centre, and was very familiar with classic cars and would love to replace my current garage.
So an MOT was booked for Friday the 6th (Yes that's yesterday)
So after a very distracted morning of work on Friday I headed back, retrieved the car and headed off. The distance also gave me a brilliant opportunity to do some running in.

Pulling into the industrial estate I thought I heard a micro-lite flying overhead, it turns out the aux air-con fans had cut in, I had been sitting in traffic for a little while, so was very happy/surprised to hear them cutting in on a thermo switch. They where catching a little so sounded a bit terrible, but I can fix that.


Unfortunately it did piss it down on the way to the test, but at least I got to prove the wipers worked!
After my apprehension, it was definitely not needed, I could tell straight away I'd come to the right place, with a Sunbeam Alpine parked outside.
They where more than happy to let me follow them as they tested the car, I think I spent as much time under it as they did! I was really happy with the whole experience. Lambda was spot on at 1, particulates were low at only 150ppm, CO was a little low at 1%, so they put it on live read after the test and I adjusted it to 1.75% slightly richer than standard of 1.5%. We had a good talk about the car, and really didn't find anything, I think one bolt was a little marginal on the nyloc nut it was secured too that he advised me to change, and of course I will do that ASAP. Exactly the kind of insight I was after from a garage.
Result was a pass with no advisories. Second MOT in my ownership and not a single advisory yet!
I will definitely be back, and will bring the rest of my rubbish when I need an MOT too!

One very good day, car ran perfectly and I couldn't resist taking it out again and getting some evening pictures.
I've been out most of today as well.
So that brings us bang up to date. The new motor was definitely worth it, it sounds epic, I'll sort some videos very soon.
Joe
Dinoboy said:
Looks great, and congratulations on the MOT.
Thankyou, I'm very happy to have it back together again. V1nce Fox said:
my dad loved these. thanks for sharing it
I got my love from my Dad too, it just sticks with you. CAPP0 said:
Years ago when I was about 20, I bought a 3500 P6 which the owner had rebuilt the engine on but couldn't get any oil pressure. One Haynes manual and a pot of petroleum jelly later and I had a nice car with a good engine!
I couldn't believe that the pump isn't self priming when I first rebuilt the old engine, I now have the priming tool and use vasoline, I couldn't believe it when i read it in the factory manual! yonex said:
The car is a credit to you, brilliant work, well done.
Thankyou very much tvrfan007 said:
Congrats. I'll keep an eye out for you as I'm in Rugby so you can't be far away. Thread has made for an epic read.
No not far away at all, I'm just up the M1 a little way. I actually dropped into Rugby to meet up with a friend also with a red Vitesse after the MOT, he wanted to see how the engine work had gone. So I was probably quite close to you! I still haven't worked out how to embed videos properly, but a little taster of the new engine, that's half throttle and 3k RPM.
https://www.youtube.com/watch?v=bdPW1gKlVZQ&fe...
Joe

SlimJim16v said:
That does sound nice. I bet you can't wait to hear it on full throttle.
I've been putting some miles on it just for that reason. It's now been back to JE Development and given a clean bill of health...The video will be at the end of this post

Eyersey1234 said:
I haven't read the whole thread but that looks a lovely car, well done OP.
Thanks, it seems to get attention wherever I take it. wormus said:
What a fantastic looking thing. Simply love this car.
Thankyou as always quote=Bobberoo99]You sir are awesome!!!! Been following this thread from the start, she's an absolute credit to your perseverance, abilities and dedication, she sounds bloody lovely too!!!!
Jaffers said:
You've probably seen photos already as mine was the one featured here on PH "Spotted" a few weeks ago. And it's still for sale... :-)
https://www.pistonheads.com/regulars/ph-spottedyky...
I have seen your advert, car looks amazing and is a credit to you, good luck with the sale, worth every penny. https://www.pistonheads.com/regulars/ph-spottedyky...
Well you've all been waiting long enough, and you're going to want good speakers for this.
https://www.youtube.com/watch?v=ybFOnwn48UI&fe...
Joe
gforceg said:
That does sound very nice. I like the crackle and burble on the overrun.
miniman said:
Greendubber said:
Sounds great, one of my favourite Reader Rides this.
Great stuff.
Great stuff.
gweaver said:
That is aural sex.
I absolutely loved that comment, did make me laugh. Thankyou all, I'm so happy with how the motor turned out. The burble and pops on the overrun are brilliant!
It sounds even angrier in the flesh, and it finally has that edge higher in the RPM range that I was always after.
There's also another 1500RPM to go before redline so plenty more noise to come.


Definitely made the most of the glorious weather on Friday and took it back to JE Development so John could give it a look over and a quick health check, he was very happy and loved the car. He kept telling me not to baby the new engine, so I have been enjoying it a little more. Hence the videos!
I then popped over to Caffeine and Machine, always a fun crowd
Joe
Edited by 1275 GT on Sunday 15th September 22:07
Gassing Station | Readers' Cars | Top of Page | What's New | My Stuff