My mighty MX5 - 'Ring Nail
Discussion


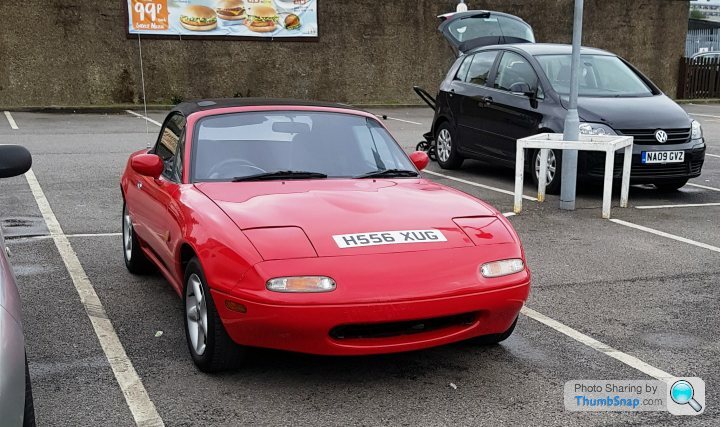
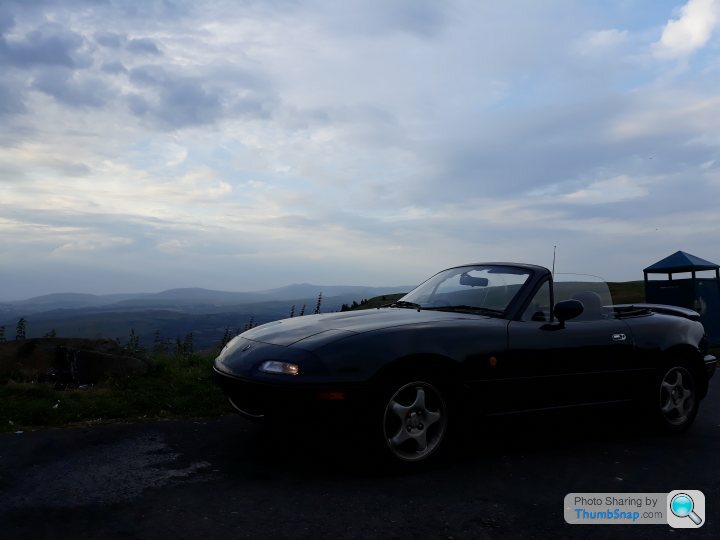
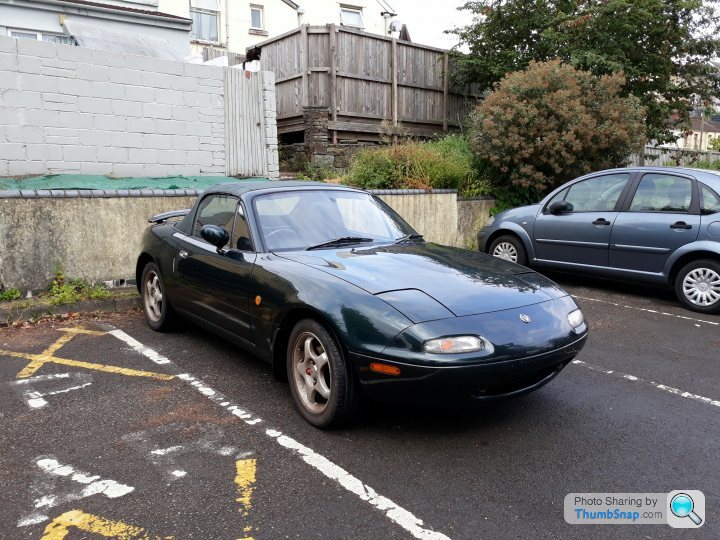
My trusty Eunos. Bought for a grand back in July 2017. It’s a 1.6 1990 import (imported in 98) with roughly 75k miles on the clock. Came with very little history and some minor mods such as a Apec air filter that was actually attached to the exhaust manifold – mmmmm heatsoak, and a Scorpion back box which sounds ok.
Couple of mates (Superchickenn and WunderBolf on here, more affectionally known as Craig and Mick) and I decided to do a Land’s End to John O’Groats trip incorporating the NC500 in October 2017. Thread here – Linky with a short clip of our trip here. For this trip, I did do some minor mods such as brake pads, decat (that was the wrong size so was “fabricated” to fit), interior 12v sockets, front spots, engine bay lights, 15” wheels with Toyo T1Rs, diff oil change and kicked the tyres. That was pretty much it.
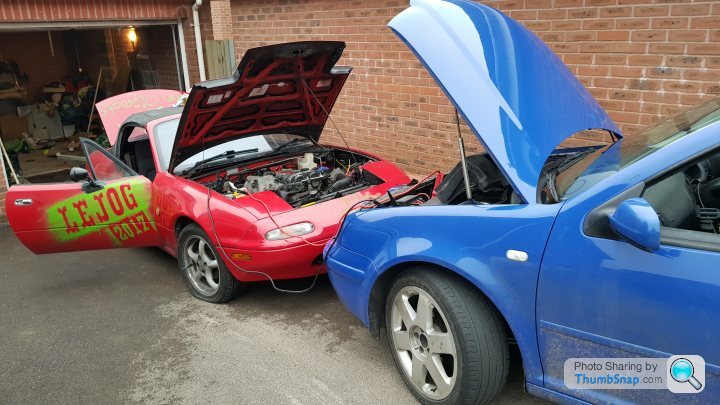
After covering 2500 miles in 5 days absolutely flawlessly, we decided we should do another road trip in September this year – to the Nurburgring for a few laps or 20. So, in the interest of not dying, but more importantly trying to achieve a respectable lap time, some more major surgery is required. Craig has also bought his ‘Ring Nail of a car and has a thread here .
On my current list of things to do are:

When I picked her up
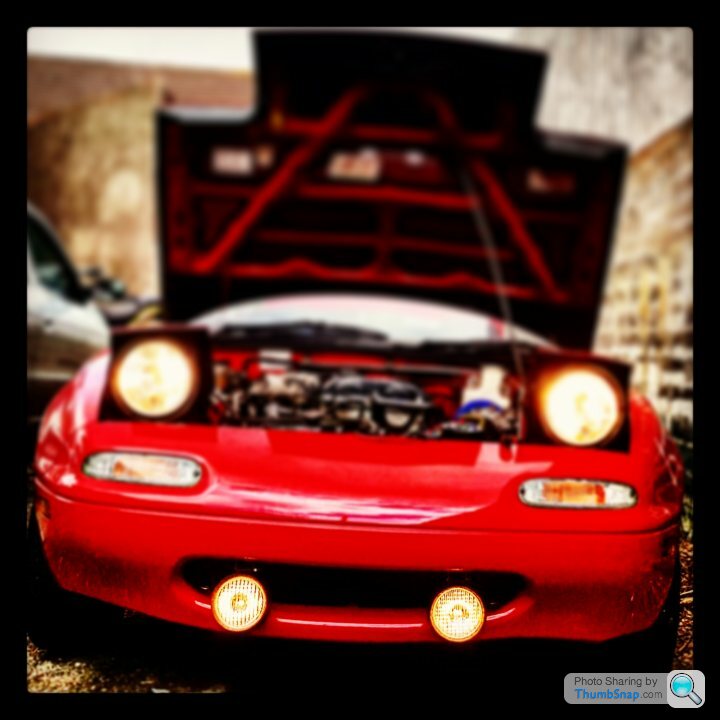
Some extra lumens for the dark roads of the NC500
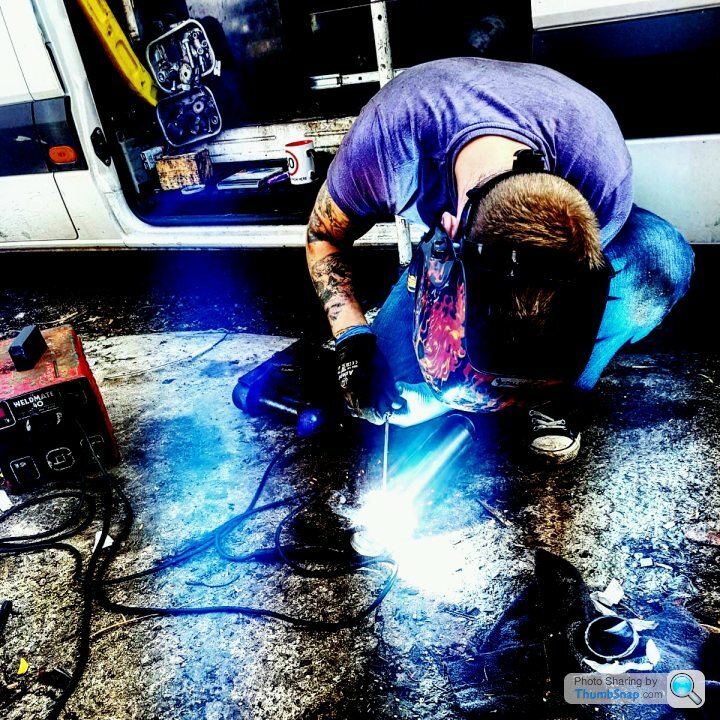
"Fabricating" the decat that was the wrong size (was for a 1.8 I think)
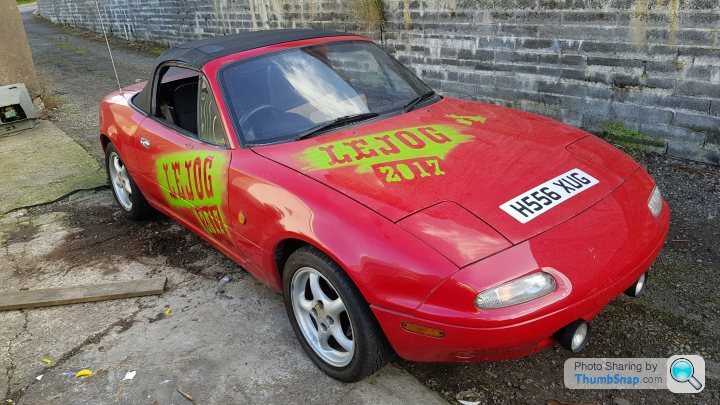
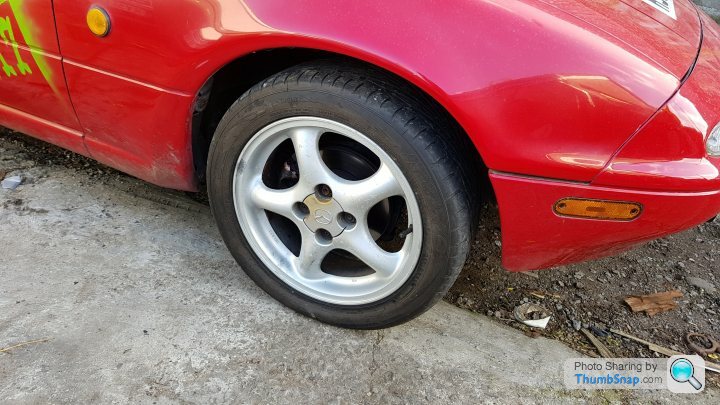
All sprayed up for the LEJOG trip and the new wheels on
From there, she was stowed away in the garage and I got her out yesterday for some fresh air. After a quick kiss of life from the daily, she burst into life at the first turn of the key
Thanks for reading. I'll keep this up to date with car related posts, but we'll also be starting another thread on or 'Ring trip. I'll post the link for those who are interested. Summary is, three track day virgins travel to the 'Ring in bangers
Couple of mates (Superchickenn and WunderBolf on here, more affectionally known as Craig and Mick) and I decided to do a Land’s End to John O’Groats trip incorporating the NC500 in October 2017. Thread here – Linky with a short clip of our trip here. For this trip, I did do some minor mods such as brake pads, decat (that was the wrong size so was “fabricated” to fit), interior 12v sockets, front spots, engine bay lights, 15” wheels with Toyo T1Rs, diff oil change and kicked the tyres. That was pretty much it.
After covering 2500 miles in 5 days absolutely flawlessly, we decided we should do another road trip in September this year – to the Nurburgring for a few laps or 20. So, in the interest of not dying, but more importantly trying to achieve a respectable lap time, some more major surgery is required. Craig has also bought his ‘Ring Nail of a car and has a thread here .
On my current list of things to do are:
- Clean out my sorry excuse of a garage so I can walk around the car when it’s inside
- Strip suspension arms, blast and powdercoat, refit with polybushes. These have been ordered.
- Drop diff, black and powdercoat casing and mount, refit with polybushes. These have been ordered.
- Polybush engine mounts. These have been ordered
- New track rod ends
- Pray upper ball joints are ok and duly ignore them if they aren’t.
- 4 wheel laser alignment
- Fit some super-duper cheap-ass coilovers for super-duper, it’s-like-it’s-on-rails handling. These have been sourced from a mate of mine.
- New discs with Yellow Stuff pads all round. Maybe only fronts if I spend money on beer instead of brakes. Man maths
- Bleed brakes
- Fit GCF Roll bar
- Fit some form of secondhand bucket seat and harnesses
- Sort out “cold” air intake so that it actually intakes cold f
 king air
 - Refabricate previously “fabricated” decat so that it doesn’t kill me with exhaust fumes
- Put the car on a diet by stripping everything apart from heaters, radio and steering wheel (oh and clocks). This will also include an AC delete.
- 14deg timing mod
- New Thermostat, cover and temp sensor
- Investigate gearbox lash and determine if I can be bothered to fix. It had a new clutch not long before I bought it so hoping a PPF alignment may fix it.
- New gearbox and engine oil, with associated filters.
- Obtain replacement batter as the current one is dead, too big and is held in place with mere hopes and dreams. And zip ties. And a bungee cord. But mainly hopes and dreams.
When I picked her up
Some extra lumens for the dark roads of the NC500
"Fabricating" the decat that was the wrong size (was for a 1.8 I think)
All sprayed up for the LEJOG trip and the new wheels on
From there, she was stowed away in the garage and I got her out yesterday for some fresh air. After a quick kiss of life from the daily, she burst into life at the first turn of the key
Thanks for reading. I'll keep this up to date with car related posts, but we'll also be starting another thread on or 'Ring trip. I'll post the link for those who are interested. Summary is, three track day virgins travel to the 'Ring in bangers
Update.
Saturday morning, awoke to this massive great big orange hot thing in the sky. After squinting, quite perplexed through the window, it could only mean one thing. SUN! In APRIL! This can only mean one thing - BBQ! Oh, and car stuff too!
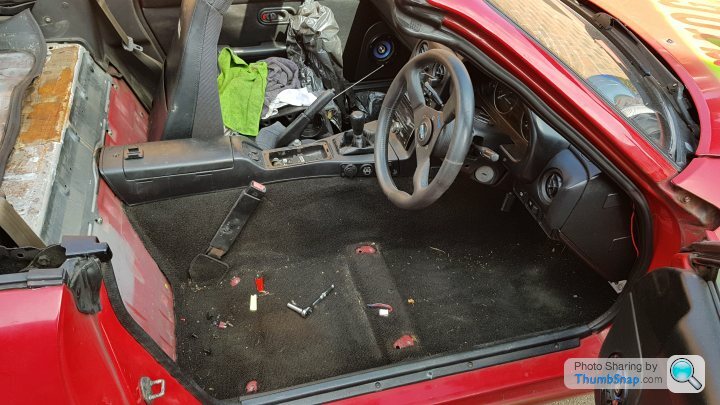
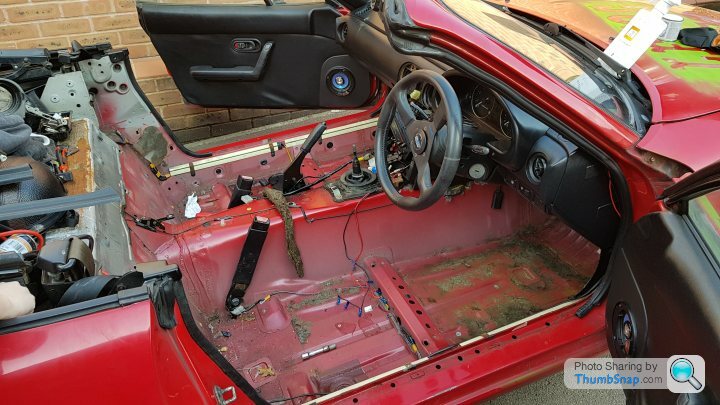
Firstly set about getting the roof down and some air circulating. Then, it was out with the seats and parcel shelf carpets:
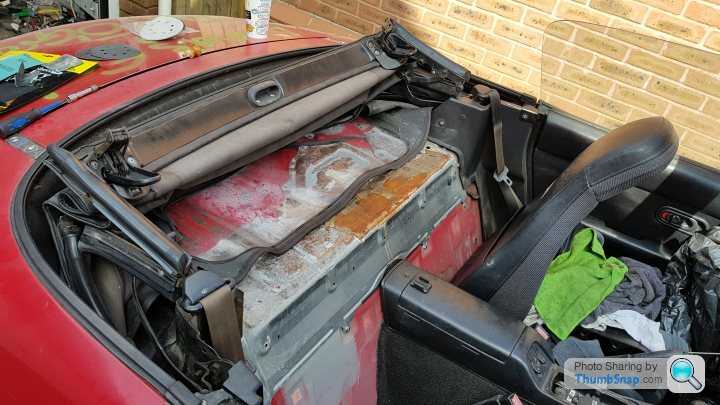
Although pretty confident that the car was an import, I'd had this niggly feeling in my balls about the veracity of this attractive feature. This was soon put to rest when I lifted the parcel shelf carpets and came across a neat little mod a previous owner had performed. No doubt to try and soak up some form of water ingress? Maybe they contain secret articles of Japanese Govt espionage? Or maybe, it's some form of lotto winning newspaper? All I know is, it's now in the bin
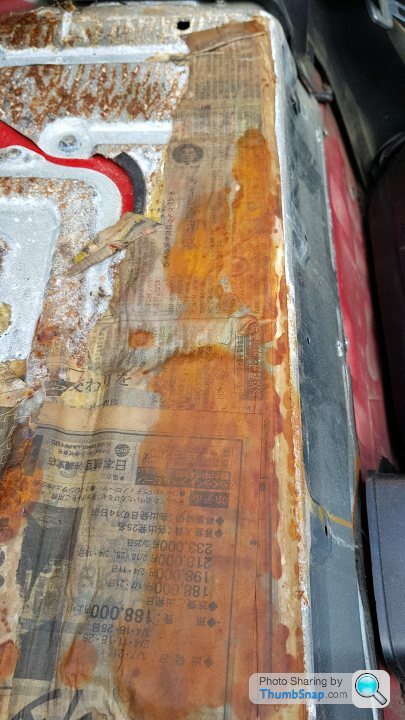

Once the seats were extracted, it was out with the carpet. It wasn't in bad condition, but I wasn't prepared to remove most of the dash, to get the centre cage unbolted to free the carpet, so I cut around it. If I do ever turn this back into a civilised road car, I'd be replacing everything with new anyway.
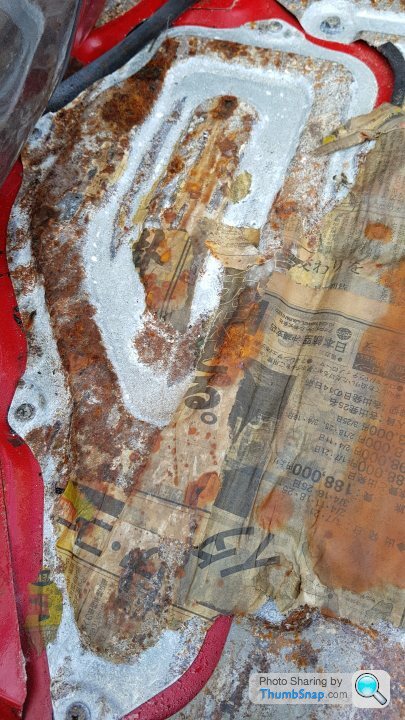
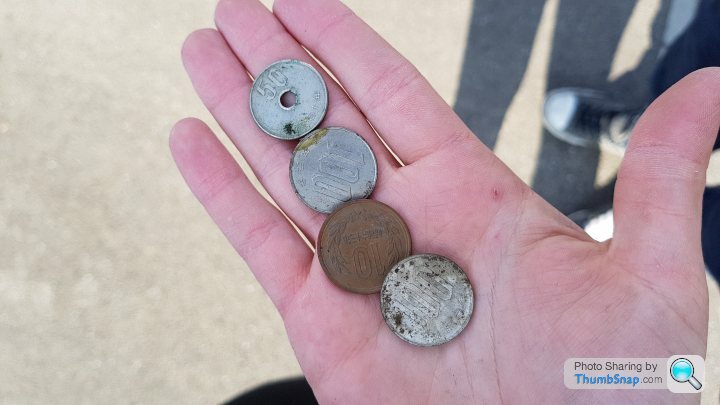
Came across some more evidence that the car did, indeed, hail from Japanese shores. What should I invest my treasure find in? Oil? Gold? Penny chews? (The girly hands are that of my girly girlfriend. I have rather manly hands. Considering I'm a bit of a girl).
Once the carpets andsound deadening water retaining, car killer devices were removed, I stripped the tombstone and centre console. Not quite sure what my plans are here. I've removed a hefty double din head unit and have a lightweight, mechless Bluetooth unit to replace. If I run without a centre console, I may relocate my Voltmeter and additional 12v sockets and USBs to the tombstone. I'm also undecided as to whether to fit a race panel ignition. For the coolz.

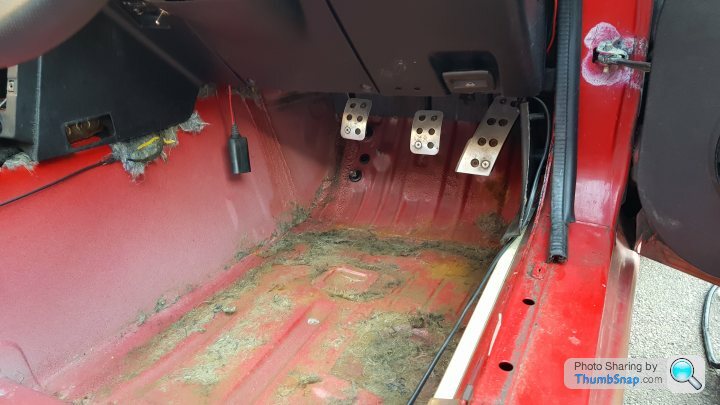
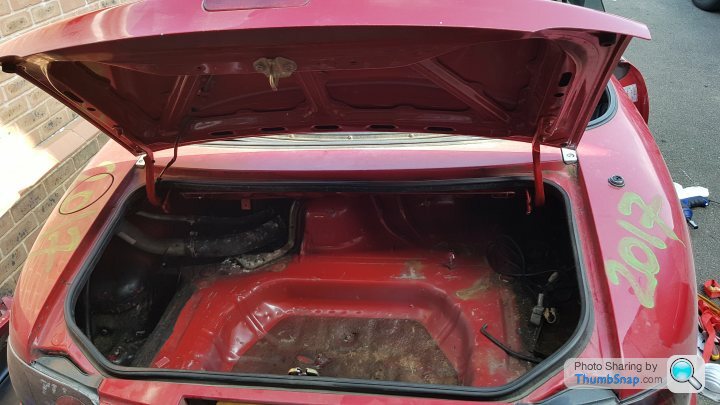
Then the boot had the weight loss treatment. The spare wheel came out, along with the battery that was big enough to start a freight train and was held in position with mere hopes and dreams - and a single bungee. The panel hiding the fuel filler came out also.
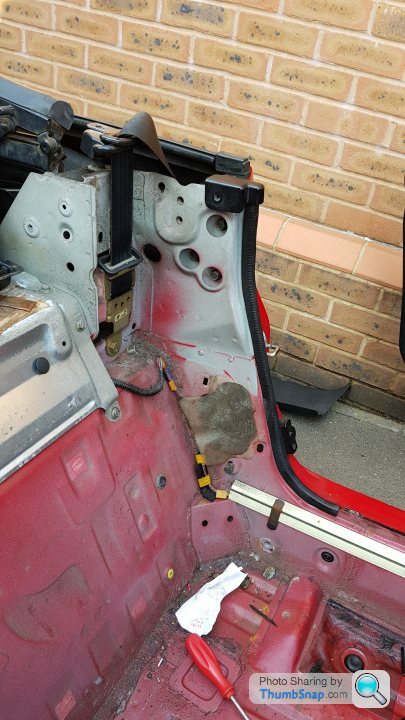
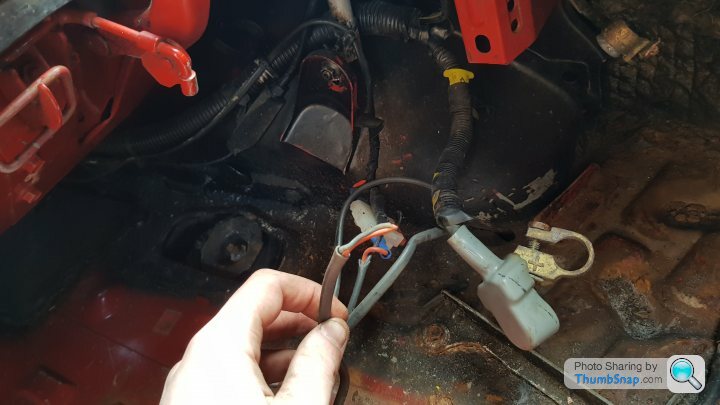
Now I had some space, I could investigate a few niggles. There was no rear fog, but the loom and switch were in place. A quick snoop revealed the below. Now I don't consider myself an accomplished auto electrician. But I think, I THINK this may be the issue (note the aforementioned manly hands).
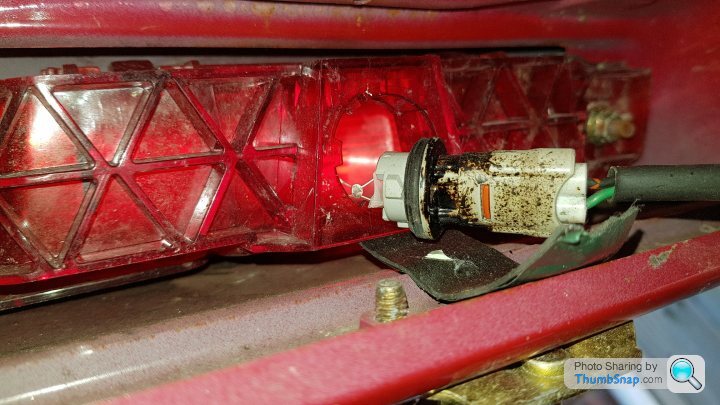
I'd also noticed my high (well, higher) level brake light wasn't working. Can't see the issue myself. Bare in mind this has never worked, and it came with a 12 month MOT
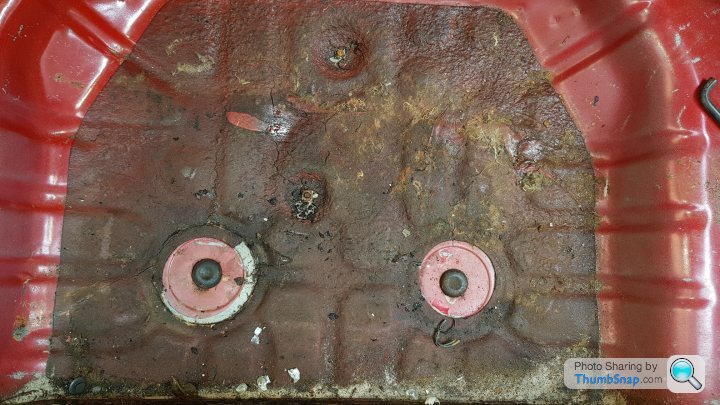
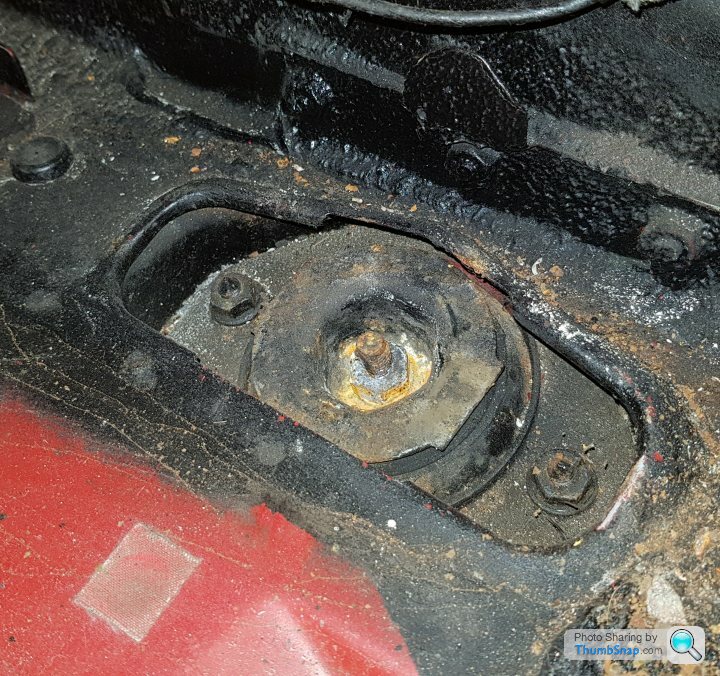
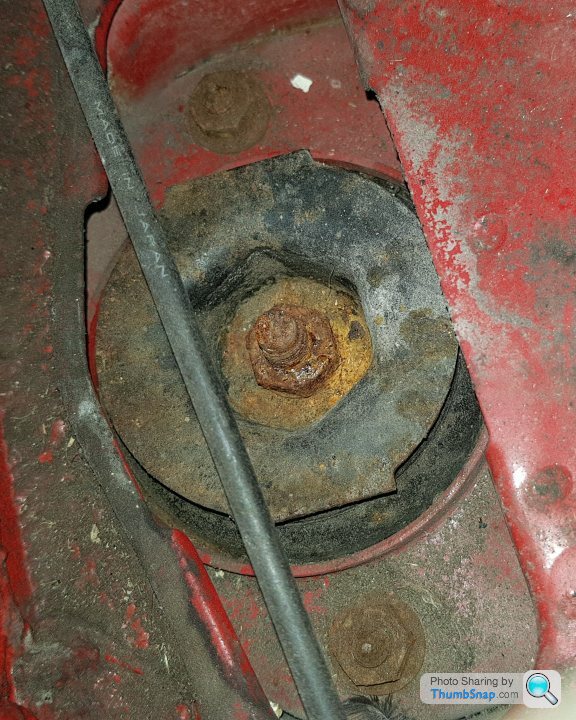
I had a snoop at the rear top mounts ready for when I want to fit some Coilovers. They didn't seem in bad shape, but really awkward to get to. Not looking forward to that task! I may employ the services of one of my kids to contort themselves into the cavity. Interestingly, it looks as though a previous owner may have loved the car enough to perform some rust prevention. I'm not sure if that black, waxy looking seal is from factory or not?
Drivers side:
Passenger side (behind the fuel filler):
Then, finally, it was the doors up next to receive a swift blow of the weight loss axe. Not that they weigh much in the first place. The majority is taken up by the electric windows, of which I have no intention of removing. Primarily, because I cannot be arsed. Secondly, manually operating windows is, frankly, beneath me.
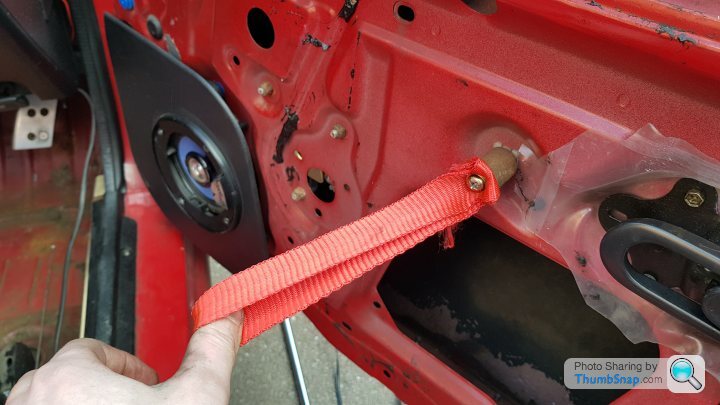
Door cards removed, but speakers remain. I'm not doing a 2000 mile roadtrip in a vibrating tin can, without some form of tooooons. I didn't want to put the big, clunky, heavy (actually it's not heavy at all but it's awful to look at) grab handle back in. So I fashioned some up using an old red ratchet strap and a rusty imperial socket. Works a treat.
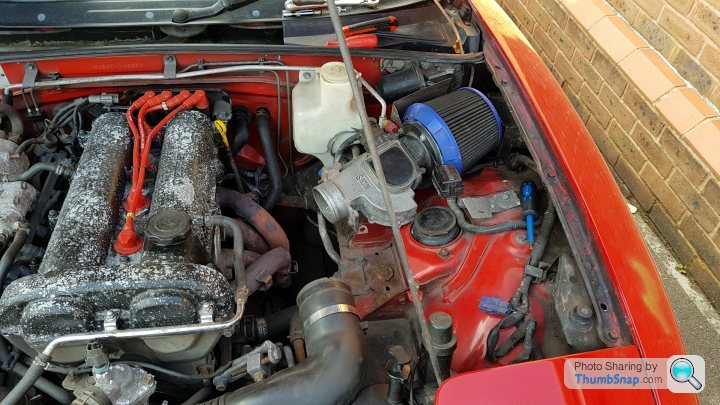
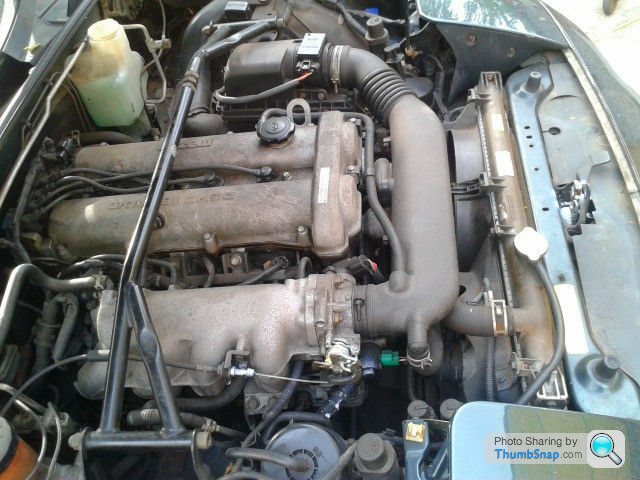
Onto the engine bay. The previous owner at some stage has already had a tinker. The carbon canister removed. Most of the standard intake is gone and replaced with some APEC thingy majig. That'll be staying but I've suffered with it in terms of heat soak. Primarily because it is literally resting on the exhaust manifold. So I wanted to toy with moving it further towards the back corner of the engine bay. I think a simple 45deg silicone bend might help get it some cool air. And maybe a bonnet vent. Further research required I think.
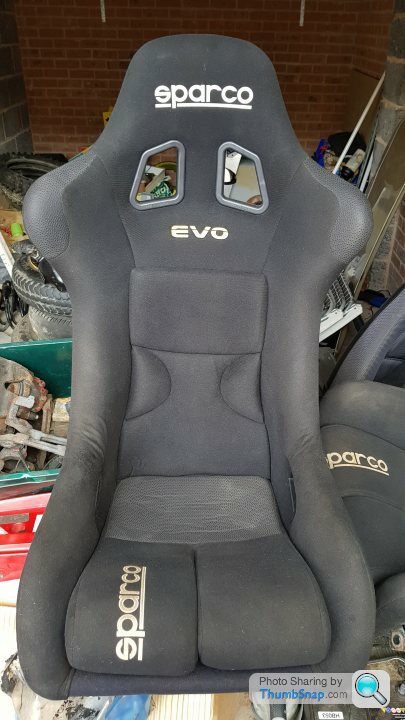
Then Craig found a decent set of Sparco seats on good ol' Gumtree. For the bargain sum of £80, these were relocated to my garage.
Sparco Evo (for my slim, but attractively athletic frame):
Sparco Corsa (for Craigs fat arse):
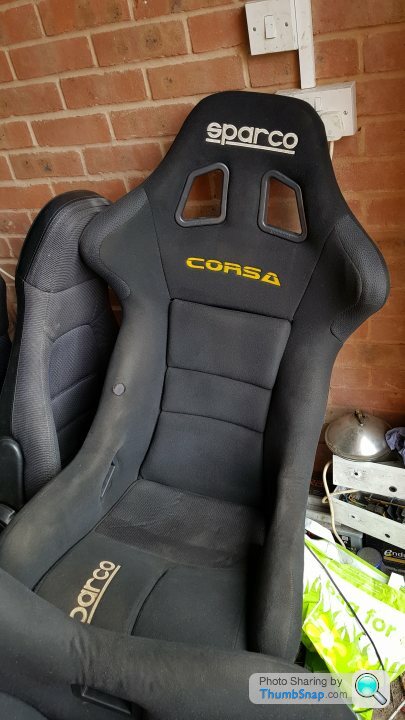
They need a good clean up but they're in really good nick. They're side mounted so an addition to the list is to source some decent side mounts. I know they do MX5 specific side mounts, but they're coming in at about £60 new. Which would be more than I paid for the seat. So keeping an eye out for used items, or some universal mounts that I can fashion onto the existing rails. At a modest 5'9", I think a floot mounted seat would be uncomfortably low.
That's it for this episode. Tune in next time for some more bargain basement updates.
Saturday morning, awoke to this massive great big orange hot thing in the sky. After squinting, quite perplexed through the window, it could only mean one thing. SUN! In APRIL! This can only mean one thing - BBQ! Oh, and car stuff too!
Firstly set about getting the roof down and some air circulating. Then, it was out with the seats and parcel shelf carpets:
Although pretty confident that the car was an import, I'd had this niggly feeling in my balls about the veracity of this attractive feature. This was soon put to rest when I lifted the parcel shelf carpets and came across a neat little mod a previous owner had performed. No doubt to try and soak up some form of water ingress? Maybe they contain secret articles of Japanese Govt espionage? Or maybe, it's some form of lotto winning newspaper? All I know is, it's now in the bin
Once the seats were extracted, it was out with the carpet. It wasn't in bad condition, but I wasn't prepared to remove most of the dash, to get the centre cage unbolted to free the carpet, so I cut around it. If I do ever turn this back into a civilised road car, I'd be replacing everything with new anyway.
Came across some more evidence that the car did, indeed, hail from Japanese shores. What should I invest my treasure find in? Oil? Gold? Penny chews? (The girly hands are that of my girly girlfriend. I have rather manly hands. Considering I'm a bit of a girl).
Once the carpets and
Then the boot had the weight loss treatment. The spare wheel came out, along with the battery that was big enough to start a freight train and was held in position with mere hopes and dreams - and a single bungee. The panel hiding the fuel filler came out also.
Now I had some space, I could investigate a few niggles. There was no rear fog, but the loom and switch were in place. A quick snoop revealed the below. Now I don't consider myself an accomplished auto electrician. But I think, I THINK this may be the issue (note the aforementioned manly hands).
I'd also noticed my high (well, higher) level brake light wasn't working. Can't see the issue myself. Bare in mind this has never worked, and it came with a 12 month MOT
I had a snoop at the rear top mounts ready for when I want to fit some Coilovers. They didn't seem in bad shape, but really awkward to get to. Not looking forward to that task! I may employ the services of one of my kids to contort themselves into the cavity. Interestingly, it looks as though a previous owner may have loved the car enough to perform some rust prevention. I'm not sure if that black, waxy looking seal is from factory or not?
Drivers side:
Passenger side (behind the fuel filler):
Then, finally, it was the doors up next to receive a swift blow of the weight loss axe. Not that they weigh much in the first place. The majority is taken up by the electric windows, of which I have no intention of removing. Primarily, because I cannot be arsed. Secondly, manually operating windows is, frankly, beneath me.
Door cards removed, but speakers remain. I'm not doing a 2000 mile roadtrip in a vibrating tin can, without some form of tooooons. I didn't want to put the big, clunky, heavy (actually it's not heavy at all but it's awful to look at) grab handle back in. So I fashioned some up using an old red ratchet strap and a rusty imperial socket. Works a treat.
Onto the engine bay. The previous owner at some stage has already had a tinker. The carbon canister removed. Most of the standard intake is gone and replaced with some APEC thingy majig. That'll be staying but I've suffered with it in terms of heat soak. Primarily because it is literally resting on the exhaust manifold. So I wanted to toy with moving it further towards the back corner of the engine bay. I think a simple 45deg silicone bend might help get it some cool air. And maybe a bonnet vent. Further research required I think.
Then Craig found a decent set of Sparco seats on good ol' Gumtree. For the bargain sum of £80, these were relocated to my garage.
Sparco Evo (for my slim, but attractively athletic frame):
Sparco Corsa (for Craigs fat arse):
They need a good clean up but they're in really good nick. They're side mounted so an addition to the list is to source some decent side mounts. I know they do MX5 specific side mounts, but they're coming in at about £60 new. Which would be more than I paid for the seat. So keeping an eye out for used items, or some universal mounts that I can fashion onto the existing rails. At a modest 5'9", I think a floot mounted seat would be uncomfortably low.
That's it for this episode. Tune in next time for some more bargain basement updates.

Jonesy1972 said:
Looking forward to seeing more progress; an entertaining read!
Jonesy
Thanks Jonesy
Altrezia said:
I'd re-fit the door cards. Not fun cutting your arms to bits in a relatively small shunt..
I'm not sure the 1mm of rain-sodden cardboard would offer much protection in the first place 
Not much of an update. I've been busy getting my daily through the MOT and trying to get my garage into some state that I can actually work in.
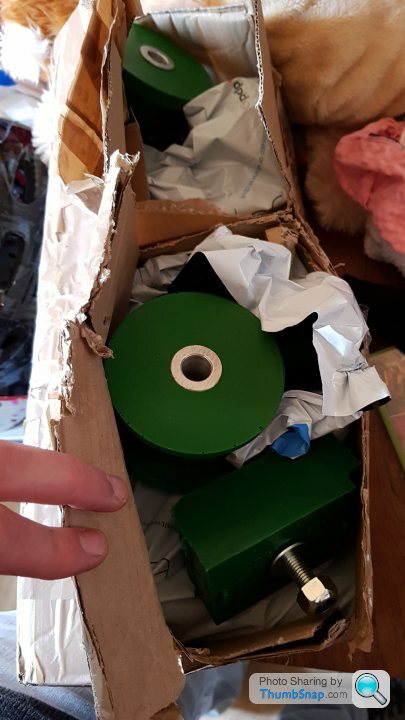
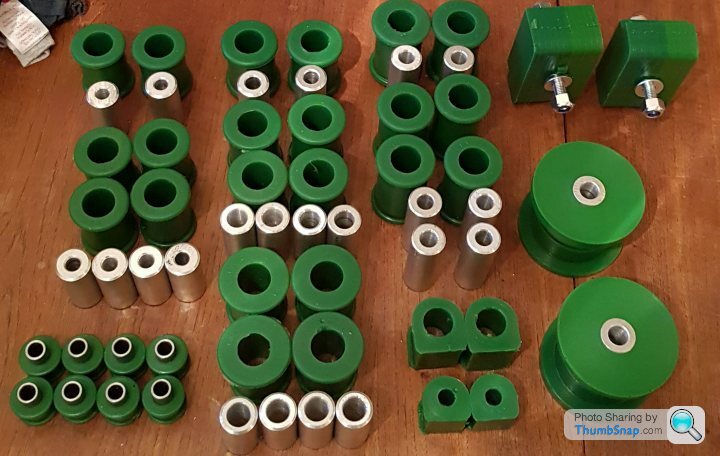
Some goodies dud turn up though. Full set of polybushes to replace the wishbone, anti-roll bar, engine mounts and diff mounts. Exciting times.
This week I'm going to try and get the mighty nail up on stands and start stripping down the corners.
Some goodies dud turn up though. Full set of polybushes to replace the wishbone, anti-roll bar, engine mounts and diff mounts. Exciting times.
This week I'm going to try and get the mighty nail up on stands and start stripping down the corners.
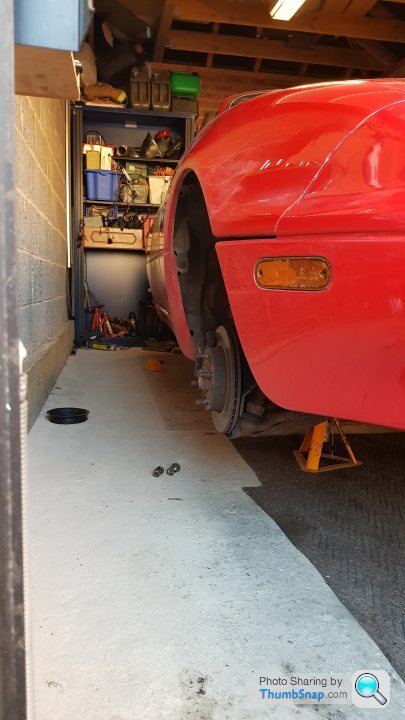
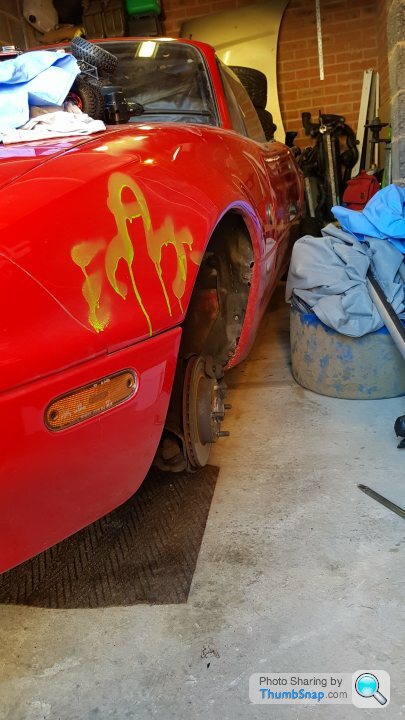
Minor update. Last night after I'd finally recovered from a stag do in Zante, I mustered up what remained of my soul and headed out to the garage. Before I'd left for the Stag I'd spent some time sorting the garage and making a clean space to work in, then there she sat whilst I drunk 3x my body weight of Greece's finest Mythos beer.
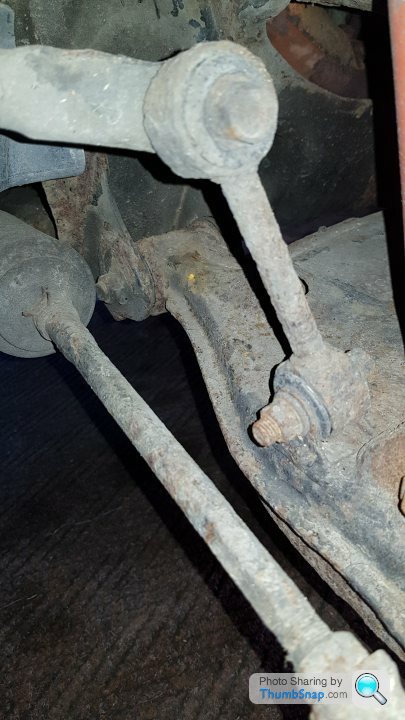
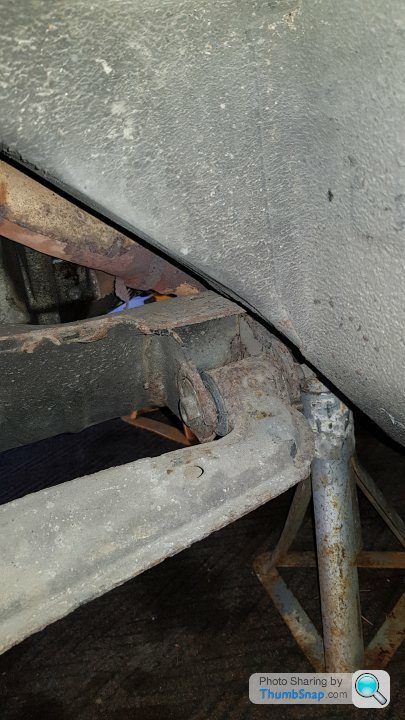
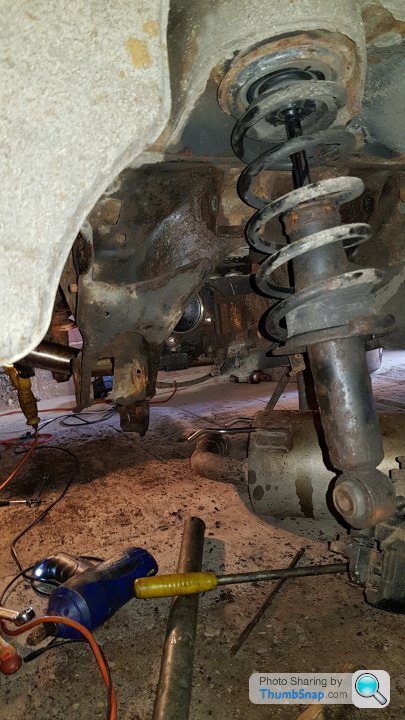
Last night I got her up on stands and inspected the mammoth task that lie ahead. The livery from last year's LEJOG & NC500 trip still standing out proud.
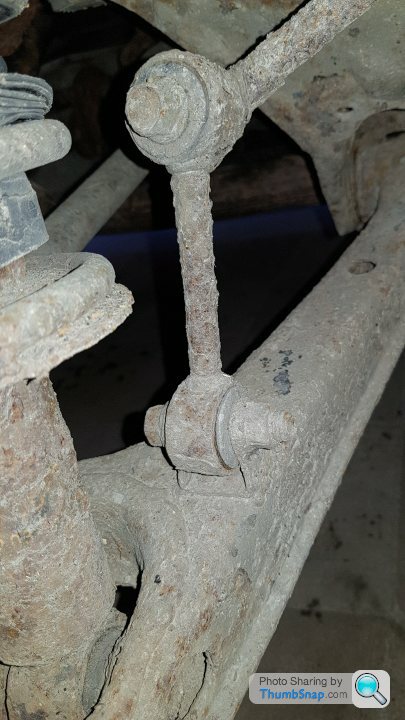
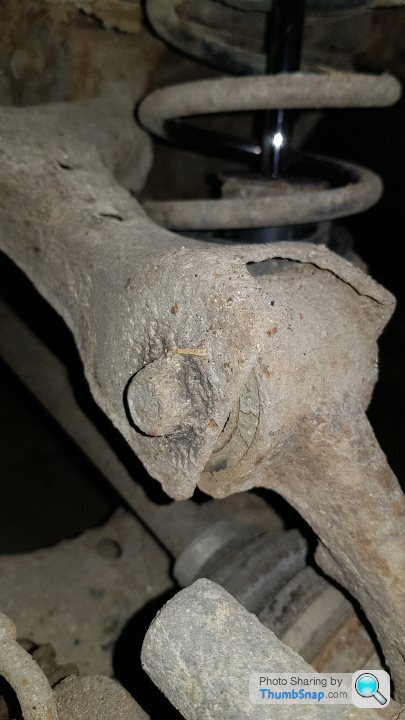
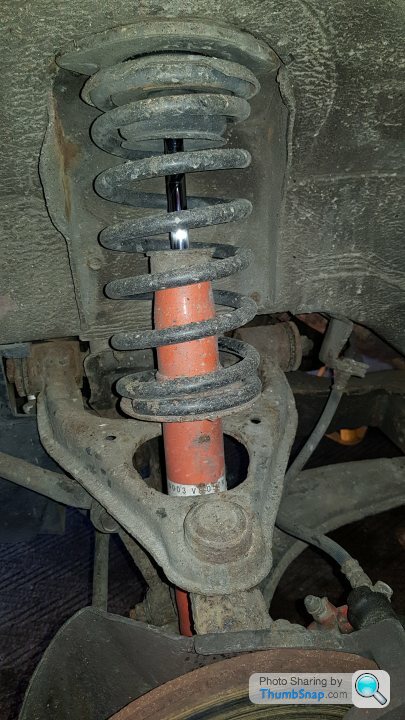
The back end was filthy (oooh matron) and I struggled to locate what hardly resembled nuts and bolts. Also, whilst on our last trip, the back end was extremely bouncy and I suspected the shocks were no longer shocking. When jacked up, I could move the strut up and down by hand, so I fear my suspicions were indeed correct. I have no fear though as my super-duper cheapo Raceland coilovers will cure her of this ailment .
.
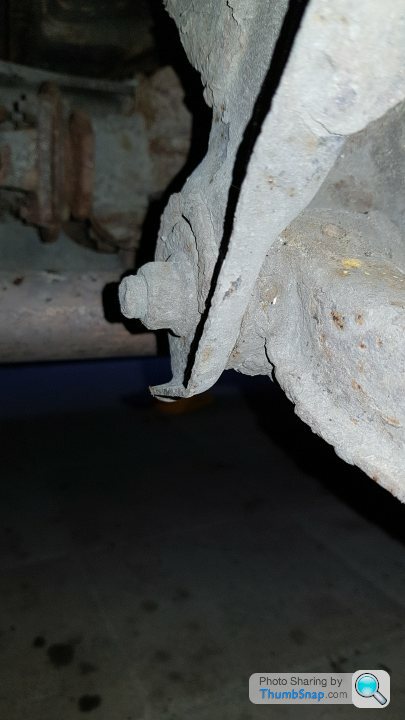
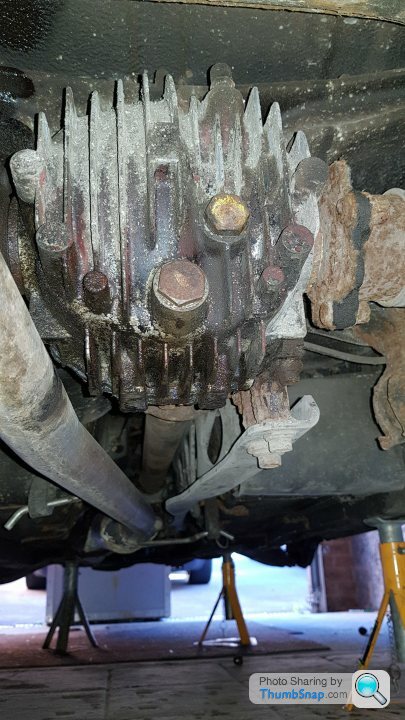
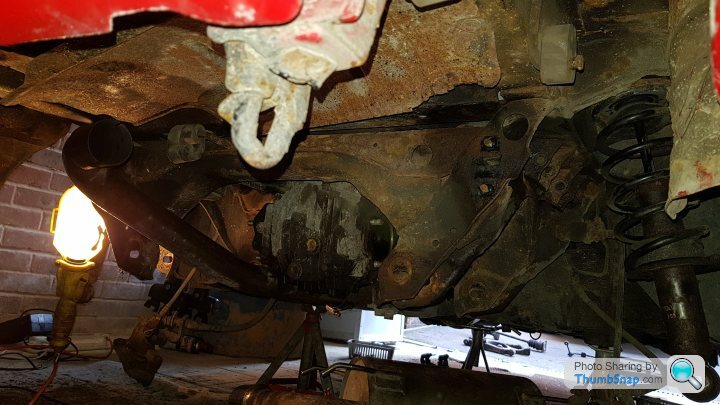
It also appears that the diff seal no longer likes to seal things and is letting some fluids out:
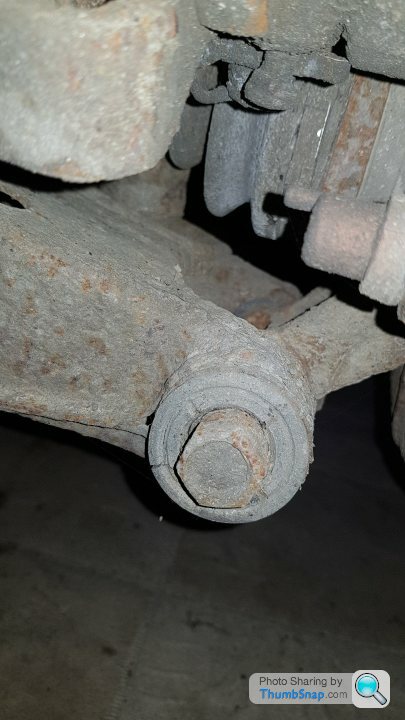
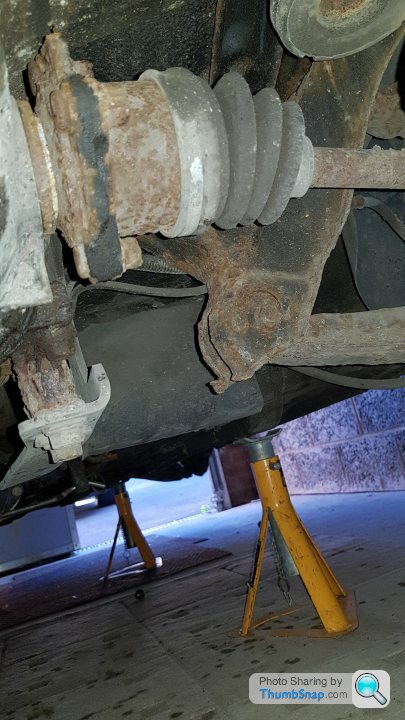
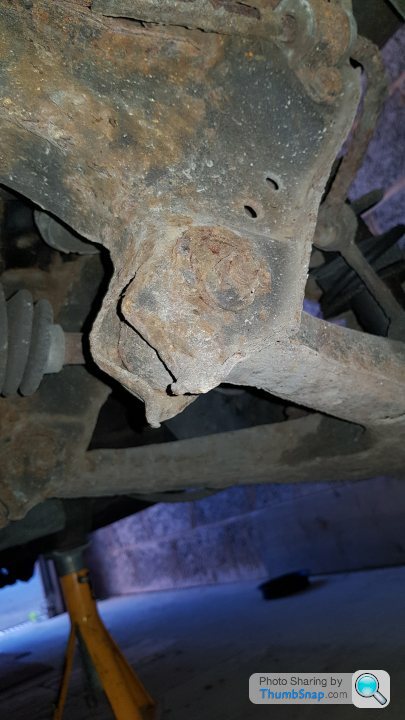
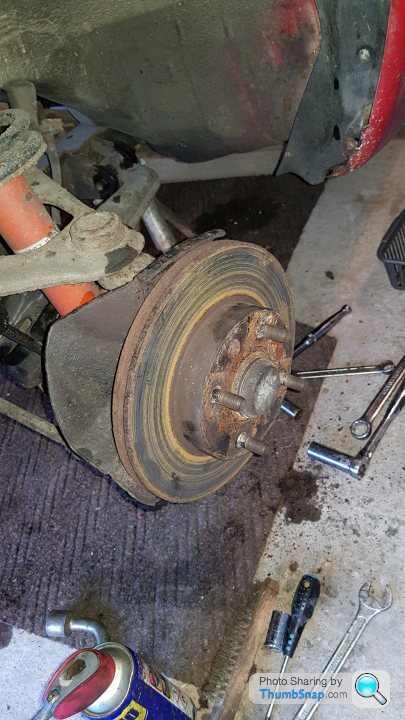
The front end was in a much better state of affairs:
So after I did this in my dark, dingy garage whilst the sun was still blaring and a cold beer was calling me, I decided to whip the front brakes off and call it a day. Not before soaking everything in 187198712847 gallons of WD40. I am now the largest shareholder of WD40 in the history of water dispelling lubricants.
Next steps for me are to
Last night I got her up on stands and inspected the mammoth task that lie ahead. The livery from last year's LEJOG & NC500 trip still standing out proud
.The back end was filthy (oooh matron) and I struggled to locate what hardly resembled nuts and bolts. Also, whilst on our last trip, the back end was extremely bouncy and I suspected the shocks were no longer shocking. When jacked up, I could move the strut up and down by hand, so I fear my suspicions were indeed correct. I have no fear though as my super-duper cheapo Raceland coilovers will cure her of this ailment
.It also appears that the diff seal no longer likes to seal things and is letting some fluids out:
The front end was in a much better state of affairs:
So after I did this in my dark, dingy garage whilst the sun was still blaring and a cold beer was calling me, I decided to whip the front brakes off and call it a day. Not before soaking everything in 187198712847 gallons of WD40. I am now the largest shareholder of WD40 in the history of water dispelling lubricants.
Next steps for me are to
- Purchase a tanker full of WD40
- Purchase many, many blowtorches
- Purchase many beers
- Remove all the suspension components
- Press out old bushed
- Press in new bushes
- ???
- Profit.
So, an overdue update. I've been working on the Ring Nail on and off for a few months now. It's been fighting me every step of the way. Bits that I thought would be a pain (diff bolts, PPF bolts etc.) have been a doddle, whereas other bits I thought might be easy have been a right royal fkfest of a job. 2 camber bolts snapped (which are £12 each new) along with a couple of other wishbone bolts.
I've gotten to this point so far and spent a lot of time with a wire brush getting tetanus in my eyes.
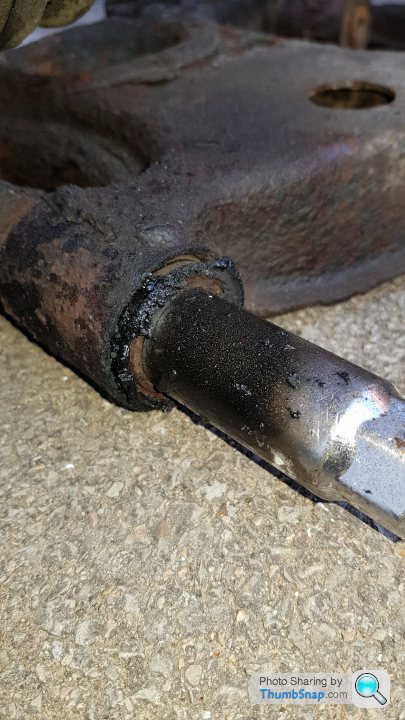
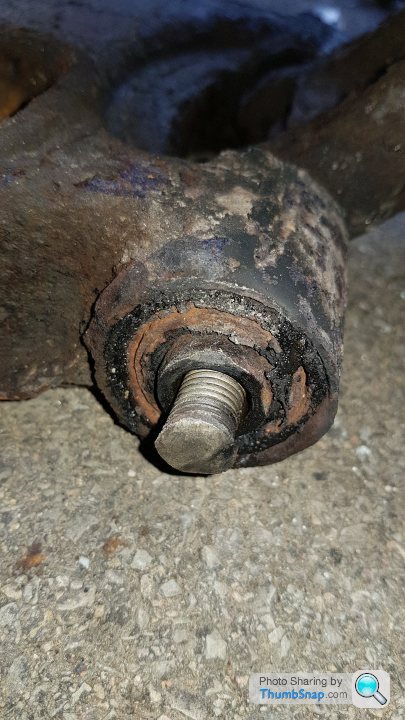
The drivers side rear, lower long bolt decided it DID NOT want to push. I threw all sorts at it. A lump hammer, blow torch, breaker bar (managed to get my socket stuck on the bolt), a sledge hammer, Thor's hammer, frozen sausage hammer, am Impact Gun - everything! Short of sticking it in a car crusher, I'm a bit stuck. I could cut it off and get a new lower arm, but then that's £££ I don't want to spend - this is supposed to be "budget", to a degree.
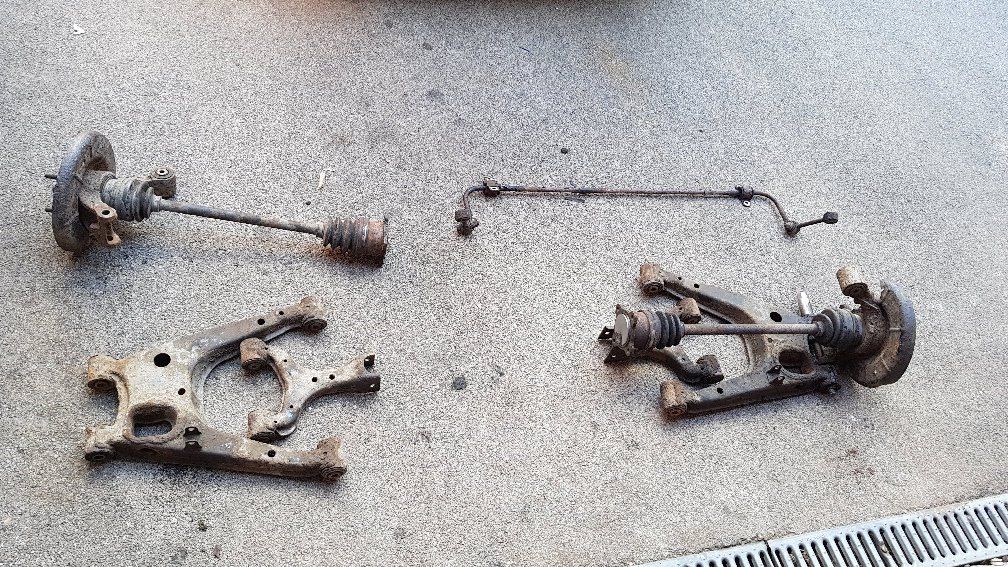
so I'd gotten to the stage where everything was off the rear end, apart from the shocks
Just the diff left
After this I'd started to remove the diff bolts and they came out surprisingly easy. The top hats, however, did NOT want to budge! At this point I knew I'd have a couple of weeks away where I wouldn't be able to work on the car and was getting a bit wary of the impending deadline of going to the Ring. Plus, I wanted it on the road a few weeks before for a proper shakedown, alignment and general hoonage to worm out any issues.
I came back from holidays and started to rethink my approach. I tinkered with the idea of something cheap and cheerful just to take to the 'Ring like a Puma, ST170 or a Clio 182 for example. But then I cam across another Mk1 MX5. This time a 1.8. It had MOT until February but was a non-runner due to the timing belt snapping. As these engines are non-interference, a new timing belt should see it back up and running.
So, to summarise, the Red MX5 will stay off the road and I'm collecting me new MX5 on Saturday morning. Watch this space
kfest of a job. 2 camber bolts snapped (which are £12 each new) along with a couple of other wishbone bolts. I've gotten to this point so far and spent a lot of time with a wire brush getting tetanus in my eyes.

The drivers side rear, lower long bolt decided it DID NOT want to push. I threw all sorts at it. A lump hammer, blow torch, breaker bar (managed to get my socket stuck on the bolt), a sledge hammer, Thor's hammer, frozen sausage hammer, am Impact Gun - everything! Short of sticking it in a car crusher, I'm a bit stuck. I could cut it off and get a new lower arm, but then that's £££ I don't want to spend - this is supposed to be "budget", to a degree.
so I'd gotten to the stage where everything was off the rear end, apart from the shocks
Just the diff left
After this I'd started to remove the diff bolts and they came out surprisingly easy. The top hats, however, did NOT want to budge! At this point I knew I'd have a couple of weeks away where I wouldn't be able to work on the car and was getting a bit wary of the impending deadline of going to the Ring. Plus, I wanted it on the road a few weeks before for a proper shakedown, alignment and general hoonage to worm out any issues.
I came back from holidays and started to rethink my approach. I tinkered with the idea of something cheap and cheerful just to take to the 'Ring like a Puma, ST170 or a Clio 182 for example. But then I cam across another Mk1 MX5. This time a 1.8. It had MOT until February but was a non-runner due to the timing belt snapping. As these engines are non-interference, a new timing belt should see it back up and running.
So, to summarise, the Red MX5 will stay off the road and I'm collecting me new MX5 on Saturday morning. Watch this space
Smitters said:
Man with car that's fighting him buys another version of the same car to make life easier. That is logic and man-maths I can get behind.
Thanks guys. The timing kit for the new addition has arrived today and I've got a second hand timing light/gun (won for £7 delivered from eBay) arriving some time this week.
Exciting times.
There will be an exciting update on this thread this morning,
My little boy documented the collection of the car and is available to watch here :
https://youtu.be/kiSqRpZMpu
Please go easy its his first attempt at "vlogging"
My little boy documented the collection of the car and is available to watch here :
https://youtu.be/kiSqRpZMpu
Please go easy its his first attempt at "vlogging"
As Superchickenn above mentioned, an exciting update (well for me anyway, not everyone gets wet about MX5s I guess).
Anyway, the morning of the collection of my new ‘Ring (not so much, as it turns out) Nail. It started waking up with a severe hangover having attended a work’s party with a free bar the night before. Craig (Superchickenn) picked me and Mick (Wunderbolf) up and we headed to Bristol to collect my new machine.
The advert for this car was quite endearing – entitled “Selling my beloved MX5” and mentions of “spares or repair” and “make a good donor vehicle”. The pictures were poor, that of the car strapped to a recovery truck and no other identifying features. The symptoms weren’t looking good. But I’d previously gone to look at it and determined that it was good enough to take a punt. Especially given the price and that it came with a hard top, my thoughts were I could break it and make my money back if worst came to worse.
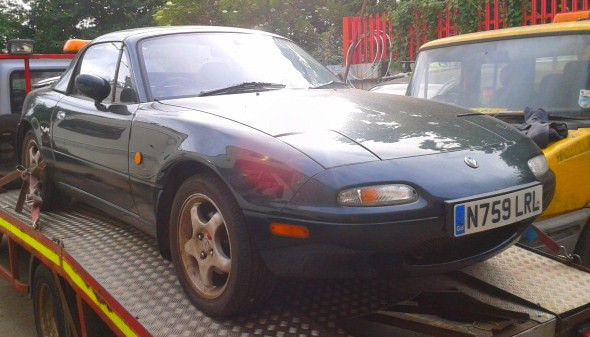
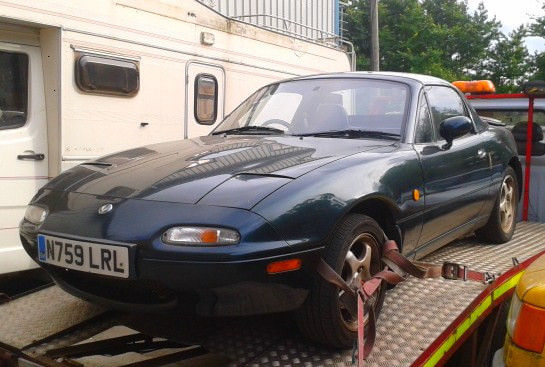
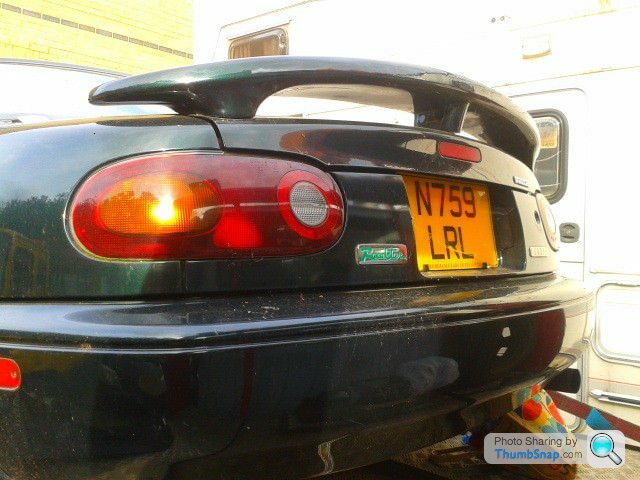
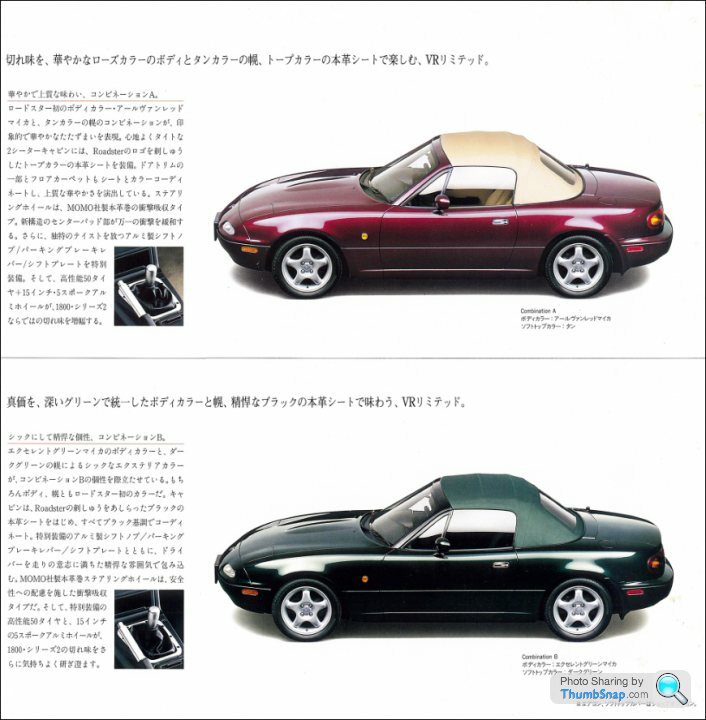
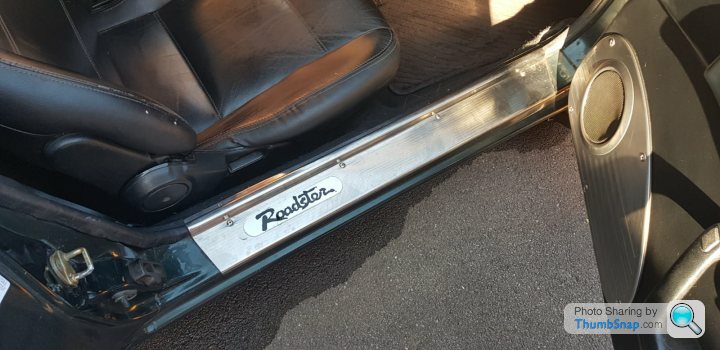
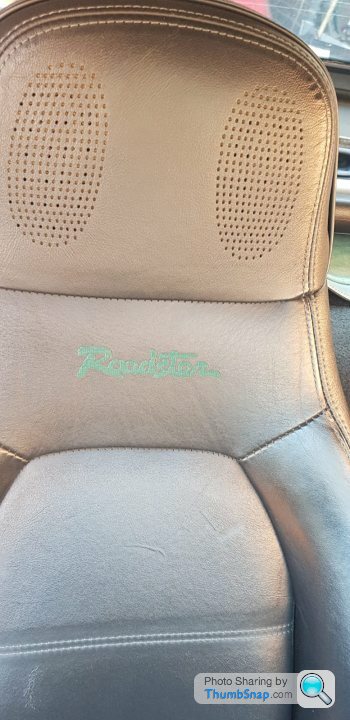
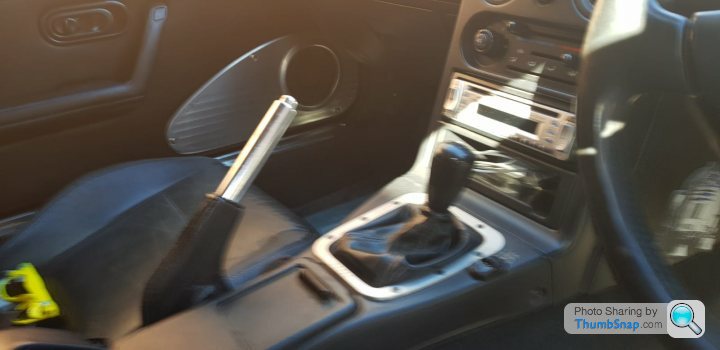
In between placing a deposit and collecting the car, it was playing on my mind that this car had a few different features to the 3 MX5s I’d owned previously. Being the first 1.8 I’d looked at, I put it down to that. First thing I noticed on one of the advert pictures was the green “Roadster” badge on the rear. Having had either red or black ones, I looked it up and discovered it had the Series 2 1.8 engine installed, which came with OBD2, a lightened flywheel and some other updated electronics. Good news. After that, I came across a very good document on the MX5OC forum outlining all of the MX5 models, including special/limited edition. That’s where my eyes lit up. It turned out, the car I was picking up was a VR Limited: Combination B – only 800 were made in Japan. It included things like; 1.8 Series 2 engine, front engine brace, rear cabin brace, Enkei wheels, Excellent Green Mica pain (British Racing Green but metallic), Green vinyl hood, leather tombstone seats with “Roadster” embroidery, ally speaker covers/door cards, ally gear surround, ally handbrake handle, Momo steering wheel, Bilstein suspension (which this one was missing, unfortunately), Torsen diff with 4.1 ratio final drive and a few other little gems.
As you can imagine, for the price I was paying (which I’ll get onto later), I was chuffed as chips. Researching more and more.
I’ve digressed, back to the collection. We rocked up and unloaded the car, hooked it up to the A Frame and I resumed my front-seat hungover-passenger position for the journey back to South Wales. After a stop off to Gordano services for a hopeful cure to my hangover, a Feast ice lolly!

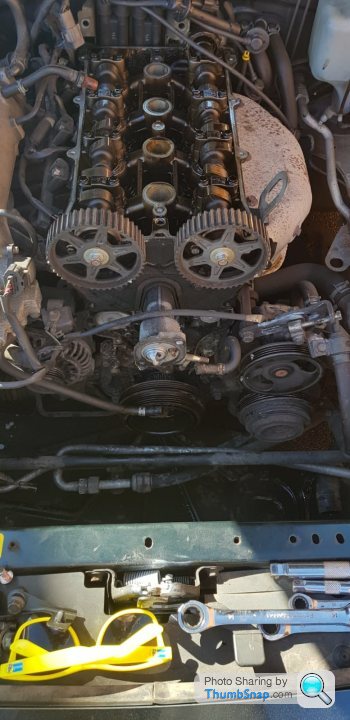
We arrived back home and, with my head feeling slightly less like a backfired cannon, the tear down began. But not before I managed to take some god awful pictures on my iPotato Spudphone.
Good god these pics are awful! Sorry guys!
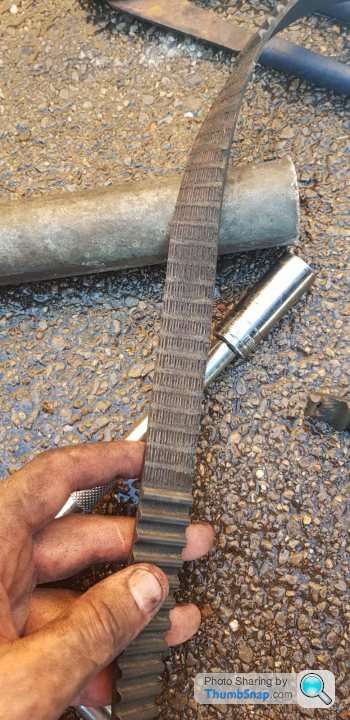
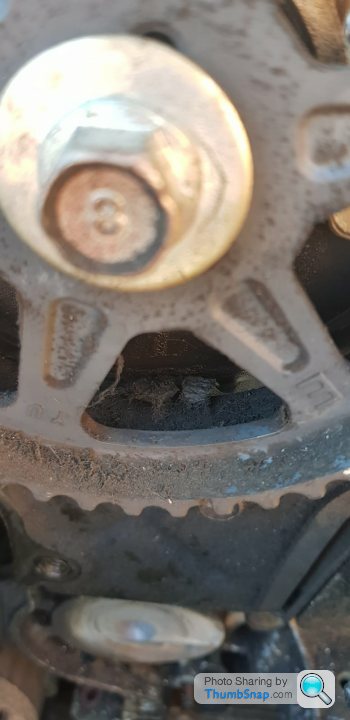
It’s not overly difficult job to do the timing on an MX5. As they’re non-interference engines, the pistons and valves don’t occupy the same space, as such, never the twain shall meet. This somewhat takes the risk out of getting the timing slightly wring on the first attempt. To reset the timing, align the crank to TDC. There is a handy little arrow on the block which aligns with a handy little notch on the crank pulley. Thank you Mazda, you Japanese marvels of engineering, you! Once this is lined up, it’s a case of lining up the marks on the crank pulleys to marks on the head, slap a belt on, set the tensioner and away you go! We cranked the engine over on the starter for a few revolutions to check the timing hadn’t shifted and all appeared to be well. Unfortunately, I didn’t take many pictures of this process. Mainly because a) my IPotato Spudphone has all the megapixels of an 80s Polaroid and b) well, I forgot. In my excitement. Craig did manage to get a video if it firing after refitting the belt, so may link to it on YouTube. Depends on how much of a dhead I look in the video.
Here is the offending article – it has stripped half its teeth on the crank end and left remnants of teeth jammed up in the crank pulley and in the cam pulleys:
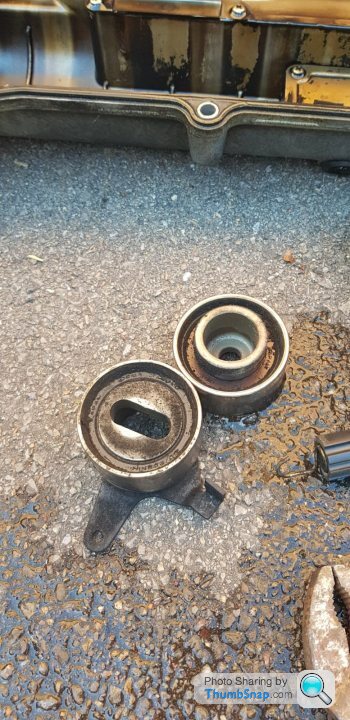
All stripped down (bar the crank pulley)
Final stages of putting the car back together, I got some old bottles from the boot of my daily to fill with water (my garage isn’t next to my house ) and to top up the radiator. After 3 bottles worth of water, I wondered why the radiator was bubbling like a bloody Jacuzzi filled with Radox. Then it dawned on me. Those old bottles, once held (not a bitter ale, for any Max Boyce fans) screenwash for my daily! fk! Cue me running back and forth the house 23123 times with one, clean bottle trying to flush the remnants if screenwash out of the system! What an absolute bellend I am sometimes! Anyway, it all disappeared after depleting Wales of all its water reserves, and she ran to temp like a champ.
Once it was all put back together, I slapped some classic car insurance on her and we went for a spin . Took her for about 60 miles, whilst not “sparing the horses”, shall we say. She didn’t skip a beat. Pulled well through all the gears, handled very well. The Torsen diff is really excellent, compared to the Viscous Limited Slip Diffs I’d had on previous MX5s. It would absolutely benefit from a 4 wheel laser alignment, so will get something booked in to get all 4 wheels pointing in vaguely the right direction. But overall, it will be a pleasure to treat this little gem with some well overdue TLC. I do think she has been somewhat neglected over the years!
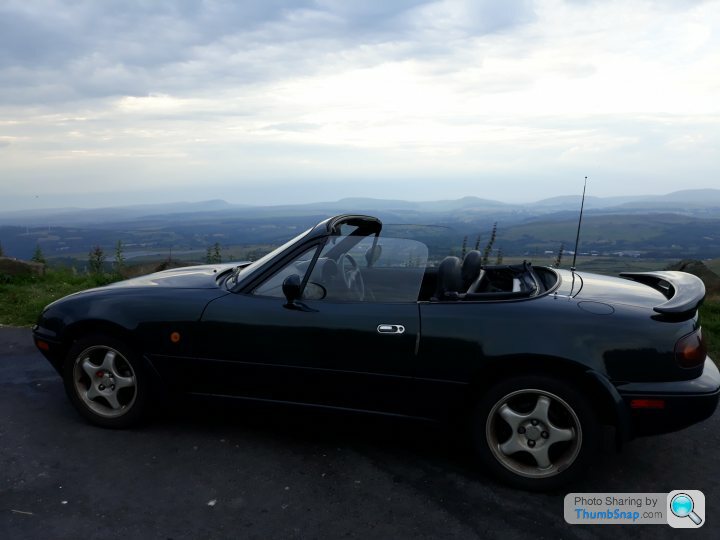
So, summary specs of the new Mighty MX5 ‘Ring not-so-nail:
Timing belt kit - £30
Driving through the Welsh roads – Priceless
Back to the ‘Ring, obviously I won’t be treating this one to the same weight saving techniques you’ve read previously. However, I will be fitting a GC Fabrications Roll bar, my Sparco seat and Harnesses as well as addressing the brakes (potentially some EBC Yellow stuff pads) and try and get some decent suspension. I would like to find the original Bilsteins it would have been fitted with, but that may be a push.
More to come, thanks for reading my escapades so far!
Anyway, the morning of the collection of my new ‘Ring (not so much, as it turns out) Nail. It started waking up with a severe hangover having attended a work’s party with a free bar the night before. Craig (Superchickenn) picked me and Mick (Wunderbolf) up and we headed to Bristol to collect my new machine.
The advert for this car was quite endearing – entitled “Selling my beloved MX5” and mentions of “spares or repair” and “make a good donor vehicle”. The pictures were poor, that of the car strapped to a recovery truck and no other identifying features. The symptoms weren’t looking good. But I’d previously gone to look at it and determined that it was good enough to take a punt. Especially given the price and that it came with a hard top, my thoughts were I could break it and make my money back if worst came to worse.
In between placing a deposit and collecting the car, it was playing on my mind that this car had a few different features to the 3 MX5s I’d owned previously. Being the first 1.8 I’d looked at, I put it down to that. First thing I noticed on one of the advert pictures was the green “Roadster” badge on the rear. Having had either red or black ones, I looked it up and discovered it had the Series 2 1.8 engine installed, which came with OBD2, a lightened flywheel and some other updated electronics. Good news. After that, I came across a very good document on the MX5OC forum outlining all of the MX5 models, including special/limited edition. That’s where my eyes lit up. It turned out, the car I was picking up was a VR Limited: Combination B – only 800 were made in Japan. It included things like; 1.8 Series 2 engine, front engine brace, rear cabin brace, Enkei wheels, Excellent Green Mica pain (British Racing Green but metallic), Green vinyl hood, leather tombstone seats with “Roadster” embroidery, ally speaker covers/door cards, ally gear surround, ally handbrake handle, Momo steering wheel, Bilstein suspension (which this one was missing, unfortunately), Torsen diff with 4.1 ratio final drive and a few other little gems.
As you can imagine, for the price I was paying (which I’ll get onto later), I was chuffed as chips. Researching more and more.
I’ve digressed, back to the collection. We rocked up and unloaded the car, hooked it up to the A Frame and I resumed my front-seat hungover-passenger position for the journey back to South Wales. After a stop off to Gordano services for a hopeful cure to my hangover, a Feast ice lolly!
We arrived back home and, with my head feeling slightly less like a backfired cannon, the tear down began. But not before I managed to take some god awful pictures on my iPotato Spudphone.
Good god these pics are awful! Sorry guys!
It’s not overly difficult job to do the timing on an MX5. As they’re non-interference engines, the pistons and valves don’t occupy the same space, as such, never the twain shall meet. This somewhat takes the risk out of getting the timing slightly wring on the first attempt. To reset the timing, align the crank to TDC. There is a handy little arrow on the block which aligns with a handy little notch on the crank pulley. Thank you Mazda, you Japanese marvels of engineering, you! Once this is lined up, it’s a case of lining up the marks on the crank pulleys to marks on the head, slap a belt on, set the tensioner and away you go! We cranked the engine over on the starter for a few revolutions to check the timing hadn’t shifted and all appeared to be well. Unfortunately, I didn’t take many pictures of this process. Mainly because a) my IPotato Spudphone has all the megapixels of an 80s Polaroid and b) well, I forgot. In my excitement. Craig did manage to get a video if it firing after refitting the belt, so may link to it on YouTube. Depends on how much of a d
head I look in the video. Here is the offending article – it has stripped half its teeth on the crank end and left remnants of teeth jammed up in the crank pulley and in the cam pulleys:
All stripped down (bar the crank pulley)
Final stages of putting the car back together, I got some old bottles from the boot of my daily to fill with water (my garage isn’t next to my house
) and to top up the radiator. After 3 bottles worth of water, I wondered why the radiator was bubbling like a bloody Jacuzzi filled with Radox. Then it dawned on me. Those old bottles, once held (not a bitter ale, for any Max Boyce fans) screenwash for my daily! fk! Cue me running back and forth the house 23123 times with one, clean bottle trying to flush the remnants if screenwash out of the system! What an absolute bellend I am sometimes! Anyway, it all disappeared after depleting Wales of all its water reserves, and she ran to temp like a champ. Once it was all put back together, I slapped some classic car insurance on her and we went for a spin
. Took her for about 60 miles, whilst not “sparing the horses”, shall we say. She didn’t skip a beat. Pulled well through all the gears, handled very well. The Torsen diff is really excellent, compared to the Viscous Limited Slip Diffs I’d had on previous MX5s. It would absolutely benefit from a 4 wheel laser alignment, so will get something booked in to get all 4 wheels pointing in vaguely the right direction. But overall, it will be a pleasure to treat this little gem with some well overdue TLC. I do think she has been somewhat neglected over the years! So, summary specs of the new Mighty MX5 ‘Ring not-so-nail:
- Imported in 1999, 2 UK owners since
- Comprehensive Service History (including some Japanese), albeit missing a crucial and, evidently, needed timing belt change
- 1 of only 800 cars ever made
- Complete with matching Hardtop (with heated rear screen)
- 99k kms (about 60k miles)
Timing belt kit - £30
Driving through the Welsh roads – Priceless
Back to the ‘Ring, obviously I won’t be treating this one to the same weight saving techniques you’ve read previously. However, I will be fitting a GC Fabrications Roll bar, my Sparco seat and Harnesses as well as addressing the brakes (potentially some EBC Yellow stuff pads) and try and get some decent suspension. I would like to find the original Bilsteins it would have been fitted with, but that may be a push.
More to come, thanks for reading my escapades so far!
Edited by MikeDrop on Tuesday 3rd July 10:22
Gassing Station | Readers' Cars | Top of Page | What's New | My Stuff