Chassis Refurb
Discussion


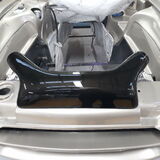
Moving on, I wanted to start getting the diff ready for refitting
With all the seals changed it was ready to go, again all new nuts bolts and washers etc used.

It was very awkward trying to lift the diff into place whilst not catching any of the paint on the chassis or diff its self, managed it though, in the end.

I even had my wife do the paint detailing in white on top of the diff


re-plated input shafts

I used polyurethane bush's for the diff mounts from iv read on here it seems to be the way to go.
With all the seals changed it was ready to go, again all new nuts bolts and washers etc used.
It was very awkward trying to lift the diff into place whilst not catching any of the paint on the chassis or diff its self, managed it though, in the end.
I even had my wife do the paint detailing in white on top of the diff
re-plated input shafts
I used polyurethane bush's for the diff mounts from iv read on here it seems to be the way to go.
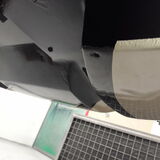
Next I moved onto the driveshafts, from all the effort I put in with painting the diff I wanted to apply the same process to them. There were plenty of people saying 'why are you making all that effort when know one is going to see it?' 1. I felt better knowing it was done 2. the car deserves it.
So I stripped the driveshafts completely, inspected everything, cleaned, painted and rebuilt
before


the rebuild, new grease, boots and I also wanted to use the crimp type boot clips to look original as possible


all the driveshaft bolts were cleaned, and lightly coated with some hammerite on the cap end, hope you guys like my egg box use


after
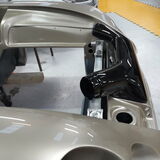
now for fitting the driveshafts and all the rear uprights, shocks and wishbones with all new bush's and bolts used. I also had the washer re-plated which secures the driveshaft.


I think that the finish came up well


thanks for reading
So I stripped the driveshafts completely, inspected everything, cleaned, painted and rebuilt
before
the rebuild, new grease, boots and I also wanted to use the crimp type boot clips to look original as possible
all the driveshaft bolts were cleaned, and lightly coated with some hammerite on the cap end, hope you guys like my egg box use
after
now for fitting the driveshafts and all the rear uprights, shocks and wishbones with all new bush's and bolts used. I also had the washer re-plated which secures the driveshaft.
I think that the finish came up well
thanks for reading
Edited by Jonbouy on Tuesday 8th November 19:32
ukkid35 said:
Nice work, but mount the Speedo Sensor on the passenger side, there is less run-off on that side, which is what the later cars use. The sensor will last longer that way (not my tip, but from remap guru Joolz).
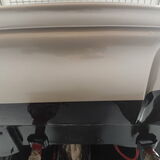
Thanks for the advice, I will get it swapped round at some point to the other sideOn goes the painting, both rear and front hubs cleaned up and painted


quickly went over a set off new ball joints for both top and bottom on the front suspension

also cleaned up the front hub assembly, firstly I cleaned all the aluminium parts in the dish washer, wife wasn't impressed!
before


after
I also used a acid called Alubright to restore the metal, then Jetlaq to seal the metal, I have done a decent amount of reading on both products and appears they have excellent reviews. I used the Jetlaq spray on any exposed bolts, nuts or aluminum surfaces, it leaves a thin protective film over the metal which can be applied time and time again.


I also bought more sets of bolts, for the hubs etc
Most of the parts are ready for the reassembly
quickly went over a set off new ball joints for both top and bottom on the front suspension
also cleaned up the front hub assembly, firstly I cleaned all the aluminium parts in the dish washer, wife wasn't impressed!
before
after
I also used a acid called Alubright to restore the metal, then Jetlaq to seal the metal, I have done a decent amount of reading on both products and appears they have excellent reviews. I used the Jetlaq spray on any exposed bolts, nuts or aluminum surfaces, it leaves a thin protective film over the metal which can be applied time and time again.
I also bought more sets of bolts, for the hubs etc
Most of the parts are ready for the reassembly
Also used the Alubright and Jetlaq on the speedo sensor mounting, really came up well


A few more parts and tools bought for the rebuild, a reamer was one the best purchases for cleaning out all the paint from the bolt holes.
also purchased a few spacers for the suspension


A few more parts and tools bought for the rebuild, a reamer was one the best purchases for cleaning out all the paint from the bolt holes.
also purchased a few spacers for the suspension
Edited by Jonbouy on Friday 9th December 15:53
Edited by Jonbouy on Friday 9th December 15:54
finished the rear end build up, assembled the hubs, handbrake, and service brake new handbrake cable etc.


Also found these o-rings which I used on the chassis to protect the hand brake cable from rubbing and chaffing

Goodridge hoses all new bush's


Also found these o-rings which I used on the chassis to protect the hand brake cable from rubbing and chaffing
Goodridge hoses all new bush's
Edited by Jonbouy on Friday 11th November 21:05
ridds said:
Before you go much further check your rear disc position in the caliper.
Looking at your images there is a lot of paint on your back plates etc and I had issues with caliper clearance when I refurbed the rear end on mine.
I had very light coats of paint and it caused caliper to disc clash issues.
Also, any painted surface that is used to clamp parts is likely to shift when it warms up so I'd be very wary of leaving paint on any of the mounting faces of the rear hubs/discs etc.

Also here, use thread lock on the front diff bolts and a nyloc on the back. These come undone and wrekc the diff mounting plates.
Just some pointers on what I found when doing mine.
Hi RiddsLooking at your images there is a lot of paint on your back plates etc and I had issues with caliper clearance when I refurbed the rear end on mine.
I had very light coats of paint and it caused caliper to disc clash issues.
Also, any painted surface that is used to clamp parts is likely to shift when it warms up so I'd be very wary of leaving paint on any of the mounting faces of the rear hubs/discs etc.
Also here, use thread lock on the front diff bolts and a nyloc on the back. These come undone and wrekc the diff mounting plates.
Just some pointers on what I found when doing mine.
Thanks for the input, I have assembled the rear end and all is well, I did mask off most flush surfaces or removed the paint. I have thread locked most bolts that don't have a nylon nut but. I put nuts on the other side of the diff bolts to ensure they come loose


Apologies for not posting for the last couple of months
I decided whilst the gearbox and steering rack were off, it would be a good idea to paint them both. I decided to use Ford star mist silver, with a coat of lacquer
firstly cleaned both the rack and steering box using a wire wheel and panel wipe with a scotch brite.
Gearbox


Rack


Painted with 3 coats of colour and 2 coats of clear lacquer
Gearbox


Rack


I decided whilst the gearbox and steering rack were off, it would be a good idea to paint them both. I decided to use Ford star mist silver, with a coat of lacquer
firstly cleaned both the rack and steering box using a wire wheel and panel wipe with a scotch brite.
Gearbox
Rack
Painted with 3 coats of colour and 2 coats of clear lacquer
Gearbox
Rack
It was now time to start the reminder of the bodywork
The F1 panel, scuttle panel, doors, bonnet and boot lid were removed for repair and prep.


There was also a repair on the bonnet front as the hinge had started to come away from the bonnet


Bonnet locking plate repaired

I had the areas on displayed blacked with 2k semi gloss


Repairs complete, now ready for primer, repair any pin holes then paint


Thanks for reading
The F1 panel, scuttle panel, doors, bonnet and boot lid were removed for repair and prep.
There was also a repair on the bonnet front as the hinge had started to come away from the bonnet
Bonnet locking plate repaired
I had the areas on displayed blacked with 2k semi gloss
Repairs complete, now ready for primer, repair any pin holes then paint
Thanks for reading
Well its been a long time since I last posted, a lot has happened over the last few years. An expanding family amongst other things had put the project on hold until further notice.
I have now completed the car and some of may of seen it at various events, but now I am going to document the reminder of the build post completion over the next couple of weeks, the ups the down and the road to completion.
I finished the rebuild in April 2019 ready for the season opener at Burleigh House Stamford were the car was displayed in the main circle.
I am going to start with the body been completely re-sprayed, yes we had already done this once but we felt the finish would of been better if we stripped it right back and start from the beginning. So the decision was made, and we started from scratch........
Picking up from August 2017
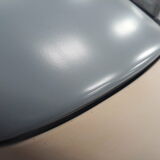
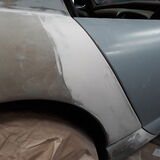
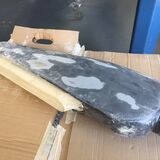
Over the following 6 months, as stated we wanted give the body the attention and detail it really needed and decided to start from scratch, during this process we identified that the body had a couple of dips/flat spots from the factory mould. These were mainly located on both of the rear quarters, very hard to see but once our paint guy pointed them out, I could no longer unsee them. We wanted to fill these and get the gapping and lines around the doors and boot lid as tight and as even as possible.
We literally spent the next couple of months sanding and flatting to reach the finish ready for a high build primer filler, for yet another heavy sand back and flatting.
From the following photos you can see the areas which we built-up
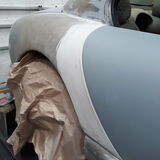
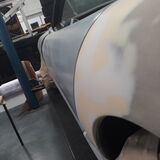
We spent a lot of time (a fair few hours) around the boot and rear wing areas to try and get the gapping bang on and the lines perfect, I think we achieved this.
Please click on the images to see the full size
Thanks for reading and I would welcome any comments
Over the following 6 months, as stated we wanted give the body the attention and detail it really needed and decided to start from scratch, during this process we identified that the body had a couple of dips/flat spots from the factory mould. These were mainly located on both of the rear quarters, very hard to see but once our paint guy pointed them out, I could no longer unsee them. We wanted to fill these and get the gapping and lines around the doors and boot lid as tight and as even as possible.
We literally spent the next couple of months sanding and flatting to reach the finish ready for a high build primer filler, for yet another heavy sand back and flatting.
From the following photos you can see the areas which we built-up
We spent a lot of time (a fair few hours) around the boot and rear wing areas to try and get the gapping bang on and the lines perfect, I think we achieved this.
Please click on the images to see the full size
Thanks for reading and I would welcome any comments
Edited by Jonbouy on Thursday 28th October 20:32
Edited by Jonbouy on Thursday 28th October 20:33
Sorry for the silent treated, life has been busy.
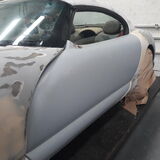
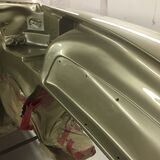
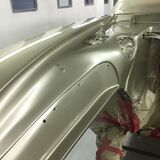
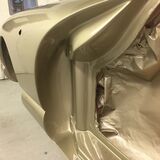
Anyway I will now continue, we decided to remove the body from the chassis and mount it on dolly. John our resident body and paint expert felt this work provide the best outcome and finish.
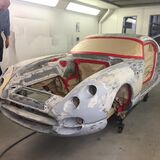
Warning picture heavy, body mounted to dolly, body painted with fibre glass friendly primer (off yellow colour) and then finally the body was primed ready for a final inspection prior to the top coat and lacquer.

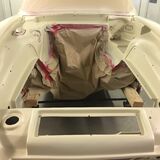
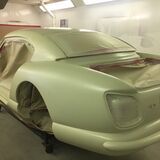
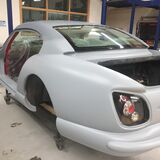
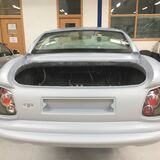
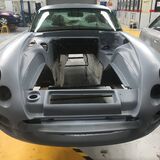
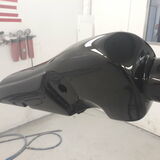
Anyway I will now continue, we decided to remove the body from the chassis and mount it on dolly. John our resident body and paint expert felt this work provide the best outcome and finish.
Warning picture heavy, body mounted to dolly, body painted with fibre glass friendly primer (off yellow colour) and then finally the body was primed ready for a final inspection prior to the top coat and lacquer.
Edited by Jonbouy on Saturday 2nd July 20:34
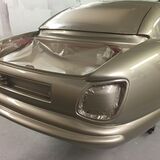
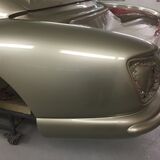
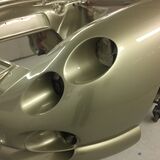

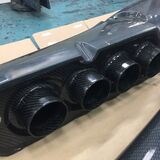
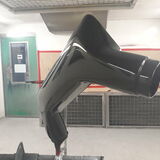
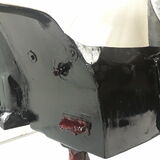
After the body was painted, we briefly moved the focus to overhauling the air boxes. The common problem of the inlets being crushed I aimed to mitigate. I bought a set of ACT carbon fibre back plates. These were bonded to the existing air box housing.
Now as per normal after the back plates had cured we continued the prepping, priming and painting, including the air filter panel box, a-post trims and rear spoiler. Black and gold goes well, as an extra we added a small amount of rose gold flake to the paint to compliment the body colour.

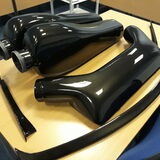
Now as per normal after the back plates had cured we continued the prepping, priming and painting, including the air filter panel box, a-post trims and rear spoiler. Black and gold goes well, as an extra we added a small amount of rose gold flake to the paint to compliment the body colour.
Underbody!
The underbody, because of the extent of the refurb we thought we may as well re-paint the underbody. We blended the sills and exhaust back box areas.
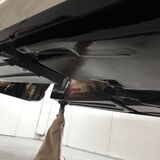
The engine bay was also completely repainted ready for the chassis and engine to go back in. We included a lot of detail, the masking was difficult especially around the exhaust box area, I cant see there been many Cerbs with this sort of body detail.
The underbody, because of the extent of the refurb we thought we may as well re-paint the underbody. We blended the sills and exhaust back box areas.
The engine bay was also completely repainted ready for the chassis and engine to go back in. We included a lot of detail, the masking was difficult especially around the exhaust box area, I cant see there been many Cerbs with this sort of body detail.
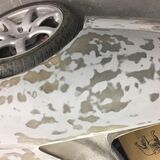
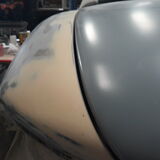
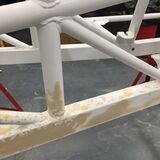
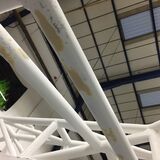
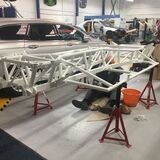
Whilst the chassis was off the body we thought it would be a good time to improve the paint finish from the first round of painting a year or two earlier. There was a few paint corrections and overspray which need some attention. I wanted a glass like finish, there also some areas that required a small amount of filling due to historic heat damage and pitting from the exhaust manifolds. This was purely from a aesthetical point of view, and probably something that know one would see.
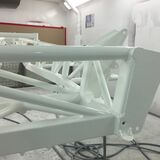
After the chassis was painted and hardened, it was polished to perfection!
The prep work.
After painting
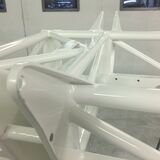
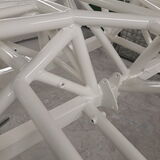
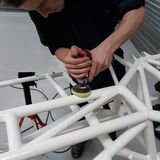
After the chassis was painted and hardened, it was polished to perfection!
The prep work.
After painting
Gassing Station | Cerbera | Top of Page | What's New | My Stuff