Body going back on LS1 Cerb tommorow
Discussion


Finally the chassis restoration is complete, suspension tuned up today so she's back on her wheels.
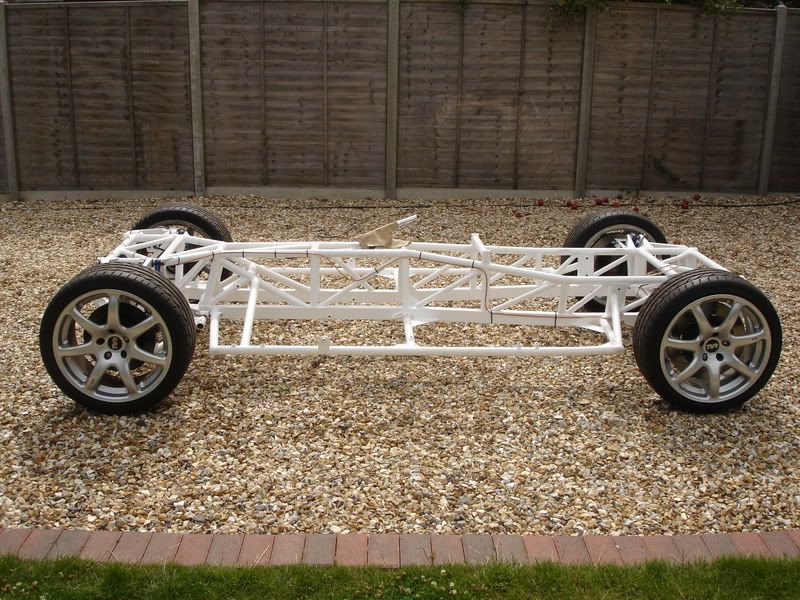
Check out those brake disc's 356mm, a leaving present from Craig before going to Dubai, I've got some 6 pot AP's to wrap around them, should stop as well as it should go
I blasted the chassis and then painted it in Bilt Hamber zinc primer, top coat is two pack poly urethane paint similar to that used on boats.
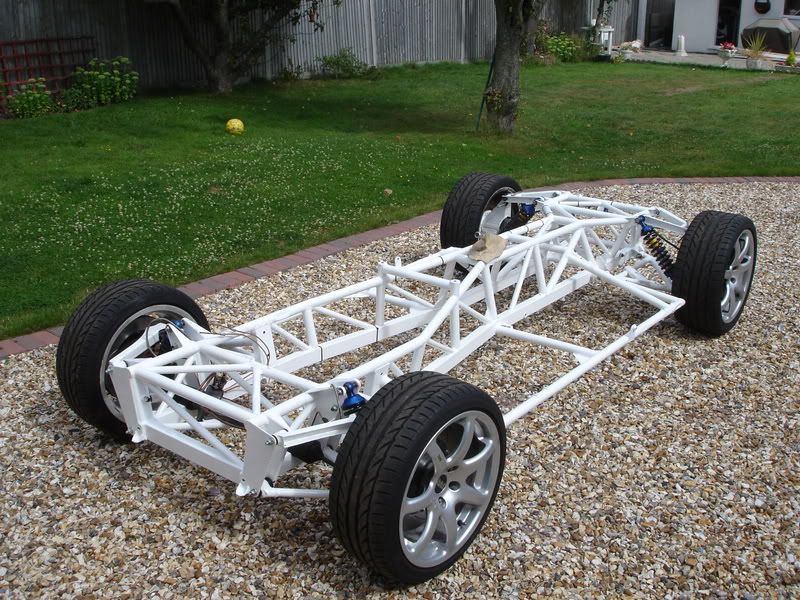
I've run the new brake lines and got the hand brake working but I ran out of time to fit the motor and drive train before putting the body back on.
I've got to put the diff back together with its new ratio and fit the new uprated driveshafts.
Hopefully get the motor back in by the end of the weekend, can't wait to fire up this baby.
Cheers,
Rich
Check out those brake disc's 356mm, a leaving present from Craig before going to Dubai, I've got some 6 pot AP's to wrap around them, should stop as well as it should go
I blasted the chassis and then painted it in Bilt Hamber zinc primer, top coat is two pack poly urethane paint similar to that used on boats.
I've run the new brake lines and got the hand brake working but I ran out of time to fit the motor and drive train before putting the body back on.
I've got to put the diff back together with its new ratio and fit the new uprated driveshafts.
Hopefully get the motor back in by the end of the weekend, can't wait to fire up this baby.
Cheers,
Rich

Its back on, Trevor is one piece again. Not too bad, lifted the back of the body with the engine crane and about 8 of us lifted the front and worked the chassis in. Sits a bit high but there's no engine etc and I set the springs as high as they would go. Time to get the spanners out again, now what did I do with all those bolts. 
Hiya Craig , good to see your're still lurking on the forum, you know you want to come back. Was thinking your plate would look good on mine, might get a small shot of NOS, just for chrage cooling obviously
Hi Caduceus, I had to free up the rod I had in the end, it didn't match anything I could find. Its the same as Granada, Escort, Mondeo etc but the thread and overall length is an inch longer than the Ford item. Got a patent part technical dept on it and they couldn't match it.
More soon.
Rich.
Hiya Craig
, good to see your're still lurking on the forum, you know you want to come back. Was thinking your plate would look good on mine, might get a small shot of NOS, just for chrage cooling obviously Hi Caduceus, I had to free up the rod I had in the end, it didn't match anything I could find. Its the same as Granada, Escort, Mondeo etc but the thread and overall length is an inch longer than the Ford item. Got a patent part technical dept on it and they couldn't match it.
More soon.
Rich.
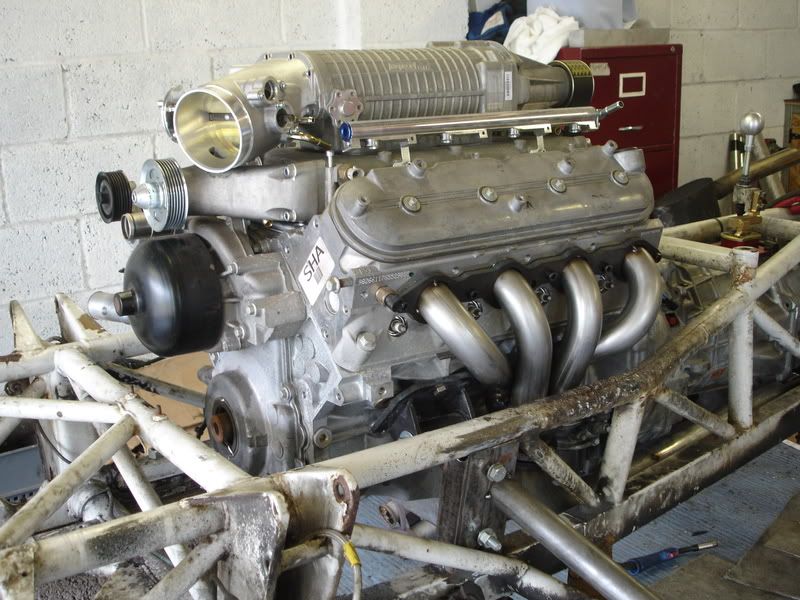
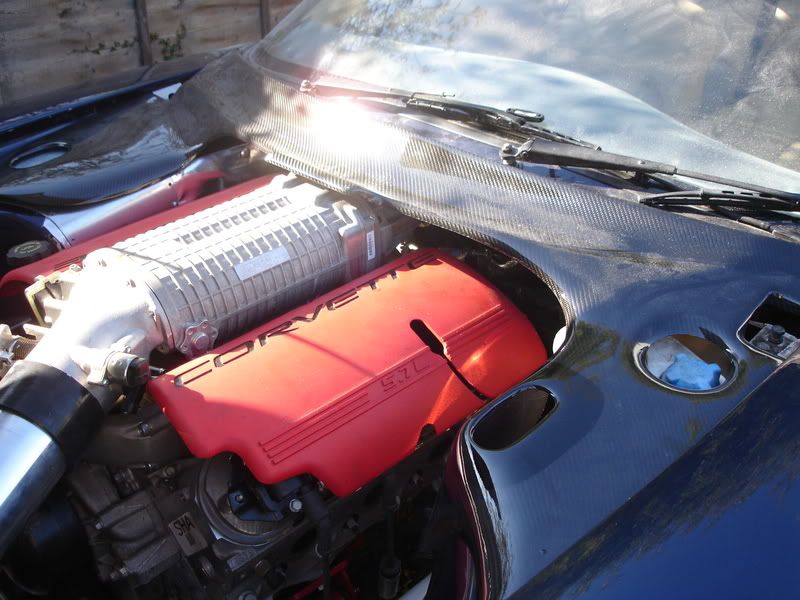
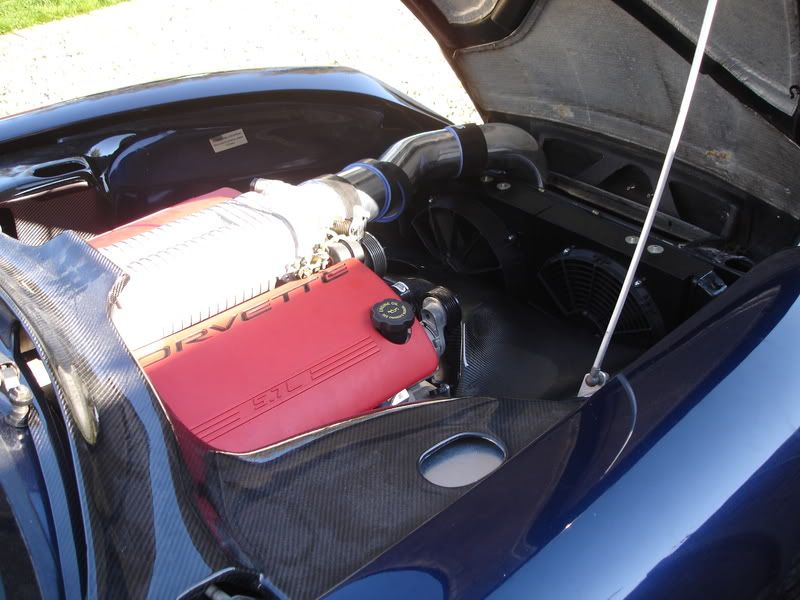
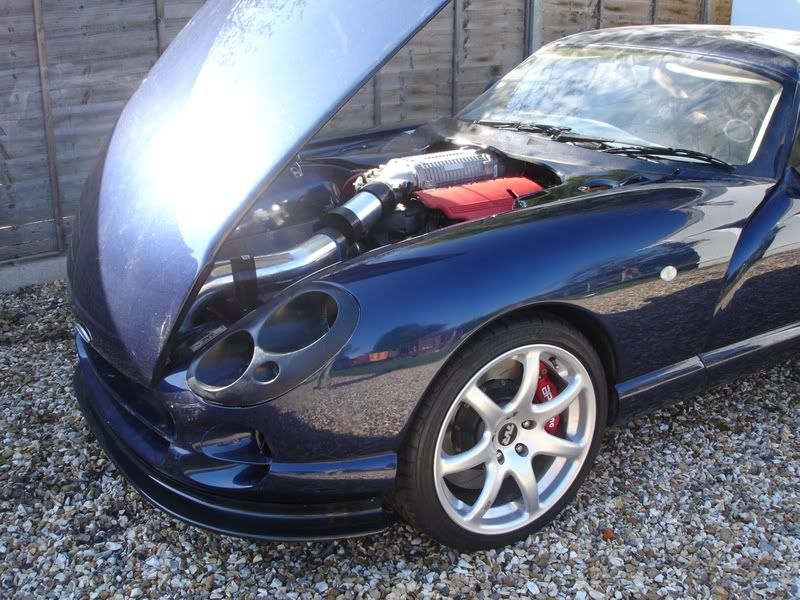
Got a bit of time this morning to fit the engine and try the supercharger with the body on. I was suprised the top engine cover fitted so well, I was trying to convince myself I needed a carbon one . The bonnet fits well with good clearance to the blower.
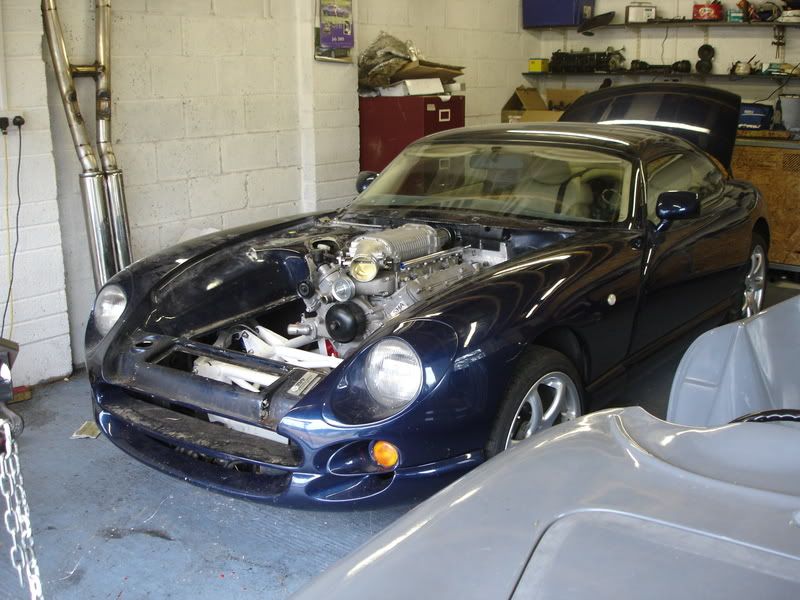
In the pic below you can just see where I had to cut into the fibreglass below the windscreen a bit worrying at first but it was very thin and is just the plenuem for the windscreen heater air. The blower pulley's clear the wiper mechanism so no big deal there.
Glad to say the gearstick sits in exactly the original position, can't wait to try out all 6 gears!!
Right time for and Top gear.
Rich.
. The bonnet fits well with good clearance to the blower.In the pic below you can just see where I had to cut into the fibreglass below the windscreen a bit worrying at first but it was very thin and is just the plenuem for the windscreen heater air. The blower pulley's clear the wiper mechanism so no big deal there.
Glad to say the gearstick sits in exactly the original position, can't wait to try out all 6 gears!!
Right time for
and Top gear.Rich.
Omerta said:
diycerb said:
Glad to say the gearstick sits in exactly the original position
Excellent  Took me ages to get those measurements right!
Looks really nice Rich - I'm keen to see exactly how that exhaust works out around that huuuuuge
T56, and make sure you get some video of the first start-up!You can see the exhaust in one of the photo's above. Its twin 3" and you can see the two rececess I had to weld in to clear the rear casing. As you can see they're quiet short and protude about an inch so it shouldn't have an effect. The exhaust they use on supercharged monaros/holdens are twin 2.5" so I've got some to play with.
Do you need the inner engine covers Don? I'm having carbon ones made. Email me if you're interested. Postage might be a problem.
Rich.
Hi Don,
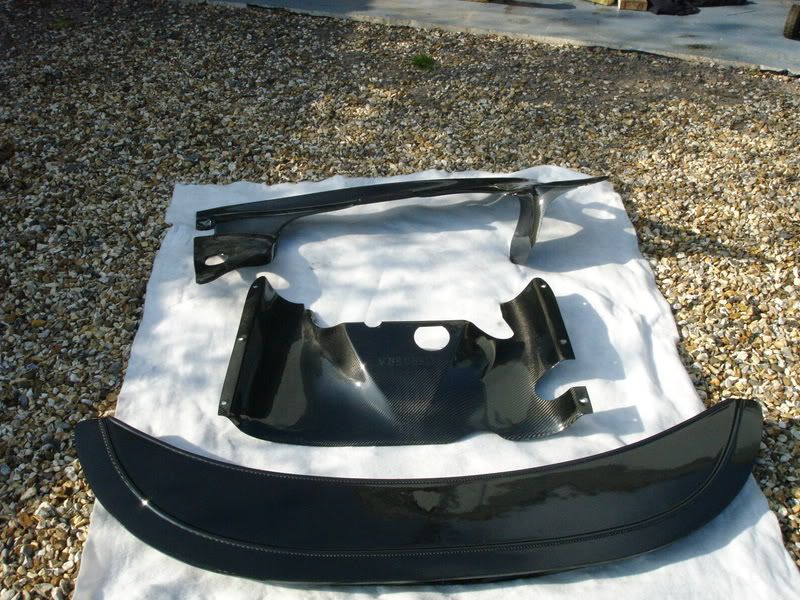
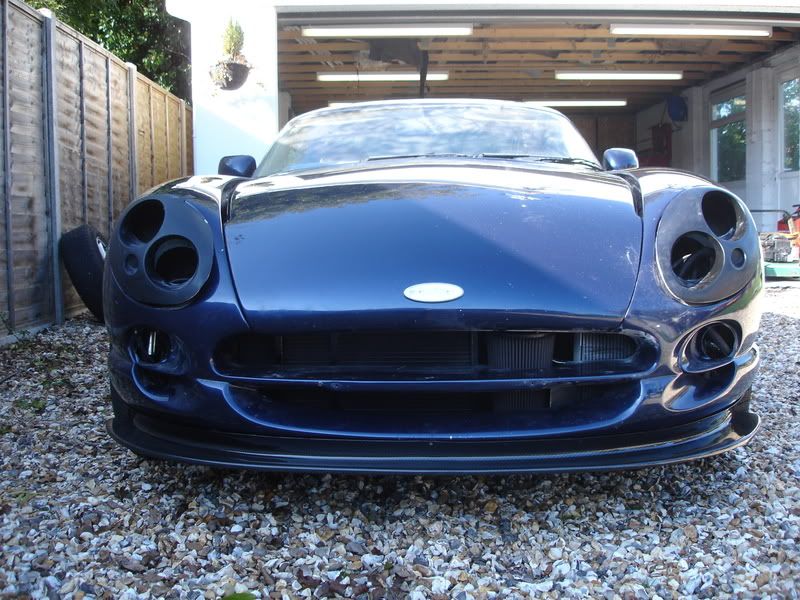
Looking good, wish my body was in that state, basically thats exactly the same front end as mine is going to be. That front splitter looks exactly the same as the one CarbonAl has made for me, only mine is in Carbon, you'll be able to see the carbon as it will just be lacquered. Heres my mates he did a while ago not carbon though. Brum if you want one YHM.

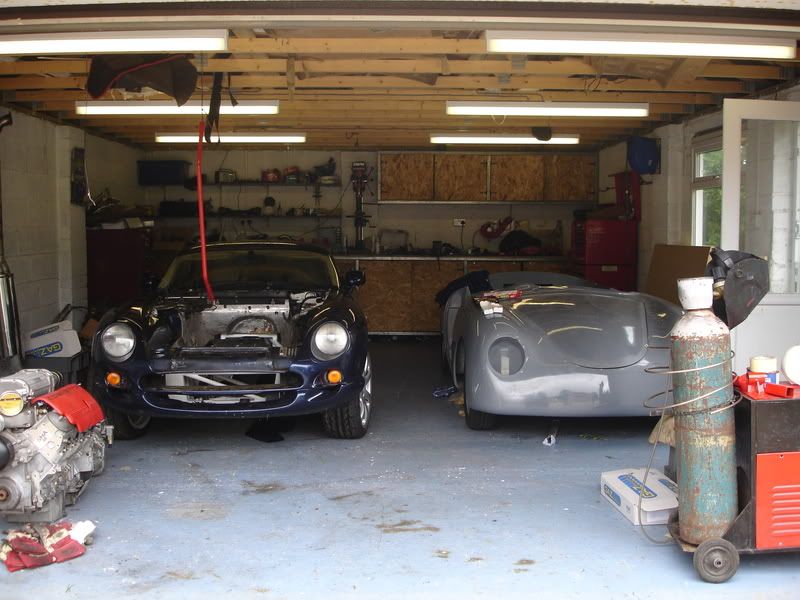
Well my progress has been a bit slow, we've started a house extension and the Porsche 356 replica has taken up a bit of time but here you go.
Engine and box are in for the last time, bugger getting them in with the front pulley and body on.
Exhaust fits nice just need to weld some brackets on, basically its going to be mounted on the lower chassis brace like a Chimera exhaust.
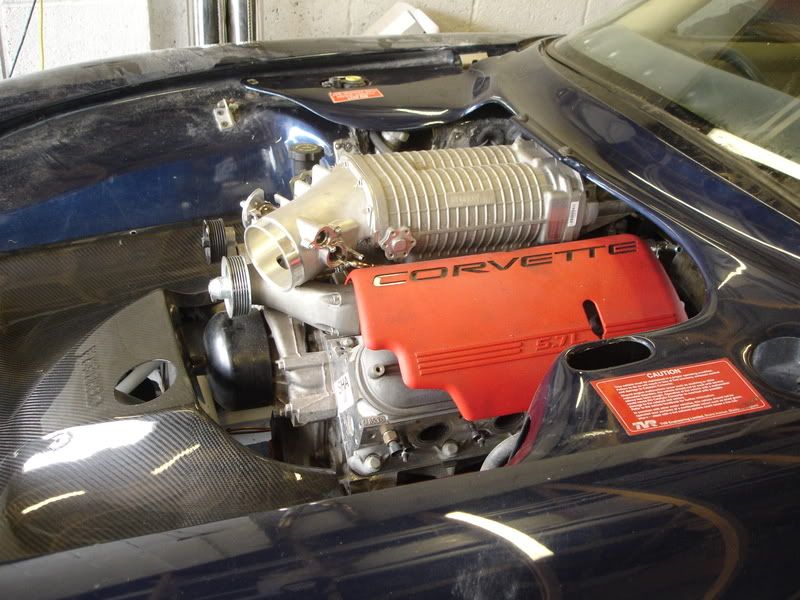
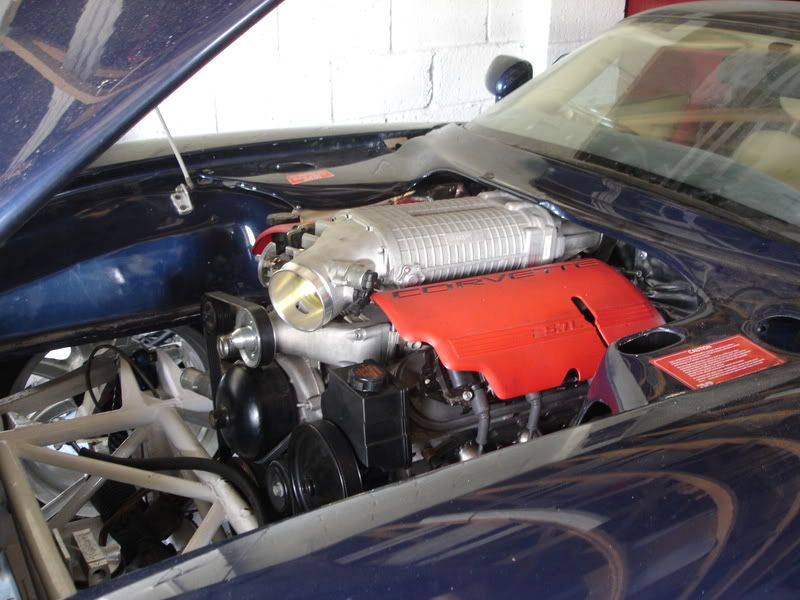
Alan is making me a Carbon top engine cover at the moment, the supercharger fits as if it was factory. I've removed the old brake and clutch masters cylinders and in there place will go the resevoir for the charge cooler system.

As you can see above the original power steering and alternator fit nicely on there original brackety.
Brum, the way my exhaust runs there was no way to even get a filter in the original location so I bought a remote takeoff plate and I'm using a remote filter housing in the top pic, similar to the original Cerb oil setup, except I've added an oil thermostat. Here's the takeoff plate.
Going to get Pirtek to make the oil hoses up.
Next step is bolt the body to the chassis, I keep forgetting about that step then sort out fuel, oil and water hoses and finish the brakes, just welded the plate in for the pedal box like yours but I've made mine adjustable, short arse you see.
All the best,
Rich.
Looking good, wish my body was in that state, basically thats exactly the same front end as mine is going to be. That front splitter looks exactly the same as the one CarbonAl has made for me, only mine is in Carbon, you'll be able to see the carbon as it will just be lacquered. Heres my mates he did a while ago not carbon though. Brum if you want one YHM.
Well my progress has been a bit slow, we've started a house extension and the Porsche 356 replica has taken up a bit of time but here you go.
Engine and box are in for the last time, bugger getting them in with the front pulley and body on.
Exhaust fits nice just need to weld some brackets on, basically its going to be mounted on the lower chassis brace like a Chimera exhaust.
Alan is making me a Carbon top engine cover at the moment, the supercharger fits as if it was factory. I've removed the old brake and clutch masters cylinders and in there place will go the resevoir for the charge cooler system.
As you can see above the original power steering and alternator fit nicely on there original brackety.
Brum, the way my exhaust runs there was no way to even get a filter in the original location so I bought a remote takeoff plate and I'm using a remote filter housing in the top pic, similar to the original Cerb oil setup, except I've added an oil thermostat. Here's the takeoff plate.
Going to get Pirtek to make the oil hoses up.
Next step is bolt the body to the chassis, I keep forgetting about that step
then sort out fuel, oil and water hoses and finish the brakes, just welded the plate in for the pedal box like yours but I've made mine adjustable, short arse you see.All the best,
Rich.
Omerta said:
If you get a chance to take some more pics of your exhaust Rich I'd like to see how it's routed from the headers and past the bellhousing. I'm planning 4-2-1 with the 2-1 merge happening just behind the bellhousing - frm your pic here it looks like you're going 4-1?
ETA - never mind about the pics, found them the earlier build thread.
Here's a couple more, still need welding up. Its 3" tube but 2.5" is plenty, I went for 3" just in case I needed to make lots of indentations to clear the gearbox, as it turned out it only required a couple of small indents.ETA - never mind about the pics, found them the earlier build thread.
Edited by Omerta on Wednesday 10th September 22:29
Manifolds,

Its not the best for scavenging effect but good enough as MK 1.

Rich.
Here we go then, I've had the week off and made a bit of progress, after battling with fixing some fibre glass around the dash board and messing with the gearbox mount again, I think I've got something to be proud of.
Firstly the brakes, now while some consider theirs to be adequate, my missus recons bigger is better. Still a bit of machining to do as theres only a knats knob between the wheel and caliper.
Big thankyou to CarbonAl and Kia for finishing my bits this week, I just couldn't wait to fit them.
With a big gulp and one eye shut I took a saw to the headlights and cut them out for the conversion pods, this also helps with placing all the ancillaries for the engine.
Beneath the headlights on the near side I've fitted the chargecooler water pump and routed the hoses to the chargecooler rad which sits in front of the coolant rad.
Beneath the offside head lights I've mounted the oil thermostat. All the new hoses were made up by Pirtek, much cheaper than getting a motorsport outlet to do it.
Heres how it looks from the front.
I'm going to lose the front indicators and fit smaller ones into the sidelight holes in the conversion pods, the sidelight will be inside the mainbeam unit. Maybe use the indicator holes for brake cooling in the future.
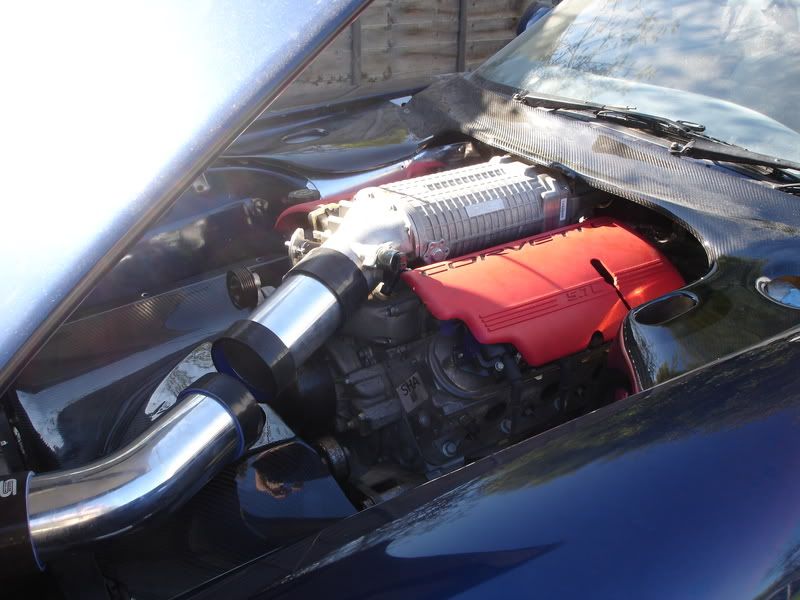
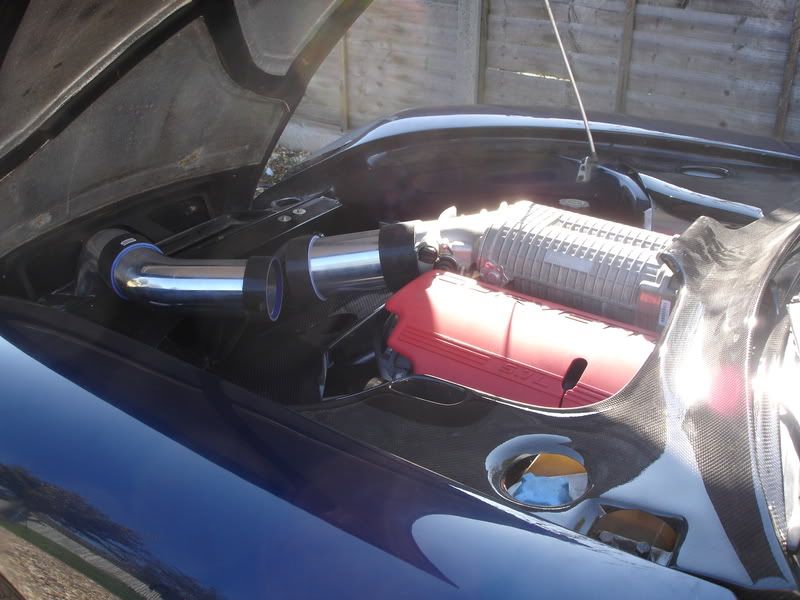
You can see the chargecooler rad to the left and the soon to be replaced oil cooler on the right, the cone filter fits nicely between the two and I've fitted a power steering cooler behind the oil cooler. Apparently the pumps are prone to seal failure through heat as its bolted directly to the cylinder head.
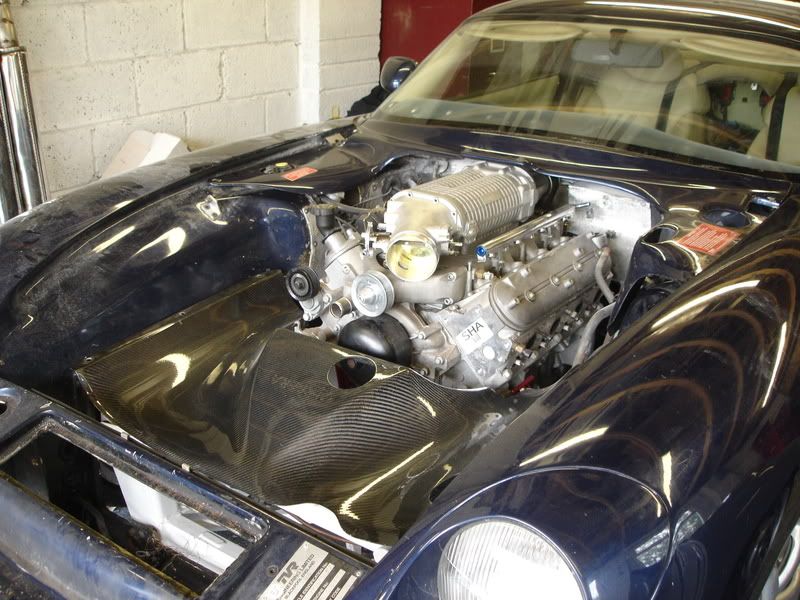
The induction tube and water pipes and hoses turned up this week from Siliconhoses.com The water pipes were very easy to make up, just 90 deg silicon bends and straight lengths of alley tube. I've fitted them so they all run underneath the F1 panel out of sight.
Induction tube is 4", the gap is for the 85mm MAF then straight into the 98mm throttle body.
Check out that carbon Black around the battery terninal is glassfibre so the carbon doesn't short the battery out.
I put the rad back in just to mock everything up for a few pics. I just love that splitter, just hope the suspension settles a bit more, the shocks are as low as they'll go without the springs rattling, theres a bit more weight to add but not much. Do the GAZ settle much?
Next bit is to fit the chargecooler resevoir where the brake master cylinder use to sit and I must remember to finish bolting the body back to the chassis.
Rich.
Firstly the brakes, now while some consider theirs to be adequate, my missus recons bigger is better. Still a bit of machining to do as theres only a knats knob between the wheel and caliper.
Big thankyou to CarbonAl and Kia for finishing my bits this week, I just couldn't wait to fit them.
With a big gulp and one eye shut I took a saw to the headlights and cut them out for the conversion pods, this also helps with placing all the ancillaries for the engine.
Beneath the headlights on the near side I've fitted the chargecooler water pump and routed the hoses to the chargecooler rad which sits in front of the coolant rad.
Beneath the offside head lights I've mounted the oil thermostat. All the new hoses were made up by Pirtek, much cheaper than getting a motorsport outlet to do it.
Heres how it looks from the front.
I'm going to lose the front indicators and fit smaller ones into the sidelight holes in the conversion pods, the sidelight will be inside the mainbeam unit. Maybe use the indicator holes for brake cooling in the future.
You can see the chargecooler rad to the left and the soon to be replaced oil cooler on the right, the cone filter fits nicely between the two and I've fitted a power steering cooler behind the oil cooler. Apparently the pumps are prone to seal failure through heat as its bolted directly to the cylinder head.
The induction tube and water pipes and hoses turned up this week from Siliconhoses.com The water pipes were very easy to make up, just 90 deg silicon bends and straight lengths of alley tube. I've fitted them so they all run underneath the F1 panel out of sight.
Induction tube is 4", the gap is for the 85mm MAF then straight into the 98mm throttle body.
Check out that carbon
Black around the battery terninal is glassfibre so the carbon doesn't short the battery out.I put the rad back in just to mock everything up for a few pics. I just love that splitter, just hope the suspension settles a bit more, the shocks are as low as they'll go without the springs rattling, theres a bit more weight to add but not much. Do the GAZ settle much?
Next bit is to fit the chargecooler resevoir where the brake master cylinder use to sit and I must remember to finish bolting the body back to the chassis.
Rich.
Thanks for the comments guys, all appreciated.
Still a fair way to go, not looking forward to re-fitting all the interior and less so to cleaning it.
Doing it yourself is definetly satisfying but it can get a bit much, the exhaust nearly beat me. Might go for a MKII exhaust if it doesn't work out as I want.
Duke, headlight surrounds are held in with 4, 10mm nuts covered in silicon access is through the panels in the wheel arch. Basically cut everything away to leave yourself about an inch around the edge to mount the pods onto.
Rich.
brogenville said:
diycerb said:
Duke, headlight surrounds are held in with 4, 10mm nuts covered in silicon access is through the panels in the wheel arch.
So are you saing that the original headlight pods are actually held in place by some bolts? Does that mean that the old pods could be removed relativly easily?Can't wait to get her started, but quite a bit to do before then. Going to be a bit controversial here...... I'm looking into Racelogic traction control at the moment. Will end up with a digital adjuster like this where the ash tray fits.

I admit I can't drive

BLUETHUNDER said:
Well lets just concentrate on the ones that are here then.Brummie,s and D.I.Y,s .I think a date at the pod needs to be arranged to sort this out?
I struggle pushing mine out of the garage let alone 1/4 mile.I think a date at the pod needs to be arranged to sort this out?I recon they'll be pair'd up a few times next year. Thats going to be some sight.

Gassing Station | Cerbera | Top of Page | What's New | My Stuff