Engine rebuild
Discussion


Sorry!
It’s taken Ricky a little while to get quotes for all of the major parts required, both OEM and aftermarket, and for the potential outsourced machine-shop work. In fact, I finally received the quote for all bar sundries just last night.
However, until the engine is out and stripped, we won’t know the full extent of the work required. Really, the unknown is the cylinder heads. Meanwhile, Ricky and I have discussed the direction that we think that we are going to go in.
I believe that the plan is to remove the engine in the very near future (Friday was mentioned!) and it’ll hopefully be stripped shortly after that. What we have decided to do is to bore and sleeve the original block, rather than build the engine around a new one. Here’s our thinking:
My car has 106,000 miles under its wheels. It’s a fab vehicle in great condition, both mechanically and cosmetically. But it can never be a collectors car! If it was a manual Mk1 Superleggera or a Balboni that had only ever covered a handful of dry miles before unfortunately lunching on a failed cat, then perhaps the expense of a new block could be justified by the potential value of the car. But even with an uprated, rebuilt engine, my car will only ever appeal to a buyer who wants to continue to drive the car and will only ever command a price at the lower end of the market. The added expense of a brand new block can’t be justified.
If we DID build up around a new block then, as it’s already de-catted there’d be no worry about the Nikasil plating of the bores becoming scored in the same way again. But the only real advantage would be being able to say, “Yeah! It’s got a broand new Lamborghini block....” Instead, the old block will be cleaned up and inspected before being sent away for specialist machining. The bores will be um...... bored and then steel liners will be inserted and honed to accept new pistons. The advantage in this is both price (later!) and we’ll be running traditional steel bores rather than trick, but ultimately fragile plated alloy ones.
New block from Lambo: £5601.23. Resleeved original block: £3750
Until the engine is stripped, we won’t know the state of the rest of the engine below the heads. However we think:
The crank should be fine. There’s no reason to expect any undue wear and we’re planning on being able to reuse it with a polish of the journals at best and a grind and oversize shells at worst! We’ll just have to cross our fingers at this stage. A new crank WILL NOT be cheap!!
Pistons are another matter. It’d be lovely to find that the originals are perfect and just need re-ringing. But Ricky is pretty certain that the skirts will have been affected by the scoring of the bores. So the options will then be OEM pistons (£1185) and rings (£270.70) (EACH!!!) or lighter, stronger, better engineered forged pistons from CP-Carrillo. They come complete with rings. So,
OEM pistons and rings: £14557 (yes, really!). CP-Carrillo: £2400
Guess which way we’re leaning?
Finally for the bottom end, connecting rods. The originals may be fine. But they’ve been slinging heavy pistons up and down for a LONG time. I think that Ricky would probably refit the originals after suitable non-destructive testing if I asked him to. However, given the rest of the work, I suppose that my inclination (and certainly his!) is to renew. The question is, what with? The options are again OEM or CP-Carrillo. But here the answer is less clear-cut. The forged CP-Carrillo rods will be lighter and allow the engine to spin faster. Ultimately they can handle much more power. But we’re not building a monster. Ultimately I hope to have an engine that revs a bit more freely, is a bit more powerful and a bit more efficient. What’s “a bit”? Ten percent would be great! So, is the expense of aftermarket justified? Expense? Yes, here the tables are turned:
OEM connecting rods and bolts: £1163. CP-Carrillo: £2975 (!!)
There’ll be some more discussion before we make that call.......
Finally, for the moment, the sundries that’ll be needed regardless (all Lambo OEM):
Gasket set: £929.05 (apparently an old cornflakes box and candle-wax won’t do?)
Conrod shells: £433.60 (20 pieces) and Main bearing shells: £123.96 (12 pieces)
Main bearing thrust washers: £33.60 Valve seals: £208.40 (40 pieces)
Head bolts: £501.60 (24 pieces) Main cap bolts: £104.16 (24 pieces)
Nothing here about cylinder head work. I’ll come to them when they’re off and have been inspected. But it’s a 10-cylinder, 40-valve engine..........
Edited by 4321go on Wednesday 9th January 21:29
Edited by 4321go on Wednesday 9th January 21:31
Edited by 4321go on Wednesday 9th January 21:33
I think that the problem is that the 5.0 litre engine is unique to Lambo. Audi chucked the 4.0 V8 from the RS6 (IIRC) at Sant Agata Bolognese and allowed then to get on with it. The resulting 5.0 was ONLY fitted to the pre-LP Gallardos.
Audi then took the engine back and developed it into the 5.2 litre engine that went into the subsequent RS6, Q7(?), R8 and LP-series Gallardo. Thus, the 5.0 parts supply is dictated by Lamborghini, the 5.2 by Audi. I think that’s probably why OEM rods look so reasonable?
Audi then took the engine back and developed it into the 5.2 litre engine that went into the subsequent RS6, Q7(?), R8 and LP-series Gallardo. Thus, the 5.0 parts supply is dictated by Lamborghini, the 5.2 by Audi. I think that’s probably why OEM rods look so reasonable?
Edited by 4321go on Wednesday 9th January 22:16
200Plus Club said:
Sweet baby jesus on the oe pistons lol.
Some substantial costs building when you think of course you'll have cleaning/machining/ balancing etc of the short motor then plus head work (assume new stem seals and a clean up minimum, possibly new valves if any wear?)
Then of course brand new oil and water pump is guess and all your timing chains and ancilliaries.
New nuts n bolts throughout, injectors perhaps flow tested and cleaned for safety?
Absolutely spot-on with all of your points! The oil pump gets rebuilt rather than replaced. The chains are getting replaced. The injectors will be flow-tested. Head work I’ll discuss when they’ve been removed and assessed, but I have the options and pricing for it all. Some substantial costs building when you think of course you'll have cleaning/machining/ balancing etc of the short motor then plus head work (assume new stem seals and a clean up minimum, possibly new valves if any wear?)
Then of course brand new oil and water pump is guess and all your timing chains and ancilliaries.
New nuts n bolts throughout, injectors perhaps flow tested and cleaned for safety?
The post above was really more to show the options between OEM and aftermarket and our thoughts as to which way to go (some of those options being no-brainers!!)
Ellb123 said:
Really interesting thread, thanks for sharing in such detail!
Im really shocked at the price different in some of the OEM Lambo parts, I was expecting expensive, but maybe not that expensive, but then some other items seem reasonable value! I wonder if the rods are perhaps uses on other cars/engines therefore cheaper?
Did you consider buying a "new" second hand engine instead? Im not sure how much an engine would be from say a crash damaged car. I understand the whole complete refresh for peace of mind on yours, but for time/cost, I just wondered if that would of been an easier route?
As to your first point, see my post at the foot of page 4Im really shocked at the price different in some of the OEM Lambo parts, I was expecting expensive, but maybe not that expensive, but then some other items seem reasonable value! I wonder if the rods are perhaps uses on other cars/engines therefore cheaper?
Did you consider buying a "new" second hand engine instead? Im not sure how much an engine would be from say a crash damaged car. I understand the whole complete refresh for peace of mind on yours, but for time/cost, I just wondered if that would of been an easier route?
Meanwhile, second-hand engines go for between £16-20k, which will be about the cost of the rebuild. And you’re buying a pre-worn engine with no idea of what sort of life it’s had. This way, I’ll have an engine that’s (potentially) better than new!
Oh, and a new, undressed motor from Lambo is circa £30k
Just a brief update tonight, starting with some spectacular thread drift.
I can thoroughly recommend the guided tour of the Ramsbury brewery and distillery! https://www.ramsbury.com/book-a-guided-tour My cousin, Nick, was given a couple of tickets for his birthday last year and invited me to accompany him, so we went on Friday. There’s plenty of opportunity throughout the tour to sample their excellent craft ales, vodka and gin. I’m not a white spirits fan, but both of the latter are really good; certainly good enough to sip neat! Fred, one of the two brewers, gives a really enthused 90 minute tour, and clearly loves doing so. He’s also a real petrol-head and will love it if you turn up in something interesting!
Why tell you this? Because Ramsbury is half-way between Nick’s in Newbury and Ricky’s joint in Swindon. So I bit the bullet, picked up Nick and drove to the brewery tour (!) and then afterwards we both went on to Swindon. (And before that causes uproar, I think that imbibed about one third of a pint in total. Bugger!!)
Ricky was hoping to have my engine out early last week, but it’s been fighting him. So he’d only got about half-way through the dismantling process required to extract it. However, it may actually be out by now. He told me that he intended to work on Saturday to get it out. I told him that I was in no rush and would prefer him to have a life. But it’s his company and he believes that he’s fallen behind with my car. It’s a personal deadline thing. I like that attitude!
I foolishly missed the opportunity to take the photograph that could easily have encompassed both my Lambo, two V10 R8s and a V8 R8, all in a similar state of undress. Without their rear bodywork, no number plates would have been visible and it would therefore have been perfect for posting. And it would have been an excellent example of why I know that my car is at the right place.
Meanwhile my own car was looking like this:
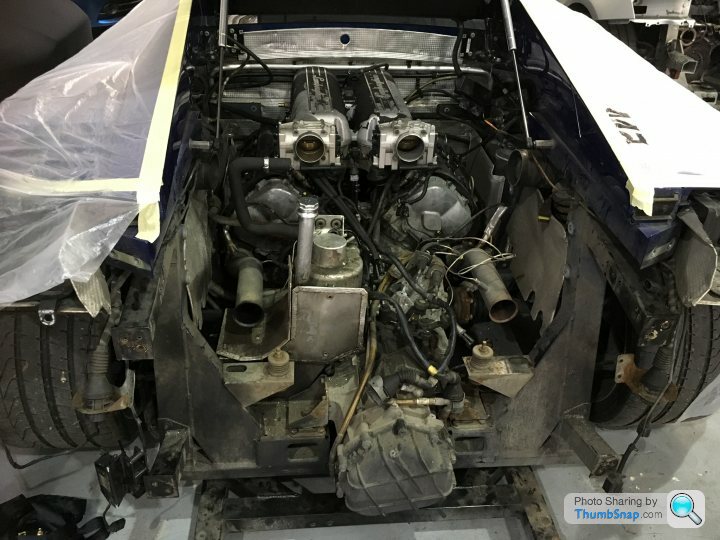
For those of you who look at it and think that it’s in a shocking state, be assured, YOUR car probably looks similar under its cosmetic dressings! You’re simply looking at the road-filth that accumulates in the areas that Lamborghini deliberately chooses to hide. And Ricky tells me that he’s already excited at the challenge of restoring it to near “factory fresh”. Like me, he doesn’t see the point of rebuilding the engine and then reinstalling it in a grubby chassis. Hopefully, in a couple of months, I’ll be in a position to repost this photo together with one of a stunningly transformed engine bay!
Ricky has a “clean room” for engine building. He currently has two V10s in build (both 5.2s I think?) One will be a 1500bhp, twin turbo unit! The next few photos are of those engines, just to whet your appetite....
When I last visited Ricky, he hadn’t received the quotes for the conrods. So I’d assumed that not only would the CP Carrillo rods be better than OE, but cheaper too! Finding that they’re almost three times the price meant I had to ask the question of whether they were worth it. Having held both OE and CP Carrillo in my hand, I can tell you that the aftermarket items are beautiful and I’d have them in a flash if they proved to be justifiable.But no! Ricky tells me that unless I want a race engine that’ll rev to 10,000rpm, or unless I intend to add turbos to the engine, the OE rods will do nicely. They’ll easily handle whatever power we end up with and unlike the stronger but lighter CP Carrillo pistons, their rods won’t really help the engine to rev more freely. But they really ARE beautifully made!!
Therefore, unless we uncover any horrors when the engine is stripped, bottom end work seems to be to: clean, test, bore, line and hone the block: clean and polish the crank journals: renew the rods with new OE items: and replace the pistons with CP Carrillo items. The rebuild will also incorporate a rebuilt oil pump, new timing chains and new bolts. Again, because we’re not going for extreme revs or power, head bolts, conrod bolts, mains bolts etc. will be new OE as the increased strength offered by ARP is simply not needed. (But again, they DO look sexy!!)
Again, although I’m now slightly more au fait with what head work will be sensible regardless, I’ll hold-off detailing it all exactly until they’re off and stripped. Once again, I’ll post both the options available to me and the prices, together with which way we go and why. What I know now is that the heads will be completely stripped and at the very least the valve springs will DEFFINITELY be renewed. The valve-train will PROBABLY be renewed and, if so, we’ll be using uprated aftermarket for not much more than OE, although that’ll incur an extra charge to recut the valve seats. And, if worn, then we MIGHT need to replace the valve guides, which will be done by the same engineering works that would cut the seats.
(Note the sexy focus, lurking in the background! )
)
I can thoroughly recommend the guided tour of the Ramsbury brewery and distillery! https://www.ramsbury.com/book-a-guided-tour My cousin, Nick, was given a couple of tickets for his birthday last year and invited me to accompany him, so we went on Friday. There’s plenty of opportunity throughout the tour to sample their excellent craft ales, vodka and gin. I’m not a white spirits fan, but both of the latter are really good; certainly good enough to sip neat! Fred, one of the two brewers, gives a really enthused 90 minute tour, and clearly loves doing so. He’s also a real petrol-head and will love it if you turn up in something interesting!
Why tell you this? Because Ramsbury is half-way between Nick’s in Newbury and Ricky’s joint in Swindon. So I bit the bullet, picked up Nick and drove to the brewery tour (!) and then afterwards we both went on to Swindon. (And before that causes uproar, I think that imbibed about one third of a pint in total. Bugger!!)
Ricky was hoping to have my engine out early last week, but it’s been fighting him. So he’d only got about half-way through the dismantling process required to extract it. However, it may actually be out by now. He told me that he intended to work on Saturday to get it out. I told him that I was in no rush and would prefer him to have a life. But it’s his company and he believes that he’s fallen behind with my car. It’s a personal deadline thing. I like that attitude!
I foolishly missed the opportunity to take the photograph that could easily have encompassed both my Lambo, two V10 R8s and a V8 R8, all in a similar state of undress. Without their rear bodywork, no number plates would have been visible and it would therefore have been perfect for posting. And it would have been an excellent example of why I know that my car is at the right place.
Meanwhile my own car was looking like this:
For those of you who look at it and think that it’s in a shocking state, be assured, YOUR car probably looks similar under its cosmetic dressings! You’re simply looking at the road-filth that accumulates in the areas that Lamborghini deliberately chooses to hide. And Ricky tells me that he’s already excited at the challenge of restoring it to near “factory fresh”. Like me, he doesn’t see the point of rebuilding the engine and then reinstalling it in a grubby chassis. Hopefully, in a couple of months, I’ll be in a position to repost this photo together with one of a stunningly transformed engine bay!
Ricky has a “clean room” for engine building. He currently has two V10s in build (both 5.2s I think?) One will be a 1500bhp, twin turbo unit! The next few photos are of those engines, just to whet your appetite....
When I last visited Ricky, he hadn’t received the quotes for the conrods. So I’d assumed that not only would the CP Carrillo rods be better than OE, but cheaper too! Finding that they’re almost three times the price meant I had to ask the question of whether they were worth it. Having held both OE and CP Carrillo in my hand, I can tell you that the aftermarket items are beautiful and I’d have them in a flash if they proved to be justifiable.But no! Ricky tells me that unless I want a race engine that’ll rev to 10,000rpm, or unless I intend to add turbos to the engine, the OE rods will do nicely. They’ll easily handle whatever power we end up with and unlike the stronger but lighter CP Carrillo pistons, their rods won’t really help the engine to rev more freely. But they really ARE beautifully made!!
Therefore, unless we uncover any horrors when the engine is stripped, bottom end work seems to be to: clean, test, bore, line and hone the block: clean and polish the crank journals: renew the rods with new OE items: and replace the pistons with CP Carrillo items. The rebuild will also incorporate a rebuilt oil pump, new timing chains and new bolts. Again, because we’re not going for extreme revs or power, head bolts, conrod bolts, mains bolts etc. will be new OE as the increased strength offered by ARP is simply not needed. (But again, they DO look sexy!!)
Again, although I’m now slightly more au fait with what head work will be sensible regardless, I’ll hold-off detailing it all exactly until they’re off and stripped. Once again, I’ll post both the options available to me and the prices, together with which way we go and why. What I know now is that the heads will be completely stripped and at the very least the valve springs will DEFFINITELY be renewed. The valve-train will PROBABLY be renewed and, if so, we’ll be using uprated aftermarket for not much more than OE, although that’ll incur an extra charge to recut the valve seats. And, if worn, then we MIGHT need to replace the valve guides, which will be done by the same engineering works that would cut the seats.
(Note the sexy focus, lurking in the background!
)Obi Wan said:
Would there be any drawbacks to having a 10,000rpm engine? It sounds like fun
I’m going to assume that your question is rather tongue-in-cheek. However, it’s an interesting one, nonetheless.To get the engine to spin to 10,000rpm would require soooooo much more work than just stronger conrods to cope with the greater acceleration of the pistons. At a guess: reprofiled air boxes to cope with the increased amount air demand: custom air filters ditto: and massive reprofiling of the ports, probably requiring the addition of material as well as the usual removal: hugely uprated valve gear and springs to cope with the increased forces: new, custom injectors to flow the increased fuel flow: those strengthened conrods: massive lightening of the crank, flywheel and clutch: an uprated oil pump: increased cooling capacity........
Basically, I’d be funding a race car engine, but without the backing of a race team. £50k, without the R&D? And then there’d be the chassis upgrades to cope with probably 650bhp (without the restrictions that the Gallardo GT3 cars ran in the day). And it’d need rebuilding every 5000 miles. And it’d be undriveable in everyday motoring. And.......
But, it would sound electrifying!!!
As is, Ricky will be building a slightly looser engine than standard. It’ll be able to rev slightly more freely and be slightly more powerful than stock. As I’ve written previously; what’s “slightly”? Don’t know!! Ten percent? Another 50bhp? An rev limiter raised by 600rpm? I’m not an engine technician, so I’ll have to ask Ricky. But that seems reasonable........
Dr G said:
Trev450 said:
Thanks for taking the time to provide an update. It makes for very interesting reading and you clearly have a talent for elequent prose.
Absolutely, really interesting stuff. Thank you.Another brief update. After a bit of a fight, the engine is out. In fact, it may even be stripped by now.

After further discussion with Ricky, I’m now much more au fait with where we’re probably going with the heads. Once off, they will be totally stripped and cleaned. If we replaced nothing else, then the valve springs would be a must. But after years of hammering in and out of their seats, best practice would be to replace the entire valvetrain. Whether or not the valves are renewed, the valve seats will nead to be recut.
Options and pricing: OE inlet valves (20), exhaust valves (20) and springs (40): £1508.40. Supertech valvetrain kit: £1750. The Supertech kit already contains the retainers and valve collets that would bring the price of OE up to the same price as aftermarket. The advantage of the aftermarket kit seems to be newer materials technology resulting in both lighter valves and better heat dissipation. So Supertech it will be then. Seat cutting will be done by the same outside contractor that’ll be doing the sleeving of the block: £400 (that’s £10 per valve seat).
The one unknown here is the state of the valve guides. If worn then they’ll need renewing at £320 (or £8 each) and installing (at the same time as the valve seats) for a further £400 (or again, £10 each). Before reassembly, Ricky will be lightly porting and polishing the tracts to improve the breathing. As standard, the head castings are quite rough and have some ugly steps!
FWIW, the crackle finish to the intake plenums and the air filter boxes will be renewed and then clear-coated in the hope that doing so will aid longevity. The plenums were last done four years ago but the combined effects of heat and rain have led to their current, leperous state.
(And here I can pass on a rather esoteric bit of info that I gleaned several years ago, when I was looking to refinish the cam covers of my F355; the “correct” term for the crackle finish used on exotica is “vermiculated” (from the Latin “vermiculus” meaning “little worm”).)
paulmnz said:
You might want to try redditch shot blasting - they are quite well known for re-finishing Ferrari intake plenums as they have managed to find a decent colour and texture match for the OEM red. The website is quite oldskool, but they do a good job - I believe they have done lambo intakes as well, so they should have the right shade and texture.
They powder coat, so it should last a lot longer than re-painting.
That’s a really useful lead. I’ll look into it. Thanks!! (The air filter boxes, which don’t get hot and aren’t under the engine lid louvres are just starting to go, so will also need refinishing.)They powder coat, so it should last a lot longer than re-painting.
Firstly, thank you for the suggestions and advice regarding refinishing the vermiculated (wrinkle!) paint on the intake plenums and air filter boxes. As I’ve mentioned before, whilst satisfying to look at, it’s not always the most robust finish. But then again, it’s a rather harsh environment.
As you can see in previous photos, the plenums look particularly scabrous! The original finish gave up at about eight years old, although it’s only just starting to fail on the air filter boxes after thirteen. But then, they don’t have to survive the same temperature extremes. The red vermiculated paint on the cam covers of my old F355 began to flake away much earlier still. Audi paint verses Fiat paint; discuss.....

I repainted the plenums about five years ago, using wet paint from rattle cans. The correct paint is available from several UK stockists, being VHT Wrinkle Plus paint imported from the US. https://www.vhtpaint.com/high-heat/vht-wrinkle-plu...
As the VHT product never seems to last as long as the original, I did wonder what process is used by the OE manufacturer. And it turns out to be powder coating. So thank you for the heads-up on that too. Ricky already has a box of brackets that will be media blasted and powder coated, and I was going to suggest that everything be dispatched together to the powder coaters previously linked to. But it turns out that wrinkle-finish powder coating is far from rare, and that the local refinishers in Swindon have done plenty of previous such jobs to his satisfaction. It’s a much more durable finish than wet paint and should hopefully last much longer.
Anyway......
I paid Ricky and the patient a visit last week. The engine was almost completely stripped, with just the heads to tackle. Several fasteners had proven troublesome as Ricky removed the engine, the last being some of the exhaust manifold nuts. He was anticipating the need for heat and mild violence/swearing in their final battle. Hopefully by now, the heads have been stripped and will have been sent away with the block for the required engineering work.
And now that the block has been stripped, we’re finally able to see the extent of the bore wear caused by the long-term ingestion of the gently degrading cats. If the following photos don’t persuade fellow owners of pre-LP, 5.0 litre Gallardos to investigate the removal of their cats, then nothing will! (For clarity, this seems to be a flaw in the design of the 5.0 litre engine, but not the later 5.2, which has a different (4.2 rather than 4.0) Audi V8 as it’s progenitor.)
And before the photos, an aside:
I’ve heard from at least one fellow owner who looked at a couple of examples before finally buying another. In both cases, he unearthed evidence of complete engine rebuilds at surprisingly low mileages. At the time he assumed that it was either bad luck, or that the cars had been ragged hard as “track experience” or hire cars (both were pre-LP SLs). My own opinion is that I’m fortunate that my car has always been used regularly and on longer drives. As such my cats have gently deteriorated with age, breaking down into a fine “sand” that has caused the bore wear. I’m aware of numerous cars that have suffered catastrophic failure at much lower mileages when much larger pieces of the cats have been ingested. Could this be the result of numerous short trips, maybe cruising through the local town, with the car parked up for extended periods of time between and condensation forming in the barely-warm cats, leading to more extensive corrosion of the plates?
So, time for the “money shots”.......
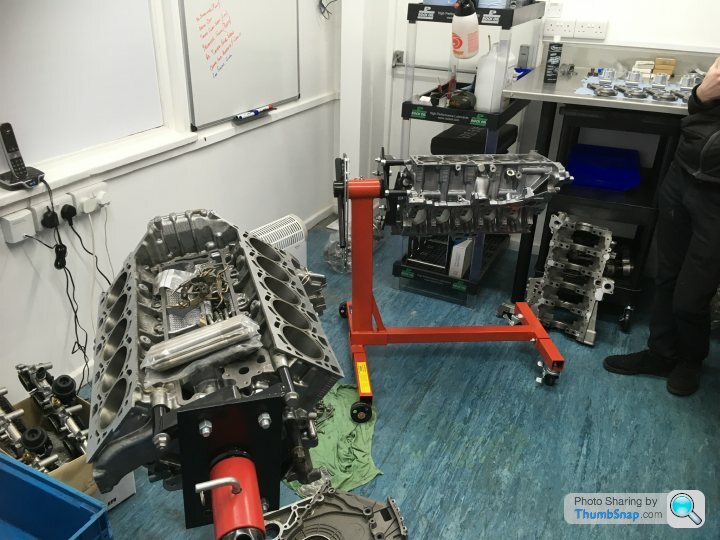
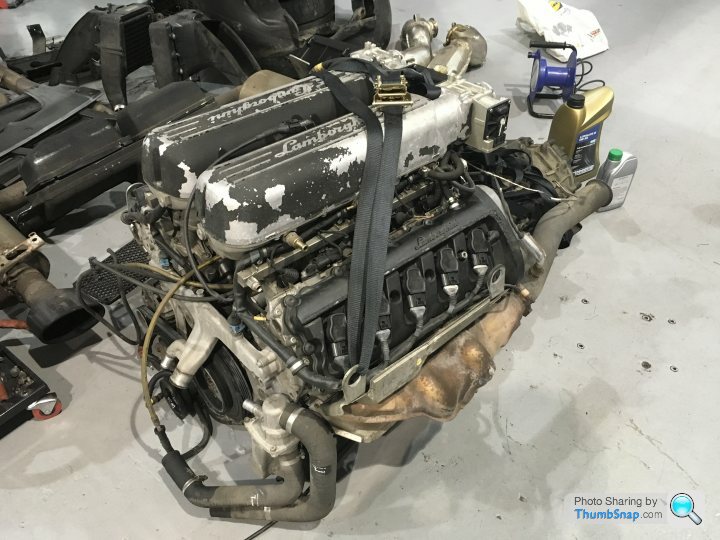
There are a lot of pieces squeezed into the engine bay of a V10 sports-car. Not everything in this first one is from my vehicle, but most of it is! That manky lump in the foreground is the Graziano manual gearbox. On the top shelf of the nearest trolly are the pistons and rods and the oil pan. It’s a stressed part of the block assembly and will be bolted back to it to provide rigidity during the machining processes. That’s my crank on the shelf below. The incongruous bag of Catsan might be for the works cat, but is probably of much more use for absorbing the inevitable oil spills that disassembly will have created. (In the background Ricky squats, contemplating what expletives will best accompany the removal of the exhaust manifold nuts):

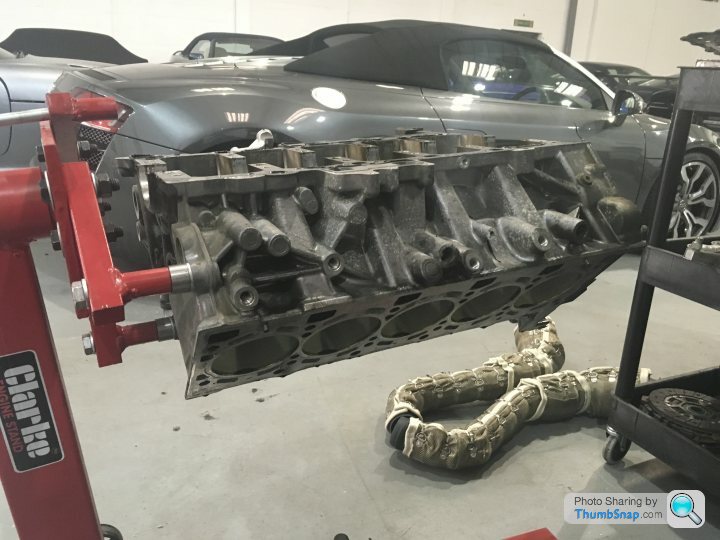
The block itself is a surprisingly small part of the whole:
Thankfully (!), bore wear aside, the internals appear to be in good nick; the crank will require nothing more than a polish. Here you see two of the “main” and four of the “big end” journals. The “stripe” on the main journals is caused by the oil access groove cut into one half of the bearing shell.

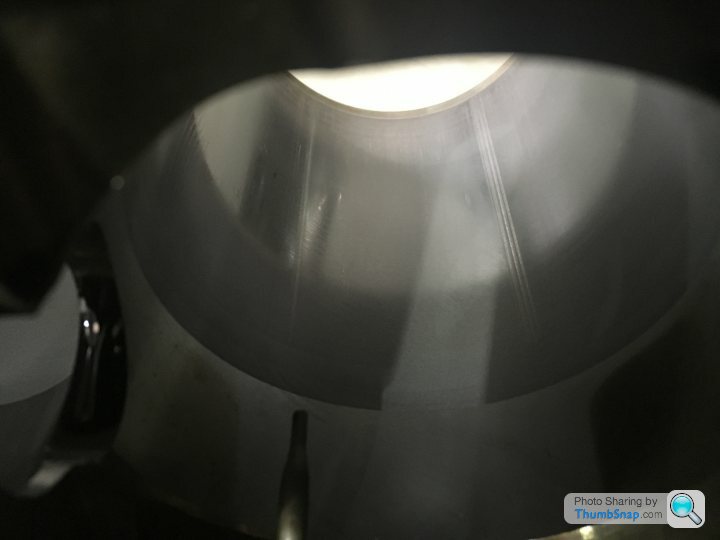
But, Oh! the bore wear. Here’s two of the cylinders at random (9 and 10, I think):

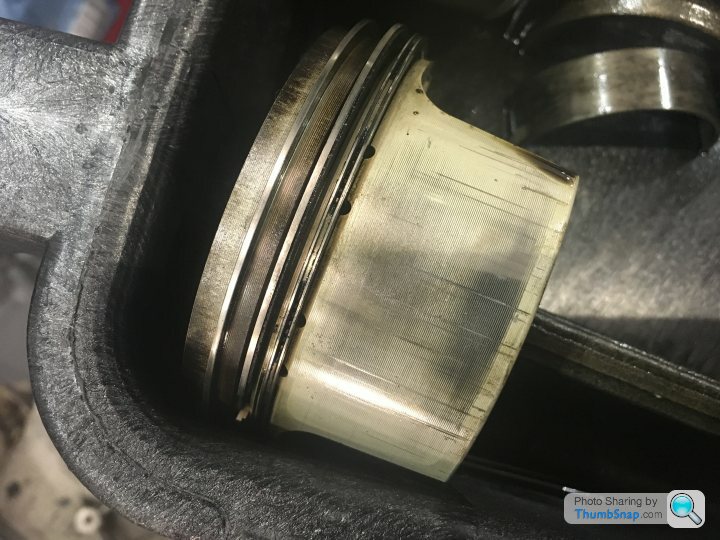
And the corresponding witness marks/gouges on the skirt of one of the pistons. No wonder the poor old girl smoked like a kipper!:
Please keep the comments and advice coming. I’m not sure when I’ll next have a significant update for you; the major castings have to receive their machine work before we get to the reassembly stage. I’m not pushing Ricky for timescales; I’d prefer that the work is done well rather than quickly! Besides, it’ll do no harm to miss a winter of road salt..........
As you can see in previous photos, the plenums look particularly scabrous! The original finish gave up at about eight years old, although it’s only just starting to fail on the air filter boxes after thirteen. But then, they don’t have to survive the same temperature extremes. The red vermiculated paint on the cam covers of my old F355 began to flake away much earlier still. Audi paint verses Fiat paint; discuss.....
I repainted the plenums about five years ago, using wet paint from rattle cans. The correct paint is available from several UK stockists, being VHT Wrinkle Plus paint imported from the US. https://www.vhtpaint.com/high-heat/vht-wrinkle-plu...
As the VHT product never seems to last as long as the original, I did wonder what process is used by the OE manufacturer. And it turns out to be powder coating. So thank you for the heads-up on that too. Ricky already has a box of brackets that will be media blasted and powder coated, and I was going to suggest that everything be dispatched together to the powder coaters previously linked to. But it turns out that wrinkle-finish powder coating is far from rare, and that the local refinishers in Swindon have done plenty of previous such jobs to his satisfaction. It’s a much more durable finish than wet paint and should hopefully last much longer.
Anyway......
I paid Ricky and the patient a visit last week. The engine was almost completely stripped, with just the heads to tackle. Several fasteners had proven troublesome as Ricky removed the engine, the last being some of the exhaust manifold nuts. He was anticipating the need for heat and mild violence/swearing in their final battle. Hopefully by now, the heads have been stripped and will have been sent away with the block for the required engineering work.
And now that the block has been stripped, we’re finally able to see the extent of the bore wear caused by the long-term ingestion of the gently degrading cats. If the following photos don’t persuade fellow owners of pre-LP, 5.0 litre Gallardos to investigate the removal of their cats, then nothing will! (For clarity, this seems to be a flaw in the design of the 5.0 litre engine, but not the later 5.2, which has a different (4.2 rather than 4.0) Audi V8 as it’s progenitor.)
And before the photos, an aside:
I’ve heard from at least one fellow owner who looked at a couple of examples before finally buying another. In both cases, he unearthed evidence of complete engine rebuilds at surprisingly low mileages. At the time he assumed that it was either bad luck, or that the cars had been ragged hard as “track experience” or hire cars (both were pre-LP SLs). My own opinion is that I’m fortunate that my car has always been used regularly and on longer drives. As such my cats have gently deteriorated with age, breaking down into a fine “sand” that has caused the bore wear. I’m aware of numerous cars that have suffered catastrophic failure at much lower mileages when much larger pieces of the cats have been ingested. Could this be the result of numerous short trips, maybe cruising through the local town, with the car parked up for extended periods of time between and condensation forming in the barely-warm cats, leading to more extensive corrosion of the plates?
So, time for the “money shots”.......
There are a lot of pieces squeezed into the engine bay of a V10 sports-car. Not everything in this first one is from my vehicle, but most of it is! That manky lump in the foreground is the Graziano manual gearbox. On the top shelf of the nearest trolly are the pistons and rods and the oil pan. It’s a stressed part of the block assembly and will be bolted back to it to provide rigidity during the machining processes. That’s my crank on the shelf below. The incongruous bag of Catsan might be for the works cat, but is probably of much more use for absorbing the inevitable oil spills that disassembly will have created. (In the background Ricky squats, contemplating what expletives will best accompany the removal of the exhaust manifold nuts):
The block itself is a surprisingly small part of the whole:
Thankfully (!), bore wear aside, the internals appear to be in good nick; the crank will require nothing more than a polish. Here you see two of the “main” and four of the “big end” journals. The “stripe” on the main journals is caused by the oil access groove cut into one half of the bearing shell.
But, Oh! the bore wear. Here’s two of the cylinders at random (9 and 10, I think):
And the corresponding witness marks/gouges on the skirt of one of the pistons. No wonder the poor old girl smoked like a kipper!:
Please keep the comments and advice coming. I’m not sure when I’ll next have a significant update for you; the major castings have to receive their machine work before we get to the reassembly stage. I’m not pushing Ricky for timescales; I’d prefer that the work is done well rather than quickly! Besides, it’ll do no harm to miss a winter of road salt..........
I’ve a degree in aeronautical engineering, but it’s gathered dust for the 25 years since I graduated. I fly them rather than design them! So if we’ve any fluid dynamicists here, or even engine designers, feel free to help me out........
In one of the photos above, you can see most of the disassembled engine on trolleys. The heads are on the middle trolly with the exhaust manifolds still attached. And the constant diameter, kinked pipes pointing backwards from the manifolds are the cat bypass pipes. So you can see that the cats are positioned quite a way back from the heads. Yet it IS fine sand from the cats that has been dragged back into the bores and has caused the scoring. And it seems that several unfortunate owners have had much larger bills than I’m facing at much lower mileages, when quite large portions of the cat’s plates have broken free and been ingested. How?
Well, I expect that you’d need some pretty accurate computer modelling of the exhaust system, a good computational fluid dynamics (CFD) programme and quite a bit of computing power to replicate things, but....
As the piston starts to descend at the start of the induction stroke, the inlet valve is open to allow the fresh charge to be drawn into the cylinder. But initially the exhaust valve is also still open (valve overlap). This allows some of the incoming charge to both purge the last of the exhaust gasses and to also cool the hot exhaust valve. It’s during this overlap period that the cat material can be drawn back into the bore. And I’m guessing that it’s not so much under high load, but at low revs and particularly during start up that the “sand” is drawn into the bores. But as I said, that’s just a guess.
As for debris being “blown” out of the exhaust, exhaust gas streams are surprisingly low speed and pulsed. It’s not a roaring gale, rather a rapid series of light puffs. And if you’ve ever seen inside a cat, you’ll have been as surprised as I was as to how restrictive the matrix seems. If a piece with any dimension greater than about 3mm broke off on the engine side of the cat, then it’s staying on the engine side!
Seems to be that Lambo got the exhaust architecture a little wrong on the 5.0 engine. It’s quite different on the later, Audi developed 5.2.
If anybody can answer this more definitively then, please do!
Edited by 4321go on Monday 18th February 19:28
Edited by 4321go on Monday 18th February 19:31
mike01606 said:
The cats are actually quite close to the engine. Valve overlap and exhaust tuning cause pressure waves in the exhaust system... particles can 'ride' these waves back into the cylinders.
I wrote above that I’m a one finger typist. You wrote that in the half-hour or so it took me to write and tweak my later reply 
“Mmmmmmmm....... Complicated.........” (best said à la Homer Simpson):
http://www.formula1-dictionary.net/exhaust_road_pe...
http://www.formula1-dictionary.net/exhaust_road_pe...
It just so happens that I chose this afternoon to pop round to Ricky’s for the first time in about a month. I knew that he had nothing new to show me yet; I just fancied a cuppa and a natter.
As regards my car, Ricky assures me that the specialist parts are in hand. The CP Carrillo pistons are not a stock item, they’re made to order and are almost ready for shipment from the States. Same goes for the valve train. And the block and heads are still away with the machinist. So no photo updates today.
But as regards the photo above.....
It’s not my car, but another 5.0 litre Gallardo that Ricky is de-catting. What you are looking at is the flange at the end of the fight-hand exhaust header. The right hand cat attaches to this and the plates of the catalyst sit about 3 inches away from this flange. Inside the hole you can see a bundle of tubes. Actually, you’re looking at about two and a half of the five individual headers that sit within the two halves of the pressed-steel manifold (ie, each of those inner pipes is connected to an individual cylinder’s exhaust port). The white “crumbs” sitting in one of those pipes is debris from the disintegrating cat! Ricky tells me that this is a low mileage car!!
He posted that post whilst I was driving over. I arrived just as he was removing the second cat, so I was able to witness the same debris sitting within the other manifold.
If you have a 5.0 litre Gallardo, thing seriously about de-catting...........
I use ACF50 myself to protect the otherwise weather-protectionless chassis of my Lotus Eleven replica (ok, a tarted-up Westfield Eleven!). The only thing that stands between the steel frame and suspension parts and rampant corrosion is paint. And the aluminium panelling is completely exposed. So after a thorough chassis wash, I give everything a light rub-over with the oily, pink fluid. The good thing is that it isn’t sticky and doesn’t attract a build-up of gritty gunk. The bad thing is that it’s a very penetrative lubricant, so you have to be careful not to get too much into the wrong place. Nicely lubricated rivet joints are not an engineering ideal!
Sadly, it wouldn’t have any effect on the exhaust manifold nuts, inaccessible with the engine in situ, after 100,000 miles. I expect that Ricky will reassemble with a smear of Copperslip and the hope that it won’t be him disassembling them in the distant future.......


Sadly, it wouldn’t have any effect on the exhaust manifold nuts, inaccessible with the engine in situ, after 100,000 miles. I expect that Ricky will reassemble with a smear of Copperslip and the hope that it won’t be him disassembling them in the distant future.......
Edited by 4321go on Friday 29th March 16:58
The briefest of brief updates.
The machine shop is still awaiting the bespoke cylinder liners from the USA. Once they’ve landed, the block can be bored and sleeved. I believe that’s all that’s left to do before the engine can be built back up again.
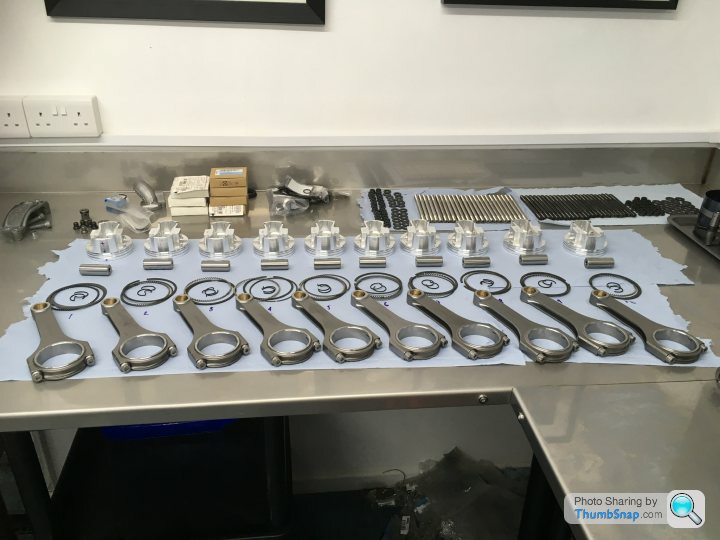
Meanwhile, Ricky has taken delivery of lots of shiny reciprocating bits, also from the States.
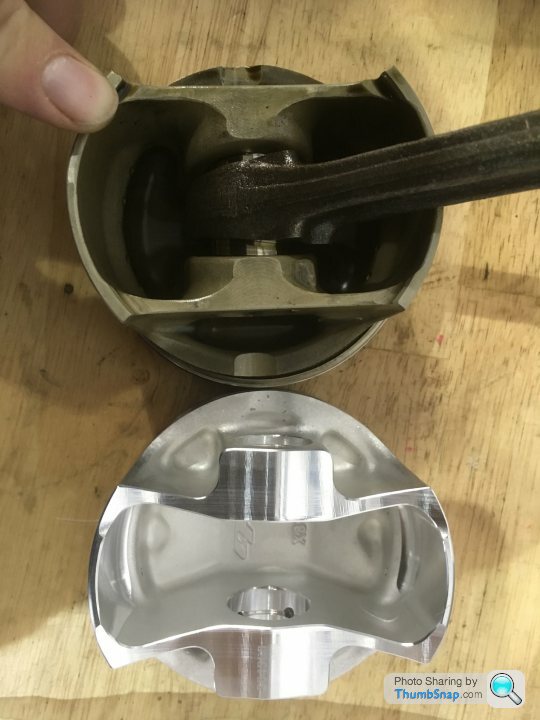
The CP Carrillo pistons, gudgeon pins and ring sets:

No, it’s not a V8. Some of those compartments are doubled up. As an aside, our Septic friends refer to gudgeon pins as “wrist pins”. How many of us have tried to explain how the linear motion of the piston is translated into the rotational motion of the crank by making our upheld fist the “piston”, our forearm the “connecting rod” and our elbow the “big end”. Lo and behold, your wrist suddenly becomes the “gudgeon pin”! Hence “wrist pin” I suppose?
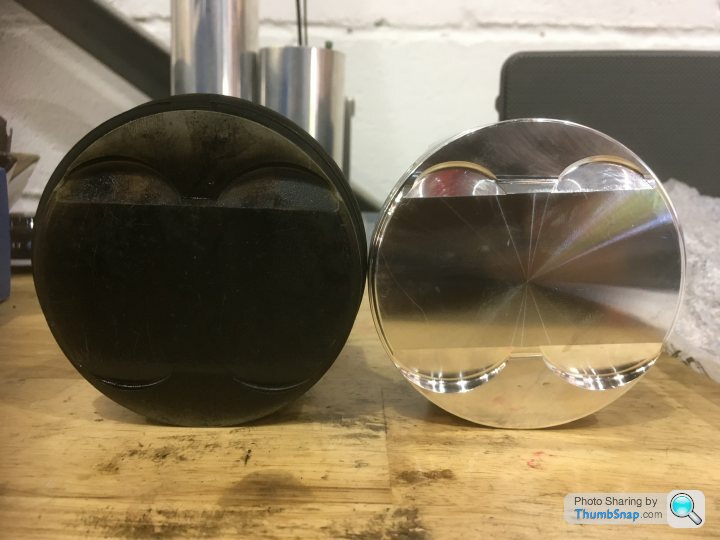
The pistons are going to be MUCH lighter!
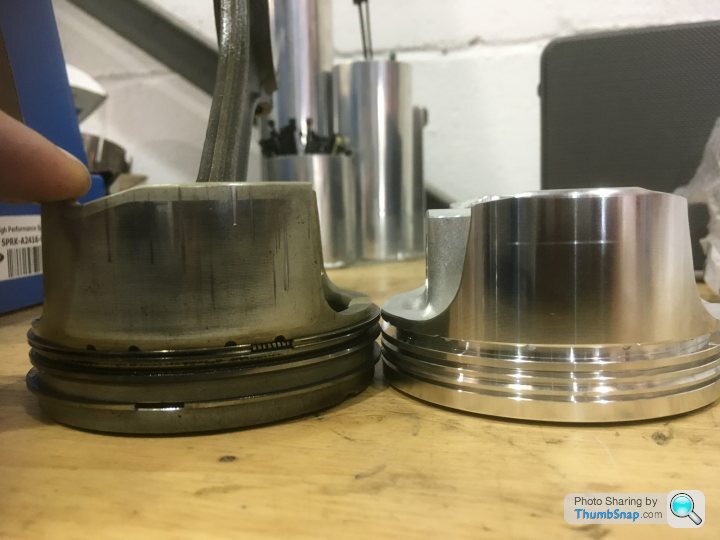
Note the scoring on the skirt of the old piston. Also note how much shorter, more narrow and hence lighter the skirt is on the new piston.
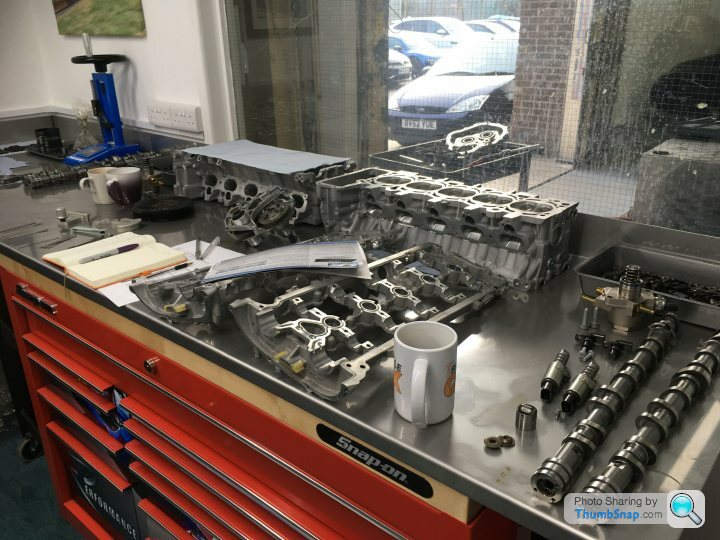
Finally, all of the valve train has also arrived from ‘Murica. Lots of small boxes containing inlet and exhaust valves, springs, top hats and collets. The heads are also with the machine shop, having already received new valve guides and seats, the latter being cut with reference to valves that Ricky already had in stock. For no better reason than I took photos of them, here are the valves, inlet then exhaust:


TTFN
The machine shop is still awaiting the bespoke cylinder liners from the USA. Once they’ve landed, the block can be bored and sleeved. I believe that’s all that’s left to do before the engine can be built back up again.
Meanwhile, Ricky has taken delivery of lots of shiny reciprocating bits, also from the States.
The CP Carrillo pistons, gudgeon pins and ring sets:
No, it’s not a V8. Some of those compartments are doubled up. As an aside, our Septic friends refer to gudgeon pins as “wrist pins”. How many of us have tried to explain how the linear motion of the piston is translated into the rotational motion of the crank by making our upheld fist the “piston”, our forearm the “connecting rod” and our elbow the “big end”. Lo and behold, your wrist suddenly becomes the “gudgeon pin”! Hence “wrist pin” I suppose?
The pistons are going to be MUCH lighter!
Note the scoring on the skirt of the old piston. Also note how much shorter, more narrow and hence lighter the skirt is on the new piston.
Finally, all of the valve train has also arrived from ‘Murica. Lots of small boxes containing inlet and exhaust valves, springs, top hats and collets. The heads are also with the machine shop, having already received new valve guides and seats, the latter being cut with reference to valves that Ricky already had in stock. For no better reason than I took photos of them, here are the valves, inlet then exhaust:
TTFN
Frustratingly stalled whilst we awaited the custom cylinder liners from the US. Apparently, they were busy building a wall or something?
Anyway, they arrived with the machinists a couple of weeks ago and they anticipated the block being finished this Monday just gone (yesterday!). I’m hoping to get over to Ricky’s in the next couple of days.
Thanks for your interest........and watch this space
Anyway, they arrived with the machinists a couple of weeks ago and they anticipated the block being finished this Monday just gone (yesterday!). I’m hoping to get over to Ricky’s in the next couple of days.
Thanks for your interest........and watch this space
Gassing Station | Supercar General | Top of Page | What's New | My Stuff