Merch 131 Mid Life Update
Discussion


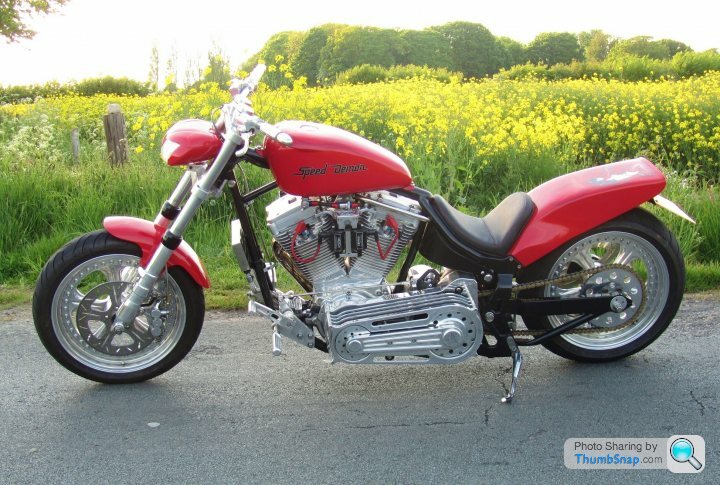
Back in 2000, I bought a 131 Cubic inch(2150cc) high output 'Harley' Evo motor, fully polished, built by the Merch Performance workshop in Canada and shipped to the UK for me. It was the best Evo of its day, and I could've bought a new Harley big twin for the cost of that one engine.
I still needed a gearbox, primary, frame, forks, wheels, bodywork and so on. It took more than two years to complete, each part being chosen because I thought it was the best option, the cost was not a consideration, it would just take longer as I saved to pay for it all. When the German drop seat frame arrived from HPU, the engine was too tall to fit, so we had to cut and raise the top tube.
When it was finally finished, within the first 100 miles, the expensive belt primary had broken, while the handling was pretty damn awful, due to the fashionable 'phat' wheels and tyres I'd fitted, a 160 x 16 front tyre is never a good idea. The primary was soon re engineered, while I spent another £2500 on new Ricks 17 inch billet and titanium wheels which improved the handling no end, it actually wanted to go around corners now, though at the cost of even less ground clearance, and it didn't have much to begin with.
I still have the Merch 131, its evolved over the years, different brakes, different seats, different exhaust, a hydraulic clutch conversion, and after snapping three belts, I switched to chain final drive, well, you get the picture.
Its been on the dyno a few times, the last being when I made a new exhaust for it. It has a Mikuni HSR 42 carb, small for such a big engine, but that was the biggest available when I placed my order back in 2000. A HSR 48mm would no doubt give a bit more top end, but at the expense of low down torque. I prefer the motor as it is, making 145 lb/ft torque and 128 bhp at the rear wheel. To put that into perspective, its making over 100 lb /ft of torque at 2k rpm.
The only Harley part on the bike is the fuel tank, and that's been modified. The trad Harley folk hate it, ''looks too Japanese'', doesn't look right in their eyes... blah blah. I just smile and nod, and think ''I didn't build it for you... ''
Mid Life Update
Anyone whose built a ground up special will know they are never finished, there's always something that can be improved or updated. Now its time for some to make those changes over the winter months...
Here is how it looks before the work started..

The updates I want to make break down into three areas...
1) The riding position.
Its never been the most comfortable bike in the world, but still things could be improved for me at least, by bringing the bars bag an inch or so and ditto the footpeg position.
2) Improve the Ground Clearance.
This is the trickiest change to make, as like all Softail Harleys the rear shocks live under the gearbox and work differently from most shocks. They don't compress when going over a bump, instead they extend. Coupled to the fact that the shocks on my bike are expensive Fournales gas shocks (No springs used) which I want to keep. But I have a plan !
3) Electrics and Instruments
The bike has basic functions only, with a speedo bolted to the rear cylinder.. not ideal. That said its all very neat with most of the wiring hidden inside the frame tubes. I want to replace the old speedo and idiots lights with a new up to date tacho/speedo with built in idiot lights, and completely replace the wiring, taking advantage of the latest tech from the German company Moto Gadget, which wasn't available when I built the bike all those years ago
I still needed a gearbox, primary, frame, forks, wheels, bodywork and so on. It took more than two years to complete, each part being chosen because I thought it was the best option, the cost was not a consideration, it would just take longer as I saved to pay for it all. When the German drop seat frame arrived from HPU, the engine was too tall to fit, so we had to cut and raise the top tube.
When it was finally finished, within the first 100 miles, the expensive belt primary had broken, while the handling was pretty damn awful, due to the fashionable 'phat' wheels and tyres I'd fitted, a 160 x 16 front tyre is never a good idea. The primary was soon re engineered, while I spent another £2500 on new Ricks 17 inch billet and titanium wheels which improved the handling no end, it actually wanted to go around corners now, though at the cost of even less ground clearance, and it didn't have much to begin with.
I still have the Merch 131, its evolved over the years, different brakes, different seats, different exhaust, a hydraulic clutch conversion, and after snapping three belts, I switched to chain final drive, well, you get the picture.
Its been on the dyno a few times, the last being when I made a new exhaust for it. It has a Mikuni HSR 42 carb, small for such a big engine, but that was the biggest available when I placed my order back in 2000. A HSR 48mm would no doubt give a bit more top end, but at the expense of low down torque. I prefer the motor as it is, making 145 lb/ft torque and 128 bhp at the rear wheel. To put that into perspective, its making over 100 lb /ft of torque at 2k rpm.
The only Harley part on the bike is the fuel tank, and that's been modified. The trad Harley folk hate it, ''looks too Japanese'', doesn't look right in their eyes... blah blah. I just smile and nod, and think ''I didn't build it for you... ''
Mid Life Update
Anyone whose built a ground up special will know they are never finished, there's always something that can be improved or updated. Now its time for some to make those changes over the winter months...
Here is how it looks before the work started..
The updates I want to make break down into three areas...
1) The riding position.
Its never been the most comfortable bike in the world, but still things could be improved for me at least, by bringing the bars bag an inch or so and ditto the footpeg position.
2) Improve the Ground Clearance.
This is the trickiest change to make, as like all Softail Harleys the rear shocks live under the gearbox and work differently from most shocks. They don't compress when going over a bump, instead they extend. Coupled to the fact that the shocks on my bike are expensive Fournales gas shocks (No springs used) which I want to keep. But I have a plan !
3) Electrics and Instruments
The bike has basic functions only, with a speedo bolted to the rear cylinder.. not ideal. That said its all very neat with most of the wiring hidden inside the frame tubes. I want to replace the old speedo and idiots lights with a new up to date tacho/speedo with built in idiot lights, and completely replace the wiring, taking advantage of the latest tech from the German company Moto Gadget, which wasn't available when I built the bike all those years ago
Lets get started by making new mounting plates for the forward controls, which moved the pegs an inch or so closer and a little lower. Luckily I was able to re drill and cut down the original plates which saved a lot of time.
Next the old one off risers were replaced with these new ones I made, they are as low as I could get them, while now moving the bars back an inch. The old risers and their mounting bolts were drilled to allow the wiring for the bar end indicators to pass unseen through the bars and down throught the risers.
I'll be losing the bar end indicators, as that'll made the bike six inches narrower at the bars. Handy when filtering through traffic..

Test Fit
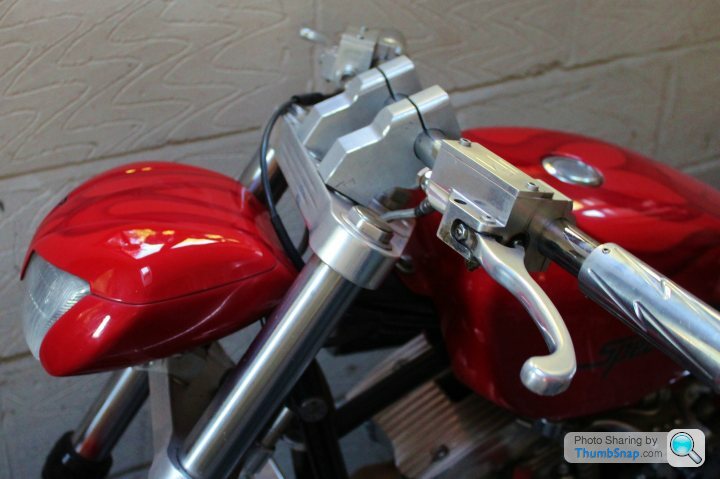
Polished and new techo/speedo mounted

Next the old one off risers were replaced with these new ones I made, they are as low as I could get them, while now moving the bars back an inch. The old risers and their mounting bolts were drilled to allow the wiring for the bar end indicators to pass unseen through the bars and down throught the risers.
I'll be losing the bar end indicators, as that'll made the bike six inches narrower at the bars. Handy when filtering through traffic..
Test Fit
Polished and new techo/speedo mounted
Improving Ground Clearance
This was the mod I was most concerned about, there's a chance it could all go wrong, which would be an expensive mistake to fix. My plan is to move the Swing arms shock mounts back 20mm, doing this means the swing arm will need to rotate further down before the shocks can be bolted to the swing arm. This change should (in theory) lift the back end of the bike up around 65mm. However, if I get it wrong, the swing arm could hit the frame at full extension or the shocks may not reach the changed mounts on the swing arm.
Oh well, nothing ventured, nothing gained...
My first problem was that I had no room to work on the bike at home, not enough to safely remove the back end anyway. Thankfully, my mate Tim owns the local bike shop and kindly allowed me to work on the bike in the corner of his storage unit to do the work.
As usual things didn't go according to plan... they never do lol... but got there in the end, the photos below show the difference before and after. And since I went to the trouble of filming the process, you can see how it was done here..
https://youtu.be/cOmDXLuC1NM
And here's the bike back on its wheels again, with the swing arm powder coated by Triple S in Bingley. I fired it up for the first time in 18 months sans baffles...
https://youtu.be/CrqCoUlsZU0
Cost for the welding was £70, while the powder coating was £60 plus £10 extra to remove the existing powder coating (done by Triple S in 2003). They charge more as blasting off powder coat takes a lot longer than the typical OE finish. While the new speedo/tacho was £140, not bad so far. The Moto gadget stuff is more expensive, its going to cost about £450 for the parts, and I'm only buying the minimum required..
Before
After
scorcher said:
Beauty is in the eye of the beerholder, no doubt, but well done for building something for yourself! I just haven't got the enthusiasm or patience.
I seem to spend more time messing with my bikes than riding them these days, I like doing both... got three other bikes to work on at the moment...Benni said:
Great engine in a cool bike, well done, those dyno pulls were impressive.
The exhausts remind me of the "Kodlin kink" ones, but suit the bike, single headers or a hidden joint ?
Now the rear is raised, I would try to lower the rear fender a bit, to get it more "level" again,
but as it is bolted to the frame and part of the seat, that might be not so easy.
The area between the rear of the tank and the front of the seat looks a bit bare,
but tunneling/extending the tank is also quite some task.
Still envious though.
Its a 2-2 exhaust, a 2-1 would work better but a suitable silencer that doesn't dwarf the bike isn't easy. The seat unit is a one off in carbon with steel supports set into the carbon underneath, not an easy thing to change. Besides I quite like the new stance of the bike, the lower frame rails are parallel to the ground now. The area behind the tank looks a bit odd as we had to cut and raise the frame top tube to fit the taller engine in the frame (makers said it'd fit, but it didn't). I tried a few different tanks on it as it was being built, and this one looked the best. A XL peanut tank looked cool, but at 2 gallons capacity, it wouldn't have got me very far between fill ups.The exhausts remind me of the "Kodlin kink" ones, but suit the bike, single headers or a hidden joint ?
Now the rear is raised, I would try to lower the rear fender a bit, to get it more "level" again,
but as it is bolted to the frame and part of the seat, that might be not so easy.
The area between the rear of the tank and the front of the seat looks a bit bare,
but tunneling/extending the tank is also quite some task.
Still envious though.
Mr2Mike said:
Always wondered why bikes like this have the enormous primary drive belt that looks like a supersized belt sander glued on the side? Why couldnt a compact chain drive be used?
A standard Harley has a chain primary in an oil bath, which works well enough, the belt is really cos it looks cool and sounds like a blower drive. Its supposed to be a bit smoother and makes it easier to work on the clutch etc. Prof Prolapse said:
Well at this rate I'm sure you'll have some time in a wind tunnel before you're done!
It's actually interesting to see. You've basically done what people like me always say when they see HD power figures in that you've fitted a more powerful engine, but now you're left with playing catch up with the rest of the bike because of geo, position, drivetrain, etc.
I'm interested to see what it ends up looking like.
I didn't start with a Harley, the only HD part on the bike is the petrol tank, which has been modified. It was built from new aftermarket or one off parts. Its fast for a 'Harley', about the same as my old VMax, but its not really fast compared to a modern sports bike.It's actually interesting to see. You've basically done what people like me always say when they see HD power figures in that you've fitted a more powerful engine, but now you're left with playing catch up with the rest of the bike because of geo, position, drivetrain, etc.
I'm interested to see what it ends up looking like.
graham22 said:
Ironically I think the tank spoils/confuses the look of the bike - it's too old school, something you expect on a skinny, girder fork type chop.
With the wide split rims, machined billet etc the bike needs a more modern, integrated tank.
Not my thing but certainly respect the work gone into it.
Most modern tanks are too wide, or don't work with a single top tube frame, but always open to suggestions...With the wide split rims, machined billet etc the bike needs a more modern, integrated tank.
Not my thing but certainly respect the work gone into it.
The bike will be at my mates workshop over the new year, as one of the modules from Moto Gadget is on back order. Not a problem as it'll not be ridden till the spring anyway.
But that hasn't prevented me from making a start on another upgrade which is a mini-project in itself. One issue I have with all Harleys is their weight, a standard Evo Softail is getting on for 650lbs with fuel. Cant do much about the mass of the engine / transmission, while an OE frame and swingarm tips the scales at 100lbs (60/40), my aftermarket German HPU frame is a bit lighter, but not much. Despite these hefty components, I've got the weight down to 515lb dry and around 540 lbs wet.
When the swing arm was off the bike, I found it weighed 33lbs, not bad for a Harley, but that's heavier than the frame kit of my Norley, so surely I could lose some weight here, particularly since its unsprung weight.
A few years ago I asked one of the UK's best frame makers how much they'd charge to make a replica of my swing arm in alloy... the answer.. £3000 ! I didn't ask them to justify that amount, as I suspect it was a job they didn't want.
I forgot about it, until last month, when the swing arm was off the bike for a couple of weeks... when I had an idea... why not make my own replica? Therefore we took careful measurements of the arm before it went back on the bike, and went through various options of how to actually make a lightweight replica in alloy. Much head scratching later, we had a plan, and I went ahead and ordered the billet alloy we'd need.
Now this replica wont be made the way most alloy swing arms are made.. ie from square section alloy extrusions welded together with cast / machined sections added where required. Instead the whole swing arm will be constructed from sections made from solid billet alloy, which will be bolted, pegged and welded together where appropriate. Doing so could result in a swing arm even heavier than the original, except that each 'jigsaw piece' which will makeup the whole, will be milled extensively to lose a huge amount of weight. Fingers crossed we'll end up with a cool looking part much lighter and stronger than the steel original.
Below you can see the original HPU steel swing arm and the 'jigsaw pieces' we've made a start on, some having been line drilled to give a basic shape and marked, before going on the miller to be shaped accurately.
Benni said:
Good project for the winter, hope you succeed.
How do you do line drilling ? A 10mm drill and the centers 20mm apart ?
Leave some thin material in between the holes and then cut/file/hammer away ?
When I try this I often end up with the drill trying to go in the neighbour hole halfway through,
maybe this is because of the cheapo small drill machine I have to use ?
Yes that's pretty much how its done, though after the 100th hole drilled cant say the 101st is exactly 20mm apart. Any material left between the holes I hacksaw through. I use an ancient pillar drill, old but very sturdy, much better than a cheapo from Machine Mart etc.How do you do line drilling ? A 10mm drill and the centers 20mm apart ?
Leave some thin material in between the holes and then cut/file/hammer away ?
When I try this I often end up with the drill trying to go in the neighbour hole halfway through,
maybe this is because of the cheapo small drill machine I have to use ?
The electronic parts we were waiting for have finally arrived from Germany, so I was asked to pop into my mates workshop to discuss options as to where various components were to go, and which buttons I wanted doing what.. The Moto Gadget stuff is clever, you can program it so one button does more than one task.
It was odd seeing my old bike on the lift, with its entrails hanging out, as I'm the only person whose ridden it or touched it with a spanner since it was built. I had to resist the urge to grab a cloth and start cleaning it lol. Fingers crossed the next time I visit, it'll be back together and running as good as ever..

It was odd seeing my old bike on the lift, with its entrails hanging out, as I'm the only person whose ridden it or touched it with a spanner since it was built. I had to resist the urge to grab a cloth and start cleaning it lol. Fingers crossed the next time I visit, it'll be back together and running as good as ever..
The switchgear from Moto Gadget has been fitted, they make a few different options... black, polished alloy, standard or mini buttons.. I went with the polished / 3 mini button option (the bike only has 3 buttons on the bars for the horn, high beam and starter) which at around £120 isn't cheap. But they do feel very well made, so hopefully worth it.
If needed they can be setup with the M-Unit control module so that one button can do more than one job..

While the mini project to make a replica swing arm in billet alloy is making slow progress, with the front side plates and the cross pieces having been milled now..

Below is my oil tank which was powder coated along with the frame by Triple S in Bingley when the bike was first built back in 2003. Its gained a couple of scratches along the way, so while its out of the bike, I wanted to have it refinished. I was going to take it to Triple S again, but having seen some parts coated with a ceramic anodising called DiamonDyze by Camcoat, I'm going for that option.
It gives a smooth satin finish and is surprisingly tough. My mate Tim has used it on a lot of parts of his Scrambler XL 1250 project, including the forks, yokes, oil tank and even the head bolts which were left unmarked having been torqued down.


If needed they can be setup with the M-Unit control module so that one button can do more than one job..
While the mini project to make a replica swing arm in billet alloy is making slow progress, with the front side plates and the cross pieces having been milled now..
Below is my oil tank which was powder coated along with the frame by Triple S in Bingley when the bike was first built back in 2003. Its gained a couple of scratches along the way, so while its out of the bike, I wanted to have it refinished. I was going to take it to Triple S again, but having seen some parts coated with a ceramic anodising called DiamonDyze by Camcoat, I'm going for that option.
It gives a smooth satin finish and is surprisingly tough. My mate Tim has used it on a lot of parts of his Scrambler XL 1250 project, including the forks, yokes, oil tank and even the head bolts which were left unmarked having been torqued down.
Edited by Merch131 on Sunday 4th February 04:51
King Herald said:
I’ve been following this on the Britchopper site, interesting project. 
I came close to buying a huge Merch motor years ago, when I had money, but adding up the rest of the parts required to even start getting the power to the ground properly would have pushed beyond my financial limits.
Its a pity that many small forums seem to be dying, guess folks are using FB etc instead. When I ordered the engine in 2000, it cost as much as a new base model big twin Harley. Add in the gearbox and Primary and your already up to the cost of a new Softail, so definitely not a cheap project. Then again its still more powerful than the latest M8 114 from Harley.I came close to buying a huge Merch motor years ago, when I had money, but adding up the rest of the parts required to even start getting the power to the ground properly would have pushed beyond my financial limits.
The alloy swing arm is progressing surprisingly well (touch wood).... 15 hours of machining so far, and this is how its looking.
Harley parts aren't known for being lightweight, and sure enough the original swing arm of my aftermarket chassis weighs a hefty 34lbs. My target is to halve that with this new alloy copy, so far with all components it weighs 20lbs, but there's still a pound or two to lose, so the target is possible. 17lbs is still a boat anchor in sports bike terms but its better than 34lbs.
Note the 'V' shaped grooves machined into the arm where two pieces are bolted together. This is where its going to be welded, as the groove allows for a neater stronger weld.


The new electrics are now all done, must say I'm impressed with the Moto Gadget components, despite the expense. The workshop charged me £1065 for the work, though more than £600 was for parts, which isn't too bad. With the changes to the swing arm (£140 for welding and powder coating) and another £140 for the new Speedo/tacho, in total all the mods came in at £1445, which is a bit less than I expected.
Just need to make a pair of bar ends and then wait for spring to arrive to get some miles on it. In the meantime, my never ending Guzzi project is going to have the same Moto Gadget M Unit and switchgear fitted soon.

Just need to make a pair of bar ends and then wait for spring to arrive to get some miles on it. In the meantime, my never ending Guzzi project is going to have the same Moto Gadget M Unit and switchgear fitted soon.
The alloy swing arm is making good progress, with the adjuster slots now milled into the two spars, and some weight lost by milling out the inside of those spars. Next is to make the axle adjusters, then the various pieces which are just bolted together can be welded together. A quick guestimate says it should end up weighing a bit less than half the steel original (34lbs).


My home made alloy swing arm (which has become a mini project in itself) got welded today. It all went ok with no distortion etc. Still to decide if its getting the under bracing of the original steel version its copied from, and what finish it having. Polished, powder coated or maybe anodised?
Its half the weight of the original (17 Vs 34 lbs), still heavy for a sports bike swing arm, but pretty light for a Harley Softail..


Its half the weight of the original (17 Vs 34 lbs), still heavy for a sports bike swing arm, but pretty light for a Harley Softail..
Gassing Station | Biker Banter | Top of Page | What's New | My Stuff