The big bike stripdown
Discussion


So after months of just putting up with my bike jumping out of second gear I've finally got my arse in gear (ah-ha!) and have begun the big task to strip it down and hopefully resolve the problem. I spent most of yesterday in the garage at my parents' with my trusty old dad & and Haynes manual. I took some photos as I went along as it's the first time I've attempted anything like this and I found it all quite interesting, and thought maybe some of you guys would too if you've never seen what goes into stripping a bike down, or what a gutted bike looks like!
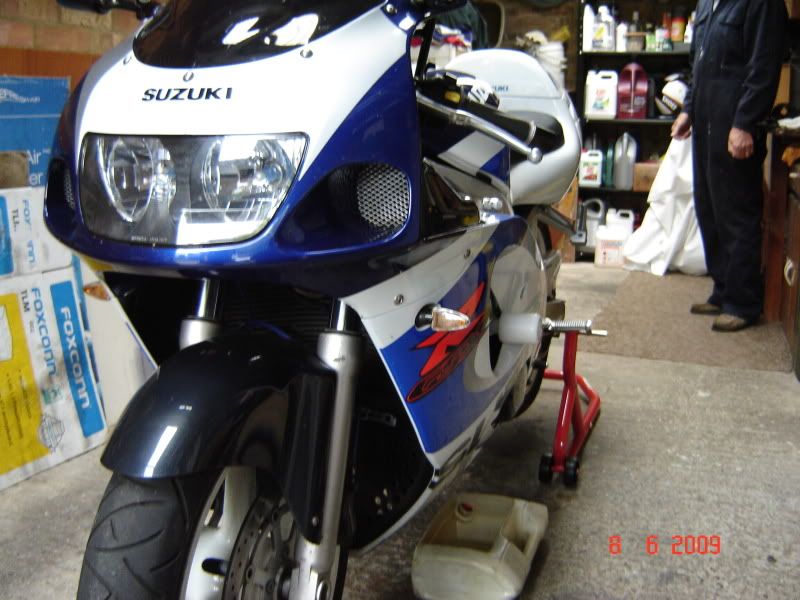
So here's the bike at the start, up on the paddock stand with oil-collecting-tub at the ready (I apologise for crappy photos by the way, I'm no photographer!)
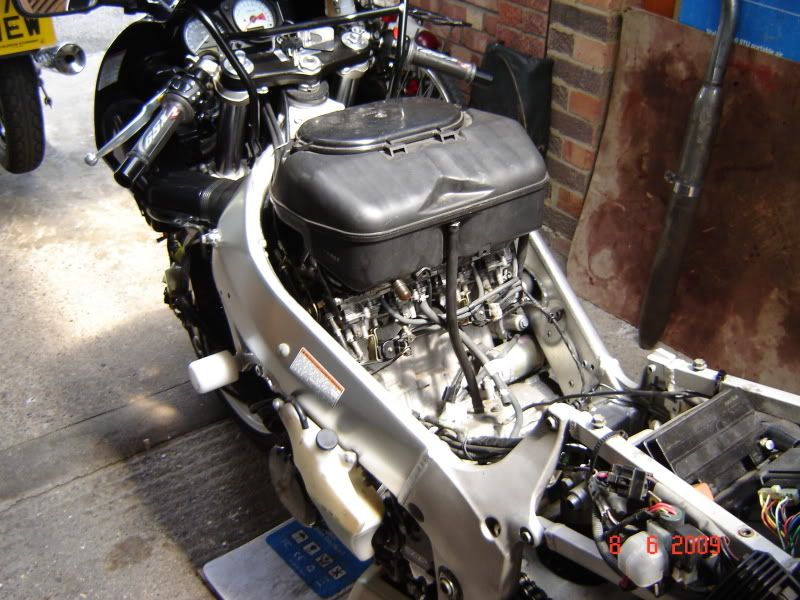
First job was to drain the oil out and take off the fairings and tank leaving it like this:
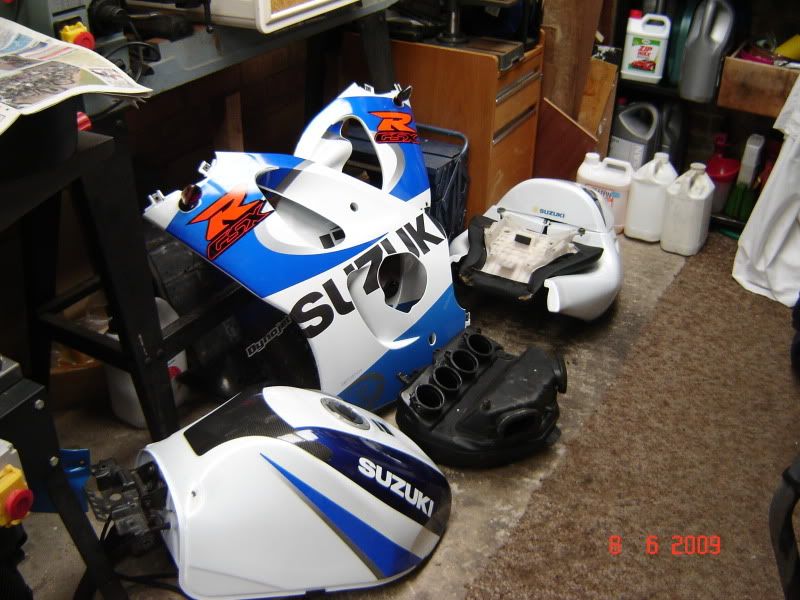
Nice pile of stuff:
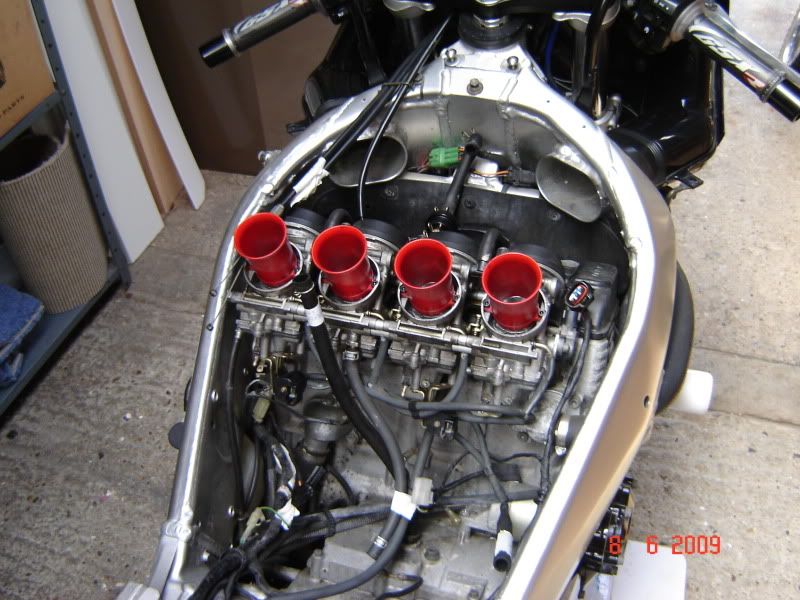
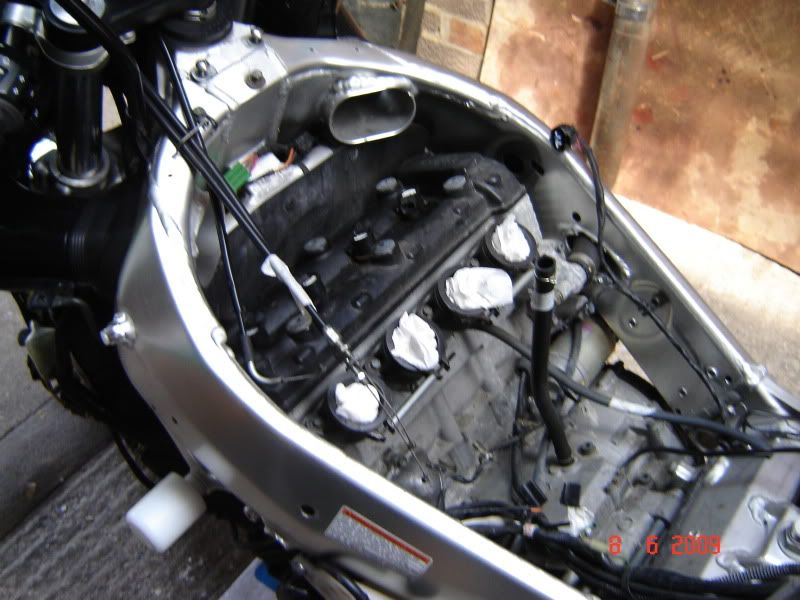
All good so far, bit of fiddling around figuring out how to get everything off, but nothing too taxing. Then the airbox came off revealing the carbs/trumpets/throttle bodies. Getting a bit scary now, a few technical bits which I don't fully understand! I played around with the twist grip and saw how it all worked with the butterfly valves and all that jazz, pretty intersting, quite clever how the carbs work really:
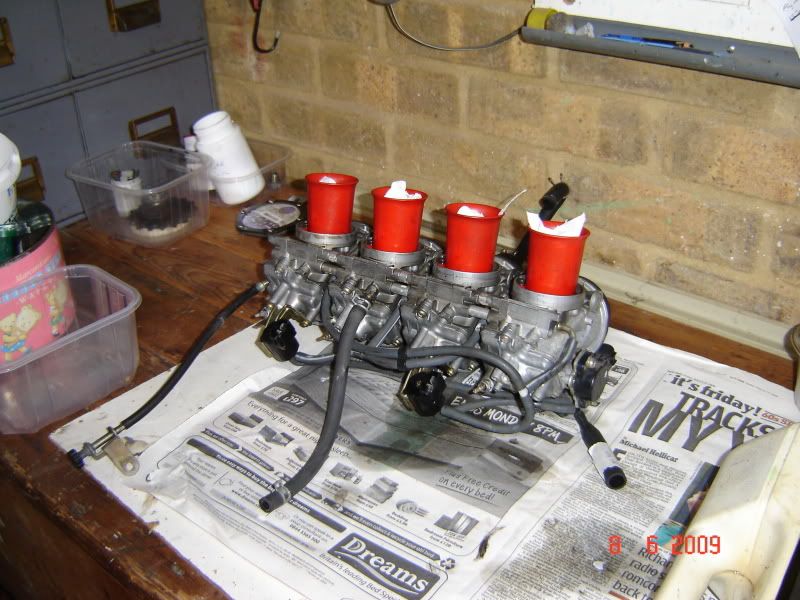
Then the carbs came off, which was a bit of a task. There's quite a lot of electrical stuff involved, which I didn't realise, carb heaters and things. So we unplugged all that (and labelled it all as I guarantee I'd not have a clue where they'd go again otherwise!). Then had to undo clips around the inlet manifold which was a bit strange - I finally found out what the holes in the frame on the side of the bike with the rubber plugs in are for (which you can see in the pic a couple above just in front of the white & orange sticker) - they're they to allow you to stick a screwdriver through to undo the clips! The manifold was pretty interesting too, 4 holes, but they split into 2 each, one for each valve (which you can see down the holes), so that was pretty cool. Jammed them up with some paper towel to stop stuff falling inside the cylinders:
The carbs on the bench:
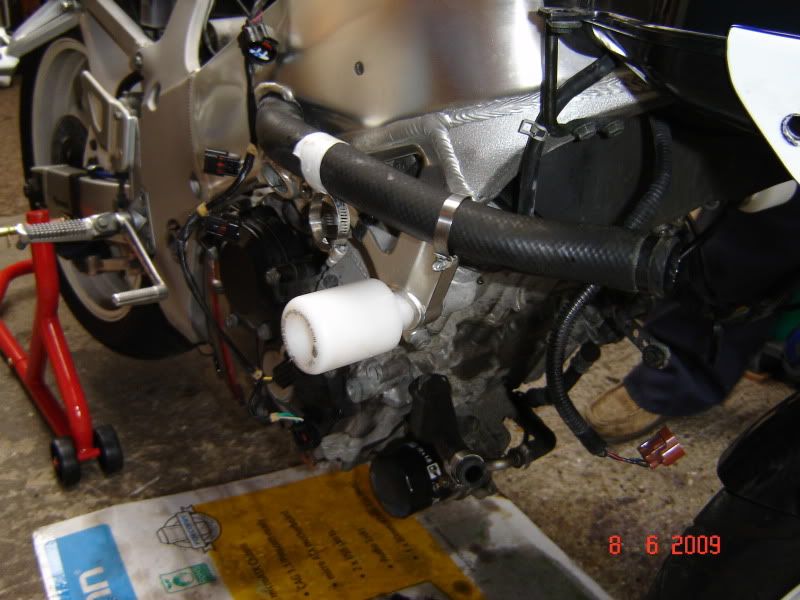
Next job was to get the exhaust off, so we had a look at the downpipes before realising that the bolts were a bit rusted into the block
(they're pretty exposed to the elements there). So we gave them a good dousing with WD40 and left it for a bit whilst we had a go at taking off the radiator. This largely involved spilling antifreezey water all over the garage floor. You undo one hose clip, with a tub underneath, and then it would all pee out of the hose you'd just drained a minute ago! Had to undo a lot of electrical stuff again (fans and thermostats etc) and then had a go at undoing the downpipe bolts. For some reason (anyone know?!) they were of the type you undo with an allen key, so it was a bit fiddly and we had to put a tube over the end of the key to get more leverage, which was pretty difficult really as there's not much space down there! Anyway, this is what it was like after the radiator and exhaust was off:
Then we had to start undoing all the bits of wiring that were still attached to the engine. This was a massive pain in the arse! I bloody hate undoing electrical clips, they always kill my thumbs! You have to push down on little plastic clips with one hand, but you need two more hands to pull the two bits apart, which isn't easy even if you have 3 hands, cos the clips are too bloody small to get a grip on! So we spent 10 minutes of breaking finger nails and swearing, then contemplating just avoiding the connectors and cutting the wires, before finally a screwdriver aided us in detaching them. Forgot to get a photo of all the electrics, but you can see some of the wires in the other photos.
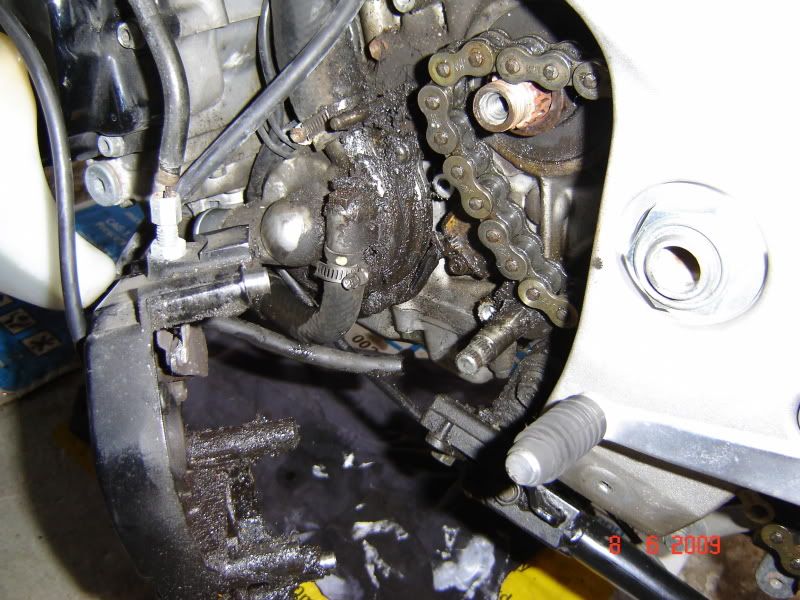
Then we had to get the front sprocket off, so the cover came off to reveal a mass of oily crap, which was nice. We cleaned this up a bit, then set upon the task of undoing the sprocket (hint: use the rear brake to hold it still whilst undoing). Then we discovered there wasn't enough room to get the bloody thing off! We had to adjust the chain tension to loosen it and then take the chain off the rear sprocket, which allowed us to then take it off the front sprocket, and take the sprocket off comme ca:
We called it a day at this point, next step is to drop the engine, which I'll hopefully be attempting on Friday.
Hope this was at least slightly interesting to a couple of people, it seems a bit longer than I'd intended!
So here's the bike at the start, up on the paddock stand with oil-collecting-tub at the ready (I apologise for crappy photos by the way, I'm no photographer!)
First job was to drain the oil out and take off the fairings and tank leaving it like this:
Nice pile of stuff:
All good so far, bit of fiddling around figuring out how to get everything off, but nothing too taxing. Then the airbox came off revealing the carbs/trumpets/throttle bodies. Getting a bit scary now, a few technical bits which I don't fully understand! I played around with the twist grip and saw how it all worked with the butterfly valves and all that jazz, pretty intersting, quite clever how the carbs work really:
Then the carbs came off, which was a bit of a task. There's quite a lot of electrical stuff involved, which I didn't realise, carb heaters and things. So we unplugged all that (and labelled it all as I guarantee I'd not have a clue where they'd go again otherwise!). Then had to undo clips around the inlet manifold which was a bit strange - I finally found out what the holes in the frame on the side of the bike with the rubber plugs in are for (which you can see in the pic a couple above just in front of the white & orange sticker) - they're they to allow you to stick a screwdriver through to undo the clips! The manifold was pretty interesting too, 4 holes, but they split into 2 each, one for each valve (which you can see down the holes), so that was pretty cool. Jammed them up with some paper towel to stop stuff falling inside the cylinders:
The carbs on the bench:
Next job was to get the exhaust off, so we had a look at the downpipes before realising that the bolts were a bit rusted into the block
(they're pretty exposed to the elements there). So we gave them a good dousing with WD40 and left it for a bit whilst we had a go at taking off the radiator. This largely involved spilling antifreezey water all over the garage floor. You undo one hose clip, with a tub underneath, and then it would all pee out of the hose you'd just drained a minute ago! Had to undo a lot of electrical stuff again (fans and thermostats etc) and then had a go at undoing the downpipe bolts. For some reason (anyone know?!) they were of the type you undo with an allen key, so it was a bit fiddly and we had to put a tube over the end of the key to get more leverage, which was pretty difficult really as there's not much space down there! Anyway, this is what it was like after the radiator and exhaust was off:
Then we had to start undoing all the bits of wiring that were still attached to the engine. This was a massive pain in the arse! I bloody hate undoing electrical clips, they always kill my thumbs! You have to push down on little plastic clips with one hand, but you need two more hands to pull the two bits apart, which isn't easy even if you have 3 hands, cos the clips are too bloody small to get a grip on! So we spent 10 minutes of breaking finger nails and swearing, then contemplating just avoiding the connectors and cutting the wires, before finally a screwdriver aided us in detaching them. Forgot to get a photo of all the electrics, but you can see some of the wires in the other photos.
Then we had to get the front sprocket off, so the cover came off to reveal a mass of oily crap, which was nice. We cleaned this up a bit, then set upon the task of undoing the sprocket (hint: use the rear brake to hold it still whilst undoing). Then we discovered there wasn't enough room to get the bloody thing off! We had to adjust the chain tension to loosen it and then take the chain off the rear sprocket, which allowed us to then take it off the front sprocket, and take the sprocket off comme ca:
We called it a day at this point, next step is to drop the engine, which I'll hopefully be attempting on Friday.
Hope this was at least slightly interesting to a couple of people, it seems a bit longer than I'd intended!
Cheers guys (and gal), I've only ever really done a couple of small jobs before, so this is a bit of a leap! Having said that though, I reckon so far pretty much anyone could have done it if they had a Haynes manual! A couple of bits I'd possibly have struggled with without my Dad, but most of it so far was just undoing stuff!
And yep, all this just to change a couple of small components in the gearbox! I got a couple of quotes from some places to see how much they'd charge to do it, and they came back with £6-700 so I thought I'd give it a go instead as most of the charge is labour apparently. I think we might need to take the actual gearbox to a mechanic when we've separated it, depends how brave we feel!
I'll take some more piccies on Friday and we can see how far we progress...
And yep, all this just to change a couple of small components in the gearbox! I got a couple of quotes from some places to see how much they'd charge to do it, and they came back with £6-700
so I thought I'd give it a go instead as most of the charge is labour apparently. I think we might need to take the actual gearbox to a mechanic when we've separated it, depends how brave we feel!I'll take some more piccies on Friday and we can see how far we progress...
Hooli said:
Chilli said:
Erm, jumoing out of gear right? I guess the goal is to get to the gearbox and you have to do all this first?!
normal way into the gearbox is engine out & turn it upside down. gearbox is accessed via the sump.good luck & keep track of all the nuts n bolts & where they came from. damn good feeling of achivement when its back together & working.
we've got lots of little tubs on the workbench with "left fairing", "right fairing", "carbs" etc written on them, but I know we'll end up with either too many or not enough bolts at the end!
Chilli said:
mitzy said:
Chilli said:
mitzy said:
Want the next installment.
love looking at pics of dirty men.
Oh, for God's sake!love looking at pics of dirty men.

Op would love to se pics of the gearbox and where it sits etc...
Maybe I'll get some pics of my dirty hands in the next lot too if you're lucky.
3doorPete said:
Nice job - going to enjoy this thread!
Thanks, I'll bear that in mind if we come across any more. - HINT* - WD40 is not that effective compared to proper Penetrating spray oil (such as that made by 3 in 1 and available from Halfords)at freeing seized bolts. I read somewhere that penetrating oil is up to 3 x as effective as WD40 and I've certainly had good results with it.
The Gixxer was a bit chavved up when I bought it, but in good nick, I've de-stickered it now and it's a bit less tarty. Would've been nice to know that 2nd gear was buggered before I got it though

Edited by Mellow Matt on Tuesday 9th June 18:57
mitzy said:
Can we get back on topic please!
So, OP has your dad got a lot of experience doing this sort of thing ?
So, OP has your dad got a lot of experience doing this sort of thing ?

He's quite an experienced spannerer, but not with modern stuff. He's always been doing mechanical stuff, taking old Nortons apart, and fixing old Austins and things, but this is by far the most modern bike he's worked on, and it's 10 years old! He's great with all the mechanical stuff (although he's scared of looking in the gearbox!), but we're both a bit crap with the electrics unfortunately. Hopefully electrical knowledge isn't needed!
We've also got a side project going on of rebuilding an old Francis Barnet Cruiser 80 (1963 vintage), which has kinda come to a standstill as we're stuck on the wiring loom
 You can see the exhaust from it leaning on the wall in one of the pics above. In fact here's a couple of pics of it:

It's in a bit of a sorry state as it was found in my mate's dad's garage, it's now got its engine in though, so looks a bit more healthy
More simple than the GSXR, just a big 250cc single cylinder lump!N Dentressangle said:
What an ace thread!
All the best with it, and keep us posted.
Thanks, will do All the best with it, and keep us posted.
Tim - from taking my exhaust off it's a piece of wee to do, so unless yours is dramatically different it should be fine. Although I'm hoping in your thread you didn't photograph everything, as I can't see an obvious way of fitting it to the block, unless you just cannibalise the mounts holding the current one on...?

TimmyWimmyWoo said:
Mellow Matt said:
Tim - from taking my exhaust off it's a piece of wee to do, so unless yours is dramatically different it should be fine. Although I'm hoping in your thread you didn't photograph everything, as I can't see an obvious way of fitting it to the block, unless you just cannibalise the mounts holding the current one on...?
It has flanges and bushes for the new headers to mount to the engine – just didn't think to take photos of them! You have to take the right-hand-side control plate off, the radiator off and all that kinda stuff. It has fairly clear instructions, though.RizzoTheRat said:
I think I see your problem there. Trouble starting it by any chance?
Good effort on the gixxer. It's amazing once you start just how quickly your confidence builds doing this kind of thing.
Ahh is that what these bits were for?! Good effort on the gixxer. It's amazing once you start just how quickly your confidence builds doing this kind of thing.

I think I'll wait until the Gixxer's back together before I start getting too confident though!

Wedg1e said:
Good man, can't call yourself a biker unless you know what the oily bits look like!
Mind you, I'm guessing from the top-down strip that the Suzi has an integral, rather than cassette-type gearbox, so you are in for some scaaaaaaaary pics of internals
Last full engine strip I did was a Honda CB550/4, some of the older PHers may remember those Mine was a semi-chop complete with demons and naked ladies, pity the previous owner didn't put as much effort into the engine as he did the artwork, that way it needn't have ended up in bits all over my kitchen.
Tip: a small amount of 10w/40 covers a LOT of worktop. And floor, sink, washing machine, kid's schoolbag, hall carpet...
Yep, I'm a bit worried about the gearbox internals! I've seen the inside of the Francis Barnett gearbox and that was complicated enough...Mind you, I'm guessing from the top-down strip that the Suzi has an integral, rather than cassette-type gearbox, so you are in for some scaaaaaaaary pics of internals
Last full engine strip I did was a Honda CB550/4, some of the older PHers may remember those
Mine was a semi-chop complete with demons and naked ladies, pity the previous owner didn't put as much effort into the engine as he did the artwork, that way it needn't have ended up in bits all over my kitchen.Tip: a small amount of 10w/40 covers a LOT of worktop. And floor, sink, washing machine, kid's schoolbag, hall carpet...
My mum's had quite enough of my dad rebuilding bikes in the house (or the bath...) so we're confined to the garage where we can't do too much damage
Davie_GLA said:
Great thread. I'm especially interested as i have a 600 SRAD too.
I said i was going to keep my bke standard, but i like your indicators, did you fit them or did the come with the bike? If the former can you point me in the general direction please, also if you did fit them and i'm assuming they are LED, did you fit resistors to adjust the flash rate?
David.
The bike came with them I'm afraid, so I don't have a clue how they're wired up, sorry chap.I said i was going to keep my bke standard, but i like your indicators, did you fit them or did the come with the bike? If the former can you point me in the general direction please, also if you did fit them and i'm assuming they are LED, did you fit resistors to adjust the flash rate?
David.
Robs_Dad said:
Mellow Matt said:
Would've been nice to know that 2nd gear was buggered before I got it though
That reminds me of when I bought my first car. The guy said the battery was flat so we bump started it. It ran like a dream so the deal was done. When I got it home and fitted a new battery it turned out my Gramps had more teeth than the starter ring. 
I didn't realise 2nd gear was buggered on the bike for a couple of months, as it only skips occassionally when you're hard on it, and as it's my first sports bike it took me a while to get to that stage
Hooli said:
kitchens are the best place of engine rebuilds 
as to 2nd gear, i bet 6th is connected too it but it doesnt play up due to the lower transmitted torque in top gear. gsx1400s have a similar problem on early models, full throttle in 2nd & it jumps like the clutch slips for a moment?
as i understand it the fault is the dogs that engage 2nd wear slightly off square as do the holes they engage with & that allows them to jump under high load. from comments on 14s you'll have to compare old & new to actually see the damage its so slight.
Yep, that's what's happening, general consensus is indeed that the dogs are worn. I'll have a look at 6th as well though, ta. I imagine it'll look like this:as to 2nd gear, i bet 6th is connected too it but it doesnt play up due to the lower transmitted torque in top gear. gsx1400s have a similar problem on early models, full throttle in 2nd & it jumps like the clutch slips for a moment?
as i understand it the fault is the dogs that engage 2nd wear slightly off square as do the holes they engage with & that allows them to jump under high load. from comments on 14s you'll have to compare old & new to actually see the damage its so slight.

instead of this:

Or at least I hope so, or else I'm going to be annoyed...!
Edited by Mellow Matt on Wednesday 10th June 21:32
OK, now I'm scared  I was just idly browsing another forum and came across a thread where the bloke's detailing the stripping of his GSX1400, so it caught my eye after Hooli's comment. He says he's got the same 2nd gear problem, "oh good", thinks I, "this'll show me what I need to do". Well too bloody right it does, have a look at this: http://www.bikechatforums.com/viewtopic.php?t=1737...
I hope all of that isn't necessary?! I'm hoping he was doing extra bits in addition to the bits necessary to get to the dogs...
I was just idly browsing another forum and came across a thread where the bloke's detailing the stripping of his GSX1400, so it caught my eye after Hooli's comment. He says he's got the same 2nd gear problem, "oh good", thinks I, "this'll show me what I need to do". Well too bloody right it does, have a look at this: http://www.bikechatforums.com/viewtopic.php?t=1737...I hope all of that isn't necessary?! I'm hoping he was doing extra bits in addition to the bits necessary to get to the dogs...
Gassing Station | Biker Banter | Top of Page | What's New | My Stuff