Another body off thread.
Discussion


From my defunct Chimaera project thread.

lancepar said:
Pads between body and chassis.
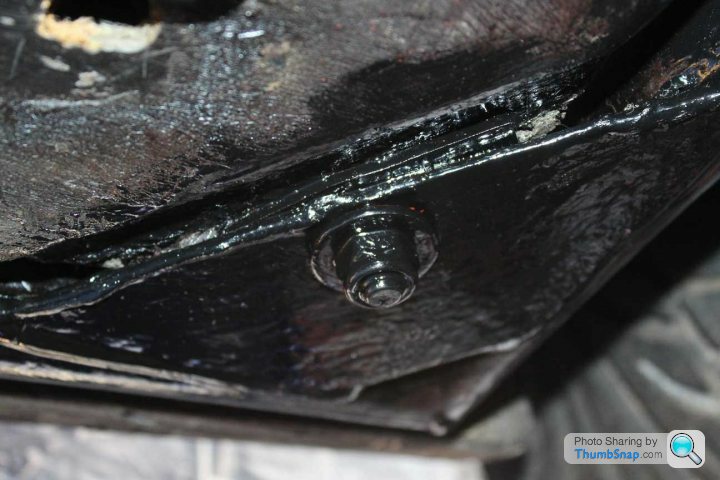
This has been discussed before but before my bolts in the floor are done up I've noticed that the front four points have a gap between the body and the chassis plate all the others are flush.
As I didn't take it apart I checked the bible and found this.
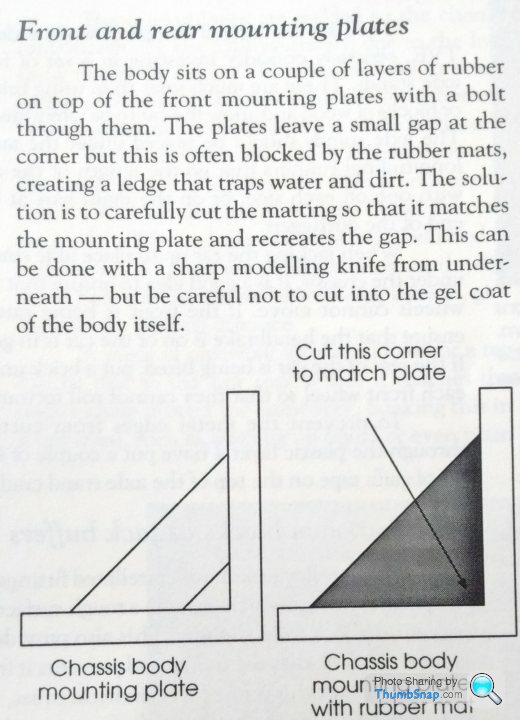
So question is..........what material have those who chose to fit pads gone for........hard rubber, polyurethane or what?
The gap to fill is about 3mm.
Cheers
I did the fronts just to aid the water sealing with some rubber and mastic on either side of the pad as well.This has been discussed before but before my bolts in the floor are done up I've noticed that the front four points have a gap between the body and the chassis plate all the others are flush.
As I didn't take it apart I checked the bible and found this.
So question is..........what material have those who chose to fit pads gone for........hard rubber, polyurethane or what?
The gap to fill is about 3mm.
Cheers
TJC46 said:
I seem to remember my old S3 had some kind of rubber on the corner plates, but the Chimaera had nothing.
Yeah maybe that’s it, it might have been on my S 2 come to think about it. After thinking about it the floor is pinched with bolts and penny washers ( big ones)
It will probably stay more secure than with something squeezed between it and the plates.
I’ll leave it as it was. Mostly the powdercoat is still intact on the old plates so there’s been no movement of body over the years I can detect.
IANATVRO, BWO. (I Am Not A TVR Owner, But Want One)
From the sounds of it I would go for a rubber mat glued to the steel - any vibrations from the body would wear the protective coating off the steel shirley? Possibly?
Enjoying the thread, please keep it coming! - but part of me wants you to spray the insides of the tubes with something - https://www.bilthamber.com/dynax-s50
Classic Chim said:
After thinking about it the floor is pinched with bolts and penny washers ( big ones)
As well as the pads at the front fixings, under all the big washers inside the cockpit I put O rings and sealant to the bolts, just to be sure, It will never float like the old VW Beetle thought
https://www.youtube.com/watch?v=lB9rK8UR0vk
Edited by lancepar on Monday 30th December 16:32
S and wedges use rubber but I suspect this was related to poor quality control on the chassis alignment and poor body moulds. They can have very drastically different amounts of rubber needed at each mount point.
Don't think I have seen a chim or Griff with rubber.
Where rubber is used you cannot get the bolts as tight so there is the possibility the joint could move and perhaps squeak.
The need for sealant on the body bolts is doubtful but you must use it on the seatbelt fixings as they 'pass through' the body without actually clamping it
Steve
I'm no expert, but the type and grade of rubber will be fairly important in terms of its life expectancy I would have thought, that and getting no relative movement between the two.
If they faces don't clamp up tight I would be looking I think for a fairly firm synthetic rubber, like a PU or EPDM.
If the faces touch I expect you could do worse then just bedding it on some PU sealant, sika, marine flex, tiger seal, etc.
Will be interested to see others thoughts.
Daniel
If they faces don't clamp up tight I would be looking I think for a fairly firm synthetic rubber, like a PU or EPDM.
If the faces touch I expect you could do worse then just bedding it on some PU sealant, sika, marine flex, tiger seal, etc.
Will be interested to see others thoughts.
Daniel
Steve_D said:
Alun
Have you dismantled the toe adjuster on the lower rear wishbones?
If not then you must do it now. Most are very stubborn to come apart and normally need a good talking to with a blow torch so not a job to be left until after paint.
If you are able to do so I would encourage you to consider hot zinc spray for all your chassis and suspension components.
https://www.youtube.com/watch?v=lArIQqCK4Es
It has almost all the benefits of galvanising but without the excessive heat. Follow immediately with a zinc prime and 2 pack epoxy. And for that little bit extra do the outriggers with an additional coat but this time in a bitumastic based paint.
Steve
I recently had my rear wishbones zinc sprayed and powder coated but had to get this adjuster free before sending them off, they were really stuck, had them in the vice and was twisting the end on the adjuster, had them red hot and they still wouldn't move, in the end I soaked them for a couple of days in a mix of ATF and Acetone, they undid so easy after that, it really is one of the best things around for freeing stuff off, note it also strips off powder coat if left to soak!Have you dismantled the toe adjuster on the lower rear wishbones?
If not then you must do it now. Most are very stubborn to come apart and normally need a good talking to with a blow torch so not a job to be left until after paint.
If you are able to do so I would encourage you to consider hot zinc spray for all your chassis and suspension components.
https://www.youtube.com/watch?v=lArIQqCK4Es
It has almost all the benefits of galvanising but without the excessive heat. Follow immediately with a zinc prime and 2 pack epoxy. And for that little bit extra do the outriggers with an additional coat but this time in a bitumastic based paint.
Steve
Really interesting thread this, I'm trying to decide if I should go the rest of the way and take my body off now or leave it till next year and focus on my Alfa Junior instead.....
EddyP said:
I recently had my rear wishbones zinc sprayed and powder coated but had to get this adjuster free before sending them off, they were really stuck, had them in the vice and was twisting the end on the adjuster, had them red hot and they still wouldn't move, in the end I soaked them for a couple of days in a mix of ATF and Acetone, they undid so easy after that, it really is one of the best things around for freeing stuff off, note it also strips off powder coat if left to soak!
Really interesting thread this, I'm trying to decide if I should go the rest of the way and take my body off now or leave it till next year and focus on my Alfa Junior instead.....
I toyed with this dilemma for about 4 years, I now wonder why I wasted 4 years. Really interesting thread this, I'm trying to decide if I should go the rest of the way and take my body off now or leave it till next year and focus on my Alfa Junior instead.....
I suppose like many I kept tapping my riggers and thinking there’s another few years in them yet but always in the back of my mind was the pictures of other people’s dissolved riggers,,, the good thing is once you start the body lift process and get so far as to raise the body even if my out riggers were ok I would have replaced them anyway.
I was not shocked at all by my riggers, they were exactly as others have been, I had tried to access the top many times, I was slightly suprised just how rotten they were on the fronts but again kind of what you expect.
Put it this way
Looking at my new riggers in place it feels fantastic. Knowing i’m doing this the right way and re covering the whole chassis is exciting and deeply satisfying.
I feel im a 1/3 the way up a mountain,,, a lot to do yet but it’s like the clouds have cleared, I see a path to the summit, Steve D and well all of you are there with a flag encouraging me to join you

I’m scrambling up that rock face as fast as I can.
But it’s also nice to pause and look about, I see all these parts I know very well really, all needing a bit of love and cleaning up. It’s a great thing to give new life to something. Cars have there own character, mines a f
 ker that demands a lot of attention but boy is she good when she’s on it, if you get my drift
I look at my semi naked chassis and even that thing stares back at me,, sort of saying, look I’m the b
ks, just finish me off and I’ll pay you back in droves,, Great really.
Loubaruch said:
One of the best posts ever on here. Please keep it flowing ( back allowing!).
Not only most interesting but of great benefit to many owners contemplating chassis restoration. Superb!
Wow what a lovely thing to say. I’m humbled. Not only most interesting but of great benefit to many owners contemplating chassis restoration. Superb!
Ok, I’ll try to be more diligent with photos and explanation on rebuild.
It’s here where the real work starts in my eyes and where you can get things wrong, any bloke can pull something apart.
Having been around cars and motorbikes since a youngster on and off learning to take the time to put bolts and washers back in their original positions or just clamping clips to pipes and things like that make a big difference. I’ll not remember which one goes on which pipe months later.
This saves so much time.
Clearly the pictures benefit me later on when rebuilding so useful for all of us.
Tubs with bolts and things I can’t attach are easy to find, it all adds up.
I think I need a good week restoring stuff so lots and lots to do yet.
For me other past rebuild threads have been really invaluable and without those I’d never have even started it. I was reading about this for a long time so if this thread helps others it’s just a continuation of a great line of people helping eachother for many many years.
Tvr, its not just the cars is it.
Happy new year guys. Apart from my back I’ve not felt like this for a long time.
Bring it on.
Loubaruch said:
One of the best posts ever on here. Please keep it flowing ( back allowing!).
Not only most interesting but of great benefit to many owners contemplating chassis restoration. Superb!
I'll second that, Alun also writes poetically expressing his emotions wonderfully as we follow him on his chassis restoration journey.Not only most interesting but of great benefit to many owners contemplating chassis restoration. Superb!
Sadly PH is so often a platform for negative types to release their personal frustrations so its absolutely wonderful to follow a post thats both informative and full of positivity.
Keep up the good work Alun, we're all routing for you mate, but take it at your pace and look after that back of yours.
Dave.
ChimpOnGas said:
Loubaruch said:
One of the best posts ever on here. Please keep it flowing ( back allowing!).
Not only most interesting but of great benefit to many owners contemplating chassis restoration. Superb!
I'll second that, Alun also writes poetically expressing his emotions wonderfully as we follow him on his chassis restoration journey.Not only most interesting but of great benefit to many owners contemplating chassis restoration. Superb!
Sadly PH is so often a platform for negative types to release their personal frustrations so its absolutely wonderful to follow a post thats both informative and full of positivity.
Keep up the good work Alun, we're all routing for you mate, but take it at your pace and look after that back of yours.
Dave.

Peanut Gallery said:
ChimpOnGas said:
Loubaruch said:
One of the best posts ever on here. Please keep it flowing ( back allowing!).
Not only most interesting but of great benefit to many owners contemplating chassis restoration. Superb!
I'll second that, Alun also writes poetically expressing his emotions wonderfully as we follow him on his chassis restoration journey.Not only most interesting but of great benefit to many owners contemplating chassis restoration. Superb!
Sadly PH is so often a platform for negative types to release their personal frustrations so its absolutely wonderful to follow a post thats both informative and full of positivity.
Keep up the good work Alun, we're all routing for you mate, but take it at your pace and look after that back of yours.
Dave.
I’m often embarrassed by my lack of education and word dyslexia, my brother is a wonderful writer and must have 10,000 books,,,, I’ve read nothing of note.
So thanks so much.
This is a big task for diy home non skilled mechanics lets not under estimate it.
Made so much easier from all the posts from all the people for years that detail and explain things.
Steve D works for Southways Automotive, I’ve met him, I know the sort of cars he’s driven and at what sort of speed, He’s a pro, these people don’t have to come on here and help us yet they often do.
These are the real hero’s that have helped not only me.
Whenever someone answers your problems it’s so important to remember this.
I also have to mention Dom and Jason at Powers Performance, those guys with all the work they do always have time for me or get back to me.
You feel very alone at first when contemplating this bloody great task,,, your never alone on here and just thanks to everyone because it’s what helps me do it.
I’m a soppy prat!
Something very simple keeps bugging me.
Drive shaft CV’s.
When reassembling not that I’ve taken them apart yet but do I pack them full of grease, like really ram it in there or do I leave space,,,
I have a wonderful ride in this car, I want to keep it that way so should I get as much of the correct grease in there as I can.
Seems obvious enough but I’m not into taking chances or allowing ignorance to ruin anything so I’m happy to ask such silly questions
Alun, did you put the roll bar fixing brackets back on the outriggers? I had one on the original rotted side but not on the previously repaired side. I would have been disappointed with lack of it had I decided to use it, I suppose, so maybe I will add them.
I've decided to go down the epoxy mastic route also. The Rustbusters stuff seems pretty decent? I will get the chassis shot blasted once I've done the outriggers, then most likely spray it myself as I have HVLP spray equipment and air fed respirator. That will mean some form of tent affair under the car and and between the posts. I'll also make up some sort of rotisserie for turning the chassis to make the job easier. Preparation for DIY always seems to take longer than the job itself!
Dougal
Roll hoop brackets just behind seat belt mounting points on riggers you mean Dougal.
No not yet, I’ve toyed over this too, I don’t want it tracked at this age but someone else might one day so yes I’ve decided to add them just in case. For the work involved I might aswell.
You are so correct, home builds often require a tonne of work just to do the job,,, the fact my mate has a wheeled carrier for the body has saved me a lot of time and aggro. I’m in a privileged position.
I’d love to paint my chassis so goodluck, great fun. I used to love doing bike frames as a kid, other kids paid me to do there’s, rattle can days,,,
For me the facilities need to be used as wisely as possible so what I can’t do quickly myself I’m better off letting pro’s do as the cost would end up being very similar if I took months to do it.
Yes Rustbusters comes with good reviews from people I’ve talked to who have actually used it so that’s why I chose it.
I’m considering what Steve said pages ago about paint and something that can take Stone chips on the riggers. I could easily add that myself.
Great fun all this I must say.

Dougal9887 said:
The Rustbusters stuff seems pretty decent?
It is very good Dougal, but quite expensive at £32.53 per litre!Its worth noting that Rustbuster do not make paint, to become an industrial marine grade paint manufaturer you need massive chemical plant for production and there are actually only a few paint companies globally that have made such an investment. Rustbuster are clearly getting their EM121 Epoxy Mastic from a large industrial paint manufacturer and then rebranding it, the 121 name Rustbuster has given their 2k epoxy mastic relates to the 1:1 paint & hardner mix ratio which gives us a clue, I suspect its Jotun's 'Jotamastic Smart Pack' product that also has a 1:1 mix ratio.
The advantage Rustbuster offers the home restorer is they sell their EM121 Epoxy Mastic in smaller quantities, they also sell it with small quaties of the essential specific thinners to match. The smallest Rustbiuster 'Starter Pack' is 1.25 Ltr and gives coverage of roughly 5 m2, you get 500ml comp A (the paint) plus 500 ml Comp B (the hardener) plus 250ml of thinners to give the total quantity of 1.25 Ltr. They also offer a 2.25 ltr 'Chassis Pack' for £73.20 including VAT and delivery that obvously gives coverage of roughly 10 m2 which Rustbuster suggest is sufficient to paint the typical car chassis.
On the other hand the original manufacturers of these industrial marine grade paints like Jotun tend to sell it in quanities to suit the industrial market its intended for, the minimum size therefore is typically 4.55 litres with this quantity being including the hardener. You then need to buy the thinners that comes in a minimum size of 5 litres which considering you are only thinning at a ratio of 10% is way more than you need for your 4.55 litres of mixed paint, what you end up with when thinned is 5 Litres against the 2.25 Litres you get with Rustbuster's 'Chassis Pack'.
In the end I went with buying the larger quanty Jotun branded product from www.smlprotectivecoatings.co.uk, SML gave great advice and suggested I went with Jotamastic 90 Aluminium as it's their latest development of their much respected Jotamastic range of paints. The mix ratio requires a bit of maths but the Jotamastic 90 is meant to offer better performance than their simpler to mix 1:1 ratio 'Jotamastic Smart Pack' product which is almost certainly what Rustbuster EM121 Epoxy Mastic really is.
So I've ended up with 5 Litres of paint with a lot of thinners left over which in reality is going to be way more than we need, however buying it this way was £100.00 all in so for only £26.80 more than the 2.25 Litres you get with Rustbuster's 'Chassis Pack' I got the better and latest development Jotamastic 90 Aluminium. To solve the challenge of getting the two different colours I wanted to help ensure the second coat is easy to see over the base coat I bought a small bottle of red tint, so the first coat will be tinted to create a red oxide clour while the top coat over it will be in aluminium which should match my 1996 siver/grey chassis well.
In summary Rustbuster EM121 Epoxy Mastic works out at £32.53 per litre while my better performing latest development Jotamastic 90 Aluminium came in at £20.00 per litre, any left over I will keep for touch ups although it's highly likely I will never need to touch up my chassis as these epoxy mastic paints are ridiculously tough, in my experience unlike powder coat 2k epoxy mastic paint bonds properly to the substrate, more over once its fully cured it is way way tougher than even the very best powder coat job.
Powder coat does look lovely though, well it looks lovely until it chips and corrosion starts underneath it, at which point I'd put money on most people wishing they'd gone with a good quality 2k industrial marine grade epoxy mastic paint

Classic Chim said:
I’m a soppy prat!
Something very simple keeps bugging me.
Drive shaft CV’s.
When reassembling not that I’ve taken them apart yet but do I pack them full of grease, like really ram it in there or do I leave space,,,
I have a wonderful ride in this car, I want to keep it that way so should I get as much of the correct grease in there as I can.
Seems obvious enough but I’m not into taking chances or allowing ignorance to ruin anything so I’m happy to ask such silly questions
Leave some space, main thing is pull them out close to max and get the grease in at the back, now push them in making sure they don't hydraulic, bang plenty more grease in at the front but don't completely fill.Something very simple keeps bugging me.
Drive shaft CV’s.
When reassembling not that I’ve taken them apart yet but do I pack them full of grease, like really ram it in there or do I leave space,,,
I have a wonderful ride in this car, I want to keep it that way so should I get as much of the correct grease in there as I can.
Seems obvious enough but I’m not into taking chances or allowing ignorance to ruin anything so I’m happy to ask such silly questions
Filled some last year from 3/4s to 7/8s full, got the boots and clips on and checked again that they didn't hydraulic, if they hydraulic will need to get working them in and out, done 10,000 miles and no grease has been chucked out past the boots
Gassing Station | Chimaera | Top of Page | What's New | My Stuff