Another body off thread.
Discussion


My car is almost 20 years old.
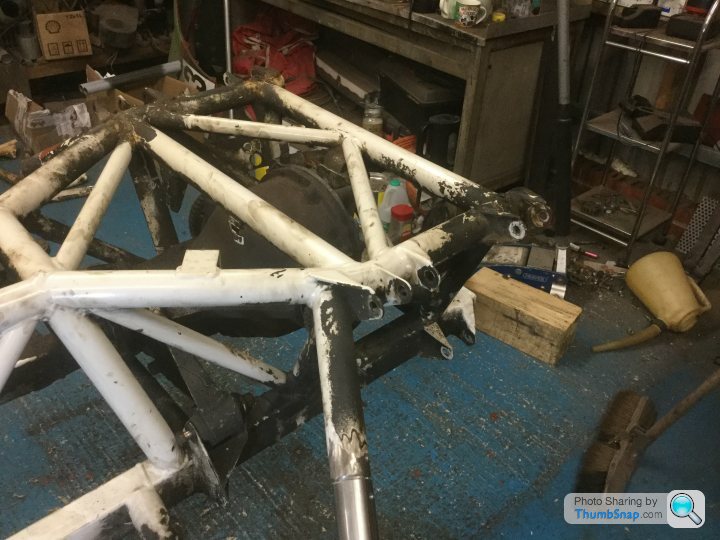
I’d say the riggers have been on there way out from as little as 5 years old based on the levels of rot. Other than the front o/s corner most of it does grind back to real steel but very thin.
Then you have the top side of the chassis which looks like new overall. Very odd.
It’s impossible to say as each car lives a different life.
Anything living up north or near a sea is going to be prone,,, so that’s all of us then
The bottom picture of the mid section which looks and is well rotten, even that grinded back to steal so although well shot still actually intact if only about 1 mm thick.
Edited by Classic Chim on Monday 16th December 13:06
It’s so unfair,, I have to do all the hard slog for the rest of us,, all 3 of us 

And your leaving
Now Brexit is settled we can get on,,,, surely it will pick up now we are on a new exciting path and everyone will be modding their cars and doing trackdays again.. probably still are but on Facebook.
And your leaving
Now Brexit is settled we can get on,,,, surely it will pick up now we are on a new exciting path and everyone will be modding their cars and doing trackdays again.. probably still are but on Facebook.
ChimpOnGas said:
Its an interesting one Alun, your outrotters are clearly shot but the rest of your chassis seems pretty mint from look of it and that's where all the structural strength is.
It's all about impact damage and chips in the powder coat, once the powder coat is breached corrosion sets in fast, but if it remains intact the steel beneath will last indefinitely. This is why I went with bullet proof epoxy mastic paint not powder coat as its way better at resisting stone chips ect.
Its also why I've gone with outrotter protection, I genuinely feel the use of outrotter protectors and two pack epoxy mastic paint will significanly extend the life these most vulnerable parts of the chassis.
Both are the way forward, rigger protection,, a friend has a plan... I dunno what it is yet but that’s a way off my radar for now. It's all about impact damage and chips in the powder coat, once the powder coat is breached corrosion sets in fast, but if it remains intact the steel beneath will last indefinitely. This is why I went with bullet proof epoxy mastic paint not powder coat as its way better at resisting stone chips ect.
Its also why I've gone with outrotter protection, I genuinely feel the use of outrotter protectors and two pack epoxy mastic paint will significanly extend the life these most vulnerable parts of the chassis.
Wherever there is a breach or chipped bit there’s rust, but if you clean it back it usually only takes a bit before your back to bonded powdercoat and zero rust. Depends how long it’s been getting attacked, if it’s been oil coated it does sort of protect it far better.
I agree painted properly and protected riggers you could fully expect another 20 years use.
The Tvr Chassis is a meaty bit of kit, I do love it’s tough guy image
It’s a damn good thing and saves you in a crash,,, sort of !
Thanks for the encouragement chaps 
Tvr wasn’t to concerned with 20 years down the line, not even 10 in all honestly, if the powder coat is adhered to a freshly blasted chassis I’m sure it lasts longer, in cases where some poor owners chassis was up a wall awaiting collection for powdercoat who knows how long any of them were powder coated directly without blasting... in some cases almost every weld shows signs of powdercoat breaking down and rust forming.
Maybe it’s very early life can dictate things years down the line, some owners or most hopefully used them in all weathers when new so it just depends on what life it had from day one. Winter use as we know accelerates corrosion 10 fold if used on salty roads.
Simple deflectors for outrigger protection,,, mud flaps we used to call em solves half your problem,
Simple heat protection around top chassis tubs saves the other.
Chassis should remain sound if looked after,, its when rust forms and left for years thats the real problem. Simple maintenance could have saved a lot of them from more remedial work needing to be carried out now.
Englishman said:
Indeed. This is a picture of the ones fitted by the original owner to my SEAC. Outriggers and rest of the chassis still fine after 32 years!

:A picture paints a thousand words..
I always liked a tasteful mud flap,, I know the fixings rotted out and rusted holes in the wings back in the day on NORMAL cars,,,,,
Now if that’s not proof if the jobs done correctly,,,,, rigger issues could become a thing of the past,,, for awhile
Wedge, more and more in fashion if you ask me. Top draw and those wheels... speechless

Can anyone help with a link to the threaded bar for seat belt mounts in outrigger on eBay, tried searching and someone even posted it on here somewhere, bugger if I can find it now!
Fuel pipe and R9 fuel hose and brake lines ordered including a new slave pipe.
Christmas coming,, shops closed,, better order some stuff before it’s to late to receive.
The holiday period seems a good a time as any to crack on. I’m a long way off but now things are coming apart I can replace bushes in arms and all those other jobs that come about from a big job like this. You either devote every spare hour or this job will take months.
Rustbuster EM121 2 pack paint ordered.
Make a list this evening...
Zener said:
Decent fuel hose clips 13/15mm https://www.merlinmotorsport.co.uk/p/stainless-ste...
Ordered a dozen Handy things


QBee said:
My car is a 99.
Hence the "flaky" outriggers.
Mine had to be replaced in 2013, similar state then to Alun's now.
Car had covered 73,000 miles at the time.
That’s really interesting, 75,000 on mine. Probably a fluke. Hence the "flaky" outriggers.
Mine had to be replaced in 2013, similar state then to Alun's now.
Car had covered 73,000 miles at the time.
Powdercoat and road attack, it’s never going to end well. Clearly where it’s protected from stone and element effect Powdercoat lasts quit well but any area of rubbing or things bouncing off it will break it down fairly quick.
Oh and thanks to Brian Horsfield on facebook I’ve found the 7/16th threaded bar for outriggers. Thanks a million.
Steve_D said:
Keep going Alun..... took another body off this morning.
Steve
Your stamina astounds me Steve. All the bending and leaning over does for me in no time which is a real pity as I love it really. Steve
Thanks I need all the encouraging I can get. Back on it tonight, last corner to remove.
Then Dif then ,,,,,,,,, it goes on forever

Good progress this evening.
Steady but wins the race
All 4 corners are now off, brake and fuel lines out, prop shaft off, all Dif fixings are out bar the shouting, just need a hand while I hold and shift the Dif out of chassis.
Steering rack out.
All wishbones and brackets off ready for blasters.
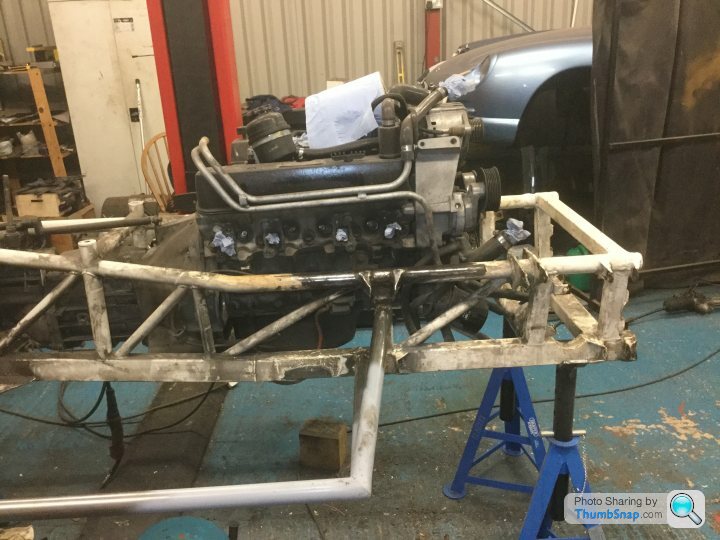
Top chassis rails are ok. Phew.

Steady but wins the race
All 4 corners are now off, brake and fuel lines out, prop shaft off, all Dif fixings are out bar the shouting, just need a hand while I hold and shift the Dif out of chassis.
Steering rack out.
All wishbones and brackets off ready for blasters.
Top chassis rails are ok. Phew.
QBee said:
Great progress Al - keep going.
Thankyou Anthony I will. 
On axle stands Steve but I’d already thought about that, lift legs should just reach main rails to lift chassis right up
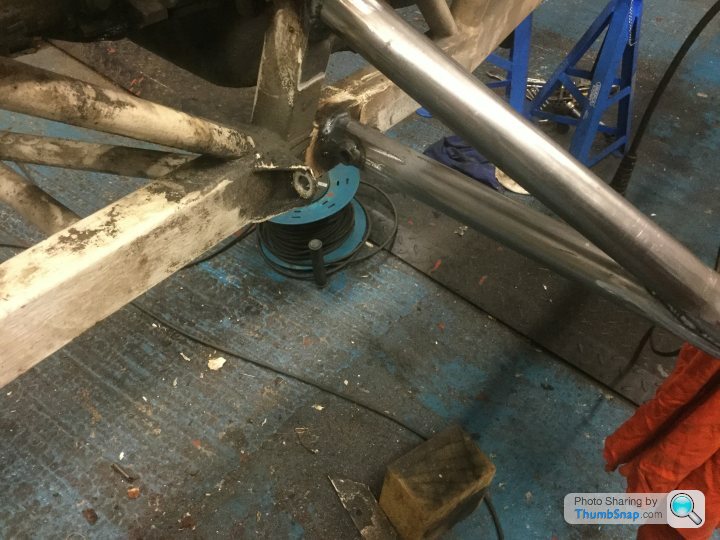
Rear tubes have been sleeved, pinned and a nice weld around chamfered gap.
Some plates to make up and riggers will be almost done.
Awaiting delivery of 7/16 threaded anchors and that will be that.
I have a tonne of jobs to do starting with carefully drilling out what turns out to be one front chassis bolt and one seat anchor bolt.
Thanks for the tips re brakes, got cables off in minutes tonight, dunno what was wrong with me
Frank the Allen keys have been really helpfull, thanks.
A few days a go I was slightly overwhelmed by just what a massive job this lot is. Today thanks to Peter High helping me install a new Dif in the past I happily removed right rear corner and everything around the Dif with some confidence.
I know this car and every single bolt now, not sure I’ll feel the same a few weeks down the line but again thanks to a great tip from Alan I’ve got tubs and tubs of bolts and washers, all indexed with a marker pen on the lids..
finding stuff later, this is a great tip.. I need more of them
Paint, gold heat proof tape, fuel lines, brake lines,rear pads, R9 fuel hose and clips all ordered up.
We’re cooking here lads.
I had a really thoughtful jesture of Dom at Powers today. You can’t get a better bunch or car to work on.
It’s emotional boys, all alone in such a quiet place with just me and it,, f
 king Christine comes to mind!
 Thanks so much for encouraging me, it’s real hard graft doing all the disassembly yourself but if anyone else helped I’d not know how to put it together so it’s better this way, I concentrate and stop talking
Edited by Classic Chim on Wednesday 18th December 00:13


 |https://thumbsnap.com/d7kwIswy[/url]
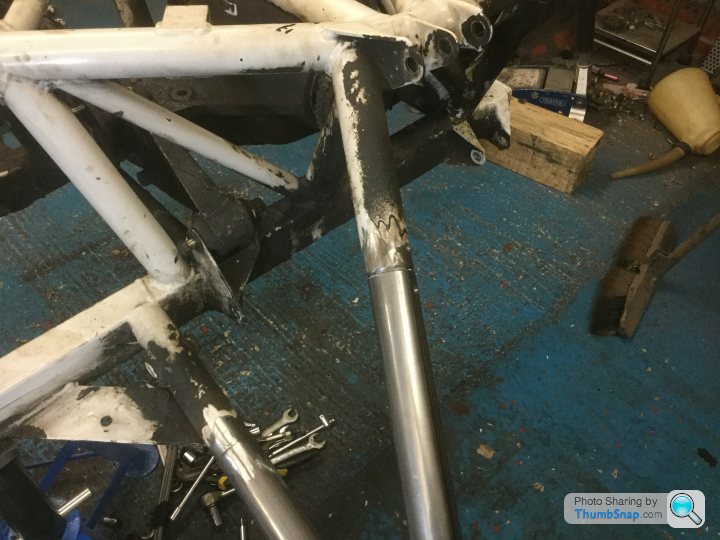
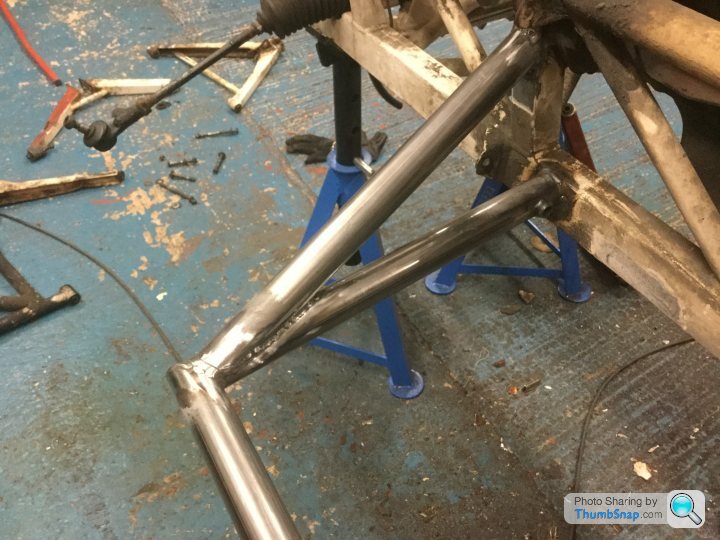
Same tube as used for riggers, slot cut down it, squeezed tight, tack welded into tubes about 3 inches either end. Holes drilled and pinned. Then a nice weld around the new joint.
This on rear chassis to rigger tubes only the rest to chassis direct.
No inner tube protection, theoretically with good welds it’s closed off to the atmosphere.
I have one saving grace, as a young kid and well into motorbikes and racing, winter was always about preparing for next year so garages were always busy, that need to get it done and be ready for the first race meet of the season, all very exciting back then, I remember for years I’d feel a bit lost in winter with no bikes to prepare, this fills that gap and something I always planned to do as that young boy,, build a car one day.
Luckily for me Peter Wheeler came along and produced such a toy.
So for me this is mostly therapy
ChimpOnGas said:
Looking really good Alun, fantastic progress mate
I don't think my guy has even started on mine yet
Keep the photos coming
I don't think my guy has even started on mine yet
Keep the photos coming
I only started this because I thought I could tag along on your lift so as to learn, fat good that idea was.
I had 3 days off the car last week and only about 5-6 hrs a time when I’m at it but I’ve been lucky in having very few stuck parts which saves a lot of messing about.
Having what is a valuable garage and expensive lift at my disposal has saved so much graft but it does add a level of pressure which overall is a good thing. I can’t just skive off
QBee said:
Are you sure you're still the same Alun we know and love?

In this case I’m having to process and store a lot of information,, which for my brain a real overload,, quietly contemplating it as I go along keeps me focused.
Such a daunting task but in less than 3 weeks I’ve got this far so considering it's kind of part time work I’m doing well I believe.
On your own it takes a lot of time.
Now I’ve sussed it out I’d happily work with someone else 2 = half the time.
Frank helped hugely with wiring early on when my nerves were shot lol but even that is logical.
It’s really great to become so personal with the car, that for me is where I’ve gained a lot of confidence, I never thought I’d see the day to be honest.
Great stuff.
ChimpOnGas said:
I'm really enjoying this post
Alun, you're moving at such a blistering pace at this rate you'll be all done before my guy has even started on mine.
Respect
It’s not just me though, most of the marking out and fabrication for riggers was done with two guys at it, my friend has done a lot of prepping cutting tubes to a slight oversize ready for the welder. Alun, you're moving at such a blistering pace at this rate you'll be all done before my guy has even started on mine.
Respect
It’s moved along faster than I can take it apart so it’s caught me out, im now waiting for seat belt anchors
More than anything else my biggest fear was somehow bodging it and you lot slating me for it, No chance.
Positive feedback feels great so thankyou so much lads. It almost matters more than anything else, you know what your looking at
Gassing Station | Chimaera | Top of Page | What's New | My Stuff