Another body off thread.
Discussion


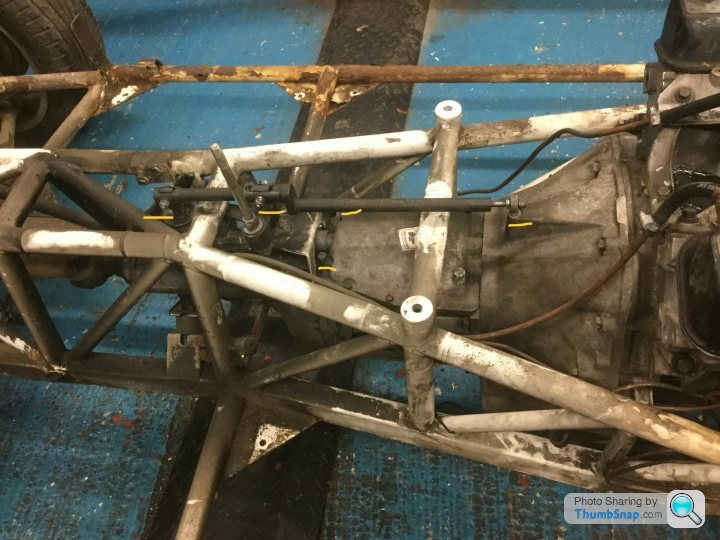
My gearbox linkage.
I’ve read there’s two versions of this, is this the later version, looks good to me.
I’ve marked the various bolt connection points.
I’ve not taken any notice of this area yet so a few questions if I may.
Well one, how do I remove this linkage so I can take engine and box out in one go. I’ve also marked the top bracket points where it bolts to gearbox which I’ll presumably remove once I’ve removed the linkage.
Looks fairly straight forward but i’n not near the car today so any tips would be divulged
Looking at the picture, do I need to remove gear lever,, my knowledge just hit a brick wall!
Edited by Classic Chim on Wednesday 18th December 17:04
Zener said:
Alun remove these two 13mm nuts that front one will allow the shaft to slide back towards the linkage and the rear bolt and nut have 2 thrust plastic shims and an inner sleeve don't lose em, if you pull the prop you will lose the oil so mark the box as empty  you know where I am going here? it can happen and thats an expensive box to lunch bearings on
  time flies and things can get over-looked
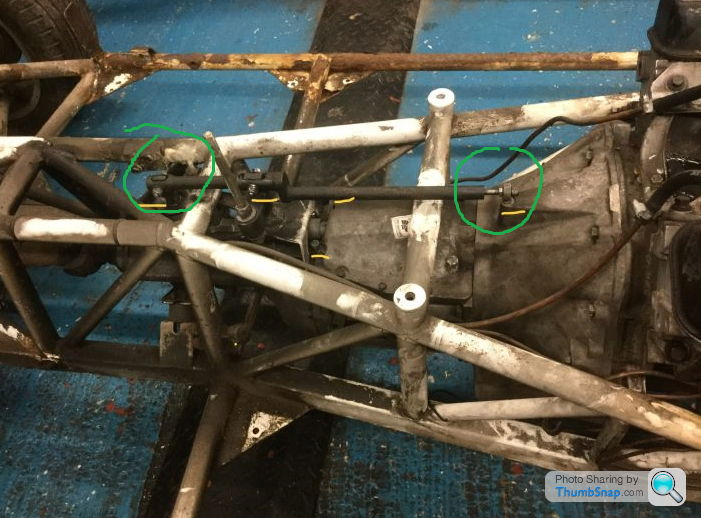
Thankyou Simon and yes I need to drain gearbox, glad you reminded me before we’re all slipping about the floor! you know where I am going here? it can happen and thats an expensive box to lunch bearings on time flies and things can get over-looked Edited by Zener on Wednesday 18th December 17:30
More importantly marking the box as empty, thanks great tip.
Looking at the picture again, I don’t need to remove gear lever if I angle box enough to miss that top chassis tube or do I ?
Dougal9887 said:
All this is great timing for me and my winter project so hope you won't mind a barrage of questions.
So far I have made up a set of taller axle stands to allay Anthony's fears for my sporran. All ready to get started on Christmas day!
Another couple of questions Alun - is the purpose of drilling and pinning simply to secure the insert and position the new piece of tube? Were the front tubes taken right back to the chassis rails due to the extent of corrosion or another reason?
Great work by the way.
Dougal.
Hi Dougal, no better day to start So far I have made up a set of taller axle stands to allay Anthony's fears for my sporran. All ready to get started on Christmas day!
Another couple of questions Alun - is the purpose of drilling and pinning simply to secure the insert and position the new piece of tube? Were the front tubes taken right back to the chassis rails due to the extent of corrosion or another reason?
Great work by the way.
Dougal.

Yes to question one. Once you are happy with lining up to corner tube drill through both tubes and just into sleeve, if it moves you can easily line them up again.
When your happy spot weld into those drilled holes and it now holds securely ready for full welding.
Yes to question 2 not because of any great rot more just because we could and I really wanted to go back to chassis.
Rear tubes are intact so very strong, with the sleeve which I think are 150 mm long it looks great and offers good strength going forward.
Very pleased with it so far.
Steve_D said:
Just a quick advisory the inner sleeve is also plastic so mind you don't damage when pushing it out.
You are probably also thinking nobody has mentioned the bolt at the gear lever. That's because when the front and back have been released the whole thing just lifts out.
Steve
Reading my mind, it’s now at rest after that last snippet. You are probably also thinking nobody has mentioned the bolt at the gear lever. That's because when the front and back have been released the whole thing just lifts out.
Steve
I hope others who are serious about this body off job jot down the valuable details shared on this thread. The contributions from experienced Tvr folk lead to doing the job right.
This is so important for a bloke like me doing this for the first time, you have no idea how these pieces of info help you along until your there sinking in self doubt because you can’t even get a handbrake cable off

Edited by Classic Chim on Wednesday 18th December 22:11
I’ve got a hoist on wheels, but no balancer bar.
If you ever need to remove engine with body on do you split it from box?
I’d so I’ll just split it.
I want the practice for if I ever face doing it with body on. Far sighted me
I’ve come this far, blasting the chassis would save me many hours of dirty work and pulling the engine completes a learning process in its own right, you know it makes sense, gearbox looks easy to remove once detached from engine.
I’d discussed this with Frank last week, he has an alignment tool for connecting it all back up so there’s no reason why I can’t just split it but can you get at Bell housing bolts with engine in situ?
QBee said:
Starting this thread was one of the best things you could have done, Alun. So much quality advice.
Steve, would it be a good idea to have two or three friends on hand come engine removal time, or can it be done by one (or two) geezers?
I think I can answer that one.Steve, would it be a good idea to have two or three friends on hand come engine removal time, or can it be done by one (or two) geezers?
Taking it out maybe just one other helper, chassis is being re covered so any banging on chassis has little consequence, slightly different when putting it back in.
Yes the advice is why I’m this far along, I can’t stop saying Thankyou enough.
Steve_D said:
You can split the engine in the chassis but it is much easier to do on the ground and much less chance of damaging the input shaft etc.
Second...if you do it separate you will have to put the gearbox back into your newly painted chassis, then the engine, then align them without scratching your paint.
If doing engine out in the car you take the bonnet of
Level bar £20 ebay
https://www.ebay.co.uk/itm/1650LB-750kg-Engine-lif...
Steve
So it looks like I’ll be buying one of these then Second...if you do it separate you will have to put the gearbox back into your newly painted chassis, then the engine, then align them without scratching your paint.
If doing engine out in the car you take the bonnet of
Level bar £20 ebay
https://www.ebay.co.uk/itm/1650LB-750kg-Engine-lif...
Steve

The idea of undoing bell housing bolts with a body on seems less than efficient or just hard grind, rather easier on the floor.
This is my preferred method.
dhutch said:
Cracking thread, and great progress for three weeks work.
Are you doing this as part of your day job? Who's is the garage/equipment? Rough amount of hours spend per day/week?
Don't have a Chim (yet?) but having done a rolling body-on restoration of a Westfield of the last ten years have some idea of the work.
My work has been evenings and weekends only, area by area, using the car in between which made it a much smaller commitment.
Life if now much busier, more senior job, living with the ms, dog to walk, house project and my garage time as all but been sidelined.
But yes, absolute credit for going for it, and looks like a grade-a job, doing what is important well without wasting time.
Daniel
Hi Daniel, not my day job, mostly evenings and weekends, so far around 40/ 45 hours working time, I’m done after 6 hrs Are you doing this as part of your day job? Who's is the garage/equipment? Rough amount of hours spend per day/week?
Don't have a Chim (yet?) but having done a rolling body-on restoration of a Westfield of the last ten years have some idea of the work.
My work has been evenings and weekends only, area by area, using the car in between which made it a much smaller commitment.
Life if now much busier, more senior job, living with the ms, dog to walk, house project and my garage time as all but been sidelined.
But yes, absolute credit for going for it, and looks like a grade-a job, doing what is important well without wasting time.
Daniel
Garage space and equipment owned by a motor racing friend, I’ll be changing wheels and running about a pit lane for years if I don’t crack on with it.
He does resto’s on old cars so the ramp is very important to him,, that’s not lost on me so every second I get I’m on the job.
I was hoping to get chassis finished and painted before Christmas but it’s too late now. The idea of Christmas week doing this sounds better than endless old Films and fattening myself up but alas just ran out of time.
I can use the week cleaning up parts and restoring bits and bobs ready so no times lost really.
I can’t wait to be putting it back together, new lines and things, proper ace fun.
TwinKam said:
Alun, great thread!
Shameless use here of non-TVR photos to demonstrate how a load-adjusting bar can manoeuvre an engine in a tight space by accurately adjusting its attitude; note extremes of travel between pics.
All this for only £20?
Rik


I’m loving this,,, Sorry for my ignorance, is that a Duke? Sod the thread Shameless use here of non-TVR photos to demonstrate how a load-adjusting bar can manoeuvre an engine in a tight space by accurately adjusting its attitude; note extremes of travel between pics.
All this for only £20?
Rik
A damn shiny one, any pics of that engine without the protection.
I’ve had similar visions of my RV going back in with lots of stuff taped around rails, that’s just confirmed it.
What a lovely looking bike.
Steve_D said:
You can split the engine in the chassis but it is much easier to do on the ground and much less chance of damaging the input shaft etc.
Second...if you do it separate you will have to put the gearbox back into your newly painted chassis, then the engine, then align them without scratching your paint.
If doing engine out in the car you take the bonnet of
Level bar £20 ebay
https://www.ebay.co.uk/itm/1650LB-750kg-Engine-lif...
Steve
Ordered today. Should be here 22/23rd. Nice Christmas present Second...if you do it separate you will have to put the gearbox back into your newly painted chassis, then the engine, then align them without scratching your paint.
If doing engine out in the car you take the bonnet of
Level bar £20 ebay
https://www.ebay.co.uk/itm/1650LB-750kg-Engine-lif...
Steve
See even this I’d be looking over them not knowing really what I’m after, looks simple enough for how often I’ll need it.
Thanks again

I’m very tired now I must admit, motivation is key.
I’ve been cycling all summer adding some fitness as I’m not getting any younger so I enjoy my 6.3 mile out to the car, very scenic and peaceful, I enjoy that part a lot as it’s off road and slippery,,, it’s how I get my kicks
A lot of effort has gone in in a shortish time, it’s really paid off as I see things progress so quickly, that naturally motivates me again.
I do find all the retail pressure around Christmas tedious, a project gives me something far better to think about.
2OOM said:
Well done Alun, I'm enjoying this thread and it's very informative ..
When she is finished you should treat her to a blast down to the D558 to La Garde-Freinet and Le Pan-de-la-Tour ..
Hi Graham, really good to hear from you and glad your enjoying the thread. When she is finished you should treat her to a blast down to the D558 to La Garde-Freinet and Le Pan-de-la-Tour ..
Aaahh mate I know that road well
Sweet Geraldine ( in a French accent ) Plan de la Tour, what a village, what a girl, late nights in the warm breeze with that Provence lighting, the smell of sweet flowers, the food and wine and gentle French music with romance filling the air
f
 k that I was outside fixing my bike
 The things I get myself into
TwinKam said:
I feel bad about sticking more bike pics on your rebuild thread, Alun, but seeing as you asked... 


It's a Buell Cyclone; tweaked HD Sportster lump (1200cc 90 bhp) in a very short agile frame.
In the style of Mission Impossible, I can delete this post once you've read it... just say.
Rik
What a beauty. It's a Buell Cyclone; tweaked HD Sportster lump (1200cc 90 bhp) in a very short agile frame.
In the style of Mission Impossible, I can delete this post once you've read it... just say.
Rik
This is where I get my love of polished metal from, pucker bikes.
You have 5 seconds before this thread explodes

Leave them there as a bit of inspiration

I bet it is
Not much to report other than seat belt anchors arrived today so they can be added.
Christmas just came a few days to early for me to get chassis painted in time so it’ll be a long wait until the new year.
Plenty of things to do and chance to go over all the bits of car I’ve got lying about. Now’s the perfect opportunity to sort any tight seat runners or paint a few things.

MERRY CHRISTMAS
I’d just like to take this opportunity to thank everyone who’s contributed to this thread so far and dearly helped me along.
Even just a photo of Body lifts can go a long way.
This time of year becomes excruciatingly painful for me on a personal level but having thrust such a big project onto myself was the best thing I could have done.
Focus on the good not the bad
Right enough of all that,,,
Riggers are done including Floor plates.
I’ve got myself an engine balance bar so over the next week I should get engine/ gearbox/ Dif out and get chassis ready for blasting.
Sorry I forgot photo’s...
will do when I’m back at it in a few days time.
ETA all wishbones and bracketry ( bar Dif plates) have been blasted revieling very sound metal. All fronts are newish, really impressed how well the all original lower rear wishbones have held up after 20 years use.
Took a pic on my phone but it’s all blurred, will take better ones as it’s quite impressive to me
Double ETA
The argument about rigger rot and chassis age.
My car had a wax oil type product added when I bought the car at 10 years old. It had a white bare chassis until then.
Various parts of powdercoat had already left the car a long time before that.
The oil protected to some extent already bare steel but I’d say the riggers were already shot when this oil based product was added.
Looking at how well the oil based stuff has adhered to the chassis Id day if this was done regularly all its life many outriggers would have survived. My main area of rot was on o/s front drivers corner going back along rigger tube, this is also the area where road crud gets blocked between tube and body.
So keep a bent rod to clean it away or make a hatch similar to our clutch servo cover affair just above that area in the bodywork, removable so every few years you can take it off and check/ clean out, carpet covers it up
Secondly coat the riggers with something that repels most things, done correctly you should be able to maintain a level of protection on top of the rails for years and years, mud flaps will do 70% of the job.
Just an observation as to why so many have rot in the same places.
Edited by Classic Chim on Tuesday 24th December 11:50
Penelope Stopit said:
If any of the engine loom sleeving has gone hard and brittle or been damaged, with a little effort the terminals can be removed from the majority of the plug mouldings (unhooked with thin flat blade), bad sleeving can be removed and new sleeving will fit over the terminals and pull along the cables
Thanks. Fortunately my engine wiring loom is virtually brand new as it was installed as part of an MBE ECU upgrade in 2015. It also has a lot less connections using coil packs, no distributor or ign amp, not even stepper motor wiring. It’s great
Steve_D said:
Alun
Have you dismantled the toe adjuster on the lower rear wishbones?
If not then you must do it now. Most are very stubborn to come apart and normally need a good talking to with a blow torch so not a job to be left until after paint.
If you are able to do so I would encourage you to consider hot zinc spray for all your chassis and suspension components.
https://www.youtube.com/watch?v=lArIQqCK4Es
It has almost all the benefits of galvanising but without the excessive heat. Follow immediately with a zinc prime and 2 pack epoxy. And for that little bit extra do the outriggers with an additional coat but this time in a bitumastic based paint.
Steve
No not yet Steve. I’m hoping a big vice and a bit of heat will loosen them. Have you dismantled the toe adjuster on the lower rear wishbones?
If not then you must do it now. Most are very stubborn to come apart and normally need a good talking to with a blow torch so not a job to be left until after paint.
If you are able to do so I would encourage you to consider hot zinc spray for all your chassis and suspension components.
https://www.youtube.com/watch?v=lArIQqCK4Es
It has almost all the benefits of galvanising but without the excessive heat. Follow immediately with a zinc prime and 2 pack epoxy. And for that little bit extra do the outriggers with an additional coat but this time in a bitumastic based paint.
Steve
I keep seeing this hot zinc spray technique, it does look very good. I’ll see if there’s anyone near me who does it.
I’m using 2 pack paint so that’s good.
I just ran out of time so in the new year I’ll talk to painter and go from there.
Steve_D said:
When you get to strip them put the locknut in the vice and use the wishbone as the lever.
Then put the flats of the adjuster in the vice and do the same. If the flats start to get chewed up make them bigger with an angle grinder. If needs be you can forfeit the adjuster as they are readily available and not that expensive compared to having to replace a wishbone.
If you do go hot zinc make sure they prime within 4 hours as the zinc starts to oxidise and will need treating before you can paint. The place we use has all three guns ....grit...zinc...prime on a rack on the wall inside the booth so just moves directly from one process to the next.
Steve
All noted. Thanks. Then put the flats of the adjuster in the vice and do the same. If the flats start to get chewed up make them bigger with an angle grinder. If needs be you can forfeit the adjuster as they are readily available and not that expensive compared to having to replace a wishbone.
If you do go hot zinc make sure they prime within 4 hours as the zinc starts to oxidise and will need treating before you can paint. The place we use has all three guns ....grit...zinc...prime on a rack on the wall inside the booth so just moves directly from one process to the next.
Steve
Merry Christmas
Gassing Station | Chimaera | Top of Page | What's New | My Stuff