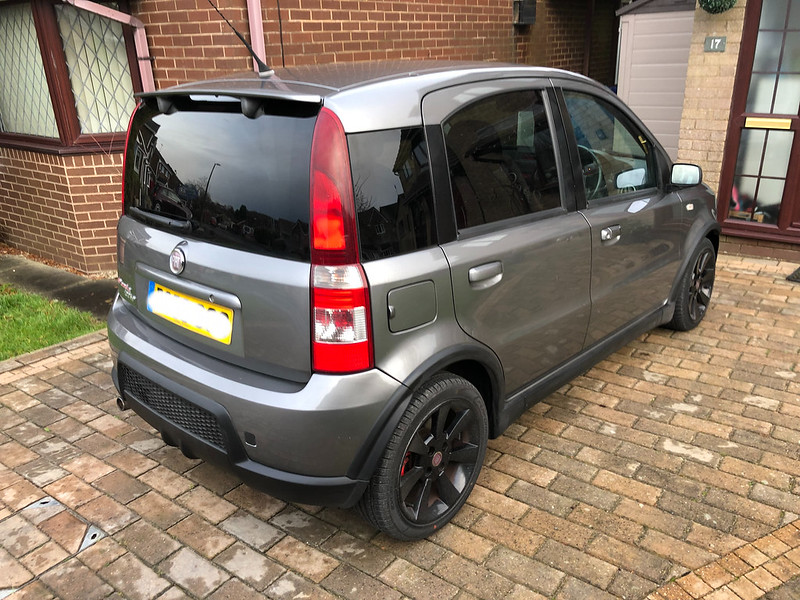
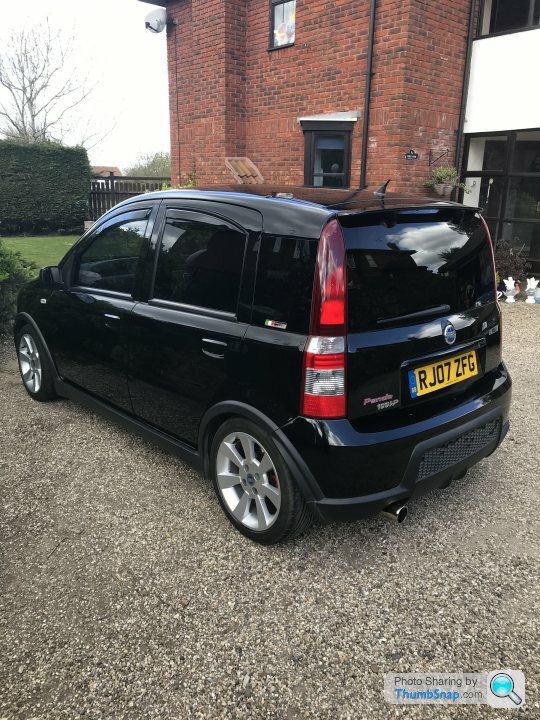
Fiat Panda 100HP - Electroclash grey
Discussion


Here is my Fiat Panda 100HP, this thread will document my maintenance / ownership experiences. I have owned a few Fiats in the past (Bravo HGT, HLX, JTD, Coupe, Uno) but never a Panda.
Lots more updates to come (servicing and cambelt)
 Untitled by Montana BI, on Flickr
 Untitled by Montana BI, on Flickr
 Untitled by Montana BI, on Flickr
 Untitled by Montana BI, on Flickr
Lots more updates to come (servicing and cambelt)
Untitled by Montana BI, on FlickrUntitled by Montana BI, on FlickrUntitled by Montana BI, on FlickrUntitled by Montana BI, on Flickr
I picked up a black 07 plate one just at the end of November there to use as a daily shed / winter hack. There great wee things, only downside is the 100hp tax on parts.
I had a blue one before, one of the first ones in the UK as a demo car when I worked for fiat. Loved it then that’s why I picked the black one up when it appeared locally.
I’ve just changed the coolant and thermostat on mine as it was playing up. Going to do the suspension, exhaust and timing belt kit and hopefully keep it for a few years.
If your not already, join the www.fiatforum.com the guys have been great on there.
Paul.
Interesting mix of pre- and post- "facelift" badges front and rear!
I had a 54 reg Punto with the same engine/gearbox and that was a good laugh to thrash along, been looking at these Pandas recently as something the sort of size even the missus would be capable of parking. Look forward to seeing how your journey with the car progresses
I had a 54 reg Punto with the same engine/gearbox and that was a good laugh to thrash along, been looking at these Pandas recently as something the sort of size even the missus would be capable of parking. Look forward to seeing how your journey with the car progresses
I bought a facelift one new in 2007 (also electroclash grey) and racked up almost 60k miles in the 3 years I had it. Great little car and fun to rev out through the nice notchy gearbox and pretty cheap to run aside from the clutch release bearing which failed at 54k miles and predictably wasn't covered by warranty and required a whole new clutch assembly.
If you plan to mod it, the two things it needed, imvho, were better damping in the suspension to avoid it getting unsettled on anything other than smooth tarmac, and more power (back then I think there was a bolt-on turbo kit available which lifted power to around 120-130bhp but these days you might be able to look at the 500 power plants instead)
Enjoy!
Chris
Love my 100HP, really simple and fun little car. Definitely recommend a good set of dampers as they can be a bit crashy on rough roads.
Running costs have been very cheap, parts are cheap and easy to find and easily gets over 40mpg.
Only selling mine as I’ve ordered a new car and my wife won’t let me keep 2 cars
Running costs have been very cheap, parts are cheap and easy to find and easily gets over 40mpg.
Only selling mine as I’ve ordered a new car and my wife won’t let me keep 2 cars
Large update incoming, full service and cambelt kit with waterpump. This will be split into 3 parts
part 1 - oil & filter
part 2 - cambelt
part 3 - spark plugs, air filter, pollen filter,wiper blades
#1 - oil & filter
jacked up and engine run up to temperature
 Untitled by Montana BI, on Flickr
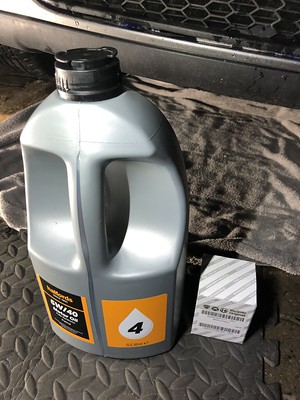
genuine filter and 5w40 fully synthetic
 Untitled by Montana BI, on Flickr
ready for the drain
 Untitled by Montana BI, on Flickr
honda civic oil filter tool coming in handy in the tight space
 Untitled by Montana BI, on Flickr
old vs new
 Untitled by Montana BI, on Flickr
torquing up
 Untitled by Montana BI, on Flickr
cleaned up an oil weep on the left hand side of the sump - something to keep an eye on
 Untitled by Montana BI, on Flickr
2.5L of oil measured out and going in
 Untitled by Montana BI, on Flickr
part 1 - oil & filter
part 2 - cambelt
part 3 - spark plugs, air filter, pollen filter,wiper blades
#1 - oil & filter
jacked up and engine run up to temperature
Untitled by Montana BI, on Flickrgenuine filter and 5w40 fully synthetic
Untitled by Montana BI, on Flickrready for the drain
Untitled by Montana BI, on Flickrhonda civic oil filter tool coming in handy in the tight space
Untitled by Montana BI, on Flickrold vs new
Untitled by Montana BI, on Flickrtorquing up
Untitled by Montana BI, on Flickrcleaned up an oil weep on the left hand side of the sump - something to keep an eye on
Untitled by Montana BI, on Flickr2.5L of oil measured out and going in
Untitled by Montana BI, on Flickrpart 2 - cambelt
jacked up, drivers side roadwheel removed
 Untitled by Montana BI, on Flickr
plastic cover to be removed
 Untitled by Montana BI, on Flickr
 Untitled by Montana BI, on Flickr
which exposes the crank pulley / aux belt setup
 Untitled by Montana BI, on Flickr
taking the tension off the aux belt tensioner to allow the belt to be removed
 by Montana BI, on Flickr
aux belt off
 Untitled by Montana BI, on Flickr
cheap ebay impact wrench did the trick on the crank pulley bolts
 Untitled by Montana BI, on Flickr
pulley removed
 Untitled by Montana BI, on Flickr
unbolt lower cambelt cover
 Untitled by Montana BI, on Flickr
carefully jack up the sump which will help with the next part - engine mount removal
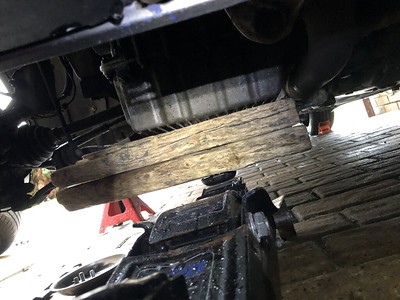 Untitled by Montana BI, on Flickr
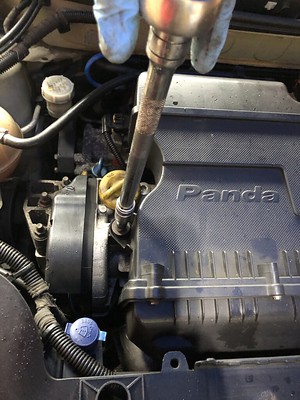
in the engine bay, remove the 3 bolts holding the air filter box on
 Untitled by Montana BI, on Flickr
 Untitled by Montana BI, on Flickr
unclip a pipe running across the top of the air box and it will be free!
 Untitled by Montana BI, on Flickr
which exposed some bodgery on one of the coilpacks (will come back to that later)
 Untitled by Montana BI, on Flickr
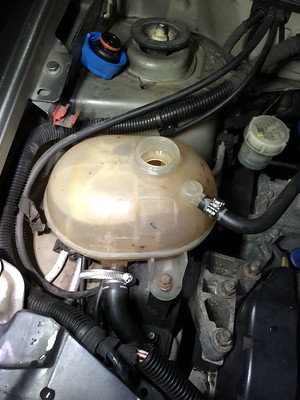
remove coolant bottle bolt
 Untitled by Montana BI, on Flickr
at this point i opted to remove the lower hose as i would be draining/flushing the coolant anyway
 Untitled by Montana BI, on Flickr
 Untitled by Montana BI, on Flickr
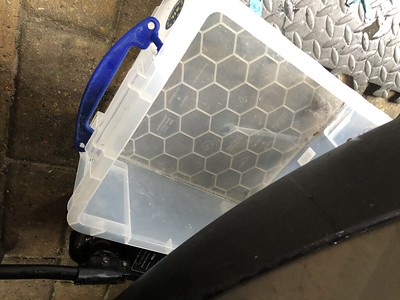
coolant collected in a very useful house box
 Untitled by Montana BI, on Flickr
coolant bottle moved out of the way
 Untitled by Montana BI, on Flickr
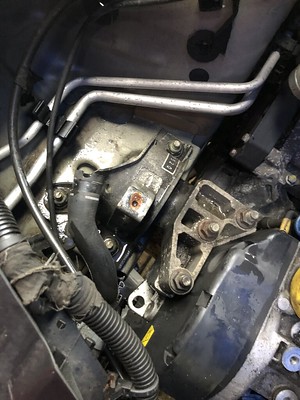
the engine mount is now exposed
 Untitled by Montana BI, on Flickr
remove these 3 bolts to the engine block
 Untitled by Montana BI, on Flickr
then these on the chassis
 Untitled by Montana BI, on Flickr
 Untitled by Montana BI, on Flickr
with the bolts removed, lift it off
 Untitled by Montana BI, on Flickr
 Untitled by Montana BI, on Flickr
now you need to remove the bolts holding the mount to the engine in order to get to the cambelt, there are 6 in total - you can see a few of them here
 Untitled by Montana BI, on Flickr
lift the engine to give easier access
 Untitled by Montana BI, on Flickr
space is tight but perfectly manageable
 Untitled by Montana BI, on Flickr
 Untitled by Montana BI, on Flickr
 Untitled by Montana BI, on Flickr
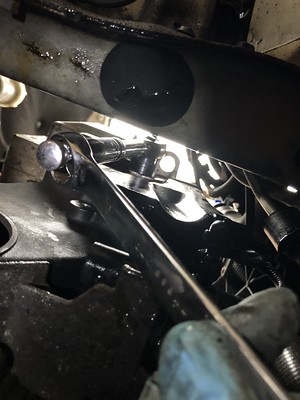
breaking a lower one free
 Untitled by Montana BI, on Flickr
for the bottom one nearest the bulkhead i opted to go from the bottom
 Untitled by Montana BI, on Flickr
all 6 bolts out but still struggling to remove, so took the upper cambelt cover off
 Untitled by Montana BI, on Flickr
exposing the belt
 Untitled by Montana BI, on Flickr
the task - i was glad to see tippex here, backing up what i saw in the service history
 Untitled by Montana BI, on Flickr
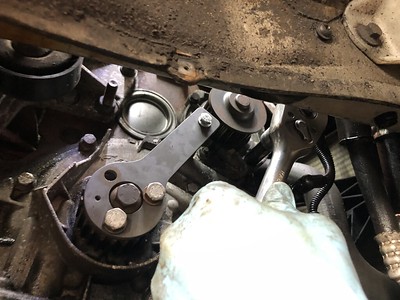
i rotated the crank to get the crank locking tool in place (it was a £30 amazon jobbie)
 Untitled by Montana BI, on Flickr
however could only get 2/3 bolts in place which was enough to stop things moving but not ideal
 Untitled by Montana BI, on Flickr
view from the top with the crank locking tool in place
 Untitled by Montana BI, on Flickr
i removed the previous tippex markings...
 Untitled by Montana BI, on Flickr
...and made new ones to keep the cam pulley orientated
 Untitled by Montana BI, on Flickr
removing the tensioner
 Untitled by Montana BI, on Flickr
belt coming off, no turning back now!
 Untitled by Montana BI, on Flickr
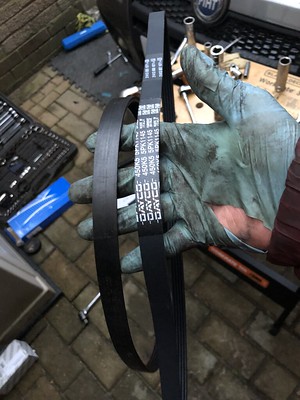
old dayco belt, no sign of cracking on the inside face (this was last changed in 2016)
 Untitled by Montana BI, on Flickr
new SKF one
 Untitled by Montana BI, on Flickr
quick check it 'looks' right
 Untitled by Montana BI, on Flickr
waterpump removal
 Untitled by Montana BI, on Flickr
 Untitled by Montana BI, on Flickr
pump removed
 Untitled by Montana BI, on Flickr
lots of sealent left behind, face all cleaned up ready for the new one
 Untitled by Montana BI, on Flickr
old versus new
 Untitled by Montana BI, on Flickr
new waterpump and tensioner back in
 Untitled by Montana BI, on Flickr
along with the new cambelt
 Untitled by Montana BI, on Flickr
setting the tensioner
 Untitled by Montana BI, on Flickr
 Untitled by Montana BI, on Flickr
crank locking tool removed and engine rotated 2 full revolutions
 Untitled by Montana BI, on Flickr
lower cambelt cover back on
 Untitled by Montana BI, on Flickr
I also planned to change the aux belt and tensioner whilst here. old vs new belt
 Untitled by Montana BI, on Flickr
new belt on and running true
 Untitled by Montana BI, on Flickr
I had an issue with the aux belt tensioner, having previously replaced one on a Mito using my standard allen keys, there is less room in the Panda so a set of stubby allen keys will be ordered to tackle the tensioner at a later date.
At this stage, i needed to leave the coolant to set before i could refill and check all was ok with the cambelt change, so left it for the afternoon and came back later (in the dark)
struggled to remove the quick release hose from the bottom of the radiator, so focused on the clip
 Untitled by Montana BI, on Flickr
 Untitled by Montana BI, on Flickr
hose removed and the residual coolant from the radiator drained, at this point 7 hours had elapsed, so refilled with water (not coolant)
 Untitled by Montana BI, on Flickr
filled to the max ready for the first start
 Untitled by Montana BI, on Flickr
all good
 Untitled by Montana BI, on Flickr
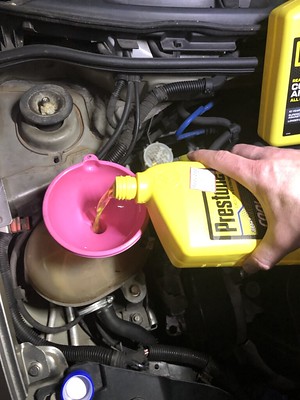
the engine was then run up to temp and then coolant drained (twice) to flush any old coolant out - it was later refilled with the Prestone all in one once i was happy there were no leaks from either the waterpump or bottom hose
 Untitled by Montana BI, on Flickr
 Untitled by Montana BI, on Flickr
All in all it was a success, the main bottlenecks were on the removal of the engine mount & cleaning the face of the block which were a time sap - all in all took me 5 hours.
jacked up, drivers side roadwheel removed
Untitled by Montana BI, on Flickrplastic cover to be removed
Untitled by Montana BI, on FlickrUntitled by Montana BI, on Flickrwhich exposes the crank pulley / aux belt setup
Untitled by Montana BI, on Flickrtaking the tension off the aux belt tensioner to allow the belt to be removed
by Montana BI, on Flickraux belt off
Untitled by Montana BI, on Flickrcheap ebay impact wrench did the trick on the crank pulley bolts
Untitled by Montana BI, on Flickrpulley removed
Untitled by Montana BI, on Flickrunbolt lower cambelt cover
Untitled by Montana BI, on Flickrcarefully jack up the sump which will help with the next part - engine mount removal
Untitled by Montana BI, on Flickrin the engine bay, remove the 3 bolts holding the air filter box on
Untitled by Montana BI, on FlickrUntitled by Montana BI, on Flickrunclip a pipe running across the top of the air box and it will be free!
Untitled by Montana BI, on Flickrwhich exposed some bodgery on one of the coilpacks (will come back to that later)
Untitled by Montana BI, on Flickrremove coolant bottle bolt
Untitled by Montana BI, on Flickrat this point i opted to remove the lower hose as i would be draining/flushing the coolant anyway
Untitled by Montana BI, on FlickrUntitled by Montana BI, on Flickrcoolant collected in a very useful house box
Untitled by Montana BI, on Flickrcoolant bottle moved out of the way
Untitled by Montana BI, on Flickrthe engine mount is now exposed
Untitled by Montana BI, on Flickrremove these 3 bolts to the engine block
Untitled by Montana BI, on Flickrthen these on the chassis
Untitled by Montana BI, on FlickrUntitled by Montana BI, on Flickrwith the bolts removed, lift it off
Untitled by Montana BI, on FlickrUntitled by Montana BI, on Flickrnow you need to remove the bolts holding the mount to the engine in order to get to the cambelt, there are 6 in total - you can see a few of them here
Untitled by Montana BI, on Flickrlift the engine to give easier access
Untitled by Montana BI, on Flickrspace is tight but perfectly manageable
Untitled by Montana BI, on FlickrUntitled by Montana BI, on FlickrUntitled by Montana BI, on Flickrbreaking a lower one free
Untitled by Montana BI, on Flickrfor the bottom one nearest the bulkhead i opted to go from the bottom
Untitled by Montana BI, on Flickrall 6 bolts out but still struggling to remove, so took the upper cambelt cover off
Untitled by Montana BI, on Flickrexposing the belt
Untitled by Montana BI, on Flickrthe task - i was glad to see tippex here, backing up what i saw in the service history
Untitled by Montana BI, on Flickri rotated the crank to get the crank locking tool in place (it was a £30 amazon jobbie)
Untitled by Montana BI, on Flickrhowever could only get 2/3 bolts in place which was enough to stop things moving but not ideal
Untitled by Montana BI, on Flickrview from the top with the crank locking tool in place
Untitled by Montana BI, on Flickri removed the previous tippex markings...
Untitled by Montana BI, on Flickr...and made new ones to keep the cam pulley orientated
Untitled by Montana BI, on Flickrremoving the tensioner
Untitled by Montana BI, on Flickrbelt coming off, no turning back now!
Untitled by Montana BI, on Flickrold dayco belt, no sign of cracking on the inside face (this was last changed in 2016)
Untitled by Montana BI, on Flickrnew SKF one
Untitled by Montana BI, on Flickrquick check it 'looks' right
Untitled by Montana BI, on Flickrwaterpump removal
Untitled by Montana BI, on FlickrUntitled by Montana BI, on Flickrpump removed
Untitled by Montana BI, on Flickrlots of sealent left behind, face all cleaned up ready for the new one
Untitled by Montana BI, on Flickrold versus new
Untitled by Montana BI, on Flickrnew waterpump and tensioner back in
Untitled by Montana BI, on Flickralong with the new cambelt
Untitled by Montana BI, on Flickrsetting the tensioner
Untitled by Montana BI, on FlickrUntitled by Montana BI, on Flickrcrank locking tool removed and engine rotated 2 full revolutions
Untitled by Montana BI, on Flickrlower cambelt cover back on
Untitled by Montana BI, on FlickrI also planned to change the aux belt and tensioner whilst here. old vs new belt
Untitled by Montana BI, on Flickrnew belt on and running true
Untitled by Montana BI, on FlickrI had an issue with the aux belt tensioner, having previously replaced one on a Mito using my standard allen keys, there is less room in the Panda so a set of stubby allen keys will be ordered to tackle the tensioner at a later date.
At this stage, i needed to leave the coolant to set before i could refill and check all was ok with the cambelt change, so left it for the afternoon and came back later (in the dark)
struggled to remove the quick release hose from the bottom of the radiator, so focused on the clip
Untitled by Montana BI, on FlickrUntitled by Montana BI, on Flickrhose removed and the residual coolant from the radiator drained, at this point 7 hours had elapsed, so refilled with water (not coolant)
Untitled by Montana BI, on Flickrfilled to the max ready for the first start
Untitled by Montana BI, on Flickrall good
Untitled by Montana BI, on Flickrthe engine was then run up to temp and then coolant drained (twice) to flush any old coolant out - it was later refilled with the Prestone all in one once i was happy there were no leaks from either the waterpump or bottom hose
Untitled by Montana BI, on FlickrUntitled by Montana BI, on FlickrAll in all it was a success, the main bottlenecks were on the removal of the engine mount & cleaning the face of the block which were a time sap - all in all took me 5 hours.
Edited by redandwhite on Monday 10th January 20:01
part 3 - spark plugs, air filter, pollen filter,wiper blades
air filter change
 Untitled by Montana BI, on Flickr
unfortunately i had been supplied with an incorrect replacement, however the one in there looked like new, so that went back in!
 Untitled by Montana BI, on Flickr
spark plug change next
 Untitled by Montana BI, on Flickr
all clips removed (including the cable tie bodgery)
 Untitled by Montana BI, on Flickr
plugs removed
 Untitled by Montana BI, on Flickr
my plug didnt have the rubber insert to allow easy removal so made my own out of blue tack (take out when tightening)
 Untitled by Montana BI, on Flickr
old vs new - old plugs had this 'burn' ring around the ceramic - replaced with like for like (NGK DPR7E-N-10)
 Untitled by Montana BI, on Flickr
torqued up
 Untitled by Montana BI, on Flickr
at this point took the oppourtunity to protect the exposed wiring (not pretty but effective)
 Untitled by Montana BI, on Flickr
 Untitled by Montana BI, on Flickr
time to reproduce the cable tie bodgery seen earlier
 Untitled by Montana BI, on Flickr
factory fresh!
 Untitled by Montana BI, on Flickr
also took the oppourtunity to protect some exposed wire at the cam cover side
 Untitled by Montana BI, on Flickr
 Untitled by Montana BI, on Flickr
new bosch wipers on the front
 Untitled by Montana BI, on Flickr
 Untitled by Montana BI, on Flickr
and a insert on the rear
 Untitled by Montana BI, on Flickr
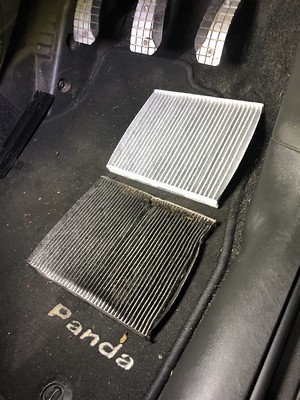
pollen filter old vs new - simple job on these
 Untitled by Montana BI, on Flickr
air filter change
Untitled by Montana BI, on Flickrunfortunately i had been supplied with an incorrect replacement, however the one in there looked like new, so that went back in!
Untitled by Montana BI, on Flickrspark plug change next
Untitled by Montana BI, on Flickrall clips removed (including the cable tie bodgery)
Untitled by Montana BI, on Flickrplugs removed
Untitled by Montana BI, on Flickrmy plug didnt have the rubber insert to allow easy removal so made my own out of blue tack (take out when tightening)
Untitled by Montana BI, on Flickrold vs new - old plugs had this 'burn' ring around the ceramic - replaced with like for like (NGK DPR7E-N-10)
Untitled by Montana BI, on Flickrtorqued up
Untitled by Montana BI, on Flickrat this point took the oppourtunity to protect the exposed wiring (not pretty but effective)
Untitled by Montana BI, on FlickrUntitled by Montana BI, on Flickrtime to reproduce the cable tie bodgery seen earlier
Untitled by Montana BI, on Flickrfactory fresh!
Untitled by Montana BI, on Flickralso took the oppourtunity to protect some exposed wire at the cam cover side
Untitled by Montana BI, on FlickrUntitled by Montana BI, on Flickrnew bosch wipers on the front
Untitled by Montana BI, on FlickrUntitled by Montana BI, on Flickrand a insert on the rear
Untitled by Montana BI, on Flickrpollen filter old vs new - simple job on these
Untitled by Montana BI, on FlickrEdited by redandwhite on Monday 10th January 20:09
I had a rear knock, examining the rear shock top mounts it was clear why with the perished bush
 Untitled by Montana BI, on Flickr
with the Panda jacked up (wheels still on) i set about replacing the rear shocks
a bit of plus gas to help things along
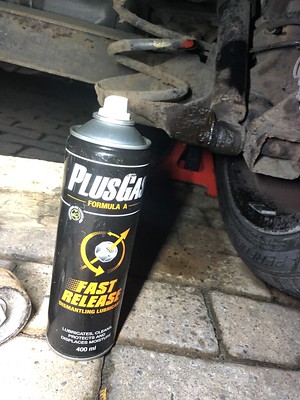 Untitled by Montana BI, on Flickr
end of life!
 Untitled by Montana BI, on Flickr
i needed some replacements sharpish, so went to GSF (i know, a Panda is italian) and got some Amtec ones for £37 a pair which with a 12 month guarantee suited me
 Untitled by Montana BI, on Flickr
both rear dampers replaced and torqued up
 Untitled by Montana BI, on Flickr
Untitled by Montana BI, on Flickrwith the Panda jacked up (wheels still on) i set about replacing the rear shocks
a bit of plus gas to help things along
Untitled by Montana BI, on Flickrend of life!
Untitled by Montana BI, on Flickri needed some replacements sharpish, so went to GSF (i know, a Panda is italian) and got some Amtec ones for £37 a pair which with a 12 month guarantee suited me
Untitled by Montana BI, on Flickrboth rear dampers replaced and torqued up
Untitled by Montana BI, on Flickrpd2 said:
I picked up a black 07 plate one just at the end of November there to use as a daily shed / winter hack. There great wee things, only downside is the 100hp tax on parts.
I had a blue one before, one of the first ones in the UK as a demo car when I worked for fiat. Loved it then that’s why I picked the black one up when it appeared locally.
I’ve just changed the coolant and thermostat on mine as it was playing up. Going to do the suspension, exhaust and timing belt kit and hopefully keep it for a few years.
If your not already, join the www.fiatforum.com the guys have been great on there.
Paul.
Yes, have a mirror thread up on there also, cheersI had a blue one before, one of the first ones in the UK as a demo car when I worked for fiat. Loved it then that’s why I picked the black one up when it appeared locally.
I’ve just changed the coolant and thermostat on mine as it was playing up. Going to do the suspension, exhaust and timing belt kit and hopefully keep it for a few years.
If your not already, join the www.fiatforum.com the guys have been great on there.
Paul.
Cambs_Stuart said:
Great little car. Looking forward to seeing how you get on it with it.
Chunkychucky said:
Interesting mix of pre- and post- "facelift" badges front and rear!
I had a 54 reg Punto with the same engine/gearbox and that was a good laugh to thrash along, been looking at these Pandas recently as something the sort of size even the missus would be capable of parking. Look forward to seeing how your journey with the car progresses
Thanks - will keep the thread updatedI had a 54 reg Punto with the same engine/gearbox and that was a good laugh to thrash along, been looking at these Pandas recently as something the sort of size even the missus would be capable of parking. Look forward to seeing how your journey with the car progresses
ScoobyChris said:
I bought a facelift one new in 2007 (also electroclash grey) and racked up almost 60k miles in the 3 years I had it. Great little car and fun to rev out through the nice notchy gearbox and pretty cheap to run aside from the clutch release bearing which failed at 54k miles and predictably wasn't covered by warranty and required a whole new clutch assembly.
If you plan to mod it, the two things it needed, imvho, were better damping in the suspension to avoid it getting unsettled on anything other than smooth tarmac, and more power (back then I think there was a bolt-on turbo kit available which lifted power to around 120-130bhp but these days you might be able to look at the 500 power plants instead)
Enjoy!
Chris
Thanks - no plans to modify at this stageIf you plan to mod it, the two things it needed, imvho, were better damping in the suspension to avoid it getting unsettled on anything other than smooth tarmac, and more power (back then I think there was a bolt-on turbo kit available which lifted power to around 120-130bhp but these days you might be able to look at the 500 power plants instead)
Enjoy!
Chris
Zlat502 said:
OP,
What has your experiences been like with your Fiats? have they proved reliable etc?
No isses, my first car was a Fiat Uno so i have a soft spot for Fiats , the pick of the bunch has got to be the Bravo HGT with the 5 cyl growl! The 100HP is such a quirky car thoughWhat has your experiences been like with your Fiats? have they proved reliable etc?
lb3nson said:
Love my 100HP, really simple and fun little car. Definitely recommend a good set of dampers as they can be a bit crashy on rough roads.
Running costs have been very cheap, parts are cheap and easy to find and easily gets over 40mpg.
Only selling mine as I’ve ordered a new car and my wife won’t let me keep 2 cars
Yeah agreed it can be firm, however it rides better than my old civic FN2 (that had new dampers) so no issues for meRunning costs have been very cheap, parts are cheap and easy to find and easily gets over 40mpg.
Only selling mine as I’ve ordered a new car and my wife won’t let me keep 2 cars
_Yeti said:
Don't think the girlfriend would forgive me if I swapped the Volvo for one of these... But there's something really special about these cars, love the looks and the idea of wringing the neck of 100hp is just fantastic. Hope it treats you well OP!
If you see my other threads i have had a journey via a few volvos to the 100HP (Volvo V50 - Volvo XC90 - Honda Civic FN2 - Volvo XC70 - BMW 320D - Panda 100HP) but circumstances as they are i am doing a handful of miles per day - the panda fits the bill perfectly.300sl-24 said:
Bookmarked!
This is mine
Good job with the cam belt, waterpump and auxiliary belt. Mine has done 42k miles and I’ve just paid £370 at a fiat specialist to have this done.
It was on the original belt, the teeth get hard and get stripped by the pulleys apparently.
thanks - do you have a thread? This is mine
Good job with the cam belt, waterpump and auxiliary belt. Mine has done 42k miles and I’ve just paid £370 at a fiat specialist to have this done.
It was on the original belt, the teeth get hard and get stripped by the pulleys apparently.
Gassing Station | Readers' Cars | Top of Page | What's New | My Stuff