Discussion


I was very glad the engine was already out when the cam bolt caught on the cam chain cover & fell off the socket down behind the cover as I was taking it out. I was also glad the engine was on a stand in the nice clean garage when the last cam nut came loose, realising the cam sending all the other nuts up in the air…
Two things I’ll remember for next time!
Anyhow with the cam cover removed, replaced all my shims out & measured up, it was just after 5 on Friday so I could only get Racetech on the phone & they don’t have any in at the mo. Has tried to get any recently? I asked them about the recommended (on here) amounts of 10 & 12 thou, they said they’d never heard of it & wouldn’t recommend going over 8 on the inlets. I assume the 10 & 12 values came from Joolz doing rolling road tests though so are fine?
Is there any problem with grinding the shims, most of my exhausts are 11, so I guess it wouldn’t be too hard to trim them a little, or is a case of 11 is close enough & it’s not worth the bother? Two of my shims have very obviously been ground down as they still have marks in them, I may replace those.
I’m a little bothered by the circular score marks on the underside of some of the shims, one was so bad I got a 2 thou difference in reading from the micrometer depending where I tested it, unless it’s going back on the same valve I won’t use that on another valve. But using the old shims on different valves will have different wear effects, is that generally not a problem?
My main concern is one of the inlets had closed up so much that I couldn’t get the 1.5 thou feeler under the cam. The leak down test on that cylinder was fine so I guess it hadn’t gone so far that it could hold the valve open (I wonder if that’s ever happened). The shim on that valve was already the thinnest of the lot (just) at 64 thou, so hopefully a 55 will get me to 10. I’m just worried that that valve could have stretched beyond its limit & could fail. Racetech said the shims go down to 50 so as long as I’m in that range I should be fine – any thoughts?
I can only give my opinion which is that
1) within 1 thou is close enough I took three goes to get mine better than this.
2) mine had not had the tappets done for some time and two of the inlets had no clearance at all but this doesnt seem to have been a big problem.
3) I know that Tanguero advocates a quick grind to remove the odd thou and it is obviously quicker than waiting for more to arrive. I am warry of grinding more than a thou off a new one though as they are probablty case hardenened and you may go through the case which would be bad
4) Given that a shim failure = new engine I would discard and that are suspect. In Carroll Smith's book on bolts for race cars he advises the Navy floatation test be applied for suspect critical components - throw in to large body of water (preferably ocean) if they float then thay may be retained and re used.
Not sure that I "advocate" grinding shims, but have certainly done so myself without any issue (provided they are jigged to keep them square). 12k miles later they were just fine. You make the decision for yourself though!
All the Cerb shims that I have had dealings with have been through hardened rather than case hardened. Not saying case hardened shims don't exist, but all the one I have seen certainly aren't.
All the Cerb shims that I have had dealings with have been through hardened rather than case hardened. Not saying case hardened shims don't exist, but all the one I have seen certainly aren't.
That’s great, thanks for the replies, sounds like my stretched valve should be ok then . I like the sound of the floatation test!
I double checked mine last night luckily all the slightly suspect shims are well outside the useful range so would need replacing regardless.
I suspect I may have trouble getting hold of enough shims to get them all bang on & as there is possibly of getting a good shim that was only 1 thou off out of square when trying to grind it I may well just leave the exhausts alone. One inlet was 9 thou so I may leave that one too, but apart from the closed up one the other inlets were 3 & 6.
ukkid35 said:
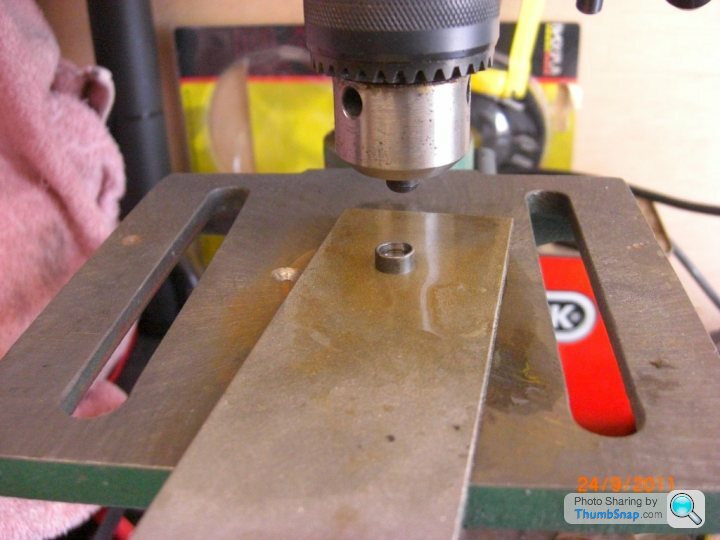
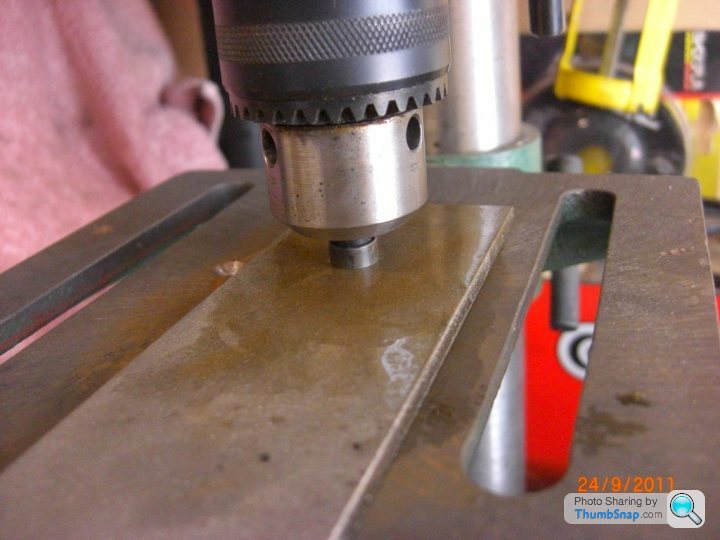
I had to adjust at least 10 of my shims, I did so by sanding by hand, finishing them using 800 grit to a fine polish. This took a couple of long evenings in front of the TV, but it did give me peace of mind.
How did you keep them square, did you make a jig or just hold them carefully? I used an old pen top that was a snug fit when pushed into the shim and mounted as per the photos. Used the stone first and then polished to a mirror finish with different grades of wet and dry. Like others have said, it's your choice as to whether you go for new or grind your own, the grind worked for me.
Rufus Roughcut said:
I used an old pen top that was a snug fit when pushed into the shim and mounted as per the photos. Used the stone first and then polished to a mirror finish with different grades of wet and dry. Like others have said, it's your choice as to whether you go for new or grind your own, the grind worked for me.
The drill stand is a good idea, I’ve got a little modelling lathe & I was trying to think how I could use it, you pics reminded me it converts to a drill stand, thanks! GT6k said:
2) mine had not had the tappets done for some time and two of the inlets had no clearance at all but this doesnt seem to have been a big problem.
Do you by any chance remember what size shims you ended up with on those inlet valves? I’d need a 55thou shim to get mine to a clearance of 10thou but looking on racing green’s web site & they only go down to a 1.47mm (57thou?) I’ll have to do a bit more digging to find what the safe minimum is.
There is a spreadsheet here http://www.pistonheads.com/gassing/topic.asp?t=993... with the tappet values from my car.
I am just in the process of checking them again and after 2 years/6k miles i have lost 1 thou on a couple of the inlets so I dont intend to adjust them.
One last thing is that care should be taken to limit any bending loads when removing or fitting the camshaft, i suspect that some of the cam failures (and stripped studs) are caused by this. I made up a strap to go over the centre which allowed me to gradually and evenly load the cam up.
GT6k said:
One last thing is that care should be taken to limit any bending loads when removing or fitting the camshaft, i suspect that some of the cam failures (and stripped studs) are caused by this. I made up a strap to go over the centre which allowed me to gradually and evenly load the cam up.
I was equally concerned so this is what I usedhttp://www.pistonheads.com/gassing/topic.asp?h=0&a...
GT6k said:
There is a spreadsheet here http://www.pistonheads.com/gassing/topic.asp?t=993... with the tappet values from my car.
That’s perfect thanks, nice colour coding there I’m running out of different coloured pens! Alas your thinnest shim looks to have been a 1.68mm (that was a 1.69mm when you measured – great) that’s’ way bigger than the 1.40mm I need on one of mine. Looks like may be that valve has gone too far.
Have valves ever snapped due to over stretching? There seems to be a few mentions of failed shims of late, but I’m not sure I remember hearing of failed valves. Wish the head gaskets weren’t so much or I’d just swap the valve as a precaution.

ukkid35 said:
GT6k said:
One last thing is that care should be taken to limit any bending loads when removing or fitting the camshaft, i suspect that some of the cam failures (and stripped studs) are caused by this. I made up a strap to go over the centre which allowed me to gradually and evenly load the cam up.
I was equally concerned so this is what I usedhttp://www.pistonheads.com/gassing/topic.asp?h=0&a...
ukkid35 said:
If you think headgaskets are expensive (£180 for a pair - really?) then you should try catastrophic engine failure...
Yeah I know! Trouble is once you start spending it's hard to stop, then all of a sudden you've passed the price of an LS conversion.... How is you engine holding up? You were the guy who rebuilt his on the street by only half taking it out of the car weren't you? If so you did a good job of resisting the spending temptation, with every one telling you you were crazy in the process as I recall!
Luckyone said:
How is you engine holding up? You were the guy who rebuilt his on the street by only half taking it out of the car weren't you? If so you did a good job of resisting the spending temptation, with every one telling you you were crazy in the process as I recall!
Still going strong, looking forward to DN10.Hope to meet you at Burghley House.
ukkid35 said:
Still going strong, looking forward to DN10.
Hope to meet you at Burghley House.
That should have worked out well, as I’ve got it all back up & running, but the first test drive didn’t go so well. Hope to meet you at Burghley House.
My kids got home from nursery just as I’d finally got all the air out of the brakes, so they were very excited to come along. The very slow speed run down the hill at idle to check the brakes really were ok was fine, so as we turned round to go back up the hill my 4 year old boy asked if we could go a bit faster this time. It seemed rude not to, I was pleased as we managed a little power slide just over idle (tyres that haven’t been used in three years) be we didn’t get any speed with the wheels spinning so as the engine revs dropped he shouted faster faster, the second time it hooked up better, he was very pleased. We didn’t do more than about 25mph in first but my 2 year old little girl didn’t like that so much & started crying, I almost joined her as the exhaust noise dropped & nasty tapping / rattling noise started up...
So rather than seeing to the finishing touches I’ll be taking the rocker covers off later this week with everything crossed!
Gassing Station | Cerbera | Top of Page | What's New | My Stuff