V8S Fuel Tank Sender Unit Replacement
Discussion


Thanks to Smokey Boyer for his help on this.
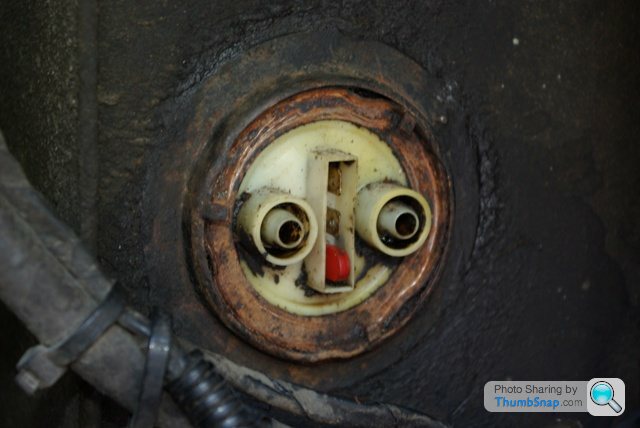
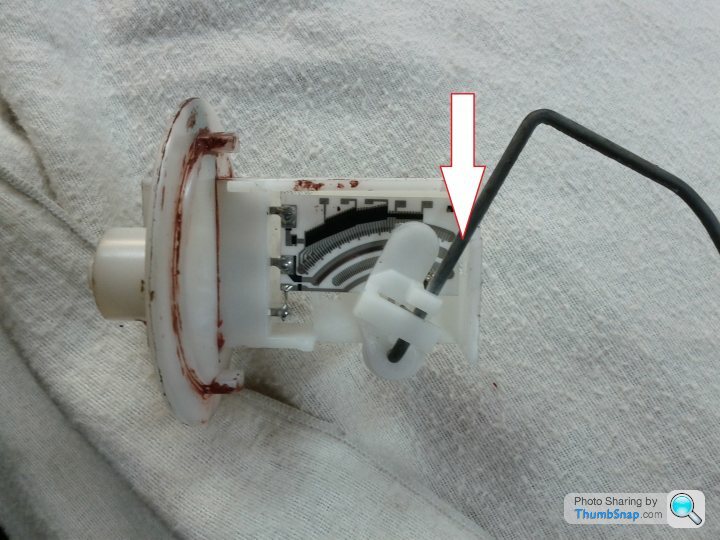
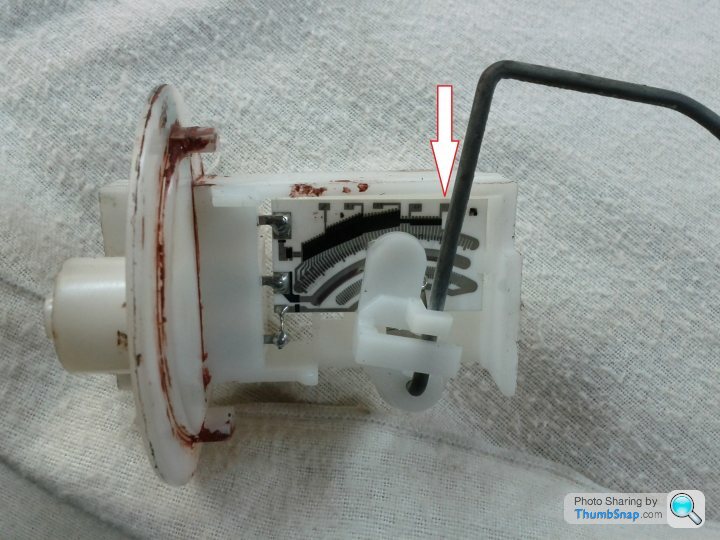
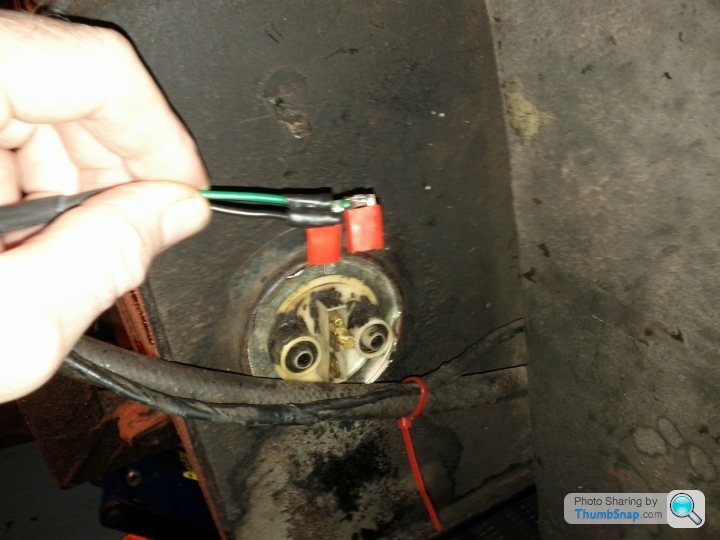
Here is my experience of changing the fuel tank sender on the V8S. This should also apply to any other S fitted with the same sender unit. First thing you need to do is find out what unit you have fitted. This will mean getting under the wheel arch and scraping away all the muck which covers the back of the old unit. Mine looked like this
The good news is that it is a current Land Rover part (so I’ve been told) and available from LR dealers for a stupid sum of money. I got mine from here http://wapsipurtlandrover.co.uk/ for £14.99 plus VAT and p&p. You’ll also need a new lock ring and rubber gasket which they can also supply for extra.
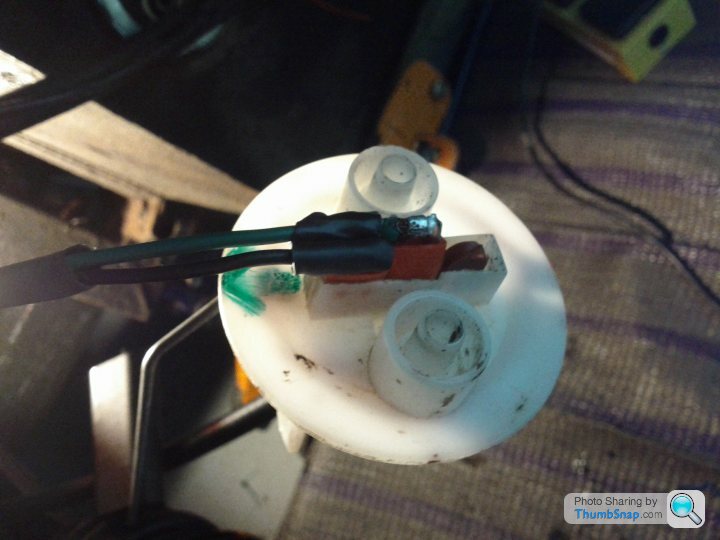
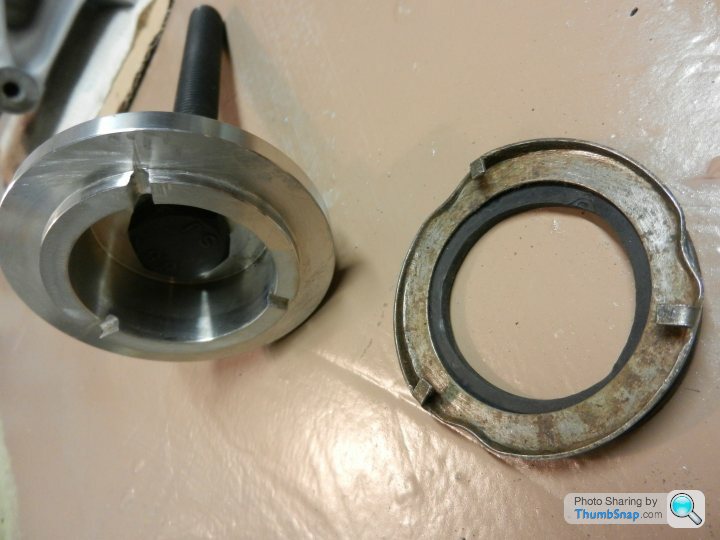
There is a complication in that this part is also available from the same source under the same part number, but as you can see it has a metal back plate.
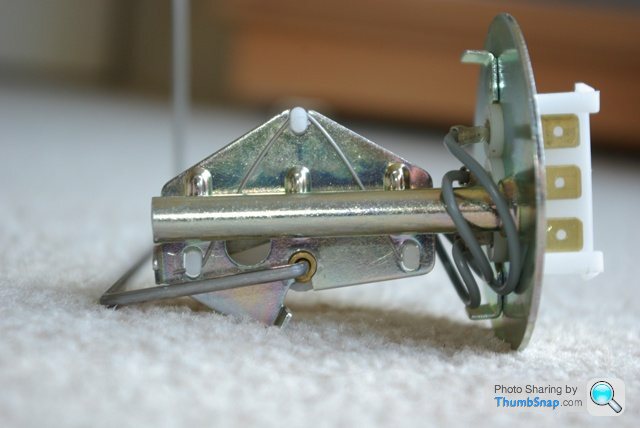
The back-plate size and lock ring are the same but the arrangement of the float arm is different on this one so getting it to register the correct level when fitted horizontally in the TVR tank won’t be as simple as with the plastic one. My guess is that the plastic one is an original LR unit and the metal back-plate one is a pattern part. For its original fitment, which is vertical, the different arrangement of the float arm is irrelevant.
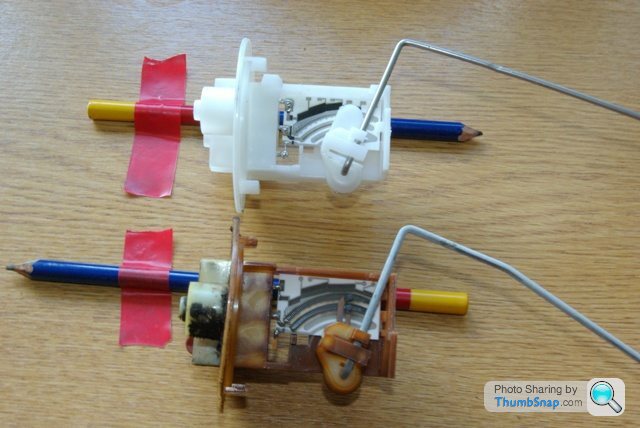
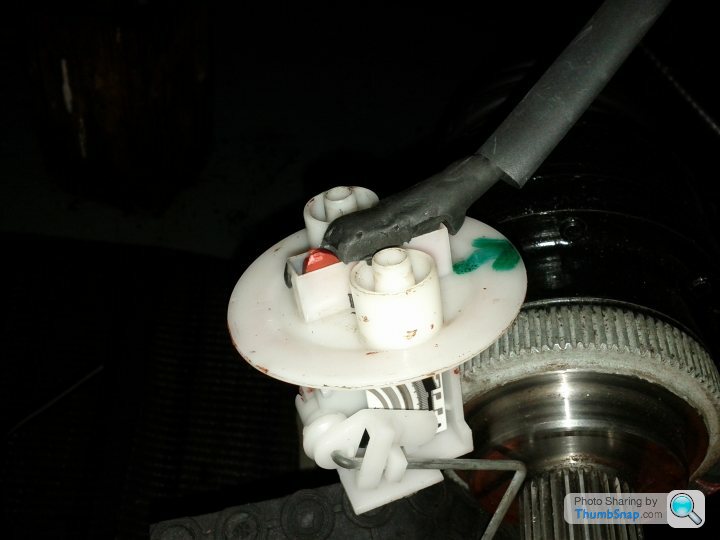
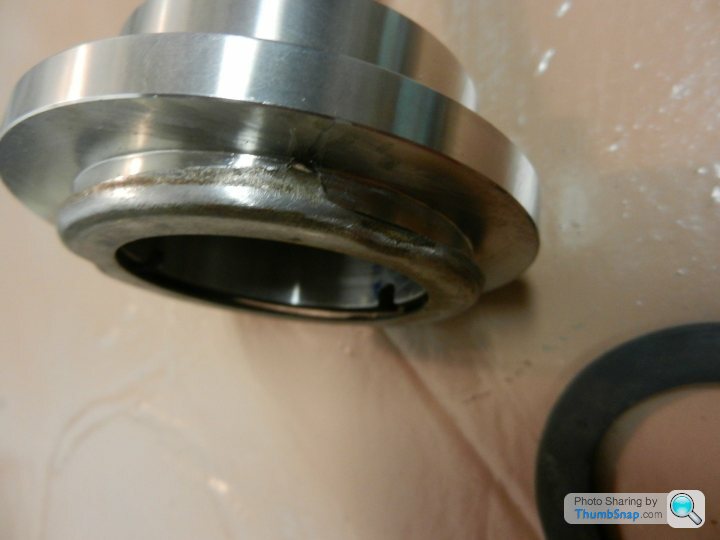
As you can see from this picture, the plastic one is identical to the original item apart from the float arm.
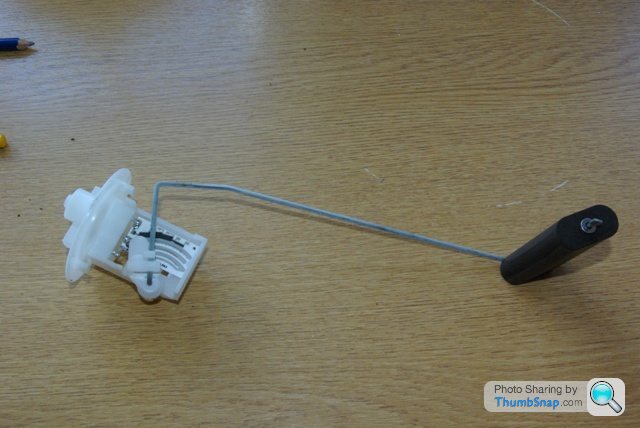
You could use the float arm supplied with the new unit if you straighten it out. However, my tank has at least one baffle plate so the straightened out arm is too long. Removing the float arm and replacing it with the one from the original sender unit is easy.
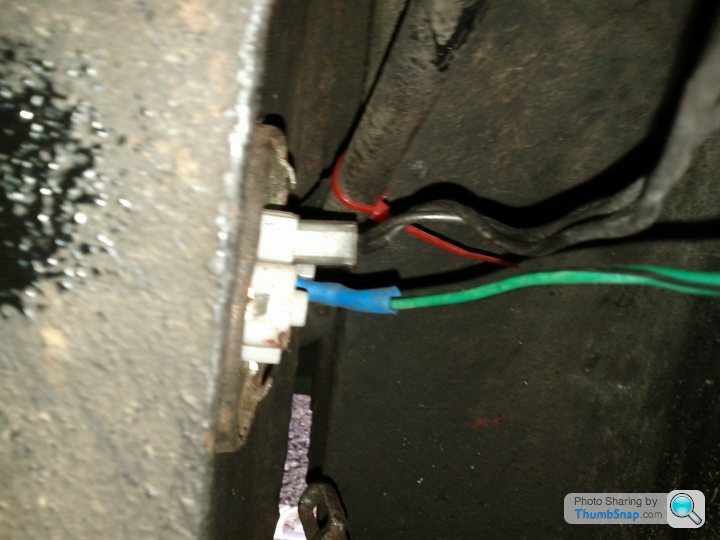
NB this is not an option if you get the unit with the metal back plate. Make a note of which wires go to which terminal. Only two of the terminals on the back of the unit are used. Before you install it, connect the new unit to the wires in the wheel arch and move the float arm up and down to check which two connections work the gauge correctly. Do this before you remove the old unit to reduce the risk of sparks near the open tank. It will probably be the middle terminal and the one which will be topmost when the unit is fitted.
Of course it’s always possible that you had a metal back-plate one fitted, either originally or as a later replacement, hence the need to check carefully what you have before ordering.
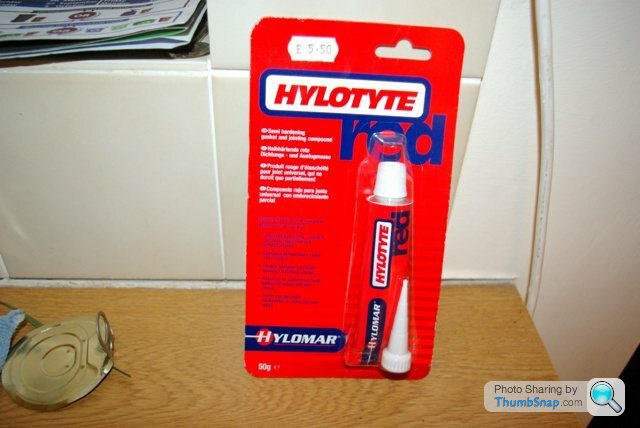
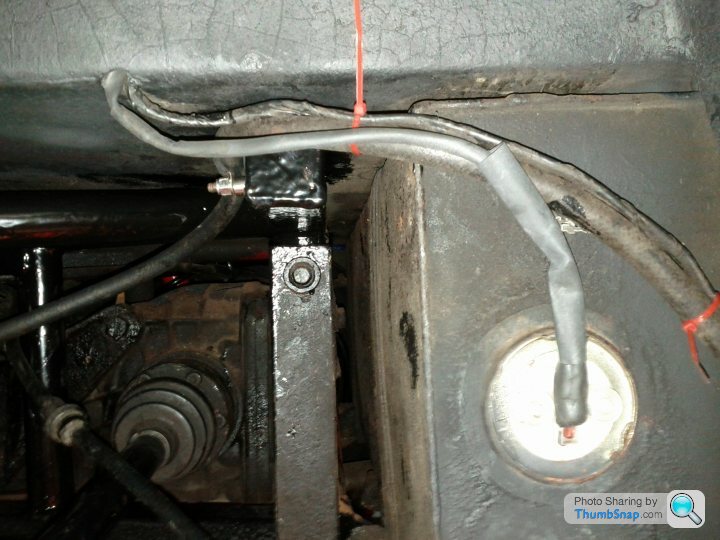
Removal of the old unit and fitting the new one was quite simple once the rear wheel was off. I used this product to seal the joint and left it 48 hours to cure before putting some petrol in.
So far I’ve only half filled the tank and it seems to work fine with no leaks. I’ll have to let you know if it remains fuel tight when I put more petrol in.
This is a guide only and not intended to be definitave. As always, when woking with pertol avoid sparks and work in a well ventilated area. If you blow yourself and/or you garage up it’s not my fault.
The difficult part of this whole exercise was getting hold of the guy at wapsipurtlandrover to try and get the correct part after I had originally been supplied with the metal back plate one. To be fair to him this was exactly the part advertised on his Ebay advert and once I finally got to speak to him he was very helpful and sent me the alternative plastic part by return. However, I lost count of the voice messages and emails I had top leave for him and I’m still awaiting a reply to an email to him last week offering to recommend him on here if he could tell me how ‘S’ owners could be sure of ordering the correct part from him. At the time of this post there’s still no reply. As there at least two quite different replacement parts available under the same description and part number from this source I suggest it’s very important to have a contact you can speak to and be sure of getting the right part first time. I’ve been in touch with Neil at ML Performance Parts http://www.mlperformanceparts.co.uk/ and he replied by return saying he can supply the plastic back-plate unit at £46.50 + p&p + VAT.
So there you go – you pays your money and takes your choice.
Related threads
http://www.pistonheads.com/gassing/topic.asp?h=0&a...
http://www.pistonheads.com/gassing/topic.asp?h=0&a...
Here is my experience of changing the fuel tank sender on the V8S. This should also apply to any other S fitted with the same sender unit. First thing you need to do is find out what unit you have fitted. This will mean getting under the wheel arch and scraping away all the muck which covers the back of the old unit. Mine looked like this
The good news is that it is a current Land Rover part (so I’ve been told) and available from LR dealers for a stupid sum of money. I got mine from here http://wapsipurtlandrover.co.uk/ for £14.99 plus VAT and p&p. You’ll also need a new lock ring and rubber gasket which they can also supply for extra.
There is a complication in that this part is also available from the same source under the same part number, but as you can see it has a metal back plate.
The back-plate size and lock ring are the same but the arrangement of the float arm is different on this one so getting it to register the correct level when fitted horizontally in the TVR tank won’t be as simple as with the plastic one. My guess is that the plastic one is an original LR unit and the metal back-plate one is a pattern part. For its original fitment, which is vertical, the different arrangement of the float arm is irrelevant.
As you can see from this picture, the plastic one is identical to the original item apart from the float arm.
You could use the float arm supplied with the new unit if you straighten it out. However, my tank has at least one baffle plate so the straightened out arm is too long. Removing the float arm and replacing it with the one from the original sender unit is easy.
NB this is not an option if you get the unit with the metal back plate. Make a note of which wires go to which terminal. Only two of the terminals on the back of the unit are used. Before you install it, connect the new unit to the wires in the wheel arch and move the float arm up and down to check which two connections work the gauge correctly. Do this before you remove the old unit to reduce the risk of sparks near the open tank. It will probably be the middle terminal and the one which will be topmost when the unit is fitted.
Of course it’s always possible that you had a metal back-plate one fitted, either originally or as a later replacement, hence the need to check carefully what you have before ordering.
Removal of the old unit and fitting the new one was quite simple once the rear wheel was off. I used this product to seal the joint and left it 48 hours to cure before putting some petrol in.
So far I’ve only half filled the tank and it seems to work fine with no leaks. I’ll have to let you know if it remains fuel tight when I put more petrol in.
This is a guide only and not intended to be definitave. As always, when woking with pertol avoid sparks and work in a well ventilated area. If you blow yourself and/or you garage up it’s not my fault.
The difficult part of this whole exercise was getting hold of the guy at wapsipurtlandrover to try and get the correct part after I had originally been supplied with the metal back plate one. To be fair to him this was exactly the part advertised on his Ebay advert and once I finally got to speak to him he was very helpful and sent me the alternative plastic part by return. However, I lost count of the voice messages and emails I had top leave for him and I’m still awaiting a reply to an email to him last week offering to recommend him on here if he could tell me how ‘S’ owners could be sure of ordering the correct part from him. At the time of this post there’s still no reply. As there at least two quite different replacement parts available under the same description and part number from this source I suggest it’s very important to have a contact you can speak to and be sure of getting the right part first time. I’ve been in touch with Neil at ML Performance Parts http://www.mlperformanceparts.co.uk/ and he replied by return saying he can supply the plastic back-plate unit at £46.50 + p&p + VAT.
So there you go – you pays your money and takes your choice.
Related threads
http://www.pistonheads.com/gassing/topic.asp?h=0&a...
http://www.pistonheads.com/gassing/topic.asp?h=0&a...
Here's an update for anyone who might be thinking of using this sender as a replacement. Since it was fitted it has given me incorrect readings ie never shows 'Full' even with a full tank and drops very quickly to 'Empty' when still half full. I think I may have found out why.You might expect the 'Empty' position to be at the point where the float arm is at its lowest position and won't go any further, ie at the point of maximum resistance. This position...
In this position the sender is reading 325 Ohms and the gauge is showing 'Empty'. However, the gauge remains firmly on 'Empty' until the float arm has moved to this position...
In this position the resistance is 198 Ohms and drops steadily and incrementally as the float arm is moved, so that when it is at the other end of its travel ie in the highest position, the resistance is 10 Ohms. At this point the gauge is on the 'Full' mark.
I've bent the wire float arm so that the float is on the bottom of the tank when the arm is at the 198 Ohm position. There's a bit more work to do before I put it all back together; the wiring is a mess and there is what appears to be a completely unnecessary 2nd earth wire off one of the terminals.
Tomorrows job will be replacing the spade terminals with right-angled ones, and heat-shrinking the two wires to make everything neater and waterproof.
The Red Hylotyte has worked well and remained fuel tight. The sender came out easily and the sealant was still soft and tacky, so its done exactly what it was supposed to do.
v8s4me said:
Two right-angled female spade connectors soldered to the wires...
With made to fit insulation covers
Many of us seem to have the gauge/sender matching problem (and not just fuel gauges).
Has anybody tried this Gauge Wizard?
I saw it demonstrated at the Shepton Mallet Restoration Show, and it seemed to do the business. He seems a nice guy, his website has lots of info, and he claims to do custom auto electronics as well.
Merry Christmas, everyone!
Has anybody tried this Gauge Wizard?
I saw it demonstrated at the Shepton Mallet Restoration Show, and it seemed to do the business. He seems a nice guy, his website has lots of info, and he claims to do custom auto electronics as well.
Merry Christmas, everyone!
mentall said:
Many of us seem to have the gauge/sender matching problem (and not just fuel gauges).
Has anybody tried this Gauge Wizard?
I saw it demonstrated at the Shepton Mallet Restoration Show, and it seemed to do the business. He seems a nice guy, his website has lots of info, and he claims to do custom auto electronics as well.
Merry Christmas, everyone!
I thought of making something like this, but now I don't need to.Has anybody tried this Gauge Wizard?
I saw it demonstrated at the Shepton Mallet Restoration Show, and it seemed to do the business. He seems a nice guy, his website has lots of info, and he claims to do custom auto electronics as well.
Merry Christmas, everyone!
mentall said:
Many of us seem to have the gauge/sender matching problem ...
After a bit of mucking about bending the float are I've got it right - in this position anyway. 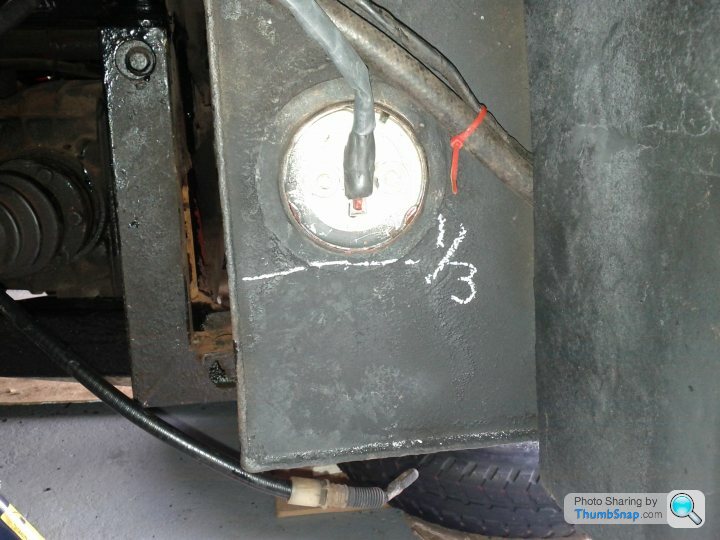 [url]
[url]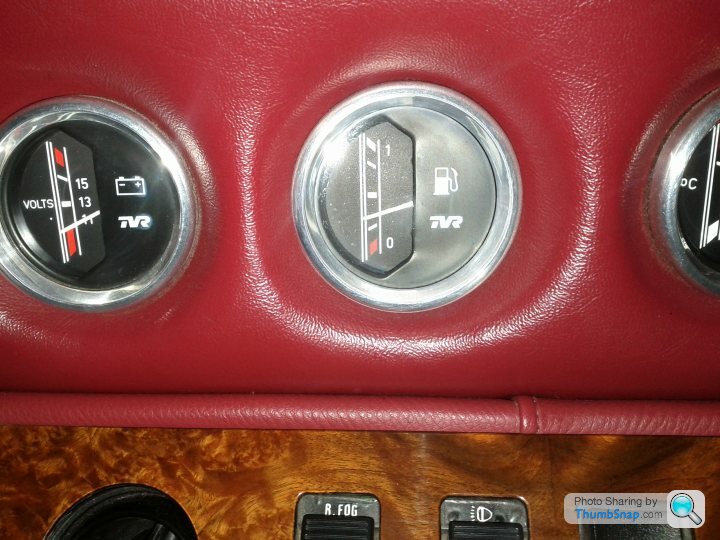 |http://thumbsnap.com/TNz5nYhZ[/url]
I know it will read 'Full' when it's full but it remains to be seen what reading the gauge gives when the float is on the bottom of the tank.
HvdWeerden said:
Need to fill your battery as well ;-)
Yeah, but not with petrol! 
Austin's fuel gauge is fine.
Stationary*:
Just over 3/4 indicated = Full
Just below 1/4 = time to fill up.
On the move: Turn right = full. Turn left = empty. Stutters or coughs when turning left = fill up asap.

- It could be stationery
 I never know which one it is. I don't mean writing pads and envelopes on the move.

v8s4me said:
mentall said:
Many of us seem to have the gauge/sender matching problem ...
After a bit of mucking about bending the float are I've got it right - in this position anyway. I know it will read 'Full' when it's full but it remains to be seen what reading the gauge gives when the float is on the bottom of the tank.

Oh well, at least it's more accurate on the lower half of the tank.


V8S Fuel Tank Sender Unit Replacement
I am in the process of sorting out my fuel sender on my V8S. At present I have not removed the sender and I need some advice on how to undo the Locking Ring, I guess I also need to drain the petrol out. I had a play today and measuring the resistance across the terminals with the connections removed I got a complete open circuit reading!. I tested the fuel gauge by putting the ignition on and shorting the supply cable down to the earth, it gave a full deflection which I am told tests the gauge, I believe the gauge has it's own voltage stabiliser or regulator in the circuit.
Please let me know your final outcome on the sender I am trying to source the plastic sender unit Part No. 555844, it does not appear to be available on e-bay anymore. Your article is brilliant and has given me encouragement to carry on attempting replacing the sender unit and I will probably do the fuel filter at the same time.
Thanks tivman
phillpot said:
....Only if it's over about 1/2 full, check your gauge ..
Would that be using the fuel gauge which isn't working? ..
tivman1 said:
.....I need some advice on how to undo the Locking Ring, ....
Tap it anti-clockwise using a COPPER drift and a hide hammer.tivman1 said:
........I am trying to source the plastic sender unit Part No. 555844, it does not appear to be available on e-bay anymore. .....
Here's a couple...
http://www.ebay.co.uk/itm/FUEL-TANK-SENDER-UNIT-FO...
http://www.ebay.co.uk/itm/LAND-ROVER-DEFENDER-90-F...
But you will probably need to change the float, as explained earlier. Why not replace the lock ring and seal while you're at it?
tivman1 said:
....Your article is brilliant and has given me encouragement to carry on attempting replacing the sender
Thank you

It's not a difficult job, but getting the float in the right position so the gauge reads more or less correctly is a bit of a pain.

Gassing Station | S Series | Top of Page | What's New | My Stuff