V8V scuff plate and door handle, full refurb DIY guide.
Discussion


For a while I've been meaning to sort out the scuff plates on my V8V - for three reasons:
1. They are *badly* scratched
2. I've always had a suspicion that my left and right plates are a slightly different colour
3. I've always disliked the fact that the scuff plates in that (Platinum) colour, are only a match for the air vent surrounds, I don't think they look good against my Iron Ore or carpet colour
again, I thought I'd create a DIY fix thread, to help anyone else wondering if they can tackle the issue themselves.
You will need:
1. Sandpaper - 120, (240, 400, 600, 800 and 1000 wet and dry)
2. Allen key and screwdriver
3. White spirit
4. Kitchen towel
5. Etch primer
6. Base coat colour, I chose Holts HGREYM06 as a light undercoat and HGREYM04 as the top coat (the M04 is an excellent match for the door handle parts, as you'll see below)
7. Polish, polishing machine (optional) and cloth to remove polish
8. Wax
In terms of difficulty, this really is a 1 out of 10. The scuff plates are by definition meant to get scuffed, but they look so much better now they are a sensible colour and factory fresh
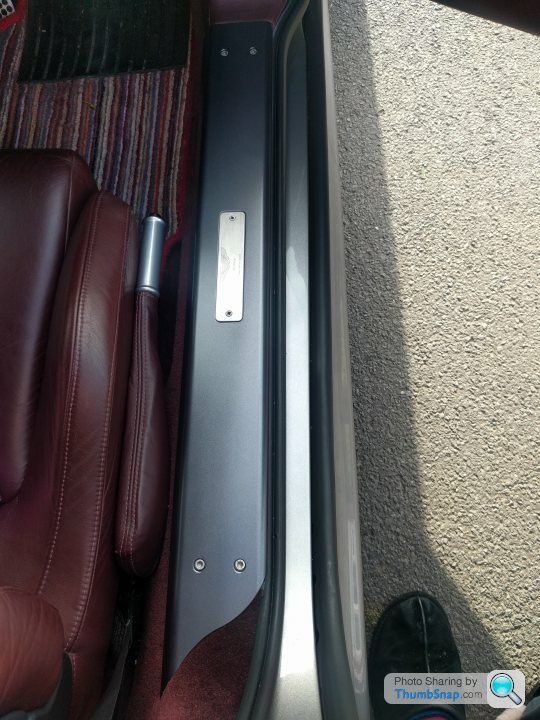
Step 1.
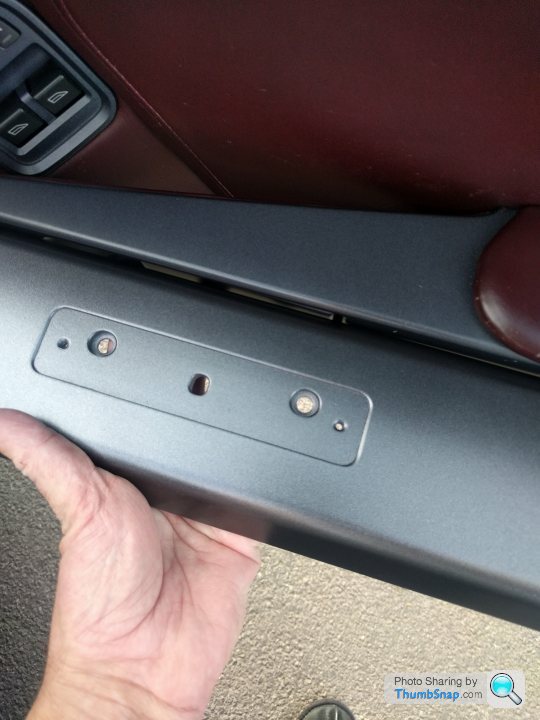
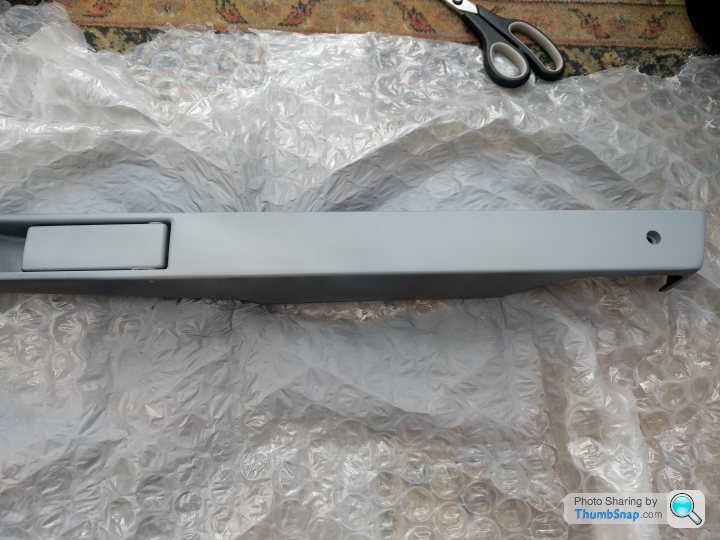
Remove the scuff plates, there are four exposed allen bolts, and two more hidden under the plaque, remove them and the plate lifts off easily
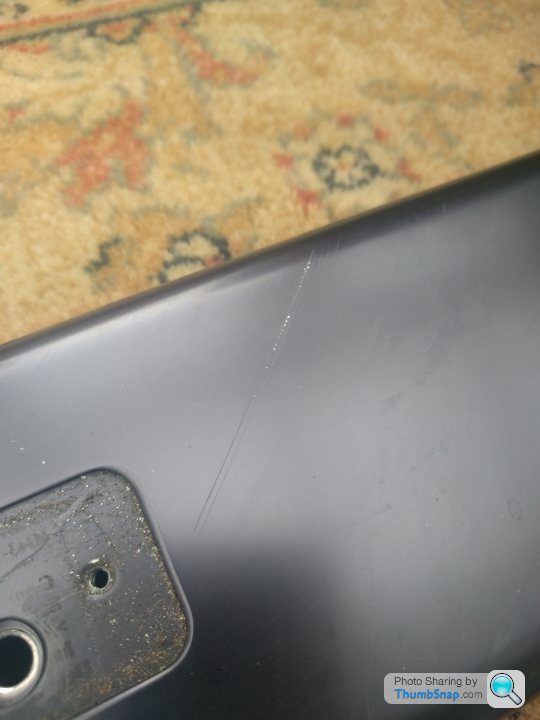
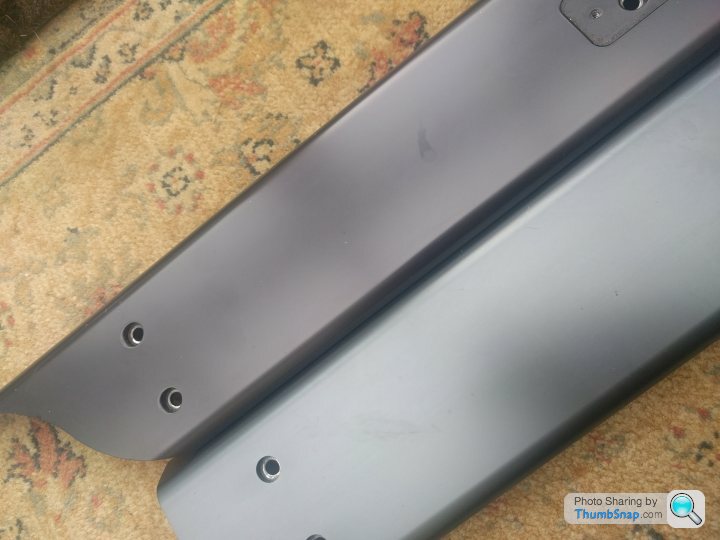
The astute amongst you will notice that I was incorrect about point 2 above. My scuff plates are not slightly different colours, they are COMPLETELY different colours
Step 2.
Clean the scuff plates under where the plaque has been. Now, with 120 sandpaper, remove the deepest scratches/marks - this took about 30 mins from the drivers side and 5 minutes for the hardly used passenger side. My plates had some pretty nasty and deep scratches hence the time taken

Step 3.
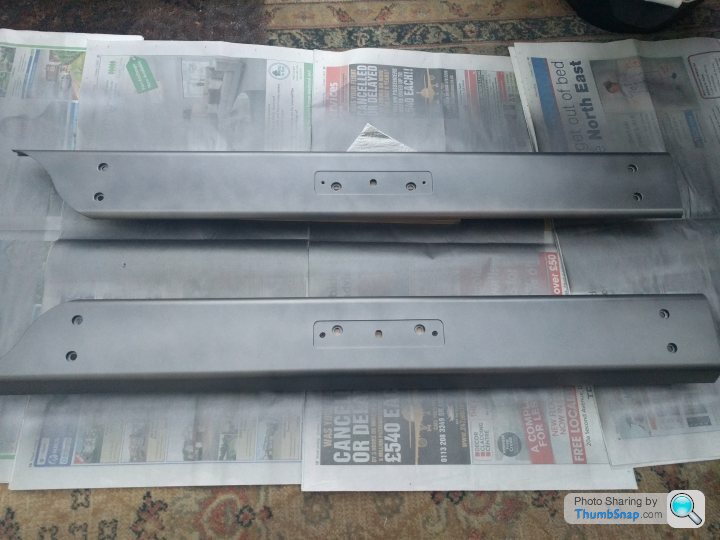
Now rub the entire surface of the area with the 240 sandpaper to get a good surface for your etch primer to stick to.
Step 4. Clean the entire plate surface with white spirit and allow to dry. Lay your plates out ideally in an area which is dust free and > 20 degrees. A great tip here is to thoroughly warm the items with a hairdryer, the paint will adhere more easily and dry faster.
Step 5. As always, lay down light strokes of etch primer rather than trying to cover all the exposed metal at once. They key to a good finish is many light coats

Step 6. At this point, Instead of watching paint dry, I examined the brushed aluminium plaques. Again they were scratched and filthy so I decided to sand them down with 240 wet and dry sand paper, avoiding the logo and text as much as possible and they came up beautifully.

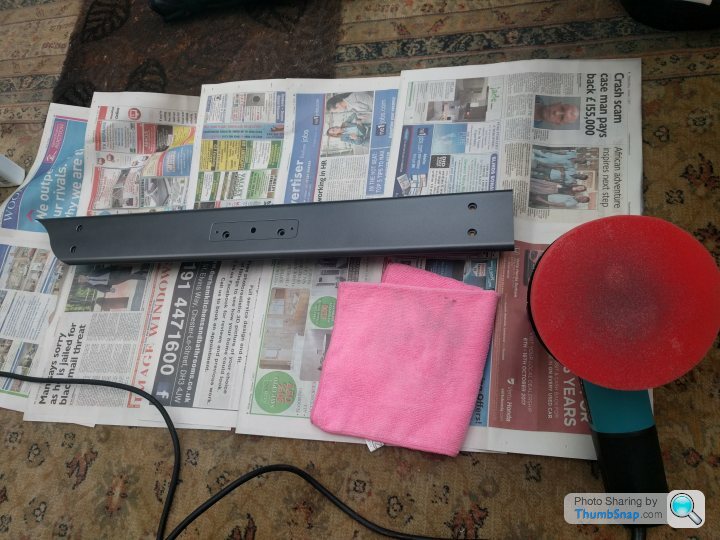
Step 7. Once you've covered the bare metal with etch primer, waft a light coat over the rest of the plates and allow to dry for circa 24 hours, or less if you can leave them somewhere warm, I left mine on a towel on a radiator overnight to harden
Step 8. Once your primer is dry and hardened, very gently remove any dust imperfections from the plate surface with 800 wet and dry to get a super smooth finish. As always, dry with kitchen towel and white spirit.
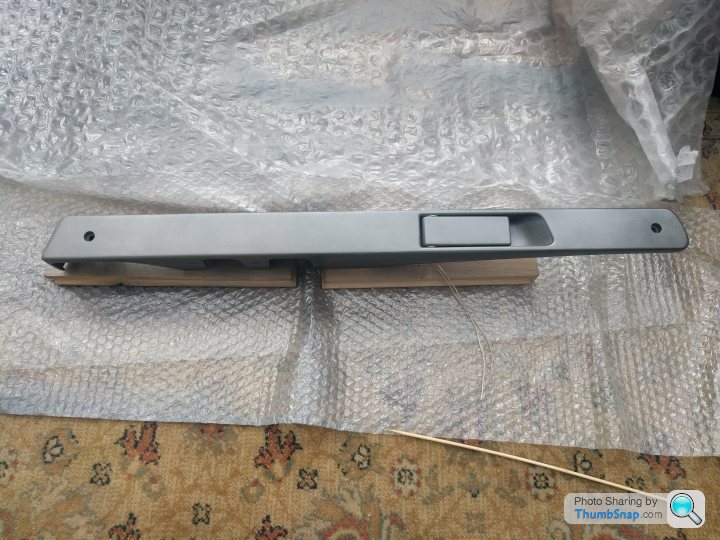
Step 9. Apply three of four coats of the base coat (HGREYM06) allowing the recommended drying time between coats. Warm the plates between coats with a hairdryer, don't worry too much about dust marks at this point, we'll deal with those later.
Step 10. Once dry, layer over 4 or 5 coats of the final colour (HGREYM04) and alloy to dry for at least 8 hours
Step 11. Once dry, take some 1000 or 1200 grit wet and dry and very lightly sand the plates down, this will fully flatten the surface and remove any dust marks or imperfections. Now take some of your favourite non abrasive polish, apply either by hand with microfiber cloth, or by machine. This will take the surface from a matte to a satin (which is what the original finish is like) I also added a little purple haze wax, just because.
Note: it's normal and expected to see the colour on the pad, as these are not lacquered.
Step 12. Re-install into the vehicle and finally add the plaques back into position. The eagle eyed will notice that the screw heads are now silver whereas from the factory they are black. Black didn't really suit (in my opinion), so I rubbed the screw head faces over 240 wet and dry until they were silver

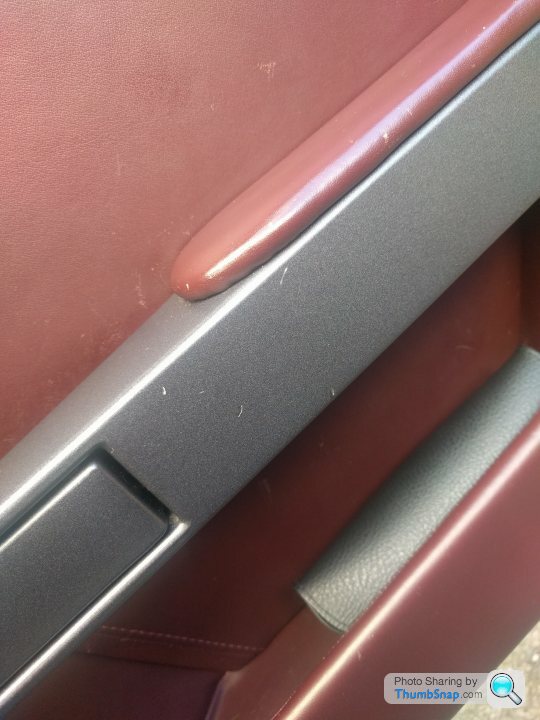
To give you an idea of how well this colour matches the door handles, here's a side by side...
At this point, I realised that the scuff plates were essentially perfect, but it highlighted how nasty, pitted and scratched my door handles were, you can tell what's coming here...
So once you've removed the door handles, (two allen bolts) and unclipped the wire for the door handle, you can follow the exact steps from 2 to 11 above, to sort the door handles.

Before, scratched and original colour
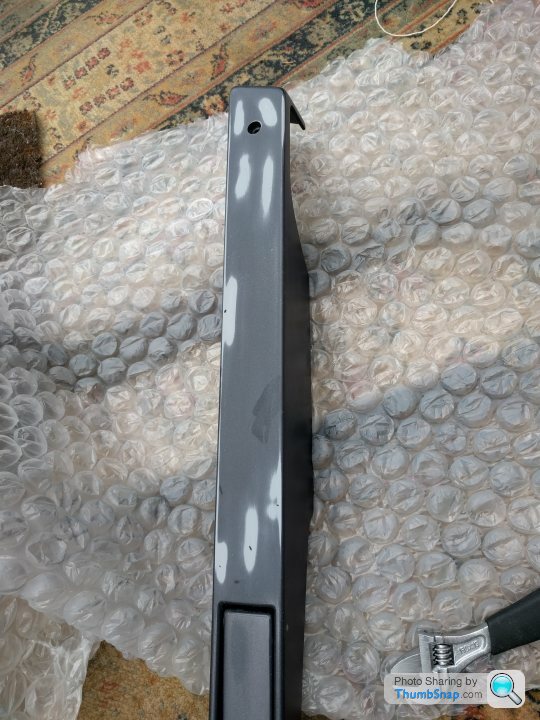
Rubbed down with 240 wet and dry. be careful here you can easily re-shape this item, it's quite 'soft'
avec etch primer
3 coats of M06, followed by 3 of M04
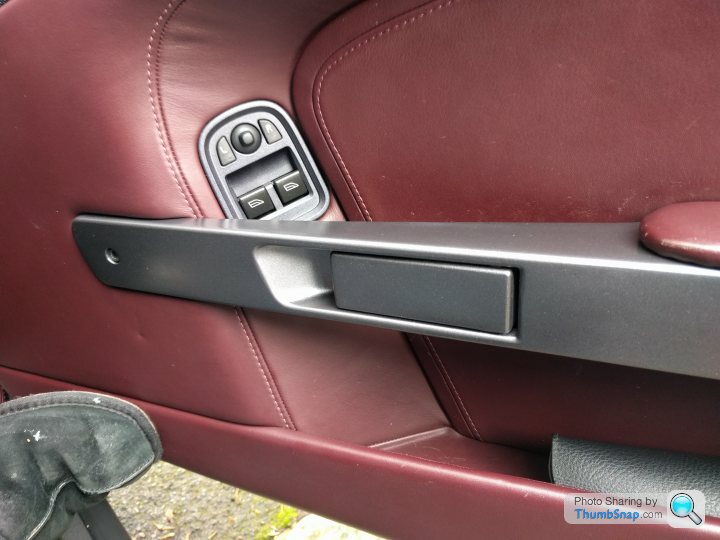
Re-installed, the light is poor in this shot, the finish and colour are near perfect. You can see how well the colour matches by comparing the door handle (Holts M04) and the electric mirror buttons surround (original)
As always, any comments questions let me know. I hope this helps someone to do the same job, sometimes seeing someone else tackle it, gives you the extra bravery to start taking your car apart!
rancid
1. They are *badly* scratched
2. I've always had a suspicion that my left and right plates are a slightly different colour
3. I've always disliked the fact that the scuff plates in that (Platinum) colour, are only a match for the air vent surrounds, I don't think they look good against my Iron Ore or carpet colour
again, I thought I'd create a DIY fix thread, to help anyone else wondering if they can tackle the issue themselves.
You will need:
1. Sandpaper - 120, (240, 400, 600, 800 and 1000 wet and dry)
2. Allen key and screwdriver
3. White spirit
4. Kitchen towel
5. Etch primer
6. Base coat colour, I chose Holts HGREYM06 as a light undercoat and HGREYM04 as the top coat (the M04 is an excellent match for the door handle parts, as you'll see below)
7. Polish, polishing machine (optional) and cloth to remove polish
8. Wax
In terms of difficulty, this really is a 1 out of 10. The scuff plates are by definition meant to get scuffed, but they look so much better now they are a sensible colour and factory fresh
Step 1.
Remove the scuff plates, there are four exposed allen bolts, and two more hidden under the plaque, remove them and the plate lifts off easily
The astute amongst you will notice that I was incorrect about point 2 above. My scuff plates are not slightly different colours, they are COMPLETELY different colours
Step 2.
Clean the scuff plates under where the plaque has been. Now, with 120 sandpaper, remove the deepest scratches/marks - this took about 30 mins from the drivers side and 5 minutes for the hardly used passenger side. My plates had some pretty nasty and deep scratches hence the time taken
Step 3.
Now rub the entire surface of the area with the 240 sandpaper to get a good surface for your etch primer to stick to.
Step 4. Clean the entire plate surface with white spirit and allow to dry. Lay your plates out ideally in an area which is dust free and > 20 degrees. A great tip here is to thoroughly warm the items with a hairdryer, the paint will adhere more easily and dry faster.
Step 5. As always, lay down light strokes of etch primer rather than trying to cover all the exposed metal at once. They key to a good finish is many light coats
Step 6. At this point, Instead of watching paint dry, I examined the brushed aluminium plaques. Again they were scratched and filthy so I decided to sand them down with 240 wet and dry sand paper, avoiding the logo and text as much as possible and they came up beautifully.
Step 7. Once you've covered the bare metal with etch primer, waft a light coat over the rest of the plates and allow to dry for circa 24 hours, or less if you can leave them somewhere warm, I left mine on a towel on a radiator overnight to harden
Step 8. Once your primer is dry and hardened, very gently remove any dust imperfections from the plate surface with 800 wet and dry to get a super smooth finish. As always, dry with kitchen towel and white spirit.
Step 9. Apply three of four coats of the base coat (HGREYM06) allowing the recommended drying time between coats. Warm the plates between coats with a hairdryer, don't worry too much about dust marks at this point, we'll deal with those later.
Step 10. Once dry, layer over 4 or 5 coats of the final colour (HGREYM04) and alloy to dry for at least 8 hours
Step 11. Once dry, take some 1000 or 1200 grit wet and dry and very lightly sand the plates down, this will fully flatten the surface and remove any dust marks or imperfections. Now take some of your favourite non abrasive polish, apply either by hand with microfiber cloth, or by machine. This will take the surface from a matte to a satin (which is what the original finish is like) I also added a little purple haze wax, just because.
Note: it's normal and expected to see the colour on the pad, as these are not lacquered.
Step 12. Re-install into the vehicle and finally add the plaques back into position. The eagle eyed will notice that the screw heads are now silver whereas from the factory they are black. Black didn't really suit (in my opinion), so I rubbed the screw head faces over 240 wet and dry until they were silver
To give you an idea of how well this colour matches the door handles, here's a side by side...
At this point, I realised that the scuff plates were essentially perfect, but it highlighted how nasty, pitted and scratched my door handles were, you can tell what's coming here...
So once you've removed the door handles, (two allen bolts) and unclipped the wire for the door handle, you can follow the exact steps from 2 to 11 above, to sort the door handles.
Before, scratched and original colour
Rubbed down with 240 wet and dry. be careful here you can easily re-shape this item, it's quite 'soft'
avec etch primer
3 coats of M06, followed by 3 of M04
Re-installed, the light is poor in this shot, the finish and colour are near perfect. You can see how well the colour matches by comparing the door handle (Holts M04) and the electric mirror buttons surround (original)
As always, any comments questions let me know. I hope this helps someone to do the same job, sometimes seeing someone else tackle it, gives you the extra bravery to start taking your car apart!
rancid
Edited by rancidswan on Monday 9th October 08:15

john ryan said:
Nice write up. Did you put clear lacquer on the name plates and screw heads? - might be worthwhile to avoid corrosion.
Thank you.I thought about lacquering them, and I also considered (and completed, but subsequently removed) some PPF as it looked poor and made the plaques look gloss, not satin.
I think the plaques are stainless steel, so lacquering probably not required IMHO. Mine looked tarnished and grubby (at 11 years old) but not so bad that a very quick light sand didn't bring them back to life.
rancid
This one is on my to do list soon - thanks for the write up. I was also considering putting PPF on them afterwards which will protect much more than lacquer if you catch a heel on them. I put it on the boot lip (amongst much cursing mind) and this definitely helps protect it. Cheers.
great write up.
re. leather colour, i have used this company....quite well known for leather care. their colour match has worked well for me
https://www.liquidleather.com/recolouring-leather-...
cheers raj
re. leather colour, i have used this company....quite well known for leather care. their colour match has worked well for me
https://www.liquidleather.com/recolouring-leather-...
cheers raj
Edited by pancholi on Tuesday 10th October 11:14
pancholi said:
great write up.
re. leather colour, i have used this company....quite well known for leather care. their colour match has worked well for me
https://www.liquidleather.com/recolouring-leather-...
cheers raj
Thanks Raj. I'll give them a shout. re. leather colour, i have used this company....quite well known for leather care. their colour match has worked well for me
https://www.liquidleather.com/recolouring-leather-...
cheers raj
Edited by pancholi on Tuesday 10th October 11:14
I can see a 'How to re-colour your seats, DIY guide' on the horizon.
rancid

I did very similar but decided to try to polish the door handle, here is the post on 6speed
https://www.6speedonline.com/forums/aston-martin/4...
https://www.6speedonline.com/forums/aston-martin/4...
Handyman2009 said:
I did very similar but decided to try to polish the door handle, here is the post on 6speed
https://www.6speedonline.com/forums/aston-martin/4...
That is absolutely superb work, really top notch. If i'd seen your guide first, I might have been tempted to go the same way for both the door handle and scuff plates, well done.https://www.6speedonline.com/forums/aston-martin/4...
Gassing Station | Aston Martin | Top of Page | What's New | My Stuff