Front suspension and brake refurb V8V
Discussion


Having finally completed the rear end subframe refurb, https://www.pistonheads.com/gassing/topic.asp?h=0&... my front was looking a little shabby.
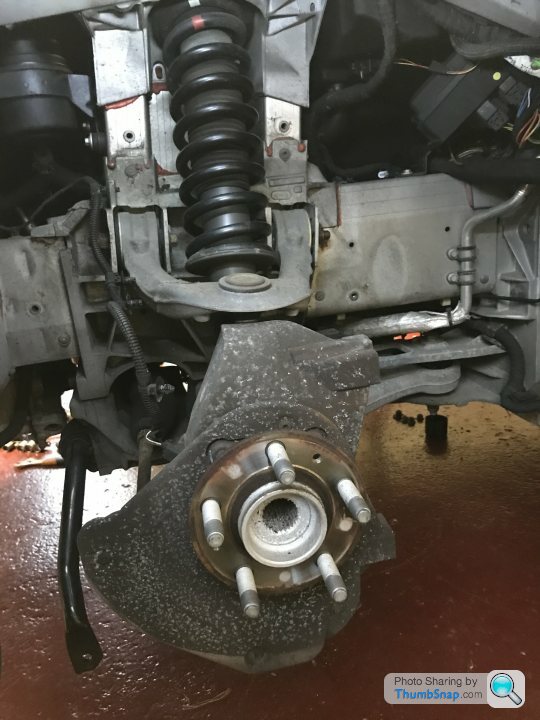
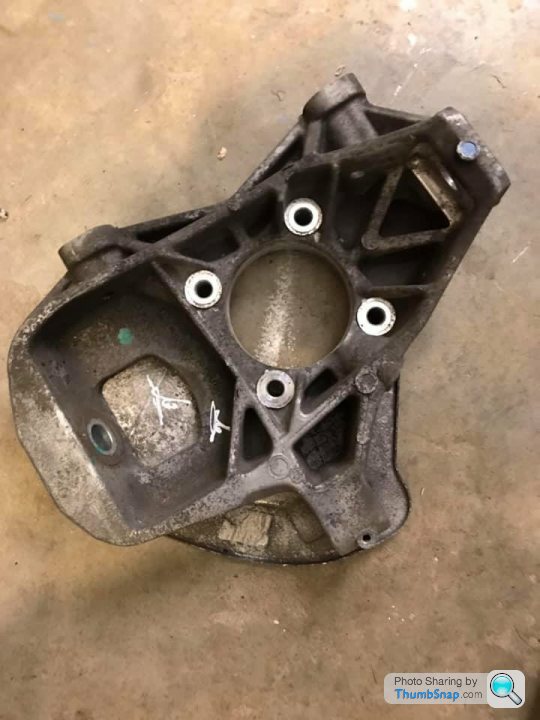
Having taken it all apart I decided to replace the front bearing/hub unit. The car has done 31,000 miles so whilst the originals are probably fine, it made sense to know that they were all good for the next 30,000+ miles.
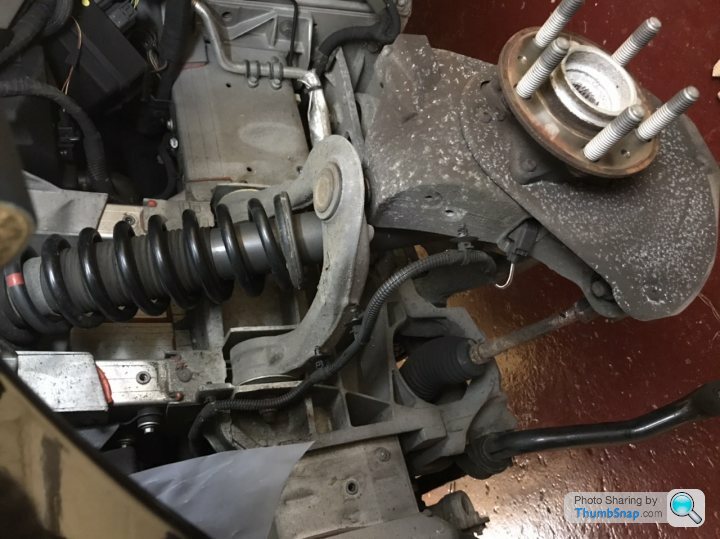
A few tips here - if you can get the suspension out as a single unit do it. Then take it to a garage and agree a price for them to press out all the ball joints, hub bearing etc. There are a couple of very tricky components that a standard ball joint splitter won’t touch. £20 or so should do it and save you a lot of swearing, frustration and hassle.
I couldn’t get one of the discs off and they did that for me, along with pressing out the old hub bearings.
Brake calipers were refurbed using the Frentech front caliper kit on eBay https://www.ebay.co.uk/itm/Aston-Martin-V8-Vantage... - new pistons, seals, slider pins and springs. Well worth doing, especially if your car is older than 10yrs or so. The pistons will be corroded and it’s a very easy do at home job. See my thread on caliper refurb https://www.pistonheads.com/gassing/topic.asp?h=0&...
The suspension components were vapour blasted and the given a few coats of XCP Rust Blocker.
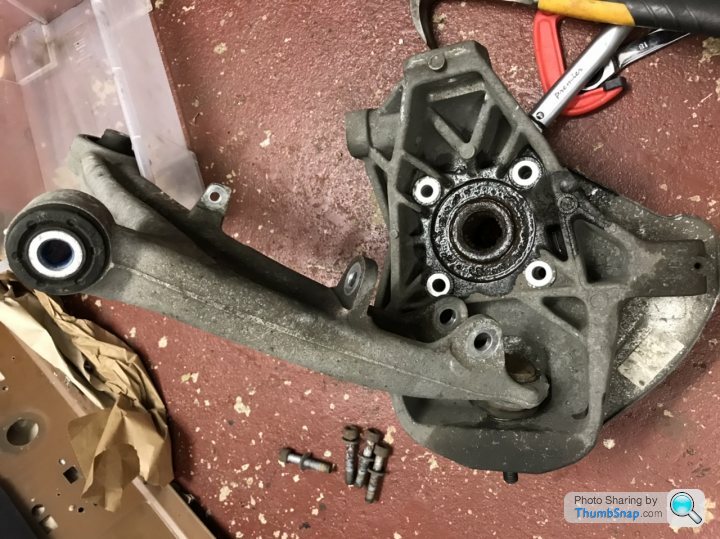
The hub/bearing units were replaced at £175 a corner. These were also given a coat or two of XCP as they do rust horribly. Many MDs and Indys spray the inside of the bearing with silver paint to stop it rusting, but XCP is a better choice and looks better.


Brake backing plates were also vapour blasted and then powder coated in black. New tie rod ends from Meyle at £17 each as opposed to AM at £63 ish plus postage. https://www.ebay.co.uk/itm/MEYLE-616-020-0007-TIE-...
Reassembly is the opposite of dismantling and nickel grease used on all non threaded bolt shafts and subframe/nuckle to suspension arm joints.
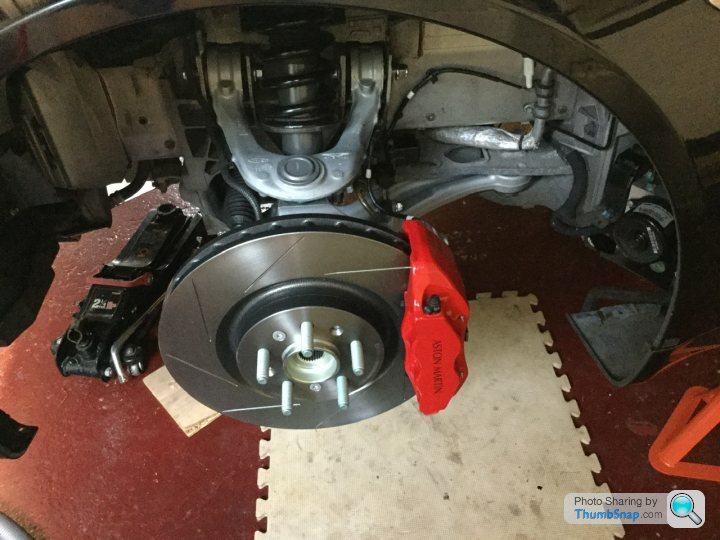
New discs and pads and all looking good.
Nearside for the finished pic. New brake sensors were also sourced at a fraction of the AM price
https://www.ebay.co.uk/itm/1pc-Car-Front-Brake-Pad...
Having taken it all apart I decided to replace the front bearing/hub unit. The car has done 31,000 miles so whilst the originals are probably fine, it made sense to know that they were all good for the next 30,000+ miles.
A few tips here - if you can get the suspension out as a single unit do it. Then take it to a garage and agree a price for them to press out all the ball joints, hub bearing etc. There are a couple of very tricky components that a standard ball joint splitter won’t touch. £20 or so should do it and save you a lot of swearing, frustration and hassle.
I couldn’t get one of the discs off and they did that for me, along with pressing out the old hub bearings.
Brake calipers were refurbed using the Frentech front caliper kit on eBay https://www.ebay.co.uk/itm/Aston-Martin-V8-Vantage... - new pistons, seals, slider pins and springs. Well worth doing, especially if your car is older than 10yrs or so. The pistons will be corroded and it’s a very easy do at home job. See my thread on caliper refurb https://www.pistonheads.com/gassing/topic.asp?h=0&...
The suspension components were vapour blasted and the given a few coats of XCP Rust Blocker.
The hub/bearing units were replaced at £175 a corner. These were also given a coat or two of XCP as they do rust horribly. Many MDs and Indys spray the inside of the bearing with silver paint to stop it rusting, but XCP is a better choice and looks better.
Brake backing plates were also vapour blasted and then powder coated in black. New tie rod ends from Meyle at £17 each as opposed to AM at £63 ish plus postage. https://www.ebay.co.uk/itm/MEYLE-616-020-0007-TIE-...
Reassembly is the opposite of dismantling and nickel grease used on all non threaded bolt shafts and subframe/nuckle to suspension arm joints.
New discs and pads and all looking good.
Nearside for the finished pic. New brake sensors were also sourced at a fraction of the AM price
https://www.ebay.co.uk/itm/1pc-Car-Front-Brake-Pad...
Edited by JonnyCJ on Sunday 19th July 09:05
Yep - will need a full geo front and rear, as well as ensuring all bolts are correctly torqued with the correct weight in the car front and rear. 25kg bags of sand are at the ready. This will need to be done on ramps to ensure the full weight is on the road wheels.
I don’t think the car has ever had a geo done as the witness marks from the eccentric washers were clearly evidenced on the front subframe. Certainly made putting the lower suspension arm back on in the correct position much easier. I had also measure the distance to the lock nut on the tie rods when cleaning them and using correct length tie rod ends the wheels should theoretically be in exactly the same position as they were when they came off.
Next job is to put the wheel arch liners back in place, under tray and front splitter back on and then rear bumper on from the rear end refurb.
I’m still scratching my head on the elliptical cut outs in the wheel arch liners. No one I’ve spoken to knows what they’re for and they let water and road crud into the engine bay. They look as though they’re there for clearance on lowered cars.
I think I’ll devise some sort of plastic cover for them and will report back accordingly.
Edited by JonnyCJ on Sunday 19th July 10:22

JonnyCJ said:
I’m still scratching my head on the elliptical cut outs in the wheel arch liners. No one I’ve spoken to knows what they’re for and they let water and road crud into the engine bay. They look as though they’re there for clearance on lowered cars.
.
I taped them off without ill side effects....
You have done so well with your restoration Jonny, the AMOC Concours entrants might retire and leave the first prize for you.

Did you know, after arrival at those competitions, it is traditional for road wheels to be removed, so that any dust or dirt in the tyre tread grooves can be removed.
Well done. Really good job.
TR-Spider said:
JonnyCJ said:
I’m still scratching my head on the elliptical cut outs in the wheel arch liners. No one I’ve spoken to knows what they’re for and they let water and road crud into the engine bay. They look as though they’re there for clearance on lowered cars.
.
I taped them off without ill side effects....
This review was helpful in my choice of XCP https://www.youtube.com/watch?v=R5LSxpoqcWo and the write up https://www.bennetts.co.uk/bikesocial/reviews/prod...
It does feel quite tacky when first applied and worth wiping down the excess and leaving to dry before re-coating. I did a couple of coats and whilst it does still feel tacky a week or two later, it does eventually dry to a soft almost silky feel. This should stop the aluminium components from developing those white salty looking deposits, although if you get it dusty/dirty whilst still tacky the dirt can stick a bit.
I would say it's similar in texture to Waxoyl, although goes on in a much finer spray and doesn't crack like Waxoyl.
Edited by JonnyCJ on Monday 20th July 11:08
Edited by JonnyCJ on Monday 20th July 13:14
m.barnes said:
Really like this. I have just bought a set of uprights which I have had blasted as I am converting to 6 pot fronts.
Not heard of XCP, I am going to ceramic coat my uprights and brake shields but will have a look at XCP too
before:
after:

Do you need new uprights when you convert from 4 pot to 6 pot calipers ? Or you just getting some new ones as part of the upgrade ?Not heard of XCP, I am going to ceramic coat my uprights and brake shields but will have a look at XCP too
before:
after:
I wasnt aware you did, but happy to be corrected.
leerandle said:
Great write up and much appreciated, especially to us that do some of our own work on our cars.
No problem - one thing really worth doing if you're taking your time to do things like this, is to get the bolts chemically cleaned and zinc plated. AML bolts just come with a light coat of silver paint and therefore will corrode over time. Zinc plating reduces bolt corrosion. Applying some grease to the bolt shafts where they go thorough the mounting points also significantly reduces this corrosion and helps prevent squeaking. Make sure you don't get grease on the threads though.Aleo Plating in Liverpool did mine, although search for zinc platers in your area. It's not expensive and the bolts come out better than new. Caliper bolts have to be renewed however although I gave my new ones a coat of silver engine enamel on the bolt heads.
Here's there front and rear torque settings for those who are going to give it a go..
Rear Suspension
Anti roll bar mounting bolts 22.5 Nm
Anti roll bar link 110 Nm
Halfshaft nut 300 Nm
Shock lower mounting 175 Nm
Shock top mount to chassis 75-80 Nm
Track rod end to vertical link (knuckle) 115 Nm
Normal Ride Height Torques
Vertical Link (knuckle) to Lower Suspension arm 175 Nm
Vertical Link (knuckle) to Upper Suspension Arm 115 Nm
Lower Suspension Arm to Subframe 115 Nm
Upper Suspension Arm to Subframe 115 Nm
Track Rod Arm to Subframe 115 Nm
Front Suspension
Vertical link (knuckle) to lower suspension arm 90 Nm
Vertical link (knuckle) to upper suspension arm 90 Nm
Track rod end lock nut 70 Nm
Anti roll bar link nuts 110 Nm
Anti roll bar mounting bolts 22.5 Nm (torque 1 then 2)
Normal Ride Height Torques
Lower suspension arm front bush to subframe 185 Nm
Lower suspension arm rear bush to subframe 115 Nm
Upper suspension arm to front structure 115 Nm x 2 nuts
Shock Lower Mount 175 Nm
Edited by JonnyCJ on Monday 20th July 15:48
leerandle said:
Do you need new uprights when you convert from 4 pot to 6 pot calipers ? Or you just getting some new ones as part of the upgrade ?
I wasnt aware you did, but happy to be corrected.
Yep, the 6 pot calipers are 200mm centres while the 4 pots are 180mm. You could probably have some kind of clever spacer made but youd want that spacer to be quite thick and then I think you end up pushing the caliper further out than needed for 380mm discs.I wasnt aware you did, but happy to be corrected.
The knuckles are £400+ vat each new!
JonnyCJ said:
No problem - one thing really worth doing if you're taking your time to do things like this, is to get the bolts chemically cleaned and zinc plated. AML bolts just come with a light coat of silver paint and therefore will corrode over time. Zinc plating reduces bolt corrosion.
Nice! Are there any limitations in terms of what you can zinc plate ie is it safe to do brake caliper to knuckle bolts etc?Edited by JonnyCJ on Monday 20th July 15:48
m.barnes said:
Yep, the 6 pot calipers are 200mm centres while the 4 pots are 180mm. You could probably have some kind of clever spacer made but youd want that spacer to be quite thick and then I think you end up pushing the caliper further out than needed for 380mm discs.
The knuckles are £400+ vat each new!
Speak to the chaps at AML Performance. One of the members off here is converting to ceramics with 6 pots and we had a discussion about knuckles when I was up last week. Apparently the knuckles are the same, although the part numbers are different and there's some sort of bracket the 6 potters bolt onto. Don't know any part nrs etc and only going by what I was told, however Adam at AML should be able to give you the low down.The knuckles are £400+ vat each new!
Gassing Station | Aston Martin | Top of Page | What's New | My Stuff