My first little 1895 project
Discussion


Hello, long term lurker, I recently created a new profile to distance myself from my previous childish sounding username but inadvertently picked an even worse one. Anyway..
I try to be helpful on here but now I need some help. So I thought I'd ask you peoples for some good ideas to solving my quandary.
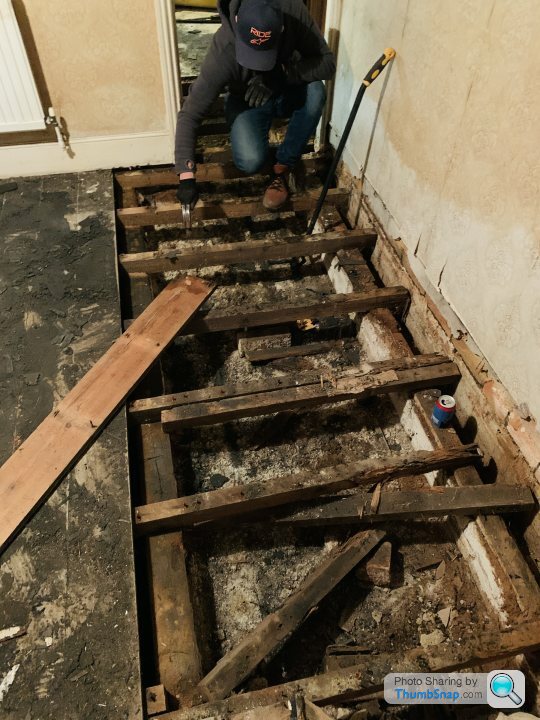
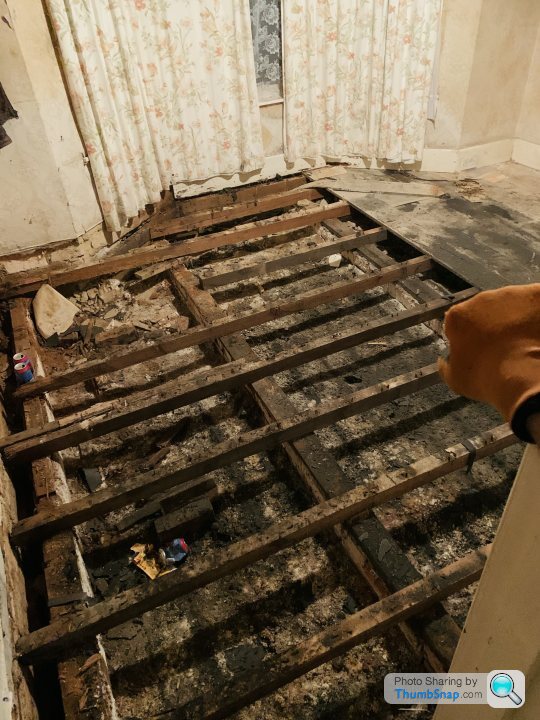
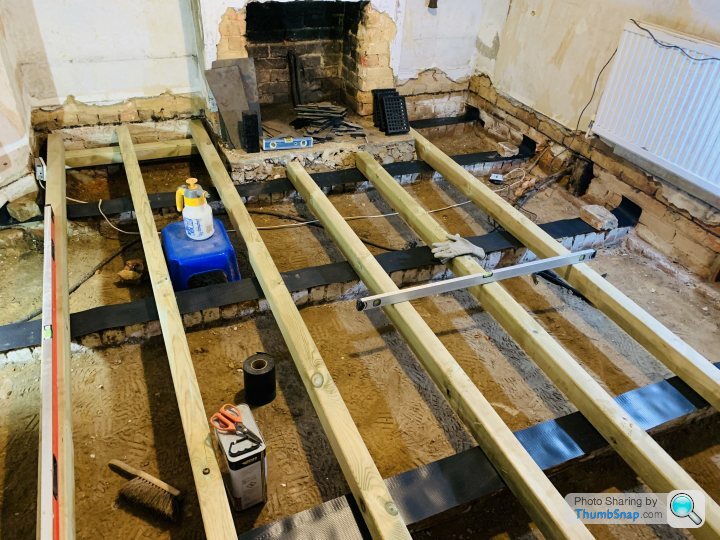
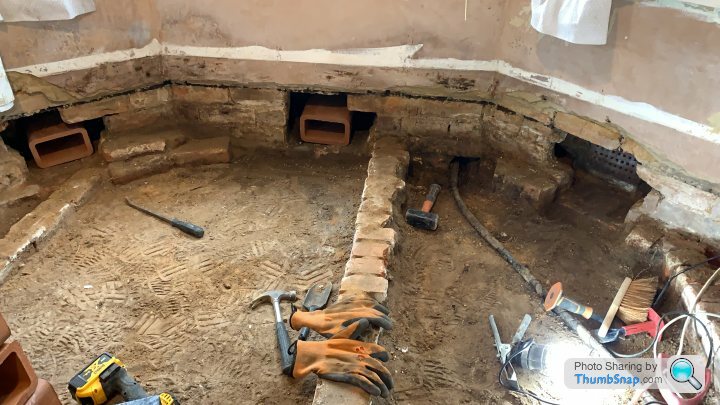
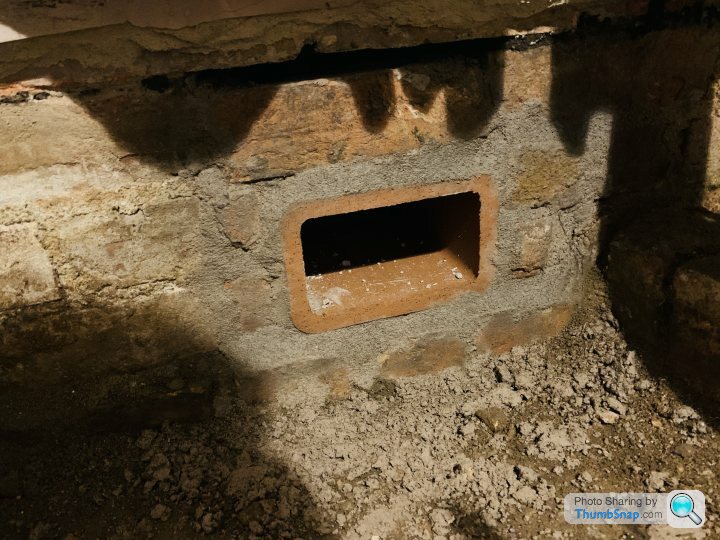
Long story short, new to me 1895 house, all the ground floor flooring is mush, 3x air bricks in the bay window, they don't vent to anywhere..
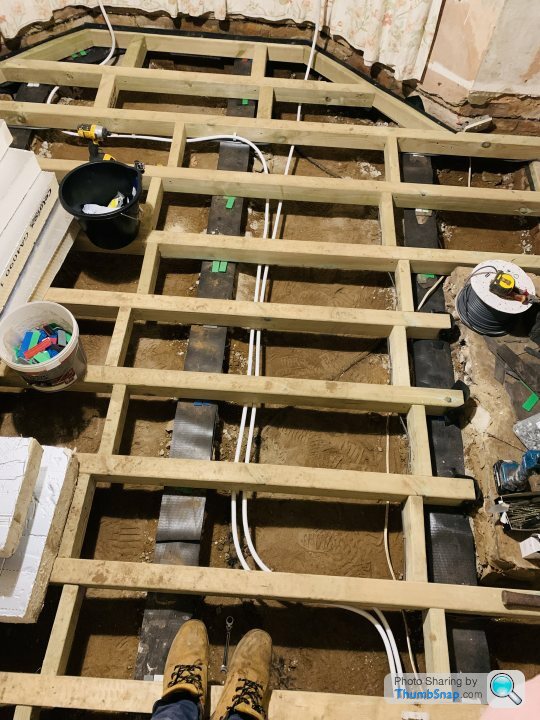
Floor build up was 2 course dwarf walls, 1,1/4" wall plate, 2,3/4" x 2" joists on 400ish centres.
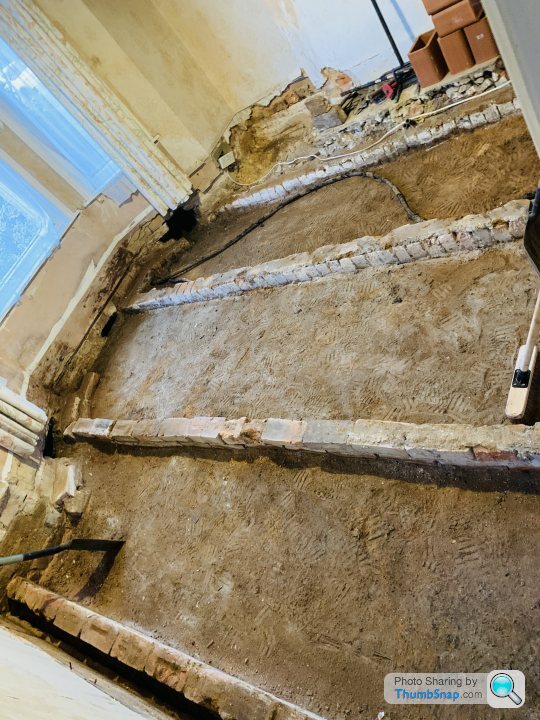
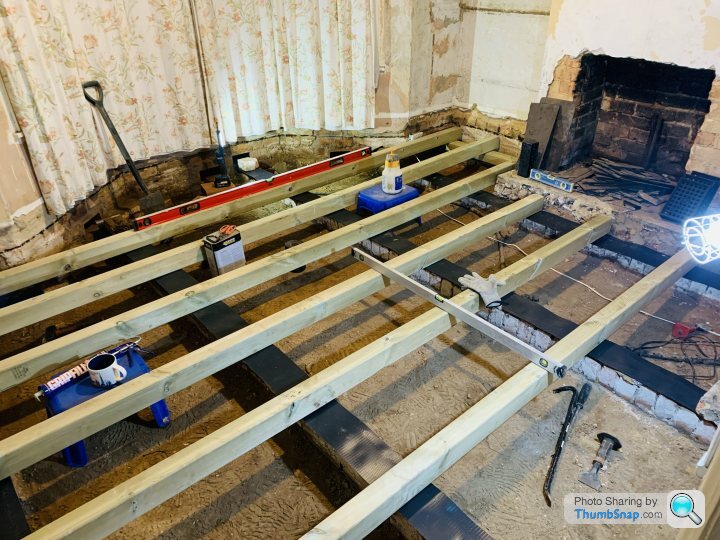
I've opted to omit the wall plates and up the joist section to 3" x 4". on dpc on a fresh bed of mortar. This turned out to mean quite a lot of packing is required to level the bearing points for the joists, but I have lots of slate for that and/or other methods, not insurmountable.
I intend to noggin down the centre and both sides of the room.
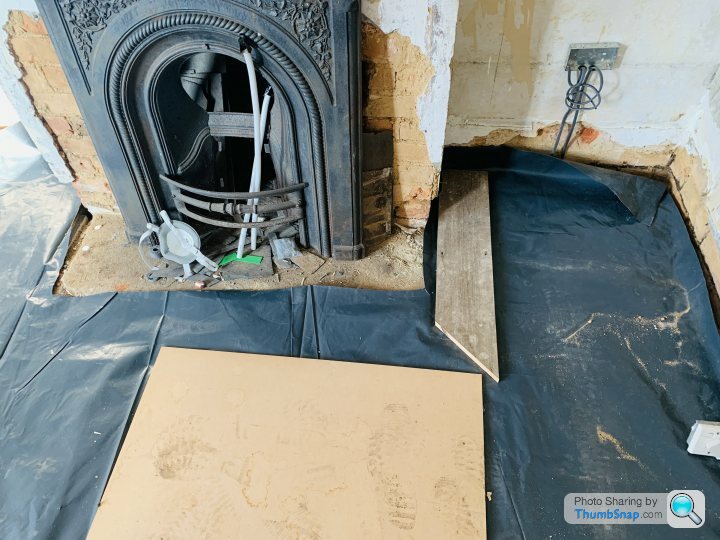
The real issue is as you may see from the images, there are no joist pockets at all, and the bricks are too much like actual earth to IMHO reliably take fixings for a bolted wall plate or hangers. Therefore I assumed I would have a fully floating wall and it would stay in place under it's own weight.
But then I realised, that through general people traffic & heat / cool cycles it might 'walk' to one end of the room, and rest hard up against a wall - Note there will be dpc over each joist end.
SO,,, I can't imagine a reliable way to easily fix the joists to the dwarf walls, so my current thoughts are something compressible to insert between the joist ends/sides and the perimeter walls to keep the joist 'structure' centralised in the space, which will not push the walls over with heat expansion of the joists.. Does that sound reasonable? I want to keep away from plastics/adhesives as much as possible on this traditional themed build, but it might be the only way forward atm.. Thoughts and input welcome.
I am adding quite a bit of air vents front to back also, all being fixed with NHL 3.5
My lime pointing will get better with practice I hope.
So how do I fix the floor so it doesn't float or walk about?
I try to be helpful on here but now I need some help. So I thought I'd ask you peoples for some good ideas to solving my quandary.
Long story short, new to me 1895 house, all the ground floor flooring is mush, 3x air bricks in the bay window, they don't vent to anywhere..
Floor build up was 2 course dwarf walls, 1,1/4" wall plate, 2,3/4" x 2" joists on 400ish centres.
I've opted to omit the wall plates and up the joist section to 3" x 4". on dpc on a fresh bed of mortar. This turned out to mean quite a lot of packing is required to level the bearing points for the joists, but I have lots of slate for that and/or other methods, not insurmountable.
I intend to noggin down the centre and both sides of the room.
The real issue is as you may see from the images, there are no joist pockets at all, and the bricks are too much like actual earth to IMHO reliably take fixings for a bolted wall plate or hangers. Therefore I assumed I would have a fully floating wall and it would stay in place under it's own weight.
But then I realised, that through general people traffic & heat / cool cycles it might 'walk' to one end of the room, and rest hard up against a wall - Note there will be dpc over each joist end.
SO,,, I can't imagine a reliable way to easily fix the joists to the dwarf walls, so my current thoughts are something compressible to insert between the joist ends/sides and the perimeter walls to keep the joist 'structure' centralised in the space, which will not push the walls over with heat expansion of the joists.. Does that sound reasonable? I want to keep away from plastics/adhesives as much as possible on this traditional themed build, but it might be the only way forward atm.. Thoughts and input welcome.
I am adding quite a bit of air vents front to back also, all being fixed with NHL 3.5
My lime pointing will get better with practice I hope.
So how do I fix the floor so it doesn't float or walk about?
Before I scrolled down, and noting the relatively shallow solum, I was going to say why not just fill it in and lay and inuslated concrete floor but I see you are now beyond that.
The original joists would have, in my experience, been loose laid anyway and reliant on the floor boards and self weight of the floor for stability so in reality I don't think you will have a problem. I am not sure why you omitted a wall plate though - that could have been secured to the brick sleeper walls and then the joists secured to it by galvanised 'clips' or skew nailing?
You could try a galvanised twist tie/strap between a number of the joists and the sleeper walls but I'm not sure they look solid enough to take plug fixing?
If the bricks are a soft as you say could you use resin fixings similar to how you would on a thermalite block? Drill your fixing hole and then rotate the drill, pivoting around the entry point, to create a cone shape inside the brick. Fill with resin pop your fixings in and it shouldn't pop without taking most of the brick with it. As you've got the floor resting on the dwarf walls there won't be much vertical movement and not much room for too much horizontal movement so you shouldn't get anywhere near the forces needed to blow all you bricks out.
Bonjour.
Thanks for comments, yes omitted wall plates to get decent joist depth section..
Tried drilling 3 bricks in various areas for various things, ended up with 3 broken bricks, including bricks in walls.. They really are terrible hence don't want hangers, they will also rust once the sacrificial galv wears off as they are below dpc.
Turns out dwarf walls slope down about 5" towards the bay... so I'm going to pull all joists out and re-bed all the dwarf walls and use something more level than my eye..
Ok if you think fully floating it will be ok without a wall tie in, reliant on friction then I'll go for it. Doesn't seem right in my head though. Perhaps some kind of compressible packing material around where joists contact walls which is water impervious? I just keep thinking where foot traffic entering the room might make the floor migrate in the opposite direction (away from the door) over time.. Happy to be told wrong though..
Also yes don't want a cement floor, I'm reusing most of the 7" square edge boards wherever possible. Also yes I'll 100mm PIR & vapour membrane over the joists for heat retention & draught exclusion
Just put noggins near the ends of the joists - they will only 'want' to move in rotation anyway though in practice that will be adequately controlled by the wracking resistance of the nailed floor boards.
If you do pack the ends put in some DPM to isolate them - the more air you have moving around the ends of the joists the better.
If you do pack the ends put in some DPM to isolate them - the more air you have moving around the ends of the joists the better.
I did pretty much exactly the same thing as the first big job when I bought my current house, we've even got the same 6' spirit level! Except I had to dig a load of bedrock out as the joists toward the back of the house were sitting on bits of slate plonked straight onto the earth, with virtually no air circulation. Unsurprisingly they were rotten as anything. I can't remember what I did about fixing the floor in place - I suspect that's because I didn't do anything - but it's not moved at all in seven years. If you were really concerned I suppose you could set a big lump of concrete in the ground near the centre of the floor and set some stainless steel into that which is tied to a couple of joists - sort of a ground anchor - but I don't think it would be necessary.
Not sure if anyone's interested but I went full bananas on the noggins and it's really solid now, thanks for suggestions. I think if I continue them down through the hall and onto the dining room floor the whole lot should be pretty firm without any tie downs which I was expecting required.
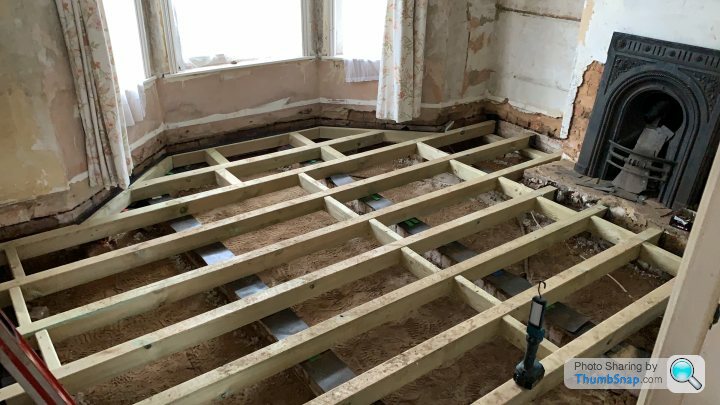
Upon research it transpires that bay windows are part of an octagonal shape, so working out the joist trimming around that required full maths.
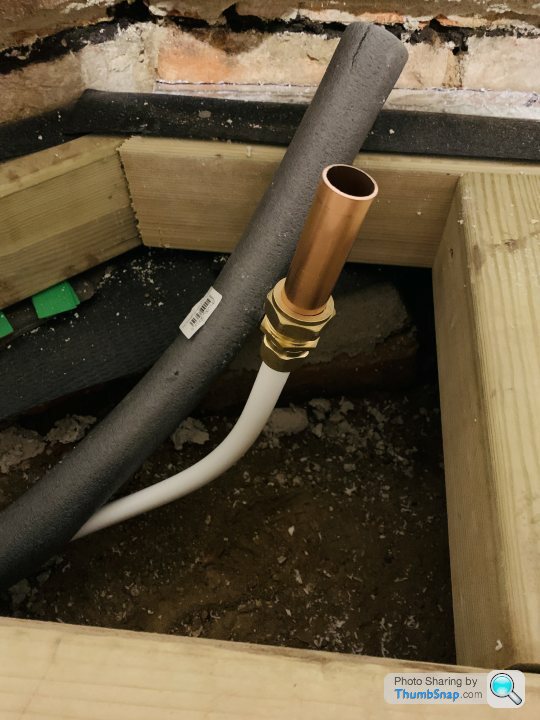
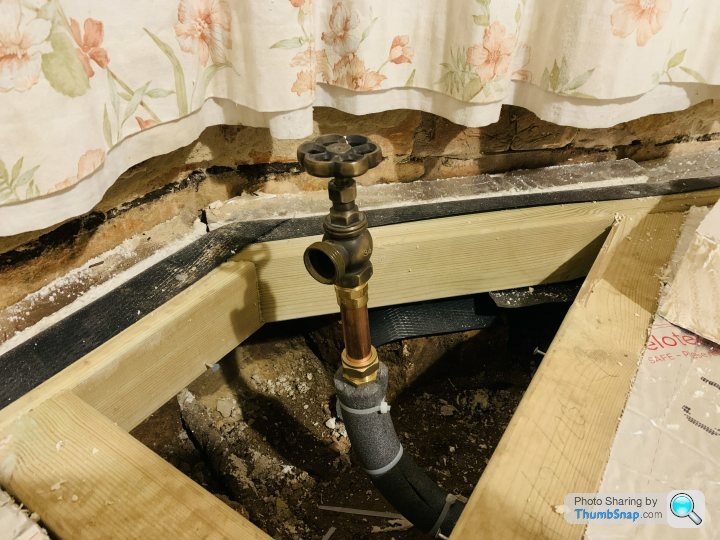
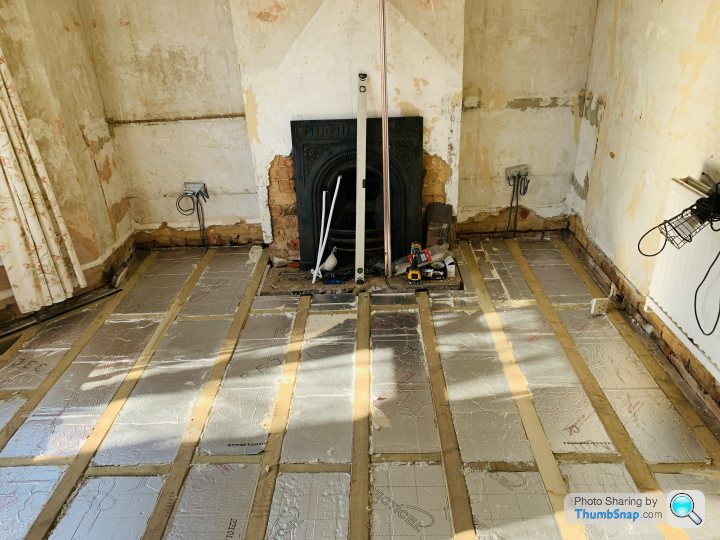
Upon advice of a friend I've opted for PEX-Al-PEX barrier UFH pipe as it's nice and stiff unlike the usual plastic stuff, and takes nice compression fittings more like typical Cu fittings but with double o-rings. and insulated with cable ties to keep in place. Hung on double 3/4" talon clips underneath.
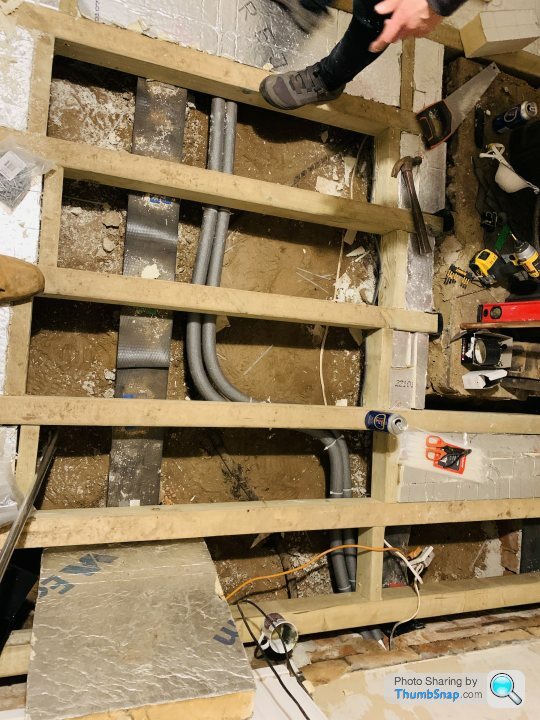
And 3/4" Cu tails for the rad. I just need to find a plumber to solder the male irons onto the ends, as I think compression fittings on show is a bit council. I tried to solder them 3 times and failed so I' not doing it, some say it's the flux..
I bought a used 'bulldog' style cast rad which I think has some leaks so will need rebuilding probably with leather gaskets not the rubber tat they get fitted with these days. But it came with nice bronze valves. No picture of the rad yet as it's still in the car I can't lift it..
Upon research it transpires that bay windows are part of an octagonal shape, so working out the joist trimming around that required full maths.
Upon advice of a friend I've opted for PEX-Al-PEX barrier UFH pipe as it's nice and stiff unlike the usual plastic stuff, and takes nice compression fittings more like typical Cu fittings but with double o-rings. and insulated with cable ties to keep in place. Hung on double 3/4" talon clips underneath.
And 3/4" Cu tails for the rad. I just need to find a plumber to solder the male irons onto the ends, as I think compression fittings on show is a bit council. I tried to solder them 3 times and failed so I' not doing it, some say it's the flux..
I bought a used 'bulldog' style cast rad which I think has some leaks so will need rebuilding probably with leather gaskets not the rubber tat they get fitted with these days. But it came with nice bronze valves. No picture of the rad yet as it's still in the car I can't lift it..
Also good from second hand gumtree PIR! I managed to get a rooms worth for £90. And recently picked up the net rooms with for £50! all 90mm because my joists are 97mm and 100mm PIR would sit proud and be generally harder to fit flush. Got to be better than nothing at least..
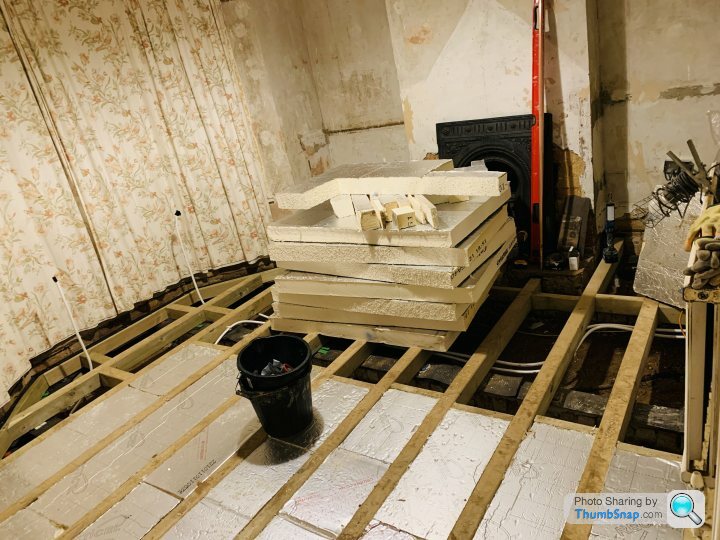
Mucho chopping required.
And after mucho fitting with expandy foam because of my poor chopping leaving loads of gaps.. it looks like this.
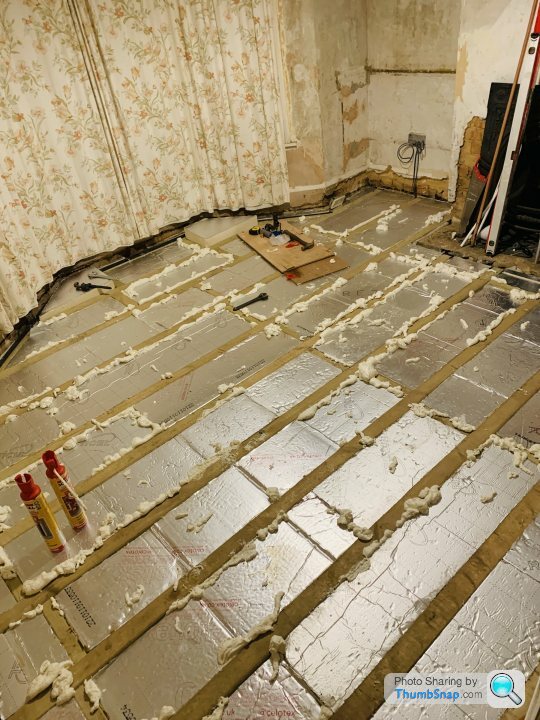
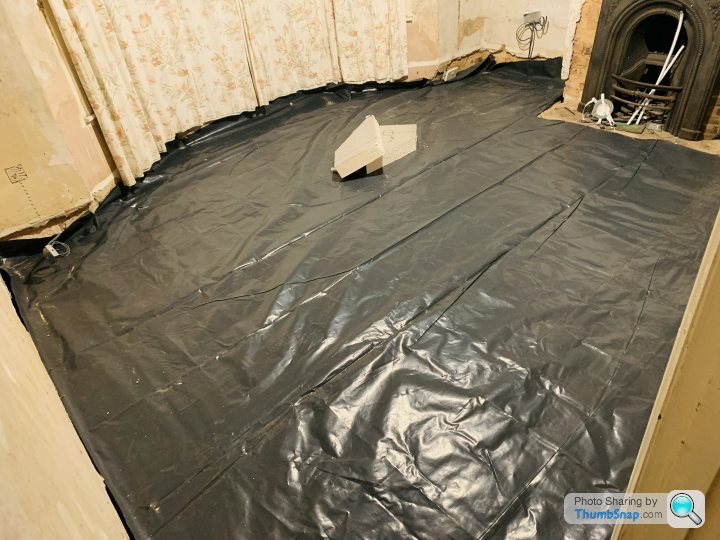
Note I decided to use one huge sheet of DPM for a vapour membrane rather than a million reels of 100mm foil tape because want to.
Mucho chopping required.
And after mucho fitting with expandy foam because of my poor chopping leaving loads of gaps.. it looks like this.
Note I decided to use one huge sheet of DPM for a vapour membrane rather than a million reels of 100mm foil tape because want to.
And I finally set up a chop saw that cuts angles and made my first ever floorboard and even it was the right size, and then I realised I did not install joists or noggins correctly to take floorboards parallel to the joists for the hearth detail I'm going for, so will do them then chop more floorboards.
I think I have enough boards for half the floor then need to find about 8sqm of 6,3/4" x 3/4" square edge boards if anyone knows of a supplier down south it would be appreciated.
More to follow..
Beers!
HH
I think I have enough boards for half the floor then need to find about 8sqm of 6,3/4" x 3/4" square edge boards if anyone knows of a supplier down south it would be appreciated.
More to follow..
Beers!
HH
Yes I know not ideal sequencing floors before walls but I am living here and the damp dirt smell gets old quick.
To be fair this floor has cost me about £500 in mats all in, that's with oversized joists, PIR, fixings new rad pipes and electrical ring and dwarf wall rebuild mats. Concrete infill would mean ufh, but I want exposed 7" boards and cut clasp nails. Besides, who wants to do it the easy way .. Thanks though.
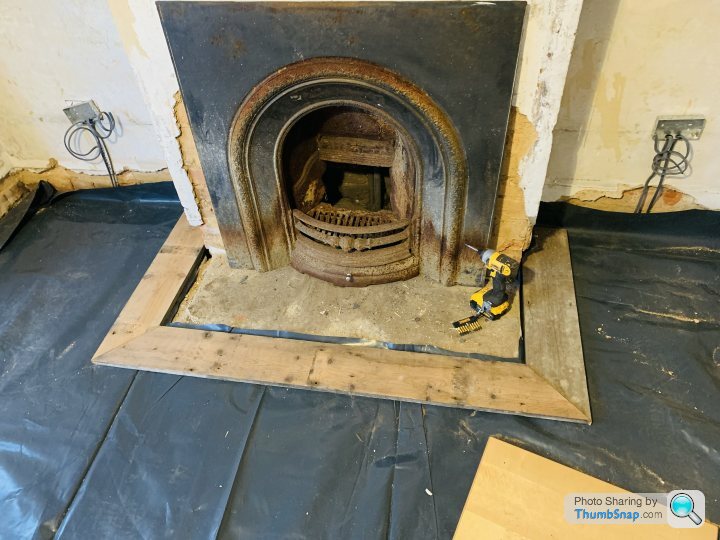
Talking of Victorians, I picked up this beauty fireplace yesterday for a bargain which is more in keeping than the repro item I was going to use. Slightly too big for the room IMHO but I like the imposing-ness of it. Really gives the property the ''1800's was pain and suffering'' vibe I'm after..
I will wire wheel the rust off and lead black it for period correct toxicity:
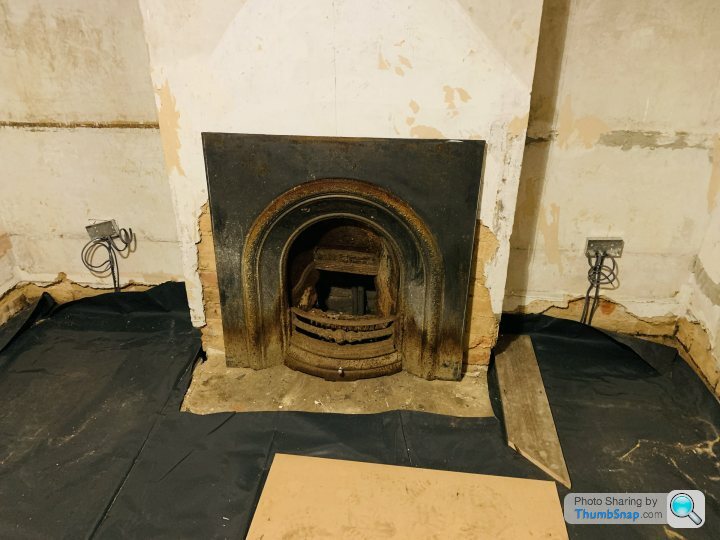
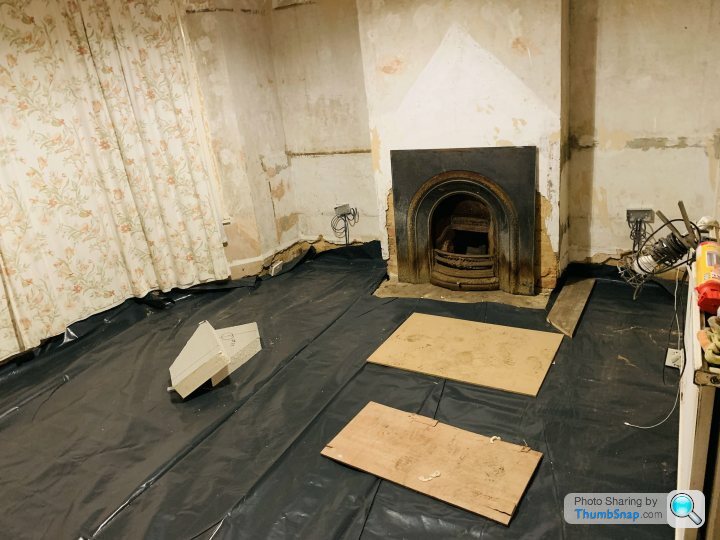
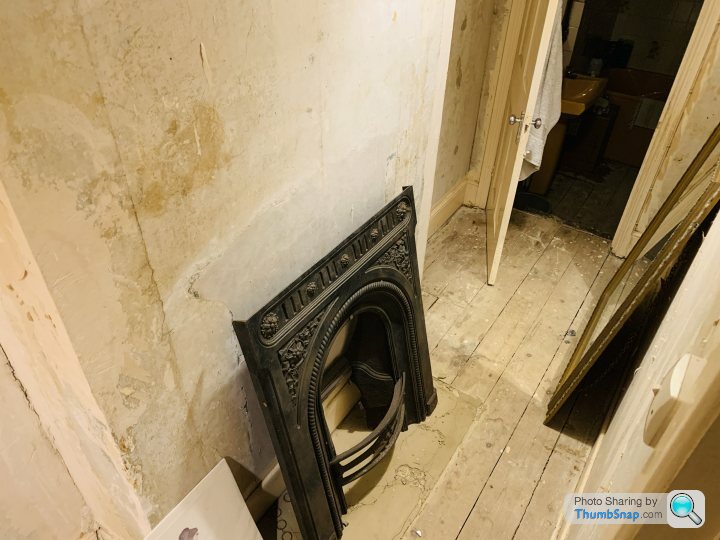
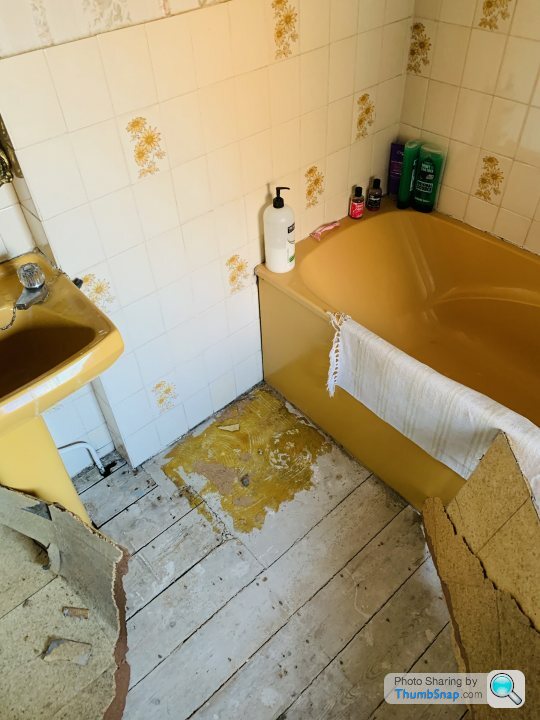
The repro is temporarily in the hallway fireplace while I think about it, whilst I did also uncover another fireplace in the bathroom so it may go there, when the bath gets swapped and I reposition the plumbing for a cast roll top there will be space for it. Unfortunately there is no stack above so it would only be ornamental, a bath fire would be nice I think..
Funny shallow breast though.. The breast below in the kitchen is a foot deep like all the others, not sure where it's loosing the dimension.
To be fair this floor has cost me about £500 in mats all in, that's with oversized joists, PIR, fixings new rad pipes and electrical ring and dwarf wall rebuild mats. Concrete infill would mean ufh, but I want exposed 7" boards and cut clasp nails. Besides, who wants to do it the easy way
.. Thanks though.Talking of Victorians, I picked up this beauty fireplace yesterday for a bargain which is more in keeping than the repro item I was going to use. Slightly too big for the room IMHO but I like the imposing-ness of it. Really gives the property the ''1800's was pain and suffering'' vibe I'm after..
I will wire wheel the rust off and lead black it for period correct toxicity:
The repro is temporarily in the hallway fireplace while I think about it, whilst I did also uncover another fireplace in the bathroom so it may go there, when the bath gets swapped and I reposition the plumbing for a cast roll top there will be space for it. Unfortunately there is no stack above so it would only be ornamental, a bath fire would be nice I think..
Funny shallow breast though.. The breast below in the kitchen is a foot deep like all the others, not sure where it's loosing the dimension.
Edited by Pistonsquirter on Wednesday 3rd March 16:00
Cheers, aren't enough Victorian period-sympathetic renovation threads on here imho.
Thought process was PIR has a much better U-value than rockwool for starters, and I understand rockwool U-value drops when there is drafts on the cold side, as the stagnant air which isolates the two sides between the mineral strands gets 'blown' away removing the insulating properties, as I have so much void ventilation I am assuming there will be decent drafts so all the damp can evaporate. Hope I explained that well enough.
Interestingly I do plan to use rockwool on the first floor's voids because of it's superior acoustic properties compared to PIR, as it will be exposed boards throughout then footfall noise should be absorbed mostly.
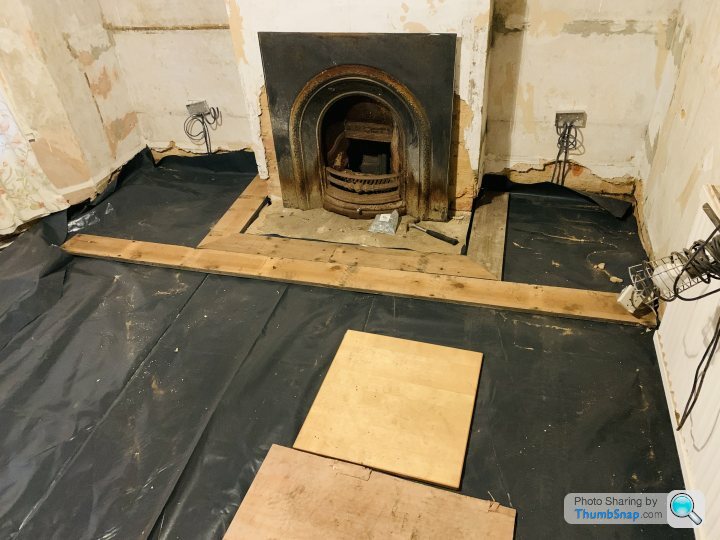
I re-did the noggins around the hearth to suit the fancy floorboard trimming I wanted as per big fancy houses (mine is neither big nor fancy).
As I will be fitting a new hearth later, I set the front board parallel off the opposite wall so there will be no angle-cut boards required, only maybe rip the last board to suit the dimension.
Thought process was PIR has a much better U-value than rockwool for starters, and I understand rockwool U-value drops when there is drafts on the cold side, as the stagnant air which isolates the two sides between the mineral strands gets 'blown' away removing the insulating properties, as I have so much void ventilation I am assuming there will be decent drafts so all the damp can evaporate. Hope I explained that well enough.
Interestingly I do plan to use rockwool on the first floor's voids because of it's superior acoustic properties compared to PIR, as it will be exposed boards throughout then footfall noise should be absorbed mostly.
I re-did the noggins around the hearth to suit the fancy floorboard trimming I wanted as per big fancy houses (mine is neither big nor fancy).
As I will be fitting a new hearth later, I set the front board parallel off the opposite wall so there will be no angle-cut boards required, only maybe rip the last board to suit the dimension.

Gassing Station | Homes, Gardens and DIY | Top of Page | What's New | My Stuff