New bike(s) incoming - first ever 2 stroke(s)!
Discussion
Looking for a winter project I always fancied an Indian Papoose - having the largest Indian pennies can buy, I always fancied the smallest.
 the Indian Papoose is actually a Brockhouse Corgi, all made in Southport immediately post war. At that time Brockhouse had just acquired the Indian brand name and so all the bikes sent to the US were badged Indian, while the rest of the world got the bikes badged Corgi - but other than the badge and shade of red on the tank the bikes are identical. No real chance of getting a 'real' Papoose in the UK, and the relatively low value of these things would make it pointless importing one. So the plan was to just track down a Corgi, restore it, and badge it as a Papoose...just as a bit of fun for shows, events and the like.
The Corgi is often wrongly described as the Paratrooper's bike; that was the Welbike which fitted in a 15" diameter container and was dropped by parachute. There are reports of Welbikes being used in the not-so-successful operation Market Garden and some shown being carried ashore on D-Day. The designer of the Welbike (Lt.Col.Dolphin) designed/launched the Corgi as a primarily a civilian successor, but some were sold to the forces but probably none saw action.
So...I spotted a barn-find one (MK1) and based on what they were going for last year I thought I got a decent price. But it had some missing parts that would have to be made from scratch (no real spares availability) and I did wonder where I could get measurements etc...there is one in the National Motorcycle Museum but that's a long trek for photos and measurements. But as I was googling for parts I spotted a complete and running and road-registered one (MK2) that wasn't selling and so made a very cheeky offer and got it
So now there are two. I'll do a proper restore on the 'good' MK2 and stick Indian badges on it. If I can get the MK1 registered I restore it properly as a civilian Corgi. If I have problems with that I'll paint it Olive Drab and see if I can shift it to some WW2 re-enactors.
Not quite superbikes, but a bit of fun to stick in the back of the car and buzz about ant events and the like, or even to pop up to the shops. And I gather Castrol R is OK to use as the pre-mix in old 2-strokes
Neat period video
https://www.youtube.com/watch?v=EONV--eWKPQ
The new additions to the tribe
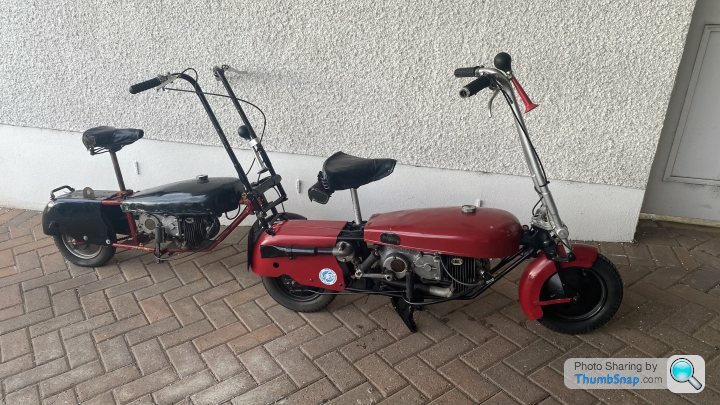
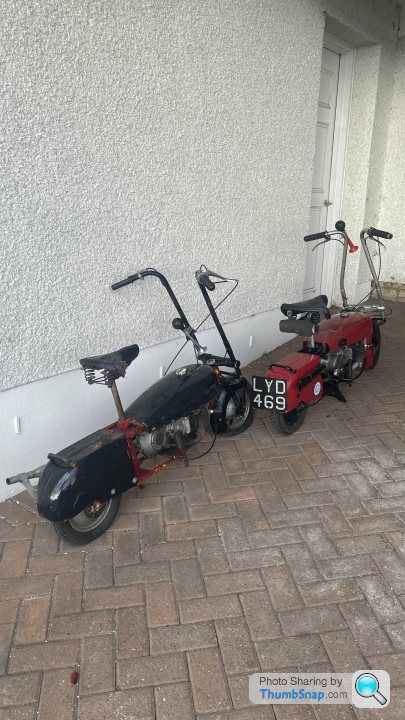
 the Indian Papoose is actually a Brockhouse Corgi, all made in Southport immediately post war. At that time Brockhouse had just acquired the Indian brand name and so all the bikes sent to the US were badged Indian, while the rest of the world got the bikes badged Corgi - but other than the badge and shade of red on the tank the bikes are identical. No real chance of getting a 'real' Papoose in the UK, and the relatively low value of these things would make it pointless importing one. So the plan was to just track down a Corgi, restore it, and badge it as a Papoose...just as a bit of fun for shows, events and the like.
The Corgi is often wrongly described as the Paratrooper's bike; that was the Welbike which fitted in a 15" diameter container and was dropped by parachute. There are reports of Welbikes being used in the not-so-successful operation Market Garden and some shown being carried ashore on D-Day. The designer of the Welbike (Lt.Col.Dolphin) designed/launched the Corgi as a primarily a civilian successor, but some were sold to the forces but probably none saw action.
So...I spotted a barn-find one (MK1) and based on what they were going for last year I thought I got a decent price. But it had some missing parts that would have to be made from scratch (no real spares availability) and I did wonder where I could get measurements etc...there is one in the National Motorcycle Museum but that's a long trek for photos and measurements. But as I was googling for parts I spotted a complete and running and road-registered one (MK2) that wasn't selling and so made a very cheeky offer and got it

So now there are two. I'll do a proper restore on the 'good' MK2 and stick Indian badges on it. If I can get the MK1 registered I restore it properly as a civilian Corgi. If I have problems with that I'll paint it Olive Drab and see if I can shift it to some WW2 re-enactors.
Not quite superbikes, but a bit of fun to stick in the back of the car and buzz about ant events and the like, or even to pop up to the shops. And I gather Castrol R is OK to use as the pre-mix in old 2-strokes

Neat period video
https://www.youtube.com/watch?v=EONV--eWKPQ
The new additions to the tribe


An update for anyone interested - the Mk2 (red tank) is/was in much better condition that I expected with pretty much everything there apart from the headlamp, tail lamp and front numberplate - but I've tracked these down. I've got a copy of the original registration (although built in 1949 it wasn't registered until 1950) and it's on the original plate - LYD469; so henceforth it will be Lydia.
Unbent the handlebars and got all the folding stuff working again and put on new tyres - I think the front was original. Wheel bearings are bicycle-style cup and cone and the fronts seemed OK with just new ball bearings but the rears were totally shagged out with the cones worn away. With spares non-existent I decided to swap to modern sealed bearings - just needed a spacer tube thingy and turned-down the axle a bit and it's all right as rain with a few other spacers to get things lied up. My idea was just to get running before doing any proper restoration, but the rear sprocket and locknut had loads of thick paint I couldn't budge (old Hammerite I think) so I ran it up on the lathe so at least the sprocket is shiny now. Got the steering head lubed up and adjusted, got the brakes functional again, cleaned out the carb and got the kick-start and clutch working again.
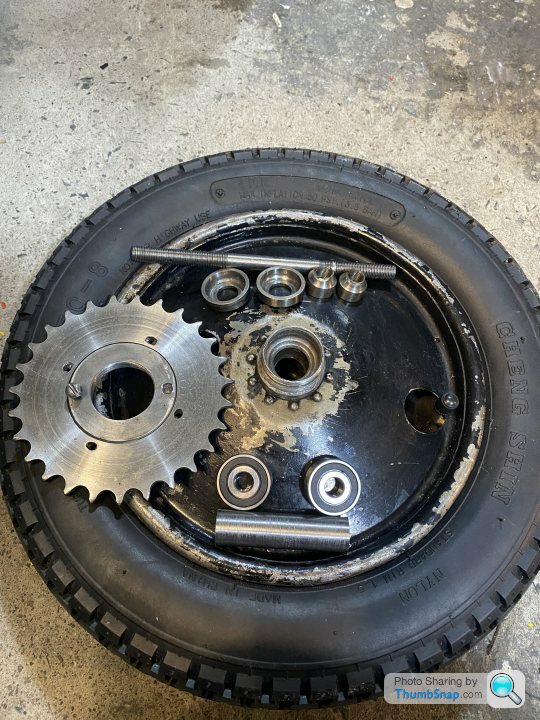
New tyre, conversion to sealed bearings and a shiny sprocket
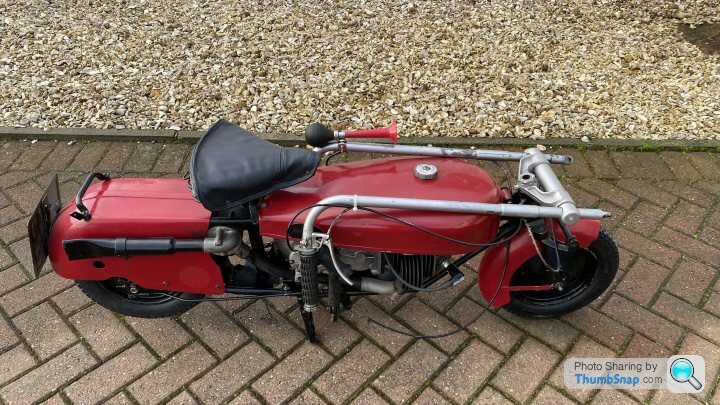
All folds down now, sits on a newly functional stand, and everything works so pretty much in 'oily rag' condition.
And proof it does actually run - I managed to get it fired-up and out on the road today. It's quite good fun - there's no gearbox so no neutral, just a clutch. But the MK2s added the luxury of a kick start, and so to stop the bike moving forward when kicked-over there's a sliding dog on the engine sprocket that operates off the right-side footrest being folded up. So once it's fired-up you pull in the clutch and drop the footrest to engage and off you go
Video from today
https://www.youtube.com/watch?v=Ctb-t55TLcw
So it's now quite usable, but I will now start to restore it as the's bashes in the tank/mudguards and a selection of shades of red...but while I thought I might have to repaint the frame I think it's original paint and it looks not bad so I'll leave that.
But the other one is not such a happy tale - it's a total shed with many missing parts (the whole rear brake mechanisn), stand, lights, inner mudguard, chainguard, etc etc; wrong parts like wrong carburettor (but I think I've tracked down one that's correct apart from the jetting), wrong exhaust, wrong levers etc...and the tinware is in a hell of a state. And bodge central - someone had fitted inner tubes without the curved valve stems so they'd just beaten-hell out the wheel disks to get a regular airline in. Best of all is the steering head - instead of the nuts (and bearings!) there was a washer and they'd drilled the stem for a spilt-pin (and buggered the threads). 'kin'ell - who would do that sort of thing? So it's a real Frankenstein's monster; so I shall call it Frankie, to go with Lydia.
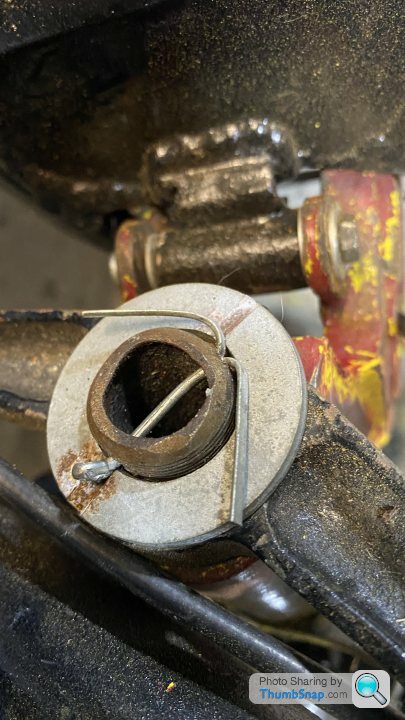
But as I've been sorting things out with Lydia, if the part I've taken off is missing from Frankie I've been making copies. The first was the kick stand toggle bracket. I had a sheet of steel that I've had for years - it's been used for all sorts of things, most notably the engine mounts to get the LS7 into the Tuscan. I didn't have any steel bar, but I did have a big bolt...
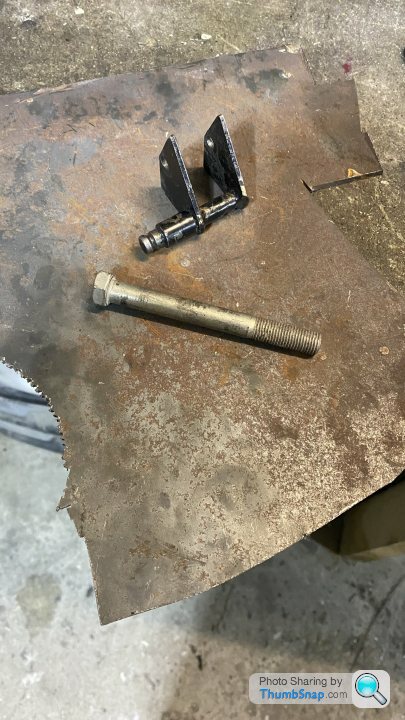
...and there we have the first new part for Frankie.
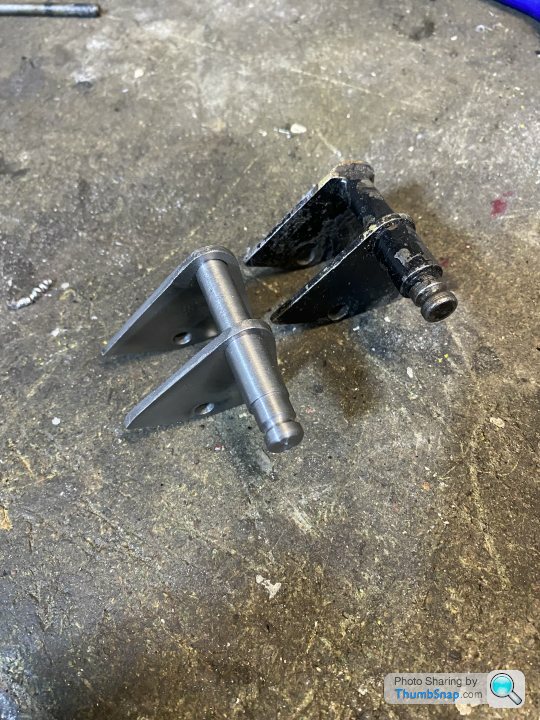
It begins
Not a patch on some of the skilled/quality work I've seen on here from others, but I'll post some more updates once I get some substantial progress under my belt.
Unbent the handlebars and got all the folding stuff working again and put on new tyres - I think the front was original. Wheel bearings are bicycle-style cup and cone and the fronts seemed OK with just new ball bearings but the rears were totally shagged out with the cones worn away. With spares non-existent I decided to swap to modern sealed bearings - just needed a spacer tube thingy and turned-down the axle a bit and it's all right as rain with a few other spacers to get things lied up. My idea was just to get running before doing any proper restoration, but the rear sprocket and locknut had loads of thick paint I couldn't budge (old Hammerite I think) so I ran it up on the lathe so at least the sprocket is shiny now. Got the steering head lubed up and adjusted, got the brakes functional again, cleaned out the carb and got the kick-start and clutch working again.

New tyre, conversion to sealed bearings and a shiny sprocket


All folds down now, sits on a newly functional stand, and everything works so pretty much in 'oily rag' condition.
And proof it does actually run - I managed to get it fired-up and out on the road today. It's quite good fun - there's no gearbox so no neutral, just a clutch. But the MK2s added the luxury of a kick start, and so to stop the bike moving forward when kicked-over there's a sliding dog on the engine sprocket that operates off the right-side footrest being folded up. So once it's fired-up you pull in the clutch and drop the footrest to engage and off you go

Video from today
https://www.youtube.com/watch?v=Ctb-t55TLcw
So it's now quite usable, but I will now start to restore it as the's bashes in the tank/mudguards and a selection of shades of red...but while I thought I might have to repaint the frame I think it's original paint and it looks not bad so I'll leave that.
But the other one is not such a happy tale - it's a total shed with many missing parts (the whole rear brake mechanisn), stand, lights, inner mudguard, chainguard, etc etc; wrong parts like wrong carburettor (but I think I've tracked down one that's correct apart from the jetting), wrong exhaust, wrong levers etc...and the tinware is in a hell of a state. And bodge central - someone had fitted inner tubes without the curved valve stems so they'd just beaten-hell out the wheel disks to get a regular airline in. Best of all is the steering head - instead of the nuts (and bearings!) there was a washer and they'd drilled the stem for a spilt-pin (and buggered the threads). 'kin'ell - who would do that sort of thing? So it's a real Frankenstein's monster; so I shall call it Frankie, to go with Lydia.

But as I've been sorting things out with Lydia, if the part I've taken off is missing from Frankie I've been making copies. The first was the kick stand toggle bracket. I had a sheet of steel that I've had for years - it's been used for all sorts of things, most notably the engine mounts to get the LS7 into the Tuscan. I didn't have any steel bar, but I did have a big bolt...

...and there we have the first new part for Frankie.

It begins

Not a patch on some of the skilled/quality work I've seen on here from others, but I'll post some more updates once I get some substantial progress under my belt.
There's something properly cool about these, so well done for saving them. I'm sure that with some luck finding parts and ingenuity swapping/amking others the Mk1 can be made whole again in time. It'd be fun to get a mate round and buzz about on the two of them together!
Please keep updates coming.
Out of interest, how much roughly do they weigh? Are they light enough to pick up and put on a shelf in the garage?
Please keep updates coming.
Out of interest, how much roughly do they weigh? Are they light enough to pick up and put on a shelf in the garage?
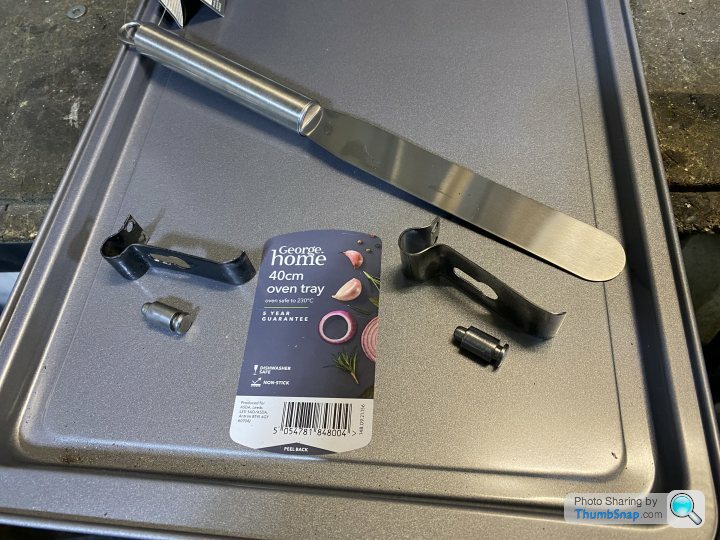
I'm not so good at taking regular pictures or posting updates, but I've reached a milestone and so here's a wee update. On the way through rebuilding Lydia I made some of the missing parts for Frankie. Easy enough to turn the locking pin for the seat post in the lathe, but the spring was another matter. While doing the weekly shop (guess where!) I noticed spatulas were springy so I bought a couple to experiment with...which was cheaper than buying a length of spring steel off eBay or wherever. Bending cold just snaps the metal, and heating to bend removes the springyness. But with the aid of a few YouTube videos on how to temper spring steel ('blue' it and quench it) I ended up with a passable pin and spring - mine is on the right. And the reason for the baking tray was I thought it would be thin enough to make the inner mudguard, but once I cut the beading off it was too thin...but I actually tracked down a used (and a bit rusty) inner mudguard anyway.
I also managed to track down a headlamp, albeit rusty - I should have taken a proper 'before' picture. But it did have the original Lucas glass intact
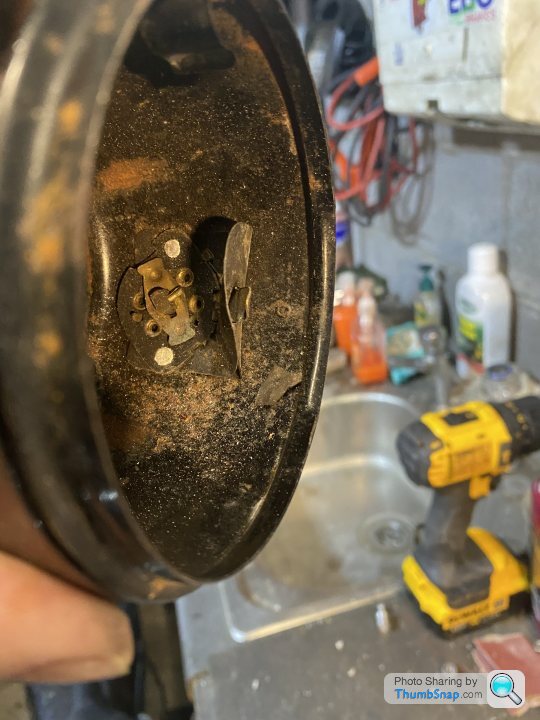
But the rubber mount at the rear was perished and unserviceable.
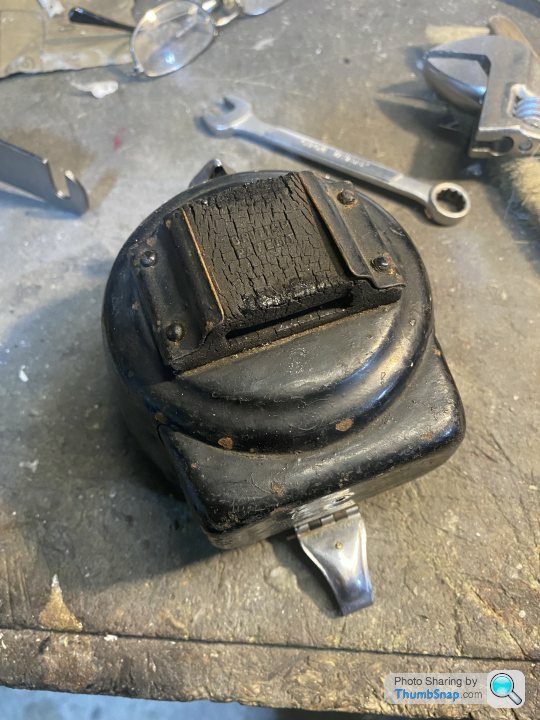
So I cut it out, got some 2-part silicone rubber (and black die), made a wee mould and moulded-on a replacement. When ordering you have to state the hardness you want the finished product and I didn't have a clue...but whatever it is I chose seemed a pretty close match in flexibility to the rubber I expected. Funny stuff to work with though - unlike lots of other 2-part stuff where once the activator/hardner is added the whole lot cures, with this any part of the silicone liquid that hasn't been in direct contact/mix with the hardner doesn't cure so you have to mix it really well. You can see my new 'rubber' mount at the back, plus it cleaned-up pretty well ready for paint.
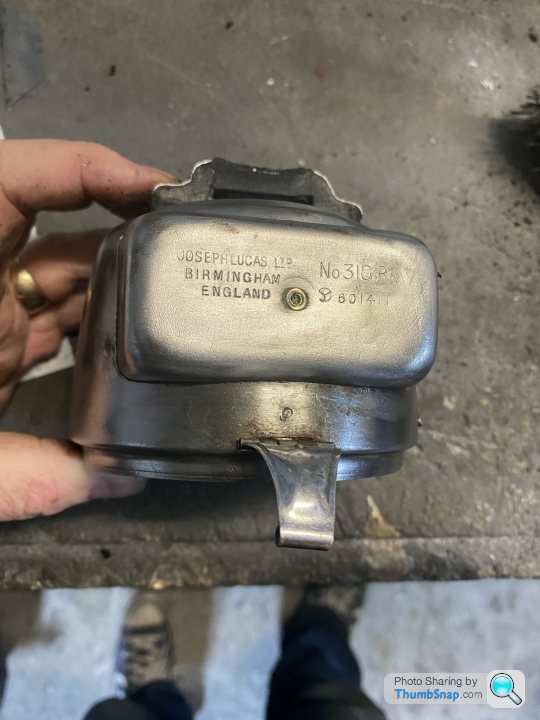
As standard the headlamp (and tail lamp, that I also got hold of and refurbed) are 6 volt off the generator, but the headlamp also should contain a couple of dry-cell batteries that you can switch between generator and batter power for the lights. But a) the battery terminals in the lamp had been eaten away, b) the 2-way switch was shagged and 3) 6v off a crappy generator isn't going to light much. So I put in a 12v rechargeable lithium battery pack (off a house alarm apparently) and reworked the lamps to take 12v LED bulbs and forgot about the generator. The lithium battery will power the lights for as long as I'd be riding it at a time. The finished lamp... I also had to tap-out quite a few dents in the rim and re-polish, but no 'before' pics
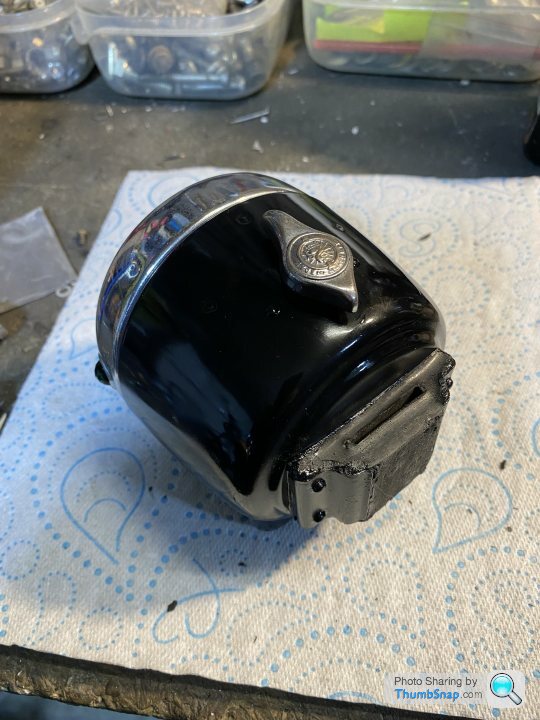
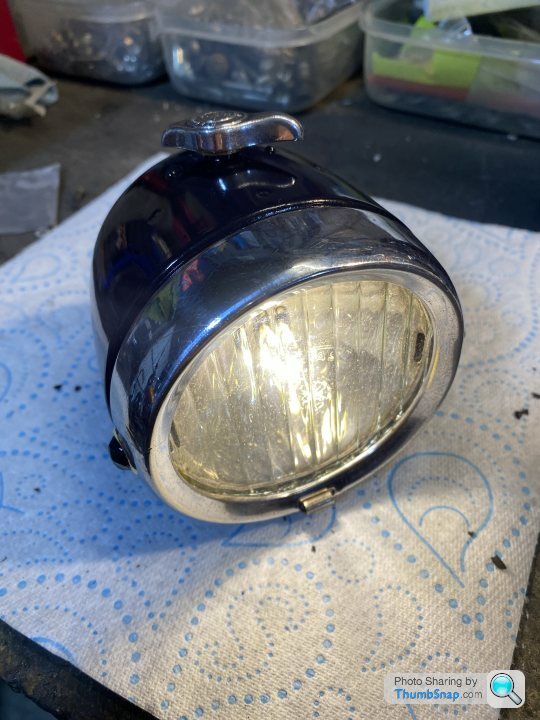
...and I had to make up the brackets etc., but no pics.
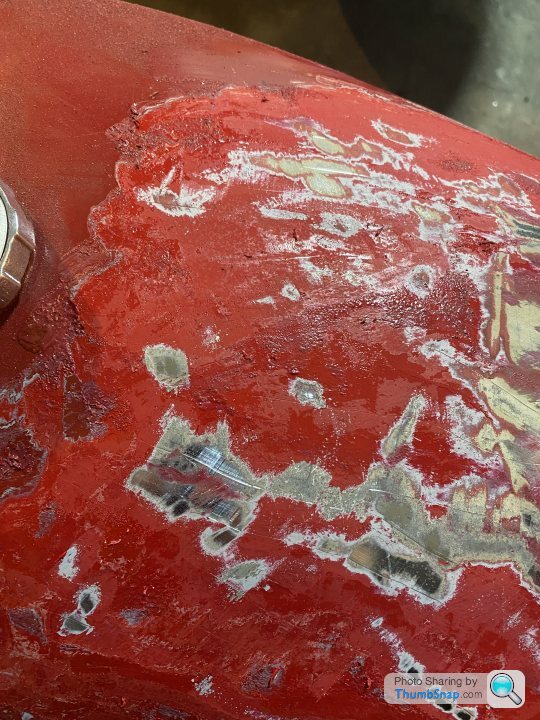
The tank didn't look too bad but it did have a few big dents in it. I did try to pull them out with a dent puller, but the metal was too thick to make much of a difference
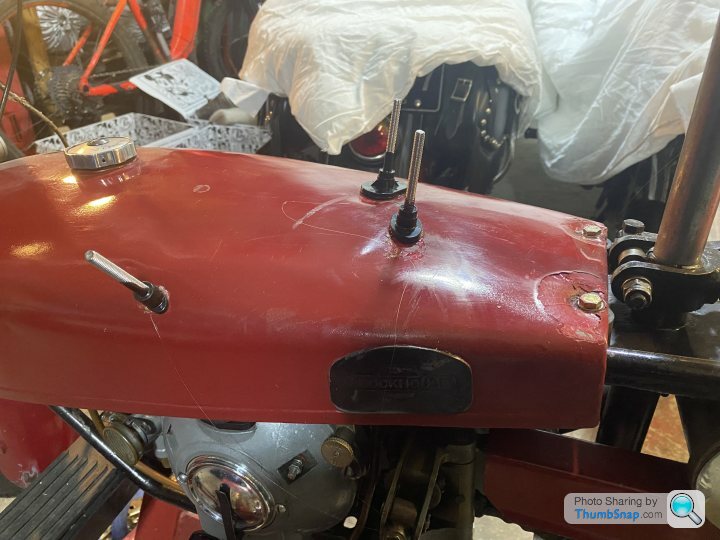
So back to bare metal and filler. I tried to get down to what I thought was the original colour, and it was a bit brighter than the current top-coat. But once I did get down to bare metal (and no photos of this unfortunately) someone had been at the filler before me and it was really in a hell of a state with dents everywhere. No pics of work-in-progress, but it took over a week of a few hours a day filling and rubbing down (and tapping down the high spots) to get it looking like a tank again.
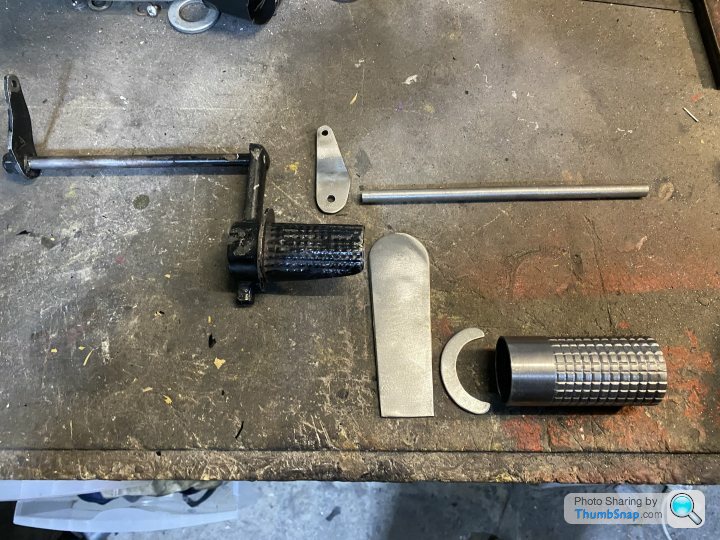
Frankie had no brake lever (amongst many other missing parts) so Lydia's is shown alone with my 'raw materials' - a bit of roll-cage tube a saved off the Tuscan (I keep all sorts of bits of scrap metal!), a rod, and my trusty sheet of mild steel. I bought this years ago as maybe 1/2 a square metre and I've used it for so many things!
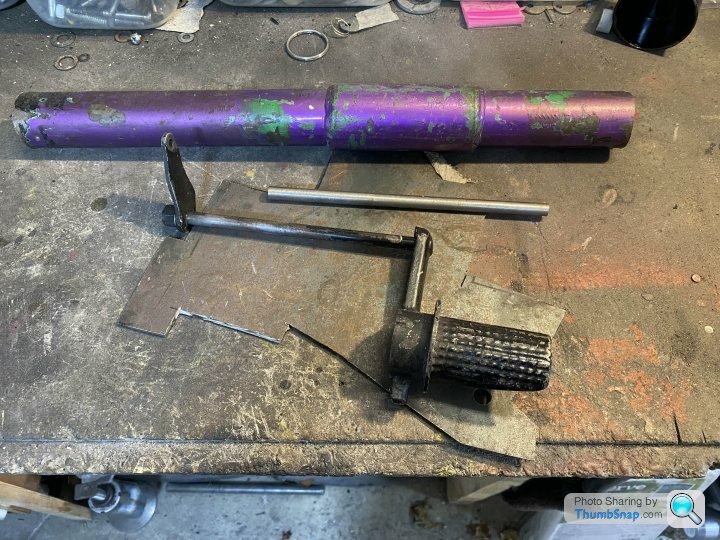
So I cut parts out of the sheet steel, and turned grooves in a section of the tube. And I'd watched an Allen Millyard video of him putting horizontal grooves using the lathe making up hand grips to I copied that.
The brake lever arm was probably made originally with a die on a press, but mine was made beating hell out of my sheet steel part with a lump hammer, and then welding up the 'seam' at the curved end.
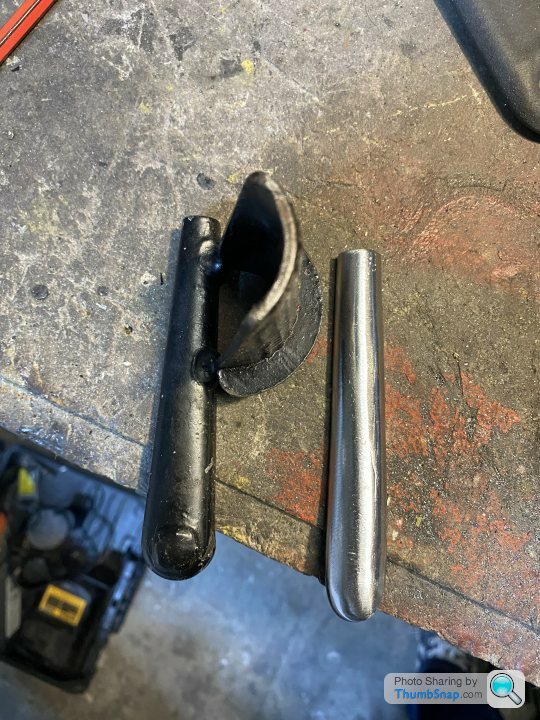
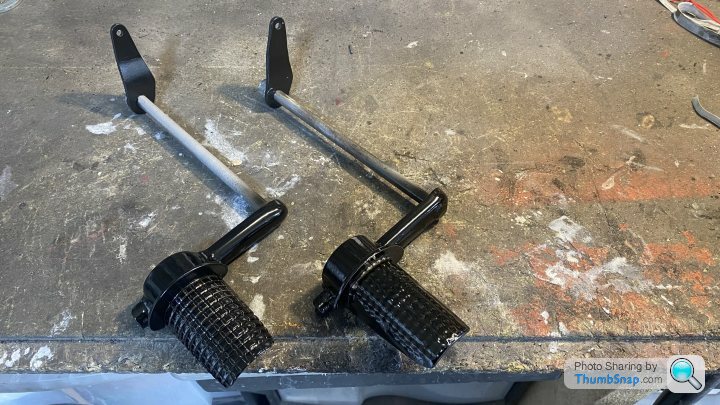
Then all welded-up and painted - my 'fake' lever is on the left, the original from Lydia is on the right. OK, not absolutely identical, I think they must have cast-on the 'treads' on the original, but close enough - a blind-man would be pleased to see it.
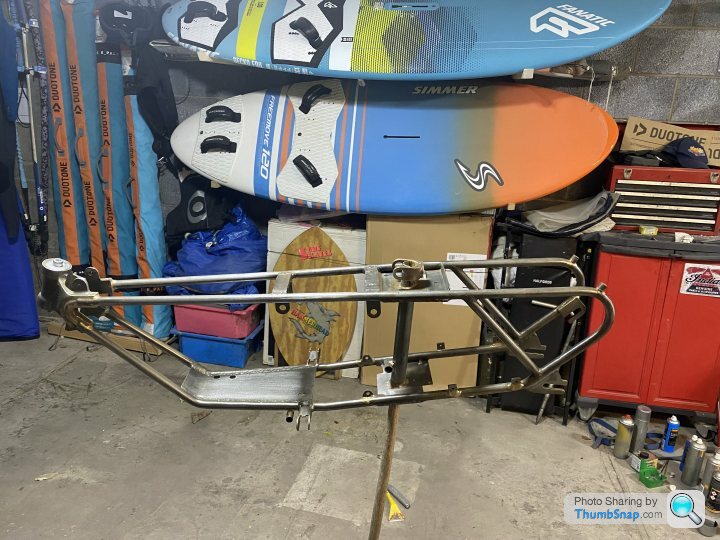
Frame stripped and ready for paint. All straight and in good condition - very nicely made actually. The steering head and seat brackets look like solid bronze (my metal recognition skills aren't great) and have been brazed on, but other brackets and bracing are welded on.
It isn't a big frame and I couldn't be bothered rigging up all the kosher spray stuff in the garage so it just got a rattle-can job. I didn't seem to have had an undercoat originally (assuming what was left before was original paint) and it was a real thin paint job so I replicated that. I wanted to avoid powder-coat as I think it looks wrong on older bikes - too think and shiny.
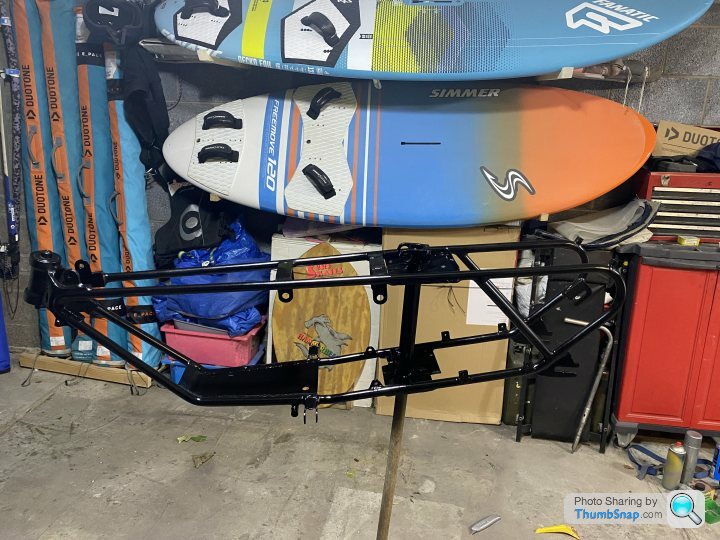
Everything else got paint too, but not too many photos. In order to get a decent paint job on the wheels without damaging it from fitting the tyres (which were little buggers to fit) I did the top coat after the tyres were fitted, glamping the tyres back from the rims.
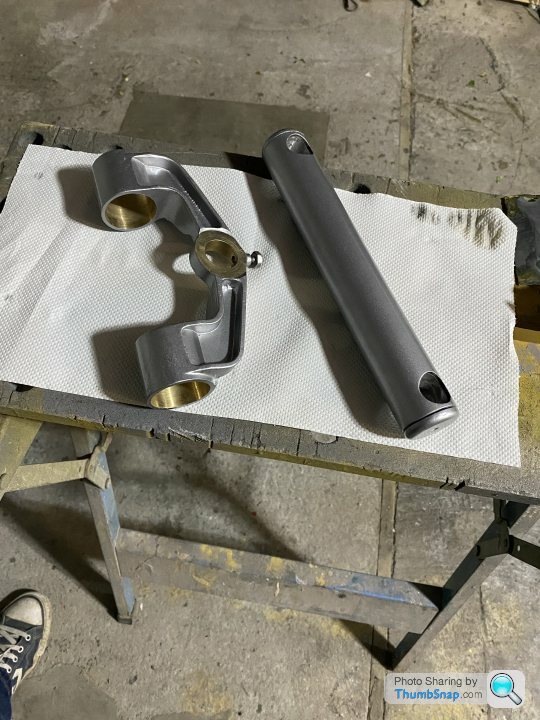
Engine out and ready to be looked at...
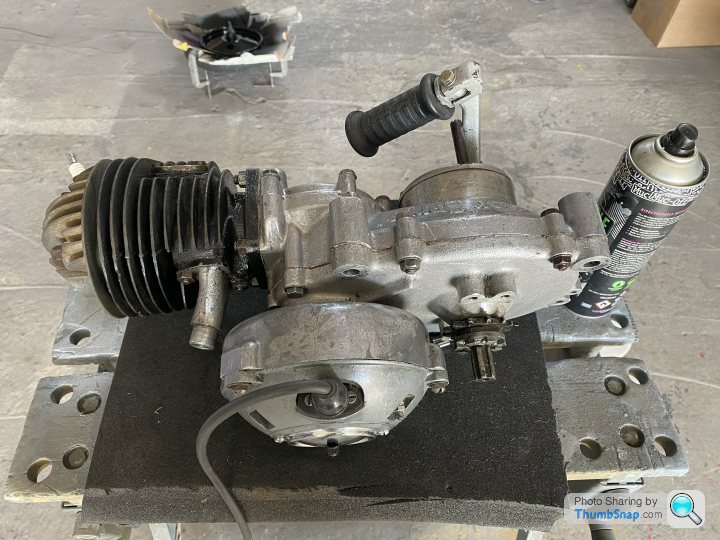
All seemed fine, so back together with a bit of polishing a repainting the barrel. ...and I couldn't resist polishing the originally [very] rough-cast exhaist manifold. My originality points have just gone out the window.
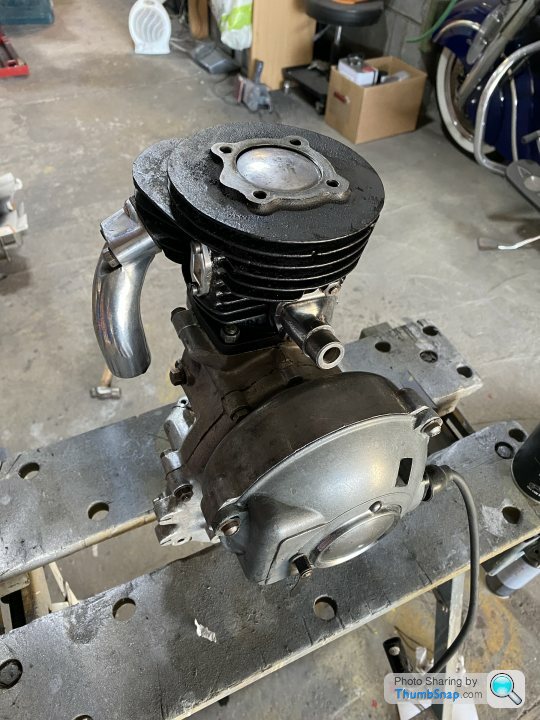
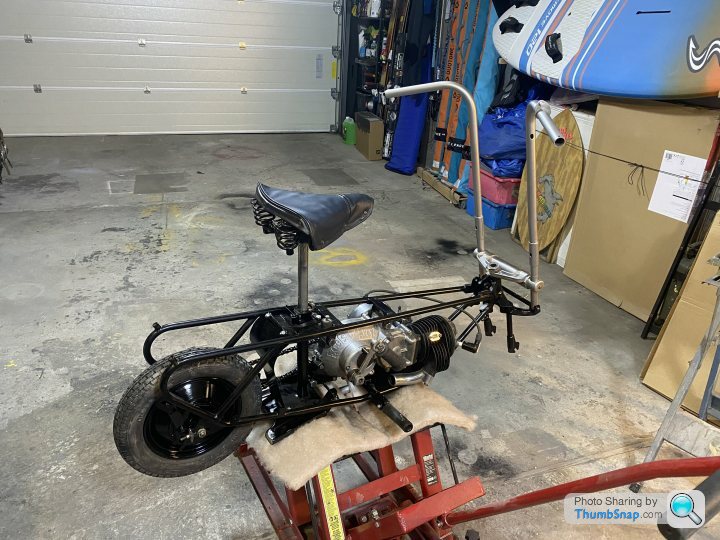
Starting to go back together.
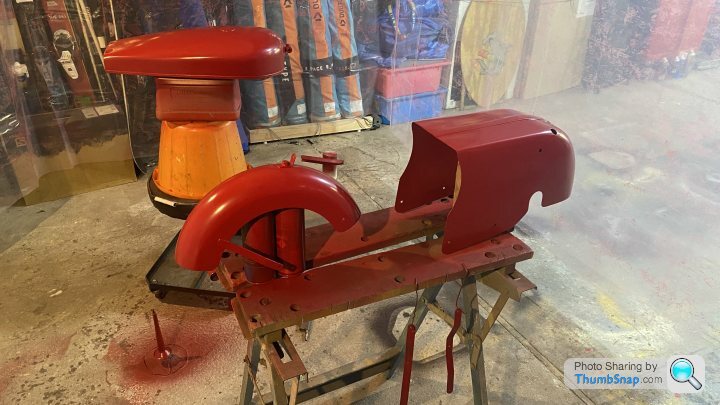
Rattle-can wasn't going to be good enough got tin-ware though, so rigged up a wee spray booth in the garage and used a 2-pack paint and 2-pack lacquer. Managed to get a pretty close match to the lowest layer of paint I came across, which I think was the original colour.
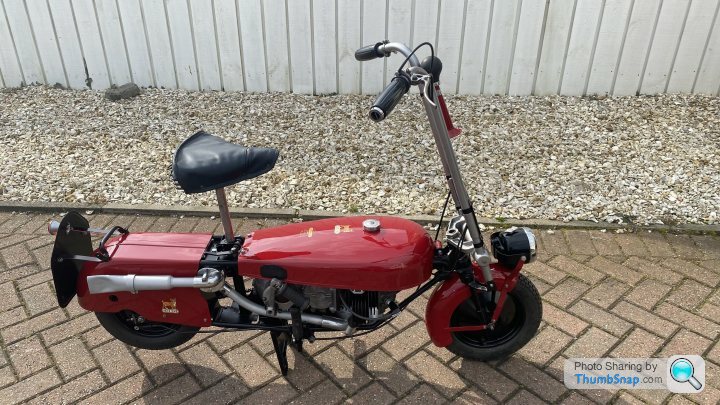
...and there we have it Lots of steps missed, but I finished it yesterday and after fixing a few fuel leaks (the cork washers/seal on the fuel tap had dried out), as had the washer on the carb union) I was zooming around town on it...much to the amusement of onlookers...if you can call a top speed of 30mph zooming.
'Classic Transfers' still do the badges for these, so it's correctly badged-up too, The silencer end -piece collector thingy was also very rough cast and I just couldn't get the ingrained muck out, so I ended up polishing it too...I do like a bit of metal polishing
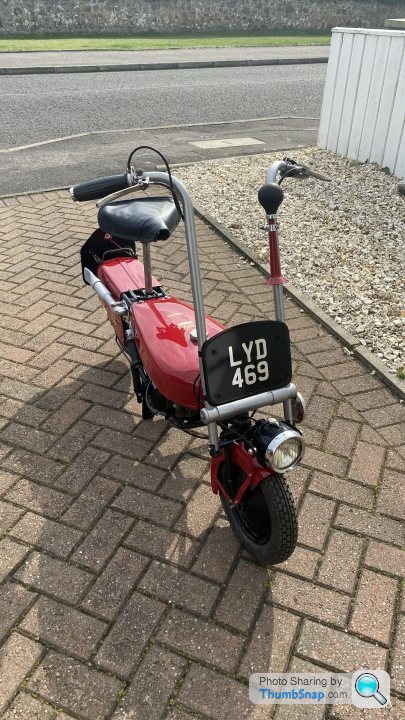
I got a replica tax disk made up for it's original date of registration (April 14, 1950) and the original location; it was first registered in Somerset.
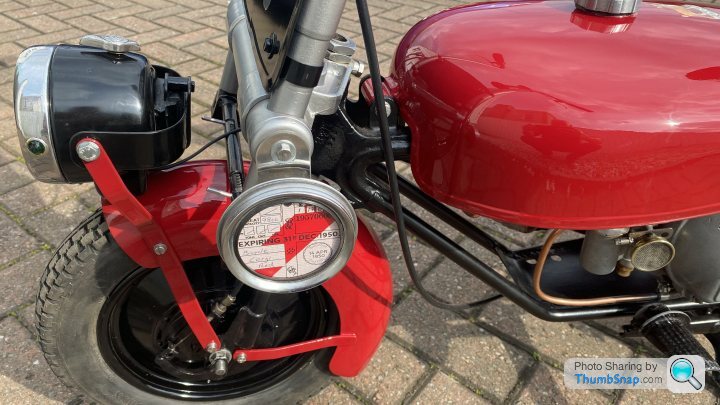
...and a few more pics...
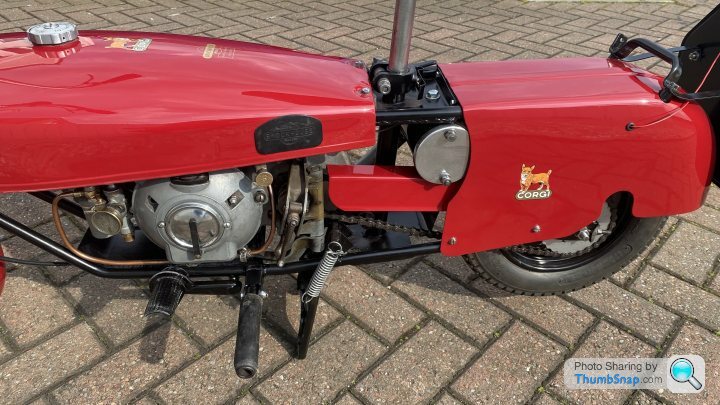
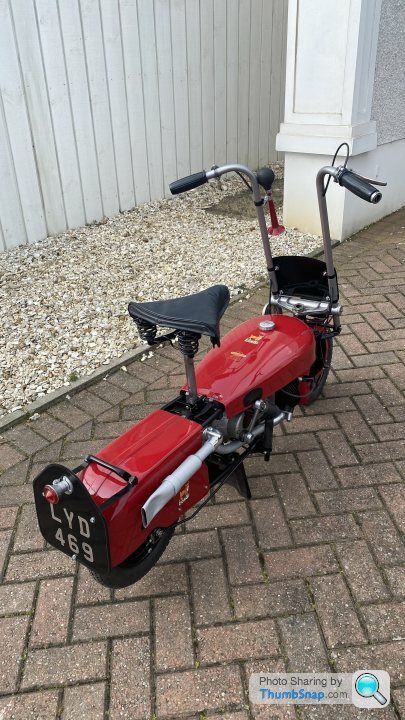
And it still folds
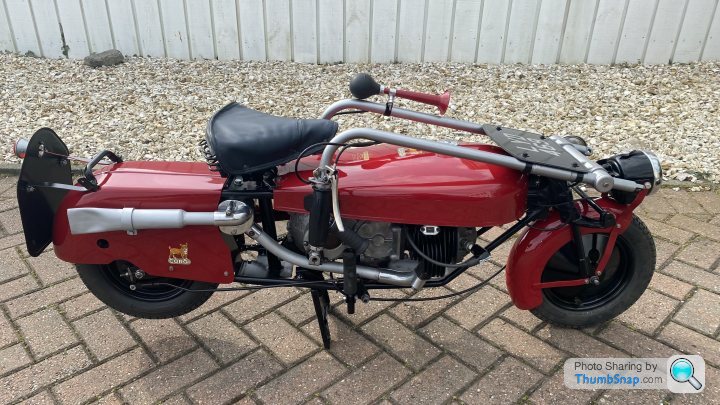
So, one down, another to go. Now the spring is here and it's riding (and windsurfing) season again I probably won't do much on Frankie until I'm forced to be garage-bound again in the autumn - so that's next winter's project. And it'll give me some time to look for some of the other elusive parts otherwise I'll just have to make them. But Lydia works - it runs - it starts, stops and steers...and it looks pretty good to my eyes too

I also managed to track down a headlamp, albeit rusty - I should have taken a proper 'before' picture. But it did have the original Lucas glass intact


But the rubber mount at the rear was perished and unserviceable.

So I cut it out, got some 2-part silicone rubber (and black die), made a wee mould and moulded-on a replacement. When ordering you have to state the hardness you want the finished product and I didn't have a clue...but whatever it is I chose seemed a pretty close match in flexibility to the rubber I expected. Funny stuff to work with though - unlike lots of other 2-part stuff where once the activator/hardner is added the whole lot cures, with this any part of the silicone liquid that hasn't been in direct contact/mix with the hardner doesn't cure so you have to mix it really well. You can see my new 'rubber' mount at the back, plus it cleaned-up pretty well ready for paint.

As standard the headlamp (and tail lamp, that I also got hold of and refurbed) are 6 volt off the generator, but the headlamp also should contain a couple of dry-cell batteries that you can switch between generator and batter power for the lights. But a) the battery terminals in the lamp had been eaten away, b) the 2-way switch was shagged and 3) 6v off a crappy generator isn't going to light much. So I put in a 12v rechargeable lithium battery pack (off a house alarm apparently) and reworked the lamps to take 12v LED bulbs and forgot about the generator. The lithium battery will power the lights for as long as I'd be riding it at a time. The finished lamp... I also had to tap-out quite a few dents in the rim and re-polish, but no 'before' pics


...and I had to make up the brackets etc., but no pics.
The tank didn't look too bad but it did have a few big dents in it. I did try to pull them out with a dent puller, but the metal was too thick to make much of a difference

So back to bare metal and filler. I tried to get down to what I thought was the original colour, and it was a bit brighter than the current top-coat. But once I did get down to bare metal (and no photos of this unfortunately) someone had been at the filler before me and it was really in a hell of a state with dents everywhere. No pics of work-in-progress, but it took over a week of a few hours a day filling and rubbing down (and tapping down the high spots) to get it looking like a tank again.

Frankie had no brake lever (amongst many other missing parts) so Lydia's is shown alone with my 'raw materials' - a bit of roll-cage tube a saved off the Tuscan (I keep all sorts of bits of scrap metal!), a rod, and my trusty sheet of mild steel. I bought this years ago as maybe 1/2 a square metre and I've used it for so many things!

So I cut parts out of the sheet steel, and turned grooves in a section of the tube. And I'd watched an Allen Millyard video of him putting horizontal grooves using the lathe making up hand grips to I copied that.

The brake lever arm was probably made originally with a die on a press, but mine was made beating hell out of my sheet steel part with a lump hammer, and then welding up the 'seam' at the curved end.

Then all welded-up and painted - my 'fake' lever is on the left, the original from Lydia is on the right. OK, not absolutely identical, I think they must have cast-on the 'treads' on the original, but close enough - a blind-man would be pleased to see it.

Frame stripped and ready for paint. All straight and in good condition - very nicely made actually. The steering head and seat brackets look like solid bronze (my metal recognition skills aren't great) and have been brazed on, but other brackets and bracing are welded on.

It isn't a big frame and I couldn't be bothered rigging up all the kosher spray stuff in the garage so it just got a rattle-can job. I didn't seem to have had an undercoat originally (assuming what was left before was original paint) and it was a real thin paint job so I replicated that. I wanted to avoid powder-coat as I think it looks wrong on older bikes - too think and shiny.

Everything else got paint too, but not too many photos. In order to get a decent paint job on the wheels without damaging it from fitting the tyres (which were little buggers to fit) I did the top coat after the tyres were fitted, glamping the tyres back from the rims.

Engine out and ready to be looked at...

All seemed fine, so back together with a bit of polishing a repainting the barrel. ...and I couldn't resist polishing the originally [very] rough-cast exhaist manifold. My originality points have just gone out the window.

Starting to go back together.

Rattle-can wasn't going to be good enough got tin-ware though, so rigged up a wee spray booth in the garage and used a 2-pack paint and 2-pack lacquer. Managed to get a pretty close match to the lowest layer of paint I came across, which I think was the original colour.

...and there we have it
 Lots of steps missed, but I finished it yesterday and after fixing a few fuel leaks (the cork washers/seal on the fuel tap had dried out), as had the washer on the carb union) I was zooming around town on it...much to the amusement of onlookers...if you can call a top speed of 30mph zooming.
'Classic Transfers' still do the badges for these, so it's correctly badged-up too, The silencer end -piece collector thingy was also very rough cast and I just couldn't get the ingrained muck out, so I ended up polishing it too...I do like a bit of metal polishing


I got a replica tax disk made up for it's original date of registration (April 14, 1950) and the original location; it was first registered in Somerset.

...and a few more pics...


And it still folds


So, one down, another to go. Now the spring is here and it's riding (and windsurfing) season again I probably won't do much on Frankie until I'm forced to be garage-bound again in the autumn - so that's next winter's project. And it'll give me some time to look for some of the other elusive parts otherwise I'll just have to make them. But Lydia works - it runs - it starts, stops and steers...and it looks pretty good to my eyes too

Janluke said:
Looks great, looking forward to seeing it in the flesh.
Was your Hurricane at a classic show in Peebles yesterday?
No - I was on holiday when the entry forms went out and only saw them last week when I got back. I emailed to say I could take the Hurricane or the Chief down, but by that time all the places were filled. Meant I could work in the garage Was your Hurricane at a classic show in Peebles yesterday?
 I had plotted going down for the auto-jumble but the opportunity to get the Corgi out and about in the sum proved too strong.
 I'd planned to leave the s tty one, Frankie, as a project for next winter...but it kind if annoyed me every time I passed it in the garage sitting there in a sad state. So I started on the forks/headstock, that REALLY annoyed me.
Remembering this famous bodge, no nuts on the headstock - they're put on a big washer, drilled a hole in the stem and put a split-pin through. Not surprisingly the forks rattled about, and below that was a rusted-out ballrace that had been further gummed-up with paint.

First task was to get the stem roughly round again and a tiny bit oversized at the top where the threads were really mashed,.
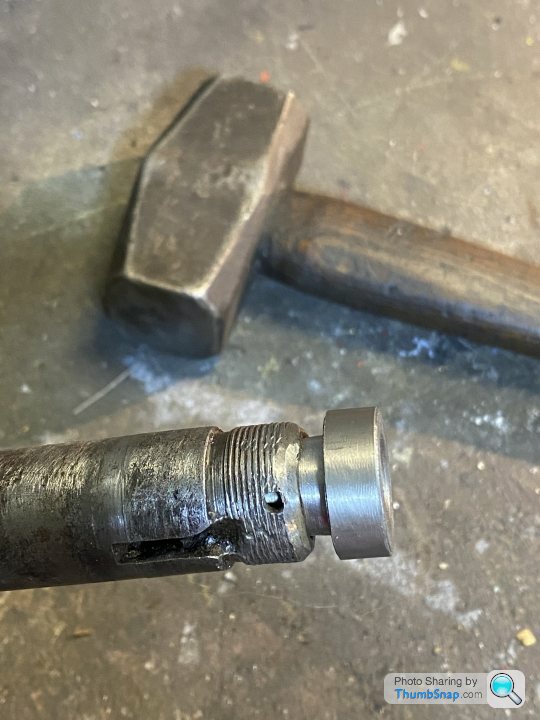
so I made up a small 'cone' and beat the hell out of it down the headstock tube and ended up with something approximating to round,
Next it was hours with a thread file recovering/remaking threads...
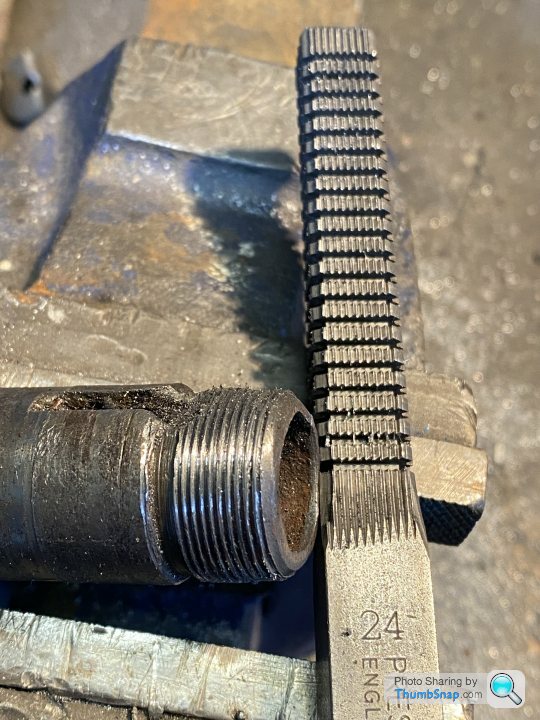
Now we have the challenge of the nuts. Typing this I can't recall the size, but they're quite big and 24tpi. I looked everywhere on- and off-line and eventually came up with just one. A mate was down at the Stafford show and he went with my one nut (ooh er missus) looking for another but came back empty handed. Only one thing for it - my lathe (circa 1948) does have thread cutting capabilities but I'd never tried it before. But I did have enough of the gears to set it up for 24tpi.
So we start with a block of steel and the existing nut as a template...and a hacksaw. The washers are just to stop the metal getting damaged by the mole grips, I used a pair so I could clamp it at different sides as I moved to cut each side. In retrospect I should have just drilled a home through the middle and clamped them together with a nut and bolt. I'll know for the next time
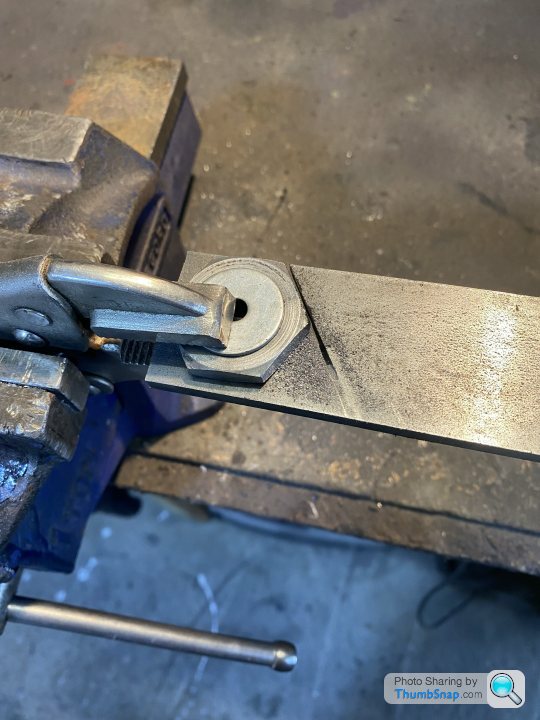
And now we have the outline of a nut, with a bit of filing on the edges to tidy things up..
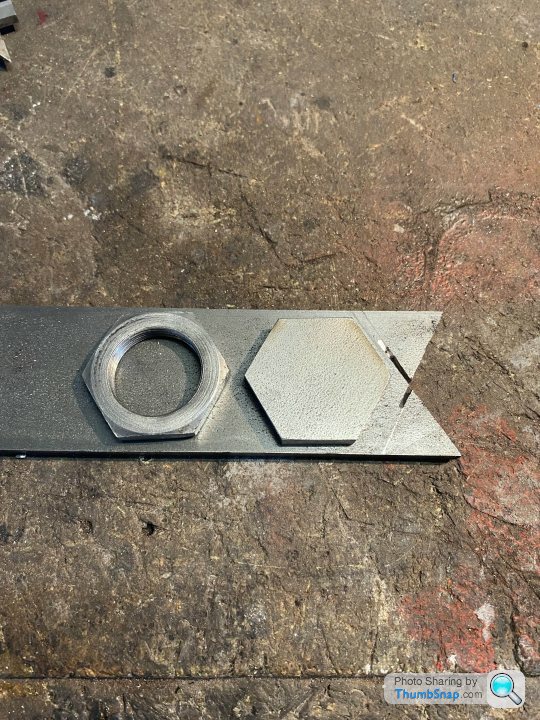
And after a little time on the lathe, and a bit of metal polishing (I can't resist metal polishing) we have my nut on the left and standard on the right
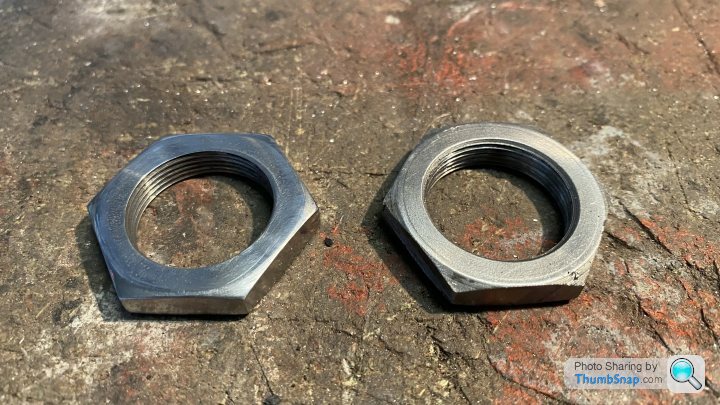
All that for a bloody nut eh? Anyway, it was quite fulfilling.
Thoughts now moved to the ball races. The bottom one was actually OK, and the top one in the frame was fine too - but the one of the forks was just a ring of rust. After much time with a wire brush I eventually got to solid metal, but this isn't exactly a smooth surface.
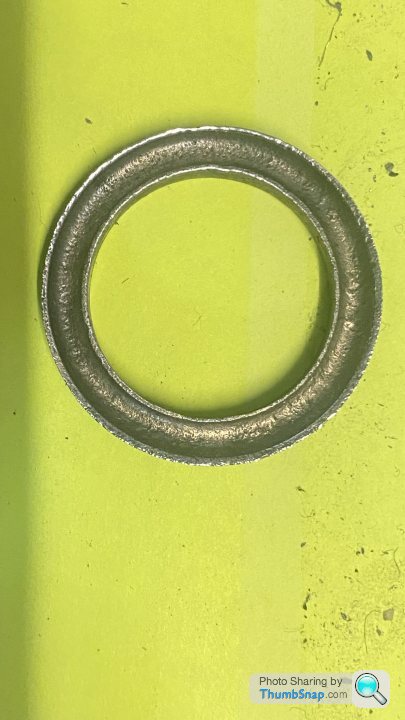
Obviously I've got a lathe, but I'm no expert and still working out how to do things and I couldn't work out how to hold the race in the lathe - no use trying to just grip it in the chuck. So I worked out I could machine up a 'holder' for the race where it's a [very] tight press-fit against a square edge. I then made up a 'tool' approximating to the diameter I wanted in the race and off we went.
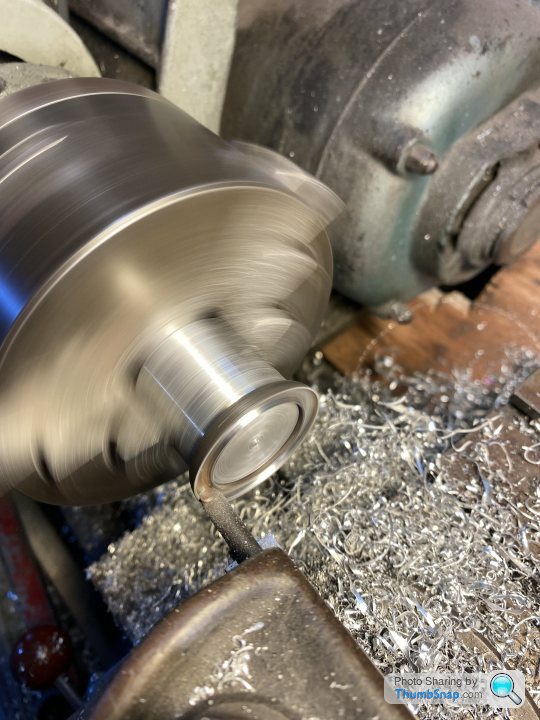
OK, I'm no Allen Millyard but I'm getting through this thing. But don't plan to do much more on this one till the winter.
But since Lydia let me down at the weekend with no spark when hot I'll be changing the ignition coil and condenser on that. I knew the lighting coils were knackered and so wired it to run LED bulbs off a wee 12v battery. And since I'll be changing the ignition coil I also managed to get 2 lighting coils (same as a Bantam) so I might swap back to 6v LEDs and junk the battery.
 tty one, Frankie, as a project for next winter...but it kind if annoyed me every time I passed it in the garage sitting there in a sad state. So I started on the forks/headstock, that REALLY annoyed me.
Remembering this famous bodge, no nuts on the headstock - they're put on a big washer, drilled a hole in the stem and put a split-pin through. Not surprisingly the forks rattled about, and below that was a rusted-out ballrace that had been further gummed-up with paint.

First task was to get the stem roughly round again and a tiny bit oversized at the top where the threads were really mashed,.

so I made up a small 'cone' and beat the hell out of it down the headstock tube and ended up with something approximating to round,
Next it was hours with a thread file recovering/remaking threads...

Now we have the challenge of the nuts. Typing this I can't recall the size, but they're quite big and 24tpi. I looked everywhere on- and off-line and eventually came up with just one. A mate was down at the Stafford show and he went with my one nut (ooh er missus) looking for another but came back empty handed. Only one thing for it - my lathe (circa 1948) does have thread cutting capabilities but I'd never tried it before. But I did have enough of the gears to set it up for 24tpi.
So we start with a block of steel and the existing nut as a template...and a hacksaw. The washers are just to stop the metal getting damaged by the mole grips, I used a pair so I could clamp it at different sides as I moved to cut each side. In retrospect I should have just drilled a home through the middle and clamped them together with a nut and bolt. I'll know for the next time


And now we have the outline of a nut, with a bit of filing on the edges to tidy things up..

And after a little time on the lathe, and a bit of metal polishing (I can't resist metal polishing) we have my nut on the left and standard on the right


All that for a bloody nut eh? Anyway, it was quite fulfilling.
Thoughts now moved to the ball races. The bottom one was actually OK, and the top one in the frame was fine too - but the one of the forks was just a ring of rust. After much time with a wire brush I eventually got to solid metal, but this isn't exactly a smooth surface.

Obviously I've got a lathe, but I'm no expert and still working out how to do things and I couldn't work out how to hold the race in the lathe - no use trying to just grip it in the chuck. So I worked out I could machine up a 'holder' for the race where it's a [very] tight press-fit against a square edge. I then made up a 'tool' approximating to the diameter I wanted in the race and off we went.

OK, I'm no Allen Millyard but I'm getting through this thing. But don't plan to do much more on this one till the winter.
But since Lydia let me down at the weekend with no spark when hot I'll be changing the ignition coil and condenser on that. I knew the lighting coils were knackered and so wired it to run LED bulbs off a wee 12v battery. And since I'll be changing the ignition coil I also managed to get 2 lighting coils (same as a Bantam) so I might swap back to 6v LEDs and junk the battery.
Gassing Station | Biker Banter | Top of Page | What's New | My Stuff


