Pour in urethane to stiffen up mounts?
Discussion


Hi,
I'm looking for a product that could be poured into engine and suspension mounts to stiffen them up. It will be used primarily on the wishbone mounts on a 944 as the existing mounts are looking a bit raggy and replacements seem to be indecently expensive these days. I've found a nice article on how to do it, here:
https://www.suspension.com/blog/do-it-yourself-liq...
What I need now is the pour-in stuff to make it work. Is this the sort of stuff that I should be buying?
https://www.mbfg.co.uk/pt-flex-70-rubber.html
Has anyone done this themselves? Any tips or suggestions to make? Anything from "Don't do it" to "It's excellent" - all welcome!
Thanks.
Guys,
Thanks for the answers. All very helpful. I'll do a bit more googling today and see what else there is available. Sikaflex and Tiger Seal both sound appealing for their simplicity - being able to squirt them in with a sealant gun would be nice, but I'm guessing that they wouldn't flow into the joint in the same way as the casting rubbers would.
Thanks for your help.
Thanks for the answers. All very helpful. I'll do a bit more googling today and see what else there is available. Sikaflex and Tiger Seal both sound appealing for their simplicity - being able to squirt them in with a sealant gun would be nice, but I'm guessing that they wouldn't flow into the joint in the same way as the casting rubbers would.
dhutch said:
How much are we actually talking for a replacement mount?
Are you aiming for a firmer 'sports' stiffness, or just getting back to an OEM feel now its worn out?
Filling voids in a clean mount to stiffen, is difference to trying to reconsolidate something shot imo.
Good Q's. Replacement mounts seem to be north of £100/side. (When I last replaced them they were £20 each side, and that wasn't much more than 10 years ago.) So there is a saving to be made. The aim is both to repair a mount that is workable but on the way out as well as to increase the stiffness, so a bit of both. The rear mount on the front wishbones has a big impact on steering response and precision and I recall that last time I changed them it made a huge difference. Some people fit solid spherical mounts but that'll be a bit too harsh for my liking as it will be a road car, not a track toy. Are you aiming for a firmer 'sports' stiffness, or just getting back to an OEM feel now its worn out?
Filling voids in a clean mount to stiffen, is difference to trying to reconsolidate something shot imo.
Thanks for your help.
Edited by 2Btoo on Thursday 13th January 09:48
Spinakerr has recently done this for his Alfa Romeo 164
Spinakerr said:
Successful little morning while the weatehr is miserable - poured my first polyurethane bush.
Thanks to the suggestions above I sourced a realtively cheap two part kit, setup my workstation as below.

First task was to take a reference of the existing bush central metal location - dead centre, and fortunately flush on onside with the oter ring. This makes pouring easier with a single flat surface.
Original bush rubber extracted with a variety of tools - saws, hammer, sandpaper and so forth. Keying the metal surafces is key to good adhesion.

Having watched a number of videos and followed forum posts on the process, it was apparant simple cardboard and wood can bond annoyingly to the poured liquid. Examining the kit I had ordered and a quick check of plastics available, I used a simple mailing envelope as a non-bonding base. Liquid was mixed 1:1 on a scale, and poured in.
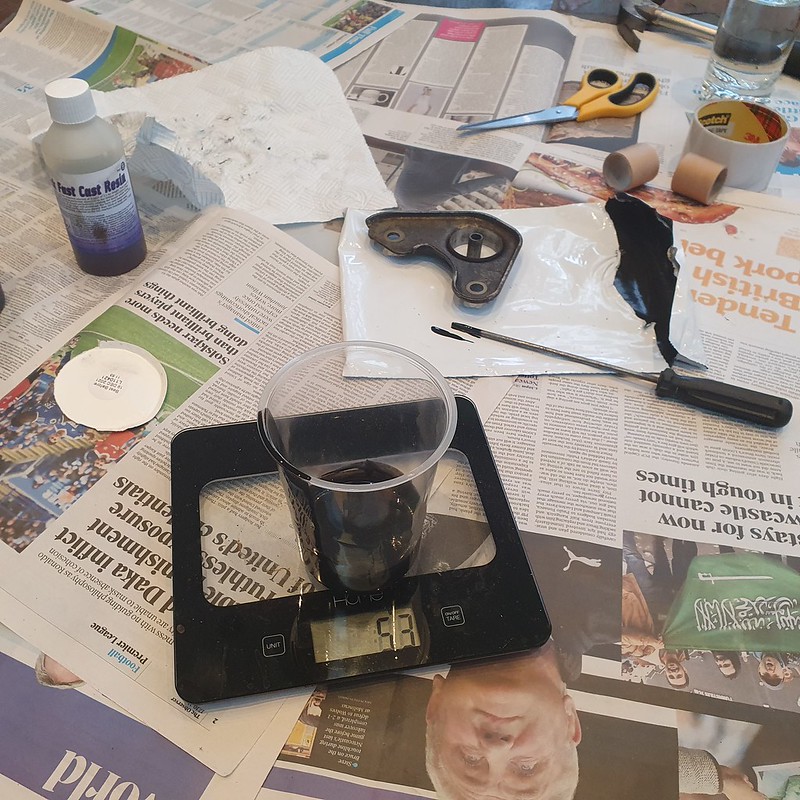

Thirty minutes later, a scalpel and careful fingers peeled away the envelope. It needs further curing but very pleased with my first attempt - hopefully its Shore rating will hold up!

Thanks to the suggestions above I sourced a realtively cheap two part kit, setup my workstation as below.
First task was to take a reference of the existing bush central metal location - dead centre, and fortunately flush on onside with the oter ring. This makes pouring easier with a single flat surface.
Original bush rubber extracted with a variety of tools - saws, hammer, sandpaper and so forth. Keying the metal surafces is key to good adhesion.
Having watched a number of videos and followed forum posts on the process, it was apparant simple cardboard and wood can bond annoyingly to the poured liquid. Examining the kit I had ordered and a quick check of plastics available, I used a simple mailing envelope as a non-bonding base. Liquid was mixed 1:1 on a scale, and poured in.
Thirty minutes later, a scalpel and careful fingers peeled away the envelope. It needs further curing but very pleased with my first attempt - hopefully its Shore rating will hold up!
superflex or powerflex or one of those companies used to sell a product for filling the voids in bushes.
Or....
https://www.youtube.com/watch?v=lnmuB4YPKvs
Or....
https://www.youtube.com/watch?v=lnmuB4YPKvs
jeremyc said:
Spinakerr has recently done this for his Alfa Romeo 164
I think he'll find without any compression added to the bush while it was setting, and no primer on the surfaces, it's going to crack around the bonds and become loose pretty quickly. That's the problem with most pour in bushes. Spinakerr said:
Successful little morning while the weatehr is miserable - poured my first polyurethane bush.
Thanks to the suggestions above I sourced a realtively cheap two part kit, setup my workstation as below.
First task was to take a reference of the existing bush central metal location - dead centre, and fortunately flush on onside with the oter ring. This makes pouring easier with a single flat surface.
Original bush rubber extracted with a variety of tools - saws, hammer, sandpaper and so forth. Keying the metal surafces is key to good adhesion.
Having watched a number of videos and followed forum posts on the process, it was apparant simple cardboard and wood can bond annoyingly to the poured liquid. Examining the kit I had ordered and a quick check of plastics available, I used a simple mailing envelope as a non-bonding base. Liquid was mixed 1:1 on a scale, and poured in.
Thirty minutes later, a scalpel and careful fingers peeled away the envelope. It needs further curing but very pleased with my first attempt - hopefully its Shore rating will hold up!
PhillipM said:
I think he'll find without any compression added to the bush while it was setting, and no primer on the surfaces, it's going to crack around the bonds and become loose pretty quickly. That's the problem with most pour in bushes.
That's what I'd think it wouldn't last very long and don't think it would bind to the outer metal very wellIts some years since i read the thread, but on one of the Mercedes owners forums there was a thread about a company refurbishing the lower ball joints by filling with some sort of compound. Keeping in mind the airmatic struts in question (common Merc trait, ball joint integral part of wishbone or strut) were some £1000 a side at the time.
If someone knows who the company was doing such refurbs they might be a source of information and products.
If someone knows who the company was doing such refurbs they might be a source of information and products.
Made my own polyurethane tranny mount that's held up for 4+ years so far:
- Took all the measurements needed
- Made a rig to hold everything in place (piece of wood with a hole in for the pin and some nails holding the mount itself in place)
- Cut out most of the rubber with a reciprocating saw
- Burnt the rest out with a propane blow torch and scraped it out
- Went over it with a file to clean it up and key the surface a bit
- Taped and rigged it up
- Mixed the PU and poured it in (hardness will be somewhere around ~70A)
- Let cure

Can't find the invoice anymore, but pretty sure I bought from Mouldcraft, and was something like this.
If it's just to fills holes in existing mounts to stiffen them, then 3M window weld is supposed to be a good shout, but arguably better to rip all the old crap out and do it properly.
- Took all the measurements needed
- Made a rig to hold everything in place (piece of wood with a hole in for the pin and some nails holding the mount itself in place)
- Cut out most of the rubber with a reciprocating saw
- Burnt the rest out with a propane blow torch and scraped it out
- Went over it with a file to clean it up and key the surface a bit
- Taped and rigged it up
- Mixed the PU and poured it in (hardness will be somewhere around ~70A)
- Let cure
Can't find the invoice anymore, but pretty sure I bought from Mouldcraft, and was something like this.
If it's just to fills holes in existing mounts to stiffen them, then 3M window weld is supposed to be a good shout, but arguably better to rip all the old crap out and do it properly.
Guys,
Thanks for the answers.
stevieturbo, thanks. I like to think of myself as being a little upmarket of Garage54 but I will admit that I like that guy's videos and they are interesting to watch, despite being lo-fi solutions.
LarJammer - they are already 968 bushes, but even those don't last for ever! (Do I know you from elsewhere in the world of 944's? Do you have another login on the PCGB forum?)
PhillipM and Chris32345 - thanks. What could be done to improve on the process already described? How could compression be added to the bush while curing and what sort of primer could be used on the surfaces?
Smint - thanks. If anyone can remember the company then it would be interesting to contact them.
Strudel - thanks. That looks the business! Very pretty, and glad to hear that it's stood the test of (4 years of) time.
2Btoo said:
PhillipM and Chris32345 - thanks. What could be done to improve on the process already described? How could compression be added to the bush while curing and what sort of primer could be used on the surfaces?
A vacuum bag is enough, if you can't do that then a close fitting bit of PP plastic and some weights, anything really just to give some static compression in the bush.Epoxy resin is great for a polyurethane primer if you sand it into the surfaces of the casing and the tube insert (if they use one), with something like 40 grit sandpaper (i.e, clean and sand the surfaces and the apply to the sandpaper and sand with the epoxy on there to key it in. If not at least heat the metal parts before you pour poly - get them up to 70-80c or so.
Silkaflex and Tigerseal, etc, aren't great, they'll take weeks to cure anything more than 10-15mm deep, use a 2-part pour in. I've used smooth on before for them.
I've made a few hundred over the years, maybe even into the thousands now, but these days I just make custom press-in ones, easier to tailor the properties.
Ooooh, now this is getting really good - thanks PhillipM.
PhillipM said:
A vacuum bag is enough, if you can't do that then a close fitting bit of PP plastic and some weights, anything really just to give some static compression in the bush.
You mean a plastic Sainsburys bag hooked up to the hoover? I can do that but would this be enough? How long do I keep the hoover running for? PhillipM said:
Epoxy resin is great for a polyurethane primer if you sand it into the surfaces of the casing and the tube insert (if they use one), with something like 40 grit sandpaper (i.e, clean and sand the surfaces and the apply to the sandpaper and sand with the epoxy on there to key it in. If not at least heat the metal parts before you pour poly - get them up to 70-80c or so.
Epoxy resin being Araldite and other suchlike things. So I give the inside of the casing a good scratch with some very coarse paper, then put some mixed up Araldite on the sandpaper and sand that into the surface as well? Do I allow the Araldite to set before mixing and pouring the resin in? And should I use regular or rapid Araldite? PhillipM said:
Silkaflex and Tigerseal, etc, aren't great, they'll take weeks to cure anything more than 10-15mm deep, use a 2-part pour in. I've used smooth on before for them.
I've made a few hundred over the years, maybe even into the thousands now, but these days I just make custom press-in ones, easier to tailor the properties.
Smooth-on? I've made a few hundred over the years, maybe even into the thousands now, but these days I just make custom press-in ones, easier to tailor the properties.
Gassing Station | Suspension, Brakes & Tyres | Top of Page | What's New | My Stuff