My first attempt with DSLR
Discussion


SimboRS said:
Sorry for the late reply guys. Iv been trying to read up on all the terminology as while I appreciate all your replies, I don't understand most of it.i need to understand more of the ISO/ aperture and shutter and what they actually do and how they will affect my photo.
I now want to move off the auto mode and try and get more from my photos. At the minute I'm going to concentrate on learning how to shoot landscapes and cars( generally stationary)
So any advice geared towards these 2 would be appreciated. Particularly the car I'd like to get some photos printed and framed for the garage.
Thanks again.
I'm not sure which lens you have, is it the kit 18-55?I now want to move off the auto mode and try and get more from my photos. At the minute I'm going to concentrate on learning how to shoot landscapes and cars( generally stationary)
So any advice geared towards these 2 would be appreciated. Particularly the car I'd like to get some photos printed and framed for the garage.
Thanks again.
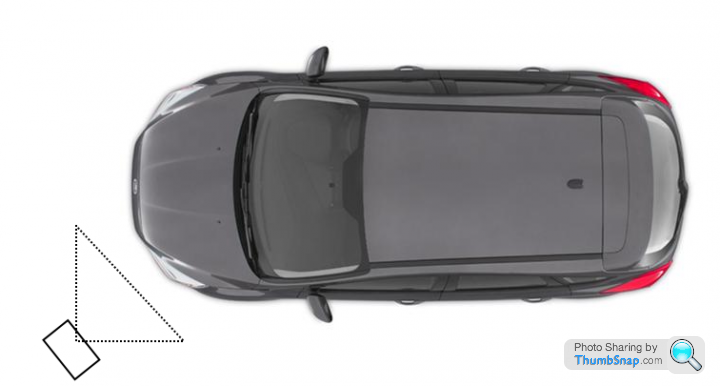
1) Get a small table/stool which is less than a foot in height, and place it diagonally from the front of the nearside of your car.
2) Set the camera to:
- Manual mode
- Iso 100 (turn off auto iso if it's turned on)
- Leave the lens fully zoomed out (e.g. at 18mm)
- The widest aperture your lens is capable of at it's current focal length of 18mm (if it's the 18-55, then F3.5)
- Shutter Speed 25
- Timer delay shooting
- Turn off vibration reduction
4) Half hold down the shutter release button so that the camera focuses on the car
5) Switch the focus into manual mode
6) Hold down the shutter release and stand back whilst the timer counts down to take the photo
7) Without moving the camera, go back to 2) and try different permutations of these settings
- Shutter Speed 80, 125, 160, 320, 500, 640, 800, 1000 - notice how the image gets darker each time
- Aperture f3.5, f4, f5.6, f8, f11 - notice how the image gets darker each time but more of it comes into focus beyond the centre of your shot. Try it zoomed up diagonally against your car grille as an example.
- ISO 100, 200, 400, 800 - notice how the image gets brighter each time. However, if you zoom in you'll notice "noise patterns" the further up you go
Try different combinations of the 7) to see how they compensate for each other.
e.g.
- shutter speed 25, f3.5, ISO 100 = you'll probably take a shot which looks ok brightness wise but is blurry as your hands shake the camera body.
- so to compensate, increase the shutter speed
- shutter speed 250, f3.5, ISO 100 = the shot is now more stable but dark.
- Compensate by increasing ISO sensitivity to ISO 400
- shutter speed 250, f3.5 ISO 100
- You want to increase the depth of field and bring more of the surrounding areas into focus
- so to compensate, increase aperture f3.5 to f8 = you'll probably take a shot which has a greater range of focus but is now a bit dark
- so to compensate further, either increase ISO from 100 to 200/400 OR drop the shutter speed from 250 to 125.
Then once you've mastered that, zoom the lens into 55mm focal length. You'll notice that the lowest aperture setting you can set it to now is probably f5.6 and not the f3.5 you had at 18mm, so your images will have a greater depth of field but will be darker as the lens is allowing in less light.
This is again where you need to adjust your shutter speed and ISO setting to compensate, as you can't widen your aperture any more due to the physical limitations of the kit lens.
Give it a go and see how adjustments in the Exposure Triangle affect your images.
Edited by eltawater on Friday 9th June 14:11
Simple answer to start you off with..
Shoot in RAW and the raise the brightness of the shadows in something like Lightroom.
Will give you soo much more detail in the dark and dingy areas of your photos and make them much more impressive IMO.
As photos go they are quite nice subjects.
You can work out Flickr and settings later as you go on.
eltawater said:
I'm not sure which lens you have, is it the kit 18-55?
1) Get a small table/stool which is less than a foot in height, and place it diagonally from the front of the nearside of your car.
2) Set the camera to:
4) Half hold down the shutter release button so that the camera focuses on the car
5) Switch the focus into manual mode
6) Hold down the shutter release and stand back whilst the timer counts down to take the photo
7) Without moving the camera, go back to 2) and try different permutations of these settings
Try different combinations of the 7) to see how they compensate for each other.
e.g.
Then once you've mastered that, zoom the lens into 55mm focal length. You'll notice that the lowest aperture setting you can set it to now is probably f5.6 and not the f3.5 you had at 18mm, so your images will have a greater depth of field but will be darker as the lens is allowing in less light.
This is again where you need to adjust your shutter speed and ISO setting to compensate, as you can't widen your aperture any more due to the physical limitations of the kit lens.
Give it a go and see how adjustments in the Exposure Triangle affect your images.
Thanks for taking the time to write all that. That's a great post for me1) Get a small table/stool which is less than a foot in height, and place it diagonally from the front of the nearside of your car.
2) Set the camera to:
- Manual mode
- Iso 100 (turn off auto iso if it's turned on)
- Leave the lens fully zoomed out (e.g. at 18mm)
- The widest aperture your lens is capable of at it's current focal length of 18mm (if it's the 18-55, then F3.5)
- Shutter Speed 25
- Timer delay shooting
- Turn off vibration reduction
4) Half hold down the shutter release button so that the camera focuses on the car
5) Switch the focus into manual mode
6) Hold down the shutter release and stand back whilst the timer counts down to take the photo
7) Without moving the camera, go back to 2) and try different permutations of these settings
- Shutter Speed 80, 125, 160, 320, 500, 640, 800, 1000 - notice how the image gets darker each time
- Aperture f3.5, f4, f5.6, f8, f11 - notice how the image gets darker each time but more of it comes into focus beyond the centre of your shot. Try it zoomed up diagonally against your car grille as an example.
- ISO 100, 200, 400, 800 - notice how the image gets brighter each time. However, if you zoom in you'll notice "noise patterns" the further up you go
Try different combinations of the 7) to see how they compensate for each other.
e.g.
- shutter speed 25, f3.5, ISO 100 = you'll probably take a shot which looks ok brightness wise but is blurry as your hands shake the camera body.
- so to compensate, increase the shutter speed
- shutter speed 250, f3.5, ISO 100 = the shot is now more stable but dark.
- Compensate by increasing ISO sensitivity to ISO 400
- shutter speed 250, f3.5 ISO 100
- You want to increase the depth of field and bring more of the surrounding areas into focus
- so to compensate, increase aperture f3.5 to f8 = you'll probably take a shot which has a greater range of focus but is now a bit dark
- so to compensate further, either increase ISO from 100 to 200/400 OR drop the shutter speed from 250 to 125.
Then once you've mastered that, zoom the lens into 55mm focal length. You'll notice that the lowest aperture setting you can set it to now is probably f5.6 and not the f3.5 you had at 18mm, so your images will have a greater depth of field but will be darker as the lens is allowing in less light.
This is again where you need to adjust your shutter speed and ISO setting to compensate, as you can't widen your aperture any more due to the physical limitations of the kit lens.
Give it a go and see how adjustments in the Exposure Triangle affect your images.
Edited by eltawater on Friday 9th June 14:11
Yes the lens is just the 18-55 that came with the camera.
The_Jackal said:
Simple answer to start you off with..
Shoot in RAW and the raise the brightness of the shadows in something like Lightroom.
Will give you soo much more detail in the dark and dingy areas of your photos and make them much more impressive IMO.
As photos go they are quite nice subjects.
You can work out Flickr and settings later as you go on.
Thanks, what's lightroom??Shoot in RAW and the raise the brightness of the shadows in something like Lightroom.
Will give you soo much more detail in the dark and dingy areas of your photos and make them much more impressive IMO.
As photos go they are quite nice subjects.
You can work out Flickr and settings later as you go on.
Gassing Station | Photography & Video | Top of Page | What's New | My Stuff