Discussion


yellowjack said:
Sounds daft, but what exactly am I looking for with the Histogram? I can see one, but I've little idea what it actually means. In Digital Photo Pro I've found I can manipulate Image Tone Curves on the Histogram graph, and I can pull the lines around by eye but I've no idea what "good" values look like on the screen on the camera. My 35mm manual SLR definitely didn't have such a thing, and my phone's camera doesn't have the facility as far as I'm aware.
Also, random "age related frustration". I can't read the LCD screen on top, or the display on the rear of the body, without putting on my reading glasses. Heck, I can barely see what the dial is set to without the specs. I'm OK through the viewfinder with the diopter set for me, but I think part of why I'm not checking the images I've taken is the "glasses on, glasses off, glasses on, glasses off" nonsense. I'm going to have to work through that, or find a work around but, at the moment, it's a source of frustration for me. I'm also colourblind, so adjusting colour, etc, "by eye" looks great to me but probably not to everyone else so I should probably lay off the editing tools a bit...
Regarding the histogram, this article gives a reasonable explanation.Also, random "age related frustration". I can't read the LCD screen on top, or the display on the rear of the body, without putting on my reading glasses. Heck, I can barely see what the dial is set to without the specs. I'm OK through the viewfinder with the diopter set for me, but I think part of why I'm not checking the images I've taken is the "glasses on, glasses off, glasses on, glasses off" nonsense. I'm going to have to work through that, or find a work around but, at the moment, it's a source of frustration for me. I'm also colourblind, so adjusting colour, etc, "by eye" looks great to me but probably not to everyone else so I should probably lay off the editing tools a bit...
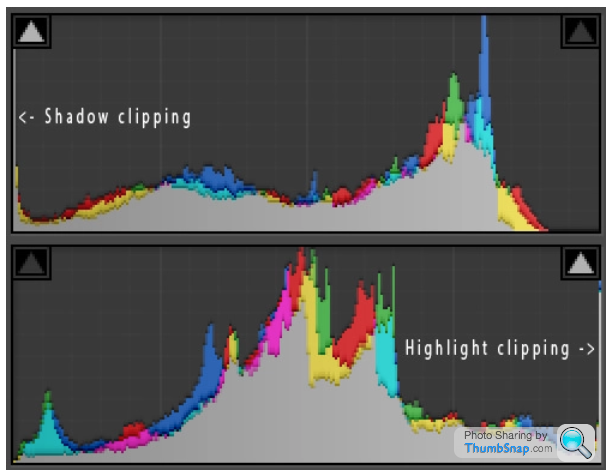
Without trying to re-write it, in simple terms it's a representation of the distribution of the brightness of tones in the image - darker tones (shadows) towards the left, and brighter tones (highlights) towards the right. Generally (as there are exceptions), you would want the graph to slope down to zero at both the left and right extreme ends with the majority of tones in between:

FOR NOW - don't worry too much about the colour channels, and just concentrate on the overall white histogram.
The shape of the histogram will change depending on the nature of the scene you are shooting. Something that is generally a dark scene (e.g. a black cat) will have most of the graph towards the left (as in the histogram above), and a brighter scene (e.g. a bride in a white wedding dress) will have most of the graph to the right.
If you get a spike at the very left of the graph, this is an indication the image is under-exposed. The important thing here is that you will have shadow-clipping which means some areas of the image are so under-exposed as to have no detail in them - they are just black.
Equally, if there is a spike at the very right of the graph, this indicates over exposure, and you have highlight-clipping, which means that some areas of the image are simply white, and detail has been lost (and no matter what you do in your post processing on the computer, you'll never get it back):
To relate this to your photos above, you mention that the shot of the swans hasn't got the detail you would like in the feathers. If you look at the histogram on your computer, I'd expect a spike on the far right of the histogram indicating highlight clipping - this is the loss of detail in the feathers, and areas just look white.
For some very contrasty scenes (maybe the very first photo you posted of the tree with the sun behind it), the range of brightness in the image is greater than the range of light levels that your camera sensor can record. In this case your histogram may have a spike at both the left and right ends of the graph. In a case such as this, when taking the photo, you need to decide whether to expose for the sky, to get detail there and leave the tree with large areas of black (shadow clipping), or expose for the tree, which will result in large areas of the sky being white, or blown-out (highlight clipping). There are techniques to get around this using multiple exposures, but FOR NOW, don't worry about it.
In terms of processing using Digital Image Pro (or whatever image editing software you use), personally, I wouldn't try dragging curves about on the histogram FOR NOW. You might have noticed, I keep writing FOR NOW in capitals a lot - that's because until you have a bit more experience and understanding of what you are doing, it's better to concentrate on getting well-exposed, sharp images, and being comfortable with the basics.
If you do want to play with the lighting balance on the histogram, I assume that DIPro has a LEVELS adjustment tool. This is a simplified version of the CURVES tool, and try experimenting by moving the white point, black point, and mid point to see how it affects your image.
This is an pretty good explanation of Levels. It is using Photoshop, but should work the same in Digital Image Pro.
Finally, regarding eyesight, I haven't got any useful advice, but I have exactly the same issue. I can see through the viewfinder ok, with the dioptre adjustment dialled up, but then cannot read the top plate LCD, or the rear screen very clearly. I tend to have my glasses on my forehead when looking through the viewfinder, then drop them down to look at the rear screen/lcd display. It's a bit of a faff, but I don't think there's an elegant solution to this.
What you will find as you build up more experience is that you need to look at the rear screen far less, and almost never at the top LCD, so it does get easier/less frustrating!
yellowjack said:

33mm, f5.6, 1/25, ISO800. Swans at Old Iford Bridge. I'd have preferred more detail in the feathers, but I'll try again in better light to get that right.
The swans feathers look over-exposed. Dialliing down the exposure one stop would have probably been enough to bring out the detail in the feathers, but would have made the background darker.
If you haven't already turn on zerba highlighting (or whatever it's called on your camera). The live view will highlight over exposed areas with a striped pattern. Or use the histogram, it tells you more, but hides a chunk of the image on the LCD.
So what can you do in camera to get the swans and the background both better exposed? Well, not much to be fair, you're hampered by the dynamic range of the camera. There is something you can do to enable you to fix the image in post processing though.
One of the benefits of RAW over jpeg is that RAW has a greater dynamic range. It can store more detail in the shadows, but if the image is over-exposed (the whites of the feathers are blown out) in jpeg, they will be blown out in RAW.
So if you really wanted this shot, expose for the feathers & shoot in RAW. Then post process in Photoshop, GIMP or your tool of choice. Using the shadows/highlight's tool you can brighten up the darker (backgound in this image) without blowing out the highlights.
The image ins't a perfect example of why/when you'd choose RAW over jpeg as the shadows wouldn't really be that dark if you exposed for swans, but you get the idea. The detail you can pull out of apparently black shadows on a RAW image is quite impressive.
All that said, I never bother and just shoot in jpeg!
You could have used a similar technique in the photo of the cars against the sky. Or a graduated ND filter if you prefer to do stuff in camera.
yellowjack said:
Uncropped image, including half of a 'Danger, Deep Water' sign which wasn't within the composition in the viewfinder. I think I need to make allowances for this phenomenon while setting up my shots.
 Odd, my camera does this too. I often get shots of lamposts coming out of peoples heads that weren't in the viewfinder, or ugly buildings in the background when the viewfinder showed greenery.
yellowjack said:
Sounds daft, but what exactly am I looking for with the Histogram? I can see one, but I've little idea what it actually means. In Digital Photo Pro I've found I can manipulate Image Tone Curves on the Histogram graph, and I can pull the lines around by eye but I've no idea what "good" values look like on the screen on the camera. My 35mm manual SLR definitely didn't have such a thing, and my phone's camera doesn't have the facility as far as I'm aware.
CnC did a good job of explaining how to interpret a histogram. It looks complicated when written out, but in a nutshell, you usually want all the data to land between the ends, not spilling off one end. If it is too far to the left the image is under-exposed, and vice versa. How you fix it is up to you. I say 'usually' because sometimes you actually want parts of the image to be pure white or pure black. An example of the former would be the sun reflecting on a shiny surface; of the former, a portrait shot against a black background.yellowjack said:
Zooming in to check focus and 'shake'? Again, not something I've had the opportunity to do before, so it's a case of getting used to preview being available and using it. I think, at the moment, that it'd be more important if I thought I'd managed a great composition, to ensure the captured image didn't let it down.
- and that's why it's wise to check it on the spot, so you can take another if it's not good enough. 'The wonder of digital' 
yellowjack said:
To be honest, right now I'm over-excited when using the camera, taking loads of shots of random subjects with mediocre composition just to get a feel for the camera limits and to get used to the controls. Stopping to study the image on the back screen isn't something I'm prioritising because I don't want to "waste" time before haring off up the path to take more shots. To begin with I was worried about "using up" my shutter count in the same way as I'd have been worried about "wasting" an exposure with a 35mm cassette film. It took a day or two but I've become rather "trigger happy" now.
There's rarely any need to rush. Don't worry about taking five shots to get one you're really happy with, but equally, if a view doesn't look much good in the viewfinder don't press the button because you'll just end up deleting it later.yellowjack said:
The controls are still unfamiliar to me but I'm beginning to understand what things do, especially controls I simply didn't have before. I feel like I'm making some headway, at least. Between the advice on here, on youtube, in the book I bought and in the Canon User Manual it's all starting to make sense. Pinning down starting aperture ans ISO settings will be relatively simple I reckon. It's knowing what to look for, and how to look for it in the resulting photo that'll take the getting used to.
A good summary! All you need is flying hours. Just as you won't buy a piano and thump out Rachmaninov on day one, learning a complex beast like a DSLR takes time and patience. A scientific eye and an artistic eye.yellowjack said:
Also, random "age related frustration". I can't read the LCD screen on top, or the display on the rear of the body, without putting on my reading glasses. Heck, I can barely see what the dial is set to without the specs. I'm OK through the viewfinder with the diopter set for me, but I think part of why I'm not checking the images I've taken is the "glasses on, glasses off, glasses on, glasses off" nonsense. I'm going to have to work through that, or find a work around but, at the moment, it's a source of frustration for me.
That's a very interesting point, and one that can't help. I wear contact lenses, well in fact only one now. Since my visual accommodation isn't what it used to be, I use one eye for close up and one for distance. The brain switches automatically. Would that be an option for you?yellowjack said:
I'm also colourblind, so adjusting colour, etc, "by eye" looks great to me but probably not to everyone else so I should probably lay off the editing tools a bit...
 I can't fix that. Shoot black and white
 Apologies if it seems I've gone to ground lately. But I have been out with the camera and taken quite a lot of pictures. What I've found is that a) in my inexpert opinion I've improved what I've produced, but also b) the volume of stuff that I've taken can become a little overwhelming when uploaded to my laptop.
I suppose what I mean by that is that where, in the past, I've shot on film, I've had the film printed and it's relatively easy to spread those prints out on a table and choose the best images to file in an album, and the worst ones to discard entirely. With digital images there's a lot of going back and forth through a series of images to decide which composition is better, and whether the exposure is right on one or another, and which compromise is best because none of the results is perfect. Then there's the option to edit stuff too. It seems a four hour "walk and shoot" can turn into just as long sat at a laptop screen sieving through the resulting images.
If I'm honest most of my "work" is going to be little more than "happy snaps" in reality. My wife likes to make a calendar each year, for instance, out of pictures we've taken ourselves on compacts or phone cameras. Places we've been, reminders of memories made. So some of it will get printed and looked at whenever we use the calendar. Apart from that, I'll add some of them to my Strava and Instagram accounts, but beyond those my pictures will probably never leave my laptop.
My photography itself? I very much appreciate the input you have all given, and life is one long lesson. I'm very much at the novice end of the scale with DSLR use, and even if I weren't there's never going to be a time when I've got nothing left to learn about it. I hope to keep posting a few bits and bobs on here to keep the conversation going, and I've also been speaking to real life people. My neighbours are both quite keen amateur photographers, and down at the beach I got talking to a chap who I now follow on Instagram, and he was getting what I thought were good results, better than those I was getting in the same light. His advice was broadly along the same lines as the general concensus on this thread WRT aperture priority and using the histogram, but he also pointed me toward making more use of my tripod (I only had the monopole doodad with me that evening).
In the meantime, I suppose I ought to put up a few of the images i've recorded in the last week or so...
28-80mm zoom at 30mm, f3.5, 1/200, ISO 100

28-80mm zoom at 58mm, f5.0, 1/60, ISO 100
Both edited copies of JPEG images from 18th January 2023. Mainly some light cropping and straightening as I recall.

28-80mm zoom at 30mm, f3.5, 1/3200, ISO 400

28-80mm at 28mm, f3.5, 1/5000, ISO 400.
No tripod with me for this stuff, and I was pretty much guessing and randomly adjusting settings at this point. By this point in the afternoon/evening it was becoming apparent that using a tripod could really help. I took a load more pictures on the walk home, including more attempts at shooting artificially lit tree branches, but without the tripod the results were truly terrible. No editing with this pair, though, so what you see is the JPEG that the camera took.
Comments and advice welcome, either positive, negative, or plain hurtful. Only honest opinions will truly help me to improve.
I suppose what I mean by that is that where, in the past, I've shot on film, I've had the film printed and it's relatively easy to spread those prints out on a table and choose the best images to file in an album, and the worst ones to discard entirely. With digital images there's a lot of going back and forth through a series of images to decide which composition is better, and whether the exposure is right on one or another, and which compromise is best because none of the results is perfect. Then there's the option to edit stuff too. It seems a four hour "walk and shoot" can turn into just as long sat at a laptop screen sieving through the resulting images.
If I'm honest most of my "work" is going to be little more than "happy snaps" in reality. My wife likes to make a calendar each year, for instance, out of pictures we've taken ourselves on compacts or phone cameras. Places we've been, reminders of memories made. So some of it will get printed and looked at whenever we use the calendar. Apart from that, I'll add some of them to my Strava and Instagram accounts, but beyond those my pictures will probably never leave my laptop.
My photography itself? I very much appreciate the input you have all given, and life is one long lesson. I'm very much at the novice end of the scale with DSLR use, and even if I weren't there's never going to be a time when I've got nothing left to learn about it. I hope to keep posting a few bits and bobs on here to keep the conversation going, and I've also been speaking to real life people. My neighbours are both quite keen amateur photographers, and down at the beach I got talking to a chap who I now follow on Instagram, and he was getting what I thought were good results, better than those I was getting in the same light. His advice was broadly along the same lines as the general concensus on this thread WRT aperture priority and using the histogram, but he also pointed me toward making more use of my tripod (I only had the monopole doodad with me that evening).
In the meantime, I suppose I ought to put up a few of the images i've recorded in the last week or so...
28-80mm zoom at 30mm, f3.5, 1/200, ISO 100
28-80mm zoom at 58mm, f5.0, 1/60, ISO 100
Both edited copies of JPEG images from 18th January 2023. Mainly some light cropping and straightening as I recall.
28-80mm zoom at 30mm, f3.5, 1/3200, ISO 400
28-80mm at 28mm, f3.5, 1/5000, ISO 400.
No tripod with me for this stuff, and I was pretty much guessing and randomly adjusting settings at this point. By this point in the afternoon/evening it was becoming apparent that using a tripod could really help. I took a load more pictures on the walk home, including more attempts at shooting artificially lit tree branches, but without the tripod the results were truly terrible. No editing with this pair, though, so what you see is the JPEG that the camera took.
Comments and advice welcome, either positive, negative, or plain hurtful. Only honest opinions will truly help me to improve.
Edited by yellowjack on Monday 23 January 11:14
Ok, the first one is certainly an interesting subject, and I quite like the photo.
The common thing across all 4 images is that you seem to be using the max aperture of the lens available (F5.0 at 58mm on the 2nd one, and F3.5 on the other 3).
Assuming you are using Av (aperture priority) as discussed earlier, this would mean you are intentionally setting this. You'd also be setting this intentionally if using manual (obviously).
Generally speaking, for pretty much ALL lenses, the image quality wide open (max aperture), is in general, lower than the image quality obtainable by using a more mid-range aperture (around F8-F11).
Note - image quality generally then starts to degrade if you use smaller apertures F16, F22, F32, as the small aperture starts to cause problems with dispersion effects.
I personally only shoot with the max aperture for 2 reasons:
1- I want minimum depth of field to leave the subject sharp and blur foreground and background:
 3O2A9681 by conradsphotos, on Flickr
2 - I need as fast a shutter speed as I can to freeze action, and (often) this is in a low light situation, so I'm already pushing the ISO to the max I can get away with whilst keeping the level of noise caused by high ISO to an acceptable level:
 3O2A2635 by conradsphotos, on Flickr
If you click on the images above, and scroll down in FlickR, you can see the exif details (camera/lens/ISO settings)
In the case of your first photo, you could have upped the ISO to 400, and used an aperture of F8, whilst maintaining a similar shutter speed.
In the last 2 photos, you could have used an aperture of F8, and also dropped your ISO to 100, whilst still keeping a fast enough shutter speed (around 1/200th sec) to maintain a sharp image.
In regards to the comment on tripods, they are invaluable in lower light situations where you are forced to use a slow shutter speed due to lack of available light, and at the same time want to keep a relatively low ISO to reduce noise. If the subject is stationary (like a landscape), then you can end up using some quite slow shutter speeds (like 1/4 sec), whilst using low ISO (ISO 100), and a reasonable aperture (F8), depending on actual light levels. The key thing with a tripod is it removes camera shake - the overall blurring of an image due to you moving the camera when hand held and using a slowish shutter speed. One other tip when using a tripod, assuming a fairly static subject, is rather than pressing the shutter button to take the photo, it is better to use a remote/aka "cable" release, so you don't move the camera when pressing the shutter release, even though it is on a tripod. If you don't have a remote release, then use the camera self timer release (P82 in your manual), as this allows any vibration caused by you pressing the shutter button to subside before the camera actually takes the photo.
I guess in summary:
1. For best image quality from a lens, aim to use a medium aperture (F8 or F11), unless you have a specific reason for going wider.
2. There is no reason you need a fast shutter speed (1/1000 sec or faster) unless you are trying to freeze fast moving action. Reducing the shutter speed will give you more freedom to use a smaller aperture, and/or lower your ISO generally resulting in improved image quality.
Question - are you generally using Av aperture priority, and evaluative metering?
The common thing across all 4 images is that you seem to be using the max aperture of the lens available (F5.0 at 58mm on the 2nd one, and F3.5 on the other 3).
Assuming you are using Av (aperture priority) as discussed earlier, this would mean you are intentionally setting this. You'd also be setting this intentionally if using manual (obviously).
Generally speaking, for pretty much ALL lenses, the image quality wide open (max aperture), is in general, lower than the image quality obtainable by using a more mid-range aperture (around F8-F11).
Note - image quality generally then starts to degrade if you use smaller apertures F16, F22, F32, as the small aperture starts to cause problems with dispersion effects.
I personally only shoot with the max aperture for 2 reasons:
1- I want minimum depth of field to leave the subject sharp and blur foreground and background:
3O2A9681 by conradsphotos, on Flickr2 - I need as fast a shutter speed as I can to freeze action, and (often) this is in a low light situation, so I'm already pushing the ISO to the max I can get away with whilst keeping the level of noise caused by high ISO to an acceptable level:
3O2A2635 by conradsphotos, on FlickrIf you click on the images above, and scroll down in FlickR, you can see the exif details (camera/lens/ISO settings)
In the case of your first photo, you could have upped the ISO to 400, and used an aperture of F8, whilst maintaining a similar shutter speed.
In the last 2 photos, you could have used an aperture of F8, and also dropped your ISO to 100, whilst still keeping a fast enough shutter speed (around 1/200th sec) to maintain a sharp image.
In regards to the comment on tripods, they are invaluable in lower light situations where you are forced to use a slow shutter speed due to lack of available light, and at the same time want to keep a relatively low ISO to reduce noise. If the subject is stationary (like a landscape), then you can end up using some quite slow shutter speeds (like 1/4 sec), whilst using low ISO (ISO 100), and a reasonable aperture (F8), depending on actual light levels. The key thing with a tripod is it removes camera shake - the overall blurring of an image due to you moving the camera when hand held and using a slowish shutter speed. One other tip when using a tripod, assuming a fairly static subject, is rather than pressing the shutter button to take the photo, it is better to use a remote/aka "cable" release, so you don't move the camera when pressing the shutter release, even though it is on a tripod. If you don't have a remote release, then use the camera self timer release (P82 in your manual), as this allows any vibration caused by you pressing the shutter button to subside before the camera actually takes the photo.
I guess in summary:
1. For best image quality from a lens, aim to use a medium aperture (F8 or F11), unless you have a specific reason for going wider.
2. There is no reason you need a fast shutter speed (1/1000 sec or faster) unless you are trying to freeze fast moving action. Reducing the shutter speed will give you more freedom to use a smaller aperture, and/or lower your ISO generally resulting in improved image quality.
Question - are you generally using Av aperture priority, and evaluative metering?
Edited by C n C on Monday 23 January 13:28
C n C said:
Ok, the first one is certainly an interesting subject, and I quite like the photo.
<snip>
In the case of your first photo, you could have upped the ISO to 400, and used an aperture of F8, whilst maintaining a similar shutter speed.
In the last 2 photos, you could have used an aperture of F8, and also dropped your ISO to 100, whilst still keeping a fast enough shutter speed (around 1/200th sec) to maintain a sharp image.
In regards to the comment on tripods, they are invaluable in lower light situations where you are forced to use a slow shutter speed due to lack of available light, and at the same time want to keep a relatively low ISO to reduce noise. If the subject is stationary (like a landscape), then you can end up using some quite slow shutter speeds (like 1/4 sec), whilst using low ISO (ISO 100), and a reasonable aperture (F8), depending on actual light levels. The key thing with a tripod is it removes camera shake - the overall blurring of an image due to you moving the camera when hand held and using a slowish shutter speed. One other tip when using a tripod, assuming a fairly static subject, is rather than pressing the shutter button to take the photo, it is better to use a remote/aka "cable" release, so you don't move the camera when pressing the shutter release, even though it is on a tripod. If you don't have a remote release, then use the camera self timer release (P82 in your manual), as this allows any vibration caused by you pressing the shutter button to subside before the camera actually takes the photo.
I guess in summary:
1. For best image quality from a lens, aim to use a medium aperture (F8 or F11), unless you have a specific reason for going wider.
2. There is no reason you need a fast shutter speed (1/1000 sec or faster) unless you are trying to freeze fast moving action. Reducing the shutter speed will give you more freedom to use a smaller aperture, and/or lower your ISO generally resulting in improved image quality.
Question - are you generally using Av aperture priority, and evaluative metering?
Thanks for taking the time to reply. I opened the images in Digital Photo Pro to get more EXIF detail and yes, Aperture priority and Evaluative Metering for all of them, with White Balance set to Cloudy. For the first three I set the AF for AI Focus, the last one for some reason to One-Shot AF.<snip>
In the case of your first photo, you could have upped the ISO to 400, and used an aperture of F8, whilst maintaining a similar shutter speed.
In the last 2 photos, you could have used an aperture of F8, and also dropped your ISO to 100, whilst still keeping a fast enough shutter speed (around 1/200th sec) to maintain a sharp image.
In regards to the comment on tripods, they are invaluable in lower light situations where you are forced to use a slow shutter speed due to lack of available light, and at the same time want to keep a relatively low ISO to reduce noise. If the subject is stationary (like a landscape), then you can end up using some quite slow shutter speeds (like 1/4 sec), whilst using low ISO (ISO 100), and a reasonable aperture (F8), depending on actual light levels. The key thing with a tripod is it removes camera shake - the overall blurring of an image due to you moving the camera when hand held and using a slowish shutter speed. One other tip when using a tripod, assuming a fairly static subject, is rather than pressing the shutter button to take the photo, it is better to use a remote/aka "cable" release, so you don't move the camera when pressing the shutter release, even though it is on a tripod. If you don't have a remote release, then use the camera self timer release (P82 in your manual), as this allows any vibration caused by you pressing the shutter button to subside before the camera actually takes the photo.
I guess in summary:
1. For best image quality from a lens, aim to use a medium aperture (F8 or F11), unless you have a specific reason for going wider.
2. There is no reason you need a fast shutter speed (1/1000 sec or faster) unless you are trying to freeze fast moving action. Reducing the shutter speed will give you more freedom to use a smaller aperture, and/or lower your ISO generally resulting in improved image quality.
Question - are you generally using Av aperture priority, and evaluative metering?
So, if I take away anything from your post it should be to narrow down the aperture to begin with, and also to maybe worry less about (what I presumed were) low shutter speeds. Seems I was vastly over compensating for camera shake. Oh, and I should also consider altering the ISO to try to keep the aperture in a sweeter spot.
I've got some more images to share from an evening when I took the tripod along and stayed out after it got dark. For those I (think I) did use Shutter Priority with longer exposures, and made use of the ten second self timer to ensure there was no camera shake. I've also read a little about using a "mirror lock-up" function and a remote switch to further reduce the potential for movement while recording the image.
I suppose now it would be good for me to go back into the book(s) again. I've been guilty of rushing headlong into using the camera, and now that I've got "hands on" with it a little, I may well be able to make far more sense of some elements of the instruction manual which weren't entirely clear at first read. There have been frustrations too. A few evenings ago the Air Ambulance came into the local hospital. I got the camera on the tripod in the garden while the helicopter was on the ground and started experimenting with trying to capture the stars on film. But the shutter refused to operate, with a flashing round light at bottom far right in the viewfinder. Turned out to be something to do with the focus not being right. when I cranked the tripod up about a foot the camera must have cleared whatever it was that was "confusing" the autofocus (possibly the top of a fence panel) and it fired OK. Then I had the same issue when pointing the camera at the helicopter as it was taking off above neighbouring houses, no focus "lock" (if that's the right term). It took a image of the two tower cranes over at the hospital though. I guess that's just something I'll solve with experience.
I'll post some of the low light stuff when I've managed to edit it all down from 21 images. I can't expect anyone to be happy to wade through that lot!
Craikeybaby said:
Autofocus can be tricky in low-light if there's not enough contrast for the camera to detect. You can always flick the lens to manual focus and the camera will take the shot.
I had mixed results switching to Manual Focus. It's good to know that it's not something daft I'm doing though. Again, it'll take getting used to but I'm sure there are ways to reframe a shot or work around that particular problem.Going back to the pictures I've taken with this "new" EOS 40D though...
19th January 2023 - Southbourne and Hengistbury Head
Lens 1 = EF28-80mm f/3.5-5.6 USM
Lens 2 = EF75-300mm f/4-5.6 USM

28mm, Av f22, Tv 1/20, ISO100. Getting used to the idea of using a tripod more often.
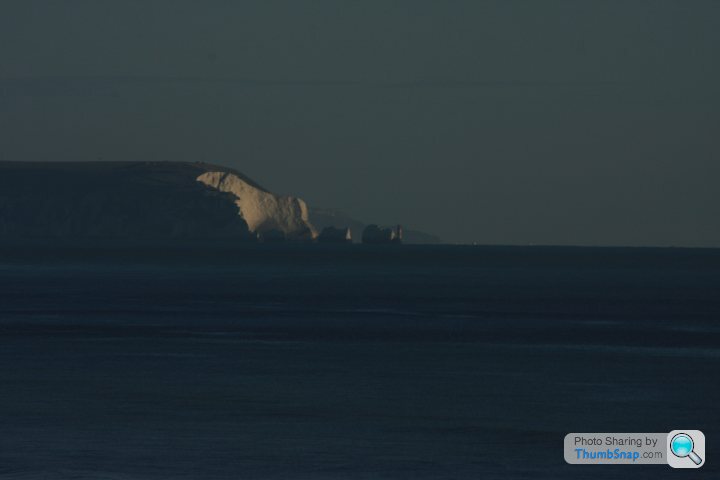
300mm, AV f13, TV 1/500, ISO100. Wildlife shooting - the Isle Of Wight Polar Bear...

I bracketed several exposures to shoot this one, and selected this particular image as it was the only one that revealed the boats/ships on the horizon to the right of the Isle Of Wight.

95mm, Av f5.6, Tv 1/800, ISO250. Subject interested me, despite the many distractions around it in the frame. Three attempts at this shot, one at ISO100 at 1/320 that was broadly similar to this one, and another which was way over exposed at ISO250 and 1/320. I guess this is an example of where, going forward, I need to start more toward the middle of the aperture range to get better results.
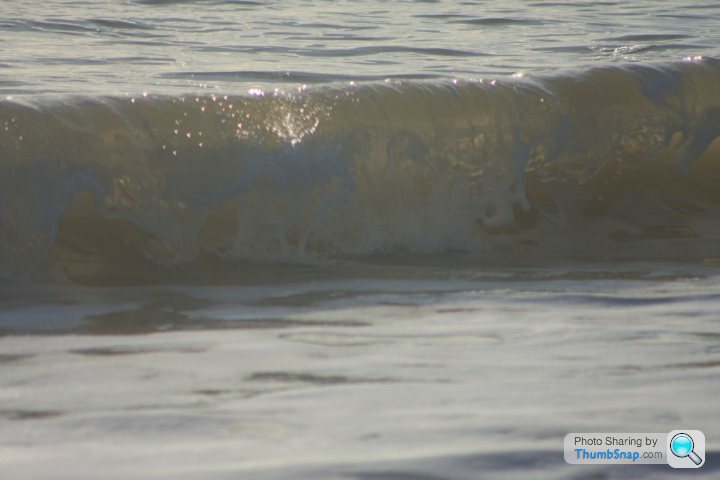
300mm, AV f5.6, TV 1/1250, ISO 100. Fast shutter speed (although it was using Aperture Priority), but indulge me here. I don't think the composition is particularly good but I'm pleased with the effect of the "tube" of the wave being lit quite nicely. Or I'm wrong and it's a load of rubbish.
After this I spent an age trying to capture the effect of the waves breaking on the wooden groynes, using a mix of low speed and high speed continuous shooting. None of the frames I shot had the spray in focus though. Fine as "happy snaps" but technically not quite there. More study required as to how to select a single point for the autofocus. I'll be honest and say I was beginning to get frustrated at this point, so I wandered further up the beach intending just to walk for a while. Putting the camera down didn't last long, though, and I ditched the landscape shots and tried to get creative...

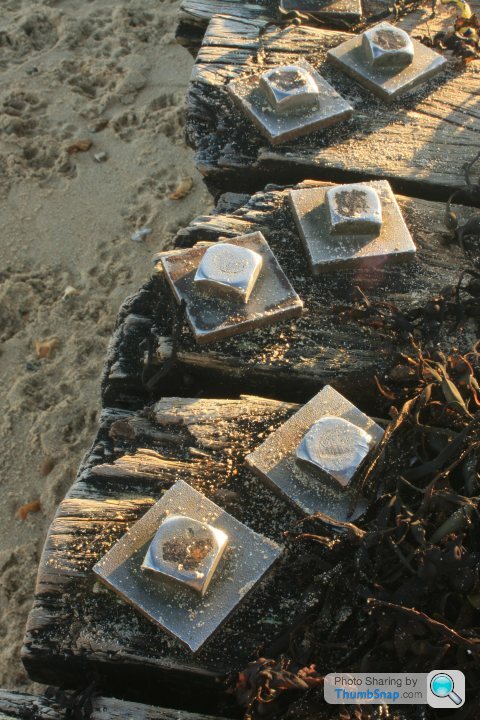
75mm, Av f4.0, Tv 1/500, ISO100. Again, I accept that the aperture is too wide and the shutter speed too fast, but it was taken before that advice was given. And even then it might be worth me looking at trying some other settings to vary the depth of field. These are the coach bolts holding the timbers of a groyne together. I liked the contrast between the texture of the wood and the smoothness of the metal fixings. It's far from perfect and maybe some other angles and dial settings could improve the composition and the exposure, but I was more pleased with this than with my lame attempts at breaking waves.
30mm, Av f4.0, 1/320, ISO100. I include this one for context. The previous shot was taken looking toward the land on the left as you look at this image.
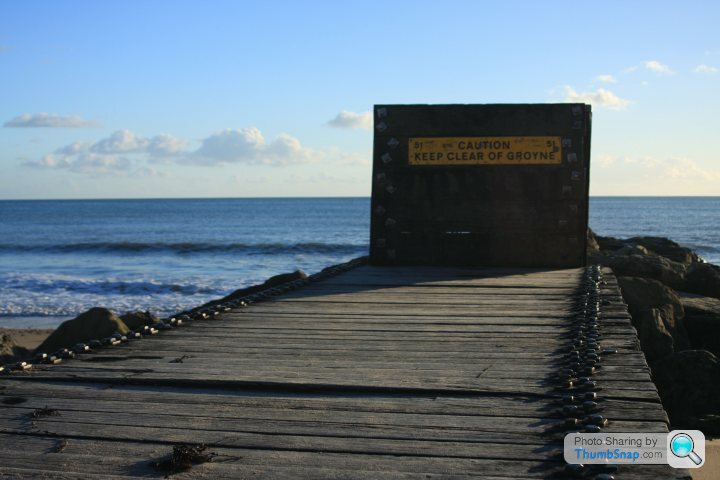
30mm, Av f22, 1 second, ISO100. Taken using aperture priority again, Picture Style was Landscape, and White Balance set to Shade. Not sure if I should have gone with the Macro preset on the top control dial, rather than trying to take control of it myself. Where the first shot of the bolts was lit from bottom left, this was on the other side of the groyne and lit from top right by the setting sun. I'm unsure of the technical quality but I feel the composition is lacking. Too many paw prints and not enough seaweed for a start, so probably a switch to landscape from portrait is needed. And that depth of field needs sorting to quieten down those paw prints in the sand.

40mm, Av f4.5, Tv 1/60, ISO 100. More coach bolts, another tripod and self-timer shot, and more mixed feelings. This one has been mildly cropped to lose most of a bolt on the right, but I'm disappointed that I couldn't get the focus sharp on more of the subject. I'd ideally like the bolts nice and crisp and to keep the grain of the timber sharp too. I feel like I'm making progress though, albeit slowly.
So, somewhat buoyed up by what I felt were better results, I tried again with some landscape/seascape shots as the sun was setting...

28mm, Av f3.5 (I know, I know), Tv 1/8000, ISO100 (with -2 Exposure Compensation if it's relevant). Still in Aperture Priority, still with Evaluative Metering, and taken using High Speed Continuous Shooting. Again, I'm going to try with a more neutral aperture in future, no idea where I got the notion that I should crank the aperture wide open, but possibly a bad habit from my manual 35mm days.
28mm, Av f8.0, Tv 1/160, ISO100. Nothing special about the subject or remarkable about the composition. I include this one simply to pose the question "is this a better aperture and shutter speed combo?" I'm not sure why, but I "feel" like the tones are warmer in this shot, perhaps...?
The other burning question I feel the need to ask is "why are my lenses giving me far smaller apertures than are stated on the lens body?" The Exif data, and the info in the viewfinder say I'm getting down to f22 in some cases, where the lens bodies say f5.6 minimum. Presumably the camera body is having some effect on smaller apertures but cannot "magic up" a wider aperture than the lens was built with?
I'm going to leave it there for now as it's late and this post is already massive. Thanks again to everyone who has weighed in with advice on this thread (even if I've hijacked a thread that wasn't mine to start with). Cheers!

yellowjack said:
After this I spent an age trying to capture the effect of the waves breaking on the wooden groynes, using a mix of low speed and high speed continuous shooting. None of the frames I shot had the spray in focus though. Fine as "happy snaps" but technically not quite there. More study required as to how to select a single point for the autofocus. I'll be honest and say I was beginning to get frustrated at this point, so I wandered further up the beach intending just to walk for a while. Putting the camera down didn't last long, though, and I ditched the landscape shots and tried to get creative...
75mm, Av f4.0, Tv 1/500, ISO100. Again, I accept that the aperture is too wide and the shutter speed too fast, but it was taken before that advice was given. And even then it might be worth me looking at trying some other settings to vary the depth of field. These are the coach bolts holding the timbers of a groyne together. I liked the contrast between the texture of the wood and the smoothness of the metal fixings. It's far from perfect and maybe some other angles and dial settings could improve the composition and the exposure, but I was more pleased with this than with my lame attempts at breaking waves.
The other burning question I feel the need to ask is "why are my lenses giving me far smaller apertures than are stated on the lens body?" The Exif data, and the info in the viewfinder say I'm getting down to f22 in some cases, where the lens bodies say f5.6 minimum. Presumably the camera body is having some effect on smaller apertures but cannot "magic up" a wider aperture than the lens was built with?
I like that shot, I would have also shot it with the lens wide open (smallest aperture number), as it throws the bolts out of focus as they get further away. That sort of composition is a good one to see the effects of different apertures though.75mm, Av f4.0, Tv 1/500, ISO100. Again, I accept that the aperture is too wide and the shutter speed too fast, but it was taken before that advice was given. And even then it might be worth me looking at trying some other settings to vary the depth of field. These are the coach bolts holding the timbers of a groyne together. I liked the contrast between the texture of the wood and the smoothness of the metal fixings. It's far from perfect and maybe some other angles and dial settings could improve the composition and the exposure, but I was more pleased with this than with my lame attempts at breaking waves.
The other burning question I feel the need to ask is "why are my lenses giving me far smaller apertures than are stated on the lens body?" The Exif data, and the info in the viewfinder say I'm getting down to f22 in some cases, where the lens bodies say f5.6 minimum. Presumably the camera body is having some effect on smaller apertures but cannot "magic up" a wider aperture than the lens was built with?
The aperture range shown on your lens will be the widest aperture at each end of the zoom. Not knowing your lens, the f4 (or f3.5 or whatever) will be the widest aperture at 28mm and the f5.6 will be the widest aperture at 80mm - this is fairly common with budget zoom lenses.
Craikeybaby said:
...The aperture range shown on your lens will be the widest aperture at each end of the zoom. Not knowing your lens, the f4 (or f3.5 or whatever) will be the widest aperture at 28mm and the f5.6 will be the widest aperture at 80mm - this is fairly common with budget zoom lenses.
Yay! Go me! Proving that the only stupid question is the one you didn't ask. The explanation, once explained, is obvious. But it needed explaining to make it so. I feel I should know this from my long past 35mm SLR days, but then again? Maybe I just didn't know it back then, or I did but I didn't know I knew it, especially as you can't trawl back through prints and negatives to establish which settings you used to use. Looking back the control I had over the process was TTL light metering, combined split prism and microprism focus, and selection of the aperture and shutter speed. My camera even "read" the ISO of the film I loaded, although I think (sort of remember) it was possible to "force" the ISO up or down a couple of steps as a form of compensation. It was pretty simple back then, choose either the desired shutter speed or aperture then adjust the other of those two things until the exposure meter went green. Then use experience to go 'plus' or 'minus' alongside the green circle to add exposure compensation. I guess if I dialled back the settings I'm playing with on the 40D and made it simpler I could reduce the number of different things I'm worrying about when operating the camera. but it's like any "new toy" - you kinda want to use all the bells and whistles straight away to find out what they all do.Craikeybaby said:
yellowjack said:
I like that shot, I would have also shot it with the lens wide open (smallest aperture number), as it throws the bolts out of focus as they get further away. That sort of composition is a good one to see the effects of different apertures though.You have a leading line drawing the eye from the corner of the frame to the focal point. The focal point is nicely placed 1/3 of the way across and 1/3 up in the frame.
Depth of field used to throw the image out of focus infront of and behind the focal point.
Image is nicely exposed and the whole thing is pleasing to the eye and interesting.
From the images you're posting, I really do think a read of Tom Ang's digital photography masterclass would help. It's a cracking book.
BrokenSkunk said:
I do too. It's easily the best of those you've posted so far.
You have a leading line drawing the eye from the corner of the frame to the focal point. The focal point is nicely placed 1/3 of the way across and 1/3 up in the frame.
Depth of field used to throw the image out of focus infront of and behind the focal point.
Image is nicely exposed and the whole thing is pleasing to the eye and interesting.
From the images you're posting, I really do think a read of Tom Ang's digital photography masterclass would help. It's a cracking book.
Thanks for the recommendation - I've just ordered a copy from World Of Books for £4.79, delivery estimated in between four and seven days... You have a leading line drawing the eye from the corner of the frame to the focal point. The focal point is nicely placed 1/3 of the way across and 1/3 up in the frame.
Depth of field used to throw the image out of focus infront of and behind the focal point.
Image is nicely exposed and the whole thing is pleasing to the eye and interesting.
From the images you're posting, I really do think a read of Tom Ang's digital photography masterclass would help. It's a cracking book.
Well, Tom Ang's book arrived. Not without damage due to the flimsy bag it was wrapped in combined with what looks like some course treatment by Royal Mail...

...but fortunately it's only the bottom edge of the back cover, and for £4.79 I don't think there's any value in making a fuss about it. It's a working book there to be read and re-read, not something to look nice on my coffee table.
Nice coincidence - the first 'assignment' in the book was night photography...
Assignment: city lights
the brief: "Find a location that offers a variety of coloured lights, such as street furniture, shops, restaurants and offices. Choose somewhere safe to walk around so that you can concentrate on capturing the brilliance of city lights"
I'd been planning a trip over to our local hospital to shoot at night anyway, if only to capture the lights on the new build they're doing. I should have gone over a few days earlier really as by the time I went they'd made a start on the walls between floors, reducing the effect of the internal lighting. If I'm honest, as I'd viewed the results on the screen on the camera I thought I'd captured some really nice photos. Perhaps not worthy of any amateur photographic competition or display, but I thought they looked OK. Sadly, a lot of them had major issues when viewed on my laptop screen. Colours out, and focus off, along with myriad issues with settings that could have been much better technically. But it (the book) was a major motivator in getting me out of the door late in the evening when I knew the hospital would be quiet so long as I avoided A&E...
Not the greatest of starts. A lesson in checking the settings before taking that first shot really. Oh, and hand held at night probably not the cleverst trick I've tried.
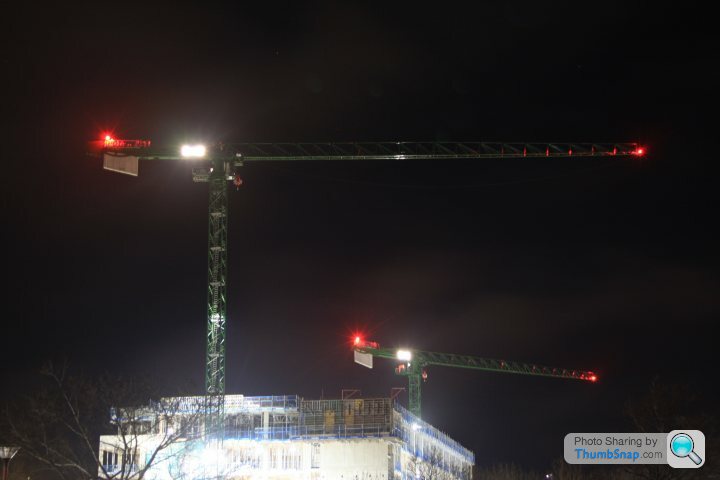
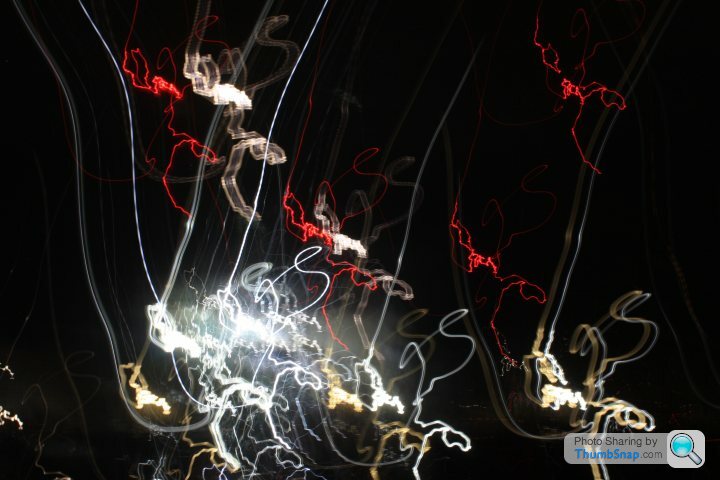
Onto the tripod then, for a 6 second exposure at f4.5, 40mm on the zoom and ISO200. Exposing so as to see the frames of the tower cranes massively over-exposed the bright lights of the construction site below but the composition wouldn't have made sense with four seemingly random red lights floating in the sky.
Moving to the other side of the site, this time a 20 second exposure at f8, 28mm zoom and ISO100. Again trying to expose so as to see the frames of the cranes, and get them in focus, while trying to exclude interference from the brightly lit building and an adjacent streetlamp. It needed luck and patience too, to get a stationary shot of the crane furthest away. Many of my attempts with longer exposure were spoiled by the wind induced movement of the tip of the crane, creating a long red light instead of a point of light.
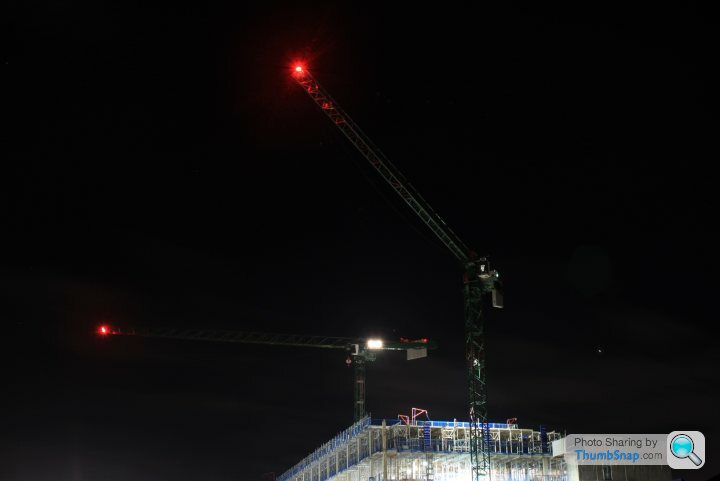
I flipped the camera over to portrait for this one. A 10 second exposure at f8 and 28mm zoom and ISO100. Reduced exposure to account for the extra light from the building site, and this time including the ground fpr context and perspective. Initially i thought this one was a bust due to a car passing through the frame mid-exposure, but in the end the blur of their tail lights gives what I think is a pleasing additional effect. The composition isn't perfect, but I couldn't set up on the road outside A&E, and this was really the only spot I could find where the composition worked and avoided the light from various streetlamps.

I'd got as much as I felt able to at the road side of the hospital, so now I headed into the site to the lake. This time a 30 second exposure at f9 with 28mm of zoom at ISO100. The scene appealed with it's mix of mellow yellow lights, crisp white lights, and a hint of a blue light from somewhere, along with those lights reflected back from the lake surface. I tried cropping the image to ditch the bright lights on the right, but the resulting composition looked a little "awkward", so I left it as I'd framed it in the viewfinder.
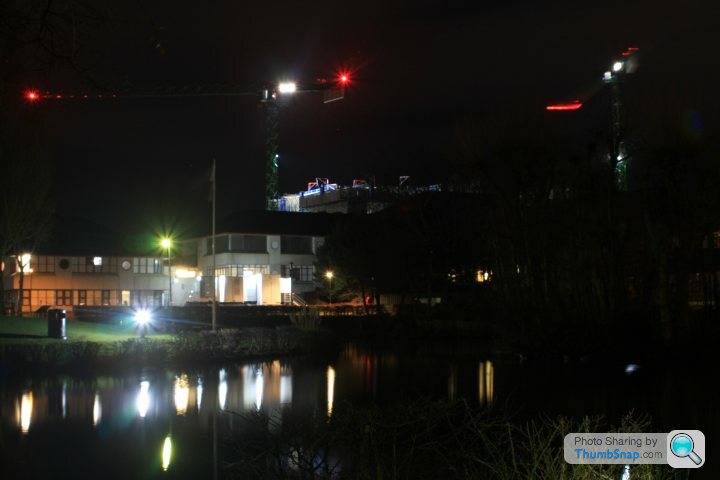
The composition is poor for this one. I only include it to show just how much the wind was shifting the end of that right hand crane from side to side, along with the "ghosting" of the flag on the pole moving in the wind. I simply couldn't get a pleasing composition on both cranes from this side of the lake due to trees and shrubs in the foreground, so I tried another approach...
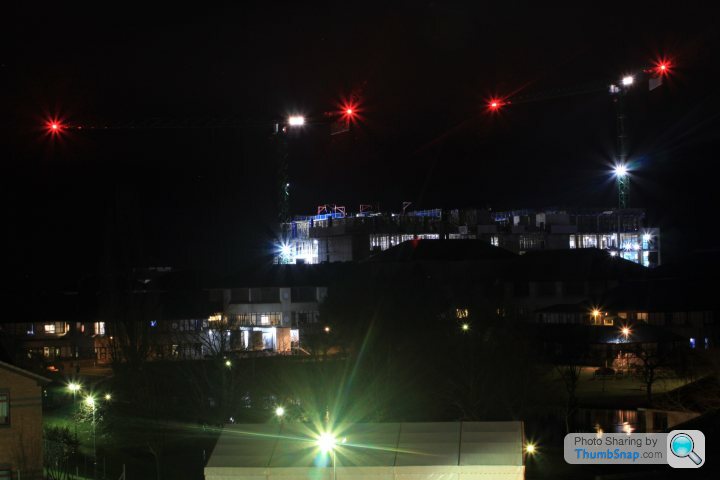
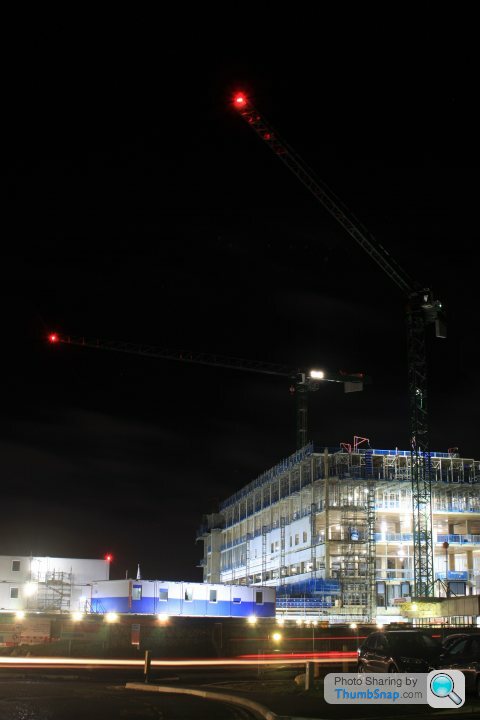
...I got myself some elevation, courtesy of an almost empty multi-storey car park at the back of the site. A 30 second exposure at f14 with 40mm of zoom and ISO100 gave me what I felt was a pleasing "spikey" effect (not sure of the correct technical term) to the red position lights on the cranes. Sadly there was nothing I could do to keep the composition balanced and also get rid of the white marquee and the bright light in the foreground, so I took what I could get.
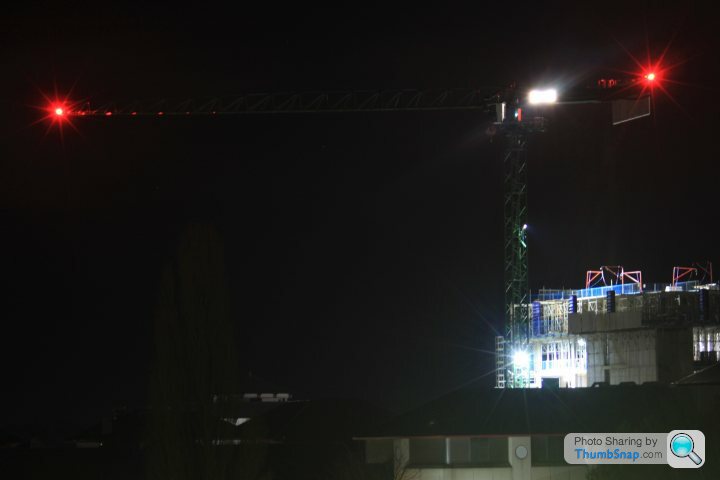
To lose those distracting foreground elements I'd also need to lose one of the cranes. A 15 second exposure at f8 using all 80mm of this lens's zoom at ISO100 seemed to do the trick. I prefer the composition with both cranes, but this one on it's own has fewer distractions in the frame.
Working my way up the floors of the car park I experimented with views vertically down the stair well, and "vanishing point" shots of ceiling lighting on the car parking decks. None of them came out well enough to share and to be honest it was mostly clumsy composition and lack of symmetry in the structure and fittings that let those down.

This was the only one of those experiments that I was pleased with. A 1/13th of a second exposure at f5 with 36mm of zoom at ISO100. I liked the strong blue of the '2' against the grey concrete. I didn't like the distraction provided by the signs and the "busyness" of the fire door, but again a crop or re-framing it left the blue '2' too close to the right hand edge of the frame. This was the best of a series taken with different apertures and exposures. The only setting I neglected to try to change was the ISO. Something to experiment with in future, perhaps?
Feeling that I'd got just about as much as I was going to get at this late hour, I quit the car park and headed home. But on the way down in one of the stairwells I came across this...

...discarded red Coke can sat on top of a dirty Dry Riser cabinet. The red colours appealed, as did the fact that this wasn't posed at all, just an item of rubbish left there by some bozo unwilling to find a bin for it.
Cutting back through the park I happened upon this view...

...so I had one last crack at these tower cranes. This time a 30 second exposure at f18, 80mm of zoom and ISO400. Once again the wind sabotaged most of my long exposure shots, with this being the one least affected by movement at the tip of the crane's boom.
I'm not sure if I'm getting any better from a technical aspect, but I was pleased with a few of these pictures, and glad I got over there to take them before any more of that skeletal concrete structure got walled in.
...but fortunately it's only the bottom edge of the back cover, and for £4.79 I don't think there's any value in making a fuss about it. It's a working book there to be read and re-read, not something to look nice on my coffee table.
Nice coincidence - the first 'assignment' in the book was night photography...
Assignment: city lights
the brief: "Find a location that offers a variety of coloured lights, such as street furniture, shops, restaurants and offices. Choose somewhere safe to walk around so that you can concentrate on capturing the brilliance of city lights"
I'd been planning a trip over to our local hospital to shoot at night anyway, if only to capture the lights on the new build they're doing. I should have gone over a few days earlier really as by the time I went they'd made a start on the walls between floors, reducing the effect of the internal lighting. If I'm honest, as I'd viewed the results on the screen on the camera I thought I'd captured some really nice photos. Perhaps not worthy of any amateur photographic competition or display, but I thought they looked OK. Sadly, a lot of them had major issues when viewed on my laptop screen. Colours out, and focus off, along with myriad issues with settings that could have been much better technically. But it (the book) was a major motivator in getting me out of the door late in the evening when I knew the hospital would be quiet so long as I avoided A&E...
Not the greatest of starts. A lesson in checking the settings before taking that first shot really. Oh, and hand held at night probably not the cleverst trick I've tried.
Onto the tripod then, for a 6 second exposure at f4.5, 40mm on the zoom and ISO200. Exposing so as to see the frames of the tower cranes massively over-exposed the bright lights of the construction site below but the composition wouldn't have made sense with four seemingly random red lights floating in the sky.
Moving to the other side of the site, this time a 20 second exposure at f8, 28mm zoom and ISO100. Again trying to expose so as to see the frames of the cranes, and get them in focus, while trying to exclude interference from the brightly lit building and an adjacent streetlamp. It needed luck and patience too, to get a stationary shot of the crane furthest away. Many of my attempts with longer exposure were spoiled by the wind induced movement of the tip of the crane, creating a long red light instead of a point of light.
I flipped the camera over to portrait for this one. A 10 second exposure at f8 and 28mm zoom and ISO100. Reduced exposure to account for the extra light from the building site, and this time including the ground fpr context and perspective. Initially i thought this one was a bust due to a car passing through the frame mid-exposure, but in the end the blur of their tail lights gives what I think is a pleasing additional effect. The composition isn't perfect, but I couldn't set up on the road outside A&E, and this was really the only spot I could find where the composition worked and avoided the light from various streetlamps.
I'd got as much as I felt able to at the road side of the hospital, so now I headed into the site to the lake. This time a 30 second exposure at f9 with 28mm of zoom at ISO100. The scene appealed with it's mix of mellow yellow lights, crisp white lights, and a hint of a blue light from somewhere, along with those lights reflected back from the lake surface. I tried cropping the image to ditch the bright lights on the right, but the resulting composition looked a little "awkward", so I left it as I'd framed it in the viewfinder.
The composition is poor for this one. I only include it to show just how much the wind was shifting the end of that right hand crane from side to side, along with the "ghosting" of the flag on the pole moving in the wind. I simply couldn't get a pleasing composition on both cranes from this side of the lake due to trees and shrubs in the foreground, so I tried another approach...
...I got myself some elevation, courtesy of an almost empty multi-storey car park at the back of the site. A 30 second exposure at f14 with 40mm of zoom and ISO100 gave me what I felt was a pleasing "spikey" effect (not sure of the correct technical term) to the red position lights on the cranes. Sadly there was nothing I could do to keep the composition balanced and also get rid of the white marquee and the bright light in the foreground, so I took what I could get.
To lose those distracting foreground elements I'd also need to lose one of the cranes. A 15 second exposure at f8 using all 80mm of this lens's zoom at ISO100 seemed to do the trick. I prefer the composition with both cranes, but this one on it's own has fewer distractions in the frame.
Working my way up the floors of the car park I experimented with views vertically down the stair well, and "vanishing point" shots of ceiling lighting on the car parking decks. None of them came out well enough to share and to be honest it was mostly clumsy composition and lack of symmetry in the structure and fittings that let those down.
This was the only one of those experiments that I was pleased with. A 1/13th of a second exposure at f5 with 36mm of zoom at ISO100. I liked the strong blue of the '2' against the grey concrete. I didn't like the distraction provided by the signs and the "busyness" of the fire door, but again a crop or re-framing it left the blue '2' too close to the right hand edge of the frame. This was the best of a series taken with different apertures and exposures. The only setting I neglected to try to change was the ISO. Something to experiment with in future, perhaps?
Feeling that I'd got just about as much as I was going to get at this late hour, I quit the car park and headed home. But on the way down in one of the stairwells I came across this...
...discarded red Coke can sat on top of a dirty Dry Riser cabinet. The red colours appealed, as did the fact that this wasn't posed at all, just an item of rubbish left there by some bozo unwilling to find a bin for it.
Cutting back through the park I happened upon this view...
...so I had one last crack at these tower cranes. This time a 30 second exposure at f18, 80mm of zoom and ISO400. Once again the wind sabotaged most of my long exposure shots, with this being the one least affected by movement at the tip of the crane's boom.
I'm not sure if I'm getting any better from a technical aspect, but I was pleased with a few of these pictures, and glad I got over there to take them before any more of that skeletal concrete structure got walled in.

yellowjack said:
Not the greatest of starts. A lesson in checking the settings before taking that first shot really. Oh, and hand held at night probably not the cleverst trick I've tried.
Grand Designs - vast white room, £80K's-worth of German windows, four ovens in a row and Yellowjack's photo
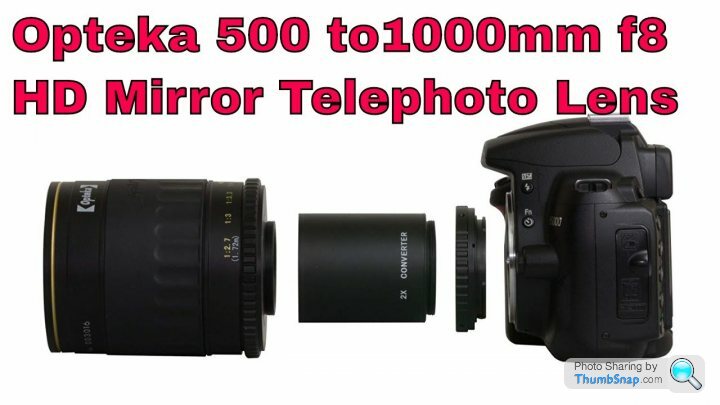
Oh, and I don't know if it was a daft thing to do, but I've gone and bought a 500mm mirror lens too. It's an Opteka item supplied with filters (ND2, ND4 and Skylight), a T2 adaptor ring to fit my camera, and a 2x converter with bags and all caps. Fixed aperture and manual focus only, but it was "only" £59.00 used, from the same shop I bought the camera body in. OK, it will clearly have limitations over a zoom lens with the same focal length which would work with autofocus and have an adjustable aperture. But it will also have the benefit of bringing subjects closer for relatively little cost. If I end up investing in something better I can just trade this one in. But one of the advantages it does have is that it's more compact than traditional long lenses. I picked it up too late today to be able to shoot with it, but I hope to get out and have a play with it tomorrow if the weather is OK. If I don't get on with it at least it isn't going to turn into a very expensive mistake. The T2 adaptor on it's own is £15 and the lady in the shop told me that will allow me to fit the camera to spotting scopes and telescopes too.
The shop's picture of the actual item I bought...
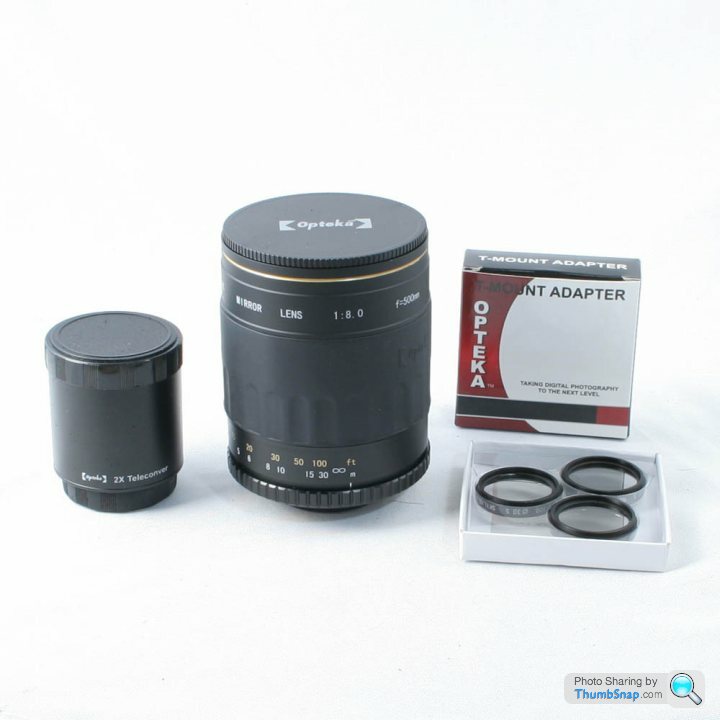
...and one to show how it all goes together...
Next on my list of things to buy is going to be a camera gear backpack that will both protect my gear and store it in a way in which all I need to do is grab the bag with everything already in it and go.
The shop's picture of the actual item I bought...
...and one to show how it all goes together...
Next on my list of things to buy is going to be a camera gear backpack that will both protect my gear and store it in a way in which all I need to do is grab the bag with everything already in it and go.
Edited by yellowjack on Friday 3rd February 00:10
Sounds like you've thrown yourself into the book. I didn't bother with the assignments and just hoovered up all the info. But each to there own, I tend to be a bit of a sponge like that.
You've written a lot about your attempt at the assignment, and it looks like you are grappling with the right stuff ( I like the "4" photo too). I'd be interested to know what you think of the book itself, as you know I found it really good, but that doesn't mean everyone will.
You've written a lot about your attempt at the assignment, and it looks like you are grappling with the right stuff ( I like the "4" photo too). I'd be interested to know what you think of the book itself, as you know I found it really good, but that doesn't mean everyone will.
BrokenSkunk said:
Sounds like you've thrown yourself into the book. I didn't bother with the assignments and just hoovered up all the info. But each to there own, I tend to be a bit of a sponge like that.
You've written a lot about your attempt at the assignment, and it looks like you are grappling with the right stuff ( I like the "4" photo too). I'd be interested to know what you think of the book itself, as you know I found it really good, but that doesn't mean everyone will[.
Time has yet to tell on that score. It's very good so far, with plenty of photographs from other folk who've tackled his assignments to help with pointers to composition and settings. But I have to be honest and say that I'm struggling with some aspects of his presentation style. To be fair to him, the book is billed as "advanced photographic and image manipulation techniques for creating perfect pictures", and that probably explains why he does use a fair bit of terminology that requires prior knowledge of more basic digital photography. In one section he spoke of "artifacts" in an image. I still don't know exactly what he meant by that as it wasn't explained. Suffice to say I'm not daft enough to imagine that he was talking about things dug up by archeologists though. Maybe I should have started with 'Digital Photography For Dummies' first. Cover the more basic differences between film and digital to get off the mark.You've written a lot about your attempt at the assignment, and it looks like you are grappling with the right stuff ( I like the "4" photo too). I'd be interested to know what you think of the book itself, as you know I found it really good, but that doesn't mean everyone will[.
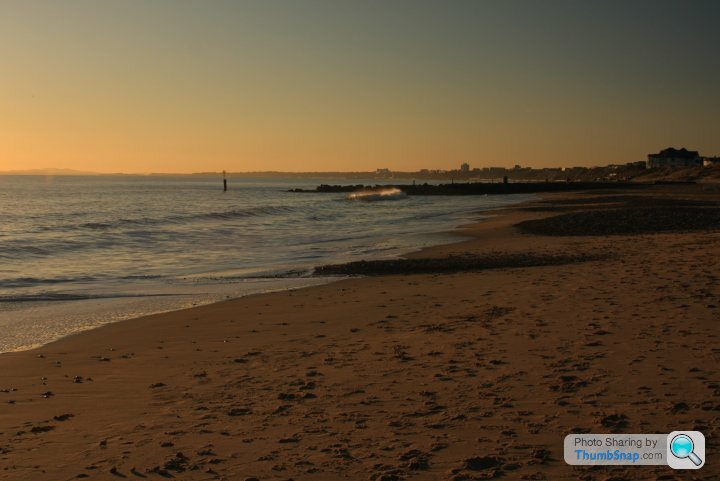
Today I went back to the beach at Southbourne and Hengistbury Head. My intention was to get some shots with that 500mm mirror lens I bought, but the light wasn't great and things that were far away were also a little hazy. That may be why I failed to get any sharp images, or that may be down to the "razor thin depth of field" of this mirror lens. Anyways, that was frustrating me so I swapped back to my 70-300mm lens and stomped off toward Hengistbury Head. Not the best day for photography at the seaside, the sea was simultaneously too calm and too rough, if that makes any sense? And the light was pretty grey with heavy cloud. It became as much about a walk as it was about my camera. I'd taken my car in for new tyres this morning and wandered around Boscombe. Cash Converters had an EF-S 18-55mm lens in a display case for £49.99 (grade B, whatever that means) and at times today I wished I'd bought it to give me a wider angle lens than the 28mm I've currently got. But these walks are good even if the photo opportunities are less so, because I'm familiarising myself with routes, paths and potential shooting spots so that I can find them reliably when conditions are more favourable.
Part of getting back into photography was also to do with getting myself out of the house. I've suffered with poor mental health for over a decade now, depression and anxiety among other things. I spend far too much time indoors "tippy-tapping way on that bloody laptop" as my wife describes it. The thing about taking pictures of the outdoors is that you pretty much have to go out into the outdoors to do it. This has forced my hand into turning the computer off and getting out of the door. So if it seems that I've become slightly obsessed with the camera and taking pictures again, it's because I have. A symptom of obsessive behaviour I'm afraid.
Hmmm? It's been a while then...
Mixed luck with the camera over the time I've been away from this thread. I don't want to flood the thread with images, especially as it's a late night post. I don't self-edit so good when I'm tired.
Suffice to say I've taken quite a few shots, I'd all but given up trying to shoot wildlife with the lenses I had, and I'd bought at least four more books on photography, a couple by Tom Ang. Sadly I've not read any of them yet.
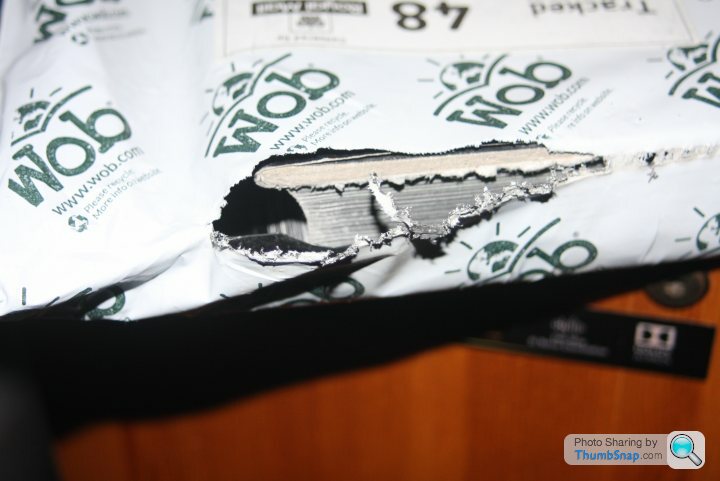
Sad news on some of my kit, though. The camera (with 18-55mm lens fitted) and a separate Canon 70-300mm zoom lens were in my rucksack when I got knocked off my bike by a car driver. The camera and the 18-55mm both seem to have survived their ordeal, but the longer zoom lens took a hit. Optically it's fine, and I can focus it manually, but the focus drive motor can no longer overcome the friction of the barrel. Presumably there are bearings in the barrel and these have been knocked out of alignment somehow. I'm in the process of making a claim against the driver so hope to get compensated for that, but...
It would appear that today my luck changed somewhat. A new local second hand/pawn shop type affair has opened. I stuck my head in the door, and by chance happened upon a Tamron SP 70-300mm f/4-5.6 Di VC USD lens in a cabinet. I had my camera and the 18-55mm in my rucksack (I was walking, plus I figured lightning might not strike twice) so I hooked it up to this used lens and felt it was worth a tickle at £49.99. Then I went home and researched it after the fact. Expecting to fail massively (like the 500mm mirror lens debacle) and find I'd bought worthless junk I was pleasantly surprised to find a very favourable Techradar review of it when it was new (released in 2010/2011). I also checked MPB for a price comparison and found ten available for between £204 and £169. Haven't had much opportunity to shoot with it yet, but so far so good. Possibly a big bargain, and I suspect it may have been confused for a similar (older) Tamron lens without image stabilisation (VC - vibration control, in Tamron parlance).
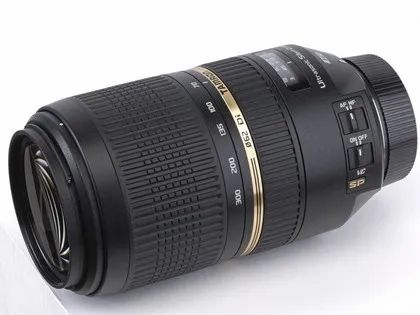
https://www.techradar.com/reviews/cameras-and-camc...
ETA: Random image from my kitchen when I first got home...
...the settings definitely weren't right, as it was a quick comparison shot just to see what difference the VC image stabilisation made. I can't help but feel pleased with my purchase now because the image looks sharper than the results I was getting from the Canon lens. I'm hoping for decent weather tomorrow so I can have a proper play with it now I know more about the buttons/switches than before. Indoors, at the shady rear of the house, with natural light. I'm expecting an improvement with proper settings and more light, but this'll do for now...
Mixed luck with the camera over the time I've been away from this thread. I don't want to flood the thread with images, especially as it's a late night post. I don't self-edit so good when I'm tired.
Suffice to say I've taken quite a few shots, I'd all but given up trying to shoot wildlife with the lenses I had, and I'd bought at least four more books on photography, a couple by Tom Ang. Sadly I've not read any of them yet.
Sad news on some of my kit, though. The camera (with 18-55mm lens fitted) and a separate Canon 70-300mm zoom lens were in my rucksack when I got knocked off my bike by a car driver. The camera and the 18-55mm both seem to have survived their ordeal, but the longer zoom lens took a hit. Optically it's fine, and I can focus it manually, but the focus drive motor can no longer overcome the friction of the barrel. Presumably there are bearings in the barrel and these have been knocked out of alignment somehow. I'm in the process of making a claim against the driver so hope to get compensated for that, but...
It would appear that today my luck changed somewhat. A new local second hand/pawn shop type affair has opened. I stuck my head in the door, and by chance happened upon a Tamron SP 70-300mm f/4-5.6 Di VC USD lens in a cabinet. I had my camera and the 18-55mm in my rucksack (I was walking, plus I figured lightning might not strike twice) so I hooked it up to this used lens and felt it was worth a tickle at £49.99. Then I went home and researched it after the fact. Expecting to fail massively (like the 500mm mirror lens debacle) and find I'd bought worthless junk I was pleasantly surprised to find a very favourable Techradar review of it when it was new (released in 2010/2011). I also checked MPB for a price comparison and found ten available for between £204 and £169. Haven't had much opportunity to shoot with it yet, but so far so good. Possibly a big bargain, and I suspect it may have been confused for a similar (older) Tamron lens without image stabilisation (VC - vibration control, in Tamron parlance).
https://www.techradar.com/reviews/cameras-and-camc...
ETA: Random image from my kitchen when I first got home...
...the settings definitely weren't right, as it was a quick comparison shot just to see what difference the VC image stabilisation made. I can't help but feel pleased with my purchase now because the image looks sharper than the results I was getting from the Canon lens. I'm hoping for decent weather tomorrow so I can have a proper play with it now I know more about the buttons/switches than before. Indoors, at the shady rear of the house, with natural light. I'm expecting an improvement with proper settings and more light, but this'll do for now...
Edited by yellowjack on Wednesday 30th August 00:46
Gassing Station | Photography & Video | Top of Page | What's New | My Stuff