Terry's tale. (S3 resto ++)
Discussion


It's just an oven door catch. The 2 white rollers are spring loaded, they grab the pin as it engages with the rollers.
I'm replacing the key lock catch on the glovebox with it. The pin will be on the door, central on a 'L' bracket pointing up. The roller assembly will be behind the dash above the door where the lock tab used to engage.
So to open the door,it will be just a sharp pull down, and a slam to close.
I know, nothing of value to be left in the glovebox... Ever !
T.
Edited by Blue 30 on Tuesday 25th August 15:36
88S1 said:
Very nice indeed. You must be virtually complete now, have you much to do. How did the hood turn out eventually, what I’d seen so far looked good, I have mine to do (eventually).
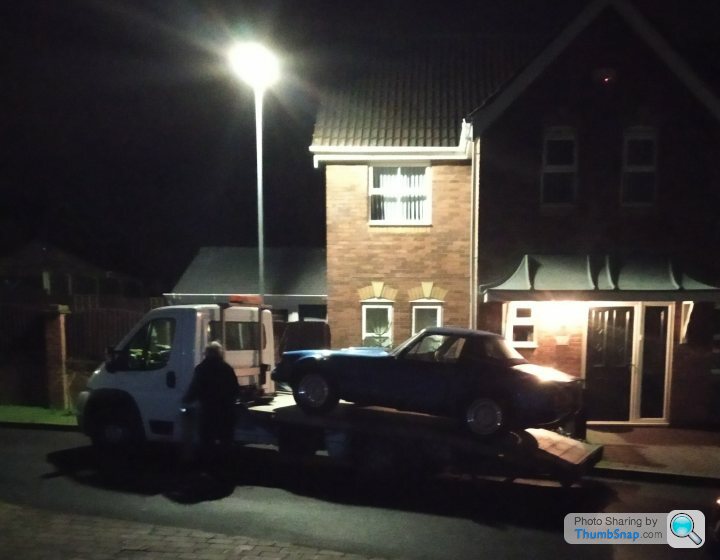
So... It had to come out of the garage today to be turned around. And it did it all under its own power. The pas is working & made the manoeuvring much easier.... Found a union leak though 
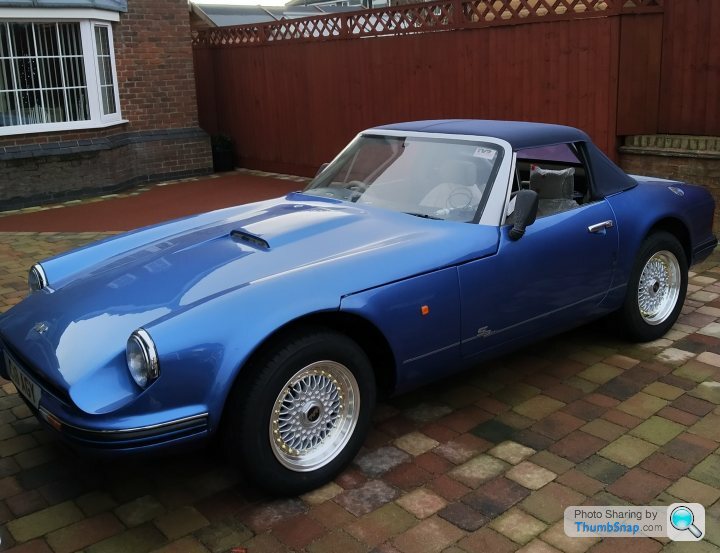
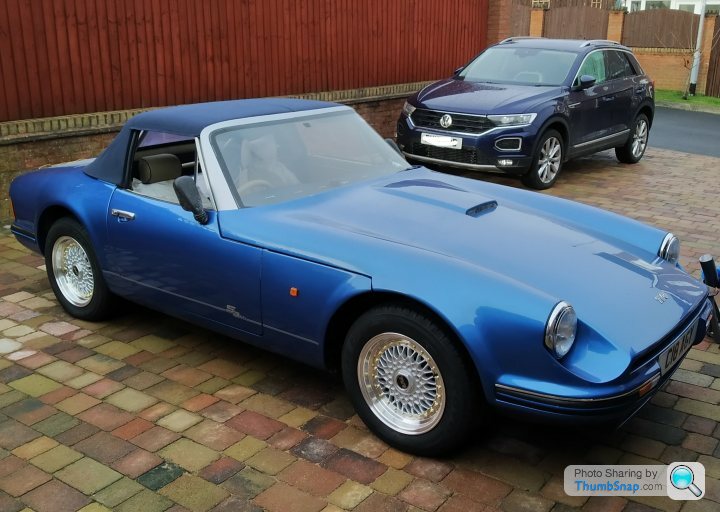
Here are some pictures of the finished hood and targas. I haven't done the targa to door glass seals yet.
T.
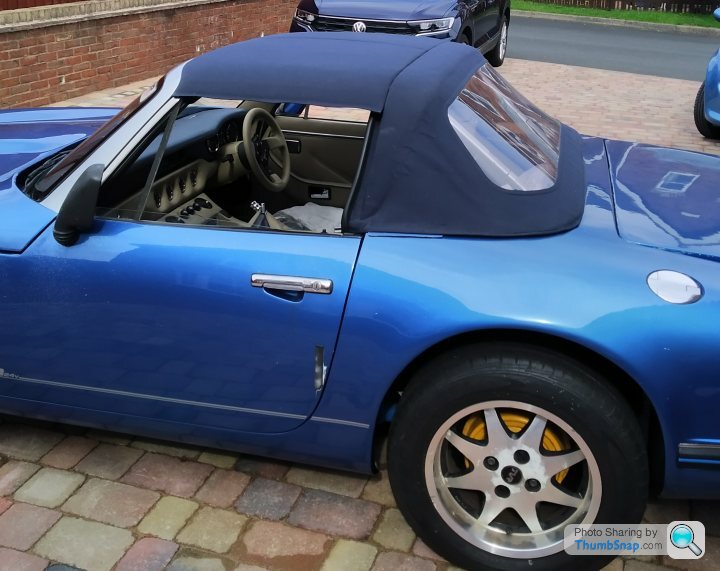

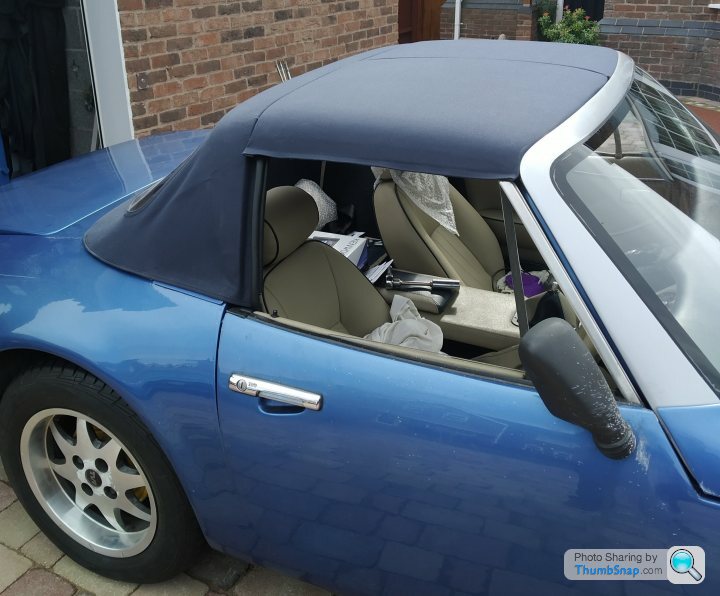

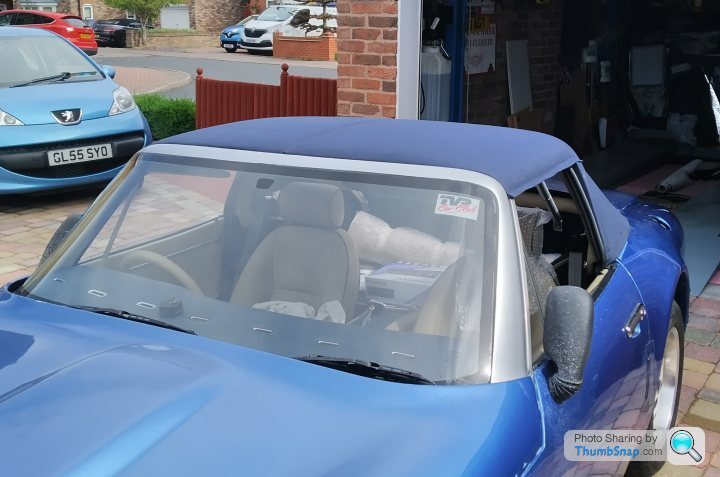
Oh, yes the car IS pretty grubby, as I have started to mop the paintwork. It flicks everywhere, including on me !
T.
PAS mod...
I will do soon.
But in the meantime have a read of this to familiarise yourself with relevant bits & pieces.
https://www.pistonheads.com/gassing/topic.asp?h=0&...
But don't go buying anything or doing any detailed mods !!
TB.
I will do soon.
But in the meantime have a read of this to familiarise yourself with relevant bits & pieces.
https://www.pistonheads.com/gassing/topic.asp?h=0&...
But don't go buying anything or doing any detailed mods !!
TB.
Edited by Blue 30 on Thursday 24th September 10:52
PAS mod...
So now you have had chance to read & digest the Chim pas mod article as per the link above.
Here is my version of the same, but on my 1990 2.9 S3.
But don't forget, this is how I did it, and I am NOT instructing how you should go about it.
That's up to you... Not me !
The rack is from a 90's classic Subaru Impreza, I think that is referred to as the GC8 model.
My used rack looked pretty sad, ripped bellows and very floppy control arms. But once they were stripped off, the rack appeared okay.
By luck the replacement arms (ICP brand) had slightly longer thread sections, and the shaft wasn't waisted, so extra thread could be cut on, if required (mine didn't). I researched and found that 90's Toyota Corolla track rod ends were the correct thread, the correct taper, and the correct length for tracking adjustments.
The rack lock to lock travel is a little less than the tvr rack, but nothing that concerns me. Oh, the Impreza rack, is the standard one, not the quick rack.
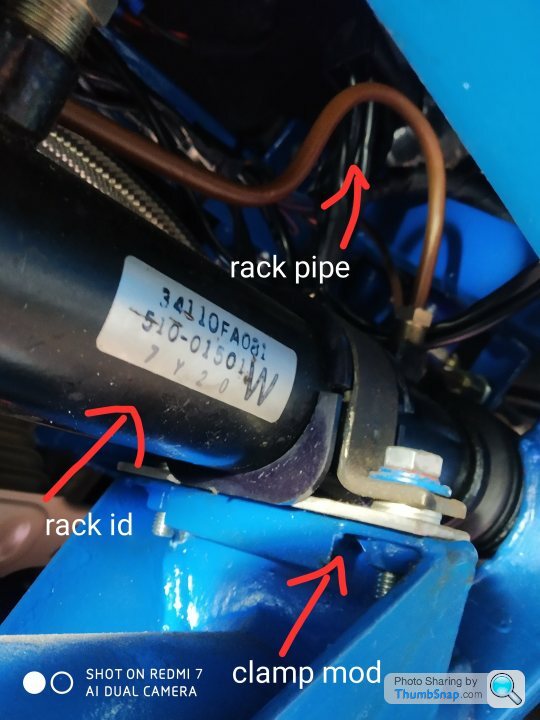
Mounting the rack is very similar to what is noted on the Chim rack fitting. New or modified mounting clamps, a chassis plate cutaway for pinion valve block & pipe clearance. And the rack pinion valve block does need to be rotated 180o.
So that's the rack bolted down and connected to the wheel stub axle uprights.
There are 2 pipes from valve block to the rack tube, mine were missing, so I made new ones. I'm not sure if the Subaru originals would have to be re bent or replaced to suit the S.
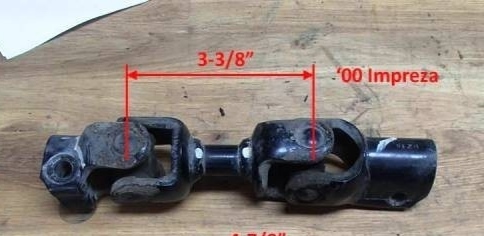
I obtained an impreza steering column lower u/j to u/j unit. Only one u/j end is required to link up to the rack input pinion. Cut the other u/j off & discard then 'graft' the u/j with the stub onto the tvr column shaft.
How you do that is your choice.... It's your life that will depend on it !!!!
So no messing about with pinion spline cutting & grinding to get ANother u/j to fit (such as described on the Chim article)
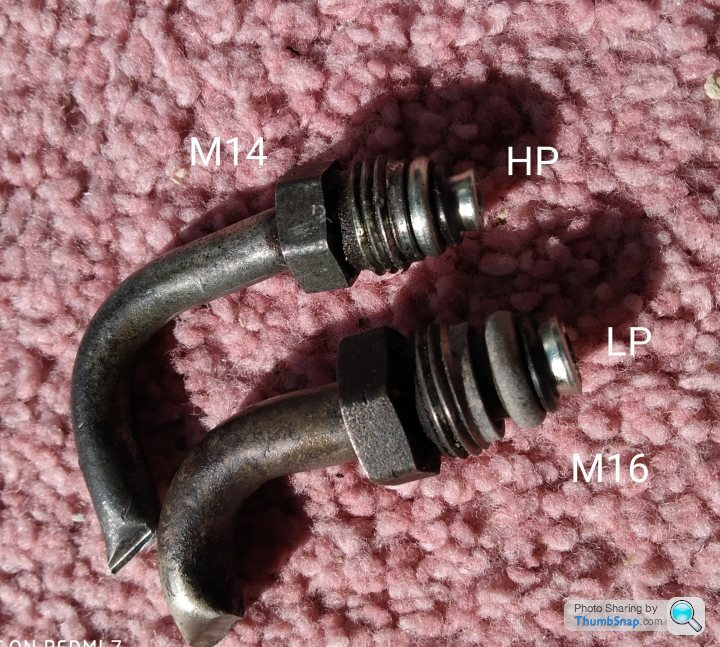
The oil pressure feed & return pipes screw into the rack valve block. The M14 is the high pressure flow. The M16 is the return. The unions are specific type of unions. I used a specific Pas union to AN-6 adaptor on the high pressure input. Some of the guys on the Chim article had problems getting that to seal properly, mine is okay so far. An alternative (better ?) union adaptor is a Bump Tube Adaptor as sold by JLS Motorsport in Birmingham. You might get the Impreza original pipes with your rack, which might be able to be modified and reused. Pump arrangements are to suit your engine size/layout. Or you could opt for an electric/hydraulic pump such as used on some VX Astras, Citroen, or the BMW mini type. Your choice.
And I think that's the essentials covered...
I'm sure you will say, if I've missed anything out....
Photos to follow, as it's getting late.
T.
So now you have had chance to read & digest the Chim pas mod article as per the link above.
Here is my version of the same, but on my 1990 2.9 S3.
But don't forget, this is how I did it, and I am NOT instructing how you should go about it.
That's up to you... Not me !
The rack is from a 90's classic Subaru Impreza, I think that is referred to as the GC8 model.
My used rack looked pretty sad, ripped bellows and very floppy control arms. But once they were stripped off, the rack appeared okay.
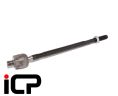
By luck the replacement arms (ICP brand) had slightly longer thread sections, and the shaft wasn't waisted, so extra thread could be cut on, if required (mine didn't). I researched and found that 90's Toyota Corolla track rod ends were the correct thread, the correct taper, and the correct length for tracking adjustments.
The rack lock to lock travel is a little less than the tvr rack, but nothing that concerns me. Oh, the Impreza rack, is the standard one, not the quick rack.
Mounting the rack is very similar to what is noted on the Chim rack fitting. New or modified mounting clamps, a chassis plate cutaway for pinion valve block & pipe clearance. And the rack pinion valve block does need to be rotated 180o.
So that's the rack bolted down and connected to the wheel stub axle uprights.
There are 2 pipes from valve block to the rack tube, mine were missing, so I made new ones. I'm not sure if the Subaru originals would have to be re bent or replaced to suit the S.
I obtained an impreza steering column lower u/j to u/j unit. Only one u/j end is required to link up to the rack input pinion. Cut the other u/j off & discard then 'graft' the u/j with the stub onto the tvr column shaft.
How you do that is your choice.... It's your life that will depend on it !!!!
So no messing about with pinion spline cutting & grinding to get ANother u/j to fit (such as described on the Chim article)
The oil pressure feed & return pipes screw into the rack valve block. The M14 is the high pressure flow. The M16 is the return. The unions are specific type of unions. I used a specific Pas union to AN-6 adaptor on the high pressure input. Some of the guys on the Chim article had problems getting that to seal properly, mine is okay so far. An alternative (better ?) union adaptor is a Bump Tube Adaptor as sold by JLS Motorsport in Birmingham. You might get the Impreza original pipes with your rack, which might be able to be modified and reused. Pump arrangements are to suit your engine size/layout. Or you could opt for an electric/hydraulic pump such as used on some VX Astras, Citroen, or the BMW mini type. Your choice.
And I think that's the essentials covered...
I'm sure you will say, if I've missed anything out....
Photos to follow, as it's getting late.
T.
Edited by Blue 30 on Thursday 24th September 10:53
Edited by Blue 30 on Thursday 24th September 11:00
Edited by Blue 30 on Thursday 24th September 19:42
Impreza column U/J to U/J
Original Impreza flow & return pipe unions.
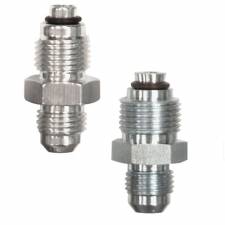
Replacement Pas to AN-6 unions.
Replacement Impreza control arm.
Edited by Blue 30 on Thursday 24th September 19:48
Bump Tube adaptors.
Edited by Blue 30 on Thursday 24th September 20:05
Edited by Blue 30 on Thursday 24th September 20:05

PAS mod...
I had better point out that as of today's date & time, I have only turned the steering wheel under the cars own power, from lock to lock, to turn the car around 180o, to be driven back into my garage.
So all I can report is, that it works and feels like what a Pas steering setup should feel like.
And now the car is back on the lift, I find a blxxdy oil leak on the diff !!!!
It appears to be coming from the driver's side output, plus there is some lift evident at the output shaft flange.
I bought the diff from a Sierra used parts supplier some 3yrs ago. It is supposed to be a rebuilt 3.14 LSD diff !
I can't be bothered with going through any possible hassle with that supplier (my lack of faith). So today I make a call to Bara Motorsports to see if they can deal with it.
Anyway, it's on the garage floor, ready to go.(and I thought I was getting towards conclusion).
Back soon...
T.
My dodgy diff gets fixed....
In just 7 days turn around Bara Motorsports fixed my diff. In short it needed another rebuild, this time using new bearings, seals, shims, etc. Plus a rebuild & recalibration of the viscous LSD.
I did feel that it was right & proper that I got in touch with the original supplier. In short an amicable settlement was agreed & concluded. There did appear to be a specific reason why the diff was supplied to me substandard, but the details are rather sad (and personal) to that supplier. So I'll leave it at that.
Yesterday and today I flexed my old muscles and lifted it back into place... A couple of safety rope tethers in place just in case.
Anyway it's in, just the prop, the drive shafts, the exhaust to refit, then I'm back on track.
One point to note...
The diff sits in a cradle, fixed to it at x4 points.
The driver's side front bolt (19mm head) sits in a recess, which is obscured by the chassis rail.
A great TVR design feature.
I have changed that bolt to a cap head bolt, where a 10mm Allen key gives much better access..... For next time... Ha !!
TB.

Steering/suspension geometry, and ride height.
It's about time I got the above sorted. Well, at least as close as I could at home.
First job was to accurately level my 4-post lift, then make sure the tyre pressures were all good. What to do first..... Ride height.
But there is just too much info on the wiki, so I chose hopefully a happy medium. That being 160mm at the front, measured ground to the square chassis tube directly adj to the round steering rack tube. And, 170mm at the back, again ground to square chassis tube adj to the round trailing arm mounting tubes.
This appears to give visually pleasing gaps tyres to body.....
Next to do was the camber, both back and front. The back wheels were both 0.5o neg camber +/- 0.25o between them, so not worth messing with.
I had already rough set the fronts earlier just using a builders spirit level, nudging the bubble off centre to give a bit of neg camber.
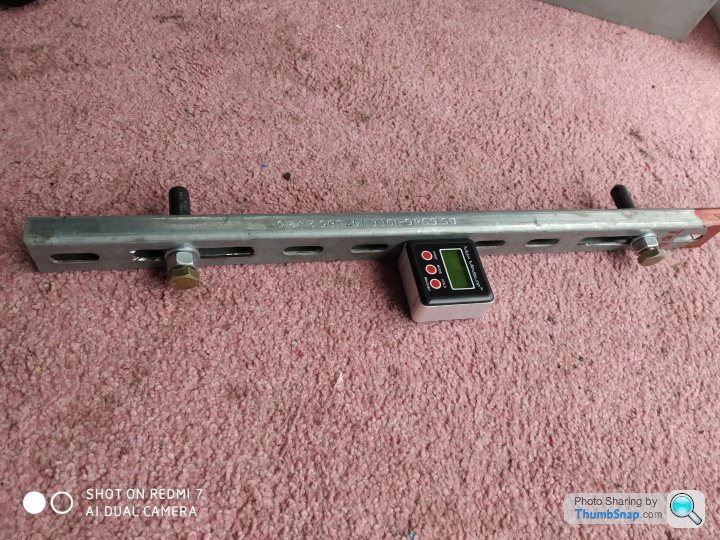
This time I made my own camber gauge, using some unistrut, and a digital level box. Knowing true vertical means the level box will show accurate figures. Well, my eye must have been 'in' previously, as they were both 1o neg camber +/- 0.25o. So again not worth messing with. That's until I have driven it of course.
The toe adjustment is just set at a rough parallel at the moment. I'll accurately set that to 0.5o toe in, later with a tracking gauge I have.
As I say, it all looks okay, but it'll be a while before it gets road tested to settle things down.
I'll review it at that point.
Next big task is to get the ECU software set on a rolling road. But after discussion with Emerald, my nearest respected RR tuner is 'Kits & Classics' at Chesterfield. But Jools can't fit it in until at least the new year, which at least gives me time to find a transport guy.
So it looks like I'll be just tinkering with odd cosmetic jobs until then.
Home made camber bar and level box.
It's about time I got the above sorted. Well, at least as close as I could at home.
First job was to accurately level my 4-post lift, then make sure the tyre pressures were all good. What to do first..... Ride height.
But there is just too much info on the wiki, so I chose hopefully a happy medium. That being 160mm at the front, measured ground to the square chassis tube directly adj to the round steering rack tube. And, 170mm at the back, again ground to square chassis tube adj to the round trailing arm mounting tubes.
This appears to give visually pleasing gaps tyres to body.....
Next to do was the camber, both back and front. The back wheels were both 0.5o neg camber +/- 0.25o between them, so not worth messing with.
I had already rough set the fronts earlier just using a builders spirit level, nudging the bubble off centre to give a bit of neg camber.
This time I made my own camber gauge, using some unistrut, and a digital level box. Knowing true vertical means the level box will show accurate figures. Well, my eye must have been 'in' previously, as they were both 1o neg camber +/- 0.25o. So again not worth messing with. That's until I have driven it of course.
The toe adjustment is just set at a rough parallel at the moment. I'll accurately set that to 0.5o toe in, later with a tracking gauge I have.
As I say, it all looks okay, but it'll be a while before it gets road tested to settle things down.
I'll review it at that point.
Next big task is to get the ECU software set on a rolling road. But after discussion with Emerald, my nearest respected RR tuner is 'Kits & Classics' at Chesterfield. But Jools can't fit it in until at least the new year, which at least gives me time to find a transport guy.
So it looks like I'll be just tinkering with odd cosmetic jobs until then.
Home made camber bar and level box.
Edited by Blue 30 on Tuesday 20th October 15:58
Edited by Blue 30 on Tuesday 20th October 15:59
Edited by Blue 30 on Tuesday 20th October 17:00
magpies said:
pretty good start up set up . I'd go slightly more camber (1.5deg), but that is a personal choice/feel. Are you using 15" wheels?
Are you on one or two Lambdas?
Jools is good, will the base map not get you up and drive to Chesterfield?
If you let me know when, I'll pop down.
I will cut the bonnet for you this weekend
Hi M.. I'd go slightly more camber (1.5deg), but that is a personal choice/feel. Are you using 15" wheels?Are you on one or two Lambdas?
Jools is good, will the base map not get you up and drive to Chesterfield?
If you let me know when, I'll pop down.
I will cut the bonnet for you this weekend
Yes, the geometry setup is just as a starting point, and to prevent any damage to tyres etc.
All standard 15" wheels & new Proxi tyres.
No lambdas, fixed maps.
Flatbed transportation to/from Jools (in the new year).
Hope to see you there.
Thanks for the bonnet section.
T.
No much to report on the run up to Christmas, although I am now booked in for my rolling road Emerald ECU mapping session with Jools at Kits & Classics, that's during the 2nd week in Jan.
Once home (subject to all things RR related being okay), I will spend the rest of the winter & spring turning it into a fully usable car.
Here's a photo of it out on the drive today, first time for a while, and nearly looking like a car too....
TB.
Once home (subject to all things RR related being okay), I will spend the rest of the winter & spring turning it into a fully usable car.
Here's a photo of it out on the drive today, first time for a while, and nearly looking like a car too....
TB.
Now I've stopped crying...
Well, the Dyno rolling road session didn't quite go to plan.
Off the car went transported at 06:00 Monday morning a couple of weeks ago.
After the operator got to know the car, settled it down on the rollers, got it up to temp, all gauge readings okay, gear selections okay. It was time to flex the Jag AJ engine, little by little. A couple of hours in, the lights went out !!!
By that I mean the car just died.
Hands up time... My fault, too little of a fuse rating in my new inline ignition main supply from the boot (battery).... Fix that & have lunch.
Now it gets serious, introducing power runs.
But....
A slight power loss coincided with a rattle/knock noise from within the engine !!!
The operator deemed the session to be prematurely over.
So the next day it was transported back home, where it is currently back in my garage on the lift, waiting on me to finish my plumbing work in our cloakroom refurb, when I will investigate further.
At least it has had more than we are getting at the moment....... A night out
T.
Yes, I have now removed the sump to inspect.
The first thing I must highlight is how good the Dyno guy (Jools) was at spotting the problem, and shutting the session down. It has kept the damage to a minimum....
In brief...
Sump oil has slight metallic paint look about it.
But not ferrous, as it's not attracted to my strong magnet.
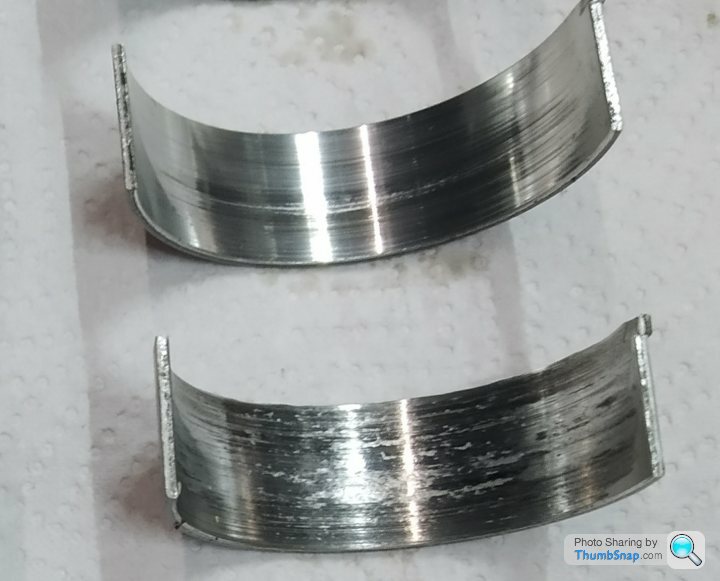
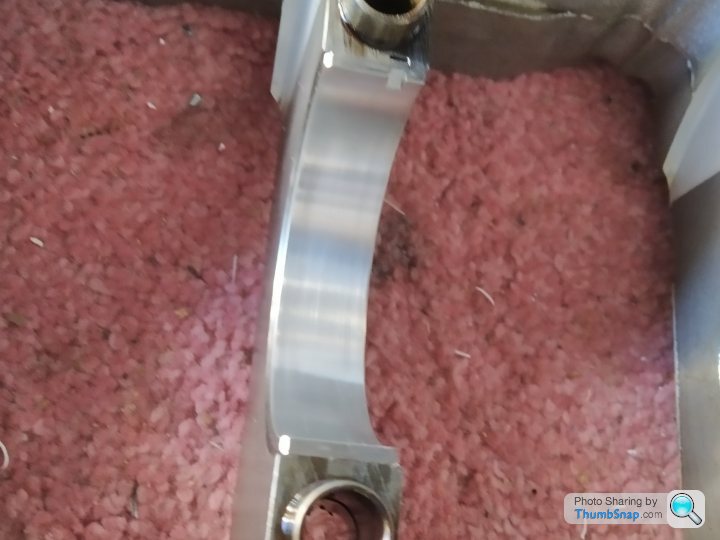
Big end bearings have got hot, see photo.
No damage to big end crank journals... Phew.
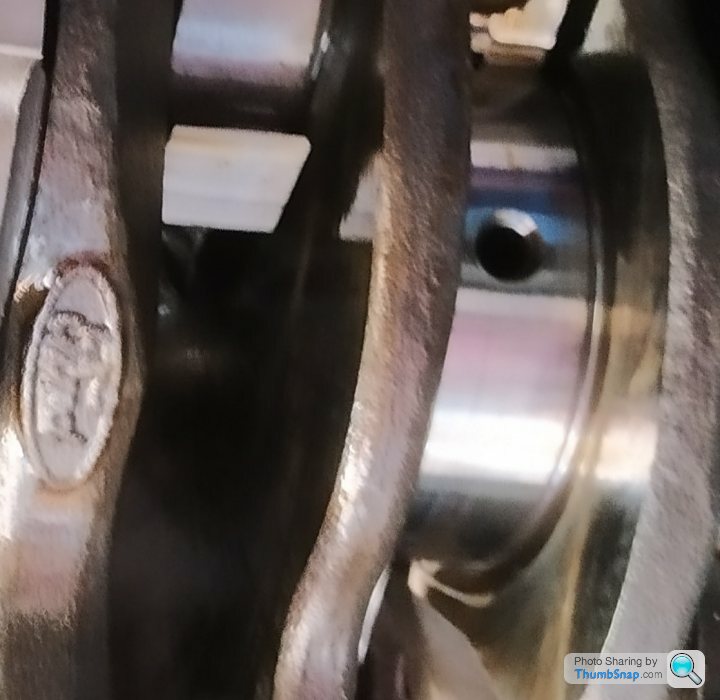
Main bearings & crank journals, no damage. See photos.
So I'm replacing all bearings. Plus new big end stretch bolts.
Plus a thorough wash out, and several quick oil changes. Filter included of course.
Oh, cylinder compressions were all text book perfect.
So I'm going to say I was lucky.
And as to why it happened....
Well, t'wos me that caused it !!!
As, I clinically rechecked the oil pump pickup location in respect to the gap to the bottom of my modified sump..... Oops, 2-5mm at best, so it was struggling for oil flow at higher revs.
I shall be dealing with that too, of course.
A few points to note...
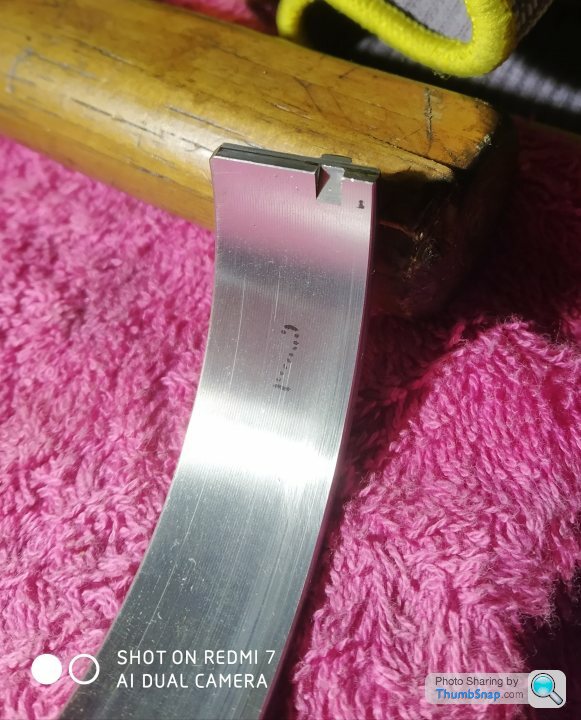
See the photo of the Crank, it's stamped Ford, confirming the Jag/Ford Duratec V6 engine connection.
Obtaining the big end Conrod stretch bolts was a nightmare. Now purchased and awaiting delivery from the USA (thanks to Mick M).
Apparently the Ford Duratec V6 was a Ford of USA design, not Ford of Europe. Hence why parts are scarce or expensive in the UK. In the USA, the Duratec Ford Vee engines are both V6 & V8, to over 5ltrs, and more widely used in Ford & Lincoln models.
T.
The first thing I must highlight is how good the Dyno guy (Jools) was at spotting the problem, and shutting the session down. It has kept the damage to a minimum....
In brief...
Sump oil has slight metallic paint look about it.
But not ferrous, as it's not attracted to my strong magnet.
Big end bearings have got hot, see photo.
No damage to big end crank journals... Phew.
Main bearings & crank journals, no damage. See photos.
So I'm replacing all bearings. Plus new big end stretch bolts.
Plus a thorough wash out, and several quick oil changes. Filter included of course.
Oh, cylinder compressions were all text book perfect.
So I'm going to say I was lucky.
And as to why it happened....
Well, t'wos me that caused it !!!
As, I clinically rechecked the oil pump pickup location in respect to the gap to the bottom of my modified sump..... Oops, 2-5mm at best, so it was struggling for oil flow at higher revs.
I shall be dealing with that too, of course.
A few points to note...
See the photo of the Crank, it's stamped Ford, confirming the Jag/Ford Duratec V6 engine connection.
Obtaining the big end Conrod stretch bolts was a nightmare. Now purchased and awaiting delivery from the USA (thanks to Mick M).
Apparently the Ford Duratec V6 was a Ford of USA design, not Ford of Europe. Hence why parts are scarce or expensive in the UK. In the USA, the Duratec Ford Vee engines are both V6 & V8, to over 5ltrs, and more widely used in Ford & Lincoln models.
T.
Edited by Blue 30 on Thursday 4th February 10:27
Edited by Blue 30 on Thursday 4th February 10:27
Magpies has said it all in the technical sense.
Of course what is being quoted above about the Ford connection to Jaguar is true, they owned Jaguar at that time !
The motoring press at that time even referred to the fwd Jag X-type, as a jaguar mondeo. However the rwd Jag S-type was based on the US Lincoln LS. Hence why some of the parts can be scarce or expensive.
Yes, Mazda did use the Duratec V6.
But neither Ford or Mazda installed the Jag 240bhp output unit.
Edited by Blue 30 on Thursday 4th February 19:36
No, I didn't have to modify the sump, I chose to as I perceived one side was at risk in terms of road clearance.
I used the fwd X-type sump, which is slightly deeper on one side. Done I guess, as the engine in the X-type is slightly canted over. Not so in my install, so I sliced one side off by about 20mm. The engine could have gone a bit higher in the chassis, but at my height it gave the best path through for the custom rear facing exhaust manifold outlets.
I used the fwd X-type sump, which is slightly deeper on one side. Done I guess, as the engine in the X-type is slightly canted over. Not so in my install, so I sliced one side off by about 20mm. The engine could have gone a bit higher in the chassis, but at my height it gave the best path through for the custom rear facing exhaust manifold outlets.
Further to the good news that my main bearings and all crank journals are undamaged. See the attached photos. You can see etched into the shell a number 2. This is the size ID. Which as it is still visible it confirms the low mileage of the engine I purchased (15k miles). Otherwise it would have been worn off !
I have now replaced the main bearings, refitted the lower block, and waiting on new Conrod bolts for doing the big ends.
Lots of internal cleaned already done, but I'll do it again, then close it all off... And try again.
After modifying the oil pick-up pipe of course....
T.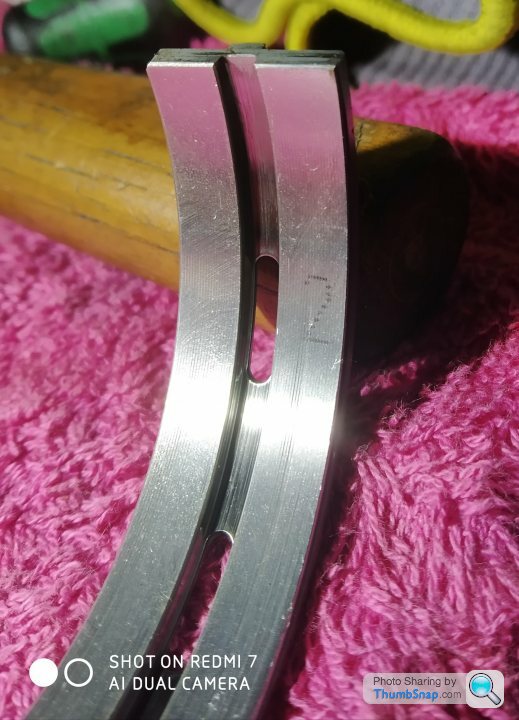
I have now replaced the main bearings, refitted the lower block, and waiting on new Conrod bolts for doing the big ends.
Lots of internal cleaned already done, but I'll do it again, then close it all off... And try again.
After modifying the oil pick-up pipe of course....
T.
Gassing Station | S Series | Top of Page | What's New | My Stuff