Terry's tale. (S3 resto ++)
Discussion


Hi Damian...
Like you I'll use the DMF for now, its a good reference point if nothing else.
Plus mass is good for torque, I don't want it too snappy. Although I agree it is a bit ott, in weight terms even just picking the damn thing up.
For the others benefit, a few Jaguar engine layouts have a growth on their sumps which just adds oil capacity. I can only think its for extended service intervals. Yes, I have changed mine for one without it, which also needs the matching oil pickup pipe. The slight change of the top & bottom (in front of the engine) chassis cross rails were not required for the AJ V6. But when I did those I hadn't finalised my engine choice. At least I have maximum spanner space in front of the engine. And the triangulation maintains the chassis strength.
The rest of the detail as you raised, I believe I have resolved &/or got in hand. But I doubt it ! All good fun.
I'll try to keep some kind of order to the thread of my progress, so some details will appear later on...
But you're always welcome to interject etc.
TerryB
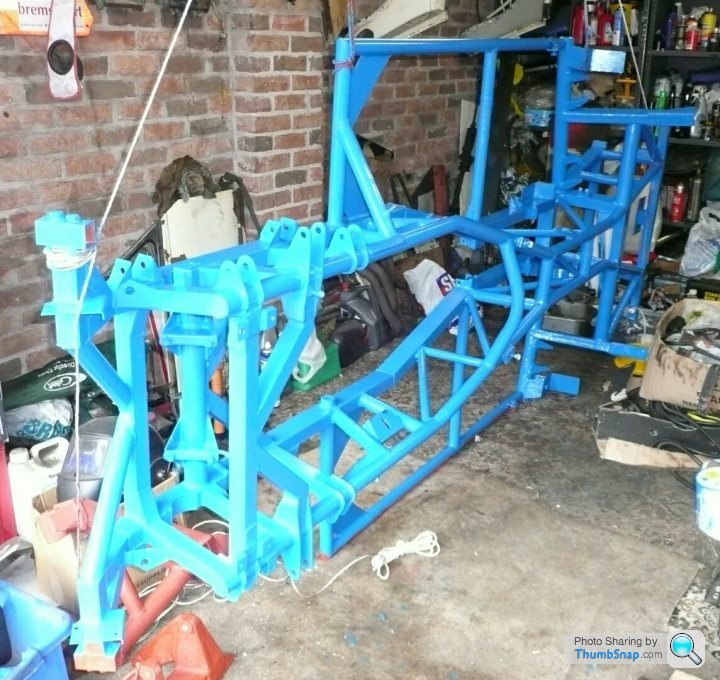
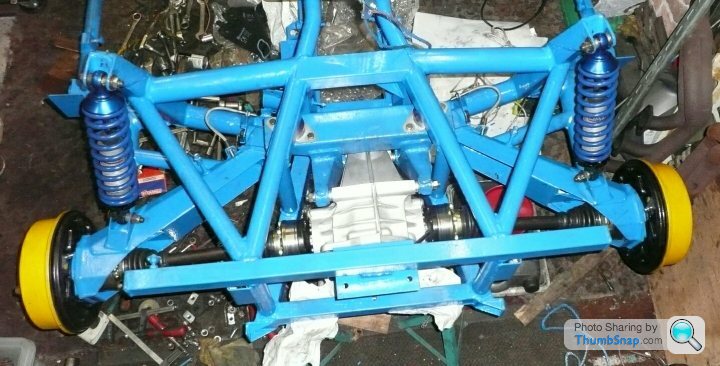
With the major conversion parts (plus other reqd items) safely squirrelled away, I am still continuing with the rebuild of the chassis. I really don't know if the zinc coating is meant to be a final finish, but the guys did say it can be over painted. Good !
Because that's what have done, in a contrasting blue to complement the body colour. Loads of red oxide primer, then top costs of coach/engine enamel, all brushed on.
Because that's what have done, in a contrasting blue to complement the body colour. Loads of red oxide primer, then top costs of coach/engine enamel, all brushed on.
Now that the paint is dry, its time to get it into a rolling chassis state.
Hard brake lines are changed to cupro-nickel. The flexi's are changed to Ssteel braided. All brake line threads are changed to metric. The original rear shocks look tired & as I had bought a pair of good used rear Gaz gold pro, I fitted those but with new pivot bearings & new springs.
The trailing arm bushes are very good so they stay. The diff carrier bushes are changed to poly.
That looks better...
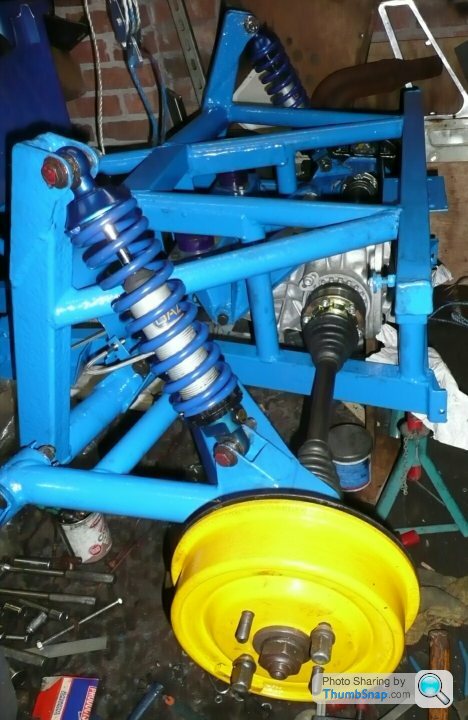
True, it does look a little bit matter of fact, so far.
But I haven't got any piccies of me sitting on my garage floor checking/replacing my spherical bearings
Which is something you gents should be doing on a regular basis.
But seriously, all shock absorbers mounting point bushes or bearings should be checked periodically. As they do take as much impact as the internals of the shock absorbers.
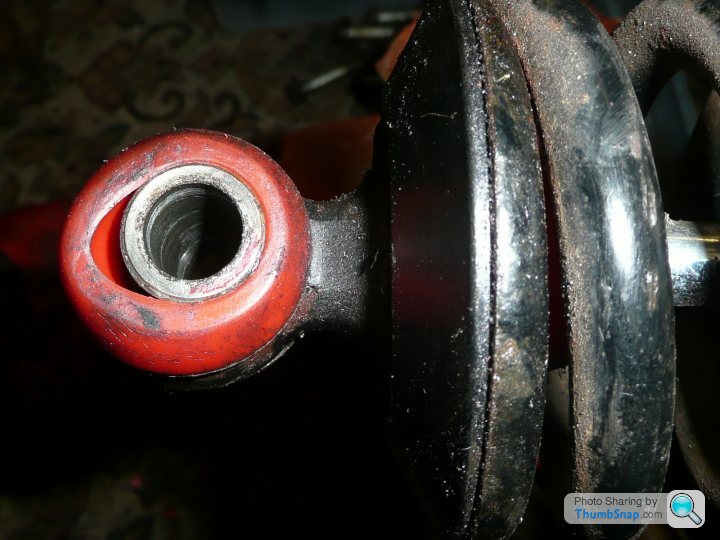
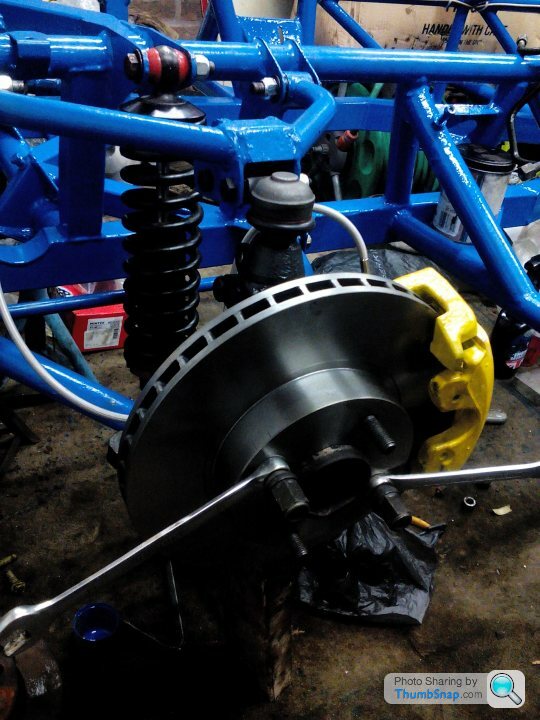
These were the bushes in my front AVO adjustable shocks (see below). Now replaced with new ones. The AVOs were already on the car when I bought it, so I don't know their age, but they appear to work okay, & the adjusters too.
I'll get onto the front end shortly...
(I know... Don't call me shortly)
But I haven't got any piccies of me sitting on my garage floor checking/replacing my spherical bearings
Which is something you gents should be doing on a regular basis.
But seriously, all shock absorbers mounting point bushes or bearings should be checked periodically. As they do take as much impact as the internals of the shock absorbers.
These were the bushes in my front AVO adjustable shocks (see below). Now replaced with new ones. The AVOs were already on the car when I bought it, so I don't know their age, but they appear to work okay, & the adjusters too.
I'll get onto the front end shortly...
(I know... Don't call me shortly)
Good info on those AVO bushes, thanks.
Maybe something I'll have to address once its fully finished. Nylon ones are a maybe.... But too much to do yet!
Ah yes, those yellow bits. You know what its like when you have some paint left over... But on the plus side it saved me from getting bruised shins as I can clearly see them during the after work, night sessions.
You won't see much of them once the body & wheels are back on... I hope !
TerryB.
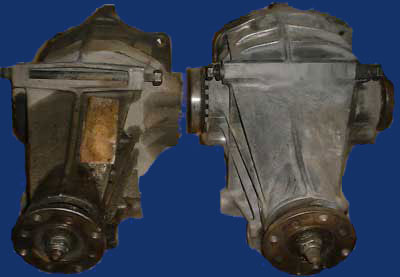
The Diff !!
As I said above, the Jag g-box has a 1:1 ratio in 5th instead of the higher 5th that the T9 box has, so I needed a higher diff ratio. The Jags diff is 3.12, so the Sierra 3.14 is just about as good as you can get.... Well that's not true, as you could fit AN.other diff (jag,BMW etc). But then you get into needing a new diff carrier, plus new bespoke driveshafts.
Again, repeating myself, I want to do the whole project in a simple as possible format...
The rebuilt Sierra diff I obtained was already 3.14, plus it included conversion to Lsd & it has flanged outlets. This is built into a 7" casing, not the S original 7.5" casing.
On both diffs there are 2 pairs of bolt locations for fixing it to the carrier.
The 7" is on the left.
TerryB
The Diff continued...
Oh, the 7" or 7.5" refers to the crown wheel, not the casing.
If one fits the 7" unit to the Tvr carrier 'as is', it fits perfect on the front/lower bolt points, as does one of the rear/upper bolt points. The other has about a 20mm gap.
If you do that, once the diff carrier is fitted to the chassis, the diff is sitting offset !!!
Which means the propshaft input is offset. And it gets worse, if you measure from output flange to wheel flange one side is now longer than the other. No good for reusing the Tvr driveshafts...
That is my finding anyway...
The 'fix' is pretty simple (its what I did).
I cut off 10mm off the near side front/lower bolt point of the diff casting. This means that the offside front/lower point has a 10mm gap between diff casting & the carrier. I jest inserted a spacer.
The upp/rear bolting points are now centralised with a 10mm gap each side. Again, spacers are fitted.
Now when the output flange to flange gaps are measured they're the same. And my driveshafts fit.
In my case I fitted x4 new CV joints to the driveshafts.
What a pig those torx bolts are to remove !
Now replaced with high tensile cap head bolts (with locktite).
So that completes the rear end, for now...
TerryB
The completed rear.
Mmmm...
You're not the first to ask or suggest I do just that.
In fact I have followed previous threads on that very subject. But I have decided to follow my own direction.
Although I cant/won't disagree that rear discs could be an advantage, especially based on a sporting driving style &/or if the car is used on a track etc.
So the following is just my thought on the matter (soapbox warning).
As we know the S has an inertia valve that acts as a 'master' shutdown of the rear brakes. So surely no matter what type of rear brakes are fitted, or how super-duper efficient they are. If the inertia switch is active under aggressive braking, then the rear brake effectiveness is being limited.
So why not just change the setting where the inertia valve comes into play, to gain a better rear brake from the type that's already fitted. That's without going too far and making the brakes too efficient and over biased to the rear. As we all know that would be very very bad...
Maybe I'll have to eat my words once the car is back on the road.
TerryB
I can't disagree with the science behind 'static' & 'dynamic'. But I have to point out that the S bias valve will (if its working properly) only activate under periods of (sufficient) inertia or a pretty steep front end inclination (downwards). So by that fact it cannot have any effect on the static braking effect setup. A screw or lever bias valve however would affect the static setup.
So going back to my original statement that under (dynamic) braking conditions where inertia is present & enough to activate (close) the supply to the rear brakes. There will be either reduced or no rear braking pressure. Which means no friction, so no heat, therefore no rear brake fade. Which for me is enough info to leave the rear 'as is'.
Purely from my personal encounters most brake fade is either due to old brake fluid &/or issues with the braking components.
I think its time (for me) to continue with the thread of the resto & conversion, but thanks for all the input, as its great to read such diverse opinions.
TerryB
Guys...
So far my messages to this thread, are of already completed work (ie. In the past). Reasonably soon I Will be up to present date in work detail terms.
Of course I still have plenty to do. My best guess at my current work rate is about another 12months before completion. I will generally only post messages of work info that is completed, especially where it is of conversion type. As there's no point in seeing anything that didn't work out. But I will probably talk about it !!
So soon my posting rate will slow down somewhat. More so if I'm doing these messages instead of doing actual work.
(Including other work stripping down & preping my Panther for its spring respray, plus taking the heads off to get unleaded seats fitted), and an interior strip/refit.
TerryB
Getting back on track.
No, not of the tarmac type.
I won't be going anywhere near one of those in my S.
I guess mine will be at the understated, subtle, comfortable, reliable end of the scale, rather than the raw racer or muscle car end.
Getting onto the resto of my front end.
No great revelations here either.
Just the usual, that's been done before.
IE. New steering swivel joints.
Poly bushes for the wishbones and shocks.
And a slight brake upgrade using 887/8 calipers & 278mm discs. I've bought Ford based servo & master cylinder just in case, as I haven't fully inspected those as fitted yet.
TerryB
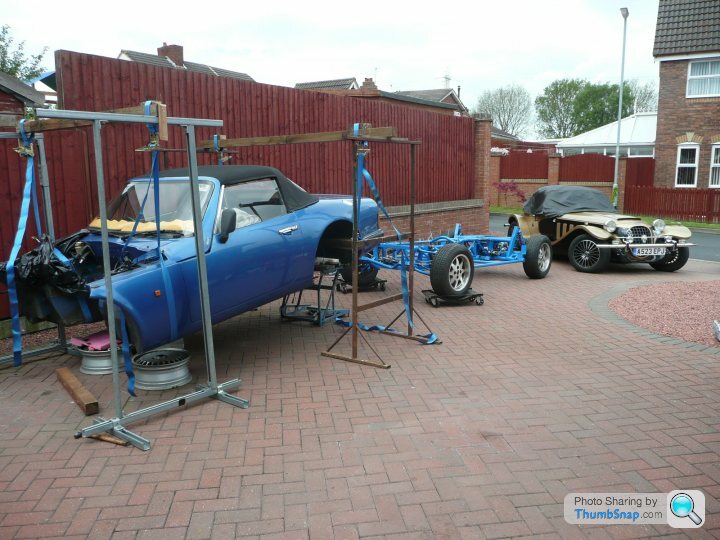
If only I could keep my garage floor 1/2 that clean.
Good looking chassis too.
But I still have some fabricating/welding left to do, such as making bespoke mounting brackets for some of the engine ancillaries. Which means doing that work just in front/along side of the rolling chassis. Never mind !
What I'm trying to do isn't that radical. My mindset is just thinking what/how Tvr might have done things 20yrs on or so with the S. Hopefully it will look close to a factory installation, plus maybe (like Tvr) with a few rough edges !!
That's a good plan to meet up, I just get the feeling at the moment, that it will be very late into next year, if at all.
But here's hoping...
Maybe I will try to create a 'to do' list soon, but doing that before has been too scary. So I'll just plod on for now.
Thanks for the ongoing support.
TerryB
Oh, just in case anyone thinks I have said or implied that there is anything wrong with the Cologne engines (2.8 or 2.9)... I haven't, & there isn't !
Like I said at the beginning of this thread, I just wanted the challenge of doing something different, but also within my own capabilities.
My S3 had 93k on it anyway, but since reading through some of its accompanying paperwork, it appears that both the engine & g-box were major stripped & overhauled at around 75k. So the buyer of my units had a good deal !!
TerryB.
Following on from the front end rebuild.
I added a new fuel pump (suitable for the AJ) & filter, refitted the fuel lines. Bolted the wheels on and waited for a sunny day...
What is it that the Haynes manuals state....
Re installing is the reverse procedure.
So back under the body the chassis goes. But just as it gets fully in place, one side gets stuck... Bugger !
Lift it up about 6" and run my fingers through the outrigger tunnel. OUCH !! Now I remembered that a piece of old chassis had been left behind corroded onto one of the rear mount bolts. Easy fix, just grind it off.
Now the body slides into place perfectly.
I read this statement some time ago in reference to removing/refitting the S body, which sums the procedure up perfectly....
Remove/fit the body, like you remove/fit your foot into a shoe.
Enough said.
TerryB
A couple of reference body/chassis bolts are inserted for now, but it does all appear to line up & sit down okay.
And for those thinking it. I did tie up the handbrake cable, plus cap off both the fuel & brake lines.
Looking into my gloomy garage, now thinking, that'll take a couple of days to make tidy enough to reverse roll the car into. But the car can stay outside for a while so that I can do my first go's at trial fitting the AJ engine (much more to come on that later).
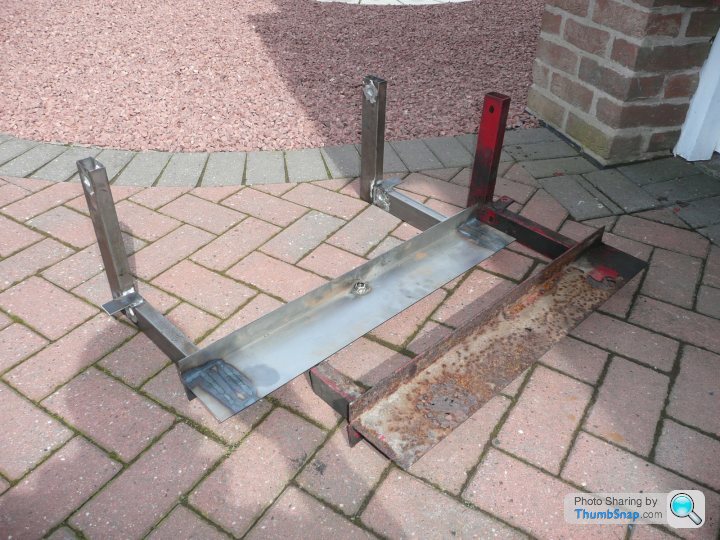
On moving things around in the garage I came across the forgotten fuel tank cradle, it didn't look so bad, but it was !!! So more fabricating to do...
The fuel tank is in the shed, it didn't leak, but it does look tatty, so I will remove/refit the sump & gauge sender, fit new seals. Wash it out, & clean/paint it later. As that saves precious funds for ???
And its around this stage of things, that I can't lie to you. That I thought why didn't I just clean up the 2.9 drive train, get it all refitted, and start driving/enjoying.
Or is it just me that always hits a brick wall into a project like this ?
So I take the covers off the AJ engine to re motivate myself...
TerryB
The old/new tank cradles.
And for those thinking it. I did tie up the handbrake cable, plus cap off both the fuel & brake lines.
Looking into my gloomy garage, now thinking, that'll take a couple of days to make tidy enough to reverse roll the car into. But the car can stay outside for a while so that I can do my first go's at trial fitting the AJ engine (much more to come on that later).
On moving things around in the garage I came across the forgotten fuel tank cradle, it didn't look so bad, but it was !!! So more fabricating to do...
The fuel tank is in the shed, it didn't leak, but it does look tatty, so I will remove/refit the sump & gauge sender, fit new seals. Wash it out, & clean/paint it later. As that saves precious funds for ???
And its around this stage of things, that I can't lie to you. That I thought why didn't I just clean up the 2.9 drive train, get it all refitted, and start driving/enjoying.
Or is it just me that always hits a brick wall into a project like this ?
So I take the covers off the AJ engine to re motivate myself...
TerryB
The old/new tank cradles.
I should of course said that its a date check when I was at that stage of the project...
And (at that time) & now its 2016, I'm only 2 years away from retiring at 60. It might be just about ready to use by then !
The next photo I will post might be of positive interest to some, and to the rejection of others. But please read the following first....
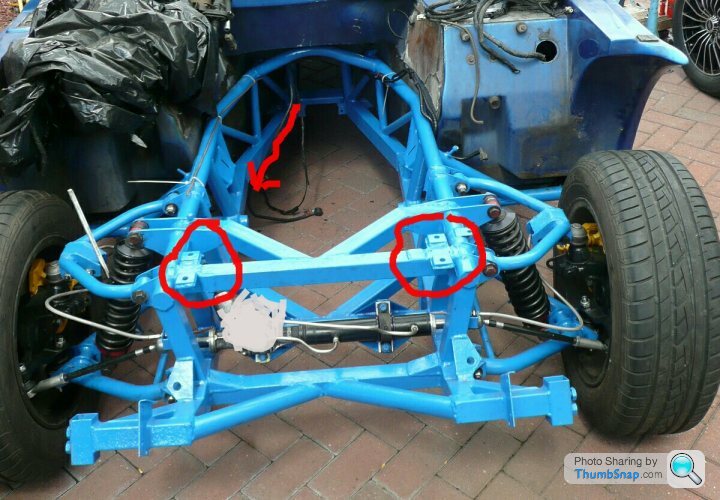
The red arrow indicates where that troublesome chassis cross-member was. Removed as I knew the AJ engine sump needs that space. I can always fit a bolt-on one at a later date.
The red circles show where I am going to mount the anti-roll bar (with drop links). As the same applies, that it couldn't stay in its original position.
You can also see the new triangulation chassis rails.
Now then, are you sitting comfortably ?....
I am fitting power steering !!
Why ?
Because I want to !
And I can always remove it if I don't like it.
I don't know if anyone has done this before on an S, but this is my attempt at it.
I'm not going to go into any details yet, as it might fail at the 11th hour, but I'll give it my best.
The rack is now in place including suitable trackrod ends to give a parallel track with adjustment either way. I've plenty of bits and pieces to make up the column from rack to bulkhead, but I won't be doing any of that until the engine is in situ etc.
It will be an engine driven pas pump, or that's the plan at the moment.
TerryB
And (at that time) & now its 2016, I'm only 2 years away from retiring at 60. It might be just about ready to use by then !
The next photo I will post might be of positive interest to some, and to the rejection of others. But please read the following first....
The red arrow indicates where that troublesome chassis cross-member was. Removed as I knew the AJ engine sump needs that space. I can always fit a bolt-on one at a later date.
The red circles show where I am going to mount the anti-roll bar (with drop links). As the same applies, that it couldn't stay in its original position.
You can also see the new triangulation chassis rails.
Now then, are you sitting comfortably ?....
I am fitting power steering !!
Why ?
Because I want to !
And I can always remove it if I don't like it.
I don't know if anyone has done this before on an S, but this is my attempt at it.
I'm not going to go into any details yet, as it might fail at the 11th hour, but I'll give it my best.
The rack is now in place including suitable trackrod ends to give a parallel track with adjustment either way. I've plenty of bits and pieces to make up the column from rack to bulkhead, but I won't be doing any of that until the engine is in situ etc.
It will be an engine driven pas pump, or that's the plan at the moment.
TerryB
Yes, there's usually more than one engineering solution to the same problem. I hadn't thought of that, great job.
I originally thought about leaving the anti rollbar off completely, as the S doesn't have any great suspension travel, plus other like (road use only) cars with that layout don't always have one. But when I was in the process of removing mine from its original location (including cutting off the chassis plates). I just threw the bar on top of the bare chassis, the ends rested over the wishbones, so that was that. I've since seen similar, I think on a Chim, where it has adjustable ends on the bar.
TerryB.
Gassing Station | S Series | Top of Page | What's New | My Stuff