wiring for electric mirrors - Chimaera / Griffith style
Discussion


As you are seeing cross over of signals (which should not be possible) I would start by spending ten minutes switching the side selector switch back and forth and see if this cleans the contacts inside. Bear in mind that this switch sits in one place for perhaps a year or more without use if you are the only driver.
Same may apply to the joystick.
Steve
Same may apply to the joystick.
Steve
v8s4me said:
Given that removing the door panels is a real PIA job on our cars wouldn't it be good if there was a way of checking the mirror motors without having to do that
I just took both door panels off and it was quite easy really. If someone wants to do this, then I suggest to give it a try.TVRees said:
I just took both door panels off and it was quite easy really.
Perhaps somebody has taken the panels off previously and not refitted all the fasteners. On both of mine, the ridiculously small bolts at the front which are almost impossible to reach were ten times longer than they needed to be and gummed up with resin.v8s4me said:
Penelope Stopit said:
If it were me checking through this circuit I would
1) Remove both door panels to gain access to where the mirrors plug into the door harnesses and disconnect them....
5) Using a suitably fused 12 Volt supply from a car battery I would test all 4 motors and mirror mechanisms by reversing the polarity to each motor and seeing them operate left to right and up and down...
Given that removing the door panels is a real PIA job on our cars wouldn't it be good if there was a way of checking the mirror motors without having to do that? 1) Remove both door panels to gain access to where the mirrors plug into the door harnesses and disconnect them....
5) Using a suitably fused 12 Volt supply from a car battery I would test all 4 motors and mirror mechanisms by reversing the polarity to each motor and seeing them operate left to right and up and down...
I know, how about....
v8s4me said:
... get your AVO out and check each wire going into the back of the switch. Find the live and the earth (if there is one on the switch - can't remember) and then connect the live to each of the other wires in turn to see what happens.
If each mirror can be made to move in all four planes then you know you have four good motors. If not then you may have to take the door panels off. But before you do that, check the direction switch is wired correctly. Is it wired like this?
Of course yours may have completely different colours

Edited by v8s4me on Wednesday 20th September 18:57

v8s4me Thursday 29th December 2011
Sorry if this is stating the obvious. If you look behind the door card you’ll be able to see which colours go to that mirror. You only need to take off one door card because the colours you can’t see will be in the other door.
L/r switch - You need to check the wiring diagram but brown is probably the common live, white is possible common earth. If that’s the case, the others will be the live power feeds. If you haven’t got one, a cheap multi meter will help you find the live wires. I’m guessing now because I don’t want to take my centre console off but these pairs then attach to the joystick? Or do they disappear off to the doors? Have you got any photos of the backs of the switches?
The joystick – black = probably the earths (one for up/down + one for l/r) the other four will be paired to the doors for up/down & in/out. Once you’ve had a look behind the door you’ll know which side is which.
With a bit of messing about you should be able to narrow it down to a choice between up/down & in/out and then it will be easy from there.
And also posted to the same topic before the above post
v8s4me Thursday 29th December 2011
Sorry, no. I looked when I saw your first post but it seems this is one of the few shots I didn't take. I left that switch alone on the basis of "if it ani't broke, don't fix it". It should (laugh) be esay enough to work out what wires go where by looking at the colour coding on the loom in the door and comparing with what is at the switch bearing in mind the terminals for the L/H door and probably on the R/H side if the switch (& top terminal will probably be down on the mirror). Good luck.
Edited by Penelope Stopit on Thursday 21st September 08:57
December 2011?!!!
Blimey, that must have taken some finding. I'd forgotten all about that post so thanks for digging it out. I'll book-mark it now for future reference.
The OP can now see I'm offering suggestions based on the practical experience of having been there and worked through a similar problem myself and knowing what a skin-scraping PIA taking off the door panel can be.
Edited by v8s4me on Thursday 21st September 11:20
FAO The Horse
The following is taken from the same topic as above where v8s4me recommends taking the door panels off
https://www.pistonheads.com/gassing/topic.asp?h=0&...
plasticpig72 Friday 30th December 2011
i hope that i'm making progress with the mirror enigma.I removed the door speakers to get access to the mirror plugs.
For the right door mirror i have Blue + Yellow to Blue for Joystick.
Green to Brown for Left/Right switch
White to Black/white tracer for Left/Right switch
For the left mirror i have Green to White x2 for Left/Right switch
Blue + Yellow to Blue x2 for ?
White to Black/yellow tracer for Left/Right switch.
I unplugged both door mirrors and tested with a spare battery and both operate in 4 directions
laugh I reconnected them and tested at the end of the cables and they both operate in one direction.
Now i know the mirrors operate and there are no cables broken between the mirrors and inside the car.
I still need to know which cable to which spade on the 2 controls.
At least i know the mirror motors functionlaugh
Alan B
If you can gain access to the mirror plugs in the doors by removing the door speakers the testing of the mirrors and wiring will prove to be much easier
Edited by Penelope Stopit on Thursday 21st September 09:12

While you are in the doors you could run some cables to wire up the heater elements in the mirrors if they aren't already wired and working

http://www.12voltplanet.co.uk/12v-universal-heated...
http://www.12voltplanet.co.uk/12v-universal-heated...
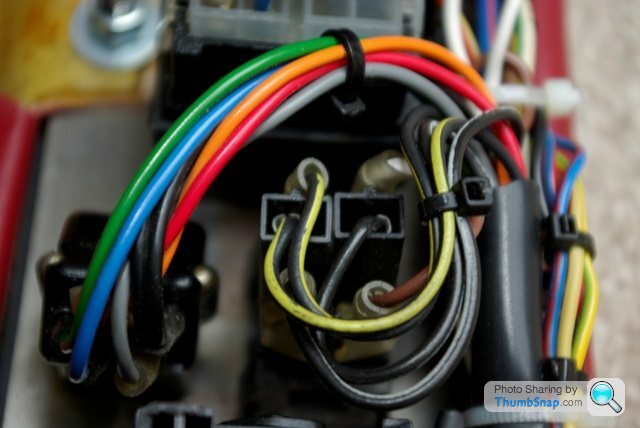
Right, I've had the driver's door speaker out and immediately behind it is the wiring to the mirror (5 cable connector), window regulator motor (2 wire connector) the speakers (green wires at bottom of photo) and a free white wire with a female connector on the end.

Using a continuity meter between the car side of the 5 wire connector and the "mirror selector switch" , I found continuity between the bottom row of three wires on the loom side of the door connector and 4 wires of the "mirror selector" switch, presumably where two of the selector wires alternate between +12v and earth.
To cut a long and frustrating story short, I found that using the mirror side of the door connector, I could move the mirrors in all directions using three of the wires, brown, white and one of the 3 black wires. However, the black wire that was needed to move the mirrors was not in the bottom row of the mirror side of the door connector, another black wire was but this didn't do anything.
So I swapped the black wires over and reconnected the connector and the "selector" switch and after a false start, I swapped over the two seemingly identical black/yellow wires on the "selector" switch and IT ALL WORKS CORRECTLY !!!
Thank you to everyone for their help and advice.
I now need to source a new drivers side mirror as the existing one has lost a lot of the "silver" and looks a mess. Has anyone bought the convex ones from RaceTech ?
http://www.racetechdirect.co.uk/car-parts/body-tri...
Thanks again, I'm sure Ill be back in the very near future with more questions, now going for a and a lie down
Using a continuity meter between the car side of the 5 wire connector and the "mirror selector switch" , I found continuity between the bottom row of three wires on the loom side of the door connector and 4 wires of the "mirror selector" switch, presumably where two of the selector wires alternate between +12v and earth.
To cut a long and frustrating story short, I found that using the mirror side of the door connector, I could move the mirrors in all directions using three of the wires, brown, white and one of the 3 black wires. However, the black wire that was needed to move the mirrors was not in the bottom row of the mirror side of the door connector, another black wire was but this didn't do anything.
So I swapped the black wires over and reconnected the connector and the "selector" switch and after a false start, I swapped over the two seemingly identical black/yellow wires on the "selector" switch and IT ALL WORKS CORRECTLY !!!
Thank you to everyone for their help and advice.
I now need to source a new drivers side mirror as the existing one has lost a lot of the "silver" and looks a mess. Has anyone bought the convex ones from RaceTech ?
http://www.racetechdirect.co.uk/car-parts/body-tri...
Thanks again, I'm sure Ill be back in the very near future with more questions, now going for a
and a lie downThank you Penelope for mentioning the heated elements. Mine are not connected at the moment. I was wondering whether the relay would already be somewhere on the car ?
I've heard some people say that the elements are on all the time the car is running..... can anyone confirm this ?
Can anyone advise me how to remove the door trim so I can get some wires into the actual mirror housing for the heating elements as there are only the 3 motor wires that actually go up into the mirror at present.
Cheers
Brilliant! Well done, and now you know a lot more about TVR wiring

At least you didn't have to take the door panel off. Don't worry though, you will need to some time so you still have that pleasure to come.
I think I got my mirror from Halfords. Just get the cheapest one you can find EG. Save your money and use it to buy petrol
v8s4me said:
....But before you do that, check the direction switch is wired correctly.....
Unfortunately I can't find a "smilies" for "smug git" At least you didn't have to take the door panel off. Don't worry though, you will need to some time so you still have that pleasure to come.
I think I got my mirror from Halfords. Just get the cheapest one you can find EG. Save your money and use it to buy petrol
Edited by v8s4me on Friday 22 September 18:20
The Horse said:
Right, I've had the driver's door speaker out and immediately behind it is the wiring to the mirror (5 cable connector), window regulator motor (2 wire connector) the speakers (green wires at bottom of photo) and a free white wire with a female connector on the end.
Using a continuity meter between the car side of the 5 wire connector and the "mirror selector switch" , I found continuity between the bottom row of three wires on the loom side of the door connector and 4 wires of the "mirror selector" switch, presumably where two of the selector wires alternate between +12v and earth.
To cut a long and frustrating story short, I found that using the mirror side of the door connector, I could move the mirrors in all directions using three of the wires, brown, white and one of the 3 black wires. However, the black wire that was needed to move the mirrors was not in the bottom row of the mirror side of the door connector, another black wire was but this didn't do anything.
So I swapped the black wires over and reconnected the connector and the "selector" switch and after a false start, I swapped over the two seemingly identical black/yellow wires on the "selector" switch and IT ALL WORKS CORRECTLY !!!
Thank you to everyone for their help and advice.
I now need to source a new drivers side mirror as the existing one has lost a lot of the "silver" and looks a mess. Has anyone bought the convex ones from RaceTech ?
http://www.racetechdirect.co.uk/car-parts/body-tri...
Thanks again, I'm sure Ill be back in the very near future with more questions, now going for a and a lie down
I don't want to come across as showing an attitude of patronizing superiority, well done in sticking at this fault and finding the problem so quickly, I did mention earlier that mirror faults are one of the worst electrical faults to solve and in your case when the fault has been caused by wrong termination rather than a failure of a component the job is a nightmare.Using a continuity meter between the car side of the 5 wire connector and the "mirror selector switch" , I found continuity between the bottom row of three wires on the loom side of the door connector and 4 wires of the "mirror selector" switch, presumably where two of the selector wires alternate between +12v and earth.
To cut a long and frustrating story short, I found that using the mirror side of the door connector, I could move the mirrors in all directions using three of the wires, brown, white and one of the 3 black wires. However, the black wire that was needed to move the mirrors was not in the bottom row of the mirror side of the door connector, another black wire was but this didn't do anything.
So I swapped the black wires over and reconnected the connector and the "selector" switch and after a false start, I swapped over the two seemingly identical black/yellow wires on the "selector" switch and IT ALL WORKS CORRECTLY !!!
Thank you to everyone for their help and advice.
I now need to source a new drivers side mirror as the existing one has lost a lot of the "silver" and looks a mess. Has anyone bought the convex ones from RaceTech ?
http://www.racetechdirect.co.uk/car-parts/body-tri...
Thanks again, I'm sure Ill be back in the very near future with more questions, now going for a
and a lie downI don't know of any heated mirrors that have elements permanently switched on, I know of elements being wired to Heated Front or Rear Screens and also some with a temperature sensor that switched a control unit/relay in and out. The more work the elements do the less lifetime they will have, a timer relay is the best option, the timer relay I linked to was my first find and there will be many more to be viewed elsewhere
Well done, great find
Is it easy to remove the speaker on the other door, if so, are the motor wires black/yellow and black/white and also have either of those got more than one yellow or white stripe/tracer? only remove the speaker if it is a simple job
Thank you in advance
Edited by Penelope Stopit on Friday 22 September 19:23
Thanks v8s4me, following your lead I found this one:
http://www.ebay.co.uk/itm/Right-Driver-side-Convex...
Heated and with the mount
Half the price of TVR suppliers but I'll pass judgment when it arrives.
I would like to know how to remove the door trim as I've just order a set of mirror mounts from Griffo400 as my drivers mirror is loose and I thought I'd sort everything out now.
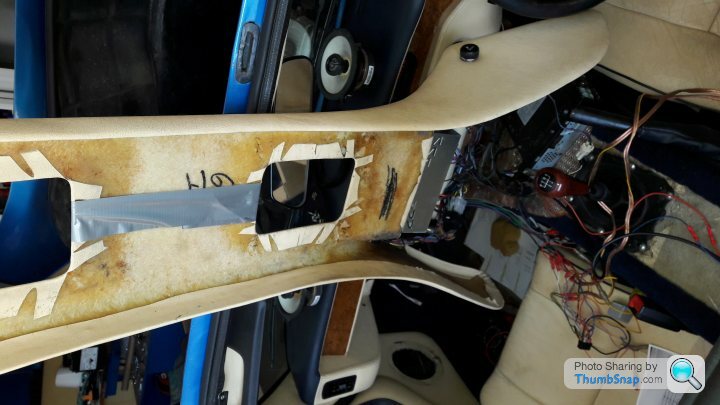
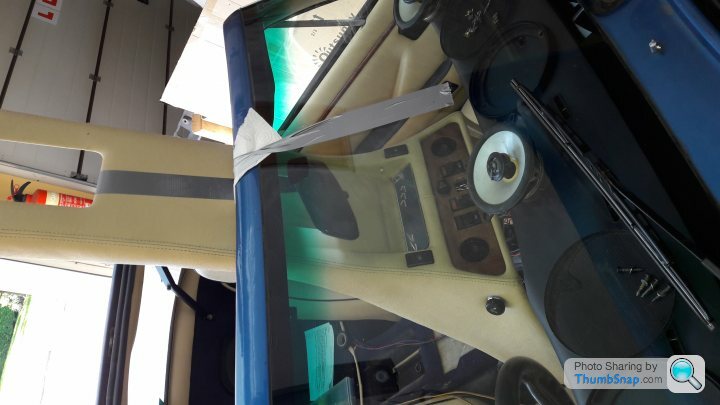
I'm not sure if this is what everybody does to get access to the electric behind the centre console but I used duck-tape to lift it clear. Very easy to see everything. I twisted the tape around it came over the header rail and protected the paintwork with some rag.
http://www.ebay.co.uk/itm/Right-Driver-side-Convex...
Heated and with the mount
Half the price of TVR suppliers but I'll pass judgment when it arrives.
I would like to know how to remove the door trim as I've just order a set of mirror mounts from Griffo400 as my drivers mirror is loose and I thought I'd sort everything out now.
I'm not sure if this is what everybody does to get access to the electric behind the centre console but I used duck-tape to lift it clear. Very easy to see everything. I twisted the tape around it came over the header rail and protected the paintwork with some rag.
You could probably change the boss on your door without having to take the door panel off. If you dismount the connector block leaving just the "bullets" I think you'll be able to pull the mirror wires through the hole in the boss.
However, if you're determined to take that panel off then you've already made a start by taking the speaker out. It's been a while since I did this but from memory; reach up inside and feel for some small nuts roughly around the area where the handle is. Then dislocate your wrist and use a small spanner to take them off. Have a mug of tea handy as you'll need to take regular breaks to get the blood flowing to your fingers again. Once you've got the nuts off, two I think (but might have been three, can't remember) remove any other obvious screws from the out side. Don't force anything but see if you can now pries the panel away from the bottom of the door moulding. If you can then get you hand in behind the panel and unhitch the wire to the door lock. Once you're sure there's nothing else holding the panel to the door try lifting it vertically. You'll find the bit of the panel which curves around the top of the moulding catches and needs to be wiggled and jiggled until is comes free. If it's difficult try the window in different positions to see if it helps you get your fingers in behind the curved bit.Putting it back is a bu er as well
Maybe someone who has done this job more recently can check this?
For various reasons I had to take mine off several times and after about the fifth time got quite good at getting it off and on.
For the centre console I fitted multi-pin connectors to all the bits of loom under there so now I can disconnect the whole thing and lift in out in a minute or so.
Good luck
PS: don't forget the family sized pack of sticking plasters.
However, if you're determined to take that panel off then you've already made a start by taking the speaker out. It's been a while since I did this but from memory; reach up inside and feel for some small nuts roughly around the area where the handle is. Then dislocate your wrist and use a small spanner to take them off. Have a mug of tea handy as you'll need to take regular breaks to get the blood flowing to your fingers again. Once you've got the nuts off, two I think (but might have been three, can't remember) remove any other obvious screws from the out side. Don't force anything but see if you can now pries the panel away from the bottom of the door moulding. If you can then get you hand in behind the panel and unhitch the wire to the door lock. Once you're sure there's nothing else holding the panel to the door try lifting it vertically. You'll find the bit of the panel which curves around the top of the moulding catches and needs to be wiggled and jiggled until is comes free. If it's difficult try the window in different positions to see if it helps you get your fingers in behind the curved bit.Putting it back is a bu
er as well Maybe someone who has done this job more recently can check this?
For various reasons I had to take mine off several times and after about the fifth time got quite good at getting it off and on.
For the centre console I fitted multi-pin connectors to all the bits of loom under there so now I can disconnect the whole thing and lift in out in a minute or so.
Good luck
PS: don't forget the family sized pack of sticking plasters.
Thanks Penelope, I hadn't seen your post. I did take the speaker out of the passenger door but could not find a connector for the mirrors so had a look in the driver's door instead and luckily that was where the problem was.
I'll look into the heating system on the mirrors. The ones in my Chimaera are heated but I don't know anything about the system as they work fine so I've left them alone.
It would be good to have a timer so they only come on for 5 or so minutes after the ignition is turned on. Should be quite simple but I haven't ventured near a RS catalogue since my A-level and that was a looooong time ago.
The Horse said:
Thanks Penelope, I hadn't seen your post. I did take the speaker out of the passenger door but could not find a connector for the mirrors so had a look in the driver's door instead and luckily that was where the problem was.
I'll look into the heating system on the mirrors. The ones in my Chimaera are heated but I don't know anything about the system as they work fine so I've left them alone.
It would be good to have a timer so they only come on for 5 or so minutes after the ignition is turned on. Should be quite simple but I haven't ventured near a RS catalogue since my A-level and that was a looooong time ago.
If you build a few hundred timers cheaper than those on the market you could make a small fortune selling them here at PHI'll look into the heating system on the mirrors. The ones in my Chimaera are heated but I don't know anything about the system as they work fine so I've left them alone.
It would be good to have a timer so they only come on for 5 or so minutes after the ignition is turned on. Should be quite simple but I haven't ventured near a RS catalogue since my A-level and that was a looooong time ago.
It's a shame the wiring for the mirror in the passenger door was not behind the speaker, the info would have helped me put a diagram together, no worries I will still do a diagram as I am 99% sure of the wiring colours to the passenger door as it will be wired from the switch the same as the drivers door is
That 1% unsure has caused many a fire
Thanks for getting back to me on this
v8s4me said:
Maybe someone who has done this job more recently can check this?
I'm sure you've done it more recently than me, but on mine as far as I remember the most awkward little  was at the front of the 'armrest' and could only be reached via the ashtray. Which introduced a whole new layer of fun since it was retained by a spikey metal thing that seemed designed to lacerate anyone foolish enough to reach through the opening. Maybe some cars have speakers giving more convenient access, but I don't think that route was an option on mine.
Gassing Station | S Series | Top of Page | What's New | My Stuff