Discussion


Haha, you are very kind, I hope I can remember where all the bits and pieces belong!
I must say though, these are a joy to work on and I think the S is a really proper, old school motor. I can't wait to drive it as I've never even had a ride in a TVR in 40 years of being interested in cars.
I must say though, these are a joy to work on and I think the S is a really proper, old school motor. I can't wait to drive it as I've never even had a ride in a TVR in 40 years of being interested in cars.
Big thank you to the lads at Global Coatings in Knutsford, this makes me very happy and I'm glad I listened to the wise words on this forum. Due back next Saturday as it takes 7 days for the paint to reach full hardness.
I think it's an International product but I'll ask for the details. Multiple coats of zinc primer before finish coats and it looks amazing. The attention to detail is exceptional, I can highly recommend this team, whose bread and butter is painting large metal fabrications to go down mines or onto oil rigs in the north sea. This should certainly outlive me!
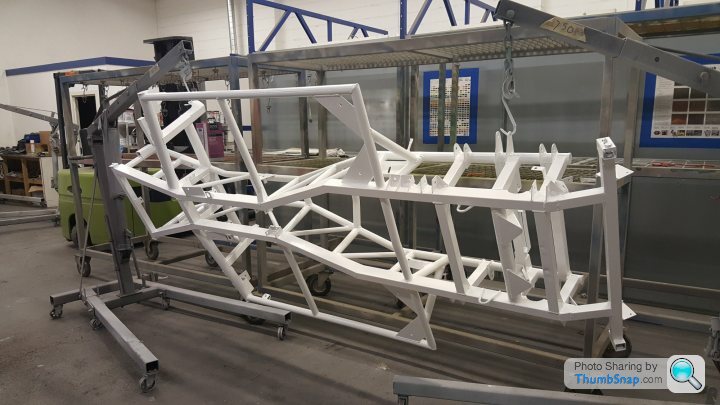
I think it's an International product but I'll ask for the details. Multiple coats of zinc primer before finish coats and it looks amazing. The attention to detail is exceptional, I can highly recommend this team, whose bread and butter is painting large metal fabrications to go down mines or onto oil rigs in the north sea. This should certainly outlive me!
Chassis back, heavy lumps of metal back where they belong.
The trailing arms and tank cradle have been painted with stonechip, primed and top coated arctic white.
I'm thinking about putting some strips of foam between the top of the outriggers and the body to prevent small stones getting stuck there. Has anyone done that or something similar or is it not worth worrying about?
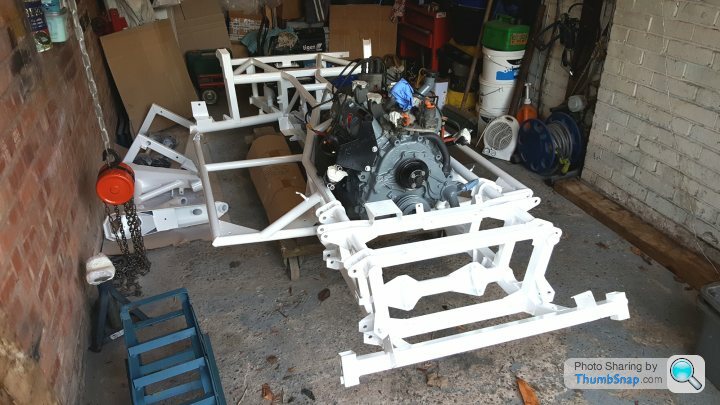

My build is going well but I've forgotten where the rear chassis earth strap is supposed to connect. None of the hundreds of photos I tool actually show where it was bolted on!
Its connected to the chassis via the small, square, rear exhaust bracket, but I can't remember if it was connected to the fuel tank bracket or the diff, or somewhere else completely.
Does anyone have an earth on their S at the back, and if so, what's it bolted onto? :-)
Its connected to the chassis via the small, square, rear exhaust bracket, but I can't remember if it was connected to the fuel tank bracket or the diff, or somewhere else completely.
Does anyone have an earth on their S at the back, and if so, what's it bolted onto? :-)
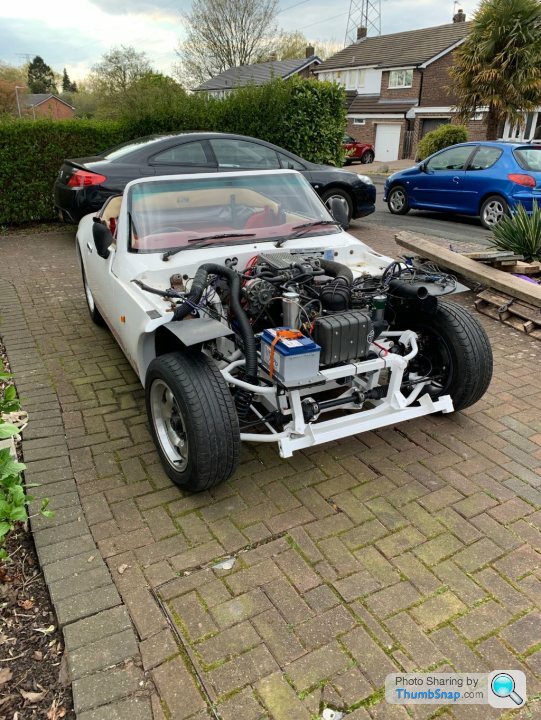
Christmas proved useful, just some more cooling system fettling, brake pipes to make and then body back on, see if it starts!

I'm still playing with configurations for the fans and radiator, which are Subaru items. I have twin fans but I don't really know if it actually requires both. What do you guys think?

I would have thought that with new a cooling system throughout (including water pump and heater matrix), plus a 45mm deep WRX radiator, everything should be as efficient as it can be.
Given that it got along fine with a single fan it might not need twin fans. If I do run two fans I guess I would need to add a second relay. What have other folk done when using the Scooby set up?
I'm still playing with configurations for the fans and radiator, which are Subaru items. I have twin fans but I don't really know if it actually requires both. What do you guys think?
I would have thought that with new a cooling system throughout (including water pump and heater matrix), plus a 45mm deep WRX radiator, everything should be as efficient as it can be.
Given that it got along fine with a single fan it might not need twin fans. If I do run two fans I guess I would need to add a second relay. What have other folk done when using the Scooby set up?

Thanks, I think that usually it doesn't make economic sense to do them properly so people don't.
I was the same when I started messing with old cars 40 years ago until I realised it was often cheaper in the long run to do it the right way.
So rather than stuffing filler into old MGs I would replace a panel, if the engine was out for a clutch change I would do the core plugs and main seals etc.
The other critical bit is paying for a professional when you run out of talent - in my case welding and painting the chassis!
Hi Tom
Spurred on by that ride in your beasty a few weeks back the car has moved along nicely.
Thanks to helping hands from Newarth yesterday (restoring this cars sister, 13 chassis numbers away and registered same day in the Leeds DVLC in 1988) she is back in (almost) one piece!
I've been back at work for a couple of weeks and the leg is much better now.
The body dropped back on nicely with a bit of wiggling and I can move on to dash removal, heater matrix replacement, doing away with the immobiliser, rewiring the engine bay, refitting the exhaust, adding the rest of the cooling system, front brake pipes and those lovely Griff seats.
I've set myself a target of June 1st for the MOT.
Edited by Bercilac on Sunday 14th April 07:58
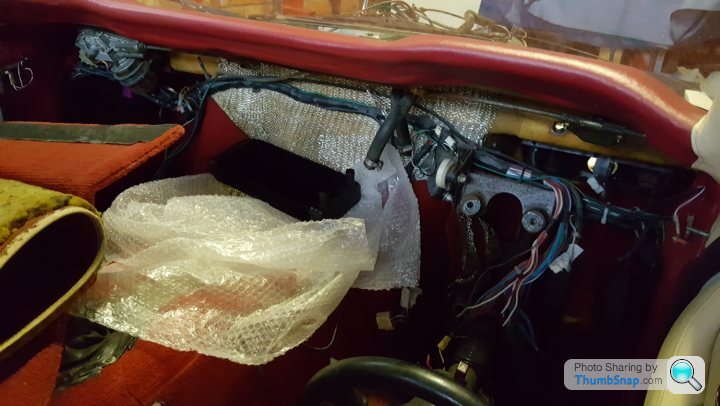
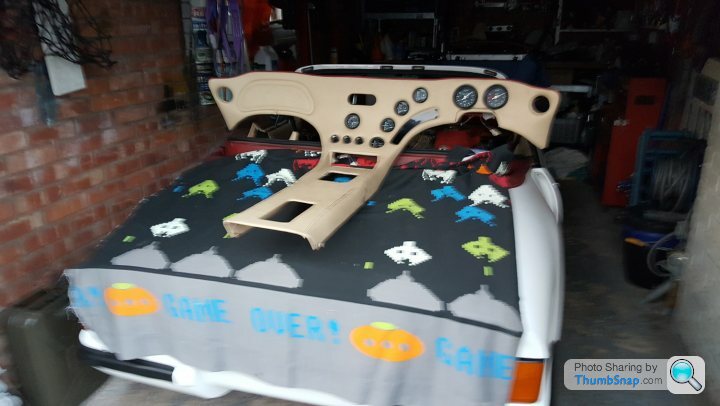
Dash out, heater matrix replaced, some observations.
The heater is sealed to the dash top by foam and this had turned into crumbs, so not doing anything useful and will be replaced with modern self adhesive stuff.
My little yellow ignition switch block was melted and charred and is now binned.
I found it best to disconnect one of the heater cables from the engine bay and feed it through, then to unbolt the whole slider mechanism.
Most of the dash circuits have simple blocks to disconnect, but the fan, light and headlamp rotary switches have two or three wires onto the back of the switch, which I labelled and photographed.
I can't see that the fresh air pipes through the engine bay serve any truly useful purpose so those are getting blocked up, and the pipes were full of leaves anyway.
Whoever thought that mounting the brake balance valve like that must have been dropping acid - evil!
The immobiliser had simply been spliced into the ignition switch wires next to the yellow block and would have taken milliseconds to defeat (it is now where it belongs in the bin).
Overall it was very easy to pull the dash out.
Next weekend will involve lots of soldering, cleaning and refitting, brakes after that.
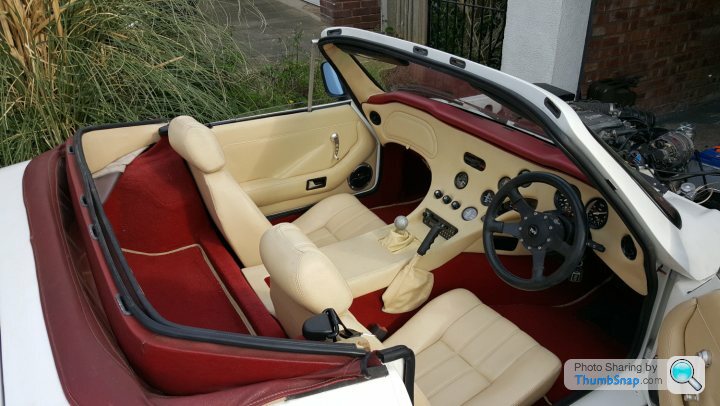
Scrubbed up nice, nearly there now. I think another 10 hours will see it ready for the MOT.
Does anyone know a supplier for the little plastic fir tree clips used behind the door cards?
Three of mine were missing, an alternative to the factory clips would be fine.

Various pipes, cables and wires to attach, one brake pipe to make and fit and the radiator area. I'm hoping next weekend will see it done.
Does anyone know a supplier for the little plastic fir tree clips used behind the door cards?
Three of mine were missing, an alternative to the factory clips would be fine.
Various pipes, cables and wires to attach, one brake pipe to make and fit and the radiator area. I'm hoping next weekend will see it done.
Incidentally the seat belts are nearly new VW van items and they don't snatch when you pull them off the reel, no matter what angle.
They were under £20 on Ebay, then another £16 for a pair of Punto stalks which seems like a good way around the factory item's propensity to bind unless pulled off the reel at a snail's pace.
They were under £20 on Ebay, then another £16 for a pair of Punto stalks which seems like a good way around the factory item's propensity to bind unless pulled off the reel at a snail's pace.
Finally, after months of having no time to work on the S (apart from the final torque on the heads, setting the tappets cleaning the injectors, fixing an exhaust manifold and fitting Landy clutch hydraulics!), I'm chasing down the last electrical funnies for the MOT (most covered by posts here which is brilliant, so thanks again everyone) and this one has me stumped.
Everything is working now apart from the offside front and rear side lights and dashboard lights.
Looking at the wiring diagram I can see that the offside and nearside side lights are on different circuits, with two 7.5 amp fuses.
Nearside I have 12 volts on the rear sidelight bulb holder, offside I have 0.1v. This is the same for the front sidelamps.
The offside lights work fine when I run a wire from the nearside unit, and I have 0.1 volts on the red and white wire in the connector block on the offside, indicating to me that the fault lies between the fuse board and the light units.
I also see that there is a rheostat for the dashboard light dimmer which of course had corroded to bits so I pulled that and put in a new one I had lying about. That also resulted in 0.1v at the red and white wire terminal.
All of the above is mentioned in various places on PH.
I think there may be a dimmer box somewhere between the rheostat and the light circuit and I strongly suspect that may be the root of the problem but I cannot find it anywhere behind the dash, or above the wiper motor or the glove box.
Does anyone know where else TVR may have hidden the dim/dip control box on a 1988 S1? I'm tempted to chop the wiring and bypass the whole shooting match but I'd rather do it properly.
Gassing Station | S Series | Top of Page | What's New | My Stuff