What's happening in your garage this weekend ?
Discussion


With the fest fast approaching......
The alternator mounting bracket needed the top right bolt replacing with a countersunk one of the correct size as it fouled on the alternator plastic cover. It's still tight but the cover has enough "give". Oddly when I took the mount off the same bolt was stuck in the head with RTV !! it looks like Rover changed the thread size in the head so when the Chim engine was fitted the bolt was too small so rather then drill the hole in the bracket out and fit the correct item they reached for the Silicone Gun !! The existing wiring has been left in the loom (so the mod can be reversed) but made safe and two new 8mm battery cables run in via 100A fuse but the Positive battery terminal needed a longer bolt as there a now a number of additional connections !
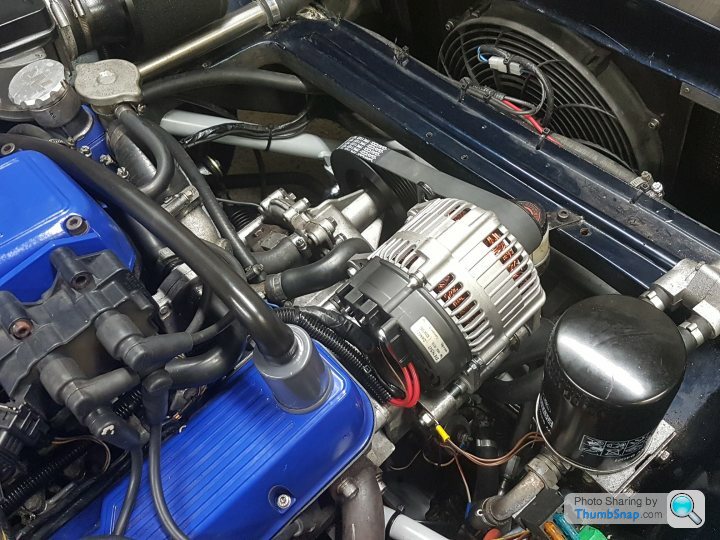
Needs a small spacer piece between the alternator rear mounting and the bracket as it's just loose on the studding at the moment.
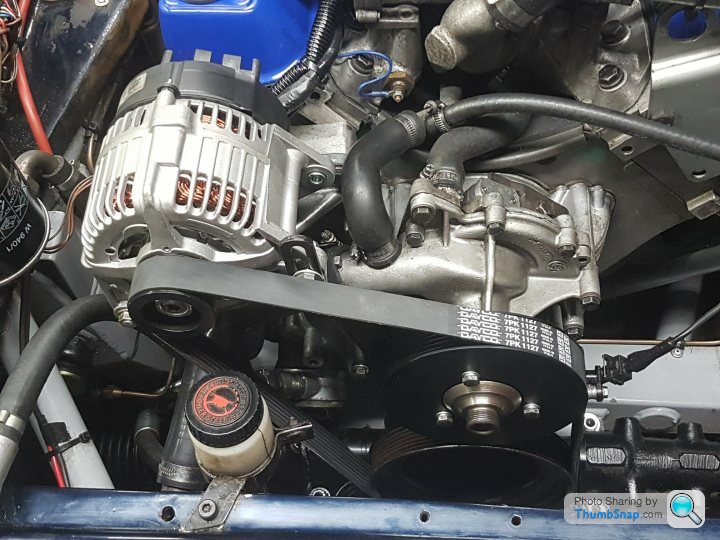
Test's look good, with a DVM connected across the battery it's maintaining 14v even with Heater, Headlights, Driving lights and rad fan running and no more burning rubber !!
Jobs left : Fit bonnet, drain a bit of oil out as I've overfilled it Doh and give her a quick wash !!
Another to the guys in the Drawing office and Mech workshop where I work
The alternator mounting bracket needed the top right bolt replacing with a countersunk one of the correct size as it fouled on the alternator plastic cover. It's still tight but the cover has enough "give". Oddly when I took the mount off the same bolt was stuck in the head with RTV !! it looks like Rover changed the thread size in the head so when the Chim engine was fitted the bolt was too small so rather then drill the hole in the bracket out and fit the correct item they reached for the Silicone Gun !! The existing wiring has been left in the loom (so the mod can be reversed) but made safe and two new 8mm battery cables run in via 100A fuse but the Positive battery terminal needed a longer bolt as there a now a number of additional connections !
Needs a small spacer piece between the alternator rear mounting and the bracket as it's just loose on the studding at the moment.
Test's look good, with a DVM connected across the battery it's maintaining 14v even with Heater, Headlights, Driving lights and rad fan running and no more burning rubber !!
Jobs left : Fit bonnet, drain a bit of oil out as I've overfilled it Doh and give her a quick wash !!
Another
to the guys in the Drawing office and Mech workshop where I work 
I really went to town
Put an Ali gear knob stop on, looks a lot better now as you cant see the black gear shaft
Took the round black plastic mobile phone holder off the dash and that looks better as well
Still messing about with the settings on the shocks but cant get a good compromise either too hard or too soft so definitely needs a trip to Gaz for monotubes
Replaced the offside front wheel bearing and a quick test drive showed the noise has disappeared.
If looked like the inner race rollers had stopped rotating freely, but it wan't too worn.
Did sone fettling of the nearside outrigger and noticed a crack in the exhaust manifold so that was welded and sounds a lot quieter.
If looked like the inner race rollers had stopped rotating freely, but it wan't too worn.
Did sone fettling of the nearside outrigger and noticed a crack in the exhaust manifold so that was welded and sounds a lot quieter.

mk1fan said:
Think I've traced the running fault to a failed CTS. Part ordered along with appropriate deep socket. Will swap out when delivered, hopefully tomorrow.
Annoyingly, I had a brand new one in the boot when I was with you in Greenwich, Saturday before last... Hopefully this will sort it!I have a spare already - but have ordered a second with part number in the 'Parts List' sticky. Wish I had fitted it when I had all the upper plenum stuff off the car!
I can't find a spec comparrison for the two different parts numbers BUT have found a working temp range for the parts list one that is 25-80 degrees. Clearly a bit low!
I also found that I can test check with a 200Ohm resistor - I go past Maplins every day - if the deep socket doesn't turn up in a timely manner.
Thanks.
Impact socket doesn't fit because the plug gets in the way. A 12 point socket should fit.
Tested the circuit today using a 200 Ohm resister. All the running issues dissaappered so I'm fairly confident I found the problem.
Just waiting on the socket. Tomorrow night looks good to get her sorted.
Tested the circuit today using a 200 Ohm resister. All the running issues dissaappered so I'm fairly confident I found the problem.
Just waiting on the socket. Tomorrow night looks good to get her sorted.
mk1fan said:
Impact socket doesn't fit because the plug gets in the way. A 12 point socket should fit.
Tested the circuit today using a 200 Ohm resister. All the running issues dissaappered so I'm fairly confident I found the problem.
Just waiting on the socket. Tomorrow night looks good to get her sorted.
Fingers crossed!!Tested the circuit today using a 200 Ohm resister. All the running issues dissaappered so I'm fairly confident I found the problem.
Just waiting on the socket. Tomorrow night looks good to get her sorted.
CTS changed. Running fine now.
Slightly more involved than I had hoped. The deep socket was 5mm too long and the vac pipe was in the way. So a bit more strip down than had hoped. Started at 7pm. Finished at 8pm incrunning her up to temp. No leaks as yet but will check again after a run.
Booked in to BD Engineering on Tuesday for a rolling road tune and to have a look at the dizzy oreintation which seems to be 90 deg out.
mk1fan said:
CTS changed. Running fine now.
Slightly more involved than I had hoped. The deep socket was 5mm too long and the vac pipe was in the way. So a bit more strip down than had hoped. Started at 7pm. Finished at 8pm incrunning her up to temp. No leaks as yet but will check again after a run.
Booked in to BD Engineering on Tuesday for a rolling road tune and to have a look at the dizzy oreintation which seems to be 90 deg out.
Slightly more involved than I had hoped. The deep socket was 5mm too long and the vac pipe was in the way. So a bit more strip down than had hoped. Started at 7pm. Finished at 8pm incrunning her up to temp. No leaks as yet but will check again after a run.
Booked in to BD Engineering on Tuesday for a rolling road tune and to have a look at the dizzy oreintation which seems to be 90 deg out.
Fettling the offside outrigger which is a bit of a pain as the fuel lines have to be moved out the way first. What a rust trap that area is! Now it's less like swiss cheese and reasonably solid. I have a plan to replace both sides fully but with stainless, that way the dry bits out of range of the engine oil will be impervious to future failures.
If any of you have not replaced your outriggers on SE style bodies yet, I would recommend drilling a small hole (4-6mm or so) in the side of each one about half way down, and then squirting some oitl in, as they appear to corrode from the inside out as well as the outside in....
Also decided to do the nearside front bearing which I did before only 2 years ago but it's also whirring a bit, so I must have made some small error when I did it last.
Finally I have a rear driveshaft UJ ready to go on if needed as I am hearing a clonk from the rear.
 t after being stuck behind a cattle truck for several miles and then washing and hosing it yet again.

Gassing Station | Wedges | Top of Page | What's New | My Stuff