Headlight reflectors
Discussion


My headlight reflectors have been slowly deteriorating for a good decade so I thought it was about time I fitted some newish second hand ones I bought off another owner probably a decade ago 
Ive read old threads so feel housed with good info.
My questions are
1 which Silcaflex do I use. Which product number
2 My replacement reflectors come with good screws but no springs etc.
I’m hoping to re use my old ones but they may well be rusty or broken so does anyone still do replacement bits for the adjustment set up
Thanks Al.
Racetech seem to do them. Link below
https://www.racetechdirect.co.uk/car-parts/body-tr...
All the best
Dick
https://www.racetechdirect.co.uk/car-parts/body-tr...
All the best
Dick
trumpet1608 said:
Racetech seem to do them. Link below
https://www.racetechdirect.co.uk/car-parts/body-tr...
All the best
Dick
Gordon Bennett I only had to look. https://www.racetechdirect.co.uk/car-parts/body-tr...
All the best
Dick
Thanks that’s reassuring

I notice with old threads most the pictures are now blocked so hopefully this information helps newer owners.
I’ll put a few pics up if I can do this job successfully.
Thanks Dick
Spunagain said:
Hi CC
I used Sikaflex 221 doing mine last month. for the lens and for the blobs at the top of the cowls.
Still holding strong!
BR
Phil
I just got TigerSeal in the end from my local motor factors. I used Sikaflex 221 doing mine last month. for the lens and for the blobs at the top of the cowls.
Still holding strong!
BR
Phil
I thought it was 221 or was that because I read your post late one night.
Thanks

Classic Chim said:
Spunagain said:
Hi CC
I used Sikaflex 221 doing mine last month. for the lens and for the blobs at the top of the cowls.
Still holding strong!
BR
Phil
I just got TigerSeal in the end from my local motor factors. I used Sikaflex 221 doing mine last month. for the lens and for the blobs at the top of the cowls.
Still holding strong!
BR
Phil
I thought it was 221 or was that because I read your post late one night.
Thanks
swisstoni said:
New photos much appreciated. Mine are knackered. I’ve got some new reflectors.
I was quoted £800 for the job by a southern based TVR outfit a few years ago.
I was quoted £800 for the job by a southern based TVR outfit a few years ago.

Is it that bad a job! I hope not.
Marking the floor where your wheels are and a nice clear wall in front of you to mark then test headlight alignment must be one of the important tasks.
I’ll let you know how I get on
Thanks Simon. It’ll do the job.
Here are the notes from my Readers car thread from when I got the bowls out and re-plated at http://www.silchrome.co.uk/.
There are also some more photos from Nosh's work here https://www.pistonheads.com/gassing/topic.asp?h=0&...
First of all, I marked out the lighting pattern on the garage door with some tape so I could reset the beam positions.

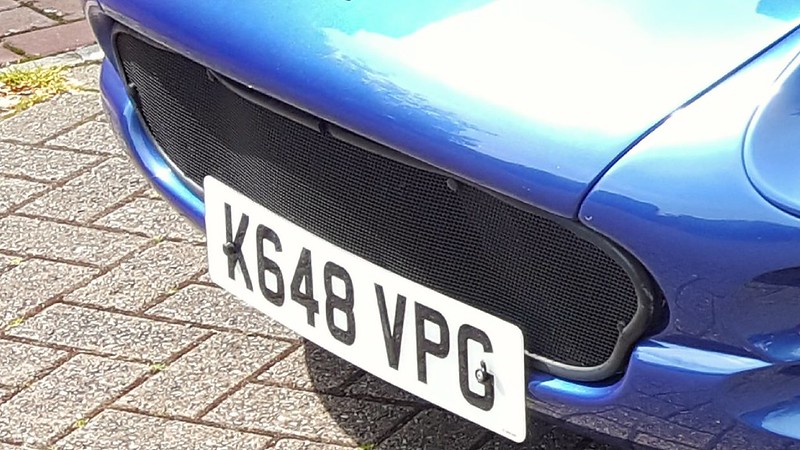
My car is an early one so there is no access hole in front of the front wheels so I then unscrewed the front number plate and the front grille - lots of cross head self tappers. The grille seal was not fixed at all to the body and was just lying on top. The seal was in a pretty poor state so I ordered a couple of metres of the https://www.woolies-trim.co.uk/product/1775/rubber-extrusion from Woolies.
I took a couple of pictures of the headlamp pods from the inside - you can see the two studs holding each one in - the lower passenger one is already undone.
Passenger side

Driver’s side - you can also just see the lower screw holding in the headlamp bowl - held in with a 7mm nut.

I unscrewed the 2 studs on each side and then started to cut the mastic blobs at the top of the cowl, it was a pig and eventually I used some dental floss to cut into it to free it off.
Here are the exposed headlamps. The failed reflector is more visible on the passenger side.

Next was to dig into what looked like white kitchen sealant behind the blue paint using a stanley knife. The bowls were also not keen to let go and again I threaded some dental floss between the water vent at the bottom of the bowl and the holes for the adjustment screws at the side and broke the seals that way. I was then able to prise the lenses off with a screwdriver using doubled over cardboard to avoid damaging the paint as I levered them out.
Driver’s side free:

I then unscrewed the headlamp bowls - this is going to be a pig to put back together - everything was just wedged in and the wing nut adjustment was not used at all. The plastic wing nuts were loose about 2cm from the bodywork the lamps were just held in with tension. I replaced the bolts and the nylon wingnuts with stainless ones.
Here is the lower screw and spring (which is not supposed to be adjusted) from the passenger side.

I released the bowls with a lot of wriggling and unplugged them and sent photos to Silchrome who agreed to re-plate them for £150 for the pair and return them for the 6th of March. You can see a couple of threaded widgets that plug into the rubber grommets in the headlamp bowl.

I then removed the 3 grommets (bits of rubber pipe) on each bowl that held the fixings together and also marked the passenger and drivers sides as I bet they are sided and popped them in the post - I insured them for £1000 to at least part cover a Lupo conversion if they get lost!
Next I cleaned up around the headlamp hole and cleaned up the lenses ready for the refinished reflectors. I also cleaned up the electrical connections with some contact cleaner - but they were already in good nick.
While I was behind the grille I noticed a couple of other bits that could be looked at, the air filter bracket and mounting standoffs looked very rusty so I applied WD40 and pulled them out -urgh:
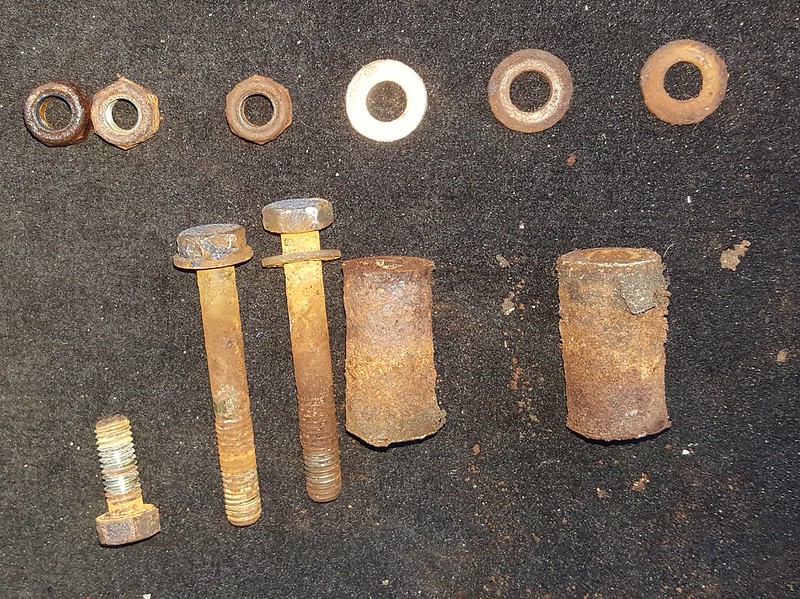
And I am glad I did - when removing the air filter - it had lumps of rusty paint inside it - the steel tube which links the air filter to the intake hose was rusting inside:

So I attacked the tube and mounts with the drill wire brush and a couple of coats of hammerite and replaced the mounting nuts with new stainless nylocks and new washers, the bolts were cleaned up and all assembled with plenty of Copperease. I also replaced a very rusty jubilee clip with a stainless one.
The diagonal bracing behind the grille was also covered in overspray, I cleaned this off with some thinners and the black satin paint also came off to reveal the original blue paint, so I masked it off and sprayed on some primer and satin black to tidy it up.
I also noticed a hole in the filler pipe for the wash bottle. Replacing it looked like a radiator out job so - bodge time, I put some Sikaflex 221 on the back of a cable tie and used that to block the hole.
I also retaped up some of the alarm wiring which was starting to unpeel.
As promised Silchrome took 2 weeks to return the reflectors which looked much better:

However there were a couple of tiny spots where the nickel and silver did not take - tiny sub mm specs.

I sent the photos to Silchrome who agreed they should not be like that and I returned them for rework.
With the reflectors back a week later and looking great I reassembled the fitting bits - rubber hose bits into the reflectors, new stainless bolts, threaded widgets which fits into the rubber hose bits, washer spring, washer and then into the body, another washer and stainless wingnuts for the side bolts and 7mm nuts for the bottom bolts all with plenty of waterproof grease to protect it..
I have since joined the Chimaera owners group on Facebook and it looks like suitable bowls are available for £30 each. They do seem slightly different to mine in that they have cowls which cover the centre of the bulbs. https://www.hcqkaqc.top/index.php?main_page=produc...

I put masking tape all around the head light area and then each assembly was carefully fitted back in and adjusted to match my light pattern door markings. I was dreading this, but while it took me a few goes it was pretty straightforward.
I put a bead of Sikaflex 221 on the back of the lenses and stuck them down, held in place with masking tape. Then the following morning I masked off the lenses and the body and filled and smoothed the edges with more Silastic.
Then after lunch I added the blobs of Sikaflex above the lenses and refastened headlamp cowls using the 2 studs on each side tightening so the fit looked right. I used some knurled nuts I had left over from the dashboard to make it easier next; time , remembering to add plenty of copper slip.
While that was curing I trimmed the new piece of ‘S’ trim to make a new grille surround and refitted the grille. This was the worst part of the whole chapter. It would have been much easier in warmer weather, as even with softening the trim with hot soapy water, it soon firmed up in the cold air. I can see why the last person to fit the grille had just bolted on top of the surround.
Here it is properly fitted waiting for the headlamp cowls to cure. Looks much better than before.

There are also some more photos from Nosh's work here https://www.pistonheads.com/gassing/topic.asp?h=0&...
First of all, I marked out the lighting pattern on the garage door with some tape so I could reset the beam positions.
My car is an early one so there is no access hole in front of the front wheels so I then unscrewed the front number plate and the front grille - lots of cross head self tappers. The grille seal was not fixed at all to the body and was just lying on top. The seal was in a pretty poor state so I ordered a couple of metres of the https://www.woolies-trim.co.uk/product/1775/rubber-extrusion from Woolies.
I took a couple of pictures of the headlamp pods from the inside - you can see the two studs holding each one in - the lower passenger one is already undone.
Passenger side
Driver’s side - you can also just see the lower screw holding in the headlamp bowl - held in with a 7mm nut.
I unscrewed the 2 studs on each side and then started to cut the mastic blobs at the top of the cowl, it was a pig and eventually I used some dental floss to cut into it to free it off.
Here are the exposed headlamps. The failed reflector is more visible on the passenger side.
Next was to dig into what looked like white kitchen sealant behind the blue paint using a stanley knife. The bowls were also not keen to let go and again I threaded some dental floss between the water vent at the bottom of the bowl and the holes for the adjustment screws at the side and broke the seals that way. I was then able to prise the lenses off with a screwdriver using doubled over cardboard to avoid damaging the paint as I levered them out.
Driver’s side free:
I then unscrewed the headlamp bowls - this is going to be a pig to put back together - everything was just wedged in and the wing nut adjustment was not used at all. The plastic wing nuts were loose about 2cm from the bodywork
the lamps were just held in with tension. I replaced the bolts and the nylon wingnuts with stainless ones.Here is the lower screw and spring (which is not supposed to be adjusted) from the passenger side.
I released the bowls with a lot of wriggling and unplugged them and sent photos to Silchrome who agreed to re-plate them for £150 for the pair and return them for the 6th of March. You can see a couple of threaded widgets that plug into the rubber grommets in the headlamp bowl.
I then removed the 3 grommets (bits of rubber pipe) on each bowl that held the fixings together and also marked the passenger and drivers sides as I bet they are sided and popped them in the post - I insured them for £1000 to at least part cover a Lupo conversion if they get lost!
Next I cleaned up around the headlamp hole and cleaned up the lenses ready for the refinished reflectors. I also cleaned up the electrical connections with some contact cleaner - but they were already in good nick.
While I was behind the grille I noticed a couple of other bits that could be looked at, the air filter bracket and mounting standoffs looked very rusty so I applied WD40 and pulled them out -urgh:
And I am glad I did - when removing the air filter - it had lumps of rusty paint inside it - the steel tube which links the air filter to the intake hose was rusting inside:
So I attacked the tube and mounts with the drill wire brush and a couple of coats of hammerite and replaced the mounting nuts with new stainless nylocks and new washers, the bolts were cleaned up and all assembled with plenty of Copperease. I also replaced a very rusty jubilee clip with a stainless one.
The diagonal bracing behind the grille was also covered in overspray, I cleaned this off with some thinners and the black satin paint also came off to reveal the original blue paint, so I masked it off and sprayed on some primer and satin black to tidy it up.
I also noticed a hole in the filler pipe for the wash bottle. Replacing it looked like a radiator out job so - bodge time, I put some Sikaflex 221 on the back of a cable tie and used that to block the hole.
I also retaped up some of the alarm wiring which was starting to unpeel.
As promised Silchrome took 2 weeks to return the reflectors which looked much better:
However there were a couple of tiny spots where the nickel and silver did not take - tiny sub mm specs.
I sent the photos to Silchrome who agreed they should not be like that and I returned them for rework.
With the reflectors back a week later and looking great I reassembled the fitting bits - rubber hose bits into the reflectors, new stainless bolts, threaded widgets which fits into the rubber hose bits, washer spring, washer and then into the body, another washer and stainless wingnuts for the side bolts and 7mm nuts for the bottom bolts all with plenty of waterproof grease to protect it..
I have since joined the Chimaera owners group on Facebook and it looks like suitable bowls are available for £30 each. They do seem slightly different to mine in that they have cowls which cover the centre of the bulbs. https://www.hcqkaqc.top/index.php?main_page=produc...
I put masking tape all around the head light area and then each assembly was carefully fitted back in and adjusted to match my light pattern door markings. I was dreading this, but while it took me a few goes it was pretty straightforward.
I put a bead of Sikaflex 221 on the back of the lenses and stuck them down, held in place with masking tape. Then the following morning I masked off the lenses and the body and filled and smoothed the edges with more Silastic.
Then after lunch I added the blobs of Sikaflex above the lenses and refastened headlamp cowls using the 2 studs on each side tightening so the fit looked right. I used some knurled nuts I had left over from the dashboard to make it easier next; time , remembering to add plenty of copper slip.
While that was curing I trimmed the new piece of ‘S’ trim to make a new grille surround and refitted the grille. This was the worst part of the whole chapter. It would have been much easier in warmer weather, as even with softening the trim with hot soapy water, it soon firmed up in the cold air. I can see why the last person to fit the grille had just bolted on top of the surround.
Here it is properly fitted waiting for the headlamp cowls to cure. Looks much better than before.
Edited by Spunagain on Thursday 22 April 22:56
Having seen what you have done with the body off, I think you should be fine. I am pretty incompetent mechanically, but was still able to do it and it came out pretty well. The thing that scared me the most was re-aligning the bowls, but it just needed a little force to get them to move!
It is certainly worth doing to save 800 odd quid!
It is certainly worth doing to save 800 odd quid!

Spunagain said:
Hi Steve
For the Mk1 Chimaeras do you just use the trim to hold on the Grille or do you add screws too?
It was a swine to fit and seems to be very solid without screws..
I am sure mine originally did not have any screws holding the Grille on but it was a long time ago!
Like Steve D says def one of those time consuming jobs and I remember even 12+ years later For the Mk1 Chimaeras do you just use the trim to hold on the Grille or do you add screws too?
It was a swine to fit and seems to be very solid without screws..
I am sure mine originally did not have any screws holding the Grille on but it was a long time ago!
Spunagain like you say no screws exactly as they come from TVR I always found grille removal and refit easy enough a plastic spatula and some Mr Sheene or similar  grill secures rubber surround and vice versa, lamps still looks fresh after all those years improved further with a brand new front grille courtesy of Phazed/Peter
  although not for much longer I am going MK3 lamps soon
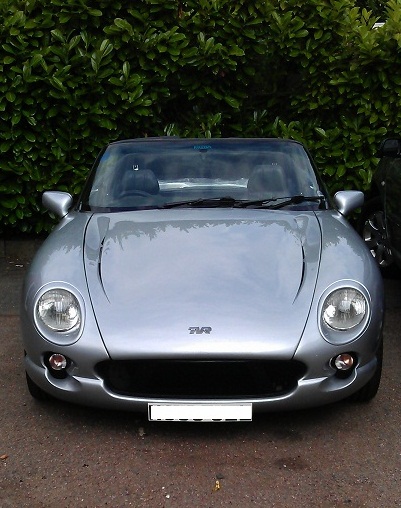
Edited by Zener on Friday 23 April 10:54

Spunagain said:
Hi Steve
For the Mk1 Chimaeras do you just use the trim to hold on the Grille or do you add screws too?
It was a swine to fit and seems to be very solid without screws..
I am sure mine originally did not have any screws holding the Grille on but it was a long time ago!
Screws happen when the owner looses the will to live trying to get the grill in with just the rubbers.For the Mk1 Chimaeras do you just use the trim to hold on the Grille or do you add screws too?
It was a swine to fit and seems to be very solid without screws..
I am sure mine originally did not have any screws holding the Grille on but it was a long time ago!
Not had that issue myself they seem to go in alright for me. But once again....time. Which is why a 'simple' job cost money wnen a garage are doing it.
Steve
PaddyZulu said:
And one of those is already breaking down! Spunagain said:
Driver’s side free:
I spotted a small detail in your photo here that relates to my driver side bulb, which I didn’t expect - the slightly rotated angle of the reflector. The side light doesn’t sit directly below the main bulb, more visible from the back (in my case through the wheel arch) where the H4 fitting is clearly rotated. Edited by Spunagain on Thursday 22 April 22:56
Is this intentional?
Does it shape the beam to be low for oncoming traffic and cast a bit more light into the verge?
When I tried LED bulbs (sadly illegal now), I have a massive spill of light up towards the sky on the near side. Which made me think it has massively exaggerated this reflector position.
I didn’t see this when the car was nose up to the wall…!
Gassing Station | Chimaera | Top of Page | What's New | My Stuff