Where can I buy a 4 point jack/lift system???
Discussion


 And I don't even know when mines going to arrive
 Well, its like me garage owning friend said when he recommended me to go a buy a two post.
A ramp gets in the way of any work you want to do on the suspension system, brakes or wheels. On most cars you can't even take the exhaust off of the car on a ramp, certainly twin rears and wide backboxes like the cerb.
In his garage the ramp was only used for the MOTs, inspection only. All the mechanics wanted to use the four sets of two posts.
The two post can do all the above, and standing underneath the car you have access to everything. You can be right there with the suspension, no giant lump of metal barring your way or having to lean over under. Its better including parking one below the other.
Personally its also smaller, gets in the way less.
The only downside of a two post is that it requires a minimum of four inches of concrete to bed into, when a ramp is more self supporting. But assuming to have or can manufacture the floor I reckon its a no brainer.
If anyone wants to look at a two post and are within striking range of Brands hatch you are welcome to see mine before you plumb for a ramp.
All your comments regarding 2 posters are valid. In a more commercial environment 2 post ramps are better for most jobs. In the case of most people on this thread, the use will be more 'domestic' and storage based. A four poster can be left down in a garage and driven on and off with ease. Also when storing a car up in the air for long periods I would rather support it on it's wheel rather than the chassis.
julian64 said:
Well, its like me garage owning friend said when he recommended me to go a buy a two post.
A ramp gets in the way of any work you want to do on the suspension system, brakes or wheels. On most cars you can't even take the exhaust off of the car on a ramp, certainly twin rears and wide backboxes like the cerb.
In his garage the ramp was only used for the MOTs, inspection only. All the mechanics wanted to use the four sets of two posts.
The two post can do all the above, and standing underneath the car you have access to everything. You can be right there with the suspension, no giant lump of metal barring your way or having to lean over under. Its better including parking one below the other.
Personally its also smaller, gets in the way less.
The only downside of a two post is that it requires a minimum of four inches of concrete to bed into, when a ramp is more self supporting. But assuming to have or can manufacture the floor I reckon its a no brainer.
If anyone wants to look at a two post and are within striking range of Brands hatch you are welcome to see mine before you plumb for a ramp.

The four posters I used to use had rails that could be locked out and then you just dropped the ramp portion down if you wanted to do any suspension work.
RedCabbage said:
All your comments regarding 2 posters are valid. In a more commercial environment 2 post ramps are better for most jobs. In the case of most people on this thread, the use will be more 'domestic' and storage based. A four poster can be left down in a garage and driven on and off with ease. Also when storing a car up in the air for long periods I would rather support it on it's wheel rather than the chassis.
Thats a good point, its probably better for all the rose joints, bushes to be stored at an operating level. But is it better to store a shock absorber with a compressed spring or at full extension sitting on its bump stop.Won't you get dieseling if the spring is continually compressed?, arne't you removing the pressure on the oil seals by having them at full extension?
Mrs BlueCerbera said:
Quinny said:
How did he offload it???
Does he have a fork truck on the back?, as the specs say it weighs 700kg.
Yes, he's got a nifty fork lift truck. Although he was concerned that the fork lift wouldn't make it up our drive as its quite steep. Managed fine though. Apparently the heaviest piece needs four people to lift it Does he have a fork truck on the back?, as the specs say it weighs 700kg.
 And there was me thinking I'd pop it into the garage on my own later on
  Best go find some butch friends ....
Cheers.
Did everyone get the £75 discount as Piston Headers??????
I hope us up norf will get ours on the next trip to the UK next week, but Fred hasn't confirmed that yet and I need 150mm cutting off the top of mine, to take it down to 2 metres high. Anyone else asked for the height cut off sensors???
I hope us up norf will get ours on the next trip to the UK next week, but Fred hasn't confirmed that yet and I need 150mm cutting off the top of mine, to take it down to 2 metres high. Anyone else asked for the height cut off sensors???
Edited by glow worm on Wednesday 6th February 14:11
Got mine today  . The driver was a nice chap, but didn't really have any idea how we might get it into my garage, so in the end just left it outside across the door. Took a fair bit of pfaffing about with dolly boards and trolley jacks to get it inside. Having lifted most of the components (individually) on my own, I can see that it will definitely need more muscle on hand to build, so that will have to wait.
Got £70 off (paid £1550) which Fred said was the Pistonheads price. In fact, had to go back to him several times to achieve this, and the driver still presented a bill for £1620 list. But after a call back to Holland he was happy to take my cheque for £1550.
So all looking good. Thanks again to those who sorted it.
Mike
. The driver was a nice chap, but didn't really have any idea how we might get it into my garage, so in the end just left it outside across the door. Took a fair bit of pfaffing about with dolly boards and trolley jacks to get it inside. Having lifted most of the components (individually) on my own, I can see that it will definitely need more muscle on hand to build, so that will have to wait. Got £70 off (paid £1550) which Fred said was the Pistonheads price. In fact, had to go back to him several times to achieve this, and the driver still presented a bill for £1620 list. But after a call back to Holland he was happy to take my cheque for £1550.
So all looking good. Thanks again to those who sorted it.
Mike
That looks really good, Fred rang today , mine comes on Thursday. I've got the Blackpool TVRCC heavy gang ready to go for a week on Sunday. So any construction tips would be appreciated. 
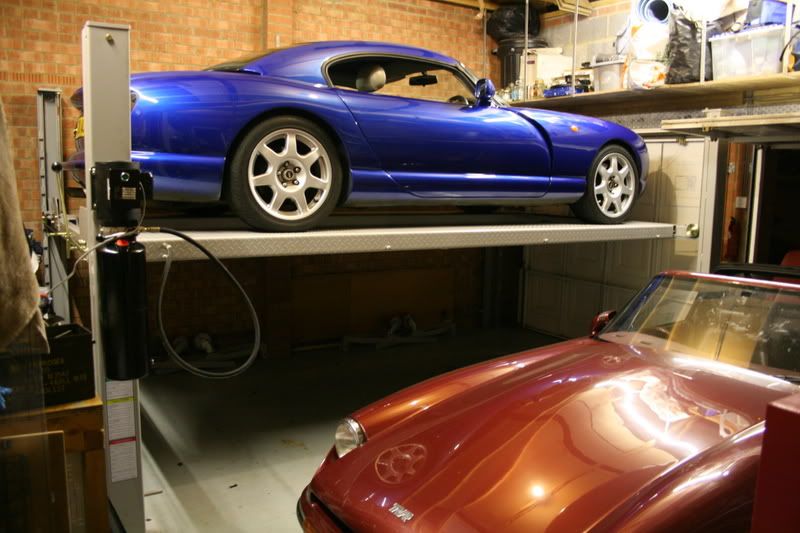
Will the 'S' fit underneath??? It's just I fancy getting something for going to the shops in......A Chim 450 or a Griff 500, keep the Tuscan for proper driving
Will the 'S' fit underneath??? It's just I fancy getting something for going to the shops in......A Chim 450 or a Griff 500, keep the Tuscan for proper driving
Edited by glow worm on Friday 8th February 19:07
The S will fit underneath but we need to do some jiggery pokery, either replacing the two single up and over doors with a roller door, or removing the shelf we've got above the garage doors so the top car and go higher and the garage door open underneath it - not sure whether thats possible or not. We've just really pleased we can get under the cars for a poke around, extra car storage space will be a bonus !
Our main problems were on step 1, where you slide the cross beams into the uprights - on both cross beams there was a side that wouldn't slide in, and it was because the black plastic blocks weren't sitting flush on the crossbeam ends due to a weld on the crossbeam. Required a little chisel action on the plastic.
Other issue was with getting the release mechanism right, but I'd left him to it by that point so I'll have to get him to tell you about that.
Mr BC here,
1st challenge is unpacking the beast. It all comes neatly bolted onto two end pieces. You will need to free one end completely to get the top ramp (the heaviest) off. I used some wood underneath for it to rest on and a bit of scaffolding to lift the bottom ramp enough to get the bolts out. Did start with a bit of 2x4 but I broke that .
.
The ramps are heavy (especially the one with the piston. Being a bloke I thought between me and the missus it would be a piece of cake. Its not. I really do recommend 4 people for those bits.
Construction of the main bits OK. Just make sure you put the cross beams in the right way round. The wheels for the steel rope go on the inside and the release mechanism must be flat part down towards the bottom of the ramp (not angled bit down like I did the 1st attempt)
It says to measure the distance between the uprights to get the ramps on. This proved difficult so I moved set of uprights further away than it needed to be (basically out of the way but lined up). We then put one side of the ramps on the crossbar and used the ends of the packing (the angle iron things you got when it was delivered) to rest the other end of the ramps on. I then pushed (well kicked actually) the far out uprights into place and lowered the ramps onto them.
Mrs BC has a picture of the mod I made to the plastic runners on the cross beam. She will post it up once we can figure out how to get it off her phone.
The cables were a worry. I couldn't pull them out and I don't have an air gun. The solution was to lie directly under the piston and put feet up on the end of the piston flange. You can then brace yourself with your hands on other bits of frame work and push like almighty. Its quite notch when it comes out and it does go a long way, so shuffle down and push more.
There were 4 6mm nuts and bolts. I assumed this was for the motor, but the ended up too long. I couldn't find any other bolts, so cut some 6mm stud and used that. Next problem is that the holes in the motor bracket does not line up with the bolt holes on the motor unit. I used a 10mm drill to take out the holes (not the slots) on the motor unit a little and the thing mated up OK.
You do need to swap the nipple from the left side to the right side as mentioned in the instructions.
Wiring up the unit. I put an earth cable on the back of the box (you will see the symbol when you take the front off with the switch on). I then used a connector block to attach the scabby wires to my cable. This is all inside the box. I've connected it using a 13amp plug and it all works OK. I will do something a little better at a later date but I was all a bit too excited for the next bit - making it go up
Next the release mechanism is the thing that took the most time for me, but with a bit more instruction should have been a piece of cake. The key bit is getting the connector bar that goes from front to back correct:
1, Take the nuts off the long bar and slide it. There’s hoops underneath for the bars to operate in.
2, Take the nuts off the NON handled end and slide it in. Put on the nuts, put on the joiner and do the whole thing up as tight as possible (together with retaining nuts)
3, Take the nut off the handle end and slide it in. Add the nuts and screw into the joiner. Do up one nut only.
4, Get one person at the one and and another by the handle. You need both flanges facing in the same direction (just by twisting one end). Once this is done. Get your helpers to hold it in place (you may need to rotate a little to get a screwdriver in the joiner's hole. Then tighten up the remaining nut. The rest is easy, just don't do the nuts up on the connectors too tight (I'll be swapping mine for nylocks at some point)
I was quite worried by how notchy the operation was (especially when going down). Follow Freds instructions and go all the way down and then all the way up. It will sort itself out, and the descent should then be smooth.
I think I need to do some fine tuning now its together with the cable bolts at the top. Some slacken at different rates to others when dropping the lift to a stop.
Other than these few details its pretty much as the instructions. Good luck
Mr BC
1st challenge is unpacking the beast. It all comes neatly bolted onto two end pieces. You will need to free one end completely to get the top ramp (the heaviest) off. I used some wood underneath for it to rest on and a bit of scaffolding to lift the bottom ramp enough to get the bolts out. Did start with a bit of 2x4 but I broke that
.The ramps are heavy (especially the one with the piston. Being a bloke I thought between me and the missus it would be a piece of cake. Its not. I really do recommend 4 people for those bits.
Construction of the main bits OK. Just make sure you put the cross beams in the right way round. The wheels for the steel rope go on the inside and the release mechanism must be flat part down towards the bottom of the ramp (not angled bit down like I did the 1st attempt)
It says to measure the distance between the uprights to get the ramps on. This proved difficult so I moved set of uprights further away than it needed to be (basically out of the way but lined up). We then put one side of the ramps on the crossbar and used the ends of the packing (the angle iron things you got when it was delivered) to rest the other end of the ramps on. I then pushed (well kicked actually) the far out uprights into place and lowered the ramps onto them.
Mrs BC has a picture of the mod I made to the plastic runners on the cross beam. She will post it up once we can figure out how to get it off her phone.
The cables were a worry. I couldn't pull them out and I don't have an air gun. The solution was to lie directly under the piston and put feet up on the end of the piston flange. You can then brace yourself with your hands on other bits of frame work and push like almighty. Its quite notch when it comes out and it does go a long way, so shuffle down and push more.
There were 4 6mm nuts and bolts. I assumed this was for the motor, but the ended up too long. I couldn't find any other bolts, so cut some 6mm stud and used that. Next problem is that the holes in the motor bracket does not line up with the bolt holes on the motor unit. I used a 10mm drill to take out the holes (not the slots) on the motor unit a little and the thing mated up OK.
You do need to swap the nipple from the left side to the right side as mentioned in the instructions.
Wiring up the unit. I put an earth cable on the back of the box (you will see the symbol when you take the front off with the switch on). I then used a connector block to attach the scabby wires to my cable. This is all inside the box. I've connected it using a 13amp plug and it all works OK. I will do something a little better at a later date but I was all a bit too excited for the next bit - making it go up
Next the release mechanism is the thing that took the most time for me, but with a bit more instruction should have been a piece of cake. The key bit is getting the connector bar that goes from front to back correct:
1, Take the nuts off the long bar and slide it. There’s hoops underneath for the bars to operate in.
2, Take the nuts off the NON handled end and slide it in. Put on the nuts, put on the joiner and do the whole thing up as tight as possible (together with retaining nuts)
3, Take the nut off the handle end and slide it in. Add the nuts and screw into the joiner. Do up one nut only.
4, Get one person at the one and and another by the handle. You need both flanges facing in the same direction (just by twisting one end). Once this is done. Get your helpers to hold it in place (you may need to rotate a little to get a screwdriver in the joiner's hole. Then tighten up the remaining nut. The rest is easy, just don't do the nuts up on the connectors too tight (I'll be swapping mine for nylocks at some point)
I was quite worried by how notchy the operation was (especially when going down). Follow Freds instructions and go all the way down and then all the way up. It will sort itself out, and the descent should then be smooth.
I think I need to do some fine tuning now its together with the cable bolts at the top. Some slacken at different rates to others when dropping the lift to a stop.
Other than these few details its pretty much as the instructions. Good luck
Mr BC

Is it a decent piece of kit? It uses good quality steel and feels like a quality product. I think so. I'll be able to answer that in 5 years when its still going strong.
Is it value for money? I considered a 2 post lift and a pit. A pit liner can be purchased from Machine Mart for a reasonable amount of money, but then you have the hard work (or to pay someone) to dig it out, and remove the mess. I was tempted. A 2 post lift was exactly what I wanted. Lift by the chassis full access to all of the car. Problem is unless you have a 3 way garage, I can't see how you can make them fit, and you also generally need 3 phase to run it. This is a great compromise and should give me pretty much what I'm looking for in a lift. Time will tell when I try removing the wheels, but compared with the other 2 options, I think its excelent value for money - especially with the PH discount!
Is it value for money? I considered a 2 post lift and a pit. A pit liner can be purchased from Machine Mart for a reasonable amount of money, but then you have the hard work (or to pay someone) to dig it out, and remove the mess. I was tempted. A 2 post lift was exactly what I wanted. Lift by the chassis full access to all of the car. Problem is unless you have a 3 way garage, I can't see how you can make them fit, and you also generally need 3 phase to run it. This is a great compromise and should give me pretty much what I'm looking for in a lift. Time will tell when I try removing the wheels, but compared with the other 2 options, I think its excelent value for money - especially with the PH discount!
Gassing Station | General TVR Stuff & Gossip | Top of Page | What's New | My Stuff