Isn't machine polishing removing the protection
Discussion


I have a brand new 335i and was left with multiple scratch marks on the bonnet after trying to remove some bird cack with some paper towels. judging from the forums, it appears that a machine polish with some abrasive compounds removes the clear layer to a depth and hence takes away the scratches. Does this not however take away a protective layer from the car so that it is more likely to be attacked by the elements, etc.
The idea isn't to remove all the clearcoat, and hence remove 'a layer' of protection!
But yes, *any* abrasive process reduces the amount of protective build between the car and its paint, and the environment.
Hence why polishing should only ever be done when there is damage to polish out. The amount of customers who can't believe this when we tell them, and say something like "My AutoGlym car care kit instruction manual says to polish the car weekly." and then look horrified when you point out that a) polish is fine liquid sandpaper, and b) Autoglym's job is to *sell more polish*.
Tol
Merlin, depending on how deep the scratches are, you could mask them with AG SRP or my favourite - Bilt Hamber Auto Balm.
If they are a bit too deep (and we're talking of only 1-2 microns here) then SRP by hand or machine, or other brands of polishing compound will remove them - but you'll need to be more careful regarding your wash technique/regime, as well as carry a fluffy microfiber cloth and a Quickk Detailer type spray, to hit the bird bombs as soon as you come across them.
Modern BMW paint seems to be in the mid-high 200's so you have plenty of clearcoat to work with - but minimising damage should be the main aim, rather than loping off a few microns every so often.
Is the point valid though, 360?
Do you advocate polishing (ie, removing) undamaged topcoat? Or just adding more protection with a wax/sealant?
And I don't think your comparison is completely fair - otherwise I'd have been suggesting Autoglym are out there putting light scratches in people's lacquer
Tol
Do you advocate polishing (ie, removing) undamaged topcoat? Or just adding more protection with a wax/sealant?
And I don't think your comparison is completely fair - otherwise I'd have been suggesting Autoglym are out there putting light scratches in people's lacquer
Tol
Merlin i am not sure if your getting slightly mixed up to what is a
protective layer! The clear topcoat (LACQUER) is part of the whole paint
process , it is just clear paint designed to seal the colour coats below
which are porous to help bond together ! This is why a stone chip nearly
always exposes down to metal or the primer coat as all the colour coats and
lacquer have bonded to become one!
The lastest paints in general are much softer now and do mark much easier!
When you machine polish it will remove a small amount of lacquer but it is tiny compared to how much is on your car. I have recently wet sand a 335i and another booked for next week which is a week old to remove the orange peel look or calld egg shell that is seen in latest BMW's which
involves sanding the lacquer down with different grades of paper then machine
polishing back with atleast four different compounds! And done correctly still does not go through the lacquer! As for protection for your car you should try and use a top quality last step protection (wax) to protect the topcoat and to help stop bird droppins etc keying into the paint.
This link shows a wet flat and multiple stage machine polish
and has still not broke through the lacquer when done correctly!
http://uk.youtube.com/watch?v=dAqLPD-H5JE
and has still not broke through the lacquer when done correctly!
http://uk.youtube.com/watch?v=dAqLPD-H5JE
Edited by kds keltec on Friday 6th June 18:37
Anatol said:
Is the point valid though, 360?
Do you advocate polishing (ie, removing) undamaged topcoat? Or just adding more protection with a wax/sealant?
And I don't think your comparison is completely fair - otherwise I'd have been suggesting Autoglym are out there putting light scratches in people's lacquer
Tol
That was tongue in cheek sir, but your right, its a little known fact that the way some of the polishing products have a mild abrasive, or they wouldn't work!Do you advocate polishing (ie, removing) undamaged topcoat? Or just adding more protection with a wax/sealant?
And I don't think your comparison is completely fair - otherwise I'd have been suggesting Autoglym are out there putting light scratches in people's lacquer
Tol
I always use the finest grade products with the softest pads, minimising the topcoat removed, whilst reducing or removing scratches and swirls. I Then progressively step up the compound grades / pad abrasion till the desired results are achived with minimal "removal" to the topcoat.
A Few guys will go right in with the heavy graded products, getting the scratches and swirls removed quicker and easier that I, but I think from a professional point of view you have to take a bit more pride and care with a clients car?
Al
I would imagine it's valeters (by and large) who would be straight in with G3 or Fast Cut + - but those who know and care about the paintwork would, as you've pointed out, start with the least aggressive combo, and change polish/pads until they find the right combo that does the trick, even if it means 2-3 hits.
You can't not remove clearcoat/paint whilst removing swirls/scratches - they by their very nature are gouges in the surface, and it's not them that are removed, but the surrounding peaks, so as the paintwork is levelled.
Bit like gardening - if you dig a hole, instead of filling it again, you remove the soil in the bed so that it's same depth as the hole . Hey presto - no hole anymore, it's been removed!
PJ S said:
I would imagine it's valeters (by and large) who would be straight in with G3 or Fast Cut + - but those who know and care about the paintwork would, as you've pointed out, start with the least aggressive combo, and change polish/pads until they find the right combo that does the trick, even if it means 2-3 hits.
You can't not remove clearcoat/paint whilst removing swirls/scratches - they by their very nature are gouges in the surface, and it's not them that are removed, but the surrounding peaks, so as the paintwork is levelled.
Bit like gardening - if you dig a hole, instead of filling it again, you remove the soil in the bed so that it's same depth as the hole . Hey presto - no hole anymore, it's been removed!
More valid points there!You can't not remove clearcoat/paint whilst removing swirls/scratches - they by their very nature are gouges in the surface, and it's not them that are removed, but the surrounding peaks, so as the paintwork is levelled.
Bit like gardening - if you dig a hole, instead of filling it again, you remove the soil in the bed so that it's same depth as the hole . Hey presto - no hole anymore, it's been removed!
The explaination you have given on the removal of defects is spot on - I have done a really s
 t sketch in paint ( I know, its really bad but might help some people understand whats going on! ).
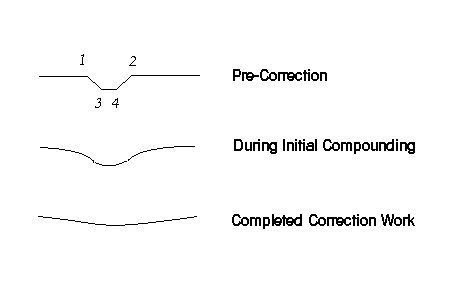
Top of the image shows pre-corrected condition. Points 1 and 2 on the sketch represent the top part of the damage ( ie top surface of the panel ). These 2 edges are points where sunlight / streetlights / garage lights will pick up and give the impression of scratches. Points 3 and 4 are at the bottom of the defect, but still give a reflection to light. basically a scratch will look 4 times as bad as you would think on initial inspection due to there being 4 points of reflection (Make any sense?!).
Second s
t sketch down shows during Correction condition. The compounding work will start to remove these edges from the paintwork. The defect is still there but due to the removal of the edges, the reflection will vanish or minimise. There will still be some evidence of these edges, which during final polishing ( s
t sketch 3 ) at a higher speed, will be reduced further, giving the perfect finish that we all desire. The arc in the s
t sketch is for indication purposes - The smooth controlled machining of the panel would obviously remove any traces of this ( It is great magnified remember!! ).Well hopefully that made some sense to someone, not trying to tell anyone how to suck eggs, just trying to expain a bit more and display my s
t ability on Computer paint packages!!!Al
Your sketch reminded me of the diagrams in the best book chapter I've read on paintwork correction (or "Paint Finessing" as the author calls it) - it's in Pfanstiehl's 'Automotive Paint Handbook'. Other than the (very forgiveable) fact that he works in thousandths of an inch for his examples rather than microns, it's extremely well written and covers everything in great depth.
He has a big downer on using rotaries to buff out scratches without wet-sanding with 1500-2000 on a block first, claiming the scratches propagate further into the paint with conventional rotary buffing, and that you remove seven or eight times as much coating before the defect is removed if you only use a rotary to achieve it. Sounded a little implausible to me, but this is certainly true: if 360's paint sketch above was a pit in lacquer texture, because all sprayers from time to time don't get a glassy smooth finish, and you wanted to restore a flat profile with the same techniques as for trace scratch removal, if you block out the texture before polishing up, you are far less likely to polish through than if you just used the rotary to mop out the texture. I guess the mop removes a certain amount of clearcoat from the bottom of the pit as well as the top surface.
Tol
Anatol said:
Your sketch reminded me of the diagrams in the best book chapter I've read on paintwork correction (or "Paint Finessing" as the author calls it) - it's in Pfanstiehl's 'Automotive Paint Handbook'. Other than the (very forgiveable) fact that he works in thousandths of an inch for his examples rather than microns, it's extremely well written and covers everything in great depth.
He has a big downer on using rotaries to buff out scratches without wet-sanding with 1500-2000 on a block first, claiming the scratches propagate further into the paint with conventional rotary buffing, and that you remove seven or eight times as much coating before the defect is removed if you only use a rotary to achieve it. Sounded a little implausible to me, but this is certainly true: if 360's paint sketch above was a pit in lacquer texture, because all sprayers from time to time don't get a glassy smooth finish, and you wanted to restore a flat profile with the same techniques as for trace scratch removal, if you block out the texture before polishing up, you are far less likely to polish through than if you just used the rotary to mop out the texture. I guess the mop removes a certain amount of clearcoat from the bottom of the pit as well as the top surface.
Tol
Please in future can you refer to my sketches as sHe has a big downer on using rotaries to buff out scratches without wet-sanding with 1500-2000 on a block first, claiming the scratches propagate further into the paint with conventional rotary buffing, and that you remove seven or eight times as much coating before the defect is removed if you only use a rotary to achieve it. Sounded a little implausible to me, but this is certainly true: if 360's paint sketch above was a pit in lacquer texture, because all sprayers from time to time don't get a glassy smooth finish, and you wanted to restore a flat profile with the same techniques as for trace scratch removal, if you block out the texture before polishing up, you are far less likely to polish through than if you just used the rotary to mop out the texture. I guess the mop removes a certain amount of clearcoat from the bottom of the pit as well as the top surface.
Tol
t sketches? lets be honest here ok!Agree with everything your saying there sir, wet sanding is always an interesting option! even with the correct training, tools and practice its something that takes ages to get right and the same again till your confident to offer this to clients!
This is getting quote a technical post from everyone, hopefully some of the comments and tips ( Like that of wet sanding from tol here ) help someone!!
Al
Tol and 360 have put some good comments about this subject, so
here is a picture of a car that has been wet sand (wet flat) then compound
to achieve this result. This panel in the pictue has no wax type products at all and had just been finished using Farecla G10 extra fine compound, which the bottle can be seen in the pic!
It would be impossible to paint straight from a spray gun or use any wax (sealant) product to do this
Sorry to crash the thread but I would like to ask about this current'trend' on a certain world for detailers of wet sanding.
Quite a few people are now leaping into the wet sanding business. Once claybar was the mystic art, then using the Porter Cable, then the Rotary but now it seems wet sanding is the new black art.
This I find disturbing as, as is mentioned before, when PC-ing I always use the least abrasive possible on a test section and work upwards until the desired result has been found. This is then used for the rest of the vehicle if necessary.
I have seen mentioned that wet sanding is used to remove orange peel and that is why it is done. Indeed on one particular website, it looks like the 'detailer' goes straight into wet sanding rather than PCing.
Now, at what point does the observation take place as to whether the orange peel is in the colour or clear coat? I have had a few US vehicles and the current F150 I have has very bad O.P. in the tailgate but this is sub clearcoat. I certainly wouldnt want to be paying for someone to wet sand that out for me.?
I'm not 100% sure I understand the question, but 'orange peel' is usually used to refer to an excessively dimpled topcoat texture. This shows in the reflection as the dimples in the gloss distort what's reflected.
That means orange peel is by definition in the clearcoat on a clear-over-base finish.
If the paint below was textured, but the clearcoat was glassy smooth, the finish would not be orange peeled. If the paint below was textured, and the clearcoat on top replicated the texture, there would be an orange peel finish, but wet sanding the clear would restore a perfect gloss profile.
With a flat colour, no matter how textured the paint is, if the clearcoat is flat, the textured paint becomes utterly undetectable. With a high metallic colour, if the metallics were laid down at textured angles, you'd see a tone variance, but this usually comes across as dark/light mottling or striping, rather than a regular orange peel texture in the tone(and in this case, wet sanding the texture in the clear out makes no difference).
Hence my confusion as to exactly what phenomenon you're describing. What exactly gives you the impression that the texture on your tailgate is below the clearcoat? And what's the visual effect?
Tol
Tol,
Sorry if I didnt explain myself properly....
On my old F150, there was a lot of orange peel i.e. small 'craters' in what appeared to be the clear coat.
As I had never wet sanded before, I good friend of mine who has a bodyshop said he would work on it and I could watch and learn. Well after wet sanding and then machine polishing afterwards, the effect was still there? The answer I received was the effect was in the paint coat rather than the clear.
So on my new truck, the general condition of the paint is very orange peely. But from what you have mentioned, this effect should be clear coat, but if the colour coat is the issues then flatting the clear will 'mask' the problem?
Hi evolutionvalet
Here is a link to pictures of the same truck which was done by me a few
years ago when it was only 4 weeks old!
The after shots have no wax/sealant products just bare paint!
http://www.kdskeltec.co.uk/ford_f150.phtml
Any orange peel can be removed if done correctly and have been doing this for over 15 years ! I have a 4 day old bmw thats in this week to have such a process !
Here is another link to a wet flatted Audi A8
http://www.kdskeltec.co.uk/audi_s8.phtml
Here is a video link to wet flat Bmw M3 which is a light pale colour whch is even harder to show on cameras etc
http://uk.youtube.com/watch?v=dAqLPD-H5JE
Edited by kds keltec on Sunday 8th June 11:09
evolutionvalet said:
Well after wet sanding and then machine polishing afterwards, the effect was still there? The answer I received was the effect was in the paint coat rather than the clear.
So on my new truck, the general condition of the paint is very orange peely. But from what you have mentioned, this effect should be clear coat, but if the colour coat is the issues then flatting the clear will 'mask' the problem?
Well, if not enough depth of clear was removed so that the surface left was flat, the effect would still be there. Easy way to check - flat a small section with a few strokes of 2000 on a rigid block and then dry completely. Everywhere the paper has touched will have gone matt. If there are still shiny pits in the finish, rather than a solid square of matt clear, then the dimples are still there and more material would need to be removed to lower the depth until everything has been flatted.So on my new truck, the general condition of the paint is very orange peely. But from what you have mentioned, this effect should be clear coat, but if the colour coat is the issues then flatting the clear will 'mask' the problem?
Yes, if the colour coat is a bit textured, flatting the clear will resolve the problem (metallics aside, but as indicated, these don't show an orange-peel finish under the clear when applied wrong).
A slight aside - when you're sure of the lacquer build, you can dry flat out texture. You use a DA with the smallest available orbit (larger than 3mm is a bad idea!) with a good quality 1500g or higher disc, and having vacuum extraction is best (to prevent clogging). This rapidly (!) cuts out the texture to a smooth surface, after which switching to a superfine product (3M's 3000 grit-equivalent trizact discs, wet, are excellent) before mopping back a high gloss with the rotary. Not for the inexperienced, and possibly not for a paintwork correction specialist, who's a bit stuck if they go too far, but for paint shops, who can simply reblend and clear if they go through, it's a popular option.
Tol
Spot on Tol
There many good valet and detail companies around!
What you just wrote makes sense and is also why i work from
a unit and not a van , as i have far more controll over what and when
i detail or paint a car ! I have been painting cars for over 15 years
mainly to show and high end cars.
I am amazed how many cars i have seen where people have broke through
the paint including a company on the same estate who work on jap cars only which have watch me over the years, tied for themselves and melted right through a skyline headlight
kds keltec said:
Spot on Tol
There many good valet and detail companies around!
What you just wrote makes sense and is also why i work from
a unit and not a van , as i have far more controll over what and when
i detail or paint a car ! I have been painting cars for over 15 years
mainly to show and high end cars.
I am amazed how many cars i have seen where people have broke through
the paint including a company on the same estate who work on jap cars only which have watch me over the years, tied for themselves and melted right through a skyline headlight
And working from a unit and not a van makes you a better detailer how exactly?There many good valet and detail companies around!
What you just wrote makes sense and is also why i work from
a unit and not a van , as i have far more controll over what and when
i detail or paint a car ! I have been painting cars for over 15 years
mainly to show and high end cars.
I am amazed how many cars i have seen where people have broke through
the paint including a company on the same estate who work on jap cars only which have watch me over the years, tied for themselves and melted right through a skyline headlight
Gassing Station | Bodywork & Detailing | Top of Page | What's New | My Stuff