Exige S1 over-winter Refresh
Discussion


Every little bit gets me that much closer to project completion 
Painting hasn't been hung yet as I need my front clamshell out of my bedroom before I've the wall space!! It's currently on display leaning up against said clamshell carefully positioned on top of a soft bean bag! I still look at it every night before I go to sleep for inspiration
Painting hasn't been hung yet as I need my front clamshell out of my bedroom before I've the wall space!!
It's currently on display leaning up against said clamshell carefully positioned on top of a soft bean bag! I still look at it every night before I go to sleep for inspiration 
Righto,
Well I've been busy lately so I've had precious little time to cavort around doing car stuff sadly. Busy as fook at work, but fingers crossed I'll be able to steal an hour or two here and there to do stuff.
I've decided that after all this work, bolting my rusty old Koni LSS shocks and springs back on the car just won't do, so I'll be making the call to Hofmann's before too long to order some of the Randy-tuned Nitrons for it. I'll be taking Chris's advice as to spring rates etc just as soon as I've given some thought to ride-heights and usage. But here's a pretty picture of them anyway:

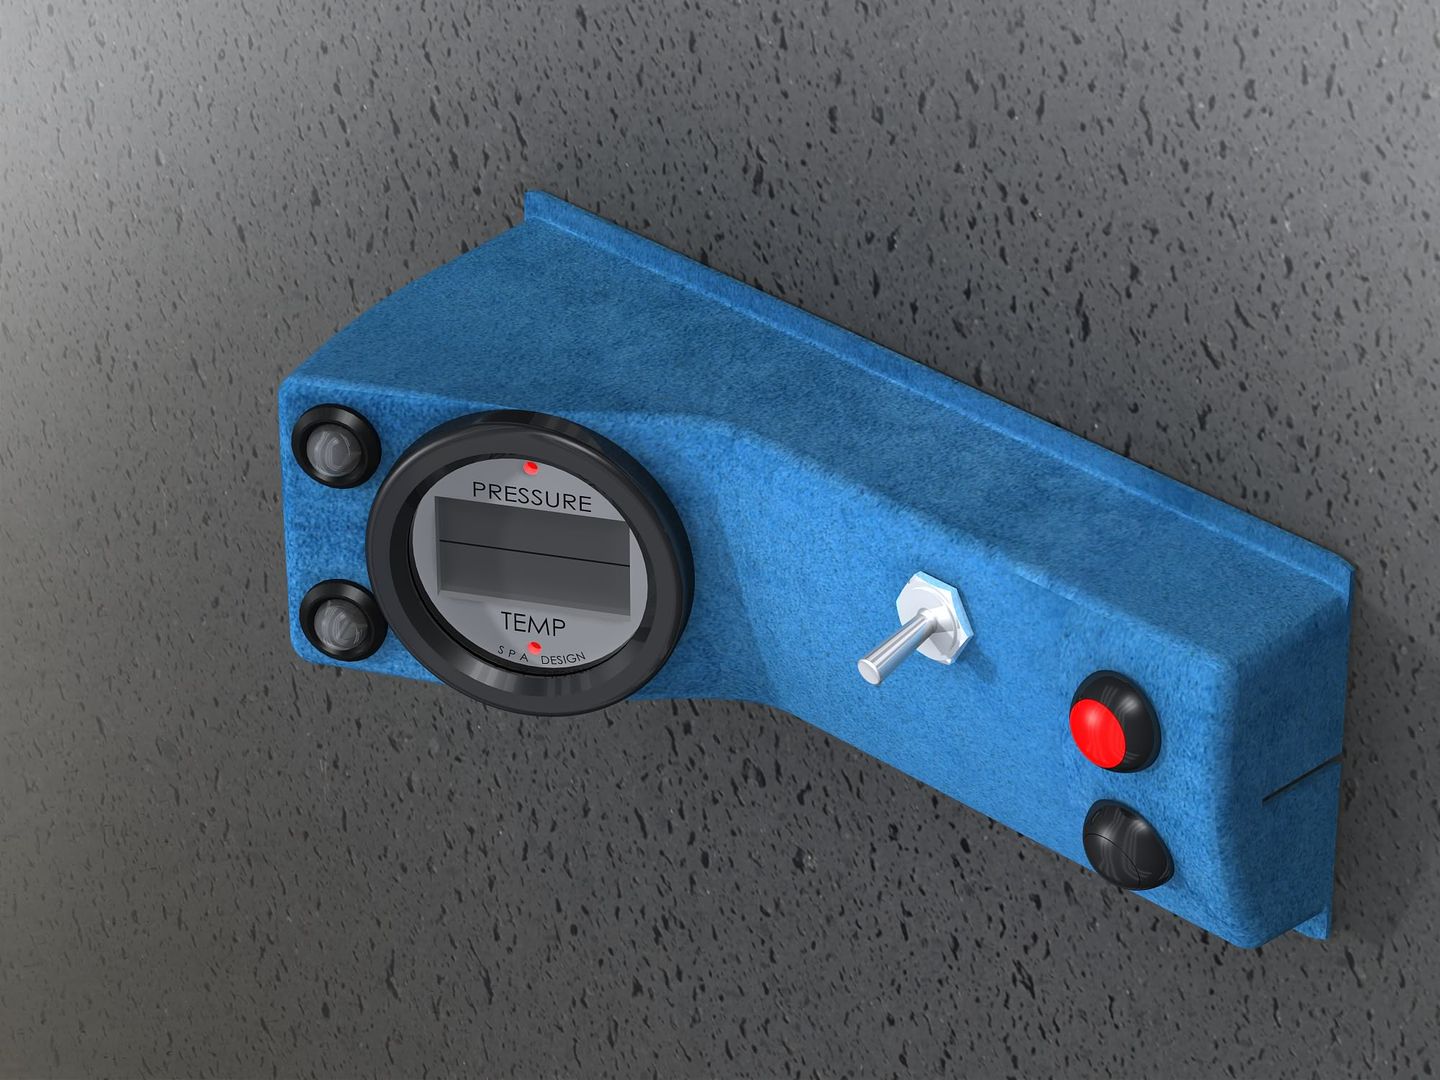
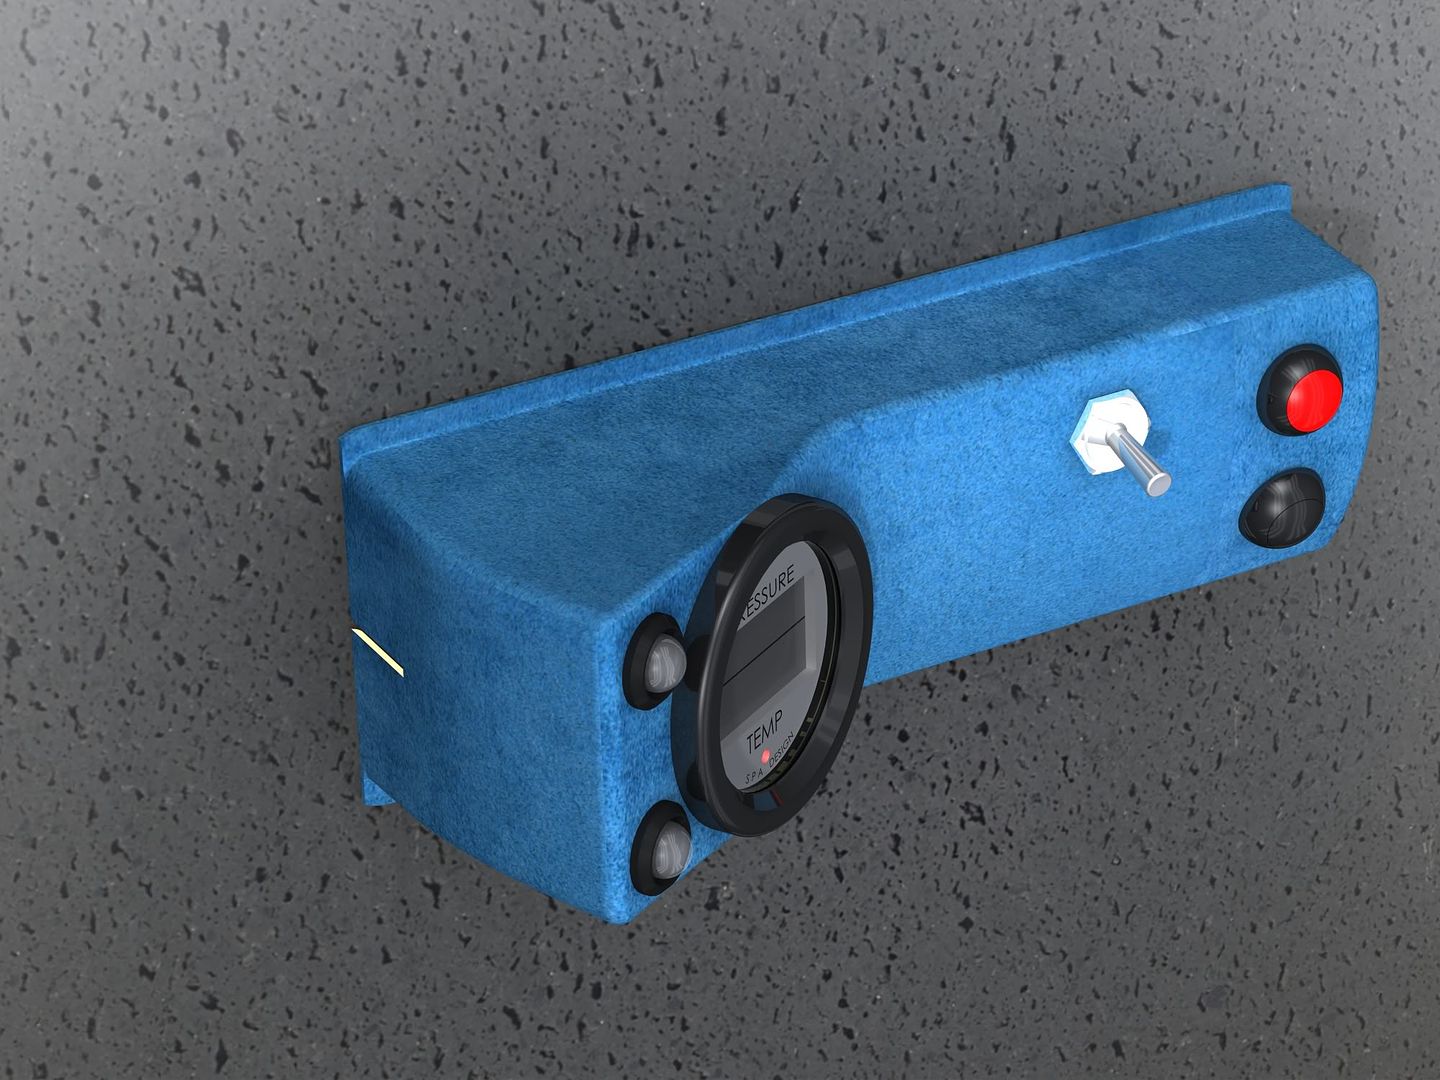
I've been doing a bit of work on the ergonomics side of things for the oil pressure/temperature gauge install. As I've said before I'm installing it in the blanked-off radio slot in the dash. I don't intend to ever run a radio on this car so it seems a logical place to put it.

It's not in line-of-sight really, but that matters little as I've got the audible warning circuit (as detailed earlier in this thread) as well as some blindingly bright LEDs to back it up.
This is the blanking plate moulding as removed from the dashboard sitting on my desk.

I then used a couple of measurements as to the radio location from the driver's head (thanks to SELOC's Alex/"dt95aac" and Danny/"Chopperver1") to figure out some viewing angles and reaches so that I could do a lay-out of the new "Gaugepod" blanking plate replacement.
I decided to quickly draft it up to make sure I could get a decent shape when I came to cut the buck from plywood and so that I could play around getting it looking right first before I cut wood and began moulding any glassfibre.
A couple hours on SolidWorks later and bingo, one raw moulding ready to go!

Of course in typical fashion, I then got carried away and wanted to check how everything would look so a couple more hours on the SolidWorks and I produced a couple of "artists impressions" (click photos for MEGASIZED pics) so that I could see what it'd roughly look like all finished up and upholstered in the OEM alcantara:


The gauge and warning LEDs are positioned to the far left (worse for line-of-sight) because I wanted to use the right hand side of the moulding to mount the buttons. This is because when harnessed in, I won't be able to reach beyond about halfway along the panel and I want the controls within reach when on track.
I'll use these to generate some 2D templates for cutting the plywood and then there'll be a lot of hand-shaping to get the buck looking right before it's ready to take a mould. Watch this space over the next few weeks.
Oh... and one more thing, flicking through a copy of "Top Gear" magazine while on the bog today and the buttons I chose to programme the gauge and silence the alarm are exactly the same as the ones used on the cockpit/steering wheel of the Le Mans-winning Audi R10 racer... how f*cking sad am I to notice that?!?! I think I need help.
Well I've been busy lately so I've had precious little time to cavort around doing car stuff sadly. Busy as fook at work, but fingers crossed I'll be able to steal an hour or two here and there to do stuff.
I've decided that after all this work, bolting my rusty old Koni LSS shocks and springs back on the car just won't do, so I'll be making the call to Hofmann's before too long to order some of the Randy-tuned Nitrons for it. I'll be taking Chris's advice as to spring rates etc just as soon as I've given some thought to ride-heights and usage. But here's a pretty picture of them anyway:
I've been doing a bit of work on the ergonomics side of things for the oil pressure/temperature gauge install. As I've said before I'm installing it in the blanked-off radio slot in the dash. I don't intend to ever run a radio on this car so it seems a logical place to put it.
It's not in line-of-sight really, but that matters little as I've got the audible warning circuit (as detailed earlier in this thread) as well as some blindingly bright LEDs to back it up.
This is the blanking plate moulding as removed from the dashboard sitting on my desk.
I then used a couple of measurements as to the radio location from the driver's head (thanks to SELOC's Alex/"dt95aac" and Danny/"Chopperver1") to figure out some viewing angles and reaches so that I could do a lay-out of the new "Gaugepod" blanking plate replacement.
I decided to quickly draft it up to make sure I could get a decent shape when I came to cut the buck from plywood and so that I could play around getting it looking right first before I cut wood and began moulding any glassfibre.
A couple hours on SolidWorks later and bingo, one raw moulding ready to go!
Of course in typical fashion, I then got carried away and wanted to check how everything would look so a couple more hours on the SolidWorks and I produced a couple of "artists impressions" (click photos for MEGASIZED pics) so that I could see what it'd roughly look like all finished up and upholstered in the OEM alcantara:
The gauge and warning LEDs are positioned to the far left (worse for line-of-sight) because I wanted to use the right hand side of the moulding to mount the buttons. This is because when harnessed in, I won't be able to reach beyond about halfway along the panel and I want the controls within reach when on track.
I'll use these to generate some 2D templates for cutting the plywood and then there'll be a lot of hand-shaping to get the buck looking right before it's ready to take a mould. Watch this space over the next few weeks.
Oh... and one more thing, flicking through a copy of "Top Gear" magazine while on the bog today and the buttons I chose to programme the gauge and silence the alarm are exactly the same as the ones used on the cockpit/steering wheel of the Le Mans-winning Audi R10 racer... how f*cking sad am I to notice that?!?! I think I need help.
Edited by Esprit on Tuesday 27th January 13:15
Edited by Esprit on Tuesday 27th January 14:00
shirt said:
you need to stop updating this esprit, its making me sick
seriously, its shaping up to be one of the nicest exiges in the world with all the things you keep coming up with. good work
Haha well thankyou... I severely doubt it'll be one of the nicest in the world, but I'm aiming for a tidy, useable car that'll give me a good number of years pleasure once it's back in one piece. It really has ended up being a much larger (and more expensive!) undertaking than I'd intended but I'm enjoying the challenge/learning that's going into it and quite aside from the finished result, it'll have taught me a lot by the time I'm done seriously, its shaping up to be one of the nicest exiges in the world with all the things you keep coming up with. good work
TonyHetherington said:
I am SO excited to see what it's going to be like when finished. Utterly stunning!
Thanks Tony... should be done by your summertime, just in time to sit in my garage sheltering from our winter  Means a lot that I've got a true Lotus nutjob like you interested
 Aww, 'tis a shame you're selling Tony (I'd seen that it was for sale) and I'm not really worried because I know that you'll be without it for about 6 weeks before you realise what a hideous, hideous mistake you've made and you'll get another. Given that sort of usage, I think a nice S1 Exige would suit you just fine
Thanks for the feedback Thumbs.
Yes, I could rapid prototype up the buck, and I will if I run into problems making the buck from wood, but for now I'm enjoying the challenge of doing a bunch of stuff by hand I've absolutely no idea how to do.... the challenge and self-teaching is part of the process.
I'm in no hurry now... as it stands the car won't be ready until April/May (mid autumn here) so there's no point rushing to get it finished in time to sit in the garage over winter. From now on I'm taking my time to get things sorted. Having said this, the car should be almost back on its wheels before too long
Well a VERY VERY VERY big day today, not in so much that I got a lot done, but more in what today represents... a very very special part of any rebuild. Today was the day when my car hit the turning point. To this point it's all been dismantling/cleaning/prepping/refurbishing, but today I finally started on the long-overdue REASSEMBLY!
I've been saying for months now that "next week or two I should be able to start bolting things back together" but it never quite happened, I always found something else to pull apart or work on, but I'm at the stage now where it really is time for some stuff to be reunited again.
First a couple of pics of the mess so far... really not a lot of difference from the pics I first took last may really, although a LOT of work has gone on since:


Still not really looking much at all like a car, but what's there now is clean as a whistle, fully fettled and ready to start becoming a car again.
Today I finished cleaning up the chassis around the engine bay and then began a couple of hours sorting through all my new fasteners. I've got the bulk of them now but am still missing a few so it's not quite all smooth sailing.
First job was to re-mount the rear lower wishbone mounts, which had the honour of being the first thing to go back onto the chassis.. and here they are in all their refurbished glory:

Then, a slightly more substantial part to go back on was the shiny, re-galvanised rear subframe. Bolted up a treat after I'd spent a bit of time cleaning and re-tapping some holes that were a bit blocked up with extra zinc! Still a long way to go to become a car but she looks better than she did this morning!


Tomorrow I hope to get a few more fasteners (hoping my supplier is open on a Saturday morning!) and I will mount the rear wishbones. I will also mount the front lower wishbones, but I can't mount the upper ones as my new castor shims (I'm having some stainless ones laser cut along with my new camber shims) aren't ready until early next week.
We're on our way.... FINALLY!
I've been saying for months now that "next week or two I should be able to start bolting things back together" but it never quite happened, I always found something else to pull apart or work on, but I'm at the stage now where it really is time for some stuff to be reunited again.
First a couple of pics of the mess so far... really not a lot of difference from the pics I first took last may really, although a LOT of work has gone on since:
Still not really looking much at all like a car, but what's there now is clean as a whistle, fully fettled and ready to start becoming a car again.
Today I finished cleaning up the chassis around the engine bay and then began a couple of hours sorting through all my new fasteners. I've got the bulk of them now but am still missing a few so it's not quite all smooth sailing.
First job was to re-mount the rear lower wishbone mounts, which had the honour of being the first thing to go back onto the chassis.. and here they are in all their refurbished glory:
Then, a slightly more substantial part to go back on was the shiny, re-galvanised rear subframe. Bolted up a treat after I'd spent a bit of time cleaning and re-tapping some holes that were a bit blocked up with extra zinc! Still a long way to go to become a car but she looks better than she did this morning!
Tomorrow I hope to get a few more fasteners (hoping my supplier is open on a Saturday morning!) and I will mount the rear wishbones. I will also mount the front lower wishbones, but I can't mount the upper ones as my new castor shims (I'm having some stainless ones laser cut along with my new camber shims) aren't ready until early next week.
We're on our way.... FINALLY!
Hehe there will be many jam jars left over when I'm done... so many of the bits (small bits, consumables and fasteners) are being replaced there'll be bucketloads of double-ups. In the end though, the car's nice and simple, I've got all the workshop and parts manuals so I know exactly what needs to go where and fear not, the reassembly will be just as methodical as the rest of the project has been up until this point
griffter said:
I like your impressive selection of 'fine adjustment tools' hanging towards the left of your tool rack.
Good luck with the rebuild!
They are the tools of torture I shall use on myself if things go tits-up with the rebuild Good luck with the rebuild!
TonyHetherington said:
Excellent - bits going on rather than off 
What are you doing to do with the bodywork? As the car is so "apart" will you be sending clam and panels off to be sprayed, or is the paint in good condition? (apologies if you've covered this already in the thread)
The bodywork will just be going back as-is at the moment. The paint's in pretty good condition although the front and sills have their fair share of stonechips (NZ roads are KILLER for these). I WILL be giving the car a respray (in original Titanium) and armourfending it at some point, probably over next winter once the finances have recovered from this phase. Given that whipping the clams off isn't something that really daunts me any more, I'll tackle it as a separate phase later on.What are you doing to do with the bodywork? As the car is so "apart" will you be sending clam and panels off to be sprayed, or is the paint in good condition? (apologies if you've covered this already in the thread)
cyberface said:
This is bloody excellent, right proper job Also a way to get vicarious pleasure from a strip and rebuild that I'd not have the balls to do myself - many thanks mate!
Not only do I not have a garage or the requisite tools and mechanical skills (though I'm sure part of the process teaches you the necessary skills), but I also know damn well what I'd want to 'rebuild' which would probably offend many Lotus types on here...
...basically I didn't get on with my S1 Elise but I *loved* the VX220 turbo and I have similarly fallen in love with my S2 Exige. But the thing is that the S2 Exige weighs a tonne (literally - 930 kg with 69 kg of cyberface makes nearly a nice round tonne). I'd love a completely rebuilt S1 Exige like yours, but with the fact that the S1 weighs so little to begin with, and the fact that I don't really get on with *hugely* noisy and rough cars, would tempt me very seriously at looking into doing a 'hybrid' S2/S1 Exige - no not a battery powered Tesla clone, but an S1 Exige with (shock horror) some of the S2 'touring pack' features bolted in. Comfy seats, some of the noise deadening, snap-off wheel, just enough of the 'taming' stuff to get the car as quiet as a VXT really. Then redress the balance by hoiking out the K series and dropping an Audi turbo in there It wouldn't end up anywhere near as heavy as an S2 Exige but would definitely be heavier than your car. Still, an extra 100 kg is only a rugby-playing passenger and can easily be neutralised with a big engine...
It seems to me that when you do a nuts-and-bolts rebuild ('refresh' doesn't go far enough!) like this, you may as well go the whole hog and either keep it as original as possible (like you) or turn it into the Lotus you *really* wanted (as per my mad idea). I'd love a Lotus where I knew that all the fixtures and fasteners were high-grade stainless, where all exposed aluminium was painted in super-tough POR-15, and I simply knew that it'd be more reliable, tougher and last longer than any factory car. Alas I don't live in NZ and besides, I'd want to drive this beastie year-round - a corrosion-protected and stainless-bolted Exige S1 would be heaven, as long as my little mods are catered for
I wonder whether by the time I'm old enough to have the time and property to embark on a brilliant experience like this (maybe 'if' rather than 'when'...) that restorable S1 Exiges are available at acceptable prices, and whether cars like that are possible to run on the roads... for now I'll have to make do with what Lotus sell, thankfully their current offerings are pretty well screwed together compared to yesteryear...
Cyberface, it sounds like you've got the right idea with your desired project. Don't worry about offending anyone, just do what you want to do... it's not as if you're butchering the car with chavvy lights and stuff Also a way to get vicarious pleasure from a strip and rebuild that I'd not have the balls to do myself - many thanks mate!Not only do I not have a garage or the requisite tools and mechanical skills (though I'm sure part of the process teaches you the necessary skills), but I also know damn well what I'd want to 'rebuild' which would probably offend many Lotus types on here...
...basically I didn't get on with my S1 Elise but I *loved* the VX220 turbo and I have similarly fallen in love with my S2 Exige. But the thing is that the S2 Exige weighs a tonne (literally - 930 kg with 69 kg of cyberface makes nearly a nice round tonne). I'd love a completely rebuilt S1 Exige like yours, but with the fact that the S1 weighs so little to begin with, and the fact that I don't really get on with *hugely* noisy and rough cars, would tempt me very seriously at looking into doing a 'hybrid' S2/S1 Exige - no not a battery powered Tesla clone, but an S1 Exige with (shock horror) some of the S2 'touring pack' features bolted in. Comfy seats, some of the noise deadening, snap-off wheel, just enough of the 'taming' stuff to get the car as quiet as a VXT really. Then redress the balance by hoiking out the K series and dropping an Audi turbo in there
It wouldn't end up anywhere near as heavy as an S2 Exige but would definitely be heavier than your car. Still, an extra 100 kg is only a rugby-playing passenger and can easily be neutralised with a big engine... It seems to me that when you do a nuts-and-bolts rebuild ('refresh' doesn't go far enough!) like this, you may as well go the whole hog and either keep it as original as possible (like you) or turn it into the Lotus you *really* wanted (as per my mad idea). I'd love a Lotus where I knew that all the fixtures and fasteners were high-grade stainless, where all exposed aluminium was painted in super-tough POR-15, and I simply knew that it'd be more reliable, tougher and last longer than any factory car. Alas I don't live in NZ and besides, I'd want to drive this beastie year-round - a corrosion-protected and stainless-bolted Exige S1 would be heaven, as long as my little mods are catered for
I wonder whether by the time I'm old enough to have the time and property to embark on a brilliant experience like this (maybe 'if' rather than 'when'...) that restorable S1 Exiges are available at acceptable prices, and whether cars like that are possible to run on the roads... for now I'll have to make do with what Lotus sell, thankfully their current offerings are pretty well screwed together compared to yesteryear...
Either way you'll probably not start with an Exige in the first place but convert a base Elise and put the Exige body on it. That way ends up being cheaper and you're not hacking apart a rather more rare Exige... but what you propose is certainly possible. There's a guy in Oz (Sport400 on SELOC) who has just built himself the tastiest carbonfibre-bodied Exige S1 replica from an Elise with an Audi Turbo engine in it and the thing is indecently quick. From that point on it'd be nothing to add a wad of extra sound deadening and some nice audio and probax seats etc to make it a little more plush.For me personally, I love my Exige the way it is. To me it represents pretty much THE most hardcore you can go with a car. I know you can go to Caterhams/Ariels etc but these I don't really view so much as cars. The Exige I could still convince a girlfriend (if I so had one) to come touring for a week in.... it's still got a real roof and doors, I doubt I'd be able to manage that in anything more stripped out.
It's strange how you didn't get on with your S1 Elise, I loved mine and after driving it again at Christmas it really is a fantastic car... there's no way I'd have sold it if my hand hadn't been forced with the Exige. Having said that, I've driven some Elises which felt a lot worse than my old one to drive, I'm guessing that not all of them are built the same. What I DO really love about the Exige that the Elise couldn't deliver is that while the Elise was VERY competent and challenging to drive, the Exige just has this way of completely immersing you in it.... it's grumpy, temperamental and unreliable (hell, my first touring journey on it ended on a low-loader) but STILL I loved the thing.... if my Elise had behaved similarly I think the shine would have worn off it, but with the Exige..... well it's just got this charm that means I can forgive it almost anything.
And on tonight's episode of "PIMP MY WISHBONES"


Got the first rear ones hung tonight and they look even sexier on the car than they did sat on the floor! I can't fully hang them or go much further as it seems I'm missing a bunch of the bolts I need to do it so can't go much further now sadly. I'm sure I'll find plenty to keep me busy while I get them though.
Got the first rear ones hung tonight and they look even sexier on the car than they did sat on the floor!
I can't fully hang them or go much further as it seems I'm missing a bunch of the bolts I need to do it so can't go much further now sadly. I'm sure I'll find plenty to keep me busy while I get them though.Cheers Tim... I'm not sure about being better than when it left Hethel, but it'll certainly be close and hopefully much more prepared to withstand the rigours of use
CooperS .... originally the aim was just to tidy up the suspension and get it protected again as the plating had gone through and the wishbones were beginning to rust. I decided to replace all the consumables (bushes, balljoints, TREs drop links etc) at the same time as that just made sense.... that was all I planned to do.
Then as fate would have it, just before I started stripping it back, the engine started making some concerning noises so the decision was made to pull that out as well and get it to bits for some exploratory heart surgery.... It was at that point that I decided that since the chassis was pretty much empty and the car was going to be off the road for a while that I may as well put some REAL effort into getting the car as close to perfect (under the skin at least) as it can be and, so far at least, I'm awfully pleased with how it's going.
nzsimon said:
Good to see I am not the only magpie
Shiny things do have their place Simon Mine is FAR from shiny when compared to yours though... the underside of your rig is a work of art!paulrhodes said:
Gutted! I can't read the ending! lol
i've just read this from start to finish and it's fascinating. Congratulations on such a great job.
Very much looking forward to seeing it all complete. I'm going to make this page a bookmark.
Cheers Paul, Glad you got some entertainment out of it.... it'll be finished eventually, and like all good stories it has its ups and downs and leaves the reader in suspense i've just read this from start to finish and it's fascinating. Congratulations on such a great job.
Very much looking forward to seeing it all complete. I'm going to make this page a bookmark.
Frustratingly little progress of late. Work has been INSANE and to be honest, after working from 8 in the morning until midnight, I don't much feel like popping out to the garage for a couple of hours. When I DO get a day off it's been spent mainly in bed catching up on sleep!
Still, I've been working away at getting together more bits I'm missing.
Another consignment of fasteners has arrived from Lotus courtesy of the fine lads at Bell & Colvill. Geary at Eliseparts is also sending me the remainder of my fastener set which was missed in the last shipment.
I've also been trying to get together the necessary adhesives and primers to bond on the rear longerons. After much searching I managed to find all the components locally. I had hoped to be bonding them on this weekend and completing the boot floor but thanks to the global recession and cost-cutting, most fastener places here aren't open Saturday mornings now... which is a MAJOR piss-off as it means MORE time during the week I have to spend f*cking around getting stuff.
Anyway, this weekend I got all the plinths bolted onto the balljoints as well as a bunch of custom fasteners turned up in the lathe... these were just a bunch of non-standard length bolts I needed that I've shortened down from longer ones.
Another job, which took a lot longer than expected was to clean up the rear longerons. Getting all the old glue off and getting them cleaned up was a mission and a half. Much elbow grease later though they're as good as new and ready to bond on as soon as I get my missing rivets.


Hopefully more progress by next weekend.
Still, I've been working away at getting together more bits I'm missing.
Another consignment of fasteners has arrived from Lotus courtesy of the fine lads at Bell & Colvill. Geary at Eliseparts is also sending me the remainder of my fastener set which was missed in the last shipment.
I've also been trying to get together the necessary adhesives and primers to bond on the rear longerons. After much searching I managed to find all the components locally. I had hoped to be bonding them on this weekend and completing the boot floor but thanks to the global recession and cost-cutting, most fastener places here aren't open Saturday mornings now... which is a MAJOR piss-off as it means MORE time during the week I have to spend f*cking around getting stuff.
Anyway, this weekend I got all the plinths bolted onto the balljoints as well as a bunch of custom fasteners turned up in the lathe... these were just a bunch of non-standard length bolts I needed that I've shortened down from longer ones.
Another job, which took a lot longer than expected was to clean up the rear longerons. Getting all the old glue off and getting them cleaned up was a mission and a half. Much elbow grease later though they're as good as new and ready to bond on as soon as I get my missing rivets.
Hopefully more progress by next weekend.
Edited by Esprit on Sunday 1st March 13:04
Well time marches on and progress of late has been slow. Still working insane hours and been suffering a bit of ill health lately (damned viruses), which have kept me outta the garage. Have been doing a lot of behind-the-scenes work though getting fasteners sorted (I've now got a full compliment of all the right ones I need to finish the rolling chassis) and also sourcing the glue / primers to bond the rear longerons back on again.
I WAS going to bond the Longerons back on this afternoon but I didn't have a rivet gun large enough for the 1/4 stainless rivets that clamp the longerons down. I borrowed my boss's industrial lazy-tong rivet gun and duly broke that (oops, sorry boss) so I didn't manage to get it done today. Off to Hirepool first thing in the morning though to hire a compressor and a 1/4" pneumatic rivet gun so that'll deal to the b ds.
ds.
Got everything mocked up though and it all fits together! (I shouldn't sound so surprised).


Fingers crossed by the end of play tomorrow I should have the rear end structure including the boot floor all bonded in place and finally sorted, the rollbar backstays bolted and torqued and all of the wishbones (bar one, which needs a new balljoint after I accidentally buggered one of the threads.... (don't ask) hung on the chassis and torqued on. All of the shock mounts should also be hung on the chassis as well as the front ARB.... tomorrow will be a busy day!
On the engine front, the wonderful Mr DVA had just about finished my head. It's now fully ported with Colisbro Bronze valve guides, new stem seals, larger Paul Ivey valves, dual valve springs with stock VHPD solid lifters. Everything's all ready to bolt together although I decided to have the camshafts (Piper ARK1444s) and vernier pulleys balanced as a precautionary measure... I know balancing cams is complete overkill, but given how much I'm spending on balancing the bottom end, the paltry sum to balance the cams too seemed like a complete no-brainer.
Crankshaft has been drilled and now tungsten inserted by Mr Steve Smith at Vibration Free and is just awaiting balancing with the lower assembly (Crank, Flywheel, Clutch Cover, Crank Pulley, Cam Drive Sprocket, plus rods and pistons).
Once this is done, my head will be built up, and then I'll be getting everything back to NZ along with a full engine rebuild kit (including new liners, uprated oil-rail etc) so that i can begin engine reassembly.
Still a long ways to go, but as we enter autumn here, I'm not too worried about deadlines so long as it's ready for springtime In another couple of weeks it'll have been a year since I started what was going to be "just a suspension refresh"..... my how these things get out of hand!
I WAS going to bond the Longerons back on this afternoon but I didn't have a rivet gun large enough for the 1/4 stainless rivets that clamp the longerons down. I borrowed my boss's industrial lazy-tong rivet gun and duly broke that (oops, sorry boss) so I didn't manage to get it done today. Off to Hirepool first thing in the morning though to hire a compressor and a 1/4" pneumatic rivet gun so that'll deal to the b
ds.Got everything mocked up though and it all fits together!
(I shouldn't sound so surprised).Fingers crossed by the end of play tomorrow I should have the rear end structure including the boot floor all bonded in place and finally sorted, the rollbar backstays bolted and torqued and all of the wishbones (bar one, which needs a new balljoint after I accidentally buggered one of the threads.... (don't ask) hung on the chassis and torqued on. All of the shock mounts should also be hung on the chassis as well as the front ARB.... tomorrow will be a busy day!
On the engine front, the wonderful Mr DVA had just about finished my head. It's now fully ported with Colisbro Bronze valve guides, new stem seals, larger Paul Ivey valves, dual valve springs with stock VHPD solid lifters. Everything's all ready to bolt together although I decided to have the camshafts (Piper ARK1444s) and vernier pulleys balanced as a precautionary measure... I know balancing cams is complete overkill, but given how much I'm spending on balancing the bottom end, the paltry sum to balance the cams too seemed like a complete no-brainer.
Crankshaft has been drilled and now tungsten inserted by Mr Steve Smith at Vibration Free and is just awaiting balancing with the lower assembly (Crank, Flywheel, Clutch Cover, Crank Pulley, Cam Drive Sprocket, plus rods and pistons).
Once this is done, my head will be built up, and then I'll be getting everything back to NZ along with a full engine rebuild kit (including new liners, uprated oil-rail etc) so that i can begin engine reassembly.
Still a long ways to go, but as we enter autumn here, I'm not too worried about deadlines so long as it's ready for springtime
In another couple of weeks it'll have been a year since I started what was going to be "just a suspension refresh"..... my how these things get out of hand!Well it's been a frustrating week (yes, another one!). I made preparations to hire a suitably-sized rivet gun and the required compressor this weekend, all sure that I'd have this infernal rear subframe job FINALLY finished this weekend come hell or high water, but NOOOOOOOOOOOOOOOOO! Predicatably, all mother of cock-ups has resulted in it still being unfinished.
This morning I started in the garage, full of hope. Tested the rivet gun on a spare rivet and it worked perfectly, FINALLY I was going to finish the job. I loaded the sikaflex in the caulking gun and applied a bead as described in the Lotus Service Notes, I hooked on the longeron and then installed the boot floor and then shot in three rivets.... easy, job done!
But... then I noticed the boot floor was still free to move about a little. Inspecting the rivets (that I'd sized from the Lotus Parts catalogue) were too long to grip and were loose in the holes as a consequence. So now I had sikaflex going off, with an improperly clamped joint!
I had some shorter rivets I bought as a backup (but only had four instead of the six required for the job), so I tested them when I installed the left-hand Longeron. I again applied the requisite bead of sikaflex and shot three rivets through and voilà! Perfection!
Now, I had to then drill out the too-long rivets on the otherside and find a way to temporarily clamp the longeron so the glue would bond correctly. Now these rivets are stainless (read, HARD) and since they were loose in the holes they just spun... GAH!
However, after much swearing, I dug out the trusty Dremel and with a small cutting disc attached, I managed to gradually mangulate (yes that is a word dammit!) the head enough so that I could punch it through. This took at least an hour to do all three rivets as it took GREAT care to cut the rivets without touching the boot floor.... today I had hands like a neurosurgeon!
With the rivets finally removed, I was able to temporarily install some M6 machine screws to clamp the joint sufficiently to allow the bonded joint to form properly. Now I need to waste MORE time (and money) tracking down further supply of the shorter rivets during a lunch break this week as well as popping back next Friday to re-hire the pneumatic rivet gun (at a cost of about $100 (that's about 35 quid to you Brits) and compressor to bang in the final two rivets to complete the job! F*$#ing annoying!
This rear subframe re-galving has turned out to be one of the worst bits of the whole job so far. It wasn't really a necessary (the subframe was in fair shape, but I decided to do it because it was easy and accessible only in the current state of disassembly. The job was budgeted at about $150 (50 quid) all up, but I think the costs add up to the following:
Acid-Stripping $50
Galvanising $40
Sikaflex and Primers $130
Rivets $35
Rivet Gun ($65x2 = $130)
Compressor ($35x2 = $70)
Petrol and running around to various places (2 tanks in all, @$70 per tank = $140)
= $595 total which is about 200 quid. This assumes I WILL actually finish the job next weekend (bear in mind I've not reattached the heat shield yet) and bills my time out at $0... so not really the cheap and easy job I've hoped for.
Still, I'm sure that when the car's finished, it'll be something I won't have regretted doing and the extra bling of a nice shiny, new-looking subframe will allow me to sleep well at night.... I hope.
Still, chin up eh?
Well I've got it sorted... FINALLY!!!
SEXIGE now has fully structural rear subframe, longerons and boot floor, all shiny, as new and ready to take many years of abuse Thanks to James and Scott at RivTec in Otahuhu, if I'd known about you guys I don't think I'd have had half the issues I did getting the riveting bit sorted.
The longerons and boot floor are now all riveted down with 1/4" Stainless rivets (through the subframe) and bonded with Sikaflex221, all properly primed and prepped. With this job finally behind me I can get on with getting the rollbar backstays bolted down and the suspension hung. But for now, pretty pictures of this week's progress.... I HAVE A BOOT AND SEXIGE FINALLY STARTS TO BECOME A CAR AGAIN!


SEXIGE now has fully structural rear subframe, longerons and boot floor, all shiny, as new and ready to take many years of abuse
Thanks to James and Scott at RivTec in Otahuhu, if I'd known about you guys I don't think I'd have had half the issues I did getting the riveting bit sorted.The longerons and boot floor are now all riveted down with 1/4" Stainless rivets (through the subframe) and bonded with Sikaflex221, all properly primed and prepped. With this job finally behind me I can get on with getting the rollbar backstays bolted down and the suspension hung. But for now, pretty pictures of this week's progress.... I HAVE A BOOT AND SEXIGE FINALLY STARTS TO BECOME A CAR AGAIN!
Thanks for the vote of confidence guys... things will start coming together from now on and she'll start looking like a car before too long... still a long way to go, but rumblings from the UK suggest that my Tungsten-inserted crank, balanced internals and fully worked head are almost ready to ship back... I'mma have to get a wriggle on!
Well here 'tis, the first update in AGES... the last month and a half I've barely even LOOKED at the car. I've been working insane hours then spent best part of 3 weeks in the states with work, so only now back to it.
It's taking a while to get back into things. Spent early this week chasing up e-mails etc and paying for engine bits (ouch!). Good news is that everything's finished over there now and will be shipped back here in a couple of weeks, should be ready to start engine reassembly in a month!
Spent saturday pressing my front hubs back together and torquing them up. All went pretty smoothly in the end, which was nice.
Spent this evening in the garage and while I've not made any great progress, tonight I FINALLY got my first suspension corner hung on the car! I've got the driveshaft torqued in and the upright bolted on. I've yet to torque in the wishbones or toelinks as I've got to get the toelink heatshields powdercoated first (in heat reflective ceramic). Going to get my powdercoating done this week so hopefully if I get a good run at it next weekend, I'll have the bulk of the suspension hung on the chassis! I'm stoked because it'll then start to look like a disassembled car rather than a bathtub on axle-stands.
But for now, a couple of photos of gratuitous rear suspension porn
Edited by Esprit on Sunday 10th May 13:02
TonyHetherington said:
Absolutely fantastic. I always love seeing it when this thread is bumped thinking "ooo I wonder how he's done this time!"
Well I'm glad I can oblige Budget for the project is going to be a bit tight as my daily driver is just about knackered and needs to be put out to pasture.... currently searching for an ever-so-slightly more entertaining parts-hauler. Trying to find an all-too-rare-in-NZ Peugeot GTi6 as I've long since wanted one of my own
Spot on Tony. I'd love to have it finished by then. That might be pushing it a little in terms of final completion, but I should have it running by then with just mapping to go.... so much will depend on how quickly the engine comes together really. I've got all new bits for it and I'll be paying someone to do the lion's share of the work on it (instead of chipping away at it myself) so it should come together pretty quickly... in theory.... but then, this rebuild was originally meant to be 2/3 months long.
Scary thing is, in September I'll have owned the car for 2 years! and driven it for all of 4.5 months.
Scary thing is, in September I'll have owned the car for 2 years! and driven it for all of 4.5 months.
Gassing Station | Elise/Exige/Europa/340R | Top of Page | What's New | My Stuff