Exige S1 over-winter Refresh
Discussion
A formal roundup.
And this is where my project comes to a rather ignoble end.
Friday saw the car head up to the dyno, for her final tune and power runs. For the back-to-back comparisons we were just doing power runs to 8000RPM when disaster struck. As near as we can tell, the oil filter either worked loose, extruded a seal or stripped a thread. Hot oil was sprayed all over the exhaust manifold, which instantly ignited into a huge fireball, which consumed the rear half of the car.
Glenn managed to immediately shut the engine down and extricate himself from the inferno, while I made a mad dash for the extinguisher. Between my efforts with the extinguisher and Glenn on the hose, we managed to extinguish it after what seemed like a very long time (but was probably only about 10-15 seconds). I've not inspected it in detail yet, but the damage seems pretty minor with the body and chassis looking like it's escaped without permanent damage.
The firewall bore the brunt of the fire and the heat shielding looks to have done its job here. This will all need replacing (for a fourth time).
Datalogging shows that the car still had semi decent oil pressure of 30PSI when Glenn got off the throttle, 0.2 seconds after the initial blow off, and still had above 16psi when unloaded on decel. Oil pressure was still at 12psi when shut down so we think that the engine should have survived unscathed, hopefully at least.
The rest of the car needs to come to bits to fix the fire damage, but I can't really be bothered. I'm currently out of room at my old place and don't have a garage I can work on the car any more. I'm looking to buy a house, which will take some time, so I'm unable to undertake another rebuild right now anyway. I'm thinking of throwing in the towel with it, part of me wishes it had just burned to the ground.
Will probably tow it down to Hawke's Bay in a few weeks over Christmas, stick it out in the back paddock with a tarp over it and forget about it for a year or three. If I ever get my motivation back, I will see then. Until then I'm giving up on playing with cars and taking up a hobby that doesn't piss on me at every opportunity.
I wish I could say it's been fun, but in reality it's not been anything other than expense and heartache.
Well, I hope that everyone has had a great Christmas and is now full of Christmas cheer and the holiday spirit.
I've decided to stick around Auckland these holidays to look after Toni, who has had to go into hospital for a couple of weeks, and also get back to work on the Lotus.
I've already gotten in some new sound deadening foam and heat reflective material from the USA, and the only thing missing, until yesterday had been the car.
I'd left the car out at Toni's parents place under a sheet since the fire, unable to look at it but yesterday I ventured out there with my friend Richy to take a look.
We got the car out of the garage and mopped up the various puddles of oil that had accumulated and set about examining the damage.
Most of the oil that got out (about 0.7litres judging by the dipstick) seems to have burned off directly from the exhaust manifold or on the firewall. The good news is that other than a couple of patches of the firewall heatshield that obviously got scorched, there seems to be no damage at all to anything else. The engine bay seems to just be very soaked with oil.
We then got the car topped back up with oil (from about 2/3 of the way down the dipstick) then we started it and left it idling for 15 minutes. There was a lot of smoke as the oil gradually burned off the manifold and exhaust, but even though we were standing by with hoses and extinguishers, there was little drama. The engine seemed to sound fine, no knock or concerning noises whatsoever.
After that, I drove the car back to my workshop where I can pull it to bits and fix it up again. Thankfully the drive back was uneventful, the car runs as it should, feels just like it did before the fire and makes no concerning noises... The datalogging seems to have been right in telling us the engine's just fine. MASSIVE relief.
So that's where we are now. Today I'll start stripping the car down and getting it up in the air so that I can work on it again, then the clean-up begins. They have a special on cans of degreaser at SuperCheap Auto today.... maybe that's an omen.
Welcome back everybody and here's to a better 2012 than 2011... a year I'd sooner forget.
Well a few hours working on the car today. I got the workshop set up and started to get the rear clam ready for removal:


I snapped a couple of shots of the damage to the firewall heat shielding to show where the fire began to take hold. As you can see it's kinda screwed the heat shielding but we got it out before it could get any heat into anything meaningful.


The car's now up on the stands and tomorrow the clam will come off. As you can see there's oil EVERYWHERE so it'll take a lot of cleaning up, and I'm hoping I can rpelace the firewall shielding with the engine in situ. My new shield is going to be made in a few pieces with overlaps, so it should be possible. Fingers crossed.


I snapped a couple of shots of the damage to the firewall heat shielding to show where the fire began to take hold. As you can see it's kinda screwed the heat shielding but we got it out before it could get any heat into anything meaningful.


The car's now up on the stands and tomorrow the clam will come off. As you can see there's oil EVERYWHERE so it'll take a lot of cleaning up, and I'm hoping I can rpelace the firewall shielding with the engine in situ. My new shield is going to be made in a few pieces with overlaps, so it should be possible. Fingers crossed.
Well yesterday afternoon I had the clam all ready to come off, but no extra pair of hands to lift it off. I organised got JC and Nixx to come up and meet Toni and I for dinner and put them to work helping me lift the clam off.
Before then, I had most of the day free, so I turned my attention to the long-delayed job of finishing off the dash.
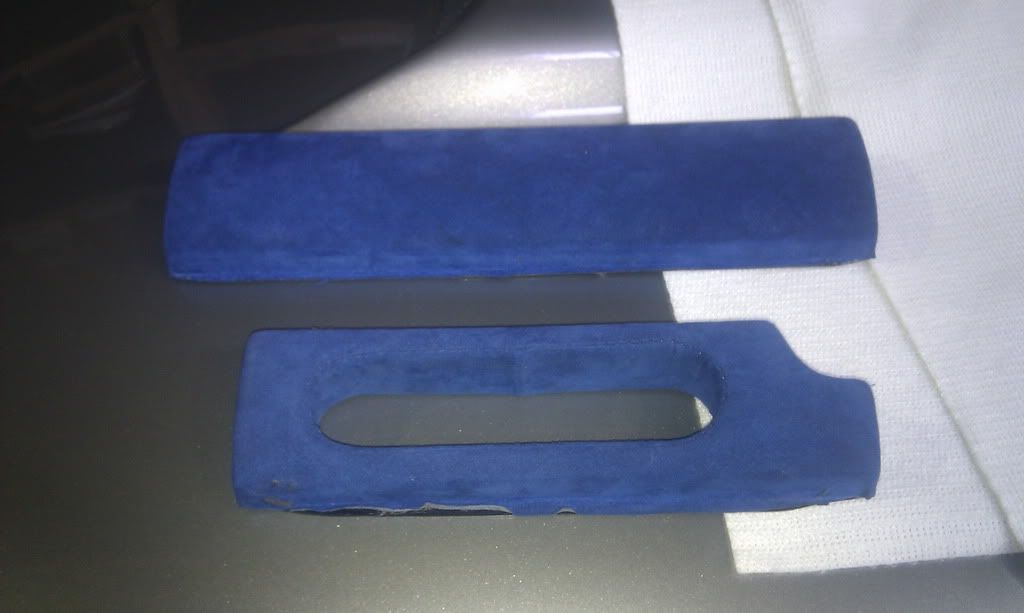
Before Christmas, I bought some spare Exige Alcantara-trimmed dash pieces off SELOC's Paul Myhill (PMyhill). These would allow me to remove my original pieces and stow them should I ever want to revert to the factory-look dash with no extras. The new pieces could then be modified to take the various buttons, sockets and modules I wanted mounted in the dash.
Here's two of the three trim pieces I bought... the missing one is the radio slot cover, which is a shorter version of the top piece.
The final tally of items I need to mount are:
- MoTeC MDD Screen
- Lifeline fire extinguisher control module
- Press-button to change pages on the MoTeC MDD
- Lifeline fire extinguisher trigger button
- CAN-Bus communications port
- RJ11 12v power socket for powering ancillary equipment such as a Valentine One radar or a PerformanceBox on-track (after one too many frustrations using the cigarette lighter and bumping it out with my leg)
I figured I could fit this all in fairly easily. The page-change button would mount in the heater control surround trim piece, just behind the indicator stalk. This would be easy to reach while driving on track to view different engine info.
The MDD mounts to the right hand side of the radio slot, I've been using it in this position mocked up and it's very visible and fits like a glove.
To the immediate left of this will be a modified trim piece that I'd make as a shortened version of the radio blanking piece. This would then be used to house (from right to left) the extinguisher trigger button, the RJ11 power socket and the comms port. This enables the extinguisher trigger to be in a position where either the driver or passenger should be able to just reach it when strapped in firmly.
To the left of this will be the control unit for the extinguisher, and to the left of this will be a shortened version of the passenger's side trim piece since all the bits I'm mounting in the radio slot are wider than the single-DIN radio slot.
The customising work I needed to then do was simply to shorten the radio blanking trim and the passengers' dash trim. To do this, I've begun by carefully peeling the alcantara material off the vac-formed plastic backing. This material will be cleaned up and used to reupholster the modified pieces for that OEM look.
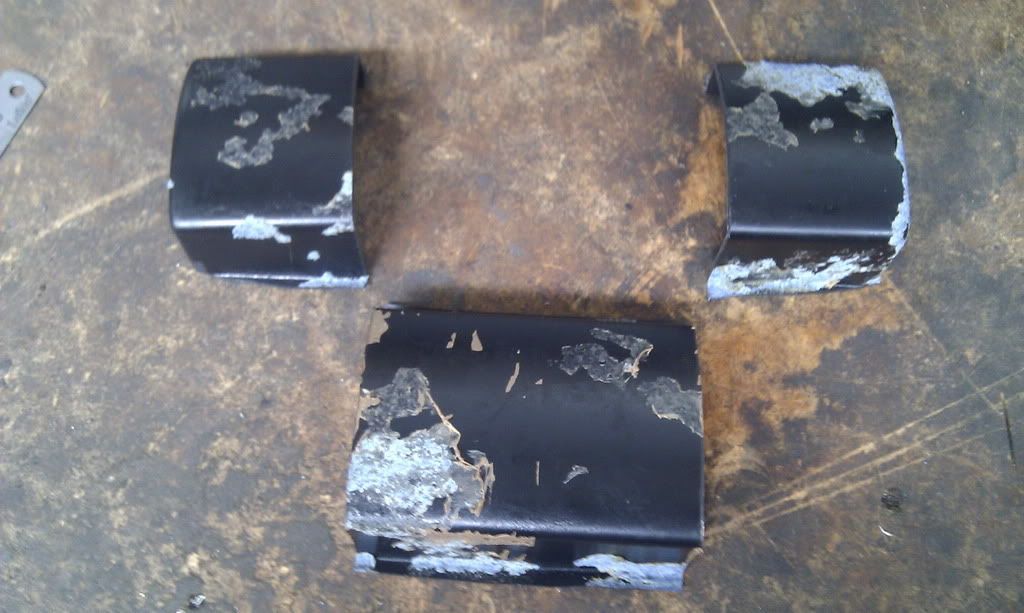
I started by modifying the radio blanking trim. The plastic pieces was carefully marked up and cut like so:
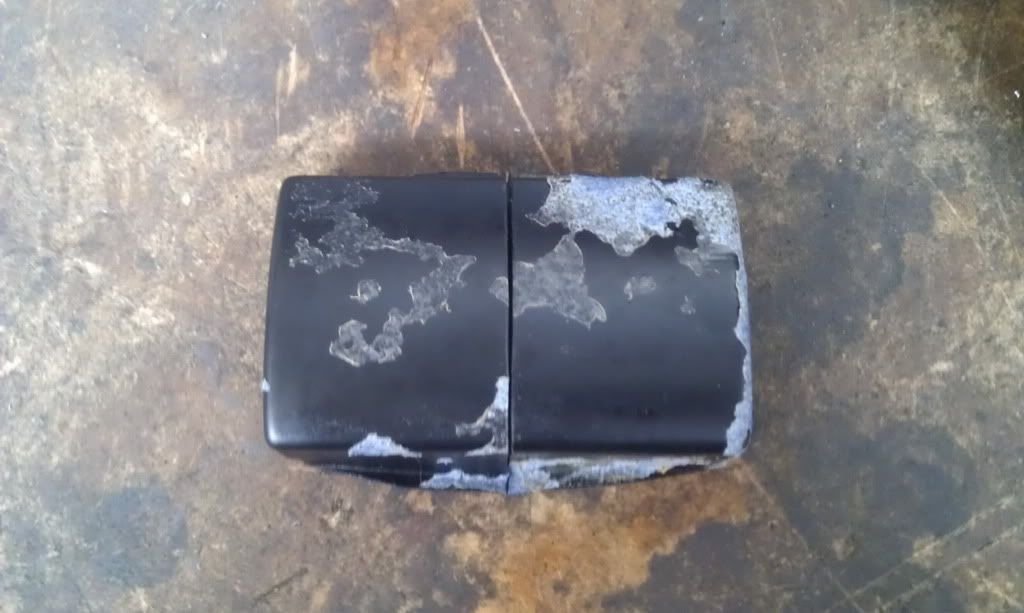
The pieces would then be joined like this:
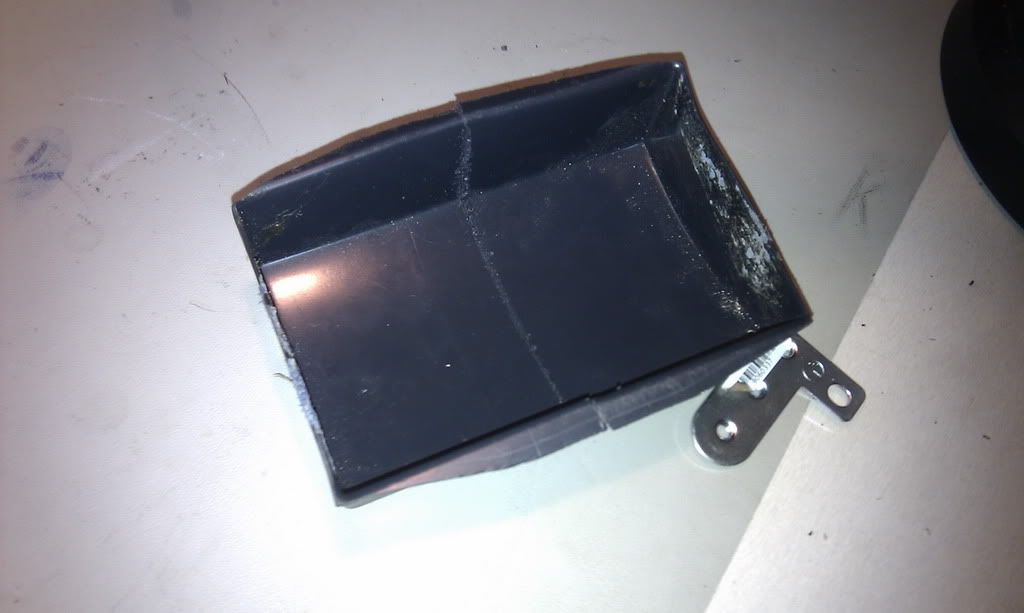
Thankfully, because the plastic was vacuum-formed, these types of plastic lend themselves pretty well to plastic-welding. I'm certainly no expert but a couple of trial runs with the soldering iron, I was able to get a pretty strong weld that didn't look too ugly. I then joined the two bits together:
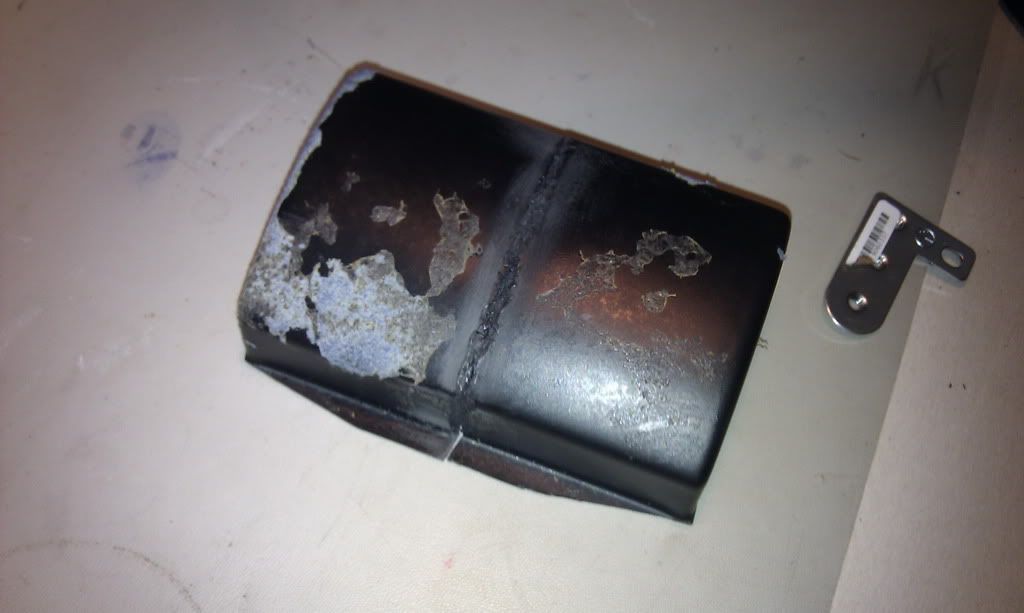
Pleased with the result, I then repeated this process with the passengers' side trim and then sanded the welds a little smoother:
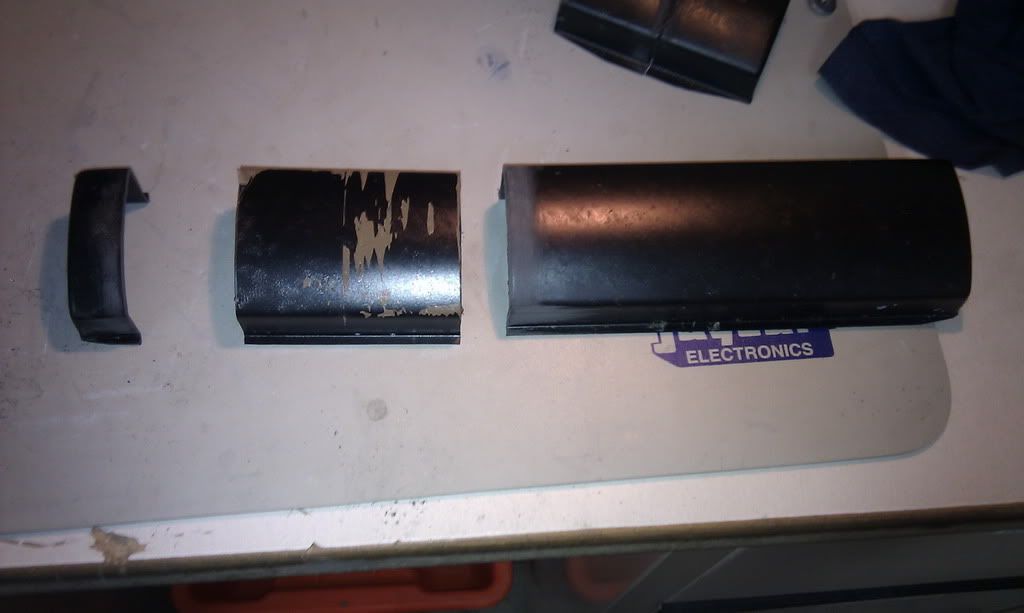
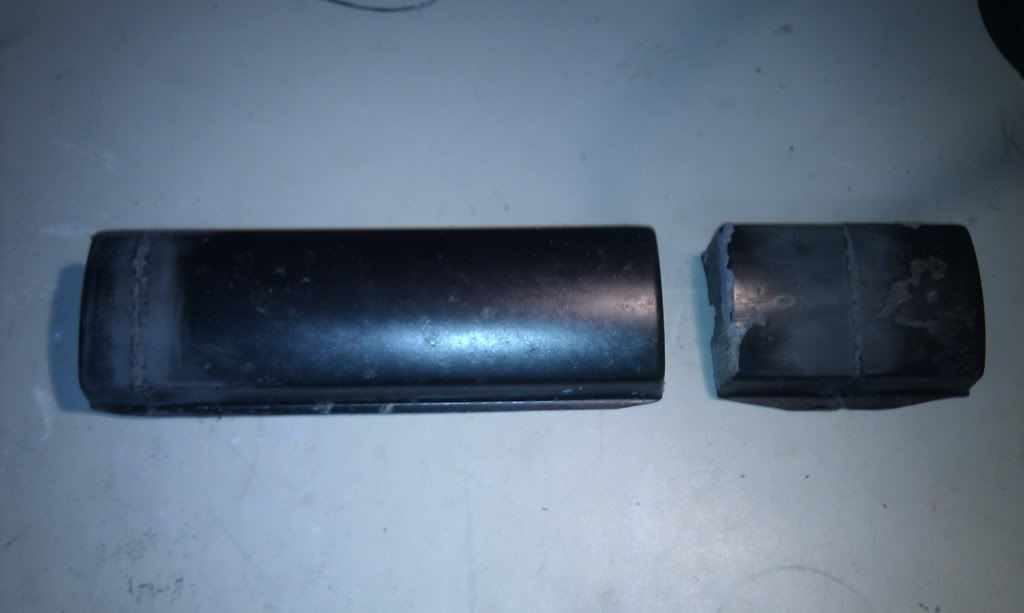
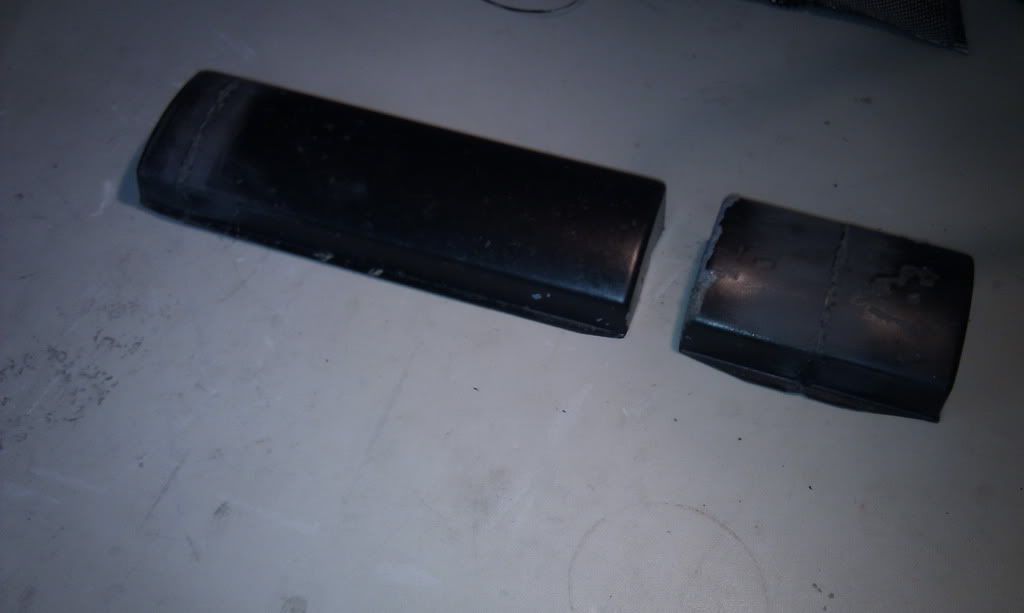
The result is pretty smooth, and I will skim-bog the joins and sand them to be perfectly smooth before reupholstering them.
Now the welds should be fairly strong, and have stood up well to me flexing them about a bit but they're always going to be a bit of a weak-point, expecially on the smaller piece which will have buttons etc mounted in it and will have to put up with a bit of force. It'd be a disaster if the trims split again once they were upholstered so I decided to reinforce the join a little.
I cleaned up the areas on the back by sanding, then wiped them down with acetone to clean them up before cutting up some scraps of carbonfibre cloth I had laying around and trimming them to size.
A quick bit of ham-fisted wet lay-up later and voila, some nicely reinforced dash trim pieces, destined to never come apart again!
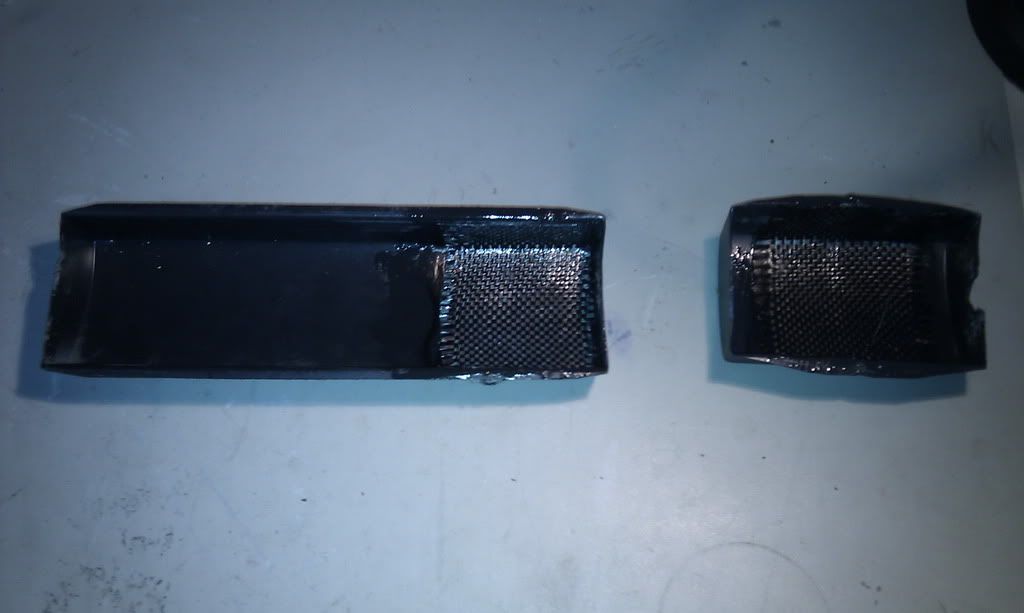
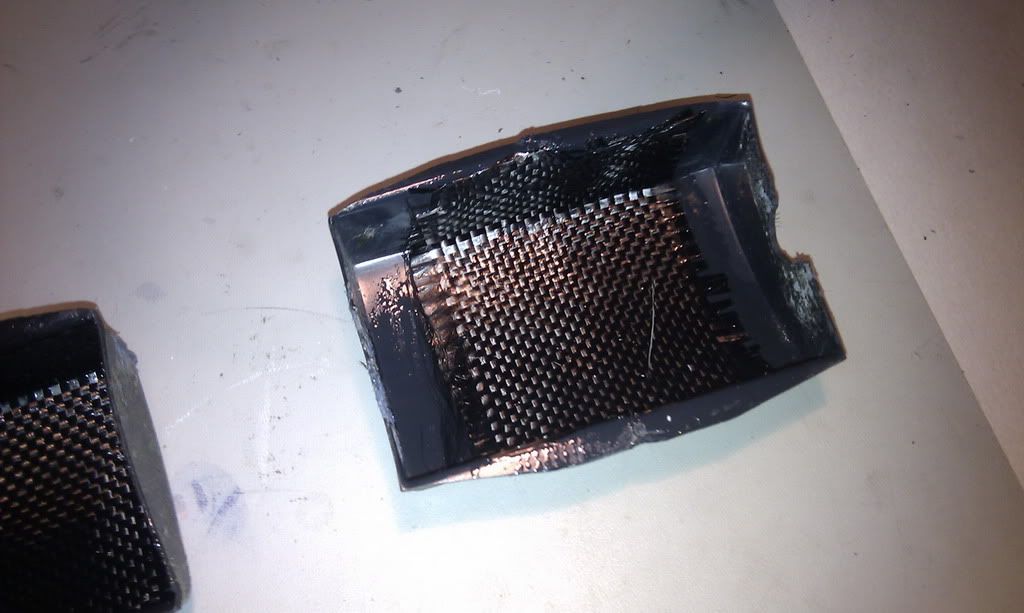
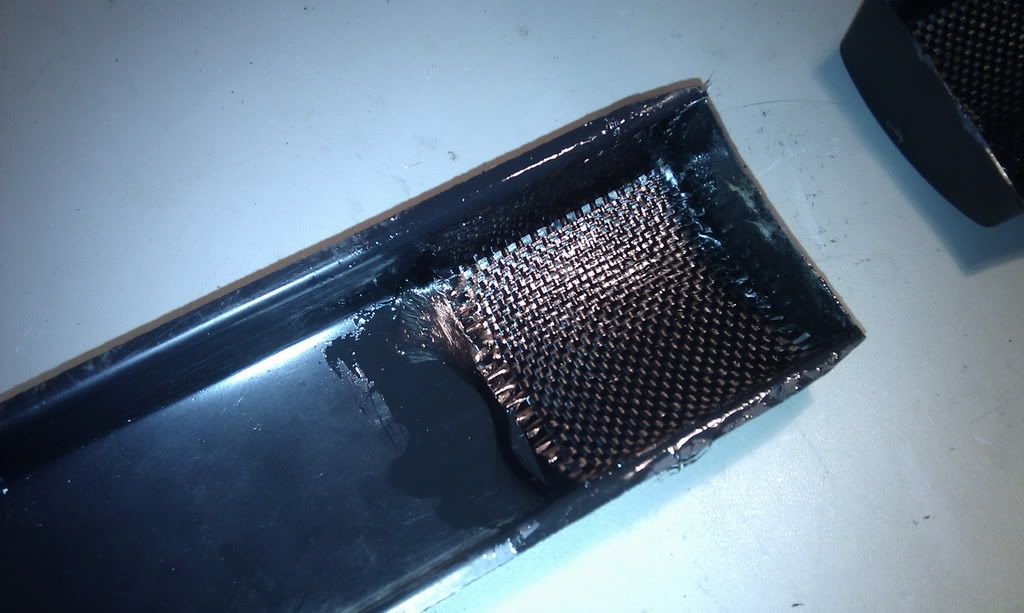
Given that the clamshell is now off the car, my attention turns again to the engine bay so I'll park the dashboard work for now. All that remains to be done is to skim bog and sand the fronts smooth, clean up the edges of the carbon reinforcement and make sure it's all smooth before marking them out and drilling the holes for the switches etc to mount through. Then I'll lovingly re-cover them in their original material and I'll be able to do a final assembly on the dash and have it looking all finished at last instead of having wires and plugs etc hanging out of it! Well overdue.
Right now, where's my can of degreaser!?!
Before then, I had most of the day free, so I turned my attention to the long-delayed job of finishing off the dash.
Before Christmas, I bought some spare Exige Alcantara-trimmed dash pieces off SELOC's Paul Myhill (PMyhill). These would allow me to remove my original pieces and stow them should I ever want to revert to the factory-look dash with no extras. The new pieces could then be modified to take the various buttons, sockets and modules I wanted mounted in the dash.
Here's two of the three trim pieces I bought... the missing one is the radio slot cover, which is a shorter version of the top piece.

The final tally of items I need to mount are:
- MoTeC MDD Screen
- Lifeline fire extinguisher control module
- Press-button to change pages on the MoTeC MDD
- Lifeline fire extinguisher trigger button
- CAN-Bus communications port
- RJ11 12v power socket for powering ancillary equipment such as a Valentine One radar or a PerformanceBox on-track (after one too many frustrations using the cigarette lighter and bumping it out with my leg)
I figured I could fit this all in fairly easily. The page-change button would mount in the heater control surround trim piece, just behind the indicator stalk. This would be easy to reach while driving on track to view different engine info.
The MDD mounts to the right hand side of the radio slot, I've been using it in this position mocked up and it's very visible and fits like a glove.
To the immediate left of this will be a modified trim piece that I'd make as a shortened version of the radio blanking piece. This would then be used to house (from right to left) the extinguisher trigger button, the RJ11 power socket and the comms port. This enables the extinguisher trigger to be in a position where either the driver or passenger should be able to just reach it when strapped in firmly.
To the left of this will be the control unit for the extinguisher, and to the left of this will be a shortened version of the passenger's side trim piece since all the bits I'm mounting in the radio slot are wider than the single-DIN radio slot.
The customising work I needed to then do was simply to shorten the radio blanking trim and the passengers' dash trim. To do this, I've begun by carefully peeling the alcantara material off the vac-formed plastic backing. This material will be cleaned up and used to reupholster the modified pieces for that OEM look.
I started by modifying the radio blanking trim. The plastic pieces was carefully marked up and cut like so:

The pieces would then be joined like this:

Thankfully, because the plastic was vacuum-formed, these types of plastic lend themselves pretty well to plastic-welding. I'm certainly no expert but a couple of trial runs with the soldering iron, I was able to get a pretty strong weld that didn't look too ugly. I then joined the two bits together:


Pleased with the result, I then repeated this process with the passengers' side trim and then sanded the welds a little smoother:


The result is pretty smooth, and I will skim-bog the joins and sand them to be perfectly smooth before reupholstering them.
Now the welds should be fairly strong, and have stood up well to me flexing them about a bit but they're always going to be a bit of a weak-point, expecially on the smaller piece which will have buttons etc mounted in it and will have to put up with a bit of force. It'd be a disaster if the trims split again once they were upholstered so I decided to reinforce the join a little.
I cleaned up the areas on the back by sanding, then wiped them down with acetone to clean them up before cutting up some scraps of carbonfibre cloth I had laying around and trimming them to size.
A quick bit of ham-fisted wet lay-up later and voila, some nicely reinforced dash trim pieces, destined to never come apart again!


Given that the clamshell is now off the car, my attention turns again to the engine bay so I'll park the dashboard work for now. All that remains to be done is to skim bog and sand the fronts smooth, clean up the edges of the carbon reinforcement and make sure it's all smooth before marking them out and drilling the holes for the switches etc to mount through. Then I'll lovingly re-cover them in their original material and I'll be able to do a final assembly on the dash and have it looking all finished at last instead of having wires and plugs etc hanging out of it! Well overdue.
Right now, where's my can of degreaser!?!
Edited by Esprit on Sunday 1st January 06:09
.... and here's what the sorry sight of the car in bits again looks like. At least at the moment I've plenty of workshop space to work in! 
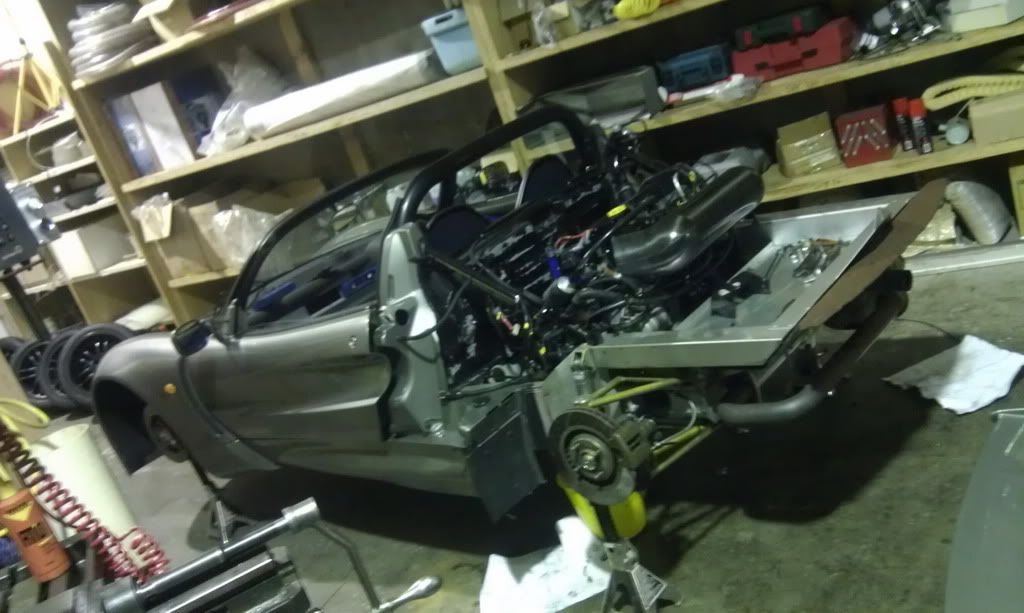
I've now got the car about as stripped as it needs to be. Rear clam, roof, rear window and surround is out. I've removed the exhaust manifold and alternator heat shields as well as the alternator itself (this is dripping in oil and will need a clean along with a new belt). I've drained the coolant off and removed a couple of the pipes as well as the header tank and catch can for access to the firewall.
I've also pulled off the charred remains of the old heat shield. Here's what it looked like after I spent a full day painstakingly making the b d:
d:
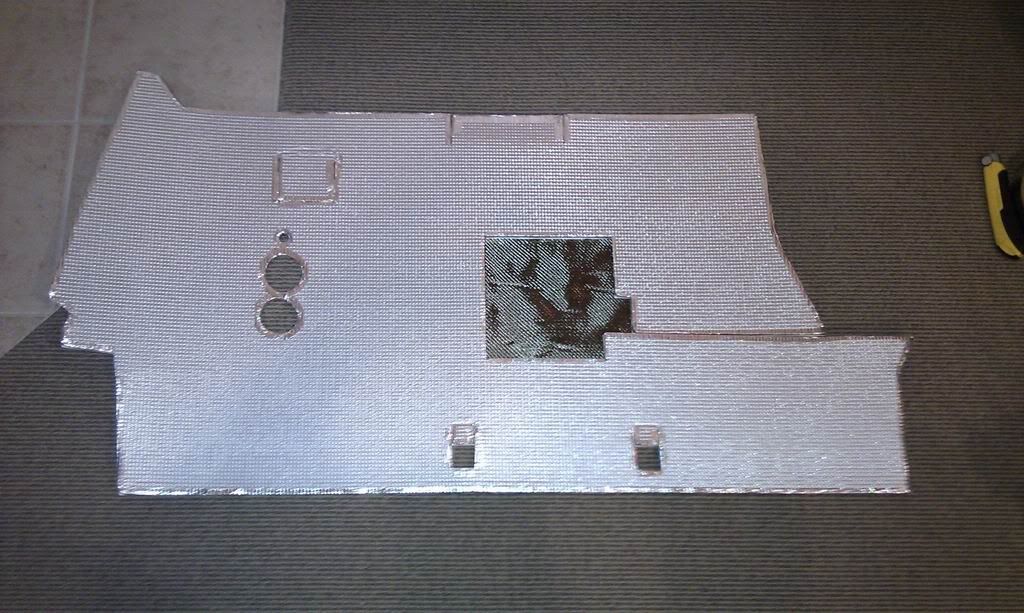
And here's what it looks like now:
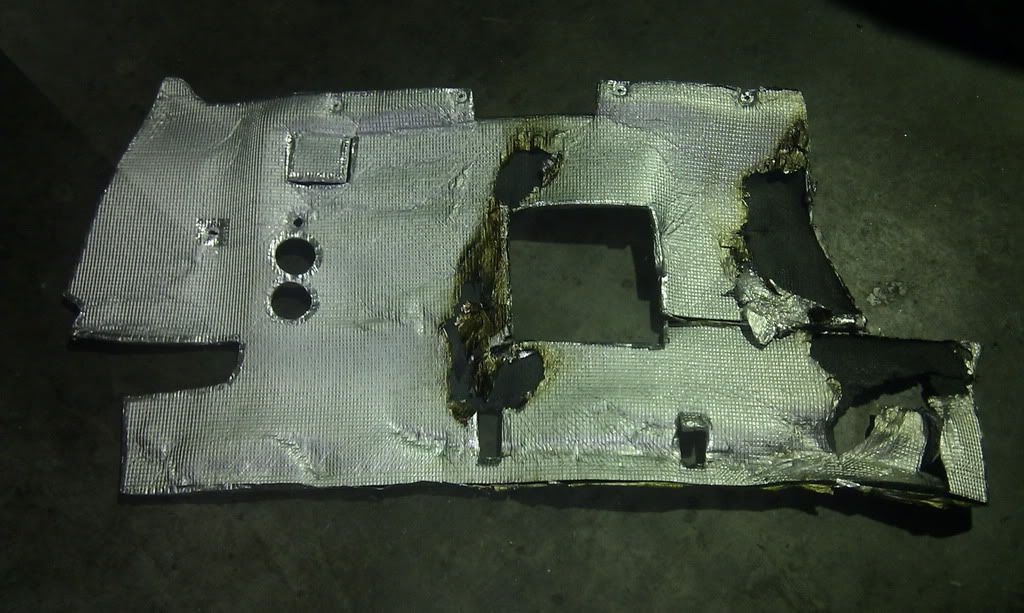
All that work down the drain! :P
It's good that I made the decision to pull it off and replace it. This heat shielding wasn't the best material choice (went with what I could get locally rather than importing) and it shows. The foam is open-celled, so in the patches where the aluminium outer has burned away, the oil has soaked right through and into the foam behind. Large chunks of the foam are now thoroughly soaked with oil right through. If I had just pressed on with it, it was a bit of a fire risk. The new foam is closed cell and will not absorb oil or moisture and is much more fire resistant as a result.
The engine bay now looks like this:
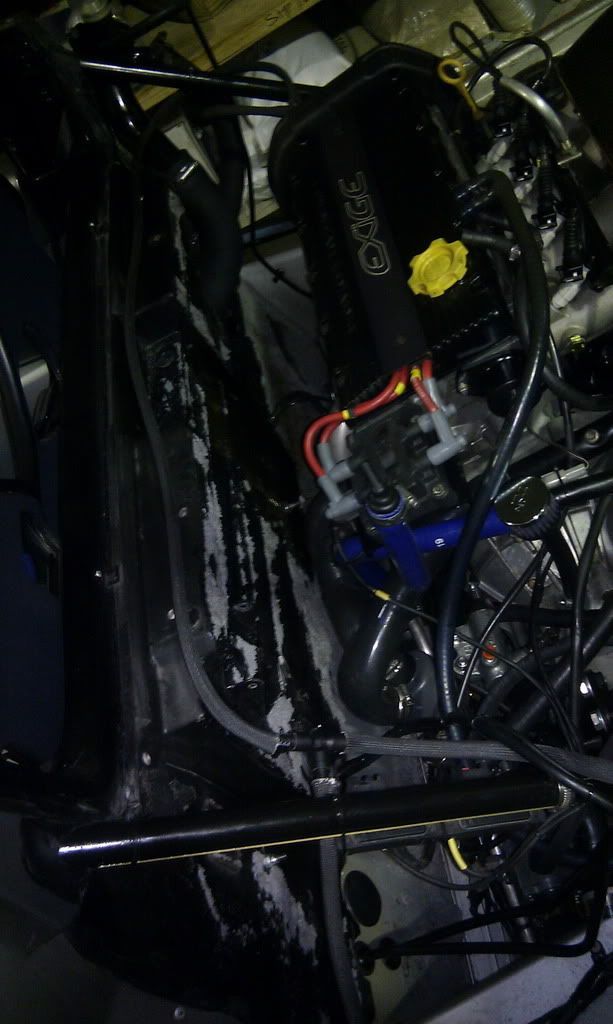
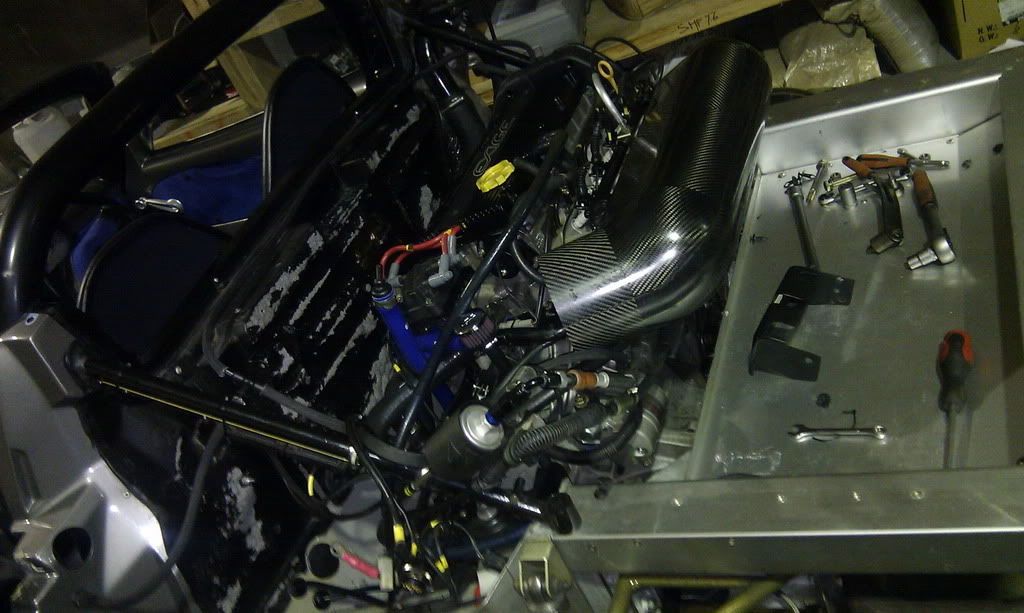
Tomorrow begins the task of cleaning up and removing the sticky remnants of the foam on the firewall. There's a good day or two's work in that so progress will be slow.
The good news is that despite having Christmas away from my family, my father's going to come up next weekend and spend the whole weekend with me and we'll work away on getting it all back together. By then I should have much of it back in one piece, but it'll be nice to have his helping hand here for the bigger stuff and to double-check my work. It'll also be bloody nice to see him and spend some good garage-time with him, something I've not had much of a chance to do in recent years.... in light of last year's accident, it's something I want to do much more of in 2012, although hopefully not on my car beyond this week!


I've now got the car about as stripped as it needs to be. Rear clam, roof, rear window and surround is out. I've removed the exhaust manifold and alternator heat shields as well as the alternator itself (this is dripping in oil and will need a clean along with a new belt). I've drained the coolant off and removed a couple of the pipes as well as the header tank and catch can for access to the firewall.
I've also pulled off the charred remains of the old heat shield. Here's what it looked like after I spent a full day painstakingly making the b
 d:
d:
And here's what it looks like now:

All that work down the drain! :P
It's good that I made the decision to pull it off and replace it. This heat shielding wasn't the best material choice (went with what I could get locally rather than importing) and it shows. The foam is open-celled, so in the patches where the aluminium outer has burned away, the oil has soaked right through and into the foam behind. Large chunks of the foam are now thoroughly soaked with oil right through. If I had just pressed on with it, it was a bit of a fire risk. The new foam is closed cell and will not absorb oil or moisture and is much more fire resistant as a result.
The engine bay now looks like this:


Tomorrow begins the task of cleaning up and removing the sticky remnants of the foam on the firewall. There's a good day or two's work in that so progress will be slow.
The good news is that despite having Christmas away from my family, my father's going to come up next weekend and spend the whole weekend with me and we'll work away on getting it all back together. By then I should have much of it back in one piece, but it'll be nice to have his helping hand here for the bigger stuff and to double-check my work. It'll also be bloody nice to see him and spend some good garage-time with him, something I've not had much of a chance to do in recent years.... in light of last year's accident, it's something I want to do much more of in 2012, although hopefully not on my car beyond this week!

Tonight I spent another 6 or so hours on the car. I got into the workshop at about 10pm and started work on removing the glue and goop and oil from the firewall. Last night I managed to remove most of the remnants of foam from the firewall, which was a pig of a job in itself, tonight's job was much easier, just a 50/50 mix of acetone and elbow grease on a rag.
The job was made all the easier by my friend Richard 'Snoozin' Opie, Esq. Between the two of us we had the firewall clean enough to eat one's dinner from by about midnight, whereupon we retired upstairs to consume alcoholic beverages and talk codswallop.
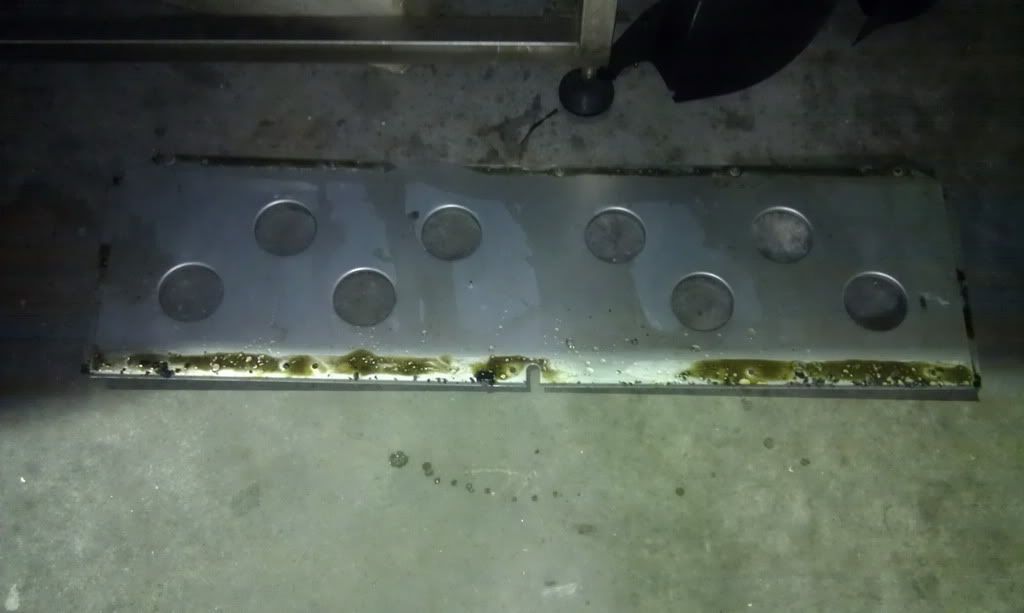
After Richy left, I went back downstairs to do a little tidying up and to remove the shear panel beneath the fuel tank. Given that oil was still dripping from here profusely, I reckoned there was a lot of crap still sitting atop it. After removing it, I found I was right!:
This is when things took a turn for the worse. For those not in the know, the shear panel is held in by 10 M8 fasteners. The rearmost 5 bolt through an extrusion with nuts on the other side. The foremost screw into a hollow section aluminium extrusion with rivnuts inserted.
When I last installed the shear panel I noticed one of the screws into the rivnut went a bit "soft" when I torqued it to the requisite 24Nm. I figured the rivnut had spun a little and I figured I'd tighten it up next time I had the panel off.... i.e. Now.
Upon inspecting the rivnut it was clear that it hasn't spun, but it had indeed stripped the thread.... bugger.
Thankfully, I had a helicoil set handy so I figured there should be enough meat in the rivnut to retap and helicoil it.
I drilled the rivnut out to helicoil size and then started tapping to M8 helicoil size. All went fine until it came time to back the tap out and it went a little tight. It then loosened up and I spun it out... or at least I thought I was until I realised the rivnut was now spinning in the hole!
Great, so now I had a rivnut, spinning in a hole with a tap stuck right through the middle of it! How the f*ck do I solve this one?
I tried backing the rivnut off the tap with a pin punch, but this failed to work. Next, I tried drilling a 2.5mm hole half through the edge of the rivnut flange and half into the alloy surrounding it. Once this hole was in place, I then inserted the shank of the bit into this hole, in an attempt to key the rivnut to the chassis to allow me to spin the tap out. THANKFULLY, after some careful work, this was successful and I managed to get the tap out! Much to my relief.
After that, the helicoil went in smoothly and the rivnut had a thread again. I then made up a little tool to try to pull the rivnut tight again to hopefully stop it spinning again. I also used this tool on the other four rivnuts to ensure they were nice and tight too, as well as ensuring their threads were clean by running a plug tap through them.... I DON'T want to have any more issues with these! I suspect at some point in the past, that bad one had been over-torqued.
While it's possible to drill out one of these rivnuts and insert a new one, the hollow section they go into is completely closed in.... there's no way to get the remnants of the old rivnut out and stop it rattling around each time you go round a corner.
Fingers crossed that in future, given careful torquing, I should have no further issues with them.
Tomorrow, I get busy with the degreaser and rags and then the strip-down and clean-up is finished. The following task will be to fabricate and install the new firewall heat shield (1-1.5 days work) and then reassemble the car (1-1.5 days work). Given my father will be coming up to help, I'm pretty confident I can have the car back on the road by the end of the coming weekend.

The job was made all the easier by my friend Richard 'Snoozin' Opie, Esq. Between the two of us we had the firewall clean enough to eat one's dinner from by about midnight, whereupon we retired upstairs to consume alcoholic beverages and talk codswallop.
After Richy left, I went back downstairs to do a little tidying up and to remove the shear panel beneath the fuel tank. Given that oil was still dripping from here profusely, I reckoned there was a lot of crap still sitting atop it. After removing it, I found I was right!:

This is when things took a turn for the worse. For those not in the know, the shear panel is held in by 10 M8 fasteners. The rearmost 5 bolt through an extrusion with nuts on the other side. The foremost screw into a hollow section aluminium extrusion with rivnuts inserted.
When I last installed the shear panel I noticed one of the screws into the rivnut went a bit "soft" when I torqued it to the requisite 24Nm. I figured the rivnut had spun a little and I figured I'd tighten it up next time I had the panel off.... i.e. Now.
Upon inspecting the rivnut it was clear that it hasn't spun, but it had indeed stripped the thread.... bugger.
Thankfully, I had a helicoil set handy so I figured there should be enough meat in the rivnut to retap and helicoil it.
I drilled the rivnut out to helicoil size and then started tapping to M8 helicoil size. All went fine until it came time to back the tap out and it went a little tight. It then loosened up and I spun it out... or at least I thought I was until I realised the rivnut was now spinning in the hole!
Great, so now I had a rivnut, spinning in a hole with a tap stuck right through the middle of it! How the f*ck do I solve this one?
I tried backing the rivnut off the tap with a pin punch, but this failed to work. Next, I tried drilling a 2.5mm hole half through the edge of the rivnut flange and half into the alloy surrounding it. Once this hole was in place, I then inserted the shank of the bit into this hole, in an attempt to key the rivnut to the chassis to allow me to spin the tap out. THANKFULLY, after some careful work, this was successful and I managed to get the tap out! Much to my relief.
After that, the helicoil went in smoothly and the rivnut had a thread again. I then made up a little tool to try to pull the rivnut tight again to hopefully stop it spinning again. I also used this tool on the other four rivnuts to ensure they were nice and tight too, as well as ensuring their threads were clean by running a plug tap through them.... I DON'T want to have any more issues with these! I suspect at some point in the past, that bad one had been over-torqued.
While it's possible to drill out one of these rivnuts and insert a new one, the hollow section they go into is completely closed in.... there's no way to get the remnants of the old rivnut out and stop it rattling around each time you go round a corner.
Fingers crossed that in future, given careful torquing, I should have no further issues with them.
Tomorrow, I get busy with the degreaser and rags and then the strip-down and clean-up is finished. The following task will be to fabricate and install the new firewall heat shield (1-1.5 days work) and then reassemble the car (1-1.5 days work). Given my father will be coming up to help, I'm pretty confident I can have the car back on the road by the end of the coming weekend.

Well a LONG night's work on the car last night, 11 hours solid and I'm nucking fackered!
Last night was all about fabricating the firewall heat shield, a long and careful process to make sure the result comes out as functional and tidy as possible.
Now, if you look back earlier in this build you'll see that I've redone this firewall heat shield before, but in light of the fire, and how the last heat shield fared, as well as the benefit of hindsight on previous installs I thought I'd do things a bit differently this time around.
The previous installs were all the same as the OEM heat shield. That is to say it was cut in one piece. This time, however I've decided to make it in several pieces so that the thick foam doesn't have to do some of the more torturous folds. The foiled foam doesn't really do sharp bends, so by making the shield in several pieces of foiled foam, with the sharp corners being insulated separately in just the foam. This way there's an all-encompassing heat shield, with the foam shield / sound deadener only covering about 95% of the firewall.
This won't look like the OEM shield, but given that I've gone for performance rather than looks now, there's no way it's gonna look original so I may as well make it look nice!
The night has involved a LOT of this:
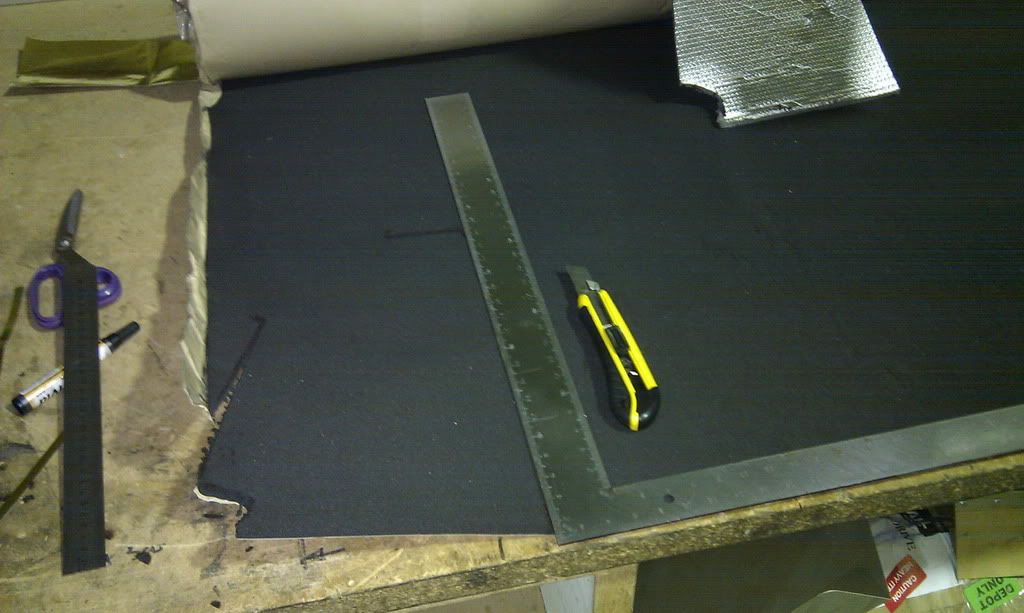
Marking up, measuring, cutting, test-fitting and repeat.
Once the foam pieces were cut, they were wrapped in the DEI reinforced gold foil, including wrapping all edges. The following photo shows the lower firewall (the aluminium bulkhead bit) heat shield section ready for installation:
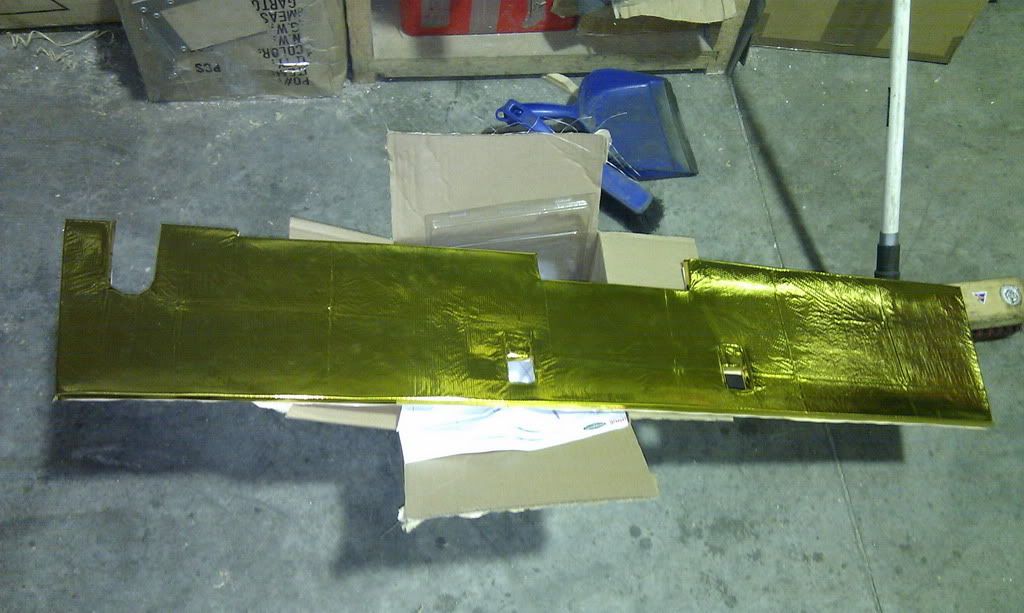
From here I was able to begin putting some of the parts and foil onto the firewall:
Here's a couple of photos mid-install:
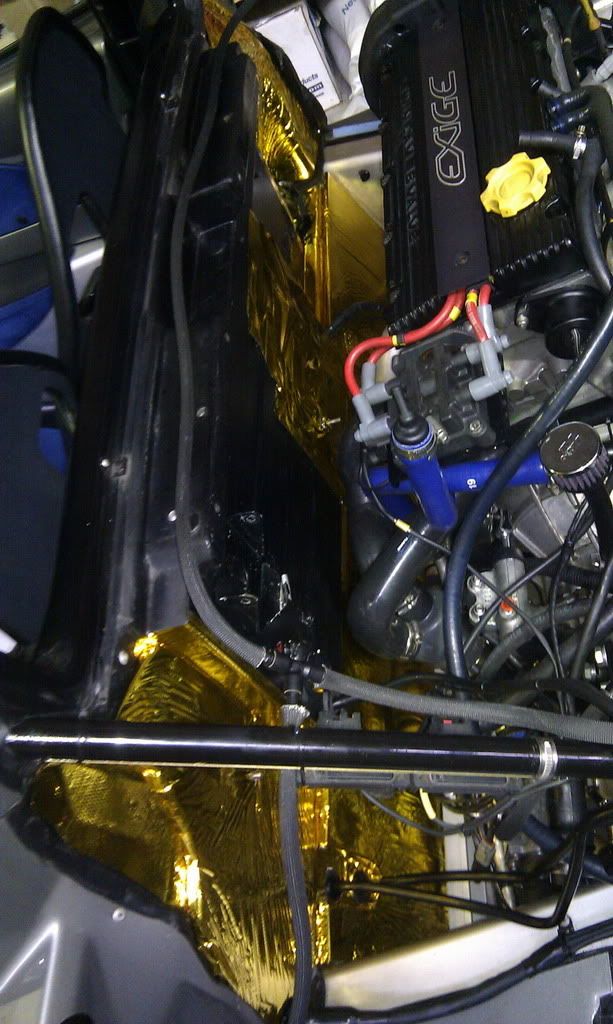
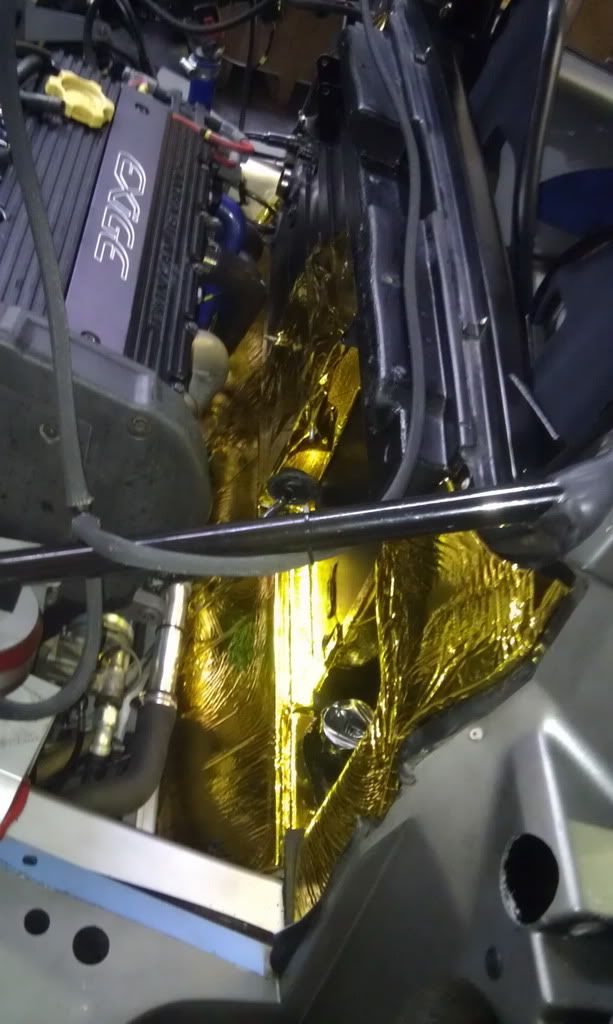
I had hoped to get it all finished, but I didn't quite manage it. I've got everything installed bar the upper middle section. I've cut the foam for this, but need to wrap it in foil and install it. Probably another 1.5 to 2 hours work... but for now I'm off to bed. Here's a couple of pics of the current state of play.... getting there!
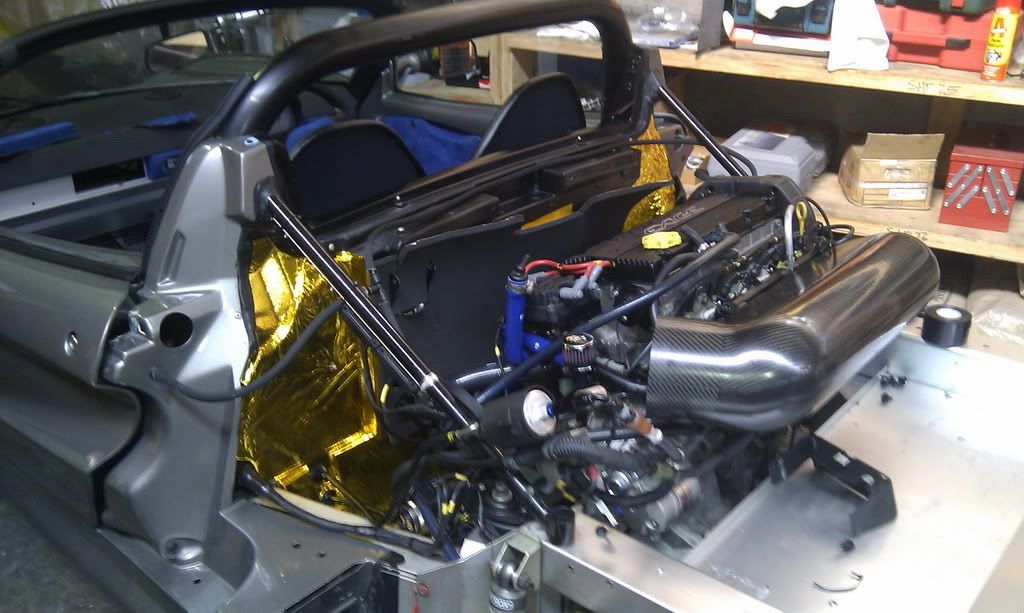
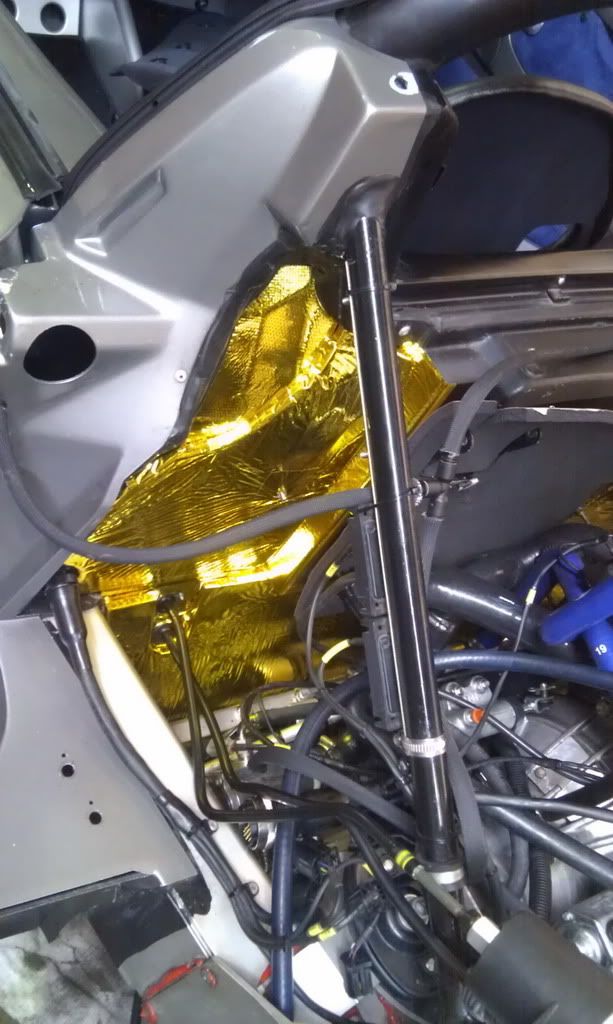
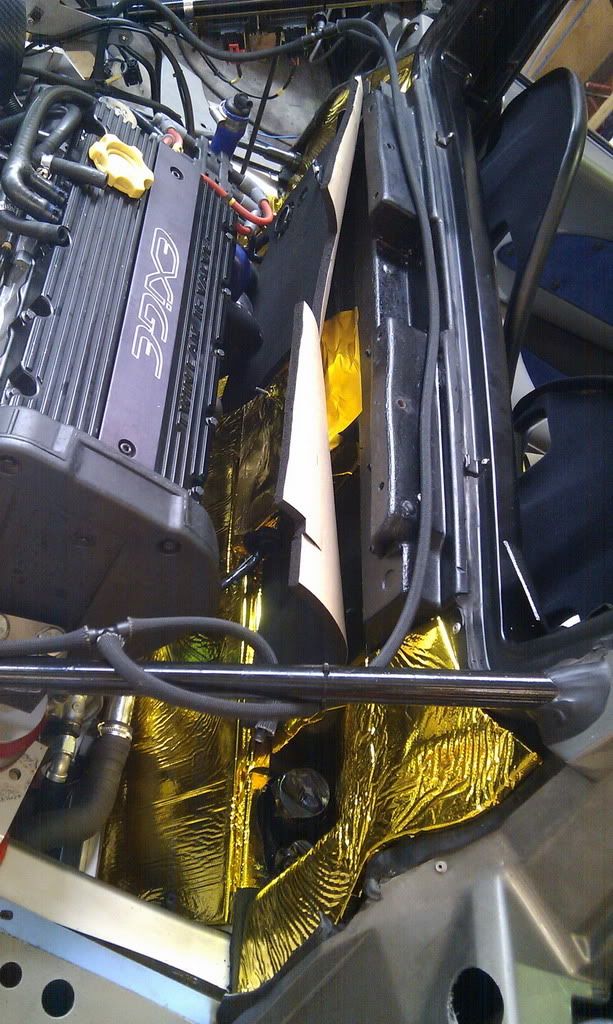
Last night was all about fabricating the firewall heat shield, a long and careful process to make sure the result comes out as functional and tidy as possible.
Now, if you look back earlier in this build you'll see that I've redone this firewall heat shield before, but in light of the fire, and how the last heat shield fared, as well as the benefit of hindsight on previous installs I thought I'd do things a bit differently this time around.
The previous installs were all the same as the OEM heat shield. That is to say it was cut in one piece. This time, however I've decided to make it in several pieces so that the thick foam doesn't have to do some of the more torturous folds. The foiled foam doesn't really do sharp bends, so by making the shield in several pieces of foiled foam, with the sharp corners being insulated separately in just the foam. This way there's an all-encompassing heat shield, with the foam shield / sound deadener only covering about 95% of the firewall.
This won't look like the OEM shield, but given that I've gone for performance rather than looks now, there's no way it's gonna look original so I may as well make it look nice!

The night has involved a LOT of this:

Marking up, measuring, cutting, test-fitting and repeat.
Once the foam pieces were cut, they were wrapped in the DEI reinforced gold foil, including wrapping all edges. The following photo shows the lower firewall (the aluminium bulkhead bit) heat shield section ready for installation:

From here I was able to begin putting some of the parts and foil onto the firewall:
Here's a couple of photos mid-install:


I had hoped to get it all finished, but I didn't quite manage it. I've got everything installed bar the upper middle section. I've cut the foam for this, but need to wrap it in foil and install it. Probably another 1.5 to 2 hours work... but for now I'm off to bed. Here's a couple of pics of the current state of play.... getting there!


The Jolly Todger said:
Looks great, did you get Gulzar to supply the foil?
Good luck with the rest of it.
Did you miss my questions above?
Aah, I did... There's still some mapping to be done. The engine is roughly mapped up to 8000RPM and is making about 212bhp at this. I'll leave it there for just now while I run the car a bit more. I want to make sure I've got the kinks ironed out (and the extinguisher fully plumbed) before I go back to the dyno Good luck with the rest of it.
Did you miss my questions above?

Another night slaving away in the workshop. I'm running out of holiday and am back at work on Monday so am going to have to move sharpish to get this thing back together!
Just a quick few shots of the now completed firewall heat shield installed. I've started to reassemble things now, and will work for a couple more hours tonight to try to get a few more small jobs done.
Pics:
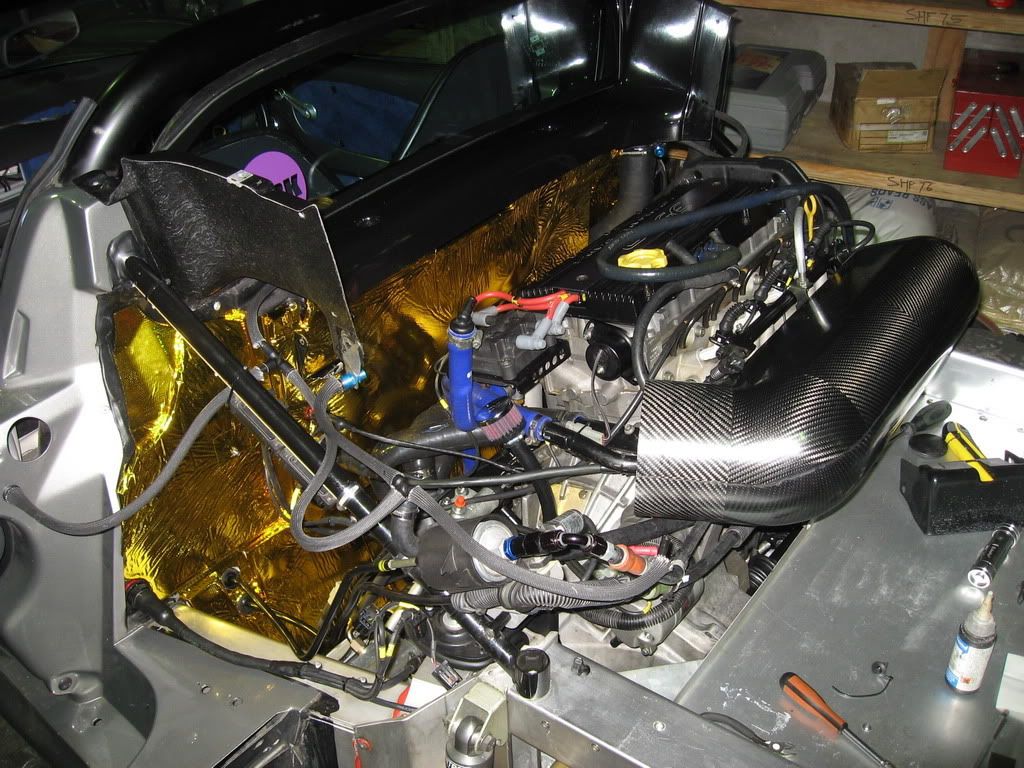
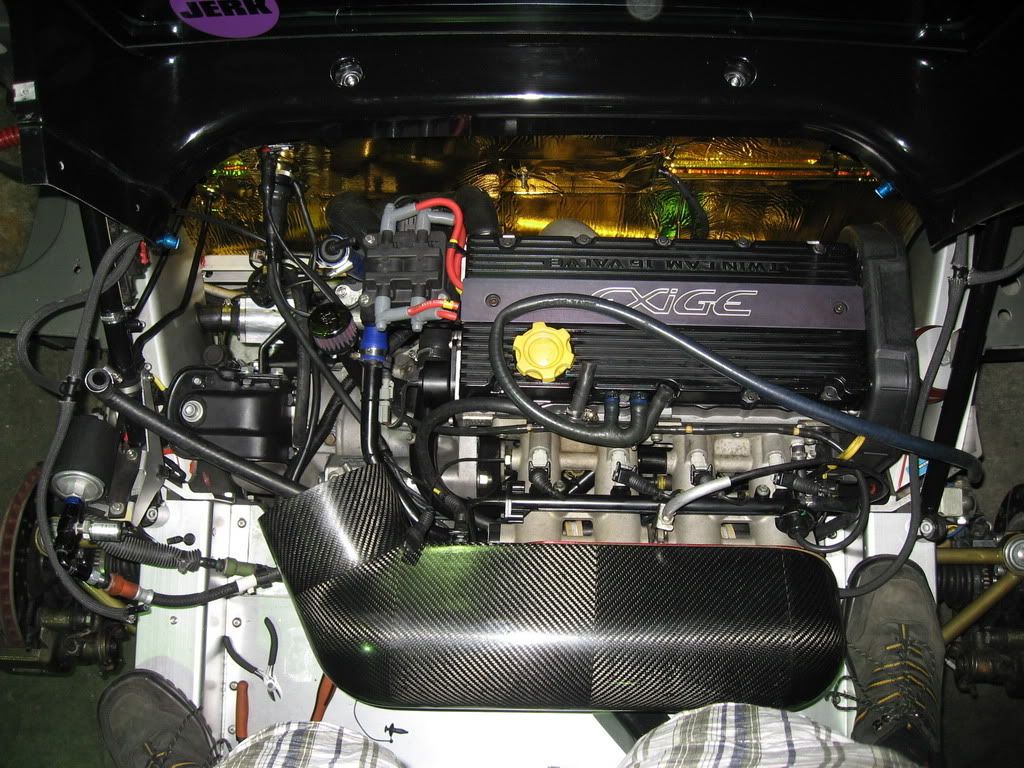
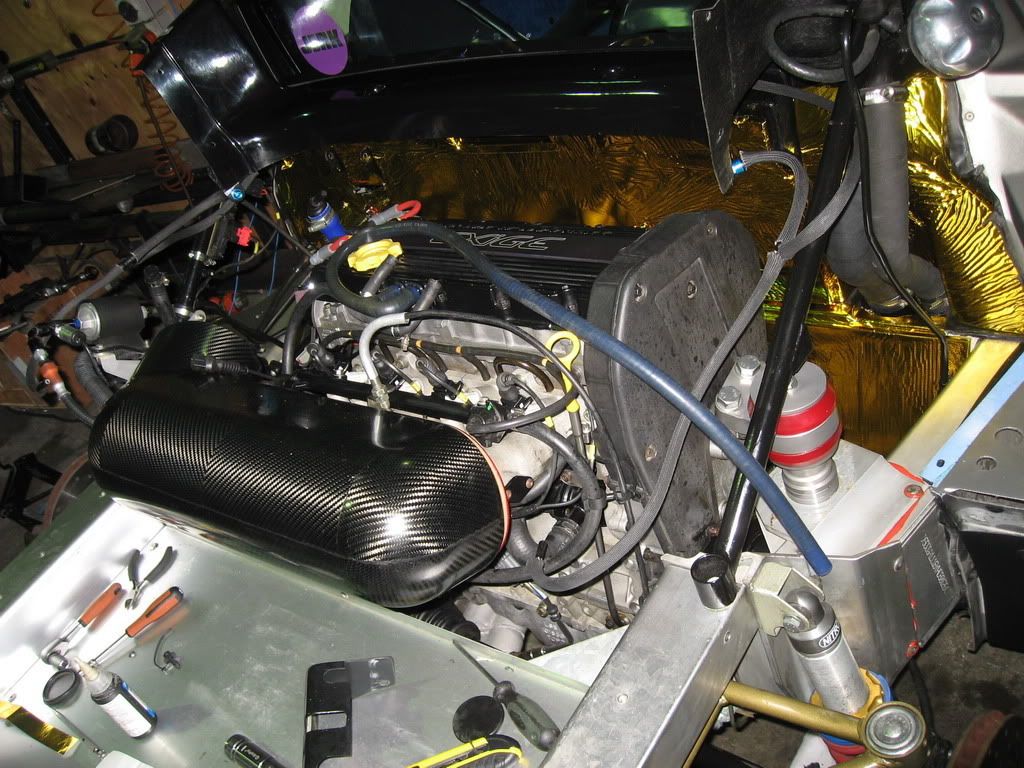
Forgive the state of the cambelt cover... I've not cleaned the oil splash off that bit yet :P
Just a quick few shots of the now completed firewall heat shield installed. I've started to reassemble things now, and will work for a couple more hours tonight to try to get a few more small jobs done.
Pics:


Forgive the state of the cambelt cover... I've not cleaned the oil splash off that bit yet :P
Well, another long night on the car complete, and this one will hopefully be the last.
Tonight I got the handbrake adjusted finally (well overdue), then managed to repopulate the engine bay, get the coolant refilled and bled. The legendary Richy came around and gave me a hand to get the clam and engine cover back on as well as some well-needed moral support and then left me to it getting all the good stuff back on her.
I've still got a couple more jobs to do Sunday afternoon like an oil and filter change (back to an OEM one while I figure out what to do with the Canton filter) as well as degreasing the floorpan and re-affixing the number plate. If I get an extra pair of hands I'll also give the brakes and clutch an overdue bleed.
But for now, have some pictures and I'm off to bed.
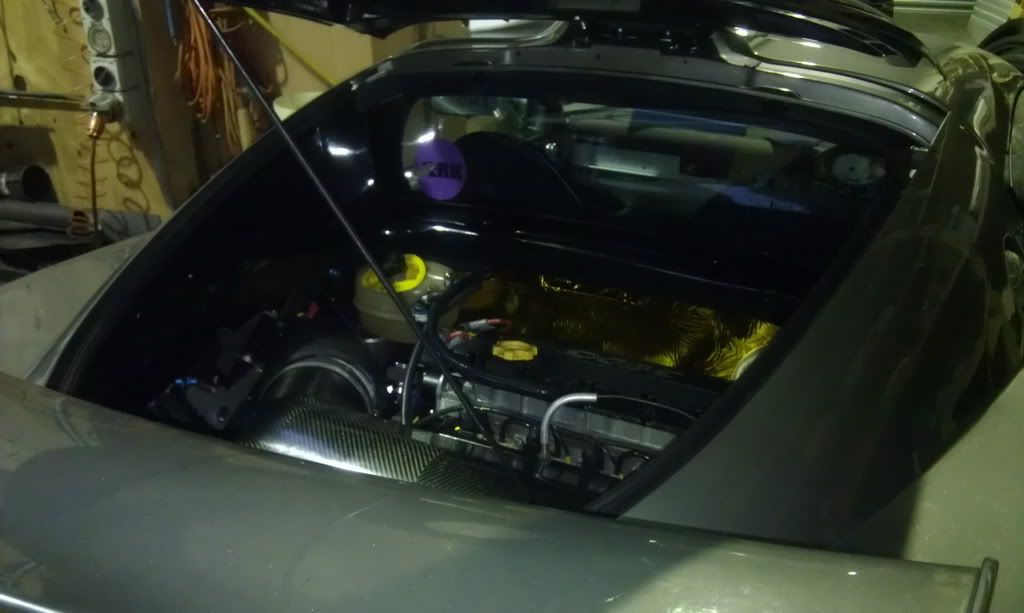
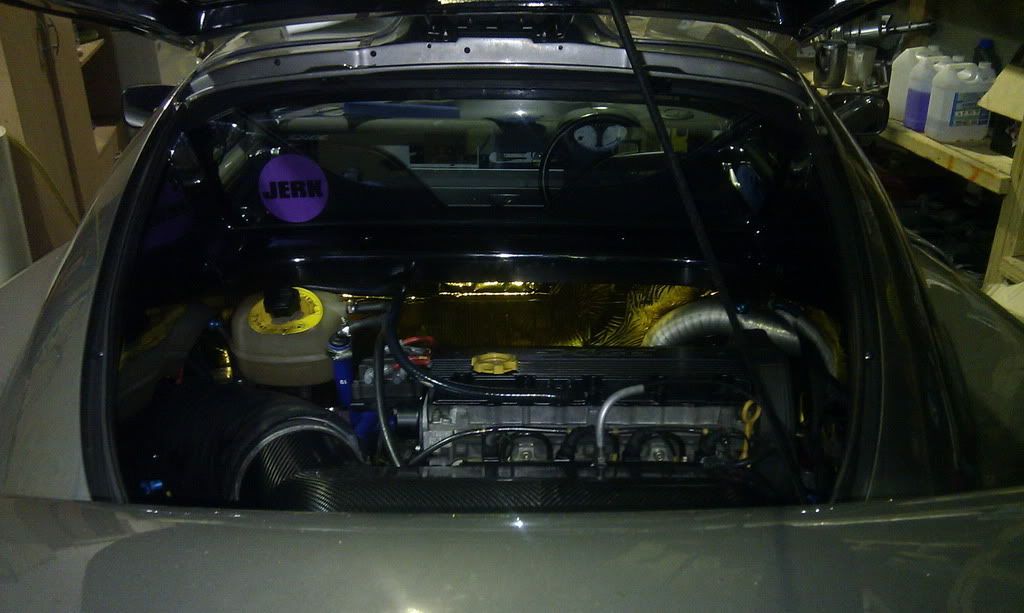
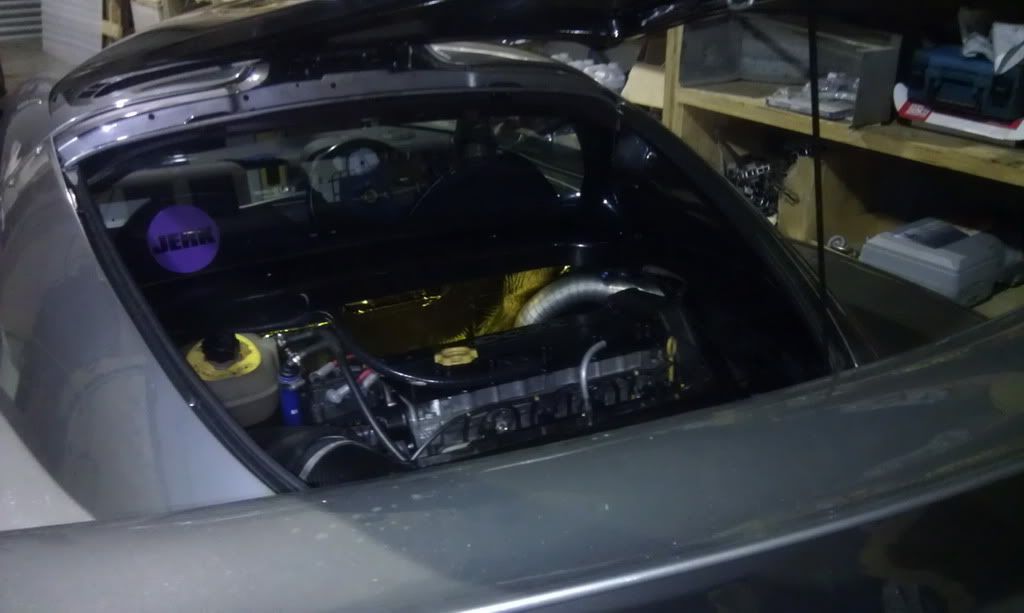
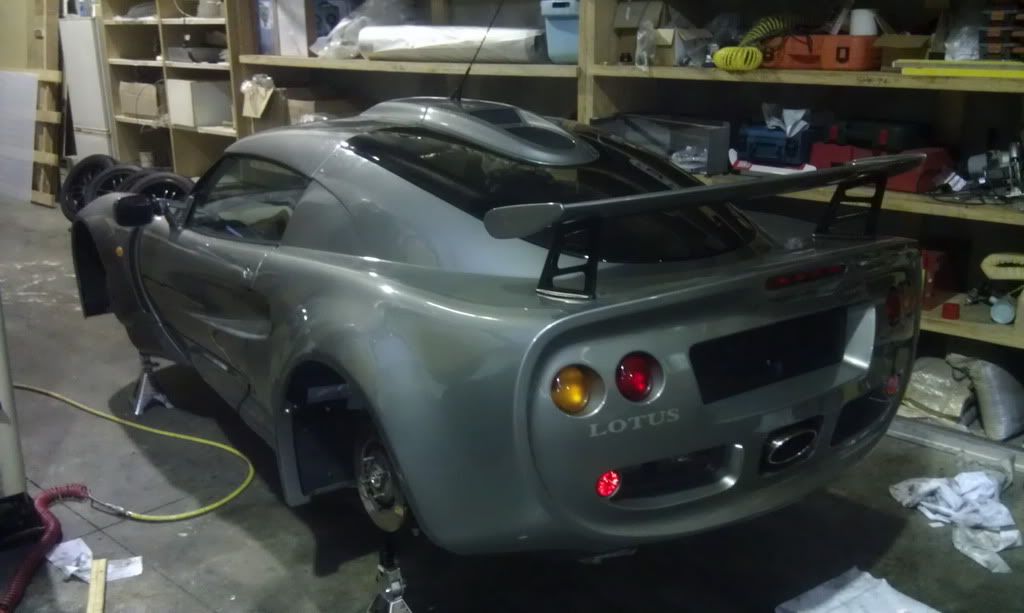
I'm pretty happy with how it's turned out... perhaps a BIT blingy, but overall, I think it looks brilliant.
Tonight I got the handbrake adjusted finally (well overdue), then managed to repopulate the engine bay, get the coolant refilled and bled. The legendary Richy came around and gave me a hand to get the clam and engine cover back on as well as some well-needed moral support and then left me to it getting all the good stuff back on her.
I've still got a couple more jobs to do Sunday afternoon like an oil and filter change (back to an OEM one while I figure out what to do with the Canton filter) as well as degreasing the floorpan and re-affixing the number plate. If I get an extra pair of hands I'll also give the brakes and clutch an overdue bleed.
But for now, have some pictures and I'm off to bed.


I'm pretty happy with how it's turned out... perhaps a BIT blingy, but overall, I think it looks brilliant.
With the car back in working order again, this weekend has been about getting the dash and extinguisher install moved on another notch.
Yesterday I bogged and sanded the dash trim pieces smooth at the join so that the join won't show once upholstered. I also drilled the openings for the extinguisher trigger button and the communications port. I've left some space in the middle for a 12v power supply to go should I want to add one in the future.
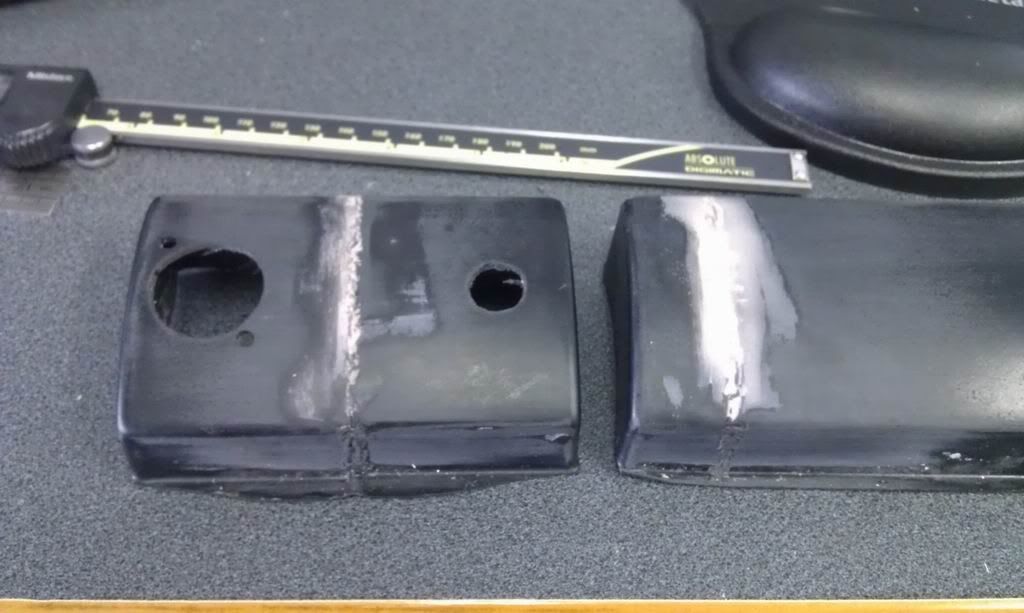
Today I ran into a bit of a glitch with the Lifeline extinguisher control box. This is to fit flush in beween the two dash pieces in the photo above, with the trim with the holes in it being to its right. I had measured it all up and allowed space for the cable to run concealed behind this trim piece. However, when test-fitting it today I realised that the connector stuck out WAY further than I'd allowed for. It fouled the communications port connector by a long way.
To resolve this, I took the Lifeline box to bits and found that there was a good bit of free space inside it I could use. I spent an hour or two making up an aluminium plate to blank off the original opening and to mount the connector inside. It's a shame I don't have any pics of this because I made a really nice job of it and it came out looking like it was meant to be that way all along
With this done, I was able to modify the heater surround trim to mount the page-select button for the MoTeC MDD display. Until now I just had this hanging on a cord until I could figure out where I wanted it. I ended up putting it here as it's easy to reach when strapped in, and I've now got a spare heater surround trim to re-fit should I ever want to go back to the factory-standard look. It's nice and tidy and out of the way, but really easy to use, I wish I'd not waited so long to do it as it's so much better like this!
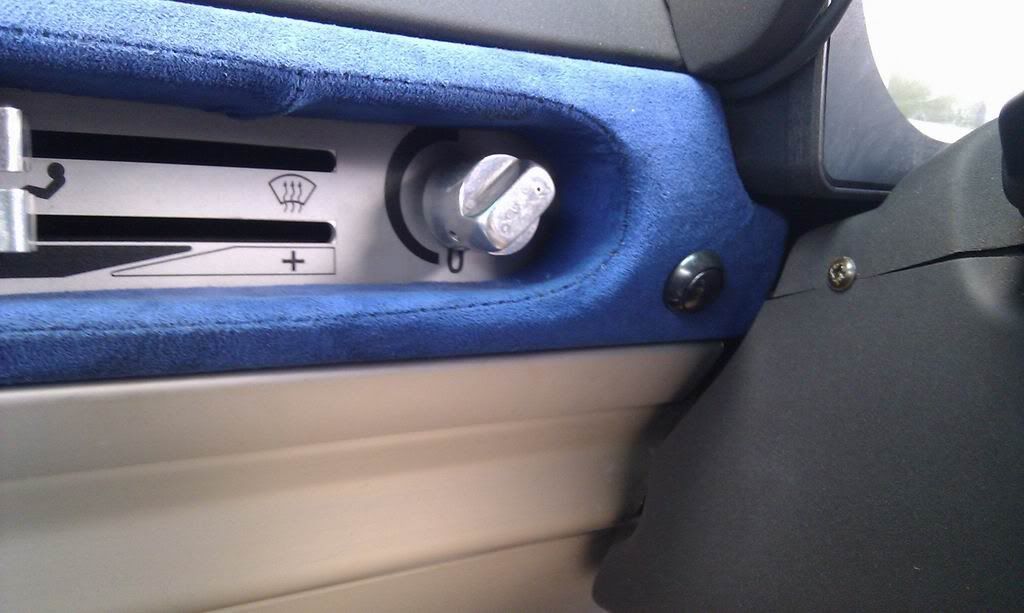
Then I was able to permanently fit the MDD display in place, and then test-fit the rest of the dash. You can see the result below. Imagine the trims upholstered in blue like the rest of the original dash bits and with button-head screws in place of the cap-heads on the com-port I've used here. Should look pretty lush when all finished!
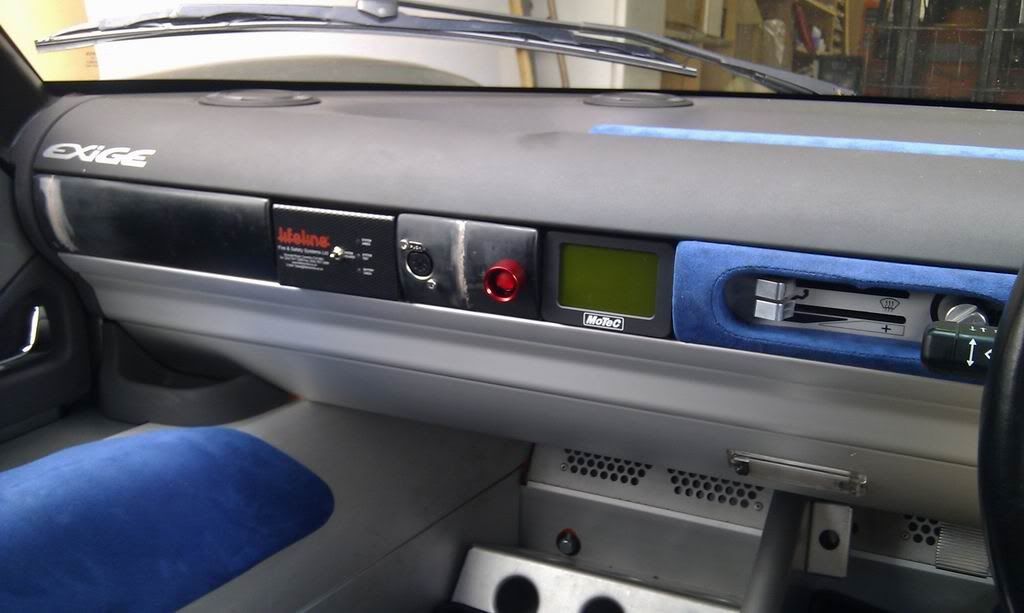
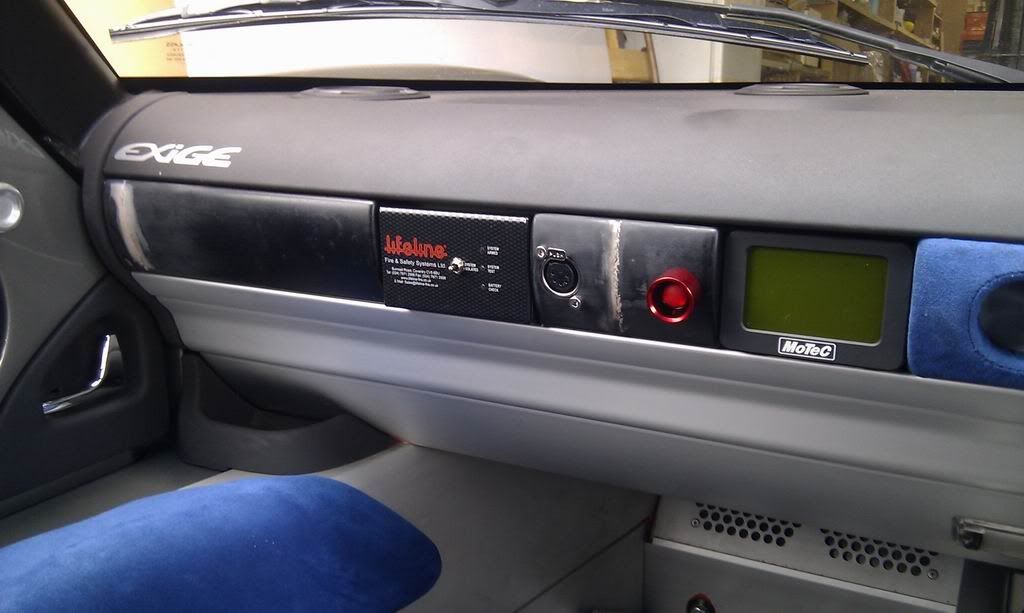
Yesterday I bogged and sanded the dash trim pieces smooth at the join so that the join won't show once upholstered. I also drilled the openings for the extinguisher trigger button and the communications port. I've left some space in the middle for a 12v power supply to go should I want to add one in the future.

Today I ran into a bit of a glitch with the Lifeline extinguisher control box. This is to fit flush in beween the two dash pieces in the photo above, with the trim with the holes in it being to its right. I had measured it all up and allowed space for the cable to run concealed behind this trim piece. However, when test-fitting it today I realised that the connector stuck out WAY further than I'd allowed for. It fouled the communications port connector by a long way.
To resolve this, I took the Lifeline box to bits and found that there was a good bit of free space inside it I could use. I spent an hour or two making up an aluminium plate to blank off the original opening and to mount the connector inside. It's a shame I don't have any pics of this because I made a really nice job of it and it came out looking like it was meant to be that way all along

With this done, I was able to modify the heater surround trim to mount the page-select button for the MoTeC MDD display. Until now I just had this hanging on a cord until I could figure out where I wanted it. I ended up putting it here as it's easy to reach when strapped in, and I've now got a spare heater surround trim to re-fit should I ever want to go back to the factory-standard look. It's nice and tidy and out of the way, but really easy to use, I wish I'd not waited so long to do it as it's so much better like this!


Then I was able to permanently fit the MDD display in place, and then test-fit the rest of the dash. You can see the result below. Imagine the trims upholstered in blue like the rest of the original dash bits and with button-head screws in place of the cap-heads on the com-port I've used here. Should look pretty lush when all finished!


Spent some more time on the car in the weekend. Been getting some bits and bobs finished inside and a little more of the extinguisher plumbing done.
Dash bits should be back in the next day or two, and I need to chase Lifeline up for the extinguisher bits I still need.
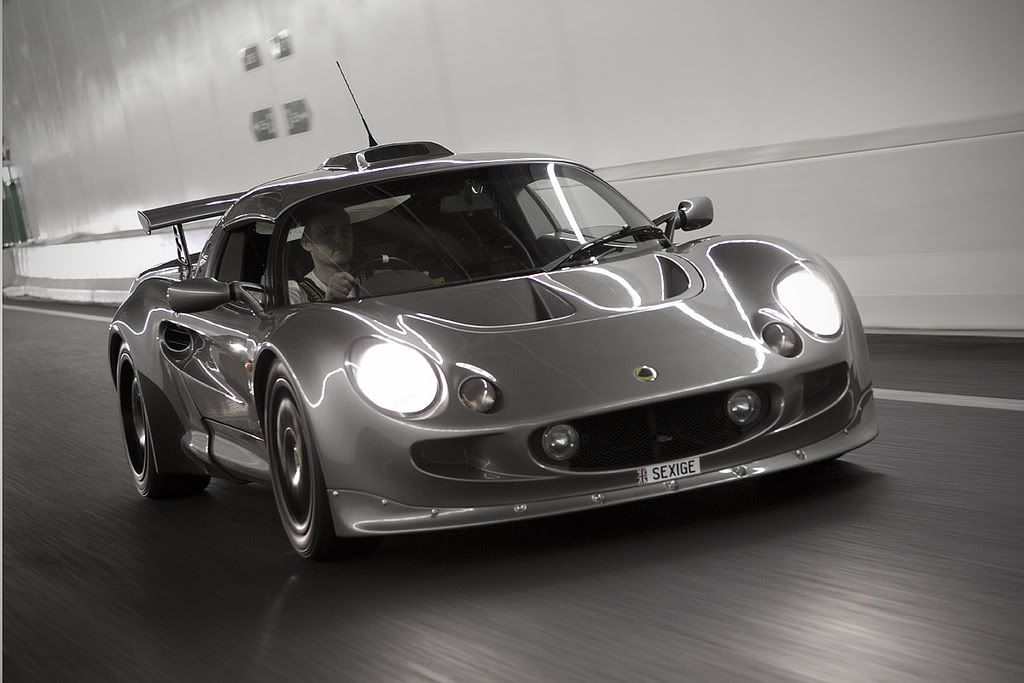
Got the car all cleaned up again so there's no more oil residue on her, erasing all memory of the little barbecue we had.
Since it was shiny, I took it out for a drive with my friend Richy doing some lenswork


IanUAE said:
Nothing for nearly a month, hope all is well.
All is still well  I've not been using or working on the car much lately since it's stored across town and the weather's been rubbish (so much for summer, you could count the number of sunny days this summer on your hands!).
I'm still waiting for a replacement part to finish off the extinguisher installation, which is stopping me from using the car in anger or getting it back on the dyno. After the little fire I had that's a major priority.
However, I did manage to do 100 or so miles in the car on Sunday on some FANTASTIC twisty roads and with 8000RPM/215bhp the car absolutely FLIES. You certainly need to use the revs, which probably means it's little faster on the road than a stock one, but it should monster the track! Above 6500RPM in second gear out of corners, bumps will cause the car to squirm about and writhe, and you can feel the LSD shuffling the power about. In short it's BRILLIANT.
Looking forward now to putting the finishing touches on!
Also looking to buy my first house, which should give me the garage space to start my next project... so if anyone knows of an S1 Elise with a knackered engine, let me know, or one that's a bit crash-damaged but with a good chassis, get in touch

chevronb37 said:
That sounds like a politically incorrect reality TV show in the making "Lotus fixing for the visually impaired". NZ is a long way to go. I wonder how long it would take to drive there from West Yorkshire.
So chuffed to see the car out and about - looks stunning. An absolute credit to you. Remind me, what spec. is the engine? I'm always interested in squeezing a few more horses out, if possible.
Why thank you! So chuffed to see the car out and about - looks stunning. An absolute credit to you. Remind me, what spec. is the engine? I'm always interested in squeezing a few more horses out, if possible.

The engine is basically a full-noise DVAPower 1.8L engine. So it's got a new, HMI-converted crank, fully balanced bottom end, new Omega pistons, larger valves (than stock VHPD), Piper 1444 cam, DVA porting, Arrow Precision rods, Westwood SG iron liners, steel oil pump drive, still running stock VHPD flywheel, piper verniers, colisbro guides.
Engine's running a full MoTeC M800 ECU with a custom loom, and some extra sensors to allow sequential ignition and injection (just helps the car run a bit better at lower throttle and part load more than anything).
Aside from that it's still running the stock VHPD throttles, stock exhaust. The engine is built for 9000RPM, we're gonna run it to 8500. It should be capable of 235-240bhp and is currently making 215bhp at 8000... we expect it'll make 220-225bhp at 8500 with the final tune... the stock manifold and throttles are holding it back a little I think.... but those are bolt-on/bolt-off bits that I can tinker with over time.
In short, it's not cheap (especially when teamed with the Quaife 6-speed box) but it's a really nice quick engine (seems to be about the same pace as a GOOD JDM Honda S1) and it makes a VERY lovely noise.... but I don't think you could go too much further without some more exotic expensive work (or an upgrade to a 1.9 or 2.0k).
This project isn't about the ultimate pace though... it's about how good I could make it within the confines of the original design, and it's come out quite well I think so far.... next project should owe a little less to originality and more to some rather scary power/torque/performance figures.
Edited by Esprit on Sunday 26th February 09:41
JBanx said:
This is my dream car. I've used your thread for lots of tips and advice when I've been sorting out my S1 111s; same color as yours as well; almost like it's baby brother!
Was gutted for you when it went up in smoke! really pleased that it's all back together now. Stunning car.
The photo above; any chance of a hi-res version?
Thanks for the kind words.Was gutted for you when it went up in smoke! really pleased that it's all back together now. Stunning car.
The photo above; any chance of a hi-res version?
This is the original from the photographer and he hasn't uploaded a mega-high res image, but he's a good mate so I'm sure I can get one.
For now though, here's the link to the original, which is 1200 pixels I think
http://www.flickr.com/photos/snoozinrichy/67352100...
Well it's been a slow few weeks. Having the car buried in the back of a shed halfway across town as well as having other things going on in life has meant little time to spend working on or enjoying the beast.
However, I finally got the replacement extinguisher parts from the UK and this weekend I set about finishing off the mechanical installation of the extinguisher system.
I had originally planned to mount the remote charge cylinder inside the centre footwell divider to keep everything hidden. The routing of the braided hose and access to it for replacement/servicing would be a major issue, so I reverted to plan B.
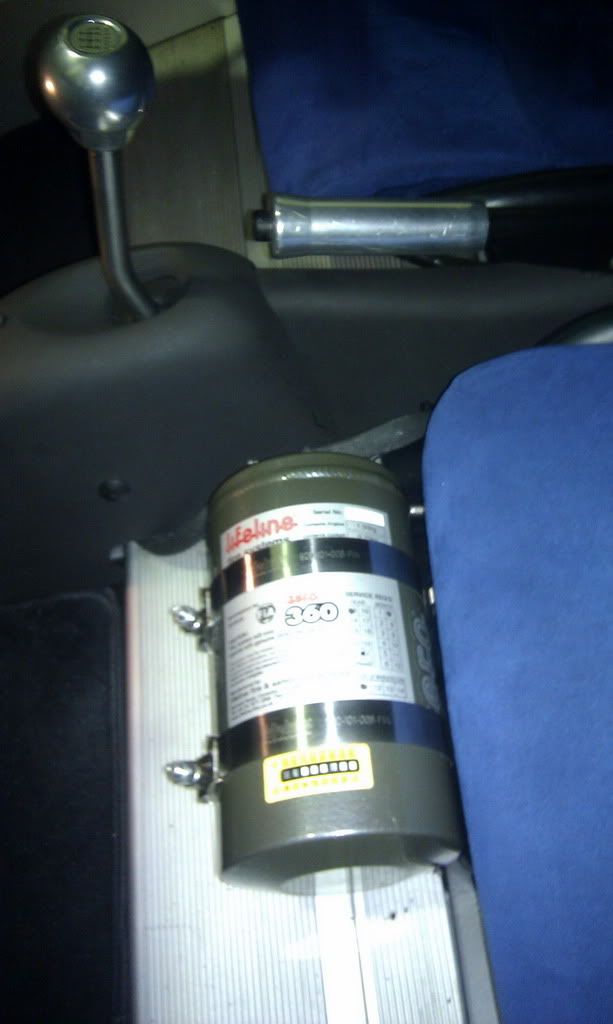
This involved modifying the extinguisher bracket I'd made up to take the remote charge cylinder as well.
Here you can see the remote charge cylinder mounted alongside the extinguisher cylinder on the bracket:
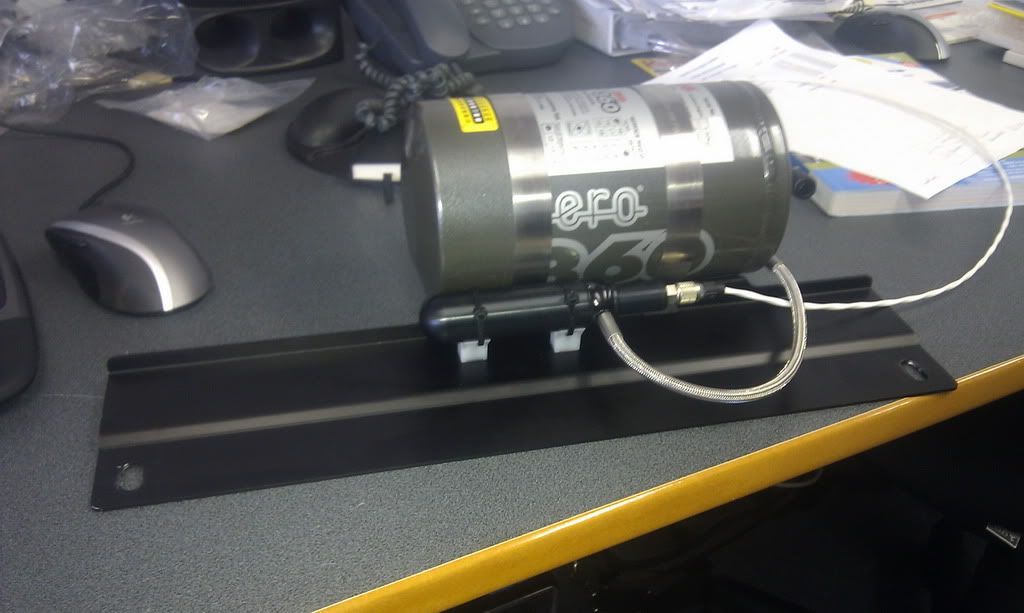
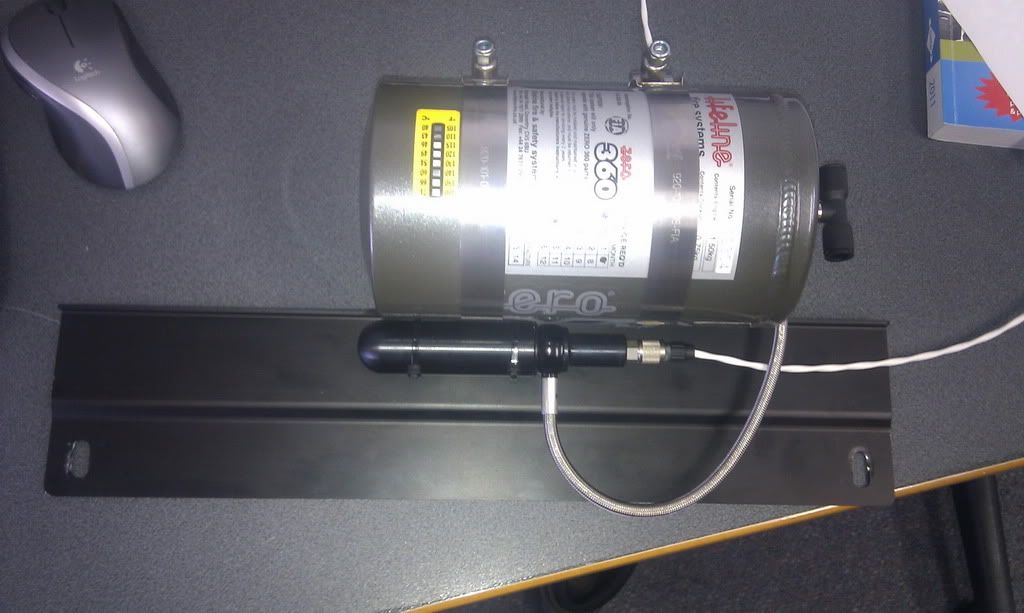
This remains nice and tidy since it sits underneath the passengers' seat and unlike the centre divider option keeps the braided hose out of harm's way from people climbing in and out of the car.
This assembly is now bolted back in the car, and I've just got to measure up for wiring and get the looms made (which will happen next week). Then I can finish the dash assembly and the extinguisher, and the car's interior will be 100% complete.
Then I've just got to modify the Canton oil filter housing to take a lockwire then it's time to hit the track!
Here's hoping for some nice Autumn weather (after literally the crappiest Auckland summer on record) so I can enjoy the thing!
However, I finally got the replacement extinguisher parts from the UK and this weekend I set about finishing off the mechanical installation of the extinguisher system.
I had originally planned to mount the remote charge cylinder inside the centre footwell divider to keep everything hidden. The routing of the braided hose and access to it for replacement/servicing would be a major issue, so I reverted to plan B.
This involved modifying the extinguisher bracket I'd made up to take the remote charge cylinder as well.
Here you can see the remote charge cylinder mounted alongside the extinguisher cylinder on the bracket:


This remains nice and tidy since it sits underneath the passengers' seat and unlike the centre divider option keeps the braided hose out of harm's way from people climbing in and out of the car.
This assembly is now bolted back in the car, and I've just got to measure up for wiring and get the looms made (which will happen next week). Then I can finish the dash assembly and the extinguisher, and the car's interior will be 100% complete.
Then I've just got to modify the Canton oil filter housing to take a lockwire then it's time to hit the track!
Here's hoping for some nice Autumn weather (after literally the crappiest Auckland summer on record) so I can enjoy the thing!

Prawo Jazdy said:
I stumbled across this thread for the first time on Sunday and have spent the last couple of days reading all 50 pages. There was a point about two years ago where I wondered what the rest of the pages were filled with. I didn't realise the project would run right up to the present day!
It's a beautiful car and a great story. Well done for being so thorough in your execution and thanks for putting so much information on here for strangers like me to read. I was genuinely upset when I thought it was a pile of ashes - good to hear it survived. As for the new heatshield, it only looks bling in the same way that Apollo hardware looked bling - i.e. with good reason.
Cheers!
ETA: Hope your father is recovering well too.
Thanks for the kind words!It's a beautiful car and a great story. Well done for being so thorough in your execution and thanks for putting so much information on here for strangers like me to read. I was genuinely upset when I thought it was a pile of ashes - good to hear it survived. As for the new heatshield, it only looks bling in the same way that Apollo hardware looked bling - i.e. with good reason.
Cheers!

ETA: Hope your father is recovering well too.
Edited by Prawo Jazdy on Tuesday 28th February 18:31
 Yeah, it's not been quite the plain sailing I'd hoped for... but hey, it's been an adventure... and one that I'm glad others get a kick out of reading
Well tonight I'm going to have a couple of nice single malts, because today, for the first time since Easter 2008, the "to do" list on the Exige is completely blank.
The final two jobs today were to finish off the extinguisher install and dashboard and to reinstall the Canton Racing oil filter and lockwire it on to prevent the possibility of our little barbecue.
The extinguisher went in first and I got the wiring all run for it nice and tidily. It was also my first chance to see the dash all finished and I think it looks great. The additions look like they're meant to be there and don't look out of place.... which is what I was hoping to achieve.
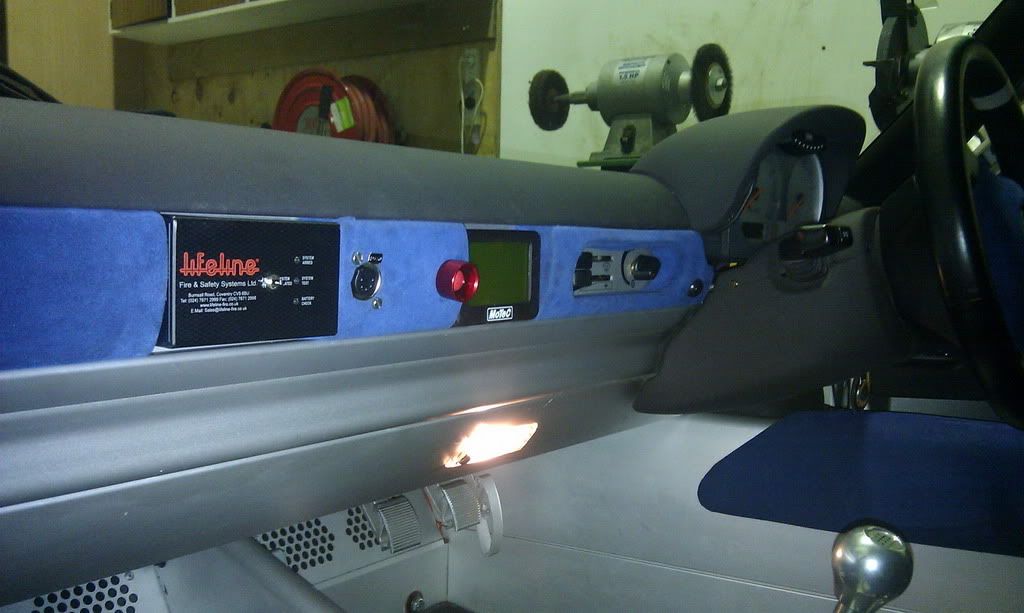
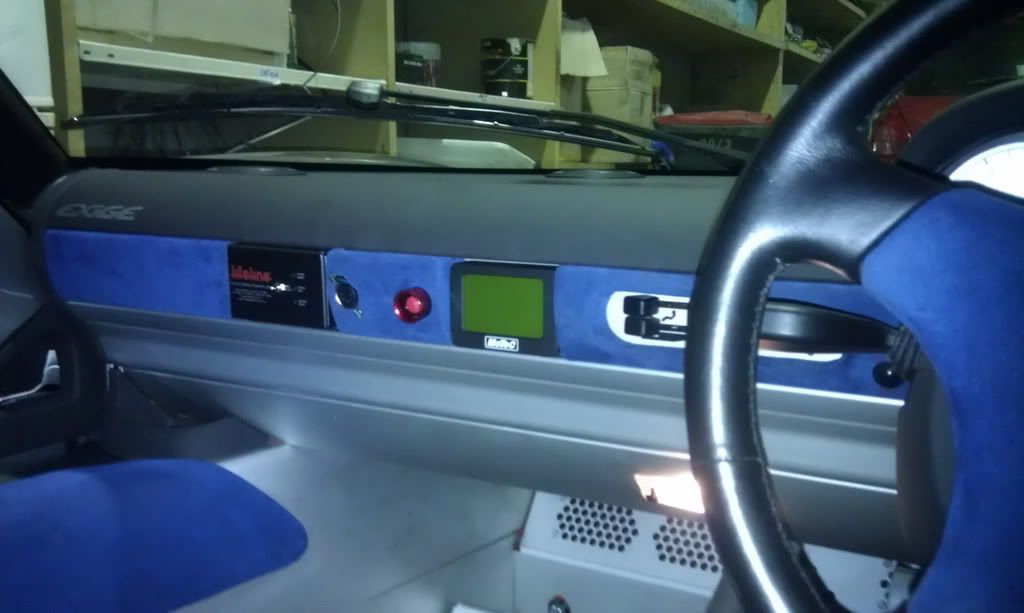
I also got the extinguisher itself back in place and hooked up. I self-tested the firing circuit and it checked out fine so it's ready to deploy if I should ever need it (perish the thought!)
The final job was to swap the oil filter back to the Canton Racing one. I've got no photos of this, but the hex on the end of the filter I've drilled to take a lockwire and there's also a cast-on boss on the side of the sump that I've drilled as well. I've then run a twisted stainless lockwire between the two, which makes it impossible for the oil filter to self-loosen.
I had hoped to take the car for a spin tomorrow, but in typical fashion, now it's ready to use it's forecast rain for the next week.... still, it's ready to go and have some fun in!
Tasks on the horizon for it now involve trackdays and getting it back to the dyno to up the rev limit a bit more and liberate a few more horsepower.
There will be ongoing stuff that needs doing as well and I'll keep posting that in here, so don't worry... this thread won't fall silent.
The final two jobs today were to finish off the extinguisher install and dashboard and to reinstall the Canton Racing oil filter and lockwire it on to prevent the possibility of our little barbecue.
The extinguisher went in first and I got the wiring all run for it nice and tidily. It was also my first chance to see the dash all finished and I think it looks great. The additions look like they're meant to be there and don't look out of place.... which is what I was hoping to achieve.


I also got the extinguisher itself back in place and hooked up. I self-tested the firing circuit and it checked out fine so it's ready to deploy if I should ever need it (perish the thought!)

The final job was to swap the oil filter back to the Canton Racing one. I've got no photos of this, but the hex on the end of the filter I've drilled to take a lockwire and there's also a cast-on boss on the side of the sump that I've drilled as well. I've then run a twisted stainless lockwire between the two, which makes it impossible for the oil filter to self-loosen.
I had hoped to take the car for a spin tomorrow, but in typical fashion, now it's ready to use it's forecast rain for the next week.... still, it's ready to go and have some fun in!
Tasks on the horizon for it now involve trackdays and getting it back to the dyno to up the rev limit a bit more and liberate a few more horsepower.
There will be ongoing stuff that needs doing as well and I'll keep posting that in here, so don't worry... this thread won't fall silent.
Edited by Esprit on Saturday 17th March 07:10
It was a long time coming, but I managed to get SEXIGE out onto the track and running at some half decent pace this weekend! Credit to Richard "FreshPrints" Opie for capturing the attitude of the car through the turn 2-3 complex at Hampton Downs quite nicely here! A dab of oppo and I was away! 
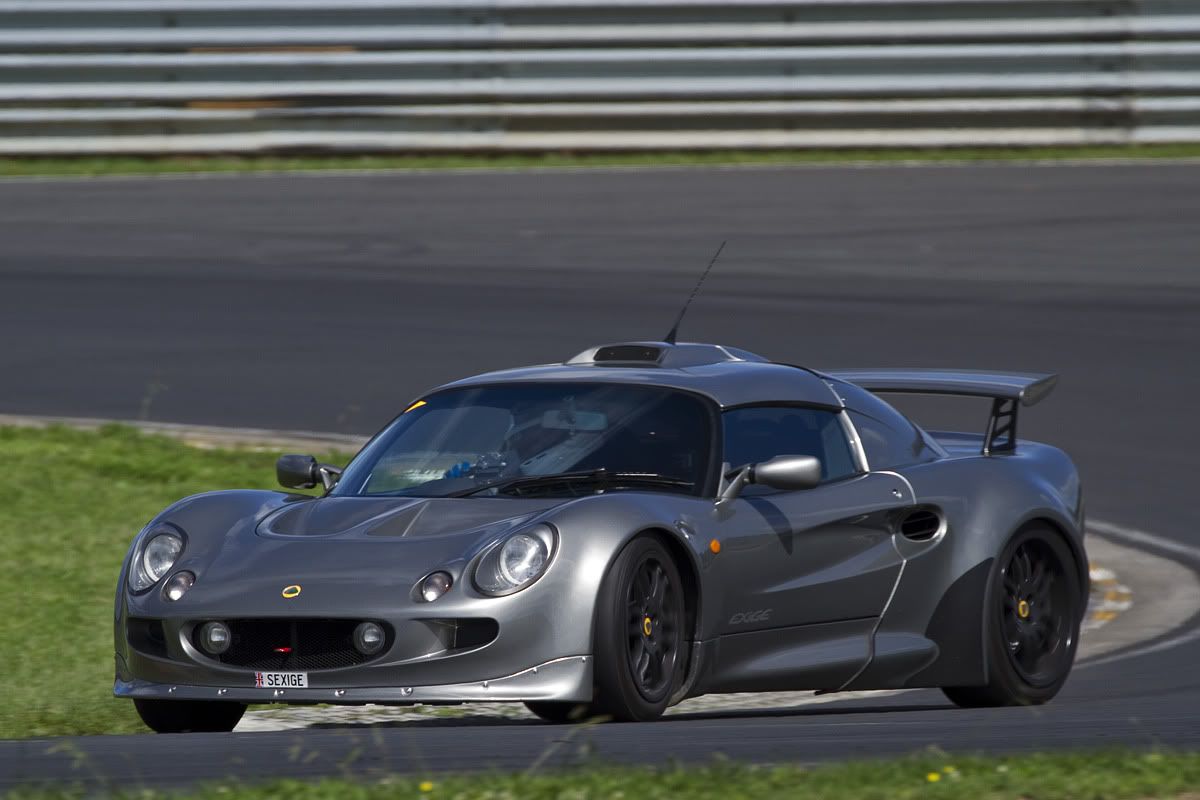
Sadly I only managed two sessions before the alternator packed in (again!) so it's shown up a weak link that'll need further investigation. Either heat or revs is killing the alternator in very short order. The day ended with the car going home ignobly on the back of a recovery truck, but a minor issue in the grand scheme of things.
The car is a good deal quicker than it ever has been, and even with me being pretty rusty behind the wheel and not having much time to dial the car in, it's lapping Hampton Downs in a 1:16 flat, which isn't hanging around. Some more practice should see me easily in the 15s, and hopefully the 14s ultimately with some fresh rubber. Given that the engine still has a little more to give I'm sure that's possible. Not bad for a completely street car
Here's the only video I got from the day. My apologies for the shocking driving, I'm hellish rusty and this was the first session and I hadn't even got the tyre pressures altered from what I run on the road so it was all ham-fisted and snatched brakes! Still, you get to hear what the car sounds like with a semi-decent head of steam (no HGF pun intended!), and I know a few of you out there have been waiting to hear that!
http://www.youtube.com/watch?v=5TufiYrGKXY&hd=...
Now to find a new alternator...


Sadly I only managed two sessions before the alternator packed in (again!) so it's shown up a weak link that'll need further investigation. Either heat or revs is killing the alternator in very short order. The day ended with the car going home ignobly on the back of a recovery truck, but a minor issue in the grand scheme of things.
The car is a good deal quicker than it ever has been, and even with me being pretty rusty behind the wheel and not having much time to dial the car in, it's lapping Hampton Downs in a 1:16 flat, which isn't hanging around. Some more practice should see me easily in the 15s, and hopefully the 14s ultimately with some fresh rubber. Given that the engine still has a little more to give I'm sure that's possible. Not bad for a completely street car

Here's the only video I got from the day. My apologies for the shocking driving, I'm hellish rusty and this was the first session and I hadn't even got the tyre pressures altered from what I run on the road so it was all ham-fisted and snatched brakes! Still, you get to hear what the car sounds like with a semi-decent head of steam (no HGF pun intended!), and I know a few of you out there have been waiting to hear that!

http://www.youtube.com/watch?v=5TufiYrGKXY&hd=...
Now to find a new alternator...
Gassing Station | Elise/Exige/Europa/340R | Top of Page | What's New | My Stuff


