P-51B Mustang "Old Crow" Academy 1:72
Discussion


dr_gn said:
perdu said:
Nice
very nice doc, I love that second hand interior
brilliant
Fraid it's all gone horribly wrong again...exactly the same issue with fuselage decals. I may give up on this one.very nice doc, I love that second hand interior
brilliant
You used Klear again? The original Johnsons or the latest Humfix Clear Gloss Varnish?
What paint did you use, is it what you usually use?
There has to be a way, one scrapping is understandable...
(Think Lady Bracknell here)
This is only basically materials technology, you can sort it
Bloody hell mon ami, the model so far deserves more finishing off
Do you have any Frisket film? I'm after some because it will allow paint modification in the broad sense with a great lowtack protective film. Just mask the rest and spray the wider area around the bad bits.
I hope you can use this as a way of solving this problem
It's all a bit odd. Basically the decals are very thick, yet transparent and brittle, plus they 'grab' the surface, so if I try to move them around, they damage the paint. The upshot is that I've had to repair the fuselage stripes and apply some spare decals - again. The positioning of the decals isn't symmetrical side-to side becasue I can't adjust them. The original aircraft's lettering did look a bit oddly spaced, which also doesn't help with how the model looks!All very odd. The rest of the decals went on OK.
Currently all decals are on, but I've doubled-up some of them with spares where they fit over the stripes to try to get around the transparent issue. It's worked, but a couple of them I have no spares so they look lighter than the rest.
I'll finish it I suppose, but it looks a bit of a balls-up.
Currently all decals are on, but I've doubled-up some of them with spares where they fit over the stripes to try to get around the transparent issue. It's worked, but a couple of them I have no spares so they look lighter than the rest.
I'll finish it I suppose, but it looks a bit of a balls-up.
The Dr sets such high standards for himself that even the slightest deviation from his original plan is looked on as a failure.
I have to say, these "failures" are not obvious to the rest of us.
I find that when building a model one gets so used to having to bodge and compromise that one is never 100% satisfied with the end result. However, others viewing the model tend not to see the issues that the builder does.
I have to say, these "failures" are not obvious to the rest of us.
I find that when building a model one gets so used to having to bodge and compromise that one is never 100% satisfied with the end result. However, others viewing the model tend not to see the issues that the builder does.
That sounds like a carrier film problem
When I worked in the transfer printing trade we'd lay out a carrier varnish on the main sheet (I was a silkscreen print apprentice back in the day) which was overprinted with the various colours in litho. Lovely definition and separation with litho, then a top varnish coat silkscreened on top.
If the lower varnish layer is catching the surface there's two things to do
First shun that decal manufacturer for life, honestly there must be a problem with their process, paper or carrier varnish.
Or yours which, having seen how you do things, I discount imediately.
The other thing to do is place the decals on top of the most smooth and glossy surface you can get.
Not Klear or Humbrol's latest either.
I'm still not convinced with Microsol either, unnatural black magic, maybe it's spell failed.
I prefer to slide normal decals with slightly soapy, washing up liquidy warm water.
You need a really fine surface like maybe Tamiya's gloss varnish can give and leave the varnish coat for a day or two to harden off fully.
I know you have worked this out already, it makes me feel better trying to help you with it

The model build vid on the Old Crow website said they had isues with the decals too.
http://youtu.be/azwlvY9_nRs
http://youtu.be/azwlvY9_nRs
HoHoHo said:
I'm sure yours are up there Eric
When you see how how much effort the good Dr makes and his attention to detail/end results it makes me realise I know f-all about this hobby!
I don't think it's question of knowing or not knowing f-all.When you see how how much effort the good Dr makes and his attention to detail/end results it makes me realise I know f-all about this hobby!
It's about the time, effort and dedication to detail that one is prepared to make. DG applies very, very high standards to what he does - and has the skills to achieve those standards.
I fall pretty short of those standards - but at the same time - I am not prepared to put the huge effort he does into 1/72 scale pocket money kits. As long as I end up with a reasonable representation of the real thing after all my efforts, I'm usually fairly happy.
That's the beauty of this hobby. Each one of us can chose to put as much or as little into each project as we want to.
I would hate to think that Dr Gns very excellent efforts would put others off - rather than inspire them.
Eric Mc said:
HoHoHo said:
I'm sure yours are up there Eric
When you see how how much effort the good Dr makes and his attention to detail/end results it makes me realise I know f-all about this hobby!
I don't think it's question of knowing or not knowing f-all.When you see how how much effort the good Dr makes and his attention to detail/end results it makes me realise I know f-all about this hobby!
It's about the time, effort and dedication to detail that one is prepared to make. DG applies very, very high standards to what he does - and has the skills to achieve those standards.
I fall pretty short of those standards - but at the same time - I am not prepared to put the huge effort he does into 1/72 scale pocket money kits. As long as I end up with a reasonable representation of the real thing after all my efforts, I'm usually fairly happy.
That's the beauty of this hobby. Each one of us can chose to put as much or as little into each project as we want to.
I would hate to think that Dr Gns very excellent efforts would put others off - rather than inspire them.
Life's too busy currently but my time will come hopefully!
Eric Mc said:
I find that quite sad.
My philosophy is to make models on my terms and my standards - not to the standards of others.
That doesn't mean I don't strive to make better models, I do. But I won't let others who build better models than me put me off.
You don't need to be Eric My philosophy is to make models on my terms and my standards - not to the standards of others.
That doesn't mean I don't strive to make better models, I do. But I won't let others who build better models than me put me off.
I like I do anything I do to the best of my abilities and I'll have a good go when I've got time to concentrate
That said I've got two models mid-build so I can't be that fussy!
Academy decals are notorious for being difficult to apply. I've usually used aftermarket in the past.
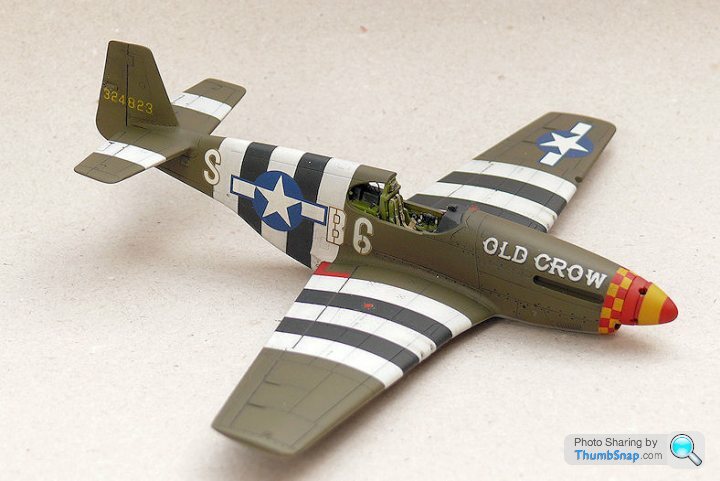
So here are some pics that illustrate the issues, namely, and the codes and insignia are not symmetrical side-to side, the B & 6 are transparent so look darker over the green. there is a bit of out of register on the letters too giving a white outline to some of them.


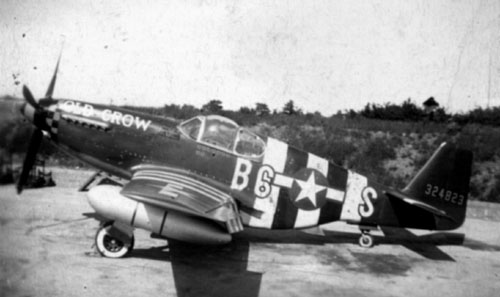
Here is a pic of the original, showing how the codes are a bit odd, but you can also see that the star can't fit properly w.r.t. the stripes and codes...I think there must me a size error somewhere, which is probably what confused everything to start with. anyhow, if I could get another spare set of decals, I could lighten the B & 6 by overlaying, and at least that would sort that:
Ho well, assuming nothing else goes wrong it will take its place in the collection after all.
So here are some pics that illustrate the issues, namely, and the codes and insignia are not symmetrical side-to side, the B & 6 are transparent so look darker over the green. there is a bit of out of register on the letters too giving a white outline to some of them.
Here is a pic of the original, showing how the codes are a bit odd, but you can also see that the star can't fit properly w.r.t. the stripes and codes...I think there must me a size error somewhere, which is probably what confused everything to start with. anyhow, if I could get another spare set of decals, I could lighten the B & 6 by overlaying, and at least that would sort that:
Ho well, assuming nothing else goes wrong it will take its place in the collection after all.
Gassing Station | Scale Models | Top of Page | What's New | My Stuff