Tamiya 1:12 McLaren MP4/6 Rebuild/Upgrade
Discussion


Halmyre said:
dr_gn said:
Halmyre said:
dr_gn said:
I suppose it's too late to point out that the spacing of the holes round the rim aren't the same as the photo-etch?
This one is though:


I'm simply aiming for "a 1991 McLaren MP4/6", as I remember them 'in the flesh'.

dr_gn said:
Halmyre said:
dr_gn said:
Halmyre said:
dr_gn said:
I suppose it's too late to point out that the spacing of the holes round the rim aren't the same as the photo-etch?This one is though:
I'm simply aiming for "a 1991 McLaren MP4/6", as I remember them 'in the flesh'.
Halmyre said:
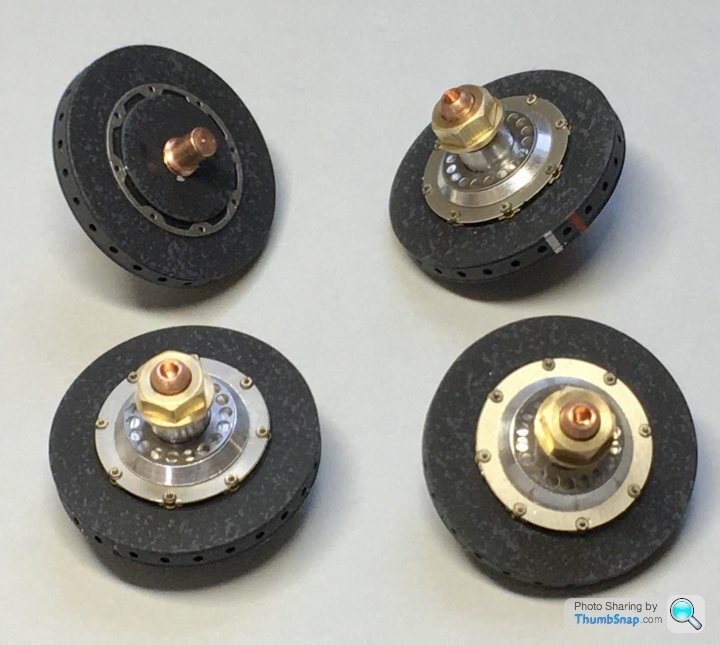
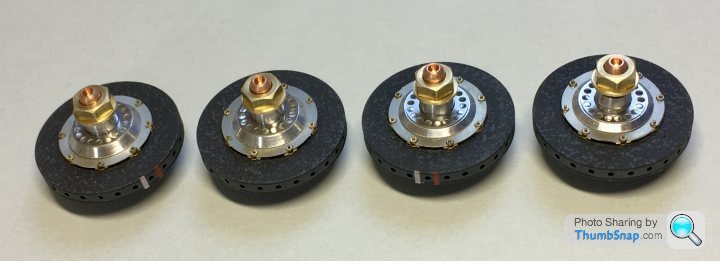
I'm now wondering why the odd spacing. Common sense would tell you that regular spacing is the most efficient way of dissipating heat.
On the model discs the 2 holes / 1 hole pattern of the outer rim looks like it lines up with the pattern of the inside, erm, tabs(?) of the disc.ajprice said:
Halmyre said:
I'm now wondering why the odd spacing. Common sense would tell you that regular spacing is the most efficient way of dissipating heat.
On the model discs the 2 holes / 1 hole pattern of the outer rim looks like it lines up with the pattern of the inside, erm, tabs(?) of the disc.dr_gn said:
ajprice said:
Halmyre said:
I'm now wondering why the odd spacing. Common sense would tell you that regular spacing is the most efficient way of dissipating heat.
On the model discs the 2 holes / 1 hole pattern of the outer rim looks like it lines up with the pattern of the inside, erm, tabs(?) of the disc.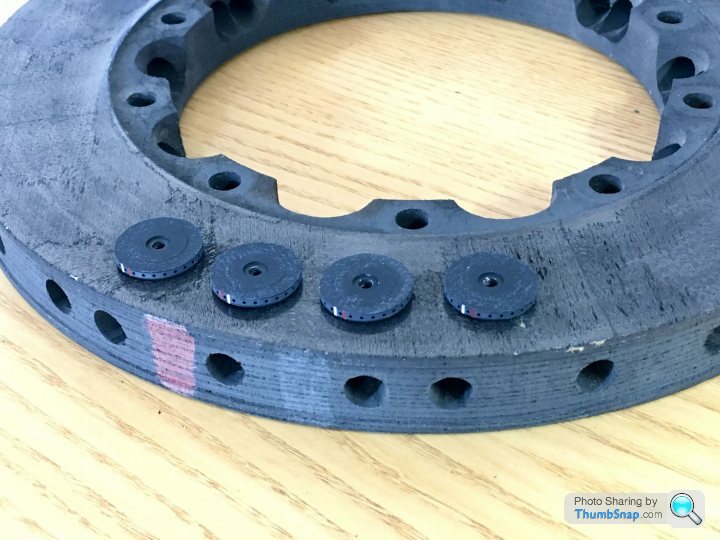
Halmyre said:
dr_gn said:
Halmyre said:
dr_gn said:
Halmyre said:
dr_gn said:
I suppose it's too late to point out that the spacing of the holes round the rim aren't the same as the photo-etch?This one is though:
I'm simply aiming for "a 1991 McLaren MP4/6", as I remember them 'in the flesh'.
If you draw it out as a circle, simple radial holes actually don't cover the area very effectively. Grouping them as per my actual disc gives a pattern like this (imagine it's wrapped around the disc, top is the outer diameter, bottom the inner):
\I/\/\I/\/\I/\I/\/\I/
If it was a simple radial pattern of lines, there would be progressively more un-drilled volume as you go from the inner to outer diameter - and the discs get hotter in that area becasue of higher surface speed. In addition, from a structural point of view, becasue the inner ends of the \I/ patterns merge into one opening, there's more meat left between adjagent drillings = more strength where the peak shearing loads in the disc are, and more room for the disc-bell holes.

villageidiot said:
That's the last thing I need - another! Already got two...How about this one:
https://www.ebay.com/itm/1991-McLaren-Honda-Type-M...
£12K+
Been for sale for years. What a muppet.
Murph7355 said:
How utterly amazing do F1 cars of that era look!?! They sounded epic too - I have very vivid memories of approaching Silverstone on race day and hearing the cars warming up.
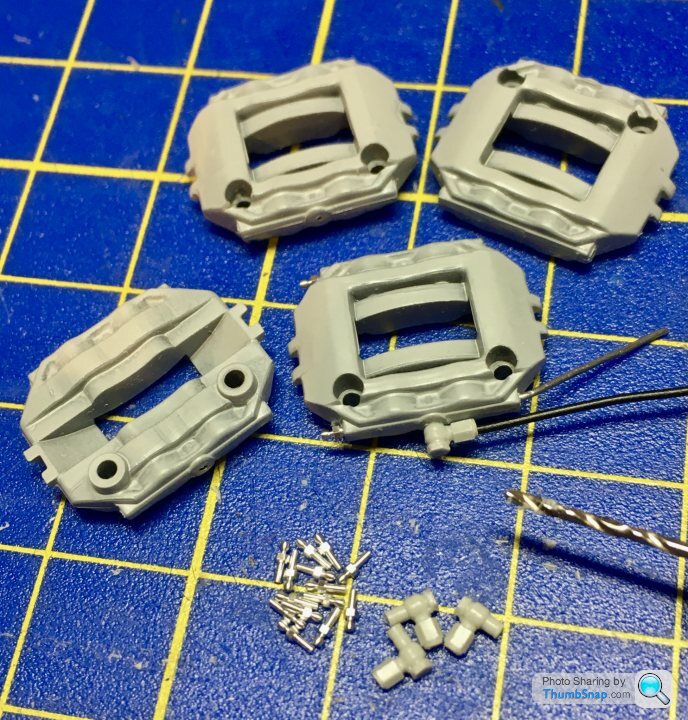
Yep. I remember about ‘90, going to a test and stopping at Silverstone village post office to buy some film. The sound in the distance was awesome. Waiting to pay for the film and getting to the pits seemed like the longest journey ever (about 10 minutes).Bit more work on the callipers, painted the bodies Vallejo gold/chrome silver, with a very thin dark wash. Pads NATO black to match the disc base colour. Also added some heat sensitive paint stripes to match the discs:

Still a lot to do - decals, satin coat, bleed nipples, transfer pipes & nuts and pad retainers & bolts. The tape is just so I can keep them matched to their discs so that only their best respective sides are visible...
Still a lot to do - decals, satin coat, bleed nipples, transfer pipes & nuts and pad retainers & bolts. The tape is just so I can keep them matched to their discs so that only their best respective sides are visible...

Gassing Station | Scale Models | Top of Page | What's New | My Stuff