Papercraft... what have you started
Discussion


Check out this guy's Corsair II paper aircraft:
http://www.britmodeller.com/forums/index.php?/topi...
...Impressive; in fact better than many plastic models of the same I've seen.
http://www.britmodeller.com/forums/index.php?/topi...
...Impressive; in fact better than many plastic models of the same I've seen.
That Corsair is amazingly built, although I'm not a fan of mascara-like panel lines.
The daughter refused flat-out to have the transporter, so it's living one the top of one of my Work PCs for the moment.

She's requested Olaf from frozen since I'm "clearly having fun doing this".
shouldn't take too long
The daughter refused flat-out to have the transporter, so it's living one the top of one of my Work PCs for the moment.
She's requested Olaf from frozen since I'm "clearly having fun doing this".
shouldn't take too long
dr_gn said:
I don't like such heavy panel lines either, but in this case I'm more than happy to make an exception. That must have taken some skill (plus I'm guessing the lines were a feature of the printed parts rather than him adding them).
Oh, I totally agree - that is a level of modelling I can only aspire to, and the printing is nothing to do with the modeller, and all to do with the kit.Ok, located some thin cardstock from Asda at the weekend. (20 sheets for £1.47 - I can live with that if it's no use)
Next up as a test - 2009 NSX
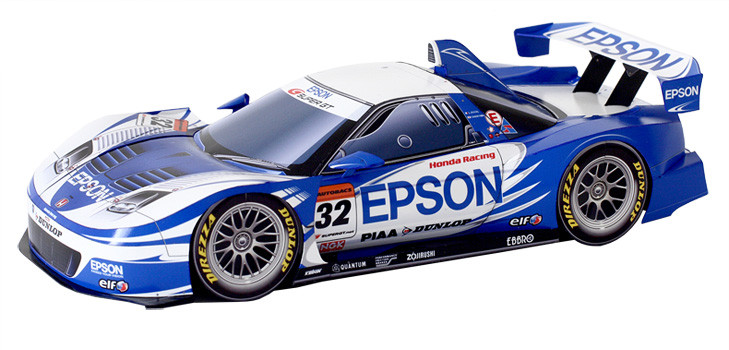
Printed out from here
http://www.epson.jp/sponsor/nakajima/craft/nsx2009...
only 3 sheets of card - as it happens, the version I'd printed out on paper had the same issue that the Transporter had anyway. If you print the PDF direct from chrome, it doesn't scale the first page to fit the paper for some reason, so save to Desktop, open in Reader and print seems to be the way forward.
Hopefully today will be a quiet day and I can get a full lunchtime's worth of work done on it. If all goes well, I'll be reprinting the motorbike on card, and starting that next.
Long term I have my eye on this, but i'm baulking at 15Eur postage
Next up as a test - 2009 NSX
Printed out from here
http://www.epson.jp/sponsor/nakajima/craft/nsx2009...
only 3 sheets of card - as it happens, the version I'd printed out on paper had the same issue that the Transporter had anyway. If you print the PDF direct from chrome, it doesn't scale the first page to fit the paper for some reason, so save to Desktop, open in Reader and print seems to be the way forward.
Hopefully today will be a quiet day and I can get a full lunchtime's worth of work done on it. If all goes well, I'll be reprinting the motorbike on card, and starting that next.
Long term I have my eye on this, but i'm baulking at 15Eur postage
Check this website out:
http://www.kartonmodellbau.de/epages/63481486.sf/e...
The boat I'm building is from the HMV range, and it appears that HMV sell the correct paper separately - look in the "Tools" section.
I've seen some buildings sold on there (and indeed the bits of cities) and they are just as amazing as the vehicles...
A little bit of downtime today due to a server outage.
I'm finding working with this thin card easier than paper, as expected, it's a little more rigid - however when moistened by the glue, it has a tendency to de-laminate into two layers
(especially if the "flap" has been folded, and is a triangle 1mm*3mm in size)
Step 1 of 12 completed.

As the stock is a little thicker, the white edge is a little more notiiable, but it's also easier to run along with a dark pen (which isn't bleeding as much as paper) - which yields better results.
I'm finding working with this thin card easier than paper, as expected, it's a little more rigid - however when moistened by the glue, it has a tendency to de-laminate into two layers
(especially if the "flap" has been folded, and is a triangle 1mm*3mm in size)
Step 1 of 12 completed.
As the stock is a little thicker, the white edge is a little more notiiable, but it's also easier to run along with a dark pen (which isn't bleeding as much as paper) - which yields better results.
Step 2 - Both Doors and rear 3/4 panels complete.
truly horrid, horrid instructions for these. Each side is 6 pieces, 3 of them are curved on one axis. the wheelarch piece calls for a curve in one direction across the top of the wheelarch and a curve on the other axis across the other two panels.
I've ended up scrapping lot as the curvature didnt work out and it just looked _wrong_. It's not perfect (particularly for the bottom sills, but they are internal and won't be seen once complete)

The gap under where it says "10L" is intentional for the wing mirror.
Step 3 is attaching these two to the canopy built in step 1 - I'll leave the glue to set overnight and try tomorrow.
truly horrid, horrid instructions for these. Each side is 6 pieces, 3 of them are curved on one axis. the wheelarch piece calls for a curve in one direction across the top of the wheelarch and a curve on the other axis across the other two panels.
I've ended up scrapping lot as the curvature didnt work out and it just looked _wrong_. It's not perfect (particularly for the bottom sills, but they are internal and won't be seen once complete)
The gap under where it says "10L" is intentional for the wing mirror.
Step 3 is attaching these two to the canopy built in step 1 - I'll leave the glue to set overnight and try tomorrow.
shortar53 said:
I'm finding working with this thin card ... it has a tendency to de-laminate into two layers
As the stock is a little thicker, the white edge is a little more notiiable,...
How are you scoring the fold lines? Rather than using light pressure from a blade - which creates a cut half-way through the card - try instead using something blunter (eg a wooden or plastic cocktail stick) and a bit more pressure - the aim is to dent the card rather than cutting it.As the stock is a little thicker, the white edge is a little more notiiable,...
Whenever possible (and it's not easy sometimes) score on the *back* of the card, hence creating a dent which the card will fold around, leaving the outer surface undamaged.
When I was 4 or 5 we used to get those made out of plastic. I think they called them Airfix or something.
I might be wrong, but I think you can still buy them but it's too long ago to remember. I was 4 or 5, not sure if I mentioned that.
Anyway there was a kid in our village who was on welfare and couldn't afford them so used to use paper to make models.
We could have made a decent nickname out of his hobby but we just called him Toilet Paul because he smelled of piss.
Did I mentioned that we were about 5 at the time?
blindswelledrat said:
When I was 4 or 5 we used to get those made out of plastic. I think they called them Airfix or something.
I might be wrong, but I think you can still buy them but it's too long ago to remember. I was 4 or 5, not sure if I mentioned that.
Anyway there was a kid in our village who was on welfare and couldn't afford them so used to use paper to make models.
We could have made a decent nickname out of his hobby but we just called him Toilet Paul because he smelled of piss.
Did I mentioned that we were about 5 at the time?
Paul now has a wife, kids and is totally fulfilled in life without resorting to "when I were a kid" stories on t'internet.I might be wrong, but I think you can still buy them but it's too long ago to remember. I was 4 or 5, not sure if I mentioned that.
Anyway there was a kid in our village who was on welfare and couldn't afford them so used to use paper to make models.
We could have made a decent nickname out of his hobby but we just called him Toilet Paul because he smelled of piss.
Did I mentioned that we were about 5 at the time?
If your airfix kits come up to the standards of the stuff Dr_gn, EricMc and Perdu post on here regularly, theres a start a topic button so you can show us... Me, I'm happy plodding along learning how to do these paper kits during my lunch break, where liquid poly and an airbrush would be frowned upon
I ended up re-doing the sill sections.
the instructions are completely unclear, which lead to me mounting them upside down
Managed to remove them without too much issue, and re-printed that part.
Inner and outer sills attached, and canopy/rear-deck attached to sides... it's taking shape now.
The level of finish is not great, but it's improving - there are a couple of places I still need to flat the white edges down, and a couple of flaps that need a dab of PVA under to stick down.
By the time it's finished, it'll be at "OK"

Doc,
there are a couple of "gaps" in the seams, no doubt due to the complex jommetry, and my hamfistedness... i'm thinking about a thin strip of paper PVA'd inside to hide the hole - would this work?
the instructions are completely unclear, which lead to me mounting them upside down
Managed to remove them without too much issue, and re-printed that part.
Inner and outer sills attached, and canopy/rear-deck attached to sides... it's taking shape now.
The level of finish is not great, but it's improving - there are a couple of places I still need to flat the white edges down, and a couple of flaps that need a dab of PVA under to stick down.
By the time it's finished, it'll be at "OK"
Doc,
there are a couple of "gaps" in the seams, no doubt due to the complex jommetry, and my hamfistedness... i'm thinking about a thin strip of paper PVA'd inside to hide the hole - would this work?
shortar53 said:
Paul now has a wife, kids and is totally fulfilled in life without resorting to "when I were a kid" stories on t'internet.
If your airfix kits come up to the standards of the stuff Dr_gn, EricMc and Perdu post on here regularly, theres a start a topic button so you can show us... Me, I'm happy plodding along learning how to do these paper kits during my lunch break, where liquid poly and an airbrush would be frowned upon
Fair point. With this in mind I decided to knuckle down and do some myself.If your airfix kits come up to the standards of the stuff Dr_gn, EricMc and Perdu post on here regularly, theres a start a topic button so you can show us... Me, I'm happy plodding along learning how to do these paper kits during my lunch break, where liquid poly and an airbrush would be frowned upon
Sure you'll agree they are already on a par

And a special 3-d swan

shortar53 said:
I ended up re-doing the sill sections.
the instructions are completely unclear, which lead to me mounting them upside down
Managed to remove them without too much issue, and re-printed that part.
Inner and outer sills attached, and canopy/rear-deck attached to sides... it's taking shape now.
The level of finish is not great, but it's improving - there are a couple of places I still need to flat the white edges down, and a couple of flaps that need a dab of PVA under to stick down.
By the time it's finished, it'll be at "OK"
Doc,
there are a couple of "gaps" in the seams, no doubt due to the complex jommetry, and my hamfistedness... i'm thinking about a thin strip of paper PVA'd inside to hide the hole - would this work?
I dunno, you could try it, or you could paint some PVA along the gap and paint it, if it's not too wide.
shortar53 said:
blindswelledrat said:
Fair point. With this in mind I decided to knuckle down and do some myself.
Sure you'll agree they are already on a par
That dog is amazing. So realistic. I think if i threw a bone, it would leap off the screen to fetch it.Sure you'll agree they are already on a par

Gassing Station | Scale Models | Top of Page | What's New | My Stuff