FORD GT40 MKII 1/12TH TRUMPETER
Discussion


CanAm said:
Excellent work! And the dark blue tub is looking good.
.The blue colour will definitely go with bringing out the black once on, instead of painting the whole car black absorbing all the detail I think. Enjoying following RK,s web and learning a thing or two along the process
Edited by henryk001 on Monday 6th May 16:33
The_Jackal said:
LOL I just saw the start of this thread for the first time, not realising its been up for a while, and thought I'll tell him about Molotow chrome pens.
Then I read the thread.....WOW
I think you know what you are doing lol
.Then I read the thread.....WOW
I think you know what you are doing lol
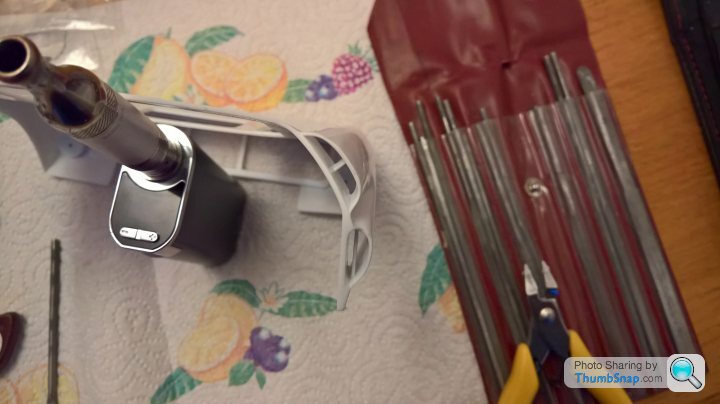
Yes not often anyone would take chrome off a model, but there was way too much of it in this kit. I am using Motolow chrome and metallic pens by running my brush over the nib to paint.
Well here it went.
This took up some time in the evenings, hurt my eyes too.
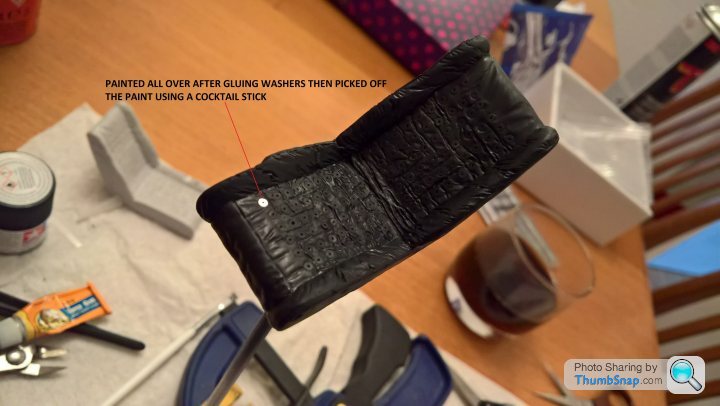
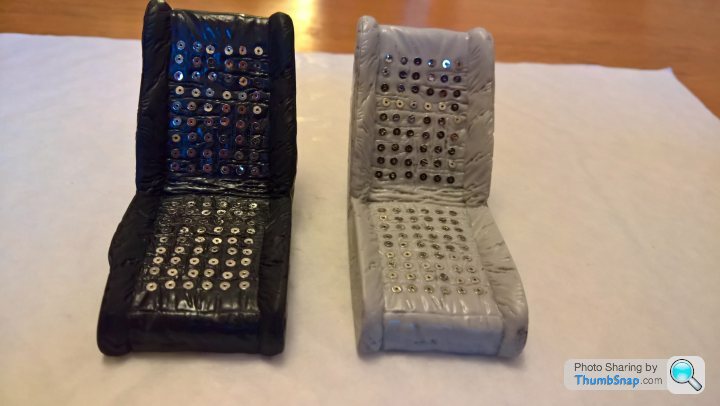
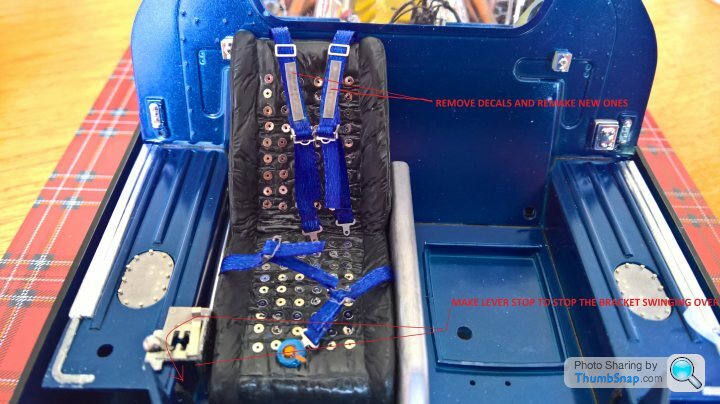
The silver self adhesive washers wernt adhesive any more, probably due to the age of the kit. so i had to dab a drop of glue (microscale PVA type) on every hole of the seat 108 of them on each seat to bond the washers on one at a time, then painted the seat all over matt black, once dried removed the black from the washers with a cocktail stick. Luckily enough it was very easy as the paint didnt take to the washers.
 .
.
 .
.
 .
.
BELT NEXT.
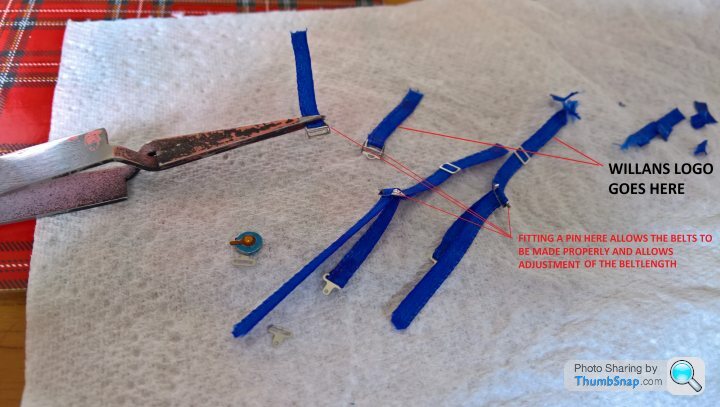
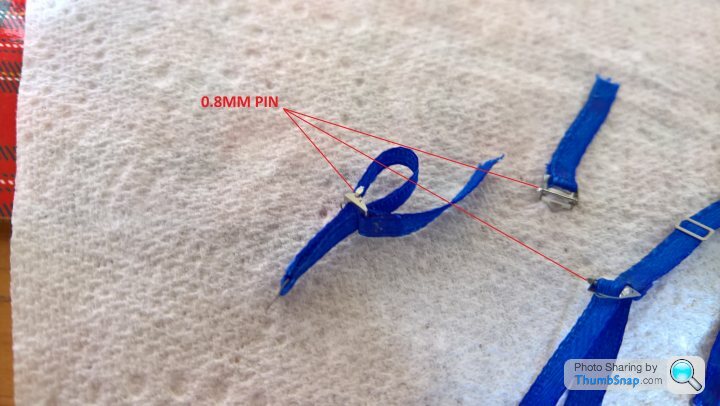
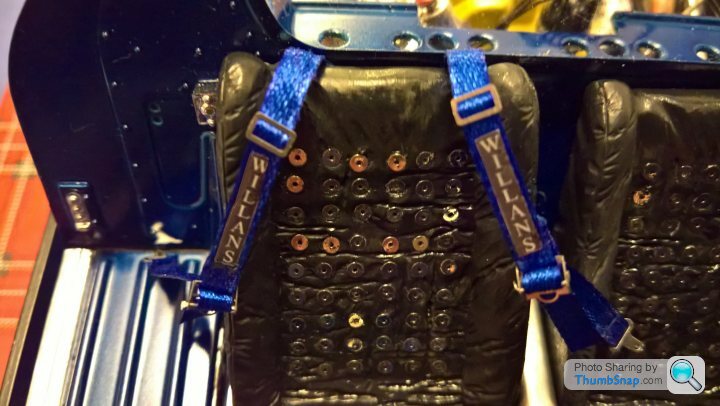
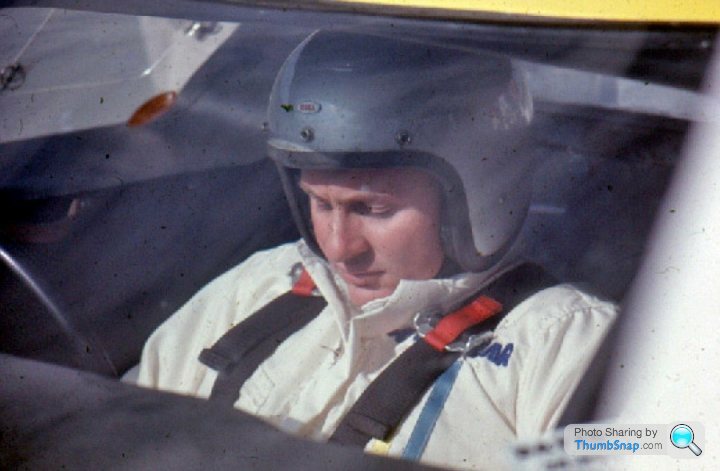
According to the RK motors website build there was only one seatbelt fitted for the driver.It might look a bit odd but obviously there was only one driver at any one time in the real car at Le mans. Ive made my belts work as fully adjustable belts by adding a pin to all the adjusting clasps,the belts can be connected to the quick release or left loose works great as long as you use tweezers . The Willans decals however were old ones i made years ago have faded to much because i didnt seal them then, so im going to do some new ones later.
THE REAL BELT.
 .
.
HERES MINE.
My wifes vast stock of embriodery materials presented me with blue silk ribbon to use, perfect width, a little bit too blue but hey, borrowed her fray stop. thanks love.XX.
 .
.
 .
.
 .
.
 .
.
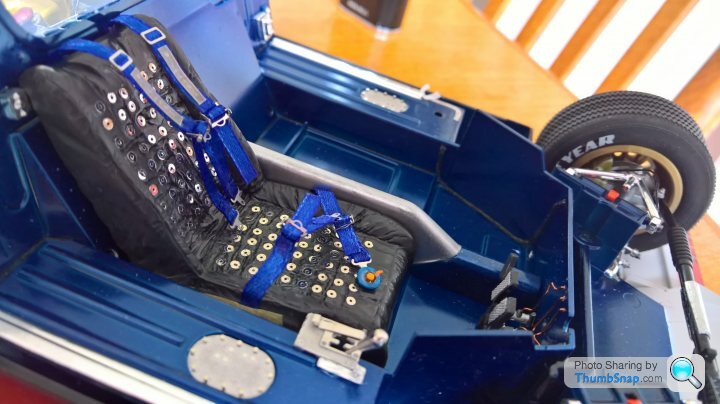
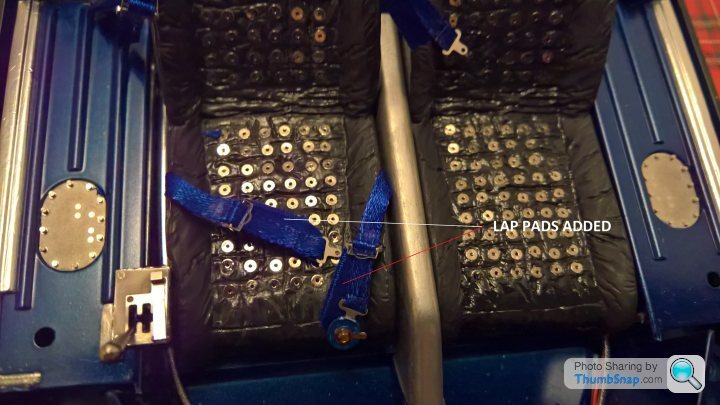
Looks ok to me ,just need to make the lap belt pads to finish, some tidying up, fit the passenger seat and on to building the model.
Cheers, time for a beer
This took up some time in the evenings, hurt my eyes too.
The silver self adhesive washers wernt adhesive any more, probably due to the age of the kit. so i had to dab a drop of glue (microscale PVA type) on every hole of the seat 108 of them on each seat to bond the washers on one at a time, then painted the seat all over matt black, once dried removed the black from the washers with a cocktail stick. Luckily enough it was very easy as the paint didnt take to the washers.
...BELT NEXT.
According to the RK motors website build there was only one seatbelt fitted for the driver.It might look a bit odd but obviously there was only one driver at any one time in the real car at Le mans. Ive made my belts work as fully adjustable belts by adding a pin to all the adjusting clasps,the belts can be connected to the quick release or left loose works great as long as you use tweezers
. The Willans decals however were old ones i made years ago have faded to much because i didnt seal them then, so im going to do some new ones later.THE REAL BELT.
.HERES MINE.
My wifes vast stock of embriodery materials presented me with blue silk ribbon to use, perfect width, a little bit too blue but hey, borrowed her fray stop. thanks love.XX.
....Looks ok to me ,just need to make the lap belt pads to finish, some tidying up, fit the passenger seat and on to building the model.
Cheers, time for a beer
Finished the lap belt pads and remade Willans decals in the evenings.
 .
.
 .
.
Made up battery cable terminals from scrap white metal bits and formed and fitted a battery clamp from some PE sheet.
 .
.
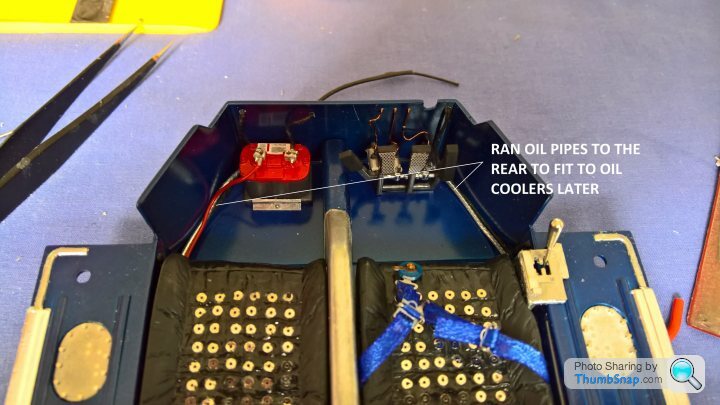
Ran the live cable, earth and the 2 braided oil cooler pipes that runs from the front oil tank to connect up to the coolers later on in the engine bay.
 .
.
 .
.
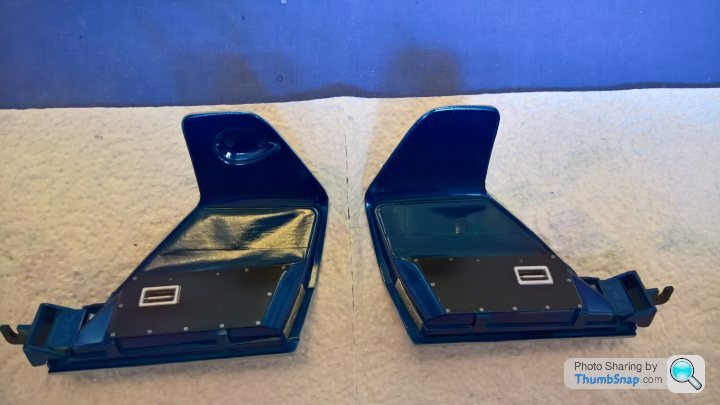
Heres where im at.
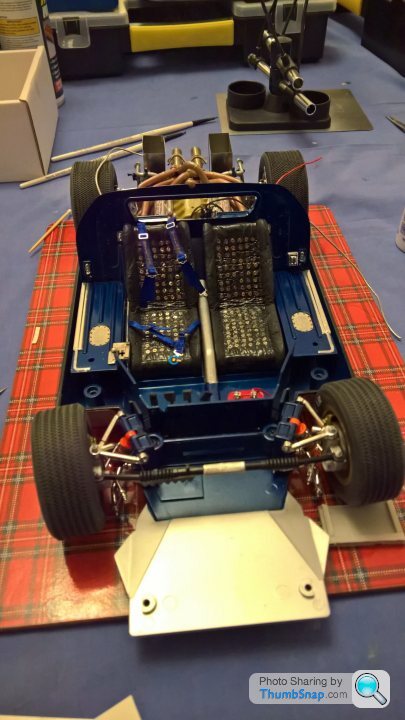
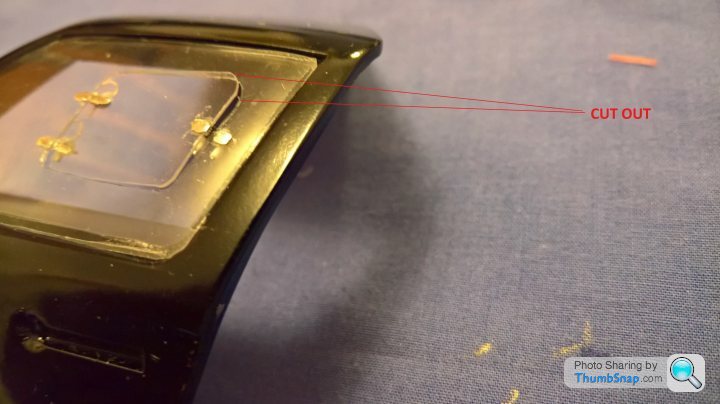
As pointed out by CanAm.The kit has a rollcage which wasnt used in the origonal car, so im blanking the holes out.
Main body and doors next. Rubbing down any edges, lines etc, test fitting before paint.
Cheers for now.
..Made up battery cable terminals from scrap white metal bits and formed and fitted a battery clamp from some PE sheet.
.Ran the live cable, earth and the 2 braided oil cooler pipes that runs from the front oil tank to connect up to the coolers later on in the engine bay.
..Heres where im at.
As pointed out by CanAm.The kit has a rollcage which wasnt used in the origonal car, so im blanking the holes out.
Main body and doors next. Rubbing down any edges, lines etc, test fitting before paint.
Cheers for now.
Edited by henryk001 on Saturday 11th May 21:46
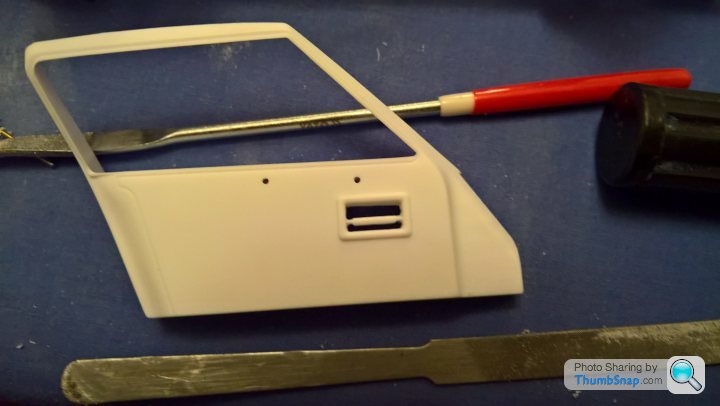
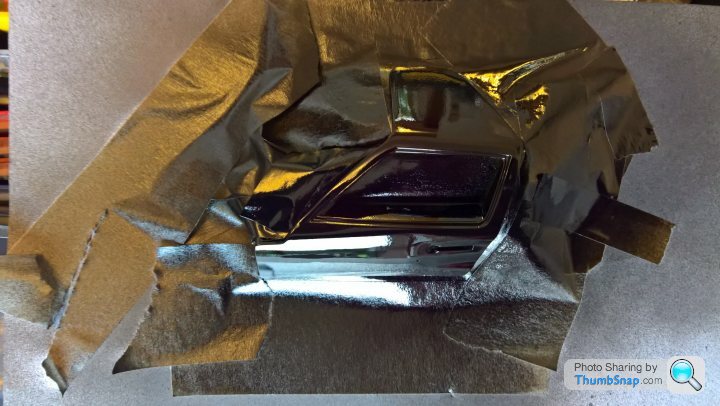
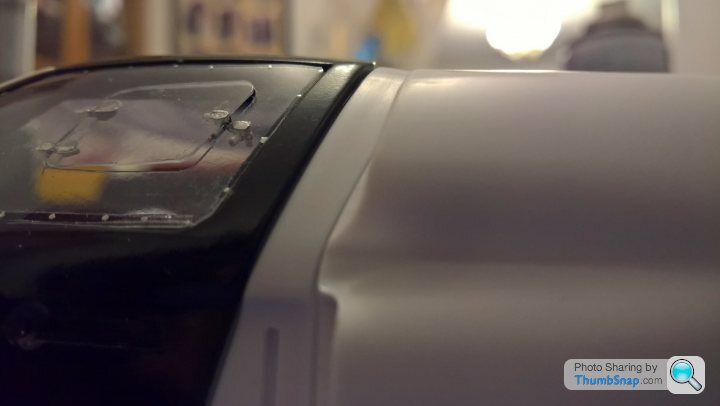
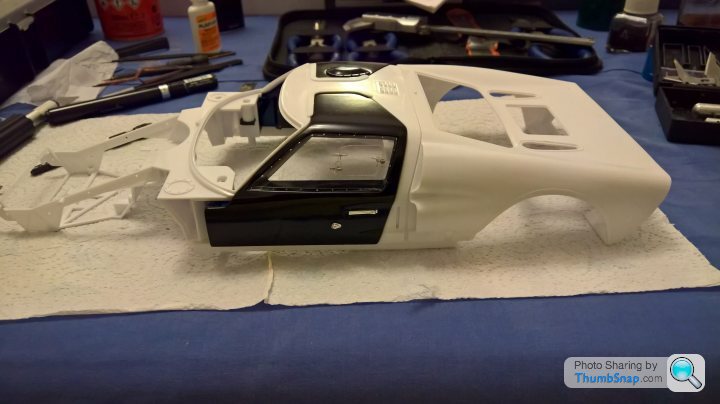
Not much to show at the moment, im doing a lot of filing and fitting prior to painting . Really good to see the close fit of the bodywork on my kit, however after primer and paint, i can see its all going to be to tight and would certainly rub especially on the doors, so ive got to make sure im getting the gapping right so i dont have to paint it two or three times.
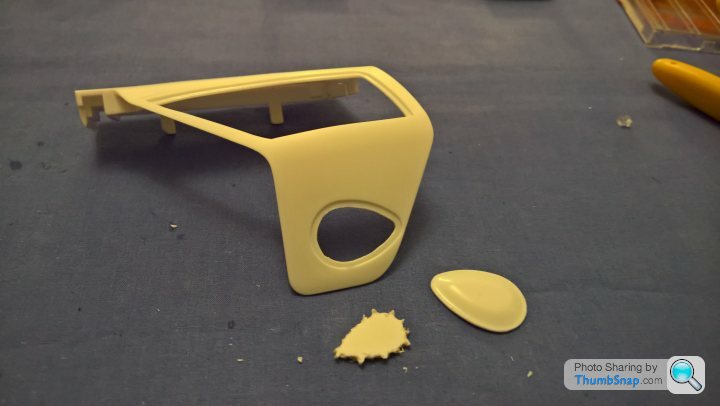
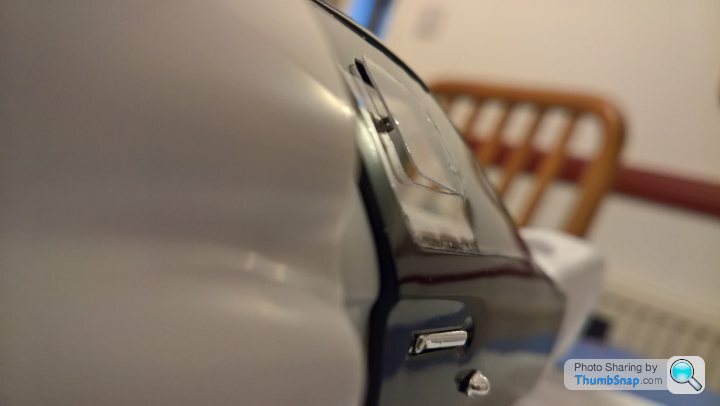
HOLE MADE FOR GURNEY BUBBLE
 .
.
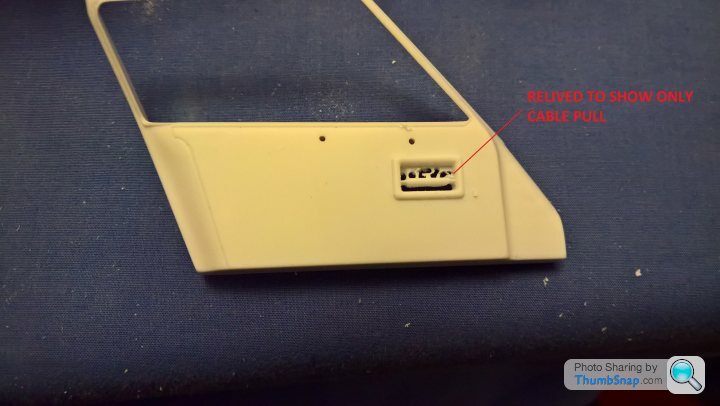
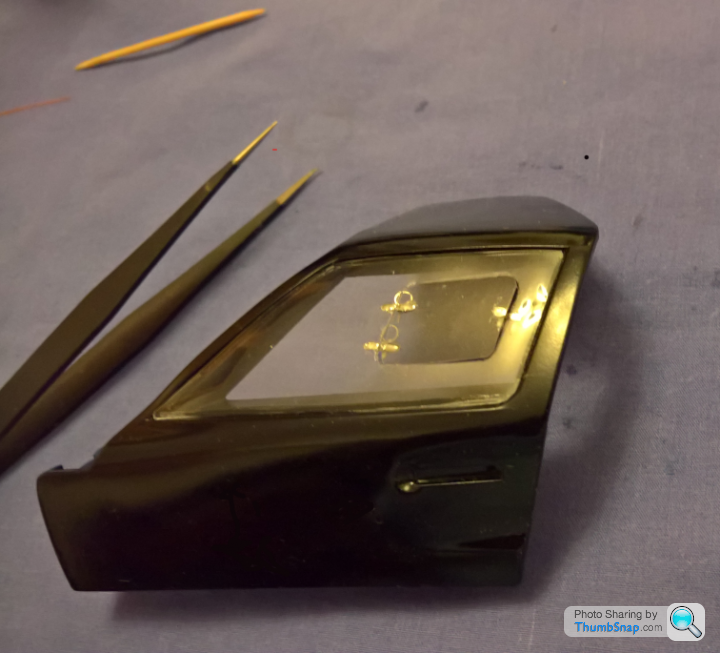
DOOR PULL RELIEVED
 .
.
 .
.
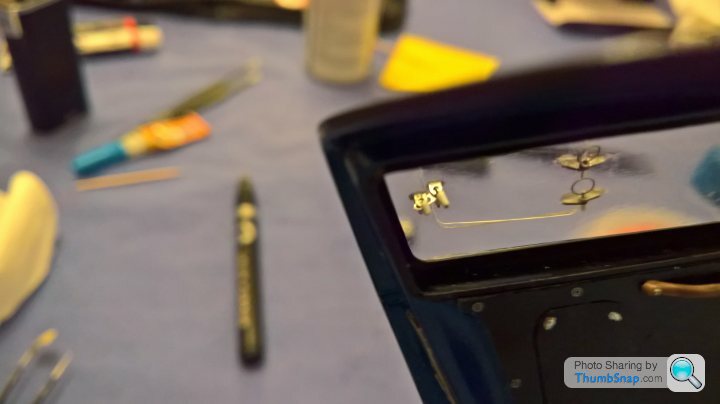
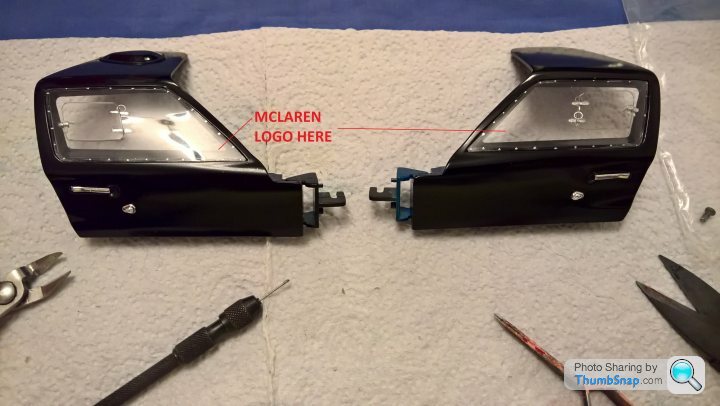
DREW UP MY OWN MCLAREN LOGOS TO GO IN THE SIDE WINDOWS AND FERN.
 .
.
 .
.
Sorry thats all for now, still filing and fitting.
Cheers
HOLE MADE FOR GURNEY BUBBLE
.DOOR PULL RELIEVED
..DREW UP MY OWN MCLAREN LOGOS TO GO IN THE SIDE WINDOWS AND FERN.
..Sorry thats all for now, still filing and fitting.
Cheers
CanAm said:
BTW Henryk, the fern was silver but the NZ letters were white.
.Thankyou CanAm, i couldnt see from the photo i had.Hows this one?.
The green on the Mclarren logo looks bright but it printed out much darker on my printer, came up very nicely ready for a decal at a later stage
Best regards

Edited by henryk001 on Tuesday 14th May 17:18
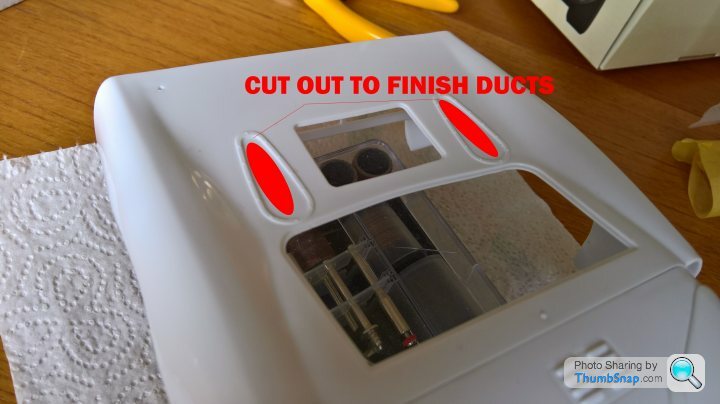
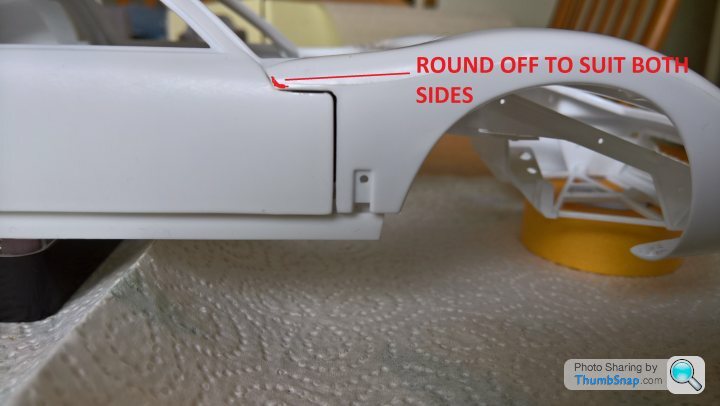
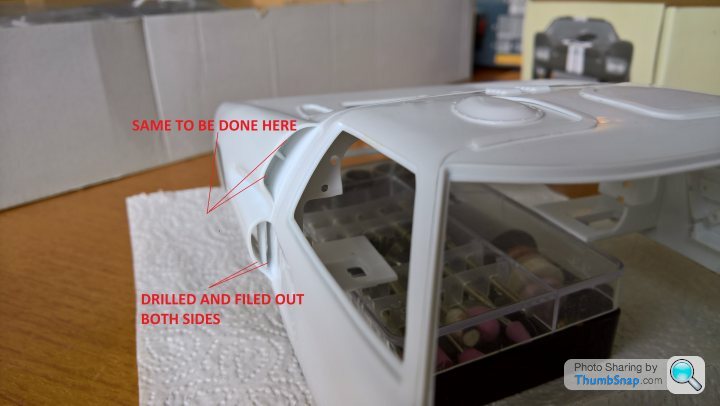
Hi! Before i can go any further im having to do a lot of cleaning, filing, drilling etc to get the bodywork right before painting.
So sorry if the next bits are a bit on the boring side.The air periscopes and side vents were all solid blanked off so i drilled and cut into them with my jewellers files. Anyway heres what ive done.
 .
.
 .
.
 .
.
 .
.
 .
.
 .
.
 .
.
Ok so now i can get onto painting, before fitting more parts, still lots of fine details to do.
Next step after priming once on the doors then painting the door insides blue, then outside black and the photo etched door panels semi matt black
Carefull not to put to much paint on as the panel lines and fit are quite close.
Cheers.
So sorry if the next bits are a bit on the boring side.The air periscopes and side vents were all solid blanked off so i drilled and cut into them with my jewellers files. Anyway heres what ive done.
.......Ok so now i can get onto painting, before fitting more parts, still lots of fine details to do.
Next step after priming once on the doors then painting the door insides blue, then outside black and the photo etched door panels semi matt black
Carefull not to put to much paint on as the panel lines and fit are quite close.
Cheers.
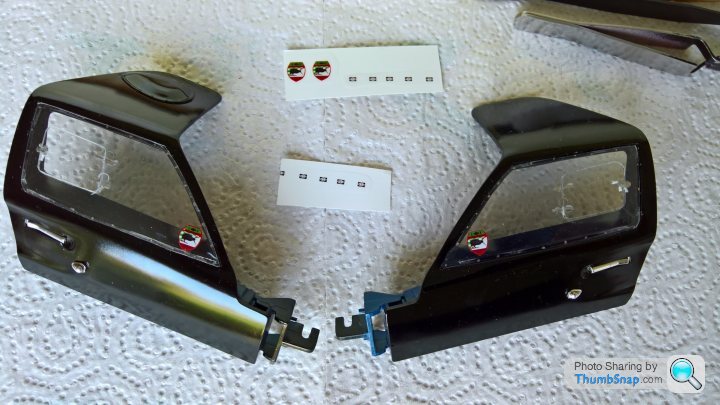
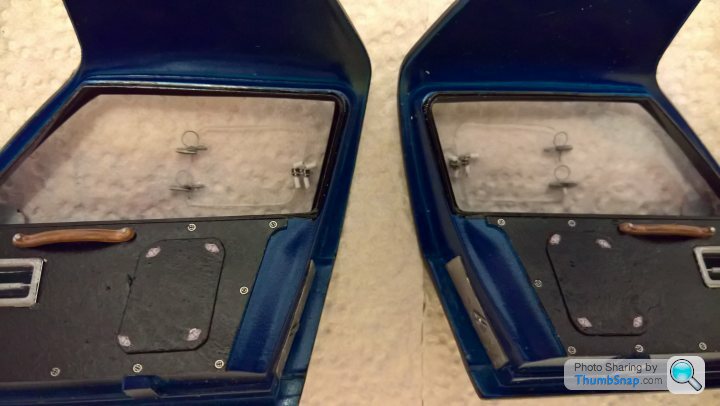
Hi!. Doing the doors at the moment. After making sure there was enough clearance to close properly on the body. Masked off 3 times as there is blue/black and Matt black.
Masked the outer skins and door panels and inside of window frame 1st. Sprayed in the blue interior colour.
Removed the masking tape and did the reverse to put the colours on. Only one coat of laquer as ive been informed the paintwork wasnt done to showroom standards for a Le Mans race back in the day.Im adding the access panels on for the door cards later on.
 .
.
 .
.
 .
.
 .
.
After fine line masking of the inside face of the door edges,rolled the doors over onto card and masked off then sprayed on the Tamiya rattle can Gloss Black.
 .
.
 .
.
Test fitted to body and alls fine, just some finishing to do.
Onto the windows which im going to make so hopefully the small hindged windows work using the KA PE hinges and brackets, well see.
Cheers for now
Masked the outer skins and door panels and inside of window frame 1st. Sprayed in the blue interior colour.
Removed the masking tape and did the reverse to put the colours on. Only one coat of laquer as ive been informed the paintwork wasnt done to showroom standards for a Le Mans race back in the day.Im adding the access panels on for the door cards later on.
....After fine line masking of the inside face of the door edges,rolled the doors over onto card and masked off then sprayed on the Tamiya rattle can Gloss Black.
..Test fitted to body and alls fine, just some finishing to do.
Onto the windows which im going to make so hopefully the small hindged windows work using the KA PE hinges and brackets, well see.
Cheers for now
Oh Bxxxer!!!.
I tried to scribe the small window out to make it as a working hindged window using the KA detail parts, but the brittle poly plastic cracked then broke.
I hold my hand up, my fault wasnt patient enough to wait till it broke through
So ive had to make up my own.Gave myself so much more work to do but i think what ive managed to retrieve is accepable without looking at it with a magnifying glass.Ive used a special very strong 0.5mm wide, x 0.25mm thick adhesive strip thats used for assembling mobile phone parts to bond the window to the door.
Anyway heres some pics showing the window in the open position.
 .
.
 .
.
 .
.
 .
.
 .
.
 .
.
 .
.
I think it looks ok?.
Got to do the other side now.
Cheers
I tried to scribe the small window out to make it as a working hindged window using the KA detail parts, but the brittle poly plastic cracked then broke.
I hold my hand up,
my fault wasnt patient enough to wait till it broke throughSo ive had to make up my own.Gave myself so much more work to do but i think what ive managed to retrieve is accepable without looking at it with a magnifying glass.Ive used a special very strong 0.5mm wide, x 0.25mm thick adhesive strip thats used for assembling mobile phone parts to bond the window to the door.
Anyway heres some pics showing the window in the open position.
.......I think it looks ok?.
Got to do the other side now.
Cheers
Thanks Threespires, Rob, Generationx. Means a lot to me.
More probs for you all to have a chuckle at. I’ve had the proverbial tweezer ping catastrophe.Doing one of the two drivers side window hinges I was going to fit to has disappeared into the minuteasphere. It’s anywhere from the dining room, possibly in the kitchen or maybe in the living room. Could be on one of my Red setters. Could be in my hair what’s left of it. God knows. Imagine a grown man on his knees with a extendable magnet, led torch searching for gold with my dogs licking my face wondering if I’m alright. Then light bulb moment. Do the hoovering then shove the magnet in the container. My wife wondering “is he I’ll?”. should I call the doctor. No luck there. Have to make another one. These are the times when you have to say to yourself stop, get a Gin and have another crack at the build tomorrow. Hope my mishap has brought a smile or a laugh and brightens anyone’s evening. Cheers
More probs for you all to have a chuckle at. I’ve had the proverbial tweezer ping catastrophe.Doing one of the two drivers side window hinges I was going to fit to has disappeared into the minuteasphere. It’s anywhere from the dining room, possibly in the kitchen or maybe in the living room. Could be on one of my Red setters. Could be in my hair what’s left of it. God knows. Imagine a grown man on his knees with a extendable magnet, led torch searching for gold with my dogs licking my face wondering if I’m alright. Then light bulb moment. Do the hoovering then shove the magnet in the container. My wife wondering “is he I’ll?”. should I call the doctor. No luck there. Have to make another one. These are the times when you have to say to yourself stop, get a Gin and have another crack at the build tomorrow. Hope my mishap has brought a smile or a laugh and brightens anyone’s evening. Cheers
After doing the bank holiday duties for my wife and watching the F1 qualifying.Made up the 2 lost hindges that fired off into the nanosphere a couplre of days ago.Cut out another window for the drivers side using the origonal window as a pattern, taped it to the window then heated it up with the hair drier to form it. Came out ok. Cut out the small window with a surgical scalpel and fitted in the hindges and fasteners. So now both small windows open and close. God My eyes hurt.Offered the doors to the body but not screwed on yet. Looks ok. Doing the dash next which is going to be even harder i think. I have to build the clocks up using ther PE detail parts even have to fit the clock needles,the air vents are several parts, fuse carrier and switches etc but still enjoying the build.Mclaren logo and Dzuz fasteners for the door panels decals ready.
Some photos.
 .
.
 .
.
 .
.
 .
.
 .
.
 .
.
Closed window
 .
.
Open window
 .
.
Cheers for now
Some photos.
.....Closed window
.Open window
.Cheers for now

robemcdonald said:
I feel your pain.
A lot of modellers wear a sort of apron that it physically connected to the work bench. I you drop a part it always falls into the apron and is easy to find.
It’s a great idea, but the thought of my wife’s inevitable hysterical laughter the first time she sees me using it has put me off.
.A lot of modellers wear a sort of apron that it physically connected to the work bench. I you drop a part it always falls into the apron and is easy to find.
It’s a great idea, but the thought of my wife’s inevitable hysterical laughter the first time she sees me using it has put me off.
Unfortunately a apron i agree wouldnt be cool but also unusable unless it was covered in neodymium magnets


CanAm said:
Henryk, your workmanship and attention to detail continues to amaze me.
Re the NZ fern, I think the top of the left side of the "N" should overlap the fern like my scruffy attempt below

I'm not sure about the seatbelts; was your picture of the original taken from the restoration website?
A period photo I have shows a plain black harness as below:-
Thanks CanAm.Will sort the fern out, easy enough.Re the NZ fern, I think the top of the left side of the "N" should overlap the fern like my scruffy attempt below
I'm not sure about the seatbelts; was your picture of the original taken from the restoration website?
A period photo I have shows a plain black harness as below:-
The belt though is based from one of the videos on RK,s web site, mentioning they soured the correct style of belt from the UK, so Ive made as the picture showed rather than black.It may be a historical error but I’m prepared to accept it as a evocation. Cheers
silverfoxcc said:
Henry
Imagine the pain doing a LIve steam loco in 5in gauge. I spent a whole day milling,drilling,filing and turning a singular part, ( a lot of the time it is batchwork) Went back the next day and ,well...... the fairies had been in. The workshop is only 9x6 feet so not a lot of space for things to get lost. Spent 4hrs cleaning and searching but it had vapourised
Next day was spent doing a replacement..Finished at late o'clock and following say No 1 son and inheritor of said machinery Aladdins cave, came in seeing me looking at No 2 fitment and asked, why have you made another,?picking up the missing one from under the lathe bed. I think it was the first time he had seen me cry!!
.Imagine the pain doing a LIve steam loco in 5in gauge. I spent a whole day milling,drilling,filing and turning a singular part, ( a lot of the time it is batchwork) Went back the next day and ,well...... the fairies had been in. The workshop is only 9x6 feet so not a lot of space for things to get lost. Spent 4hrs cleaning and searching but it had vapourised
Next day was spent doing a replacement..Finished at late o'clock and following say No 1 son and inheritor of said machinery Aladdins cave, came in seeing me looking at No 2 fitment and asked, why have you made another,?picking up the missing one from under the lathe bed. I think it was the first time he had seen me cry!!
Ha ha. Nice one. I’m not laughing at you, but with you.So I am not alone then losing things. Whenever this happens to me (quite often). I mutter the excuse of “should have gone to spxcsavers”.Cheers
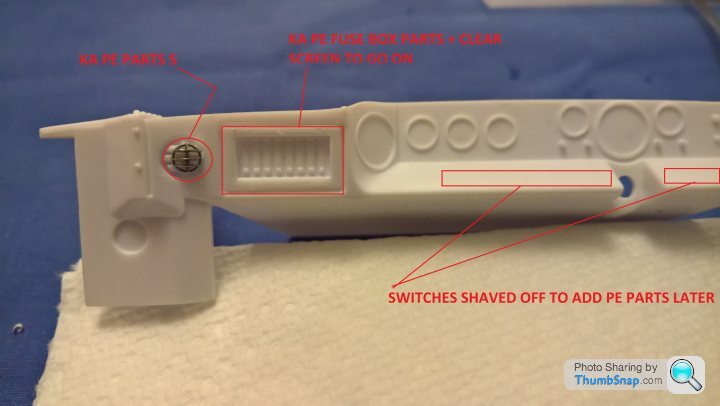
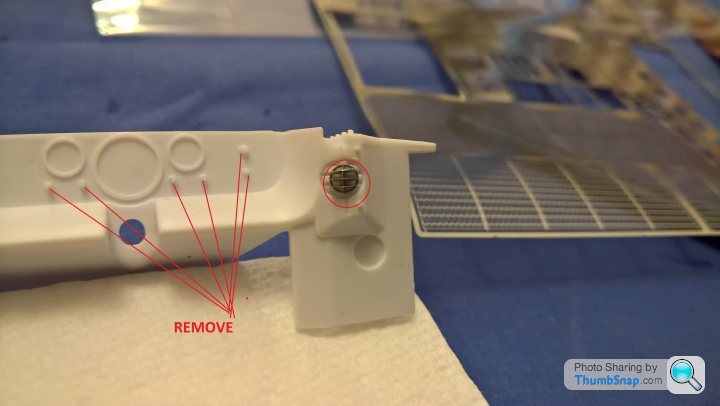
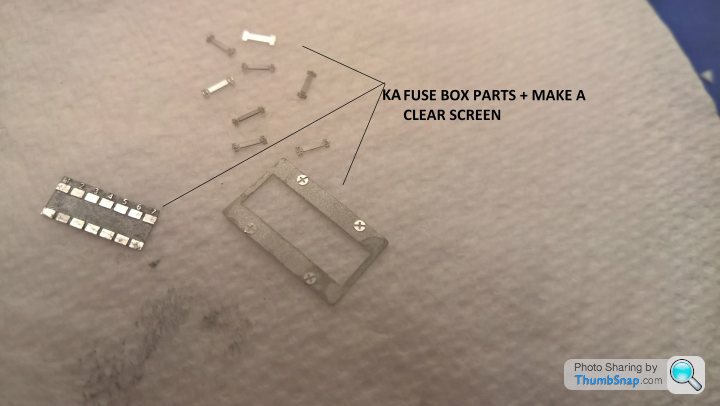
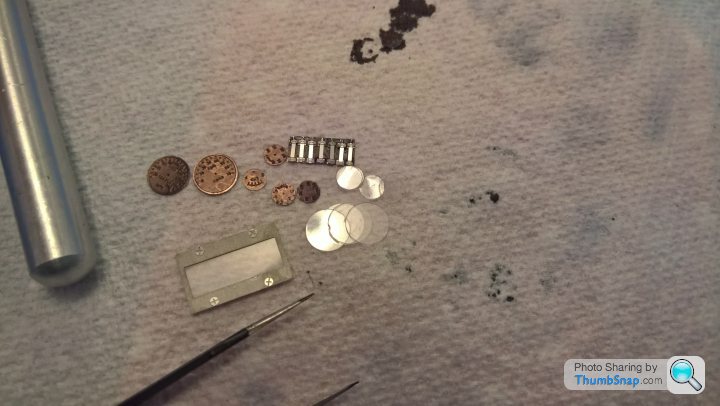
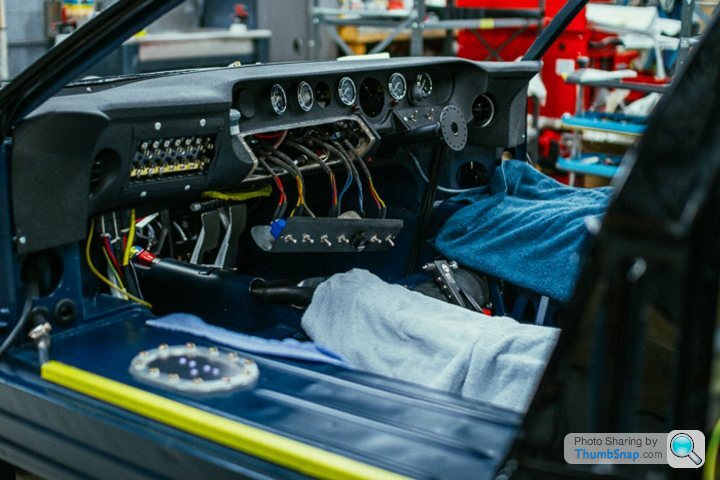
Fair bit of faffing around with the dash.
Cutting the dash gauge rings off and preparing the PE parts. The KA models PE parts for the gauges have raised detail, very fine, Gauge needles and spindles to make up. So the idea is to paint all over the guages in black then rub off the higher details.
Very time consuming . Heres a couple of pics.
 .
.
 .
.
 .
.
 .
.
Cheers.
Cutting the dash gauge rings off and preparing the PE parts. The KA models PE parts for the gauges have raised detail, very fine, Gauge needles and spindles to make up. So the idea is to paint all over the guages in black then rub off the higher details.
Very time consuming . Heres a couple of pics.
....Cheers.
Thankyou CanAm & Sausage for your encouraging comments. Doing my best, maybey trying a little bit too much, but absolutely enjoying getting immersed in this project, also learning along the way making mistakes and rectifying them.
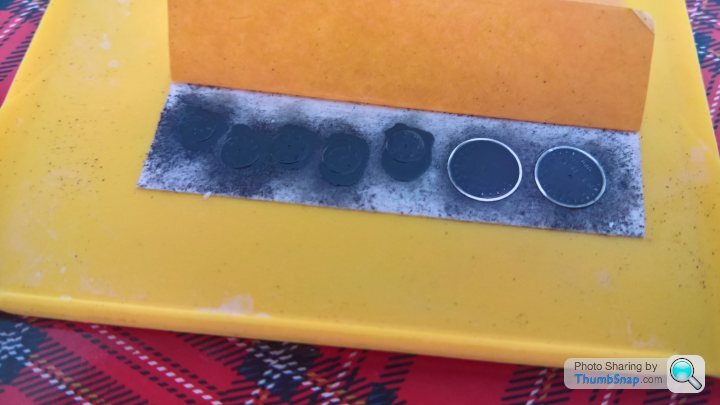
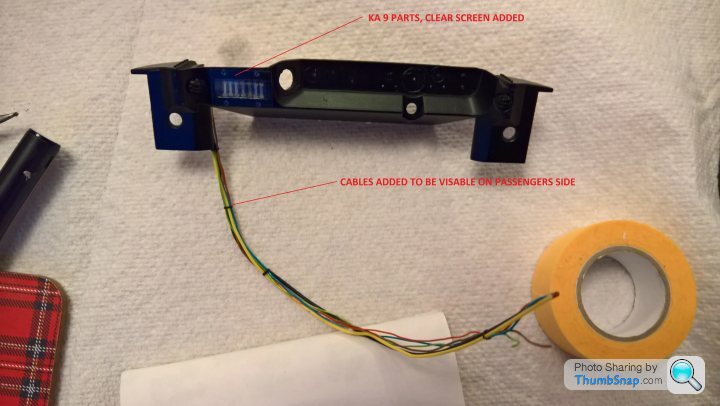
The guages are PE 5 parts in total each guage, bezel,needle,pin and later on fitting the window and outer ring. Taking up a lot of time, could have used the decals but worth tyrying these out.
Some photos.
 .
.
COVERED OVER WITH WIFES BLACK ACRYLIC NAIL POLISH
 .
.
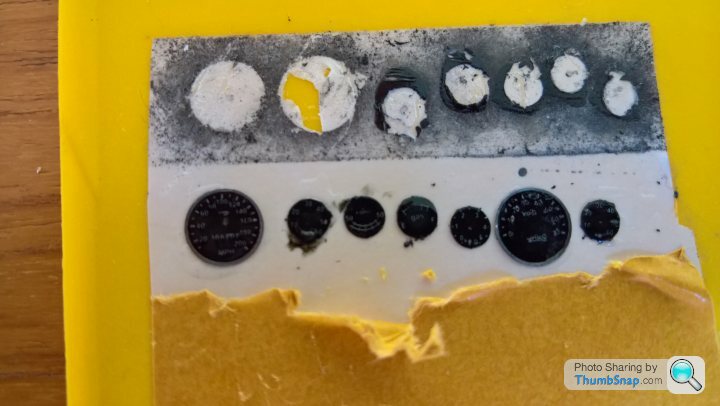
AFTER RUBBING DOWN WITH 4000 GRIT TO BRING OUT THE HIGHLIGHTED DETAILS
 .
.
DRILLED OUT 0.35 AND GLUED PINS ON TO CUT OFF LATER
 .
.
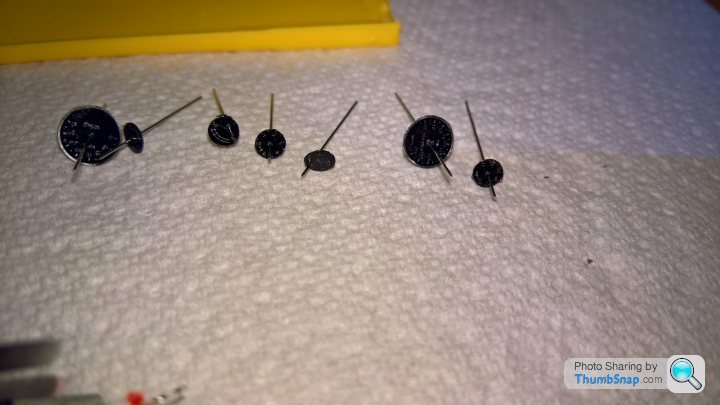
READY FOR THE NEEDLES FIXED WITH MICRO CLEAR
 .
.
NEEDLES ADDED. CLEAR WINDOWS AND OUTER RINGS TO GO ON LATER WHEN FITTED TO DASH
 .
.
I see from the RK website the speedo wasnt used, there is some kind of mechanical switch mounted instead, quite understandable in racing, i didnt have one when i used my jedi racing car in Hillclimbs and sprint events, rev counter and seat of pants driving was all that was required but im going to fit the speedo in.
Next to add colour/texture on the dash before mounting them on
Cheers for now..
The guages are PE 5 parts in total each guage, bezel,needle,pin and later on fitting the window and outer ring. Taking up a lot of time, could have used the decals but worth tyrying these out.
Some photos.
.COVERED OVER WITH WIFES BLACK ACRYLIC NAIL POLISH
.AFTER RUBBING DOWN WITH 4000 GRIT TO BRING OUT THE HIGHLIGHTED DETAILS
.DRILLED OUT 0.35 AND GLUED PINS ON TO CUT OFF LATER
.READY FOR THE NEEDLES FIXED WITH MICRO CLEAR
.NEEDLES ADDED. CLEAR WINDOWS AND OUTER RINGS TO GO ON LATER WHEN FITTED TO DASH
.I see from the RK website the speedo wasnt used, there is some kind of mechanical switch mounted instead, quite understandable in racing, i didnt have one when i used my jedi racing car in Hillclimbs and sprint events, rev counter and seat of pants driving was all that was required but im going to fit the speedo in.
Next to add colour/texture on the dash before mounting them on
Cheers for now.
.Edited by henryk001 on Sunday 2nd June 15:07
Just a bit more here.
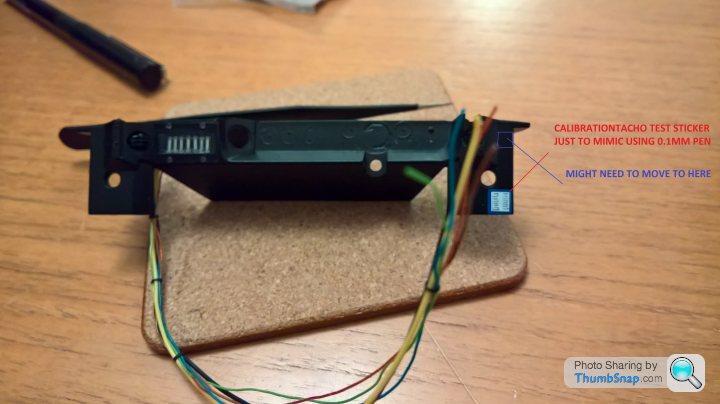
Did the fuse box and added some wiring,referenced from a photo.
The real thing.
 .
.
My kit
 .
.
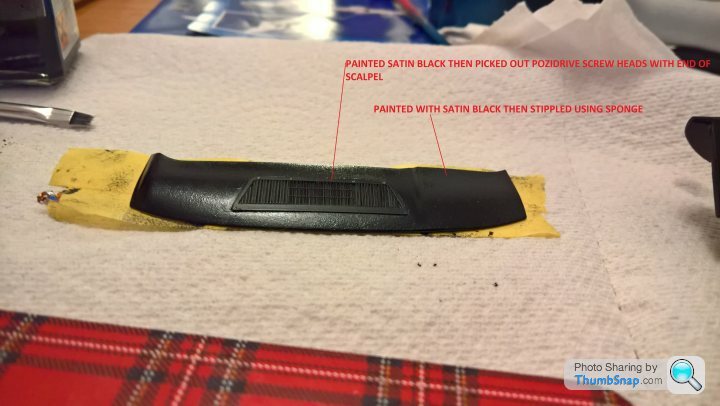
Fitted the PE dash grill painted in satin black then stippled the dash top with a sponge and then again with matt black
 .
.
 .
.
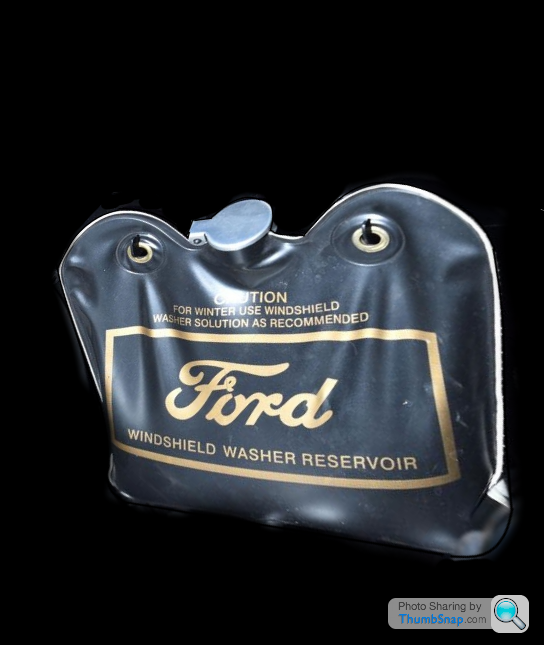
Have found the windscreen washer bag used , fits in the passenger side, which i will make from PVA and cover with a decal later in the build.
 .
.
Its Going a bit slow at the mo. Certain commitments taking presidence over this build.
Cheers for now.
Did the fuse box and added some wiring,referenced from a photo.
The real thing.
.My kit
.Fitted the PE dash grill painted in satin black then stippled the dash top with a sponge and then again with matt black
..Have found the windscreen washer bag used , fits in the passenger side, which i will make from PVA and cover with a decal later in the build.
.Its Going a bit slow at the mo. Certain commitments taking presidence over this build.
Cheers for now.
Gassing Station | Scale Models | Top of Page | What's New | My Stuff