FORD GT40 MKII 1/12TH TRUMPETER
Discussion


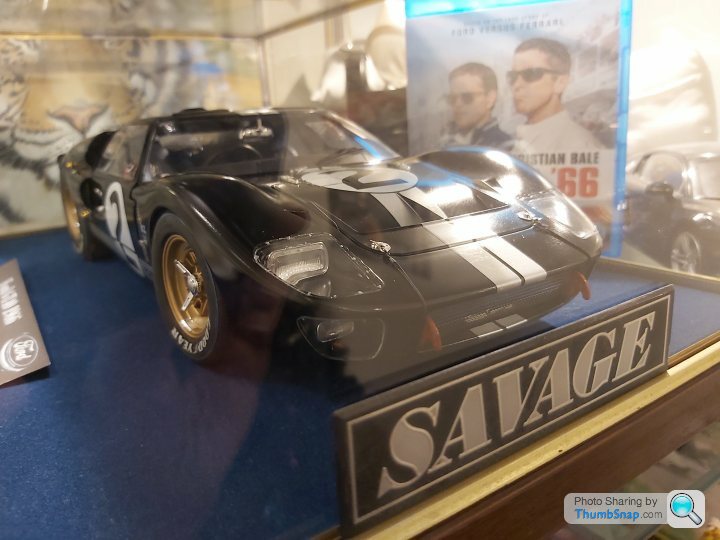
Thankyou very much. NDA, Jester27,robemcdonald,AshVX220,daimlerV8.
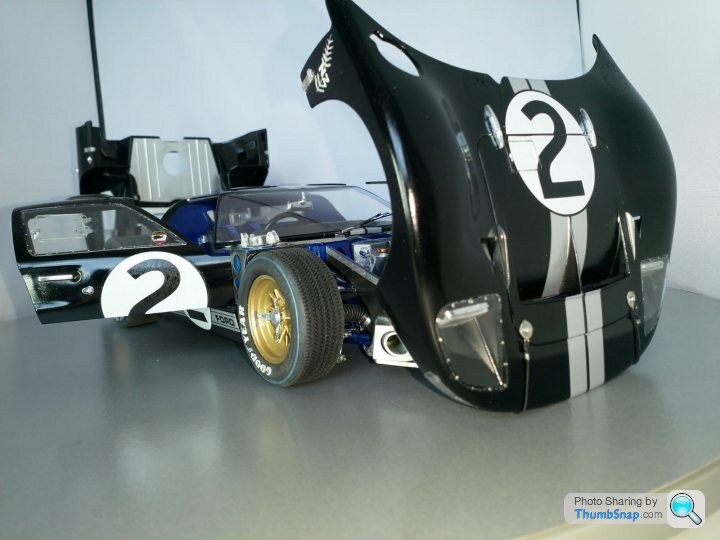
All yours and others comments have helped to spur on this project. It’s a shame that there was a mix and match of quality with the kit. From high detail to toylike aspects.
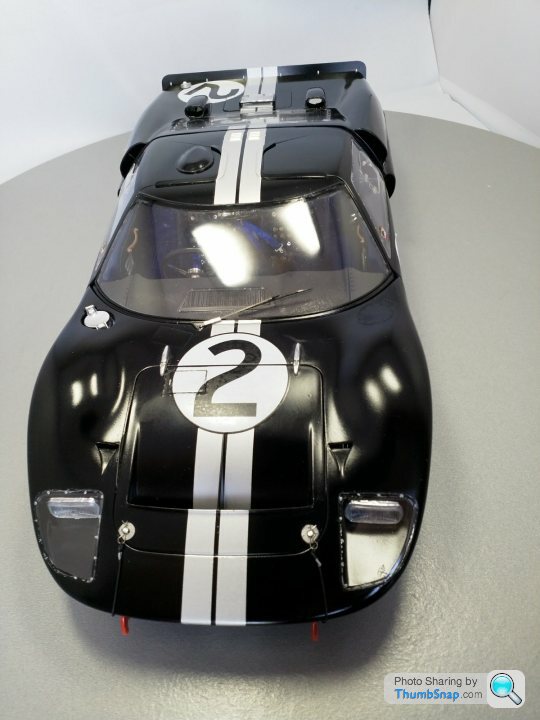
If anyone’s thinking of trying to get hold of one to build, I would say that the KA super detail kit isn’t really necessary, I have loads of bits left over. It was the steering wheel that really only stood out. There’s enough PE in the standard kit to do a nice job.The body scaling is spot on though.
The faults with the kit are.
Steering rack way too long
Ride height way to high
Drivers door needs heating and forming to a better fit.
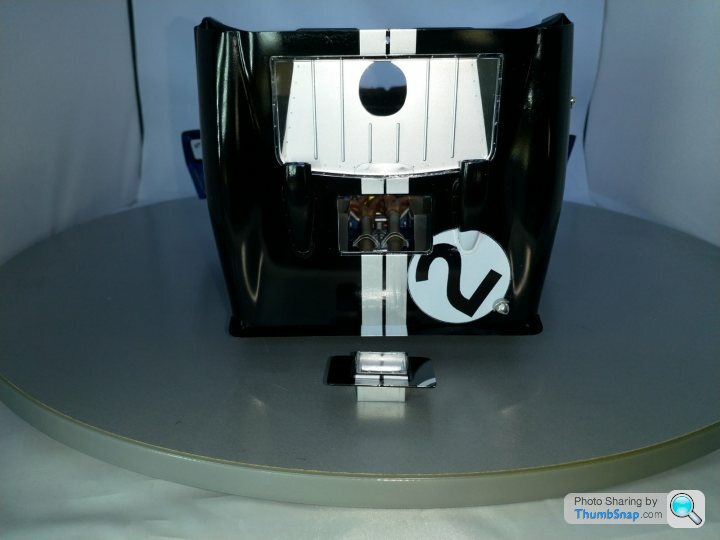
Rear Clam is a poor fit.
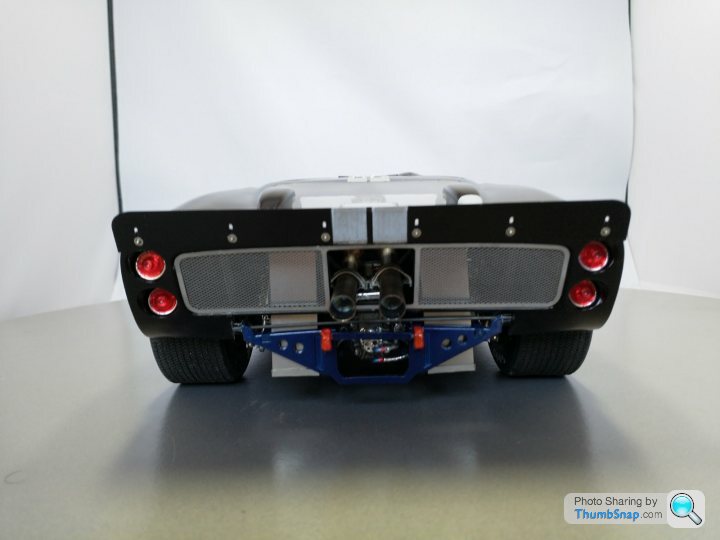
Not enough fine detail in the engine/gearbox. Suspension.
Decal sheet, No2 rear wrong, missing fern and mclaren window logo.
Painting instructions are very poor compared to say Tamiya
My venture into the RC FTX Carnage is going well, and really enjoying a new challenge. I’m sure the grandson will do well if he can pry my hands off the controller. Ha ha.
There’s a lotus mk3 and a Ferrari yet to complete, so I hope to get back into it soon before I get rusty.
Cheers all.
All yours and others comments have helped to spur on this project. It’s a shame that there was a mix and match of quality with the kit. From high detail to toylike aspects.
If anyone’s thinking of trying to get hold of one to build, I would say that the KA super detail kit isn’t really necessary, I have loads of bits left over. It was the steering wheel that really only stood out. There’s enough PE in the standard kit to do a nice job.The body scaling is spot on though.
The faults with the kit are.
Steering rack way too long
Ride height way to high
Drivers door needs heating and forming to a better fit.
Rear Clam is a poor fit.
Not enough fine detail in the engine/gearbox. Suspension.
Decal sheet, No2 rear wrong, missing fern and mclaren window logo.
Painting instructions are very poor compared to say Tamiya
My venture into the RC FTX Carnage is going well, and really enjoying a new challenge. I’m sure the grandson will do well if he can pry my hands off the controller. Ha ha.
There’s a lotus mk3 and a Ferrari yet to complete, so I hope to get back into it soon before I get rusty.
Cheers all.
Edited by henryk001 on Saturday 30th January 14:13
mrkipling said:
Stunning build Henry, really enjoyed following along, might start mine one day.....
Thanks Mrkipling. It would be great if you did any one of the 3 colour schemes that came in.Go for it and start a new thread. Hope I’ve pointed out the pitfalls and issues around the kit. You could have a nice display model instead of bits in a box. I love looking at the finished article. PM me any time if you need decal files etc.Robemcdonald has the kit as well. I’ve got quite a lot of bits left over that I didn’t use because I used the KA stuff. So if anything’s missing or broken. Let me know and I’ll have a look.
Cheers
tangerine_sedge said:
Great modelling, stand outs for me are the weathering on the tyres and exhaust - very natural.
Thanks tangerine_sedge. Those tailpipes are stainless steel and just needed a bit of heat from the stove. The tyres were were scuffed then painted with a acrylic Matt nail varnish over the decals as well, took away the gloss. Thanks for looking.Cheers
Elderly said:
They've reissued this kit under the 'Magnifier' brand and just called it 'US sports car'.
It's under £100 in this country and I've seen it for about £56.00 sold from China.
I would imagine that the shortly to be released Meng version in the same scale will be
much more accurate and desirable and so maybe Trumpeter/Magnifier are trying to clear their stocks?
Wow, i paid £200 + the extra detail kit over 2 years ago, as was informed that they were discontinued.It's under £100 in this country and I've seen it for about £56.00 sold from China.
I would imagine that the shortly to be released Meng version in the same scale will be
much more accurate and desirable and so maybe Trumpeter/Magnifier are trying to clear their stocks?
Pleased though to see a re release.Quandry is now i feel the 2nd and 3rd car build coming on, more importantly Ken Miles car which really should have finished 1st place.
CanAm said:
Damn, i was on holiday (remember them?) last September and missed the end of build pictures!
One other point if you're building this kit, is DON'T include the roll-cage. This was only added for the 1967 season.
I think we mentioned that the original has now been correctly restored to its race-winning condition, and is nearly as good looking as Henryk's.
Hi! CanAm. I emailed a few photos over to you, would have been around the time you went on holiday i guess.I can send them over again if you like.One other point if you're building this kit, is DON'T include the roll-cage. This was only added for the 1967 season.
I think we mentioned that the original has now been correctly restored to its race-winning condition, and is nearly as good looking as Henryk's.
pnance26 said:
Was reading on another build that the use of anodized and "red/blue" fittings for oil lines, etc and braided hose were not correct for 1966 and that plain metal with black hose was proper. It was only the rebuild replicas that were done later in the 80s had all these added.
Comments?
I used the RK Motors website for details as they rebuilt the origonal No2 car. I agree though,anodised hose fittings back in the day may not have been used.Comments?
The blue and red added a bit of colour and detail to the assembly.
pnance26 said:
Found this build much more helpful than some I have read and will use a lot of the knowledge here to assist in my build of the Magnifier kit in 1/12th. I will also be using the KA-0007 upgrade kit and the GY tire set along with IndyCals decal sheets to build the Ken Miles/Denny Hulme entry for LeMans 1966.
Thanks, Henry, for plowing through a lot of fertile ground!
Glad you find my thread helpfull. Its a car build that i admire and still looks OK in its case, no bits have fallen off as yet.Would love to see someone to a build thread and put their slant on this kit. Wish i new there was going to be a rerelease of this kit which would have saved me over £100.Thanks, Henry, for plowing through a lot of fertile ground!
Thankyou for your kind comments.
pnance26 said:
Henry, I've got a couple of questions for you since you built this bad boy...
Hi!. The No1 Car, i found on the following link had 3 pumps on the left with a rail across them and from looking at the photos it looks like a transfer pump on the right. - 1. The kit supplies 6 fuel pumps, 3 for each side. Is that accurate? I always see photos of the left (from the rear) of the bulkhead with those three pumps and a filter. Is that assembly repeated on the right bulkhead?
- 2 Could you give me a little more detail about the latches to hold the rear "clam" down? Do yours actually flip up to allow the rear to lift up? How does that work?
- 3 The work with the fuel filler cap is excellent. Only hope I can do that well.
- 4 I wonder if I will have to do the same with the roundel on the rear deck lid for the #1. I bought the decals from IndyCals and I hope they are correct to go over the scoop and around the light.
https://www.ultimatecarpage.com/img/Ford-GT40-Mk-I... .
See the youtube video at the shelby institute:
https://www.youtube.com/watch?v=nZgXDSJjY8g.
The latches just gently clip into the holes i made see the photos i posted. I ended up making them from left over spru and leaving enough rounded lip to allow the rear cowl to clip on and off.
Towards the end of the build you should be able to read my good and bad comments on the issues relating to the kit.
I dont know if my kit was from the same mould as yours, so dont assume everything will fit ok.
One thing the pivot supports are not strong enough to support the rear cowl. I cut them off and ran a steel pin though.
Im not a historian and dont assume everything you see on google is correct. Research is key. Learnt this from CanAm.
It might be a good idea to contact the shelby institute, they must have loads of usable data.
Good luck with your build. It would be nice if you can give Pistonheads and this thread a thumbs up on your forum.
pnance26 said:
Also, Henry, there is a tank pictured in many photos located on the right of the rear bulkhead above that single auxiliary pump. Do you know if that was a radiator fluid reservoir or windscreen cleaning solution? I know I will need to fabricate that if I want it to be there.
Hi!.Looks like theres going to be loads of GT40 kits being made up.Answering your question The tank on the rear bulkhead i believe is the expansion tank for the radiator, it could also be a oil catch tank. This part should be in your kit (2 chrome parts) see photos pages 7&8.You should have in the decal set i sent, the Ford soft bag washer bottle decal which i made up on page 6 with araldite and sits on the passenger side wall in front of the battery. Will drop into your forum from time to time and see how your all getting on. Cheers
Edited by henryk001 on Monday 18th January 18:23
pnance26 said:
Henry,
I took a look at the instruction sheets and steps 7 & 8 are tires, and pages 7 & 8 are engine and main "tub". Not sure about the parts you reference. Is that the part number (7 & 8)? Also in the instructions, it doesn't show such a piece on the right rear bulkhead on the back...
Not sure what you mean...
Hi just about to retire.The photos and pages i refer to are the pages on this, my GT40 build forum. Hope this clears things up.I took a look at the instruction sheets and steps 7 & 8 are tires, and pages 7 & 8 are engine and main "tub". Not sure about the parts you reference. Is that the part number (7 & 8)? Also in the instructions, it doesn't show such a piece on the right rear bulkhead on the back...
Not sure what you mean...
skryll said:
This is such a cool kit, even more so that so many people are doing it at the same time! I bought this kit about a month ago thinking there wern't many out there!
Yes i "missed the bus" on my model purchased when they were unavailable. if i waited another year i could have saved over £100.00skryll said:
yea thats unfortunate. Earlier in the thread you offered the file for your custom decals, I'd like to take you up on that! however, I'm doing a youtube video series on this kit, would you mind If I show/use them on there?
Hi! If you click on my name it will give you the option of emailing me, please send me a email to discuss.skryll said:
robemcdonald said:
This is a great reference, one of the things Ive heard about the MkII is that they were all slightly different, so if you're going to use this for a P/1046 (#2) build, make sure to check details between this and the restoration, but the majority of the bits should be at least similar if you're not too worried. Hi! Skryl.
Looks ok to me. The only potential issue is IMO at the 1/12th scale paint doesnt reflect light as well and once parts are built around the chassis the blue will become too dark and any other smaller details will become lost when looking into the cars interior.The pearl helps to reflect light especially if you have the area illuminated. I did mine with 4 coats over grey primer which got darker the more coats i added. If you take a look at the photos on pages 7-8 you will see the difference between normal light and using a flash. Im sure you have younger eyes than me,like i said yours looks ok without any added parts.
Do what you see is best its your project. Regards
Hi! Plasmaman,
I haven't been on here for a while and only just seen your comment.
I don't see a issue from my side on PC or phone but i do know that if your using a secureline VPN or on Mozilla Firefox there have been issues with
not being able to see photos.
suggest going onto Microsoft edge or temporarily turning off your VPN.
Good luck with your build. Would be nice to see your progress
Gassing Station | Scale Models | Top of Page | What's New | My Stuff