1/8 Ghostbusters Ecto-1 Partwork
Discussion


Got some copper wire to represent the brake pipes
 IMG_1885 by MBBlat, on Flickr
Just need to work out how to represent the clips to attach to the front chassis, slightly tempted to leave them loose until the front fender liners arrive and fix them then, should be part of next months pack so not long.
Did some filling on the propshaft and a rough coat of black primer, only did the ends as most of it will be hidden in a tunnel.
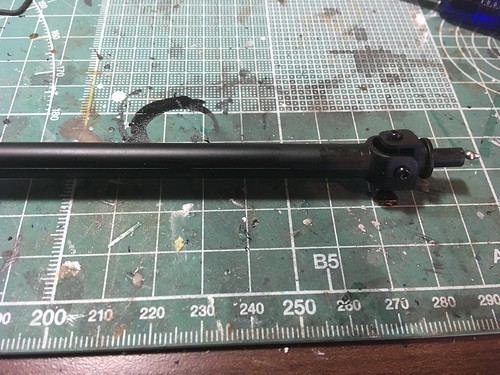 IMG_1884 by MBBlat, on Flickr
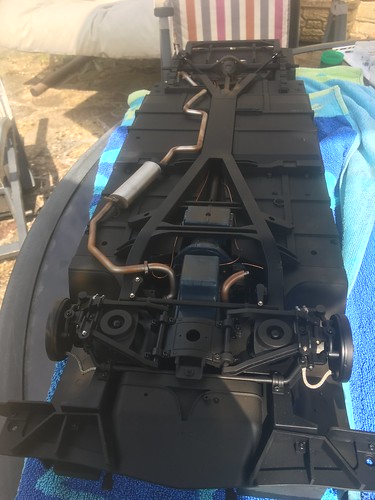
Last pack this month was only 3 parts, the rear chassis, battery box holder and levelling valve
 IMG_1887 by MBBlat, on Flickr
This gets attached to the rest next month, but starting to get an idea of the size of this beast.
Looking ahead on World of Wayne's videos looks the next two months add a lot of details, I may have to do some work on the back of the radiator to hide the screws, one place when glue would have been preferable to screwing everything together.
IMG_1885 by MBBlat, on FlickrJust need to work out how to represent the clips to attach to the front chassis, slightly tempted to leave them loose until the front fender liners arrive and fix them then, should be part of next months pack so not long.
Did some filling on the propshaft and a rough coat of black primer, only did the ends as most of it will be hidden in a tunnel.
IMG_1884 by MBBlat, on FlickrLast pack this month was only 3 parts, the rear chassis, battery box holder and levelling valve
IMG_1887 by MBBlat, on FlickrThis gets attached to the rest next month, but starting to get an idea of the size of this beast.
Looking ahead on World of Wayne's videos looks the next two months add a lot of details, I may have to do some work on the back of the radiator to hide the screws, one place when glue would have been preferable to screwing everything together.
Next 4 packs have arrived, the first of which is the rear floor, so the chassis is now complete and the full size of the thing becomes apparent. For those with the LEGO Technic Porsche RSR I thought I'd do a quick size comparison
 IMG_1892 by MBBlat, on Flickr
Also put it up by the poster that came in the first issue that shows the car in 1:1, so alittle bit more front and rear overhang to add.
 IMG_1891 by MBBlat, on Flickr
Next step is the front wheel wells and radiator - and the radiator has 6 screws in the back end, this together with the screw in the gearbox sump are probably the the worst placed ones I've come across yet, I think some filling or scratch-building may be coming in the future. Already put some MrSurficer 500 in the sink holes on the brackets.
 IMG_1894 by MBBlat, on Flickr
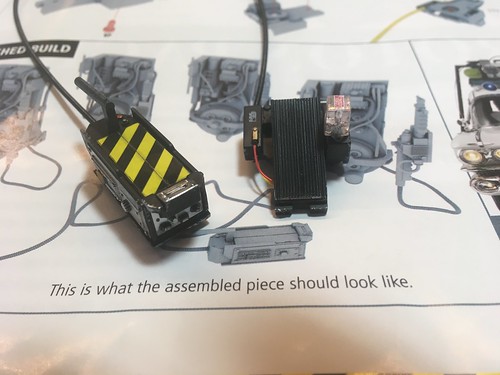
Also received the first 2 Proton Packs, did a bit of repainting and weathering on the first, still trying to work out how to do the prominent ribbon cable that is totally missing.
 IMG_1893 by MBBlat, on Flickr
IMG_1892 by MBBlat, on FlickrAlso put it up by the poster that came in the first issue that shows the car in 1:1, so alittle bit more front and rear overhang to add.
IMG_1891 by MBBlat, on FlickrNext step is the front wheel wells and radiator - and the radiator has 6 screws in the back end, this together with the screw in the gearbox sump are probably the the worst placed ones I've come across yet, I think some filling or scratch-building may be coming in the future. Already put some MrSurficer 500 in the sink holes on the brackets.
IMG_1894 by MBBlat, on FlickrAlso received the first 2 Proton Packs, did a bit of repainting and weathering on the first, still trying to work out how to do the prominent ribbon cable that is totally missing.
IMG_1893 by MBBlat, on FlickrEngine bay finished for now
 IMG_1899 by Mark Benger, on Flickr
 IMG_1898 by Mark Benger, on Flickr
Next step is the exhausts - seem lines galore and the supplied paint is a bit silvery, so out with the sanding sticks and airbrush.
IMG_1899 by Mark Benger, on FlickrIMG_1898 by Mark Benger, on FlickrNext step is the exhausts - seem lines galore and the supplied paint is a bit silvery, so out with the sanding sticks and airbrush.
For those still following.
Spent a bit of time removing the seam lines and repainting the exhaust, also added some random rusting effects
 IMG_1903 by MBBlat, on Flickr
Also added the rear axle and starting weathering the underside. Once it cools down a bit I might add some oil washes and pigmentation.
 IMG_1900 by MBBlat, on Flickr
Spent a bit of time removing the seam lines and repainting the exhaust, also added some random rusting effects
IMG_1903 by MBBlat, on FlickrAlso added the rear axle and starting weathering the underside. Once it cools down a bit I might add some oil washes and pigmentation.
IMG_1900 by MBBlat, on FlickrMBBlat said:
For those still following.
Spent a bit of time removing the seam lines and repainting the exhaust, also added some random rusting effects
IMG_1903 by MBBlat, on Flickr
Also added the rear axle and starting weathering the underside. Once it cools down a bit I might add some oil washes and pigmentation.
IMG_1900 by MBBlat, on Flickr
Looking good. Random double bend in the exhaust system!Spent a bit of time removing the seam lines and repainting the exhaust, also added some random rusting effects
IMG_1903 by MBBlat, on FlickrAlso added the rear axle and starting weathering the underside. Once it cools down a bit I might add some oil washes and pigmentation.
IMG_1900 by MBBlat, on Flickr

Just a little job this weekend - the Ghost trap and foot pedal.
Added the chipping and a little bit of detailed painting followed by a black Tamiya panel line wash. I also added the missing red and yellow wires to the foot-pedal.
 IMG_1905 by MBBlat, on Flickr
 IMG_1906 by MBBlat, on Flickr
 IMG_1908 by MBBlat, on Flickr
Added the chipping and a little bit of detailed painting followed by a black Tamiya panel line wash. I also added the missing red and yellow wires to the foot-pedal.
IMG_1905 by MBBlat, on FlickrIMG_1906 by MBBlat, on FlickrIMG_1908 by MBBlat, on FlickrRear axle assembled. I didn't like the plastic pipes supplied so superglued some copper wire in place, will trim them once the axle is mated to the chassis & install some braded hose for the flexible parts.
Also got the oil paints out and did some weathering - I think it came out rasonably well and I might replicate on the rest of the chassis.
 IMG_1909 by MBBlat, on Flickr
Also got the oil paints out and did some weathering - I think it came out rasonably well and I might replicate on the rest of the chassis.
IMG_1909 by MBBlat, on FlickrDash Completed. Used a bit of Tamiya black panel liner to tone down the chrome, and scratch built the face of the dummy antenna.
 IMG_1933 by MBBlat, on Flickr
Detailed and painted the back of the radio, didn't have any black wire so painted the yellow NATO black, tied to make the red positive seem as if it had been partially black coated during installation.
 IMG_1935 by MBBlat, on Flickr
Added caballing to the switches and instruments below the dash, will tidy them up when installing the dash onto the car. From what I can gather on the original they were run behind a loose panel next to the steering column.
 IMG_1936 by MBBlat, on Flickr
And finally did an oil weathering pass on the underside
 IMG_1940 by MBBlat, on Flickr
Still got to reattach the rear axle and sort out the brake lines, plus the fuel tank/battery box.
 IMG_1941 by MBBlat, on Flickr
IMG_1933 by MBBlat, on FlickrDetailed and painted the back of the radio, didn't have any black wire so painted the yellow NATO black, tied to make the red positive seem as if it had been partially black coated during installation.
IMG_1935 by MBBlat, on FlickrAdded caballing to the switches and instruments below the dash, will tidy them up when installing the dash onto the car. From what I can gather on the original they were run behind a loose panel next to the steering column.
IMG_1936 by MBBlat, on FlickrAnd finally did an oil weathering pass on the underside
IMG_1940 by MBBlat, on FlickrStill got to reattach the rear axle and sort out the brake lines, plus the fuel tank/battery box.
IMG_1941 by MBBlat, on FlickrNext 2 issues, 13 & 14 have arrived. 13 didn't have a lot to do, a couple of lower dash side panels with (fake) speakers and the front floor panel and mats. The floor doesn't come carpeted and the floor mats were optional extras on the real Cadillacs, and not present on the restored ECTO-1, so I've ordered an aftermarket carpet set.
Issue 14 is the front seats, these are softish rubber with a foam insert, so slightly squishy. The backs were a bit to plastic looking for my taste so I've taken them apart again ready for some paint. Mocked up how the seats will look with the dashboard.
 IMG_1947 by MBBlat, on Flickr
The seatbacks do tip forwards a bit, revealing a lot of screwheads
 IMG_1949 by MBBlat, on Flickr
Next up the dividing bulkhead and first jumpseat.
Issue 14 is the front seats, these are softish rubber with a foam insert, so slightly squishy. The backs were a bit to plastic looking for my taste so I've taken them apart again ready for some paint. Mocked up how the seats will look with the dashboard.
IMG_1947 by MBBlat, on FlickrThe seatbacks do tip forwards a bit, revealing a lot of screwheads
IMG_1949 by MBBlat, on FlickrNext up the dividing bulkhead and first jumpseat.
Scrump said:
I have not posted in here before, but wanted you to know I am still watching and interested in the build and your modifications.
Same here. I’m always torn between making a not very useful post so that the OP knows people are interested, or keeping quiet and keeping the thread tidier. Gassing Station | Scale Models | Top of Page | What's New | My Stuff