1961 FERRARI 156 SHARKNOSE 1/43
Discussion


henryk001 said:
dr_gn said:
Good progress again...
I keep looking at the 1:43 156/85 my Dad got me for the Christmas after going to Silverstone for F1 stuff in 1985. I built it the best I could, but...it's not great. Always had a soft spot for the car ever since. This thread has pushed me to investigate further; turns out Tameo are now on their third iteraton of that kit. I'm sorely tempted, but I just can't justify it at £90. Also a Western Kits 1:43 Tyrrell P34 prototype my Dad built soon after its release in 1975. It's pretty crude, falling to pieces and completely the wrong blue, but how I'd love to build another...and there's one on EBay.
Anyway as you were - the more I see of your great work with these Ferraris, the more I want to have a go. too much WIP though.
..I keep looking at the 1:43 156/85 my Dad got me for the Christmas after going to Silverstone for F1 stuff in 1985. I built it the best I could, but...it's not great. Always had a soft spot for the car ever since. This thread has pushed me to investigate further; turns out Tameo are now on their third iteraton of that kit. I'm sorely tempted, but I just can't justify it at £90. Also a Western Kits 1:43 Tyrrell P34 prototype my Dad built soon after its release in 1975. It's pretty crude, falling to pieces and completely the wrong blue, but how I'd love to build another...and there's one on EBay.
Anyway as you were - the more I see of your great work with these Ferraris, the more I want to have a go. too much WIP though.
All it needs is some research,time and a lot of patience of which you have prooved your more than capable of. You know you want to


Anyway, you’re making some good progress, looking forward to seeing more soon. Cheers!
dr_gn said:
I happened to mention this thread, and the two kits I was on about, to a friend at work a few weeks ago. Massively surprised to get them both today as birthday presents: Tameo’s latest Ferrari 156/85 and the Western Kits Tyrrell P34 prototype - the very one off EBay. Both are ‘kerbside’. Turns out they had a whip round at work. Result!
Nice! I get on well with my colleagues but I don't think this kind of thing would happen unprompted! Of course now we'll all be looking forward to detailed build threads on these 
Wow. You have some great friends Dr-Gn.
Theres some great tutorials on the Tameo web-site if you need a refresher.Just a tip before you start, you probably know anyway.Most important thing i found is Clean the white metal parts and scratch the surfaces that you will bond CA with a scalpel will give a first time bonding result.
The Ferrari has some nice PE i see. Looking forward to seeing your build which will put me to shame im sure.
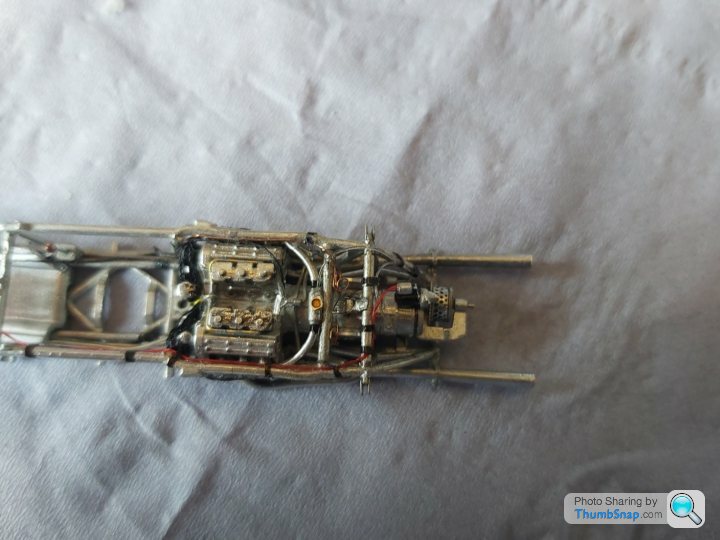
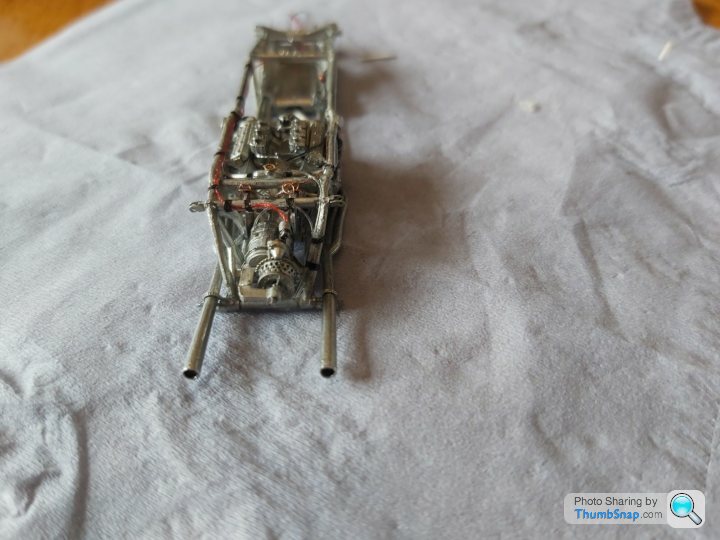
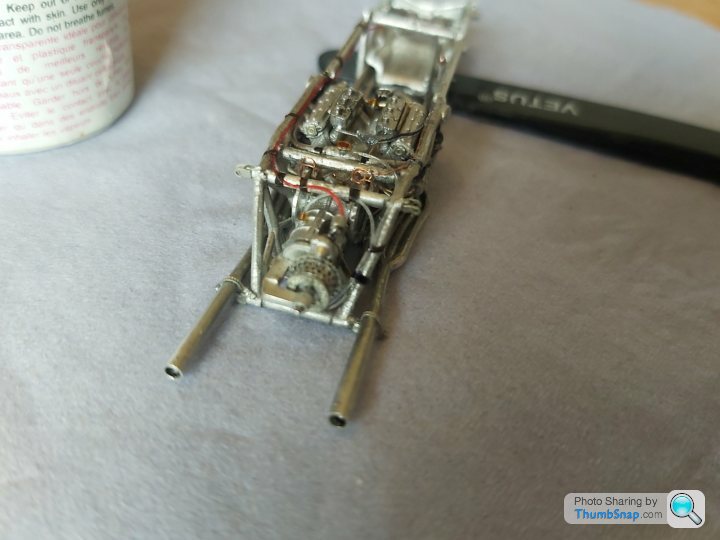
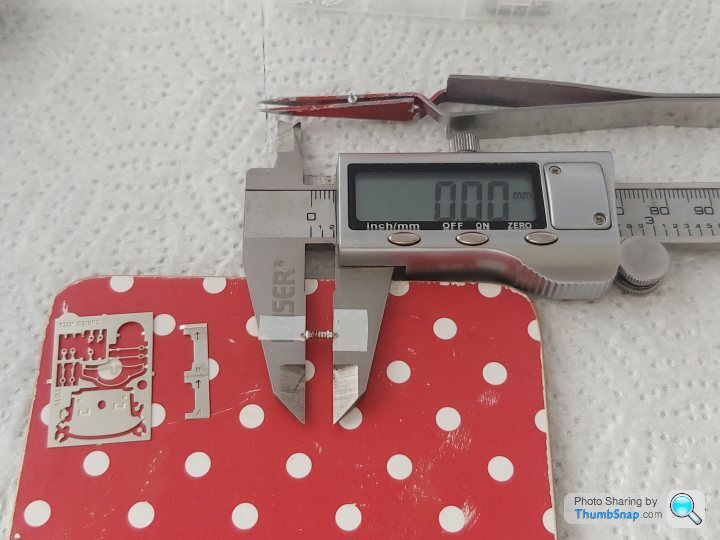
Anyway, ive been having to do duties at home and some work related items.
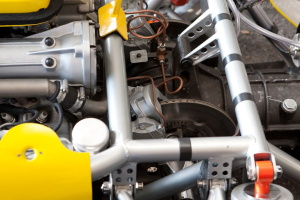
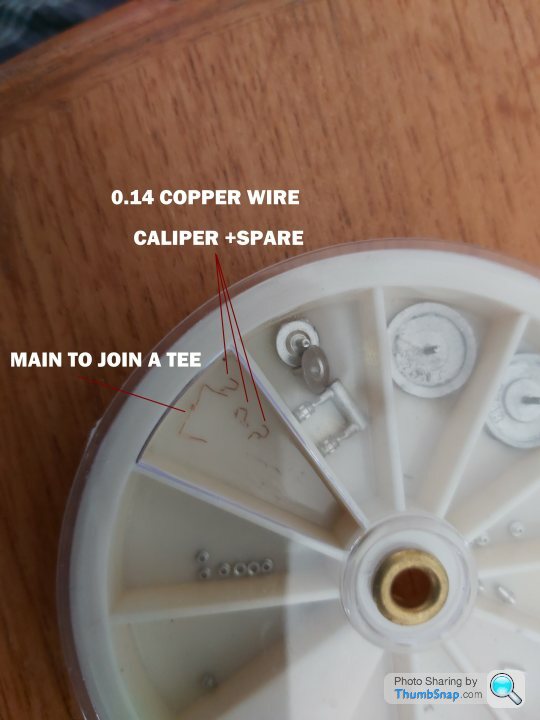
Ive started bending up copper wire 0.14mm dia which i got from some scrap encoder cable for the rear brake calipers
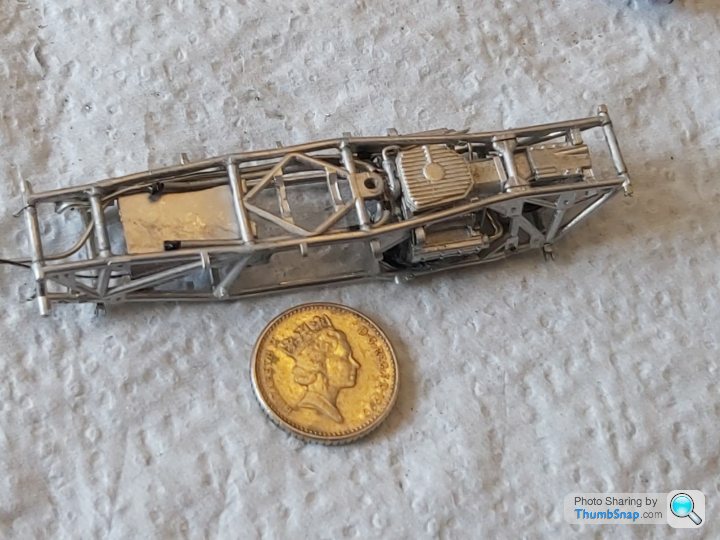
Heres a real picture.
 .
.
Heres mine calipers and 1st bridge pipe which needs to be teed off before running to the front.
 .
.
Cheers
Theres some great tutorials on the Tameo web-site if you need a refresher.Just a tip before you start, you probably know anyway.Most important thing i found is Clean the white metal parts and scratch the surfaces that you will bond CA with a scalpel will give a first time bonding result.
The Ferrari has some nice PE i see. Looking forward to seeing your build which will put me to shame im sure.
Anyway, ive been having to do duties at home and some work related items.
Ive started bending up copper wire 0.14mm dia which i got from some scrap encoder cable for the rear brake calipers
Heres a real picture.
.Heres mine calipers and 1st bridge pipe which needs to be teed off before running to the front.
.Cheers
henryk001 said:
Wow. You have some great friends Dr-Gn.
Theres some great tutorials on the Tameo web-site if you need a refresher.Just a tip before you start, you probably know anyway.Most important thing i found is Clean the white metal parts and scratch the surfaces that you will bond CA with a scalpel will give a first time bonding result.
The Ferrari has some nice PE i see. Looking forward to seeing your build which will put me to shame im sure.
Anyway, ive been having to do duties at home and some work related items.
Ive started bending up copper wire 0.14mm dia which i got from some scrap encoder cable for the rear brake calipers
Heres a real picture.
.
Heres mine calipers and 1st bridge pipe which needs to be teed off before running to the front.
.
Cheers
Thanks Henry - I'll take note of the cleaning advice.Theres some great tutorials on the Tameo web-site if you need a refresher.Just a tip before you start, you probably know anyway.Most important thing i found is Clean the white metal parts and scratch the surfaces that you will bond CA with a scalpel will give a first time bonding result.
The Ferrari has some nice PE i see. Looking forward to seeing your build which will put me to shame im sure.
Anyway, ive been having to do duties at home and some work related items.
Ive started bending up copper wire 0.14mm dia which i got from some scrap encoder cable for the rear brake calipers
Heres a real picture.
.Heres mine calipers and 1st bridge pipe which needs to be teed off before running to the front.
.Cheers
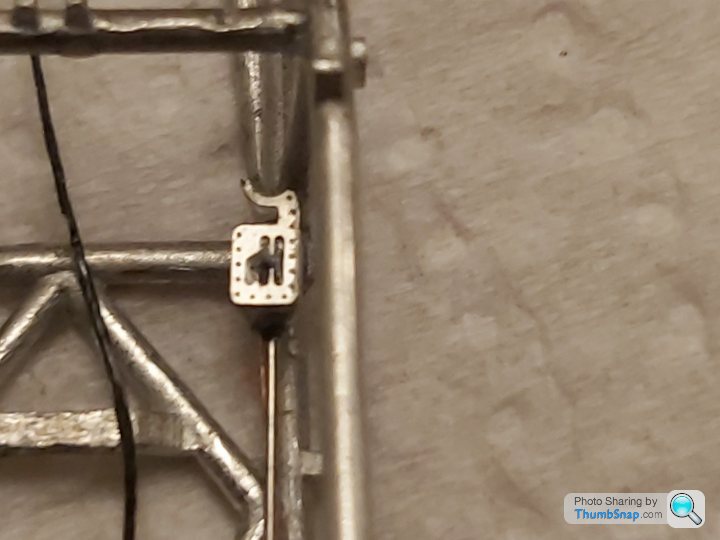
There's a small oval plate that is shown as fitted under the car, but it's not on the real car - I'm wondering if it's a support to take weight of the suspension - do you happen to know what it might be for?
dr_gn said:
Thanks Henry - I'll take note of the cleaning advice.
There's a small oval plate that is shown as fitted under the car, but it's not on the real car - I'm wondering if it's a support to take weight of the suspension - do you happen to know what it might be for?
.There's a small oval plate that is shown as fitted under the car, but it's not on the real car - I'm wondering if it's a support to take weight of the suspension - do you happen to know what it might be for?
Yes all these kits have a base support which more importantly for kits that have PE suspension like yours.Even though they are small by scale they are quite heavy in comparrison of their size. I also experienced a issue that when bending PE, do it once toward the bending point, but not over, as if you go back it will tend to snap
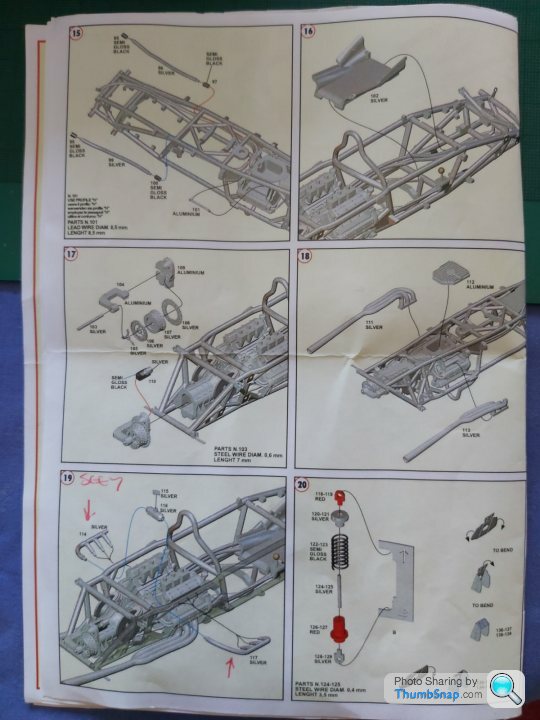
PS Dr_gn. Spotmodel website have instruction downloads if the booklet is too small (it is for me).
Theres a couple of different links on there and much easier to read on a PC.
Heres one for TMK428 .
https://media.spotmodel.com/docs/Tameo%20Kits/TMK4...
Theres a couple of different links on there and much easier to read on a PC.
Heres one for TMK428 .
https://media.spotmodel.com/docs/Tameo%20Kits/TMK4...

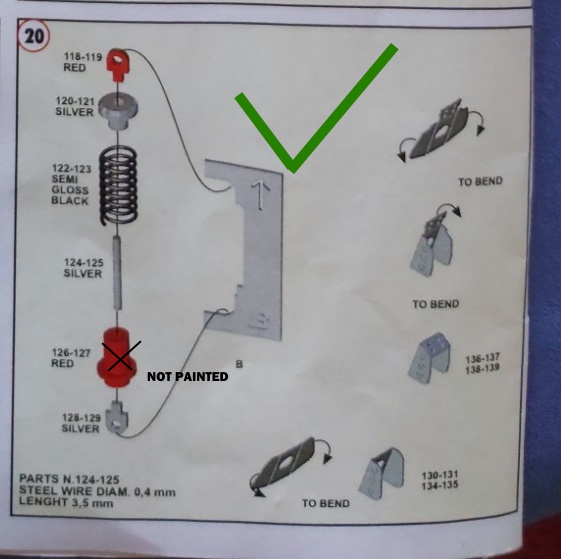
Thanks Henry - I'm OK with the instruction size for now. There are some odd notes on them though, such as "no paint" in the corner of one of them, but that's it; just "no paint" - doesn't appear to refer to anything!
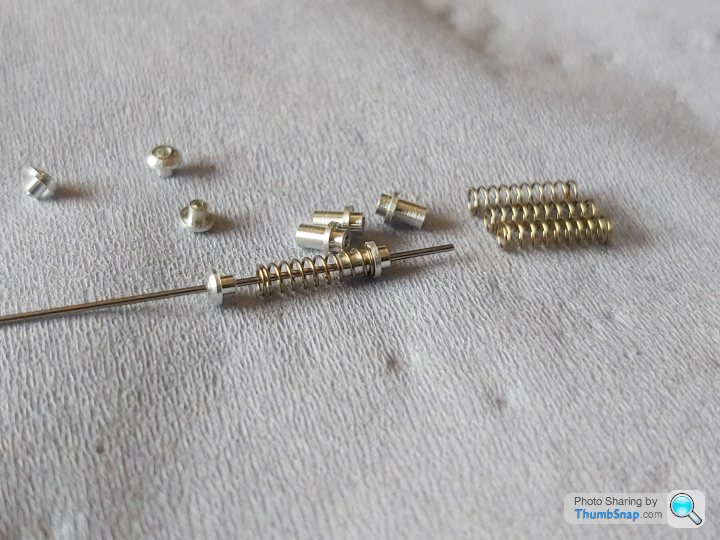
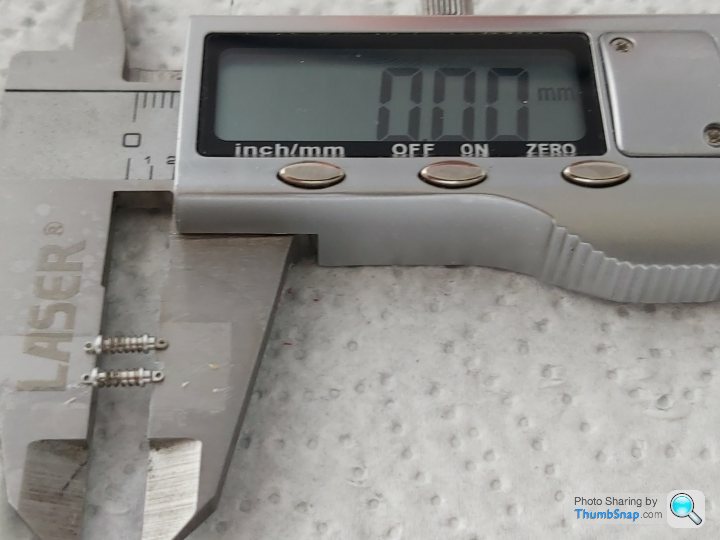
I love the little details like the tiny coil springs they've included. Things have definitely moved on since I last built one.
I love the little details like the tiny coil springs they've included. Things have definitely moved on since I last built one.
dr_gn said:
Thanks Henry - I'm OK with the instruction size for now. There are some odd notes on them though, such as "no paint" in the corner of one of them, but that's it; just "no paint" - doesn't appear to refer to anything!
I love the little details like the tiny coil springs they've included. Things have definitely moved on since I last built one.
.I love the little details like the tiny coil springs they've included. Things have definitely moved on since I last built one.
Yes took me a while to get to their way, but the instructions are quite good.
The "|NO PAINT OR NO COLOR" you see on any page is a key. If you look around that page you will then see a part with a number and no paint or no color written next to that part.
Example " the gear stick shows to paint the gear knob yet the no paint or no color shown within that part area refers to the stick not being painted.
Trust this makes sense.
It does, but just having "no paint" next to the part would have been enough I think!
There's another that says at the bottom of the stage box "steel wire" on one side and "length" on the other, but there's no steel wire on that stage, nor is any length given...
It doesn't really matter - the diagrams are very clear.
There's another that says at the bottom of the stage box "steel wire" on one side and "length" on the other, but there's no steel wire on that stage, nor is any length given...
It doesn't really matter - the diagrams are very clear.
Yes ive found some pages misleading then found the wire for example indicated on another page.
Also if you read through the stages a couple of times you may find as i did with my kit that its not practicle to follow step by step . I got caught out a couple of times but managed to use the grey matter to make the neccesary adjustments etc, so far fingers crossed.
It will be a challenge im sure and the time spent doing just one thing can be daunting, but if you can get to the end of your build and if the end result is a success reaps a personal reward
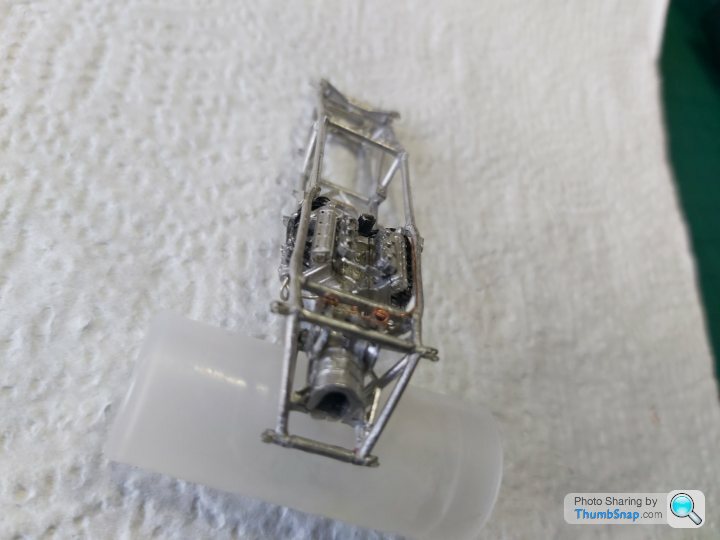
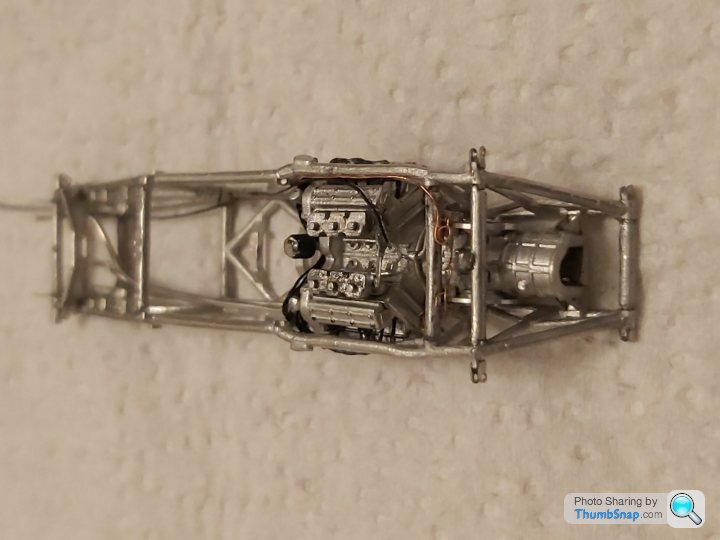
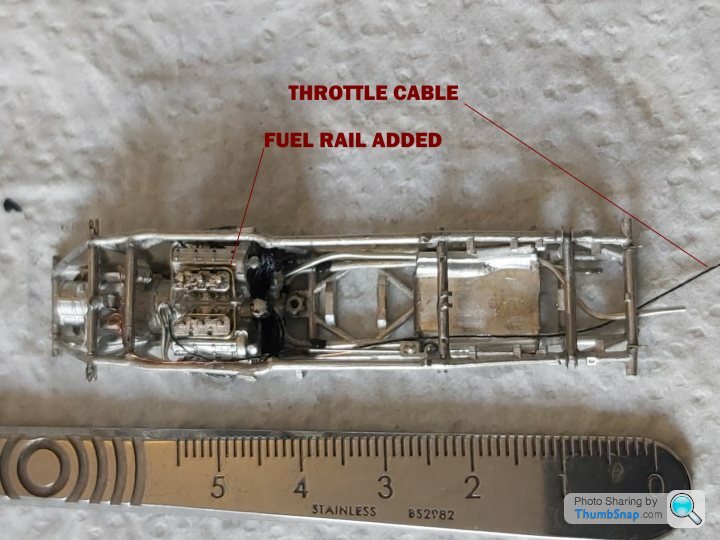
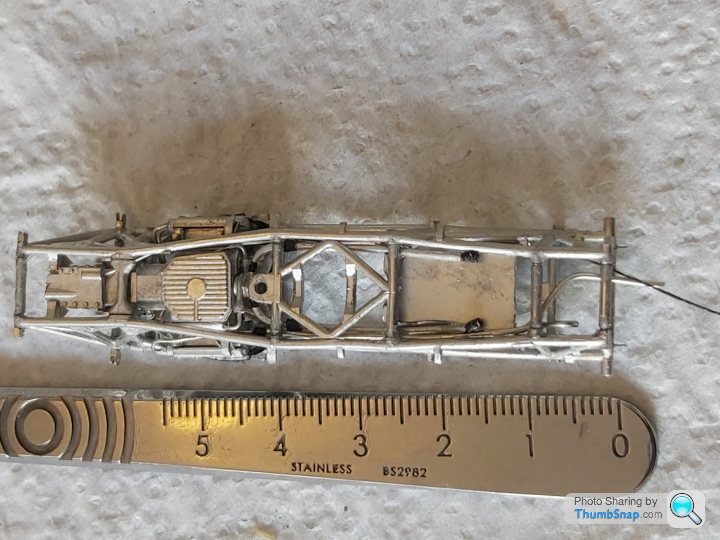
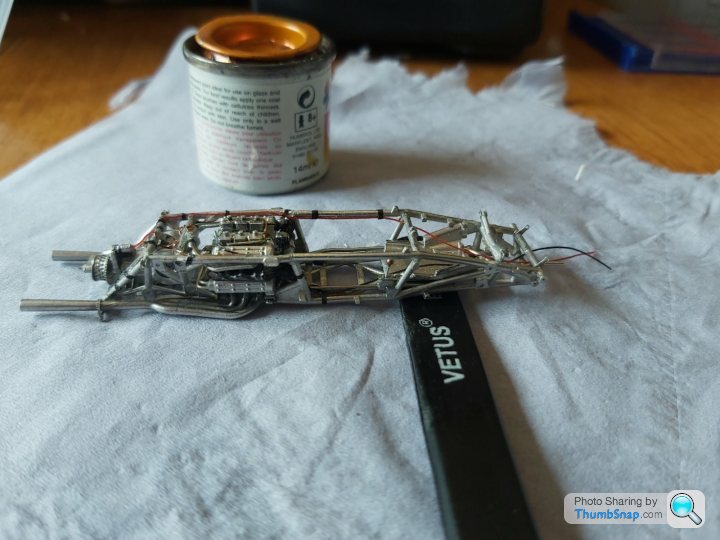
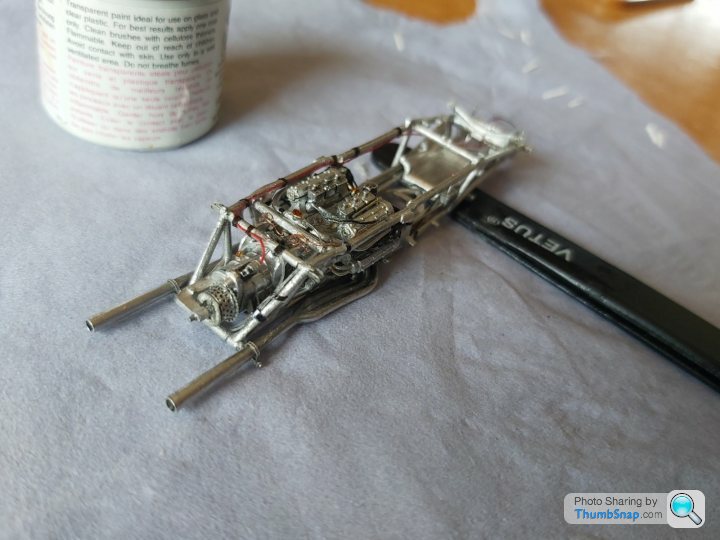
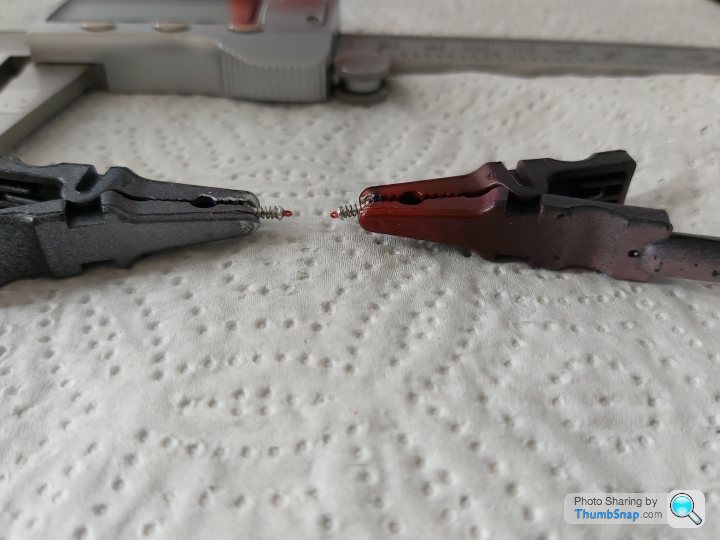
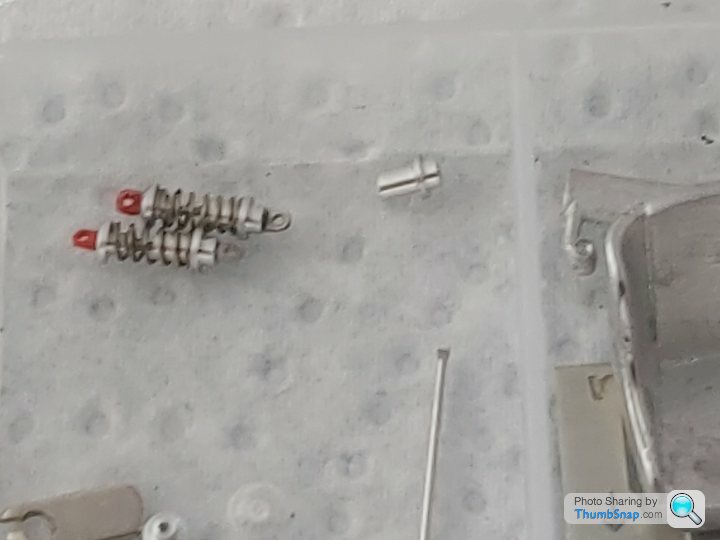
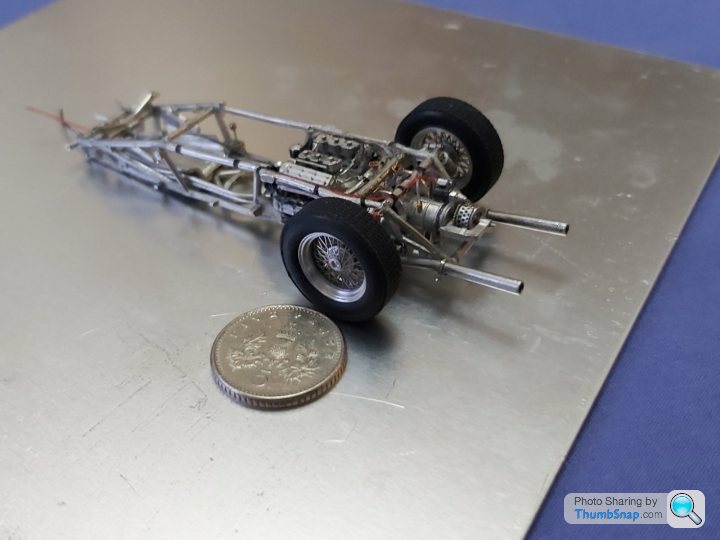
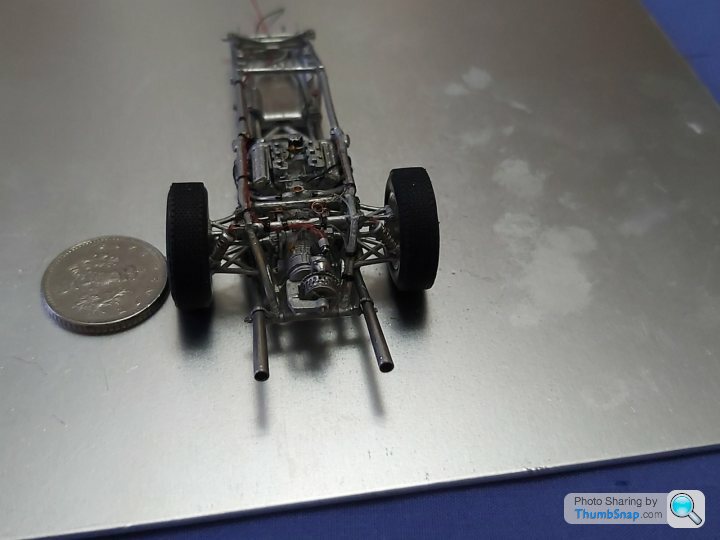
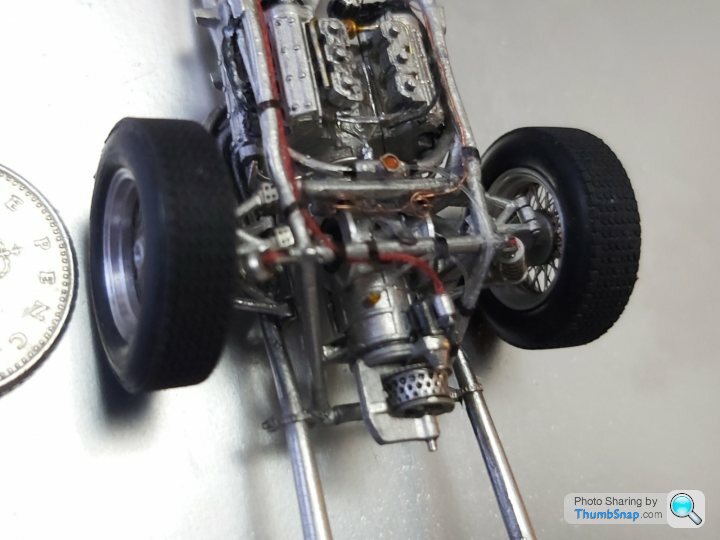
So the dreaded rear brake pipes and throttle cable today.
0.14mm copper wire with 1 x .5mm coil up and 1 x .8mm coil up to mimic the loops in the photo i found on the web. .25mm black thread coated with Kristal Klear for the throttle cable to finish.
The real thing.
.
Heres Mine.
Some photos.
.
 .
.
 .
.
 .
.
 .
.
 .
.
Now off to levels 15 to 20
 .
.
0.14mm copper wire with 1 x .5mm coil up and 1 x .8mm coil up to mimic the loops in the photo i found on the web. .25mm black thread coated with Kristal Klear for the throttle cable to finish.
The real thing.
.Heres Mine.
Some photos.
......Now off to levels 15 to 20
.Guiddy said:
Oh my! I'd struggle making this in 1/12 scale!
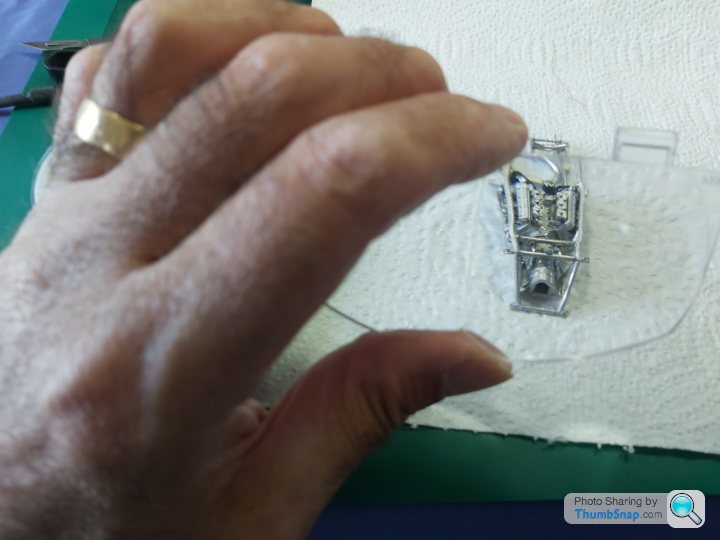
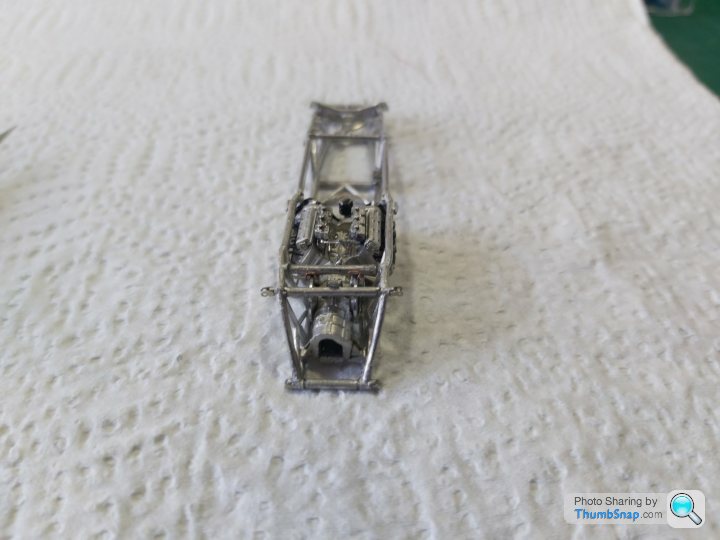
I am struggling a bit, really my fault as im adding details that arnt included in this kit. Theres so much fine detail parts on this particular model. Which from Tameos website shows as being the most complex kit to build in there product range.Its why i paid the money for it to pass time. I feel that if im messing around like this, may as well put other bits on as well or go round the bend or end up throwing it in the bin.A MAZE ING. Found a zoom app that makes my camera phone zoom in up to 140%. I cant say where i got it from because i dont know if there are hacks on it or data issues that could cause anyone issues on their phone and bit of heartache. In other words wouldnt want to get the blame for recommending it.
For me personally its giving me crisper close up pictures which im showing as of today.
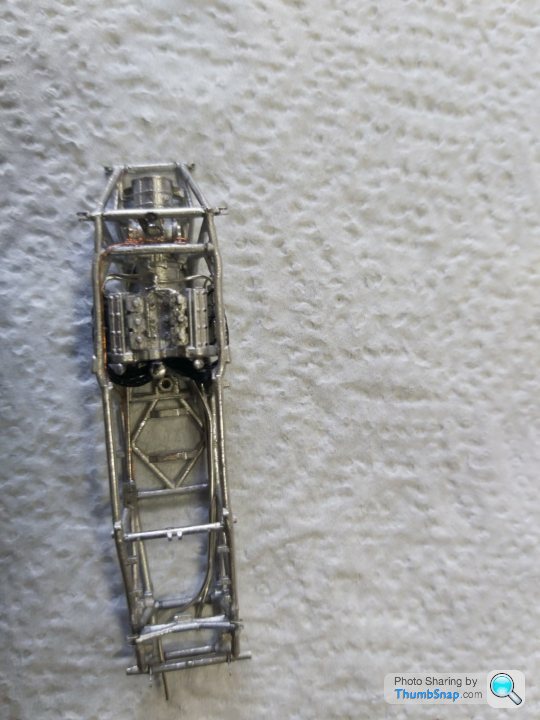
Levels 15-16 completed this week
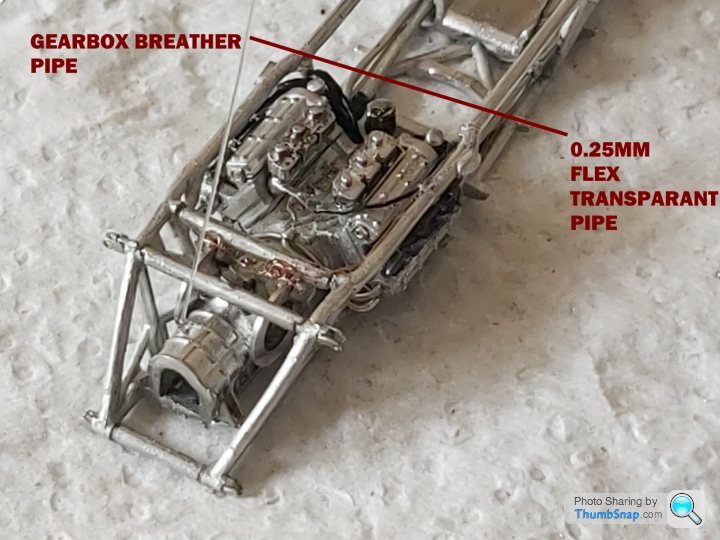
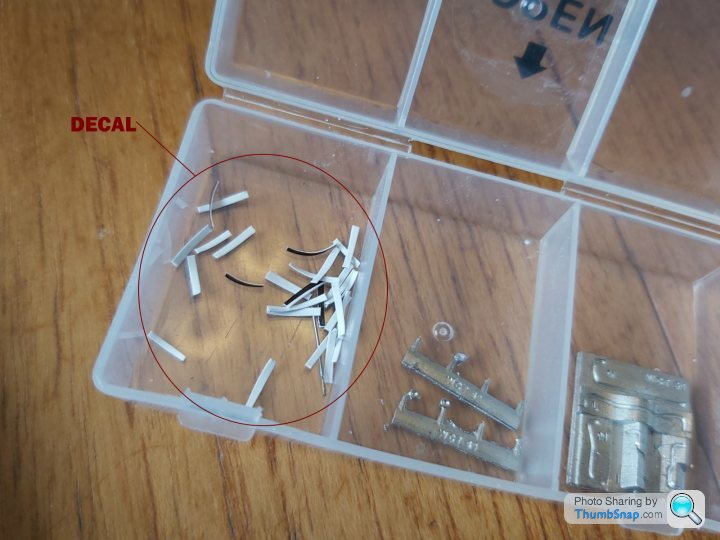
So not in the kit, ive added a transparent gearbox breather pipe 0.25mm from my wifes sowing box, a throttle cable and a yellow gold 0.4mm fuel rail to carbs. Im making some black decal to cut and use as a representation of insulation tape to wrap around pipework as was on the real car.
Heres a close up of the gearbox PE gate which i never would have been able to show and some better photos from the App i downloaded, theres going to be some touching in to do before i get to the bodywork sections.
 .
.
 .
.
 .
.
 .
.
 .
.
 .
.
 .
.
 .
.
 .
.
 .
.
Onto 17-20
Friday night time for some beers. Cheers
For me personally its giving me crisper close up pictures which im showing as of today.
Levels 15-16 completed this week
So not in the kit, ive added a transparent gearbox breather pipe 0.25mm from my wifes sowing box, a throttle cable and a yellow gold 0.4mm fuel rail to carbs. Im making some black decal to cut and use as a representation of insulation tape to wrap around pipework as was on the real car.
Heres a close up of the gearbox PE gate which i never would have been able to show and some better photos from the App i downloaded, theres going to be some touching in to do before i get to the bodywork sections.
..........Onto 17-20
Friday night time for some beers. Cheers
Edited by henryk001 on Friday 26th June 19:08
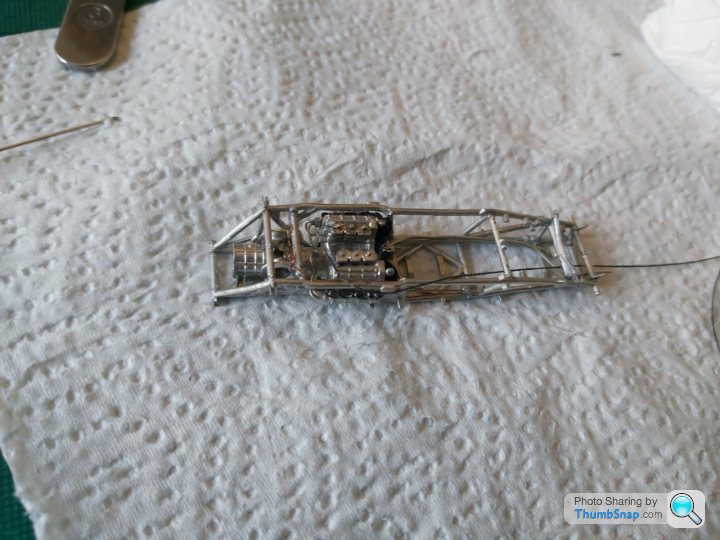
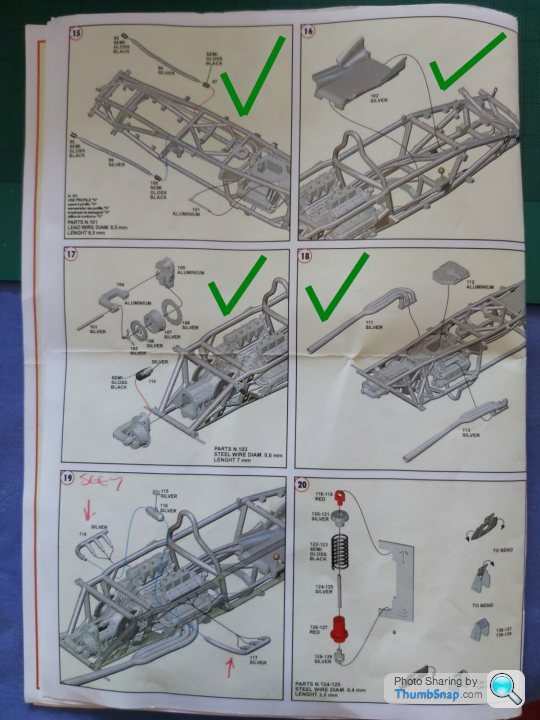
LEVEL 17-18 COMPLETE
 .
.
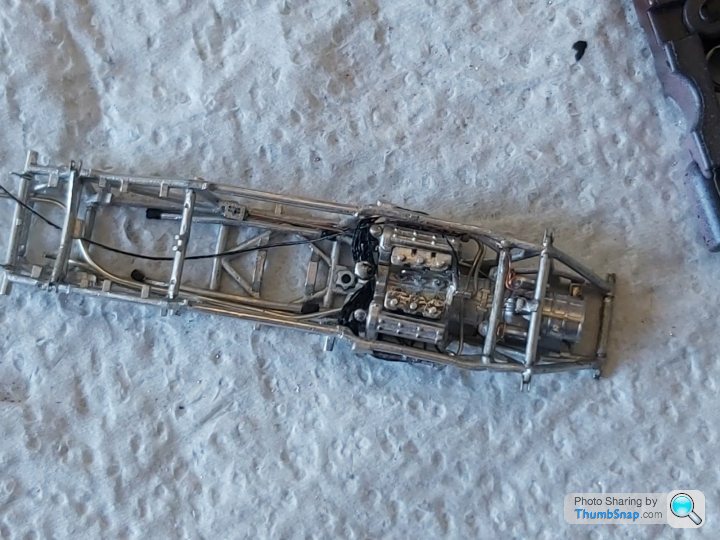
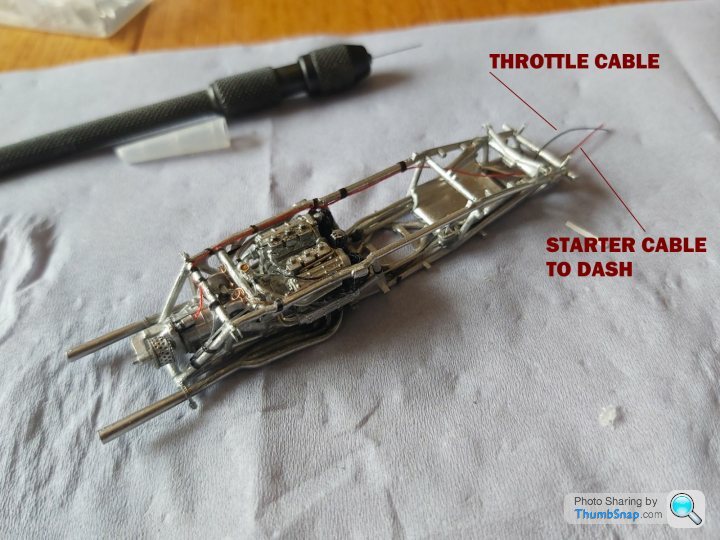
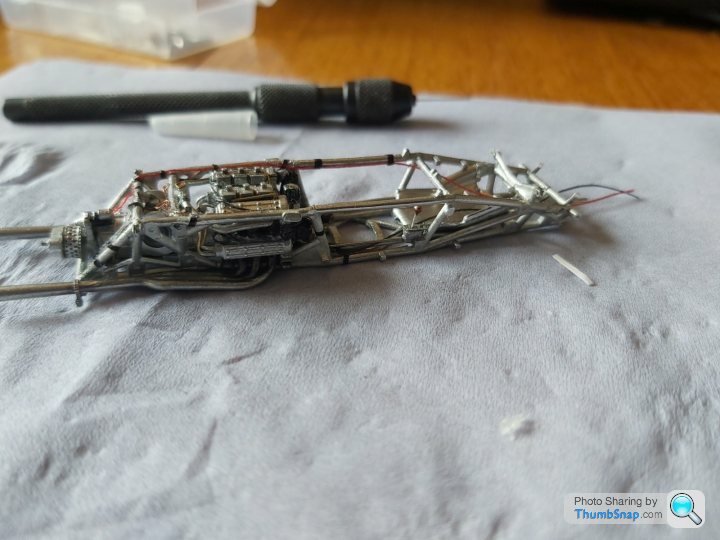
Made up the PE and cast parts for the starter, clutch and ringear assembly.Drilled out the holes for the clutch shaft,exhaust ends drilled out 1mm and painted.Finally added a red cable,ran from the starter motor to finally connect to dash button then going on from there onto the battery later on.
Pics.
 .
.
 .
.
 .
.
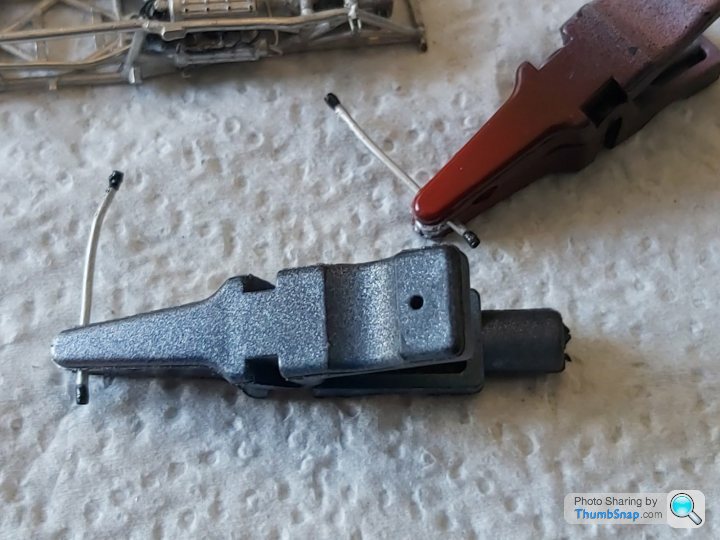
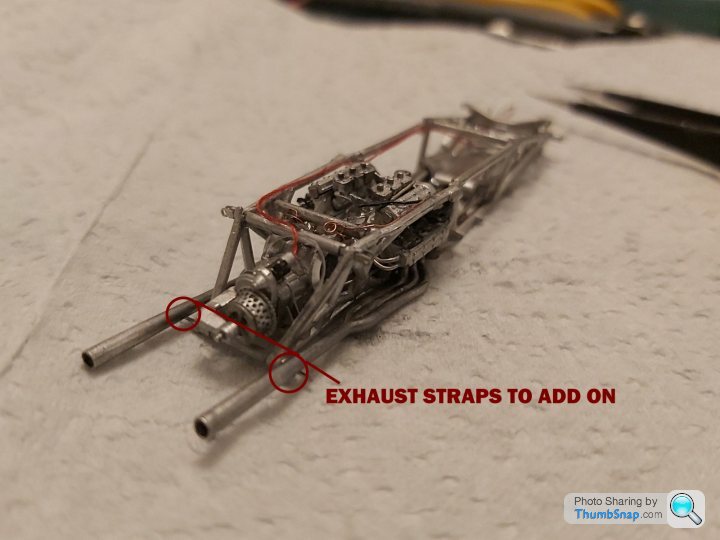
The PE had snapped off for the exhauast supports at the beginning of this build,way too fragile to support the exhaust,so i made up 2 x 0.3 pins instead and add a couple of straps before i go onto the next level.
 .
.
Onto 19
.Made up the PE and cast parts for the starter, clutch and ringear assembly.Drilled out the holes for the clutch shaft,exhaust ends drilled out 1mm and painted.Finally added a red cable,ran from the starter motor to finally connect to dash button then going on from there onto the battery later on.
Pics.
...The PE had snapped off for the exhauast supports at the beginning of this build,way too fragile to support the exhaust,so i made up 2 x 0.3 pins instead and add a couple of straps before i go onto the next level.
.Onto 19
Sorted out the exhaust straps made from spare PE stock and finished level 19. Added the starter cable and thought to cheat a bit which failed miserably by using my wifes nail art black lines as insulation tape.Stripped them all off and printed sealed decals instead which looks much better.Painted the rear tank cap clear gold and also the joint from the gearbox breather the same. Onto level 20.
Heres some pics.
 .
.
 .
.
 .
.
 .
.
 .
.
 .
.
 .
.
 .
.
 .
.
 .
.
Heres some pics.
..........Oh Buxxer 
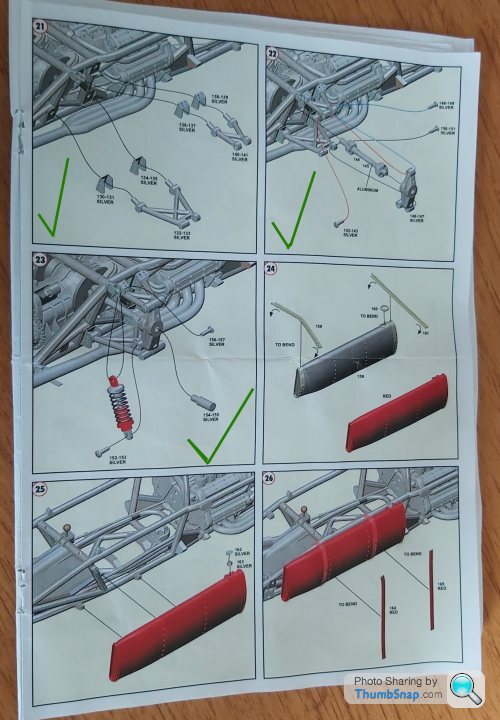
 .Level 20 building the rear shocks at 1st was a pleasure. Turned parts, springs and a couple of PE parts was going well.
 .
.
 .
.
 .
.
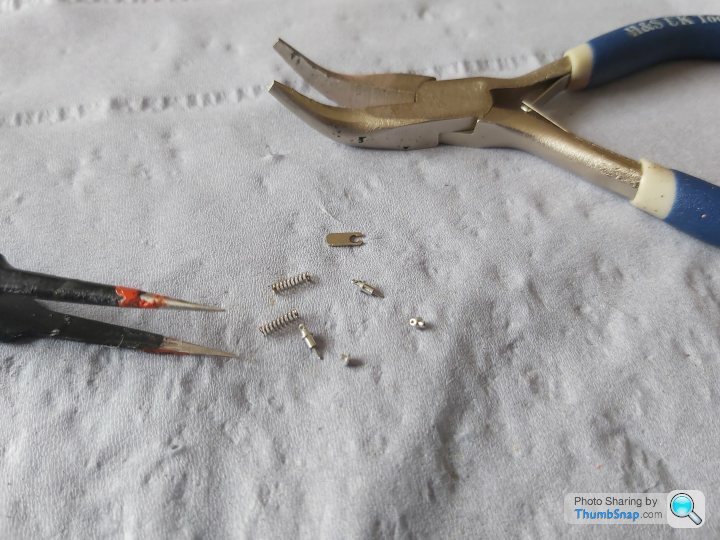
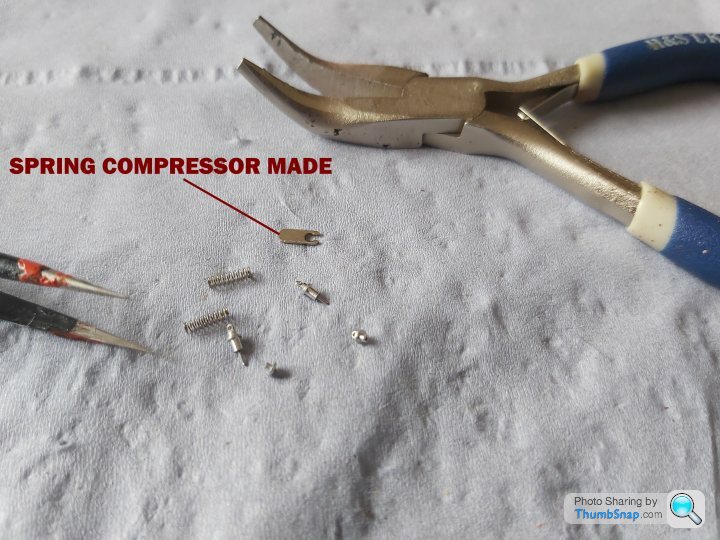
I didn't want to cut the springs so I made a small spring compressor. Tweezer clamped the shock body, compressed the spring down to fit the shock tops and hey presto. Pinged off into the household. Looked everywhere, but no joy.
So called Grand Prix Models, who is arranging some spares for me. What a gent.
Guess its time for a break and rest my eyes.
.Level 20 building the rear shocks at 1st was a pleasure. Turned parts, springs and a couple of PE parts was going well. ...I didn't want to cut the springs so I made a small spring compressor. Tweezer clamped the shock body, compressed the spring down to fit the shock tops and hey presto. Pinged off into the household. Looked everywhere, but no joy.
So called Grand Prix Models, who is arranging some spares for me. What a gent.
Guess its time for a break and rest my eyes.
While waiting for the spare shock parts i lost to come from Tameo. Decided to rethink about how to put these tiny parts together without loosing them again,seeing as i have to build 4 up.
So i borrowed my wife's photography shroud, laid down some kitchen paper to localize any more parts that might ping off.
I have enough parts to do the rears whilst waiting for the spares to turn up.
Measured the assembled length required (8.3mm Minus 2.6mm) from the PE jig, then used my vernier with some double sided tape to temporarily stick the sub assemblies and then fed the vernier in to zero before applying a drop of CA to the piston rod. Left for 30 mins then sprayed with activator .
Success.Painted the top mounts only, im leaving the bottom of shock aluminium as seen on the various websites ive looked at.If anyone is going to do this,it was by far the easiest method to do it and i didn't loose anything.
 .
.
 .
.
 .
.
 .
.
 .
.
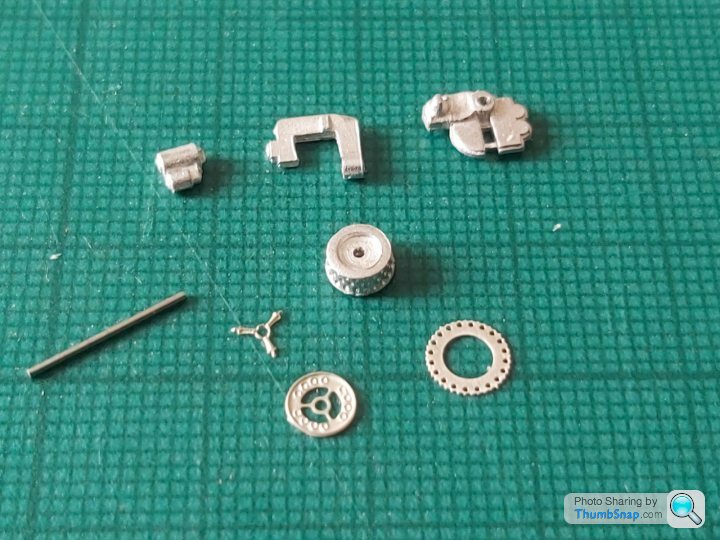
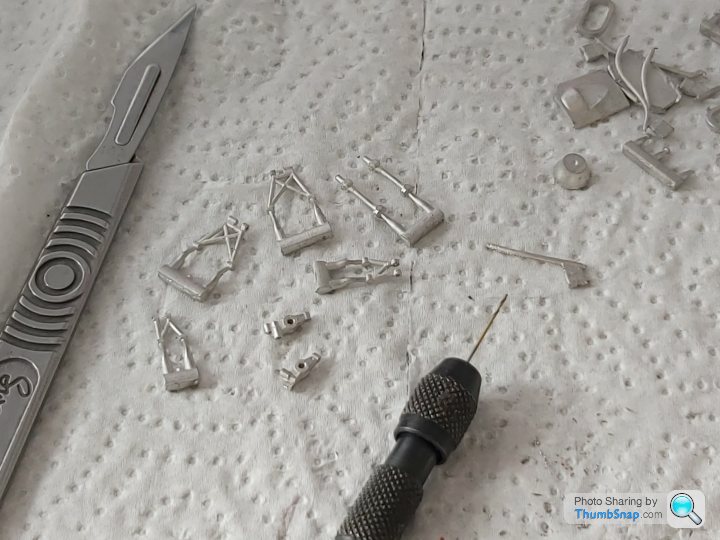
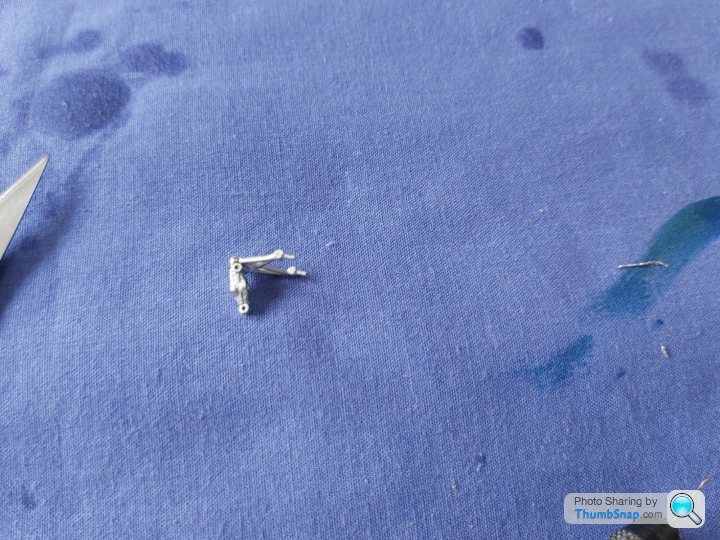
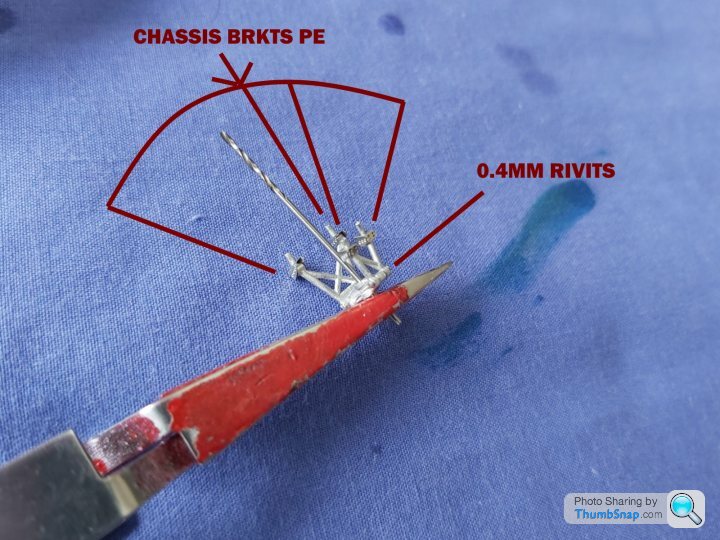
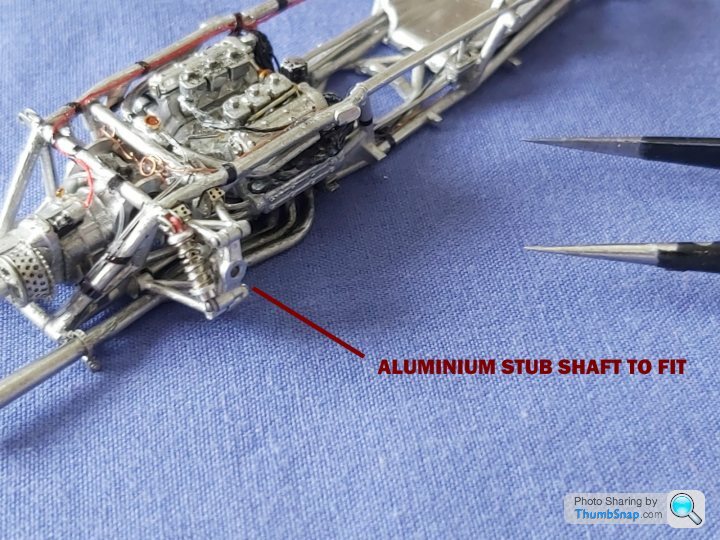
Drilled out all the holes 0.4mm for upper and lower rear wishbones. 0.8mm for the stub shaft which is a turned aluminium part, then clean the parts up
in my ultrasonic tank. Ordered FF pumice powde, should arrive next week to see if i get a bertter finish than using salt crystals.
 .
.
Cheers
So i borrowed my wife's photography shroud, laid down some kitchen paper to localize any more parts that might ping off.
I have enough parts to do the rears whilst waiting for the spares to turn up.
Measured the assembled length required (8.3mm Minus 2.6mm) from the PE jig, then used my vernier with some double sided tape to temporarily stick the sub assemblies and then fed the vernier in to zero before applying a drop of CA to the piston rod. Left for 30 mins then sprayed with activator .
Success.Painted the top mounts only, im leaving the bottom of shock aluminium as seen on the various websites ive looked at.If anyone is going to do this,it was by far the easiest method to do it and i didn't loose anything.
.....Drilled out all the holes 0.4mm for upper and lower rear wishbones. 0.8mm for the stub shaft which is a turned aluminium part, then clean the parts up
in my ultrasonic tank. Ordered FF pumice powde, should arrive next week to see if i get a bertter finish than using salt crystals.
.Cheers
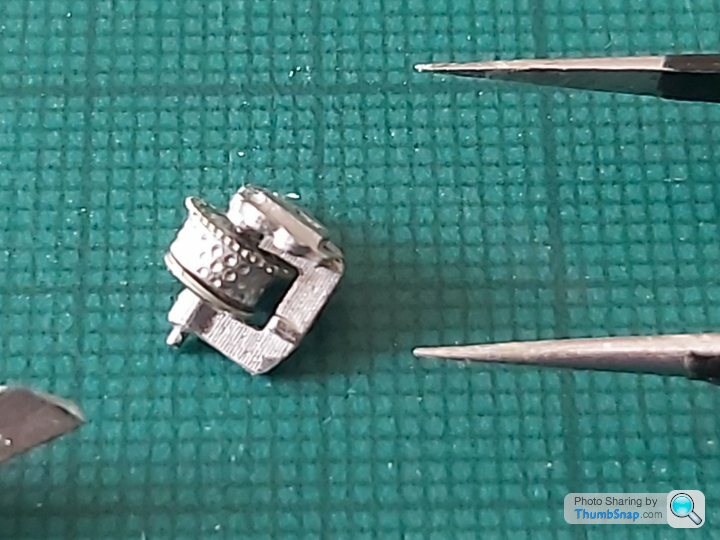
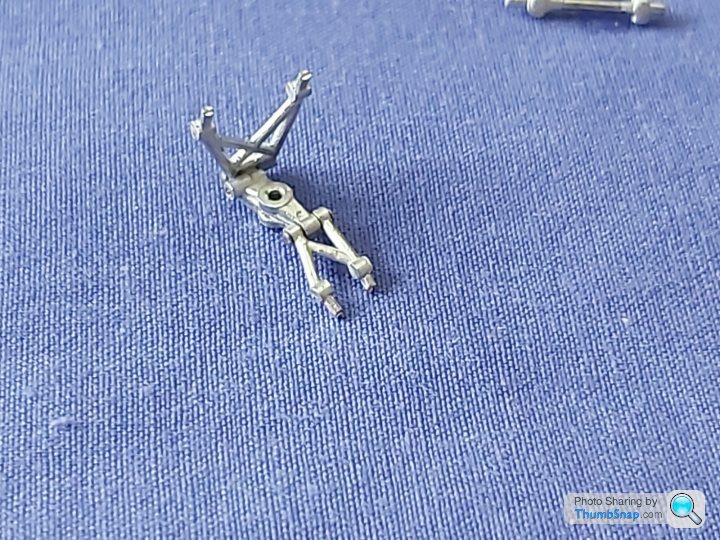
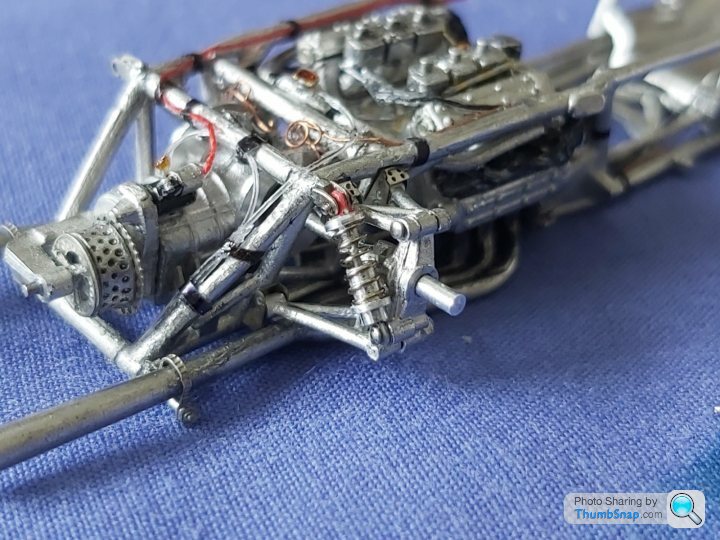
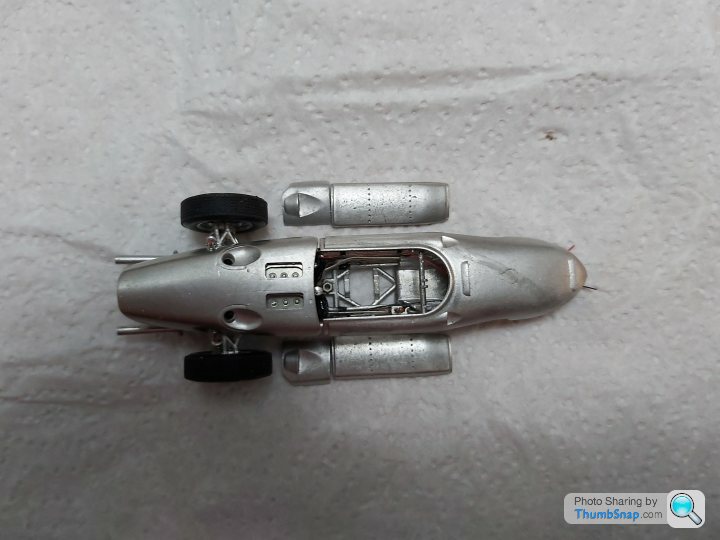
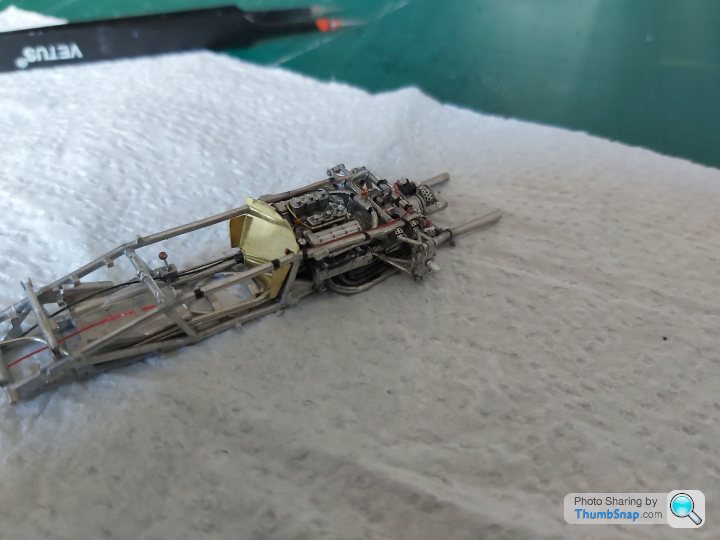
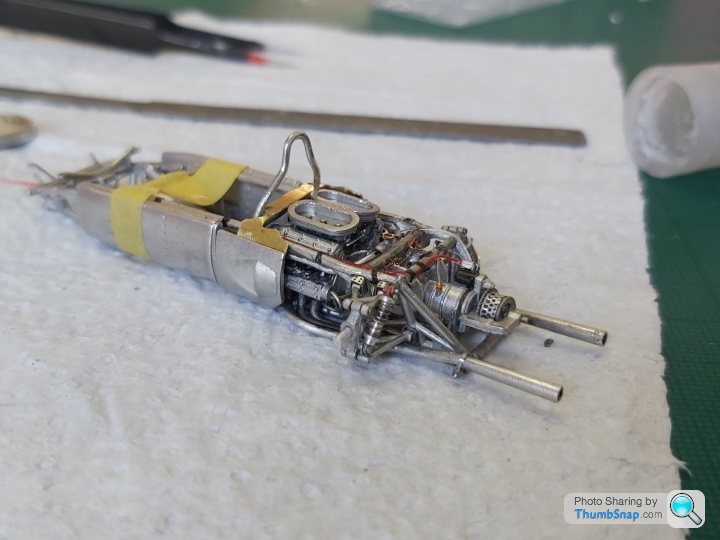
Rear suspension parts 20-23 completed. Ive noticed that some areas need cleaning up as well, scalpel some excess CA in a few places and repaint a couple of parts black. Ive lost a filler cap somewhere which i will need to remake no problem. The suspension parts,turned aluminium, PE and tiny rivits took some time to manipulate but got it all assembled to move on.Looks a bit messy when zooming in due to its scale but looks ok by eye to me.
Pics:
 .
.
 .
.
 .
.
 .
.
 .
.
 .
.
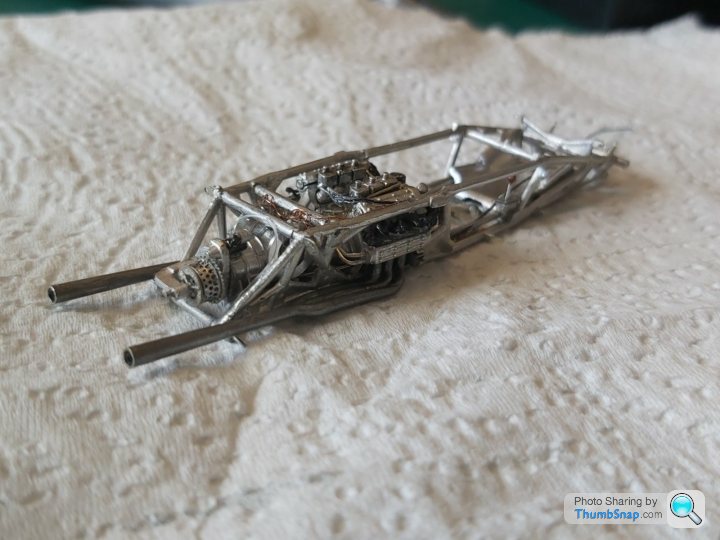
FINAL ASSEMBLY
 .
.
 .
.
 .
.
 .
.
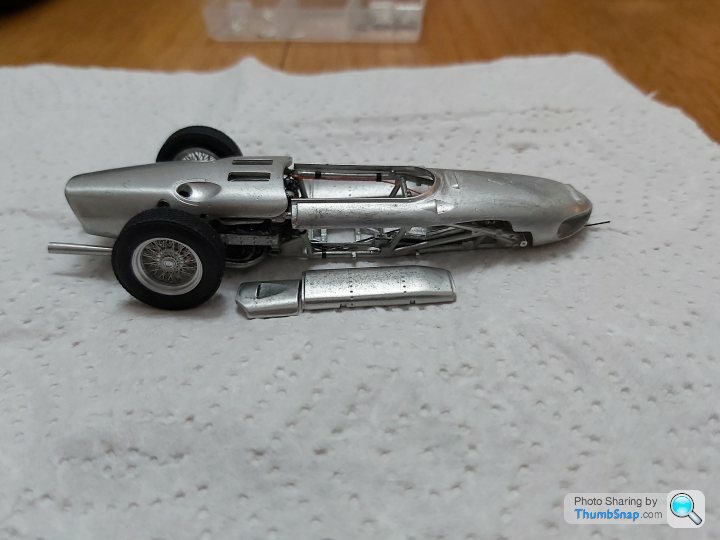
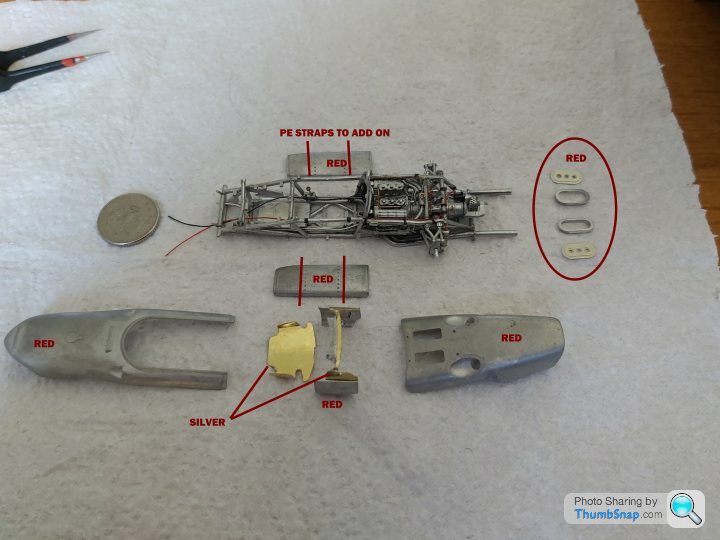
Time to prepare all parts for painting, requiring sub assembly, test fitting etc, which will take some time im sure
ONWARDS.
Pics:
......FINAL ASSEMBLY
....Time to prepare all parts for painting, requiring sub assembly, test fitting etc, which will take some time im sure
ONWARDS.
Fettling, fettling and so on. Test fitting of these body sub assemblies found to be the most important step so far prior to painting all the parts that are red.
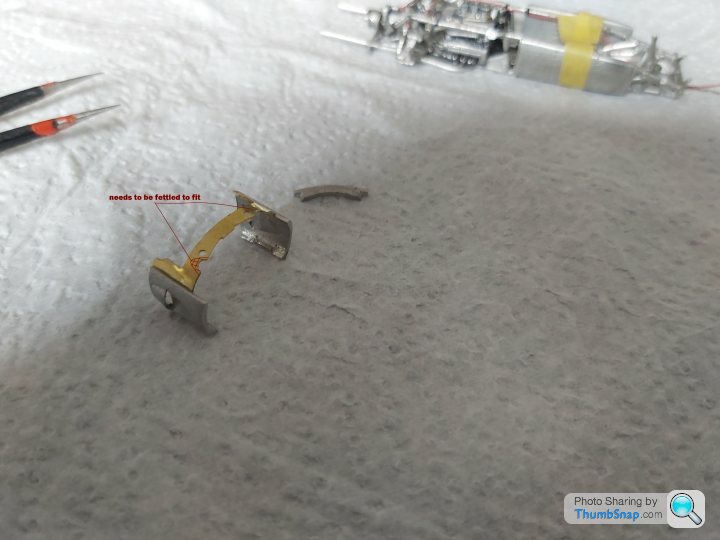
The Brass PE rear bulkhead needed some correction to fit and brass rollbar cross brace holes are miles out so made the neccesary adjustments.
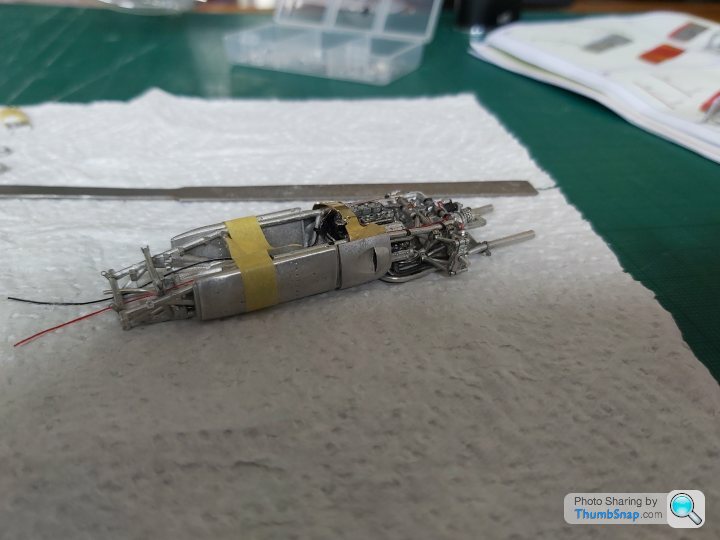
Main front and rear body parts cleaned up ok, then scrubbed them down with FF Pumice and a battery tooth brush i keep for modelling only, gives a nice dull Key and doesnt show any scratches prior to priming.
Some pics so far.
Initial Quick visual
 .
.
 .
.
Air intake covers
 .
.
Rear bulkhead
 .
.
Rear Side vent panels to rollover bar
 .
.
 .
.
 .
.
After rubbing with FF pumice
 .
.
The Brass PE rear bulkhead needed some correction to fit and brass rollbar cross brace holes are miles out so made the neccesary adjustments.
Main front and rear body parts cleaned up ok, then scrubbed them down with FF Pumice and a battery tooth brush i keep for modelling only, gives a nice dull Key and doesnt show any scratches prior to priming.
Some pics so far.
Initial Quick visual
..Air intake covers
.Rear bulkhead
.Rear Side vent panels to rollover bar
...After rubbing with FF pumice
.Gassing Station | Scale Models | Top of Page | What's New | My Stuff