Toylander from scratch (metal chassis and body)
Discussion


Its a good idea, and one that I thought about for a while. I would have probably made a combined wooden and 3d printed buck and then tried making it from the CF I have lying around. I really want it to be metal though, partially stubbornness and also wanting to learn a bit more about hand forming thin gauge metalwork. My brother has a rusty classic Impreza, and perhaps a bit of metalwork on this will give me confidence to weld his up for him...
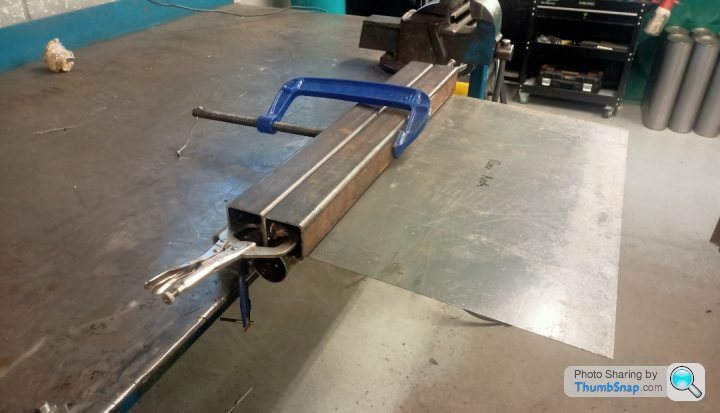
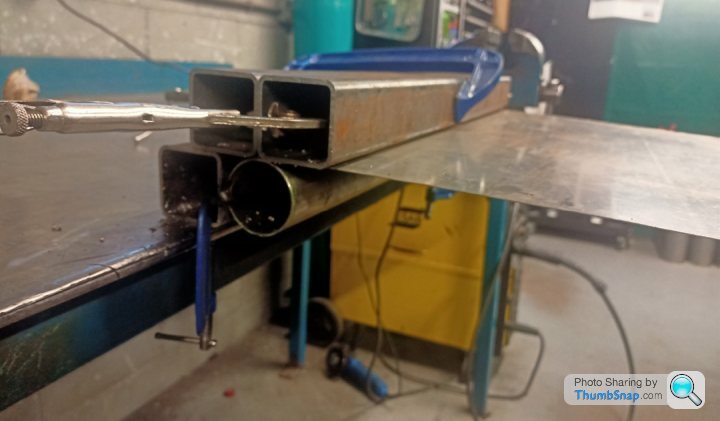
Ref the front wings, I have got our tube benders at work to bend up some 90 degree 50mm pipes for me in a similar radius to my chassis profile.
Plan A - weld 50mm box to bend straights and attempt to hammer form front wing around that tool (concerns - tucking of material and material wanting to 'fall' into the gap between bend and welded box section). Some of those I can mitigate and probably all of them with enough time!
Plan B - Use bends, section them into 4 and take radius and weld onto sheet metal (concerns - panel warping)
Plan C - Only use bend section and do the same as B. Use rear radius tool in above posts to do straight sections on the wing to minimise welding distortion.
To further complicate it I would ideally like to put a return/flange on the wing so it looks right where it butts up to the wing/bonnet panel.
That would be straight forward enough on the straight parts, but the radius will cause some issues I am sure. Issues on top of issues, that is what everyone is here for right!
Edited to add: I have just seen your post Hard Drive. You are grossly overestimating my experience and our facilities!
Edited by Jon_Bmw on Monday 10th January 11:07
That's a sweet little steering rack! That'll be nice to use I reckon. Those indicators look Bob on as well which is a great find.
I'm using a chain and sprocket setup as well and I think it's quite common. I can send you a link to the supplier of mine if you need, although there are lots of people that do them fairly cheaply.
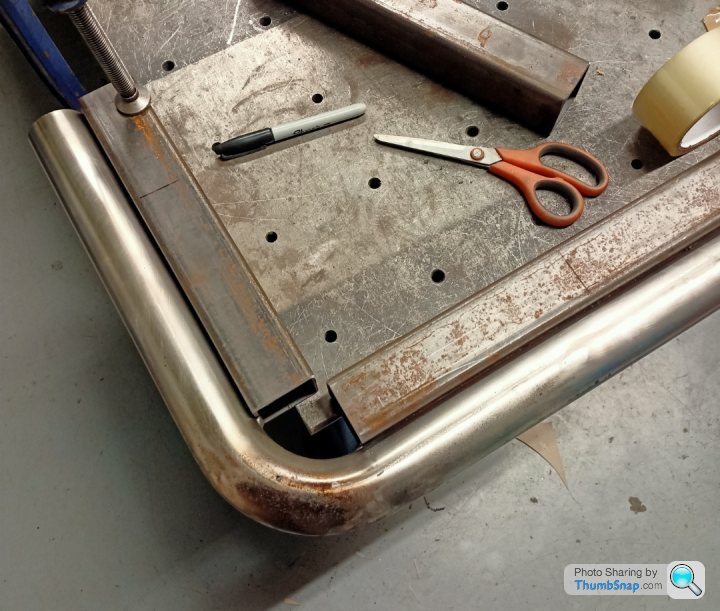
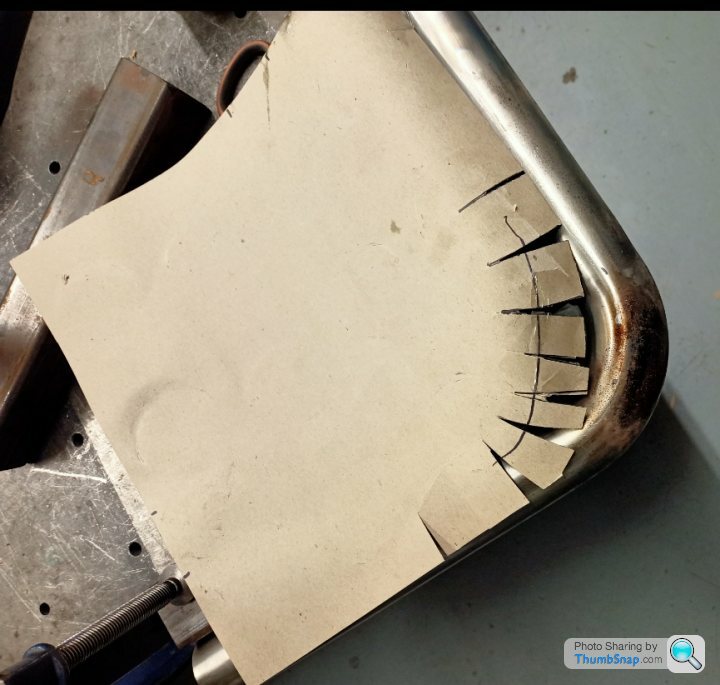
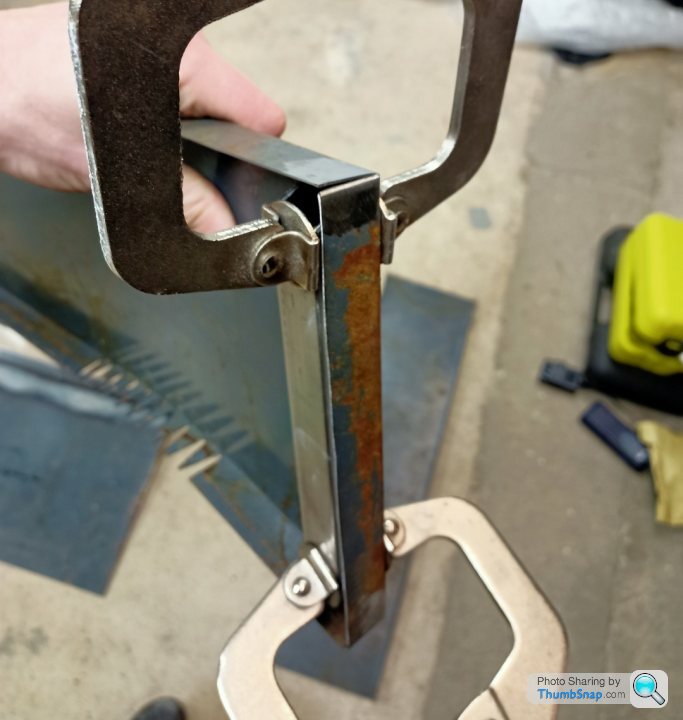
I had an extremely quick go at practising on the front panel this afternoon. I had 30 mins before I had to pick one of the boys up from nursery, so my efforts were cut short. It was plan A and it's not gone any better or worse than I expected. I'd like some more time with the hammer on Friday to see what can be done.
Many tucks to sort...
I'm using a chain and sprocket setup as well and I think it's quite common. I can send you a link to the supplier of mine if you need, although there are lots of people that do them fairly cheaply.
I had an extremely quick go at practising on the front panel this afternoon. I had 30 mins before I had to pick one of the boys up from nursery, so my efforts were cut short. It was plan A and it's not gone any better or worse than I expected. I'd like some more time with the hammer on Friday to see what can be done.
Many tucks to sort...
Tight radius, general inpatientness, 50mm of material trying to lose, lack of skill = picture above.
I need the 50mm as 1/4 circumference is 40m plus 10mm for the flange. I get the feeling if I go down this route I'll be slitting the corner and welding up the gaps after followed by a liberal grinding session.
I need the 50mm as 1/4 circumference is 40m plus 10mm for the flange. I get the feeling if I go down this route I'll be slitting the corner and welding up the gaps after followed by a liberal grinding session.
So, I'm on plan A+.
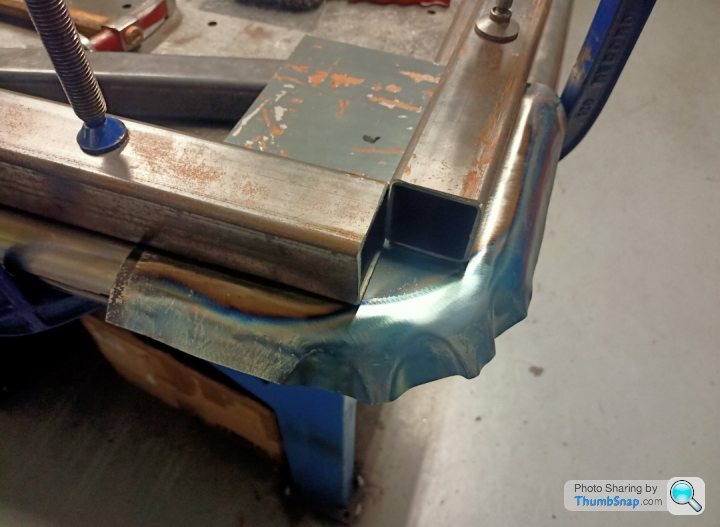
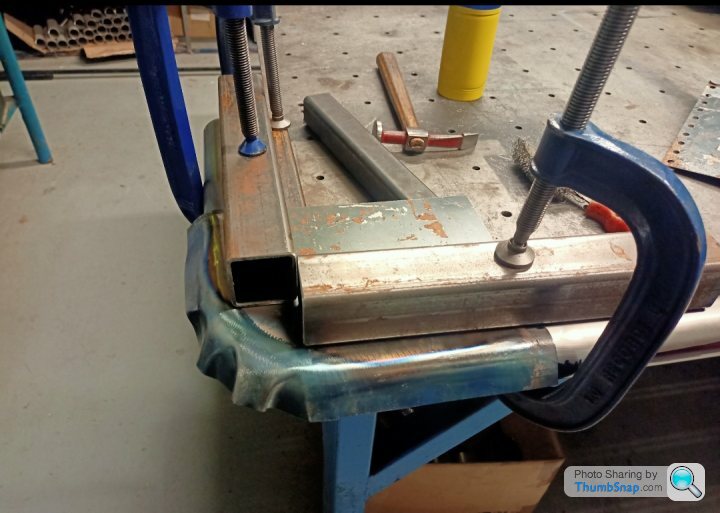
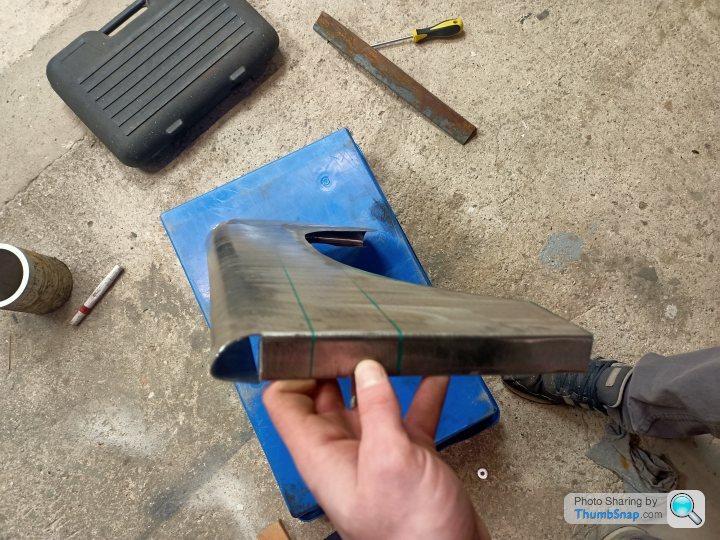
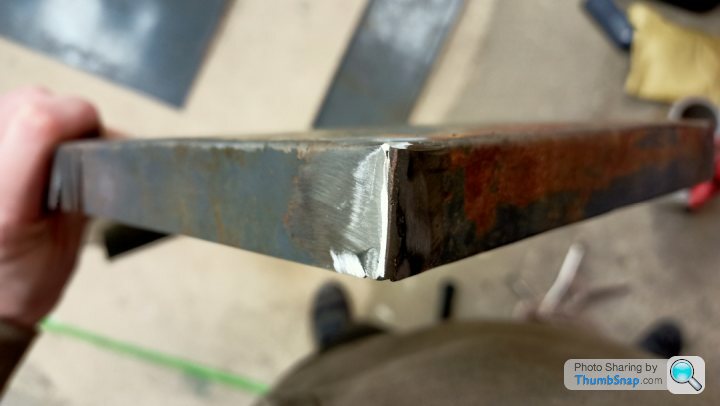
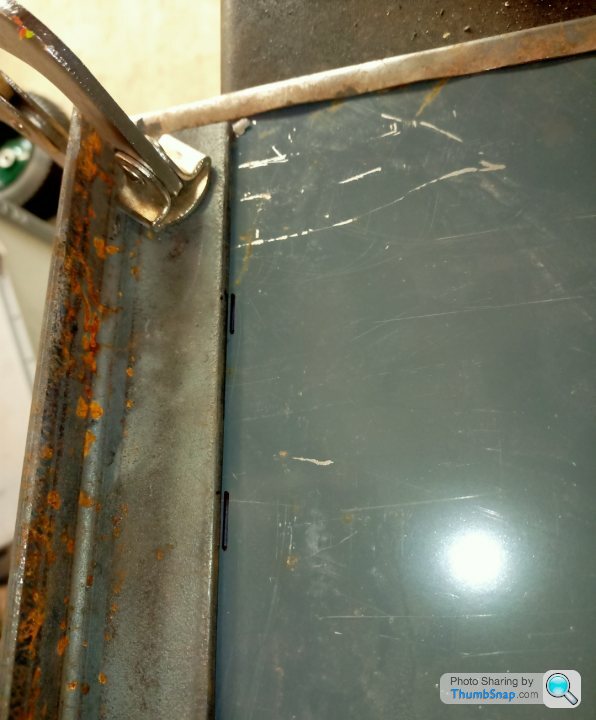
Cutting some slits in the metal, forming, then welding up. In hindsight more slits would have been better. The gaps I was having to weld were up to 4mm, which when the panel is 0.8mm thick, is a challenge! I used some odd scrap Aluminium as a backer but it was still unpleasant.


This last photo is fairly damning. Lots of height difference between the welds due to large gaps and a bit of distortion. I'll probably clean up the inside more. Hammer it a bit, grind it back and see what we have got. I think it would need a fair bit of filler in it whatever I do, so I might try plan C next on the other side and see if that goes better.
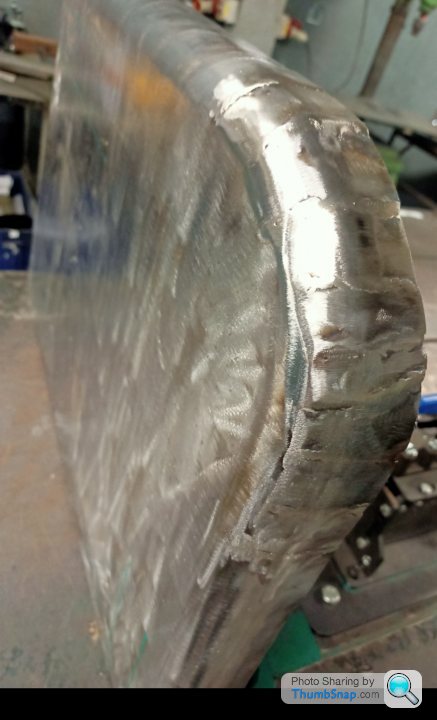
Considering that's the first metal panel I've ever made, it could be worse, although not quite a success story yet...
Cutting some slits in the metal, forming, then welding up. In hindsight more slits would have been better. The gaps I was having to weld were up to 4mm, which when the panel is 0.8mm thick, is a challenge! I used some odd scrap Aluminium as a backer but it was still unpleasant.
This last photo is fairly damning. Lots of height difference between the welds due to large gaps and a bit of distortion. I'll probably clean up the inside more. Hammer it a bit, grind it back and see what we have got. I think it would need a fair bit of filler in it whatever I do, so I might try plan C next on the other side and see if that goes better.
Considering that's the first metal panel I've ever made, it could be worse, although not quite a success story yet...
The comments and suggestions for toylander style parts are most welcome. I see a thread like this as a general information page and how not to do lots of things by yours truly, rather than me being the owner and custodian of it! If its vaguely related, post it up.
I will almost certainly get some of those Fiat bulbs, they look just the trick. As I am a tight arse, I will probably get 6 and see if I can find some orange and red paint lying about...
Ref the panel Cobain, a variation of your suggestion I am planning to try. Having the minimum welding on the panel is key to reduce it warping and distorting I think. Plan C on the previous page is the best bet for me. I do like your idea though. I need to spend a bit of time with the mock up one I had made and the chassis. It is highly likely that my chassis doesn't exactly match the CAD because of the way I made that chassis front section, so it will need tweaking I am sure. I'd rather know what needs tweaking more making an amazing (haha!) panel that doesn't fit the chassis/body.
In other news progress is going to be even more glacial than normal as my garage is now full of OSB and LED light panels so I can board the ceiling and have some proper light in there. It is 40sq metres worth so that will take me ages by the time I have cut them in and fitted appropriate noggins!
Originally I was going to make the body panels out of aluminium mainly to be lighter. Whilst it will form a bit better I still don't think I could do the front arch without welding it. At that point I am stumped, I cannot weld aluminium. The guys I work with can, but I am trying to do as much as I possibly can by myself. Any experience gained here will help with car bodywork in the future. That is how i'm selling it to myself.
If I want to weld wheel arch return lips on this project, that would be fairly straightforward TIG welding (famous last words!) steel. In aluminium its well out of my league.
I'll take the weight penalty of steel and accept the lower cost of the material and the fact I can weld it. I also have found a load of 0.8mm steel sheet metal shelves that are currently ripe for re-purposing!
On the garage front, 3 out of approximately 16 panels done. Painfully slow progress putting up 2.4m OSB on your tod!
The rear axle has been machined but I've not trialed it yet as it's tucked away in the corner until I get more of this roof done!
I'm about half way with the roof is progress is pretty glacial with that as well. Trying to get motivation when it's cold and still dark in there is the issue.
Your gauges look good. I fear nice finishing touches like that will never make it onto mine!
I'm about half way with the roof is progress is pretty glacial with that as well. Trying to get motivation when it's cold and still dark in there is the issue.
Your gauges look good. I fear nice finishing touches like that will never make it onto mine!
Cobain, I love the mirror! That is going to look great when painted and the edge protector glued down.
So I contracted Covid, which meant some isolation time.
Half the garage roof and lights done;
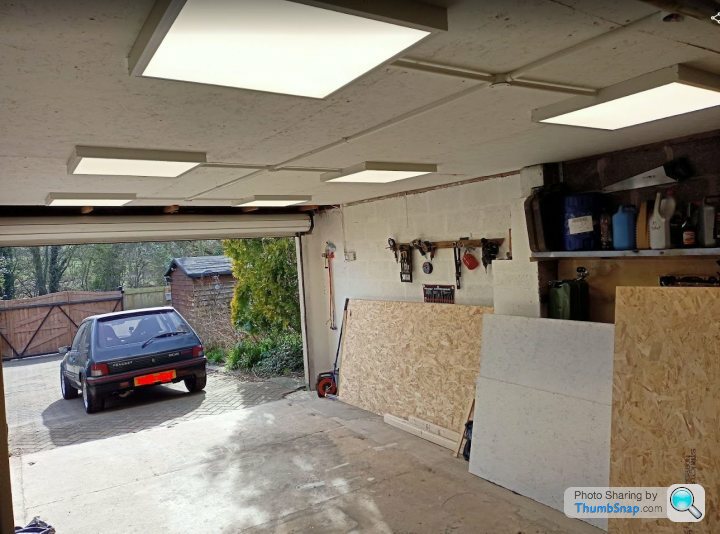
Obviously the end I want to work in, hasn't been done
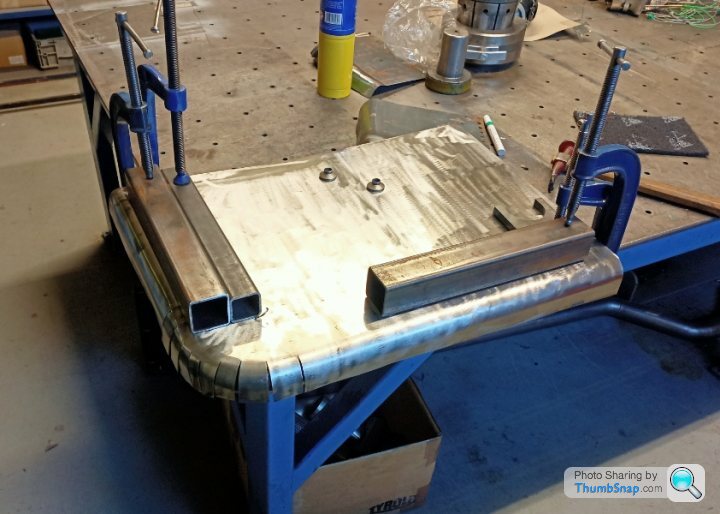
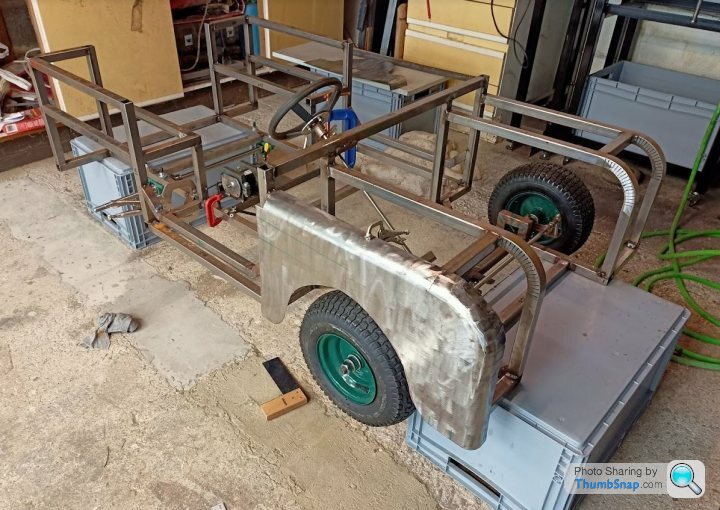
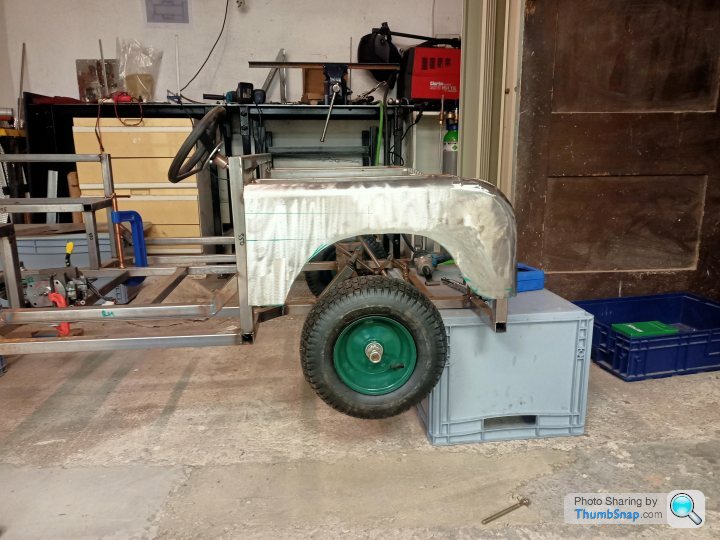
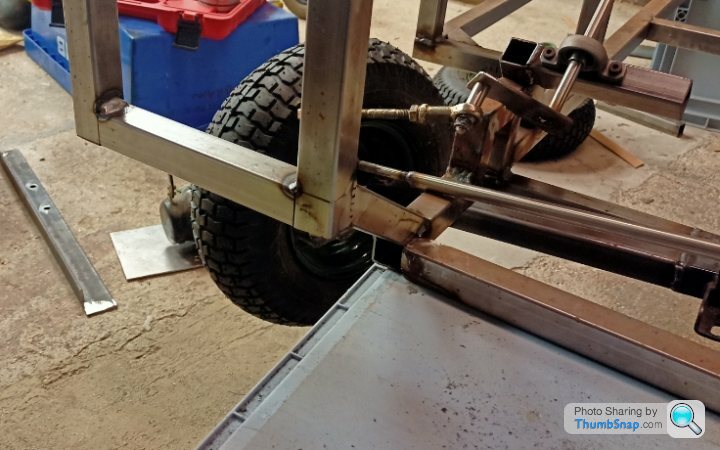
My mate from work turned the rear axle. We used 304SS so hopefully it won't rust and even if it does it will still rotate in the pillar bearings. Loosely positioned here.
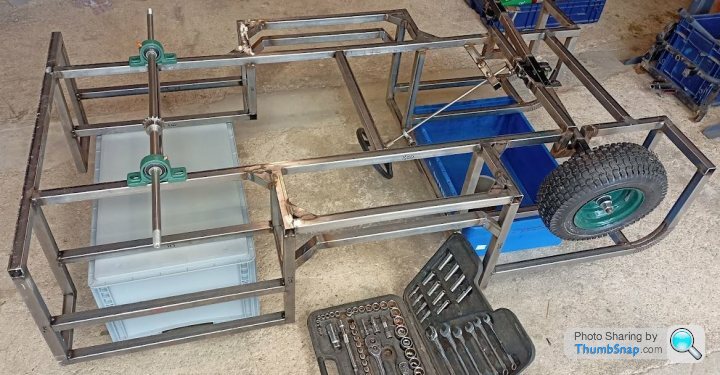
Some eyeball and some well recognised "to the nearest 5mm measurements" and its bolted down. The pillar bearings even have a grease nipple, Phwooar! Lets be honest, those grease nipple caps aren't coming off in my lifetime. Also you might notice that its going to have about 3/4 of an inch rake between front and rear. If you could be so kind as to not mention it, or else I will tell you I was a redbull engineer and I meant it like that.
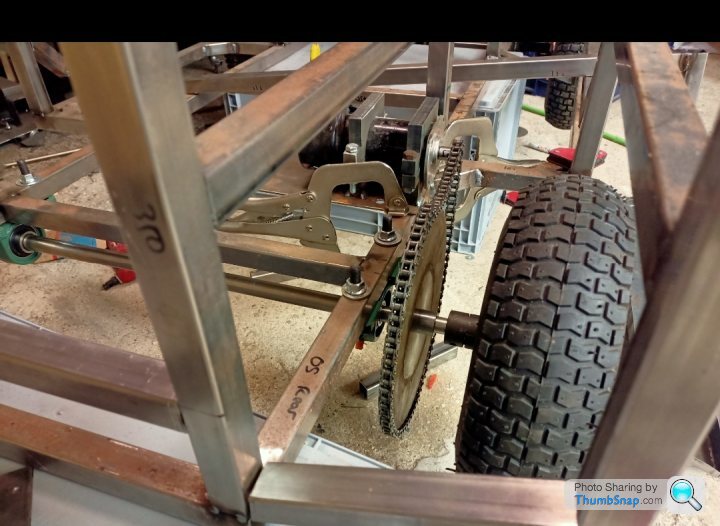
The downside of isolation is that you have to use the material at hand, and as most of my material is at work (near the chop saw!) I made do for the motor mount.
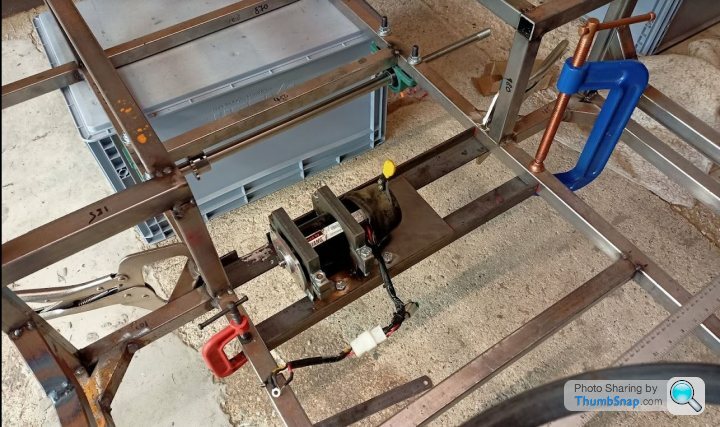
Clearance hole for the chain guesstimated, because you guessed it, the chain and motor sprocket is at work too! The angle iron has also been drilled out at 10mm and I will use 4 matching 8mm bolts in time. This allows a reasonable amount of travel in X and Y to set the chain tension and position in Y. Basically to account for many, many build issues! The axle sprocket has been drilled centrally but I haven't cross drilled the axle yet.
The motor has been positioned there so it is hidden (by the drivers bench seat) in the future. I will probably hinge that so I can lock/unlock the motor using the yellow lever.
At that point (about 45 minutes in) I had run out of stuff to do. So, lets make lots of grinding dust and molest the dummy wing some more! I just got a very very loose shape by hand drawing the wheel arch cut out on. This is not the real wing....I repeat, this is not the real wing, until it becomes the real wing due to laziness.
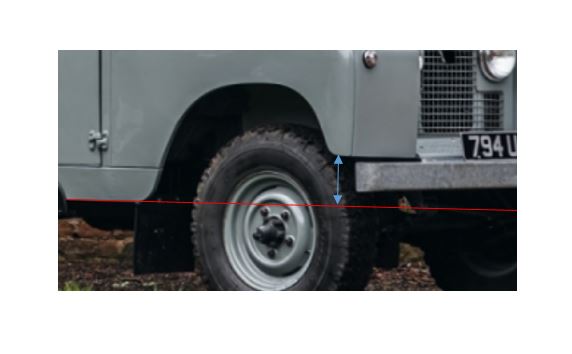
With the radius at the top of the LR wings, the panels are going to be spaced off the chassis by about 1".
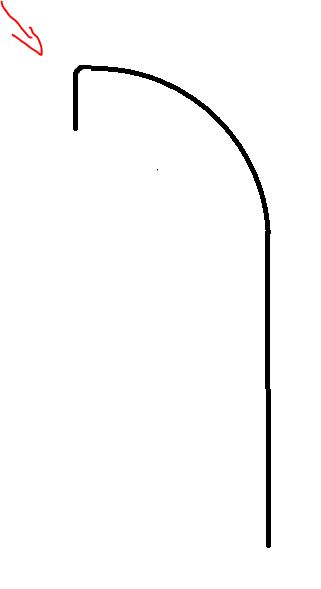
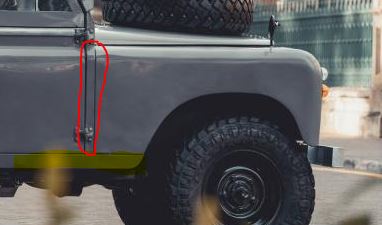
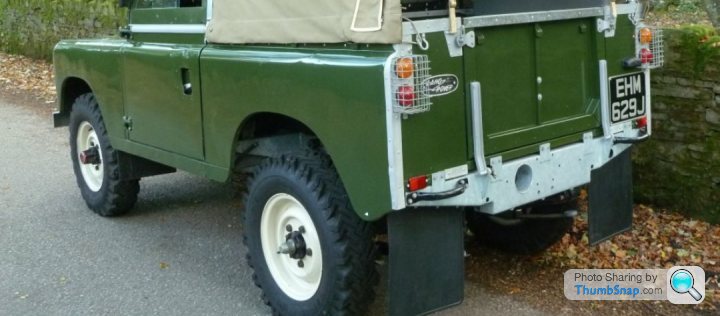
When I originally drew the car I hadn't really looked at the shape properly! So the front wing on the real thing is like this:
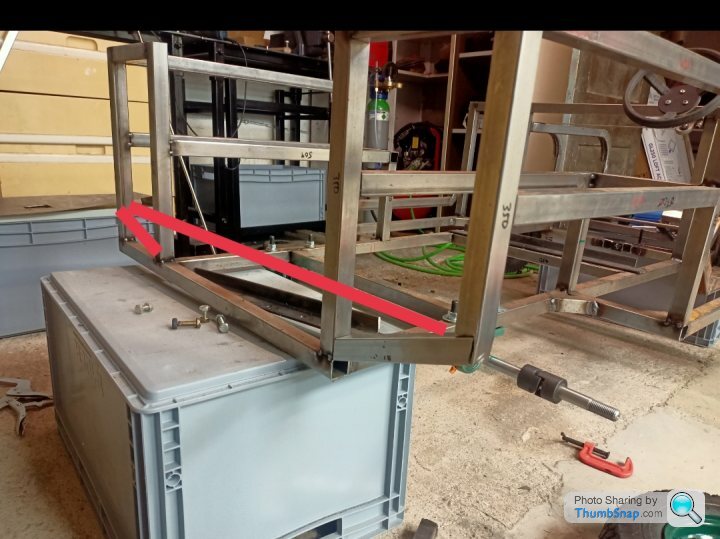
So my plan is to do the following:
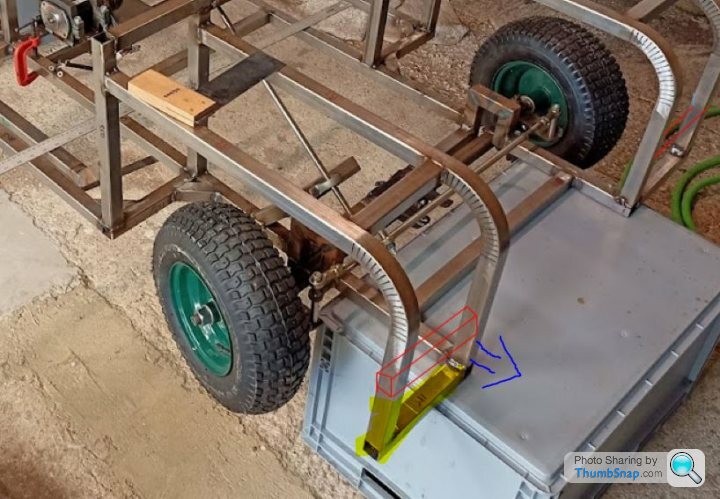
The highlighted yellow will disappear. The red will become a new box section. The blue arrow is where I will mount the front bumper. It will help the look and help with ground clearance. You cannot lose, unless you are the poor sod making the changes.
Wing would end up something like this:

Over and out.
So I contracted Covid, which meant some isolation time.
Half the garage roof and lights done;
Obviously the end I want to work in, hasn't been done
My mate from work turned the rear axle. We used 304SS so hopefully it won't rust and even if it does it will still rotate in the pillar bearings. Loosely positioned here.
Some eyeball and some well recognised "to the nearest 5mm measurements" and its bolted down. The pillar bearings even have a grease nipple, Phwooar! Lets be honest, those grease nipple caps aren't coming off in my lifetime. Also you might notice that its going to have about 3/4 of an inch rake between front and rear. If you could be so kind as to not mention it, or else I will tell you I was a redbull engineer and I meant it like that.
The downside of isolation is that you have to use the material at hand, and as most of my material is at work (near the chop saw!) I made do for the motor mount.
Clearance hole for the chain guesstimated, because you guessed it, the chain and motor sprocket is at work too! The angle iron has also been drilled out at 10mm and I will use 4 matching 8mm bolts in time. This allows a reasonable amount of travel in X and Y to set the chain tension and position in Y. Basically to account for many, many build issues! The axle sprocket has been drilled centrally but I haven't cross drilled the axle yet.
The motor has been positioned there so it is hidden (by the drivers bench seat) in the future. I will probably hinge that so I can lock/unlock the motor using the yellow lever.
At that point (about 45 minutes in) I had run out of stuff to do. So, lets make lots of grinding dust and molest the dummy wing some more! I just got a very very loose shape by hand drawing the wheel arch cut out on. This is not the real wing....I repeat, this is not the real wing, until it becomes the real wing due to laziness.
With the radius at the top of the LR wings, the panels are going to be spaced off the chassis by about 1".
When I originally drew the car I hadn't really looked at the shape properly!
So the front wing on the real thing is like this:So my plan is to do the following:
The highlighted yellow will disappear. The red will become a new box section. The blue arrow is where I will mount the front bumper. It will help the look and help with ground clearance. You cannot lose, unless you are the poor sod making the changes.
Wing would end up something like this:
Over and out.
Nice Cobain. I wonder if you could slip a bit of 10mm foam behind the vinyl to give it some depth. Mind you, the original cars probably didn'd have nice touches like that!
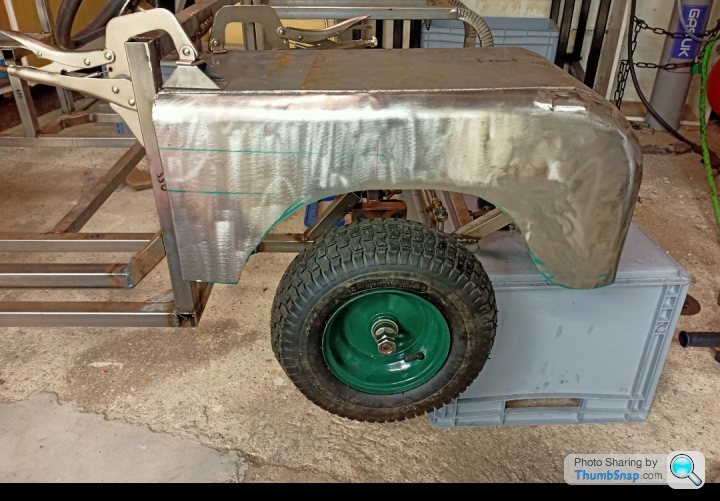
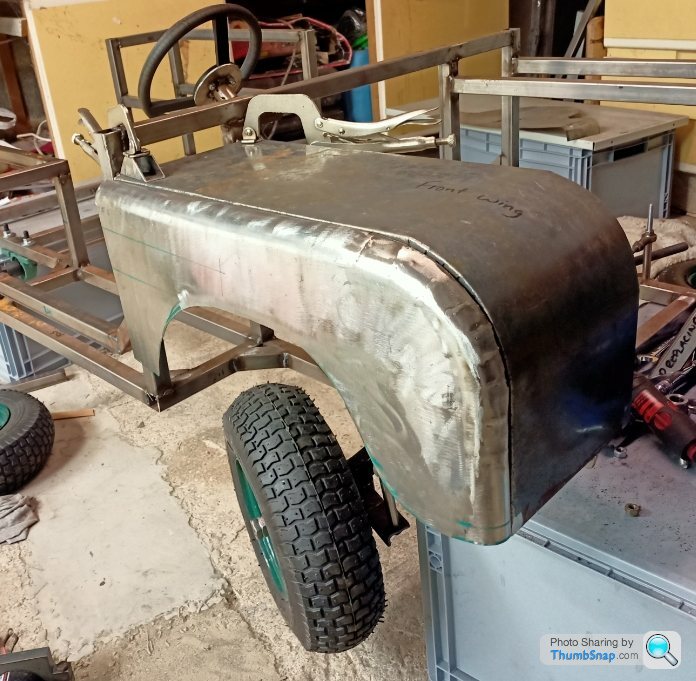
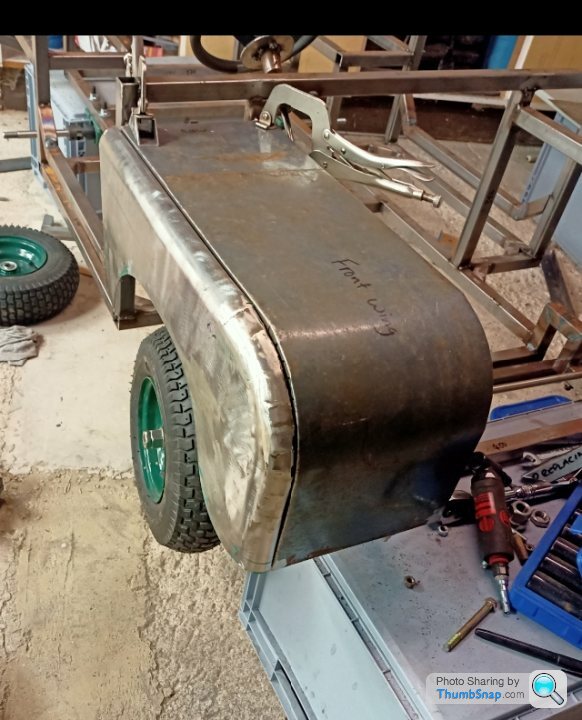
I did a bit more with the dummy wing, which is soon to become the real wing...
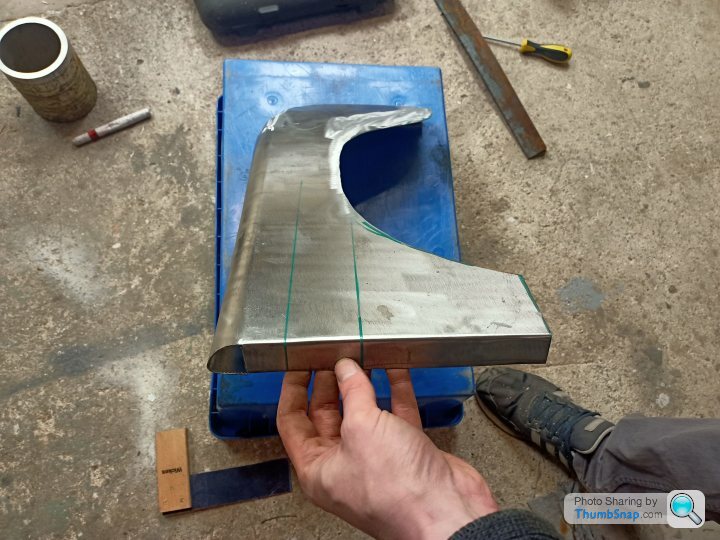
I have created a return on both mounting faces. This will give it a more authentic look rather than two raw edges of sheet metal joining.
I also reshaped the wheel cut out too. There are some differences to the original but that was mainly because I couldn't put the metal back that I had already chopped. Either way, I think it looks a bit better.
A bit of filler required....
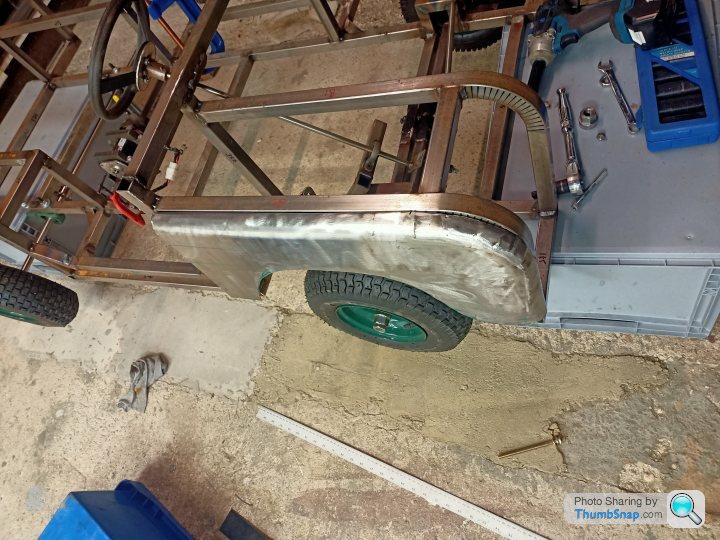
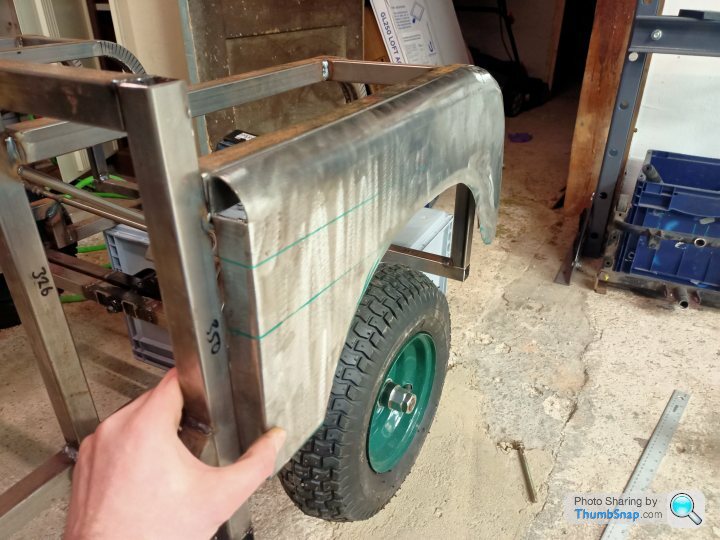
The various returns have stiffened up the panel nicely. I will probably weld on a wheel arch return lip...one day. I also need to trim the front cross member back as described in a previous post. The light in the garage and warmer nights are giving me more enthusiasm.
The yellow highlighted part will be a separate sill type panel, as will the bit circled in Red.
I did a bit more with the dummy wing, which is soon to become the real wing...
I have created a return on both mounting faces. This will give it a more authentic look rather than two raw edges of sheet metal joining.
I also reshaped the wheel cut out too. There are some differences to the original but that was mainly because I couldn't put the metal back that I had already chopped. Either way, I think it looks a bit better.
A bit of filler required....
The various returns have stiffened up the panel nicely. I will probably weld on a wheel arch return lip...one day. I also need to trim the front cross member back as described in a previous post. The light in the garage and warmer nights are giving me more enthusiasm.
The yellow highlighted part will be a separate sill type panel, as will the bit circled in Red.
I did a bit more work on it this week.
I have adjusted the rear chassis to get a more authentic looking rear panel. The side in the foreground is done and the other side will be done to match shortly.
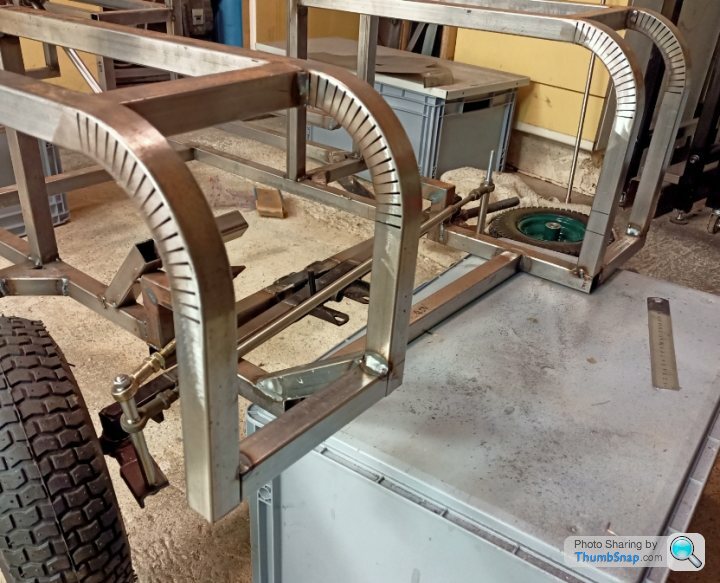
I also started forming the rear wheel arches at the end of the day yesterday. First I put on the 90 degree fold that will clamp to the chassis and then tried to roll it around the tube (former).
Holy molies, it was difficult. Across that length it really does have some strength. I got the map gas out and warmed it up and it was slightly easier. I was in the workshop alone so couldn't get any help to pull it around whilst giving it a tickle with the hammer. Short story is that I cant get it to stay tight to the former as the material springs back. I changed the former down to 40mm and the result was similar. On my own I got to the limit of force I could apply. I have brought both of them home to check how they compare to the front radius. If there is a difference I could correct/blend it on the B pillar radius or I could man up and take it back and get one of the boys to lend some muscle. I didn't take any photos but you can imagine what it looks like.
I also guillotined and folded up the returns on both B pillars and the front bonnet/wing tops. I'll have to snip the returns when I fold that around the chassis as I don't have a shrinker.
I've ordered a super cheap air nibbler to cut the wheel arches on the rear. I wonder if it will survive a couple of panels...
I also discovered a cock up. Well actually I didn't discover it, my much smarter brother and dad popped around the other day and I was showing them progress on it. Being inquisitive types they picked up the mobility scooter rear axle and discovered it isn't just a differential, but actually a gearbox too. so it's approximately 7/1 which means I need a much bigger sprocket on the axle. I can't believe I didn't check!
That means the following
1) bin existing sprockets
2) buy new sprockets
3) machine adapter for new sprocket as ID is to big for my machined axle
4) move motor outbound as sprocket is going to be in wheel arch well so I don't lose floor height.
1 step forward and 4 back. Ha. It'll still be ready for Christmas...
I have adjusted the rear chassis to get a more authentic looking rear panel. The side in the foreground is done and the other side will be done to match shortly.
I also started forming the rear wheel arches at the end of the day yesterday. First I put on the 90 degree fold that will clamp to the chassis and then tried to roll it around the tube (former).
Holy molies, it was difficult. Across that length it really does have some strength. I got the map gas out and warmed it up and it was slightly easier. I was in the workshop alone so couldn't get any help to pull it around whilst giving it a tickle with the hammer. Short story is that I cant get it to stay tight to the former as the material springs back. I changed the former down to 40mm and the result was similar. On my own I got to the limit of force I could apply. I have brought both of them home to check how they compare to the front radius. If there is a difference I could correct/blend it on the B pillar radius or I could man up and take it back and get one of the boys to lend some muscle. I didn't take any photos but you can imagine what it looks like.
I also guillotined and folded up the returns on both B pillars and the front bonnet/wing tops. I'll have to snip the returns when I fold that around the chassis as I don't have a shrinker.
I've ordered a super cheap air nibbler to cut the wheel arches on the rear. I wonder if it will survive a couple of panels...
I also discovered a cock up. Well actually I didn't discover it, my much smarter brother and dad popped around the other day and I was showing them progress on it. Being inquisitive types they picked up the mobility scooter rear axle and discovered it isn't just a differential, but actually a gearbox too.
so it's approximately 7/1 which means I need a much bigger sprocket on the axle. I can't believe I didn't check!That means the following
1) bin existing sprockets
2) buy new sprockets
3) machine adapter for new sprocket as ID is to big for my machined axle
4) move motor outbound as sprocket is going to be in wheel arch well so I don't lose floor height.
1 step forward and 4 back. Ha. It'll still be ready for Christmas...
Cobain, cad skills look well in advance of mine. I'm afraid that's not much of a compliment! 
Have you got a build thread on here, what are your plans, where about in the job are you?
At some point in the next 6 months can you take a photo of the door mechanism on your S3? I'm debating whether to do something like it, or have a replica (or not even have a replica!) and a slide bolt hidden in the cabin.
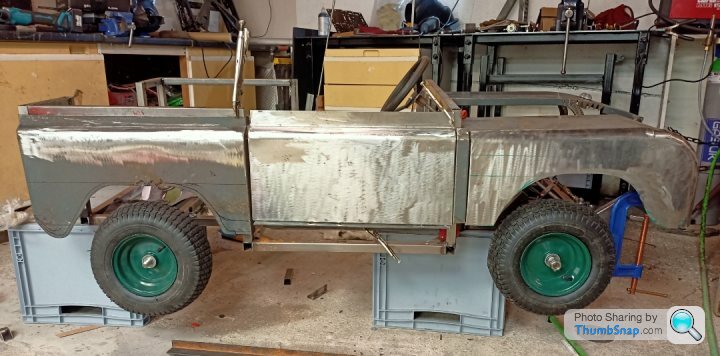
I popped into the garage for a couple of hours this evening. Mission was to try and get the bonnet/wing in place.
Start with these;

Cut incisions into wing return and create return at the bottom of the panel:
Weld and grind:
Modify chassis to bring leg upwards. Rh side modified Lh still to do:
Test fit some panels;
Could be worse
I'm almost pleased with myself!
Start with these;
Cut incisions into wing return and create return at the bottom of the panel:
Weld and grind:
Modify chassis to bring leg upwards. Rh side modified Lh still to do:
Test fit some panels;
Could be worse
I'm almost pleased with myself!
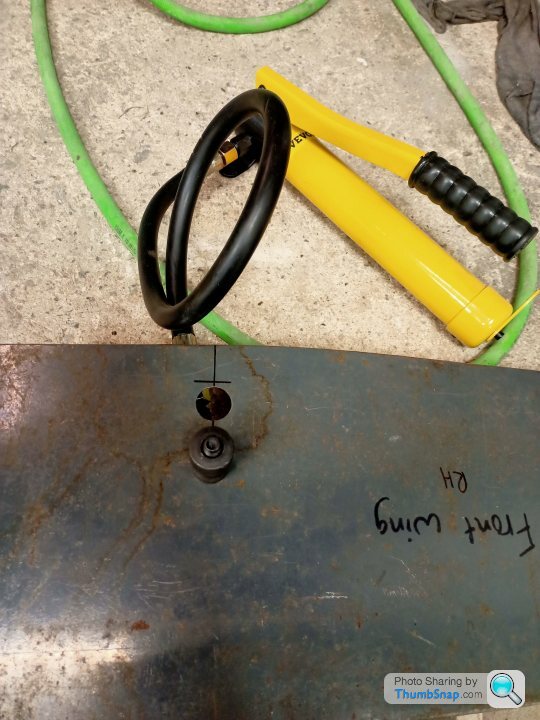
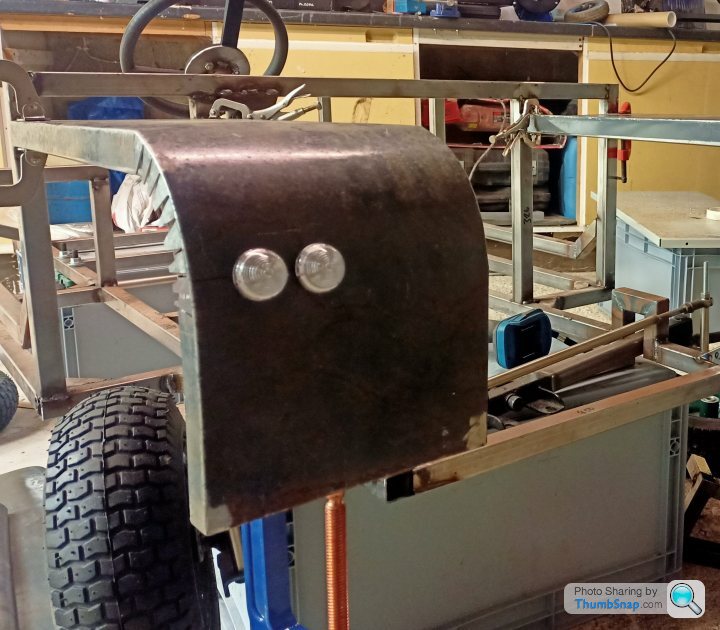
A little bit more progress last night.
Cut indicator holes to fit £1 eurocarpart specials. The hydraulic tool makes light work of 0.8mm steel.
Started work making the rear panels up.

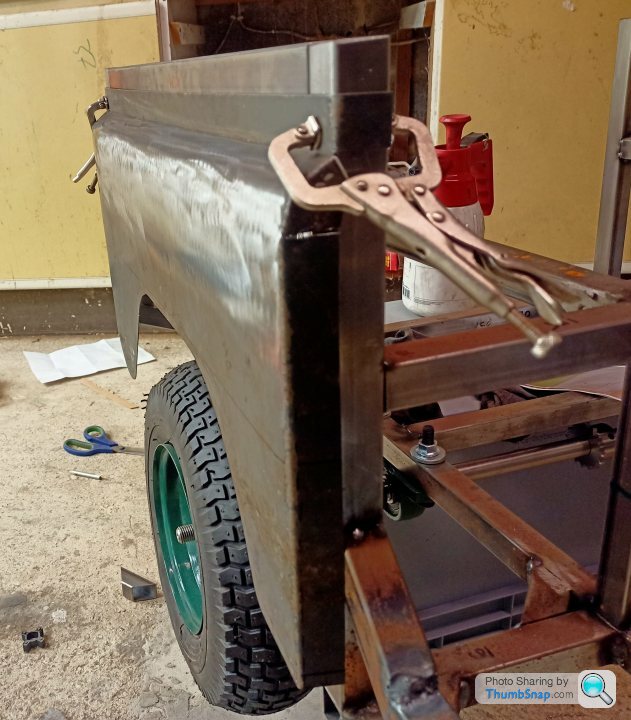
The returns have pulled the panel together nicely. I used the panel from the 40mm tool I had made previously. With some rivets it will hold a nice (enough) shape. I ran out of time to put the bottom wheel arch return lip on. I think I also need to lift up the front edge about 20mm, but need the door made to check that...
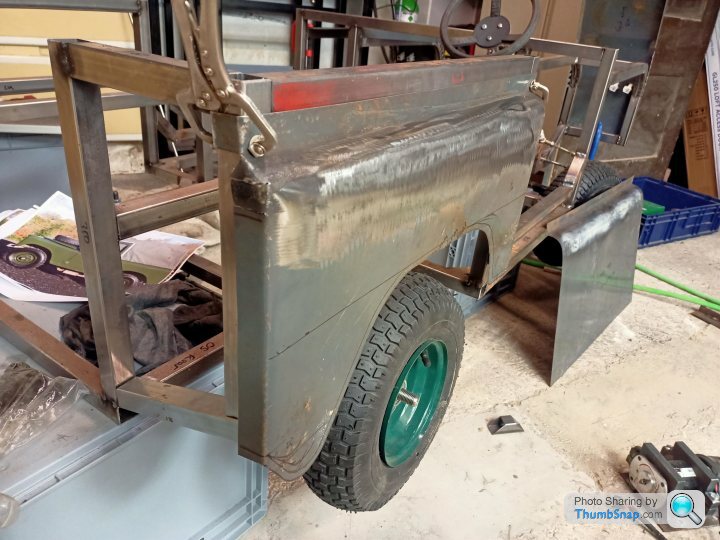
If I was doing the panel again, I would have put a 40mm deep straight at the top, so that I can overlap the aluminium cover piece (1" 90 angle). Rather than buy 1" Alu angle, i'll make that myself, so I can have a 30-35mm leg so it overlaps my panel. Or I could drop the upstands down by 1"...
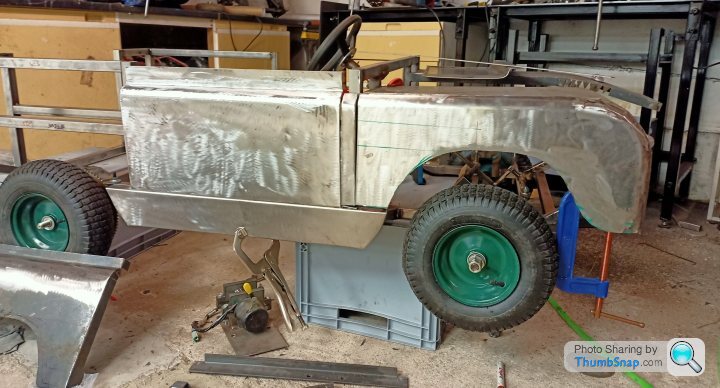
Its starting to look like a thing now.
I have ordered a new large sprocket for the rear axle so I should get that in a week or so. That needs an adapter turned to mount to my axle. Better bring some nice nom nom into work to tempt the machinist.
Cut indicator holes to fit £1 eurocarpart specials. The hydraulic tool makes light work of 0.8mm steel.
Started work making the rear panels up.
The returns have pulled the panel together nicely. I used the panel from the 40mm tool I had made previously. With some rivets it will hold a nice (enough) shape. I ran out of time to put the bottom wheel arch return lip on. I think I also need to lift up the front edge about 20mm, but need the door made to check that...
If I was doing the panel again, I would have put a 40mm deep straight at the top, so that I can overlap the aluminium cover piece (1" 90 angle). Rather than buy 1" Alu angle, i'll make that myself, so I can have a 30-35mm leg so it overlaps my panel. Or I could drop the upstands down by 1"...
Its starting to look like a thing now.
I have ordered a new large sprocket for the rear axle so I should get that in a week or so. That needs an adapter turned to mount to my axle. Better bring some nice nom nom into work to tempt the machinist.
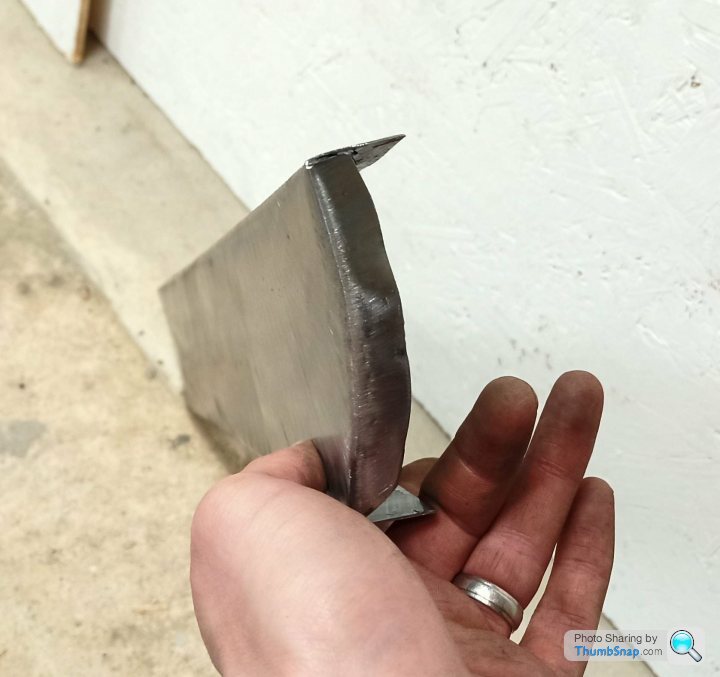
Just got in from the garage. One door panel skin done.

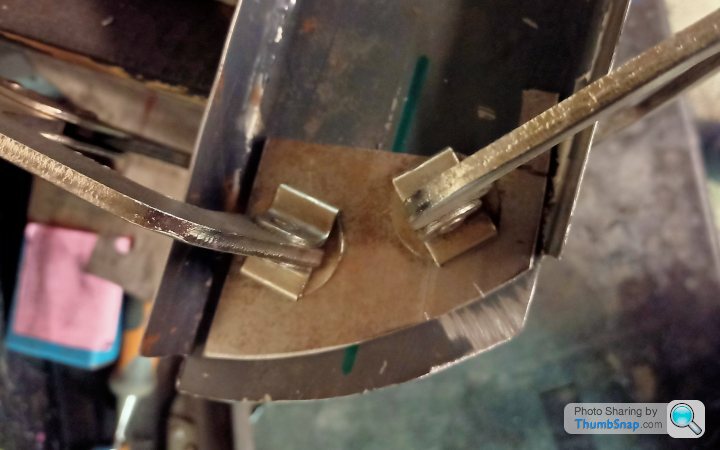
I used angle iron to hammer form the edge round on itself. Get a nice 90 on it, but keep checking your angle iron isn't wondering down the panel. Little pen marks help
Some little finishing touches with some cold chisel
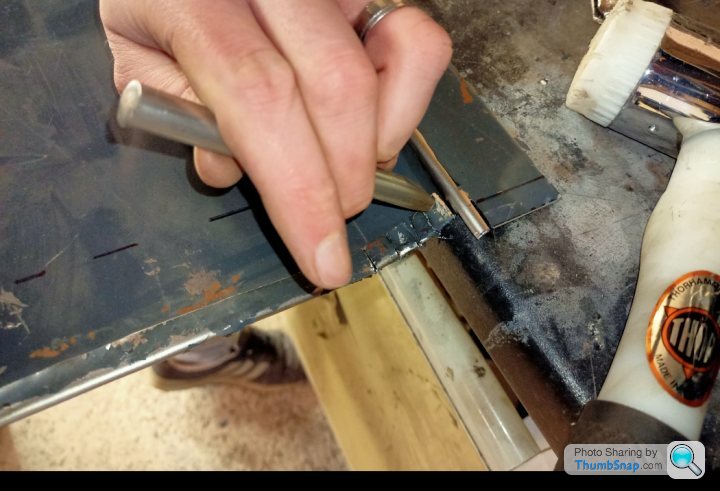
Wolah!
I think the real doors are similar with the edges folded around on themselves.
I couldn't resist a fake test fit. Many many issues and alignment to sort but it's looking more like a thing. Bodywork guys, please look away now and don't kill me too hard. Forgive my sins, for I have never done this before.
The b pillar piece needs shrinking in half to get everything in the right sort of place. Easier to start with the fresh piece. Good job I'd already made two up to the original size! The rear panel needs trimming on the front edge, and perhaps the whole cutout needs shifting up a bit.
Still enjoying it..
I used angle iron to hammer form the edge round on itself. Get a nice 90 on it, but keep checking your angle iron isn't wondering down the panel. Little pen marks help
Some little finishing touches with some cold chisel
Wolah!
I think the real doors are similar with the edges folded around on themselves.
I couldn't resist a fake test fit. Many many issues and alignment to sort but it's looking more like a thing. Bodywork guys, please look away now and don't kill me too hard. Forgive my sins, for I have never done this before.
The b pillar piece needs shrinking in half to get everything in the right sort of place. Easier to start with the fresh piece. Good job I'd already made two up to the original size!
The rear panel needs trimming on the front edge, and perhaps the whole cutout needs shifting up a bit.Still enjoying it..
Sounds familiar to my visits to Solihull. Taking the exact measurement report of the supposedly bad fitting part with me, only to find the part that it mated to was in completely the wrong position. Whatever gets fitted last must be the problem... 

I remember another visit to a premium UK car maker. We were being shown around the facility and about 3 guys were pushing a car onto a 2 poster ramp. It was the rework ramp, so presumably needed something retrofitting, repairing etc. So they push it on the ramp with one guy pushing on the A pillar with the door open and a couple at the back. You guessed it, the open door makes fairly heavy contact with the 2 poster ramp pillars. Doh! Good job it was in the right place for some more rework
I made a bit more progress last night. I made up another door panel and made this one about 2mm narrower as one side of the chassis is slightly narrower.
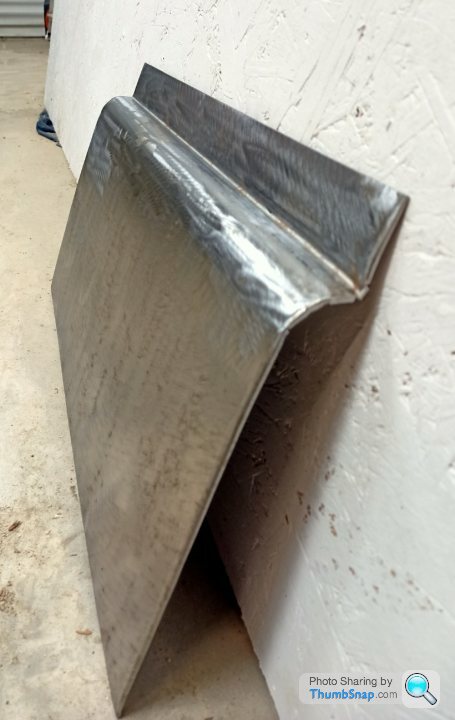
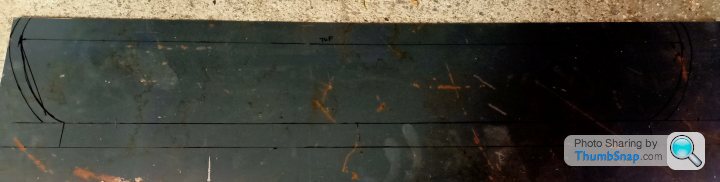
I also started on the sill panel. Start off with some offcut, drawing an approximate shape, leaving a 25mm return on the top and bottom. On the sides, the return is 10mm as this will eventually blend into the wheel arch returns which I want at about 10mm. Also because you are trying to lose material in this area you want it as small as possible;
Cut that out with a disc cutter and then form the upper and lower 25mm returns using the angle iron trick shown before. Normally you would do these on a folder, but I don't have one at home.
Create a quick 3mm edge to form the side returns on. A carefree quality attitude meant I could use the same tool to do the front and rear edge;
As you hammer the return on and you need to shrink the metal to stop it bunching. In doing this, you end up curving the panel as you are failing to lose the material. So a bit of back and forth, prioritising the face of the panel and accepting the return will be what it is, gets you this;
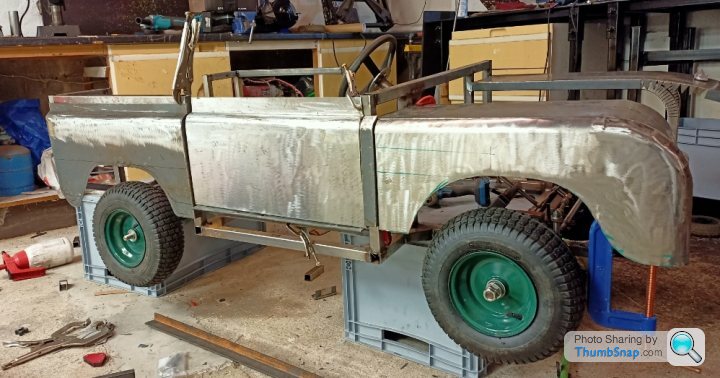
Then a trail fit at about 11pm last night when you are knackered results in this:
I had to remove the rear quarter panel because I hadn't trimmed that back to suit yet. It will fit up better in real life, but I don't have any mounting points set yet, so you can see various packers and I was running out of clamps/magnets/suitable clamping points.
The sill panel is a bit deep compared to the real thing, but this is the path I ended up down. Mainly due to the starting from the front wing panel. You make a mistake there and you carry it to the door, that gets carried to the rear quarter. I can live with it!
Still on target for their 17th birthday. I've got 12 years to go, or 14 if I want to be fair to the young one.
I remember another visit to a premium UK car maker. We were being shown around the facility and about 3 guys were pushing a car onto a 2 poster ramp. It was the rework ramp, so presumably needed something retrofitting, repairing etc. So they push it on the ramp with one guy pushing on the A pillar with the door open and a couple at the back. You guessed it, the open door makes fairly heavy contact with the 2 poster ramp pillars. Doh! Good job it was in the right place for some more rework
I made a bit more progress last night. I made up another door panel and made this one about 2mm narrower as one side of the chassis is slightly narrower.
I also started on the sill panel. Start off with some offcut, drawing an approximate shape, leaving a 25mm return on the top and bottom. On the sides, the return is 10mm as this will eventually blend into the wheel arch returns which I want at about 10mm. Also because you are trying to lose material in this area you want it as small as possible;
Cut that out with a disc cutter and then form the upper and lower 25mm returns using the angle iron trick shown before. Normally you would do these on a folder, but I don't have one at home.
Create a quick 3mm edge to form the side returns on. A carefree quality attitude meant I could use the same tool to do the front and rear edge;
As you hammer the return on and you need to shrink the metal to stop it bunching. In doing this, you end up curving the panel as you are failing to lose the material. So a bit of back and forth, prioritising the face of the panel and accepting the return will be what it is, gets you this;
Then a trail fit at about 11pm last night when you are knackered results in this:
I had to remove the rear quarter panel because I hadn't trimmed that back to suit yet. It will fit up better in real life, but I don't have any mounting points set yet, so you can see various packers and I was running out of clamps/magnets/suitable clamping points.
The sill panel is a bit deep compared to the real thing, but this is the path I ended up down. Mainly due to the starting from the front wing panel. You make a mistake there and you carry it to the door, that gets carried to the rear quarter. I can live with it!
Still on target for their 17th birthday. I've got 12 years to go, or 14 if I want to be fair to the young one.
The grill looks great cobain, smashing work!
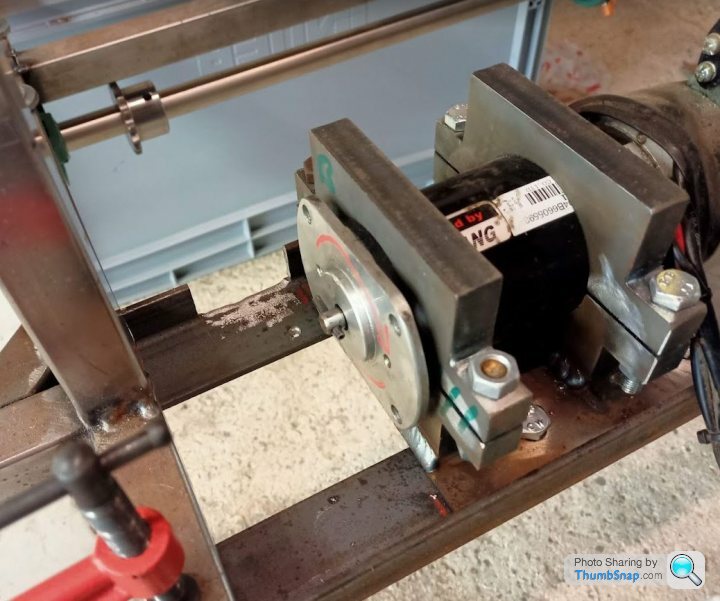
I have been really lazy the last couple of weeks and not done anything of note. I did get the machinist at work to nip a bit off the jaw coupling so they fit over the shaft along with the spider rubber. Before they were a touch tight.
I also ordered my larger sprocket, machined up an axle adapter and welded it on.
Test fit;
Jaw coupling mechanism, you can just about make out the rubber spider piece;
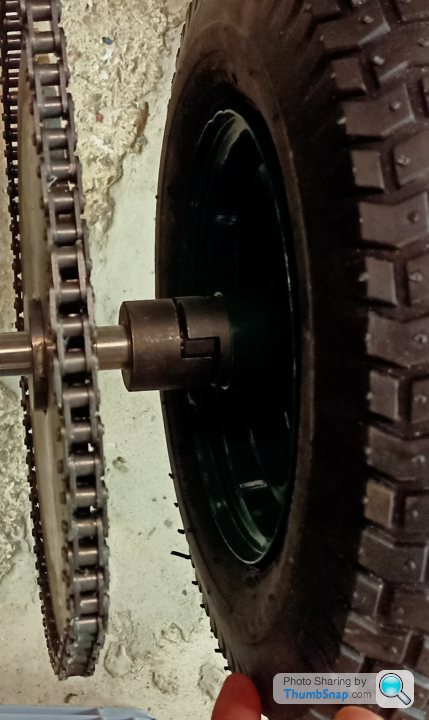

One side of the jaw coupling will be welded to the axle, the other side is pressed into the wheel rim and will be welded to that, although it is a very tight fit in there at the moment. I pressed it in.
With the correct placement of the jaw coupling on the axle, you'll push the wheel on, ensuring engagement into the spider gear and secure with a centre wheel nut. I'll need a little custom washer on the outside of the wheel to ensure the wheel remains central (although the jaw coupling will probably keep it pretty square).
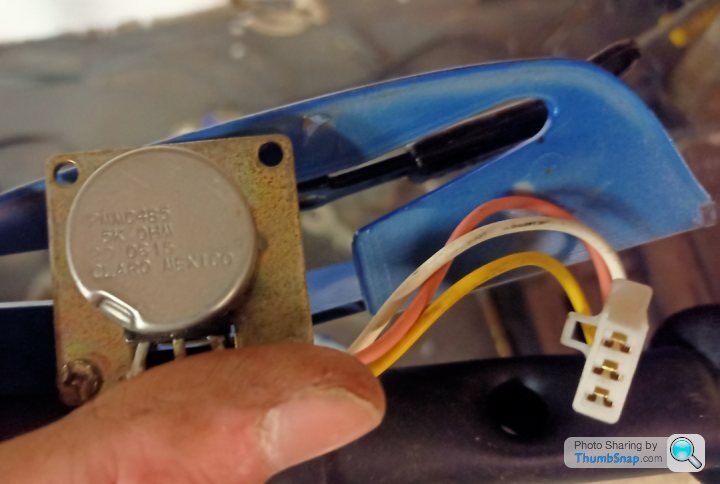
I stripped out the wiring loom from the mobility scooter and labeled up a few things.
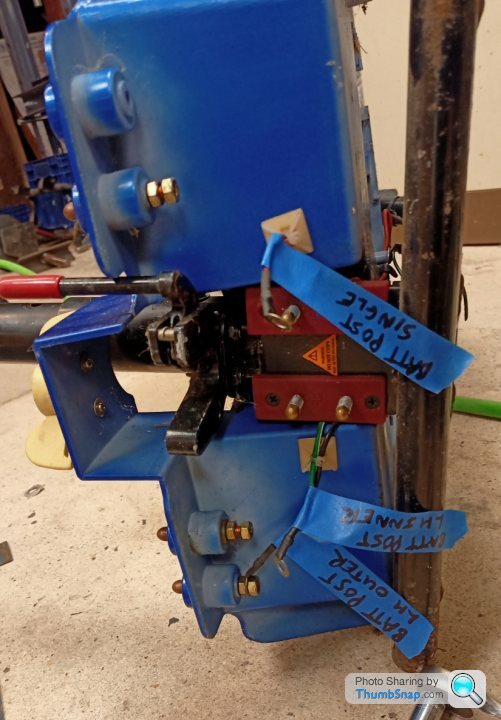
Electronics are not my forte, so I'll probably call on my brother for help with the next bit.
The original scooter had rocker lever that you pushed in one direction for forwards and the other way for reverse. There was also a seperate twist knob for controlling overall speed.
I would like to retain the twist knob for overall speed, depending on who is using it, but have a single accelerator peddle for the 'throttle' and a toggle switch for forward or reverse. How hard can it be? I'm sure they'll figure it out. Ha.
I have been really lazy the last couple of weeks and not done anything of note. I did get the machinist at work to nip a bit off the jaw coupling so they fit over the shaft along with the spider rubber. Before they were a touch tight.
I also ordered my larger sprocket, machined up an axle adapter and welded it on.
Test fit;
Jaw coupling mechanism, you can just about make out the rubber spider piece;
One side of the jaw coupling will be welded to the axle, the other side is pressed into the wheel rim and will be welded to that, although it is a very tight fit in there at the moment. I pressed it in.
With the correct placement of the jaw coupling on the axle, you'll push the wheel on, ensuring engagement into the spider gear and secure with a centre wheel nut. I'll need a little custom washer on the outside of the wheel to ensure the wheel remains central (although the jaw coupling will probably keep it pretty square).
I stripped out the wiring loom from the mobility scooter and labeled up a few things.
Electronics are not my forte, so I'll probably call on my brother for help with the next bit.
The original scooter had rocker lever that you pushed in one direction for forwards and the other way for reverse. There was also a seperate twist knob for controlling overall speed.
I would like to retain the twist knob for overall speed, depending on who is using it, but have a single accelerator peddle for the 'throttle' and a toggle switch for forward or reverse. How hard can it be? I'm sure they'll figure it out. Ha.
Cobain, many thanks as always and it'll probably make more sense when I'm looking at the wiring again. I will probably buy the switch and then get my brother over for a tactical beer or 5 in the garage. Ha.
HD;
Yes, it'll be ok.
20mm solid, I will suck it and see, although I think it will be fine, and it's not too hard to add another pillar bearing like previously eluded to, albeit for slightly different reasons.
As previously mentioned, the motor mount is oversized, allowing for adjustment in X and Y.
I'm sure more dramas will occur along the way! Part of the fun....I think
Nice Cobain, Have you got sheet metal rollers at your work? I'm still debating if I could create a folded return on a bonnet panel. The two leading edges in the front corners will probably make it a pipe dream.
Thanks Jenny, I think we will have to wait to see if its epic, more of a journey into the unknown!
Last night I cut the chain to length, welded the motor mount in and got it roughly in position. I haven't welded or cross drilled the sprocket to the axle just yet. I jury rigged up the motor, battery pack and controller etc. First pull and push of the wig wam got it spinning in both directions nicely! I've yet to do the switch mod, I don't want to get carried away with progress. Small milestone ticked off.
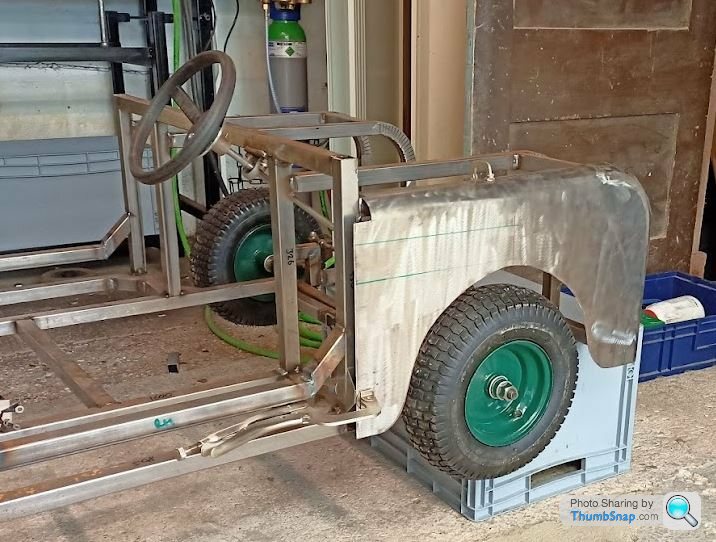
I also mounted the seat uprights and made sure there is just enough room for my size 10s in between the seat upright and bulkhead. We can't let the kids have all the fun...
Thanks Jenny, I think we will have to wait to see if its epic, more of a journey into the unknown!
Last night I cut the chain to length, welded the motor mount in and got it roughly in position. I haven't welded or cross drilled the sprocket to the axle just yet. I jury rigged up the motor, battery pack and controller etc. First pull and push of the wig wam got it spinning in both directions nicely! I've yet to do the switch mod, I don't want to get carried away with progress. Small milestone ticked off.
I also mounted the seat uprights and made sure there is just enough room for my size 10s in between the seat upright and bulkhead. We can't let the kids have all the fun...
Gassing Station | Scale Models | Top of Page | What's New | My Stuff