Airfix 1:72 Vulcan B.2
Discussion


curvature said:
Thanks for sharing this for two reasons, I'm a massive fan of the Vulcan but also used to build Tamiya kits back in the late 80's.
Not sure where you are based but there is a Vulcan, XM655, that you can visit at Wellesbourne airfield in Warwickshire.
https://xm655.com
It is currently the only original Vulcan that is serviceable. XH558 had lots of changes made to fit in with CAA regulations.
Thanks for that. The Airfix kit is based on XM594, currently on display at Newark Air Museum. I think there are a couple of kit errors (such as the missing middle windscreen wiper and the extra u/c locking bar on the main gear which wouldn't have been present on an active aircraft) which resulted from using that airframe as a reference. Anyway, I guess that's a good enough excuse to go and visit again (I'm just up the road in Sheffield).Not sure where you are based but there is a Vulcan, XM655, that you can visit at Wellesbourne airfield in Warwickshire.
https://xm655.com
It is currently the only original Vulcan that is serviceable. XH558 had lots of changes made to fit in with CAA regulations.
r159 said:
dr_gn said:
curvature said:
Thanks for sharing this for two reasons, I'm a massive fan of the Vulcan but also used to build Tamiya kits back in the late 80's.
Not sure where you are based but there is a Vulcan, XM655, that you can visit at Wellesbourne airfield in Warwickshire.
https://xm655.com
It is currently the only original Vulcan that is serviceable. XH558 had lots of changes made to fit in with CAA regulations.
Not sure where you are based but there is a Vulcan, XM655, that you can visit at Wellesbourne airfield in Warwickshire.
https://xm655.com
It is currently the only original Vulcan that is serviceable. XH558 had lots of changes made to fit in with CAA regulations.
Thanks for that. The Airfix kit is based on XM594, currently on display at Newark Air Museum. I think there are a couple of kit errors (such as the missing middle windscreen wiper and the extra u/c locking bar on the main gear which wouldn't have been present on an active aircraft) which resulted from using that airframe as a reference. Anyway, I guess that's a good enough excuse to go and visit again (I'm just up the road in Sheffield).
Tried flatting and re-painting the intakes tonight, but still finding it impossible to get a good finish. Light coats cause a sandpaper finish with the paint drying as it hits the furthest recesses of the pipes, any thicker coats cause runs. Factor in that white doesn’t cover too well and it’s very frustrating.
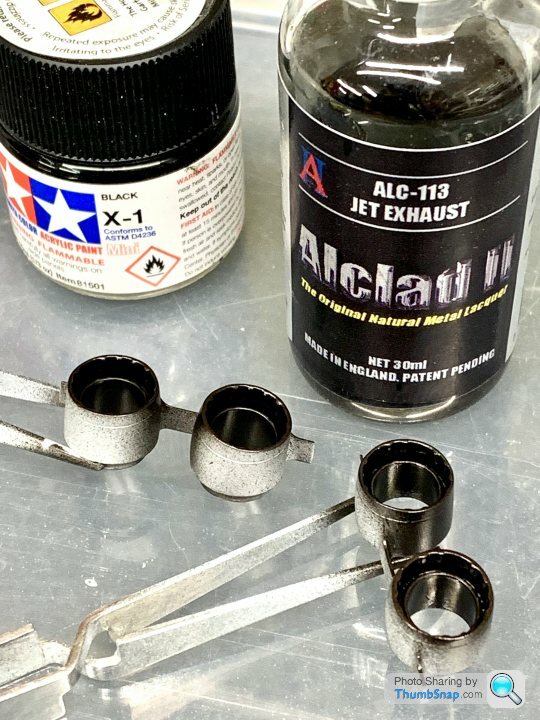
Anyway, got the insides of the jet pipes primed with gloss black, followed by Alclad “Jet Exhaust”:
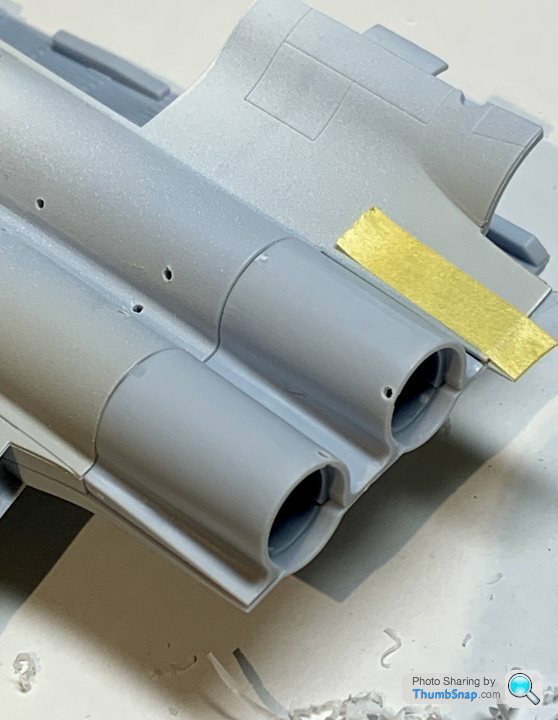
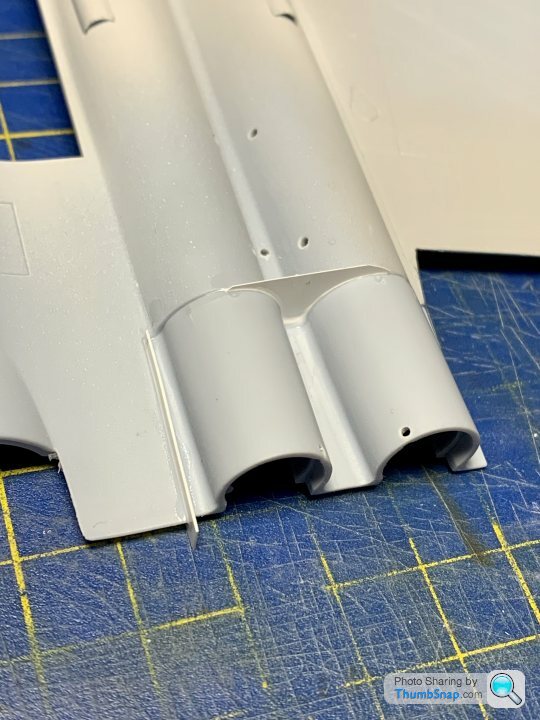
Still plenty to do to get them looking right, but I want to do all the weathering on the pipes at once. With that in mind, I had a look again at the wing halves, where the exhausts fit onto the fairings. Not a great fit:

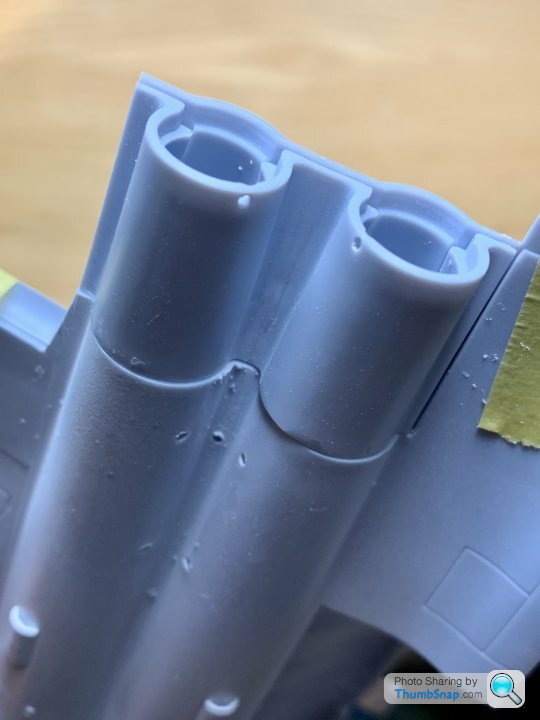
And even after a load of scraping and flatting of the mating surfaces, it’s still going to be a challenge to get all that seamlessly blended together:

The other side is a bit better:
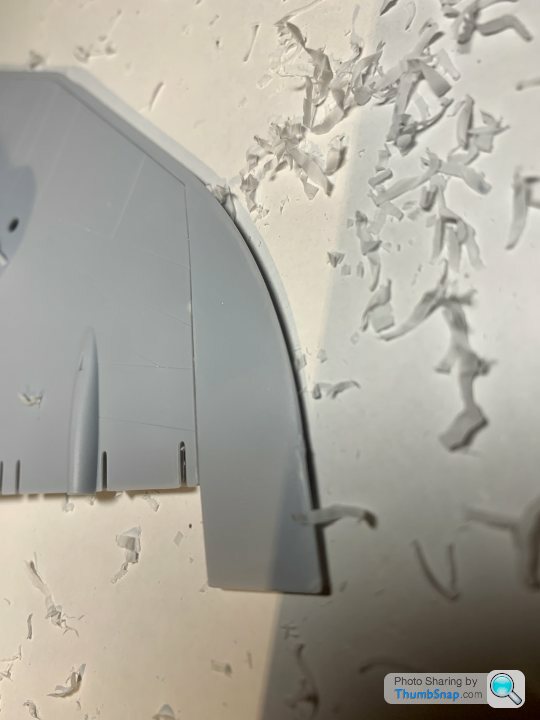
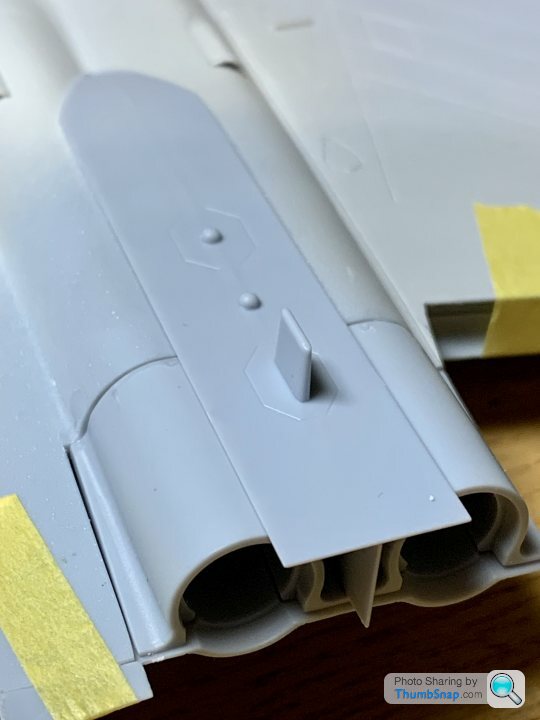
The wing tip undersides also stand proud where they mate together:

But after a hell of a lot of scraping and flatting:

They now fit quite well:
So feels like more shavings made than visible progress, and more to come, but I’ll get there in the end.
Anyway, got the insides of the jet pipes primed with gloss black, followed by Alclad “Jet Exhaust”:
Still plenty to do to get them looking right, but I want to do all the weathering on the pipes at once. With that in mind, I had a look again at the wing halves, where the exhausts fit onto the fairings. Not a great fit:
And even after a load of scraping and flatting of the mating surfaces, it’s still going to be a challenge to get all that seamlessly blended together:
The other side is a bit better:
The wing tip undersides also stand proud where they mate together:
But after a hell of a lot of scraping and flatting:
They now fit quite well:
So feels like more shavings made than visible progress, and more to come, but I’ll get there in the end.
IJWS15 said:
Out of curiosity googled Blue Steel and there is one at the museum near Coventry airport.
Looks like it’s on a different trolley to the one I want unfortunately.Still struggling with the fit of various parts. The port side lower jet pipe end seems distorted. I’ve ended up deviating from the instructions, because I don’t think it’ll be possible to fit this part later without even worse mis-alignment than this best-fit:
It literally fits where it touches, so I’ve had to fill the gaps with plasticard, and liberally dosed with liquid cement:
I’ll have to cut, fill and flat it all to profile once fully cured. At least I remembered that there’s a fairing that covers up about half the mess, so not a total disaster:
What potentially is a disaster waiting to happen is the fuselage spine joint. The parts seem distorted, and can be just about wrestled into place - and only then using engineering clamps and locking forceps:
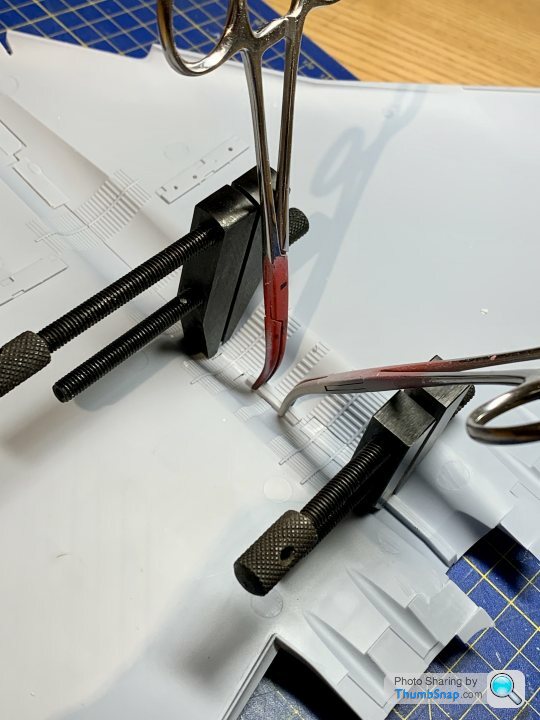
I’m concerned that if I now bond the join, it might spring apart at some point after painting, which would scrap the model.
If I flat the edges to fit without pressure, I’m concerned other parts such as the fin and bomb bay arches then won’t fit. There are two tabs visible in the bomb bay, with corrugation detail on them. Strange because it looks like they should be intentionally proud of the rest of the roof in that area. There are gaps all around them, and I’m not looking forward to filling and fettling them.
yellowjack said:
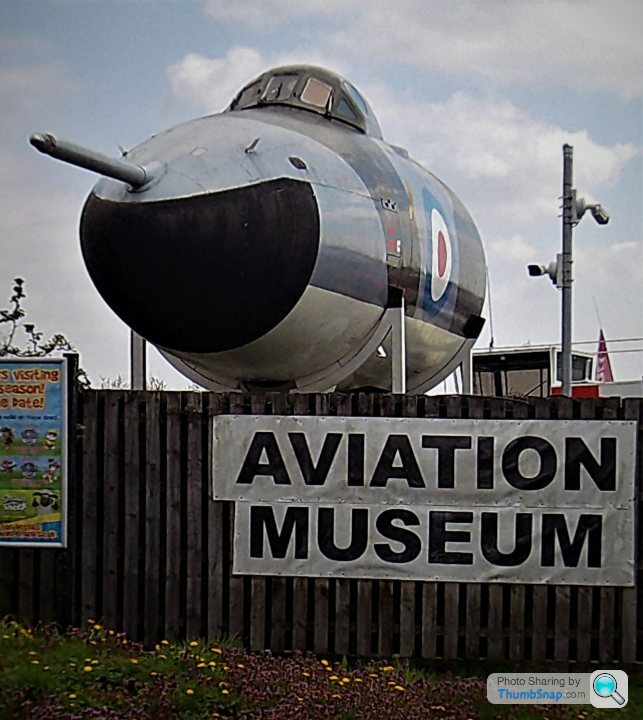
Not sure if this image is of any use to you. It's the nose section of Vulcan B.2MRR XH537 at Bournemouth Aviation Museum.
https://www.bamhurn.org/exhibits/avro-vulcan/
https://www.google.com/maps/@50.7759202,-1.843393,...
Edited by yellowjack on Thursday 6th January 23:36

edusa said:
Trevatanus said:
edusa said:
silly question but i feel someone will know the answer.Where do the intake covers get stored when the planes flying? Are they in the plane somewhere? THe RED things in the pictures.
Would be removed by ground crew and left at base.edusa said:
That makes sense i cant see them taking alot of space.
There's a box in the cockpit for the pitot covers etc, but I doubt enough room for the intake covers - even if they'd fit through the crew hatch. As you say, the bomb bay is huge, and the covers wouldn't take much room up I guess.Buzz84 said:
edusa said:
But that only works if they are coming back?I mean commercial planes would have to have an enormous stack of them at every airport for bad weather and other events.On a security note military planes, if you saw them being put in a hangar you know the trip will end back at base?
If a commercial plane ain't flying it isn't making money, so the model that most work on is to maximise the amount of time the aircraft in the air. so they are never around enough to use covers. When they do sit around for a bit they will normally be at the airlines home base or maintenance facility where the covers will be in the stores. (Ignoring pandemics and volcanoes - and then they would bung them in a van and send them out with a maintenance crew who will prep them for storage where ever they end up)
(hurricanes/tropical storms etc - they are normally known about in advance so airlines will cancel the flight and the aircraft wont fly in if there is a chance it wont get out again)
But on topic again - great work on the Vulcan, very impressive even if a little challenging. slightly worried that I bought my dad this kid for Christmas, what have i got him into!
(Massive vulcan fan, good with his hands but probably not done a airfix kit in an incredibly long time if at all...)
So after much fettling, I’m going to have to pause this one - I’ve worn out all my sanding sticks. I don’t think that’s happened before, and I’m still only on the minor panels…


Should get some replacements next week.
It’s as if the parts have distorted after coming out of the mould. I can spring them into position, but…come on this is a £60+ newly tooled kit. Not good.
Should get some replacements next week.
It’s as if the parts have distorted after coming out of the mould. I can spring them into position, but…come on this is a £60+ newly tooled kit. Not good.
Thanks.
I assume Airfix must be well aware of these kinds of issue; this kit is by no means an exception, in my experience. As long as people buy enough of them, I doubt things will change, and if they do change I’d expect a price increase.
Don’t get me wrong, it’ll look great when it’s finished, and is the best kit of the type out there anyway. It’s just I find flatting filler and re-profiling things and re-scribing panel lines a tedious part of the process. This rework is never perfect either, so it can spoil an otherwise very nice kit.
AW111 said:
dr_gn said:
So after much fettling, I’m going to have to pause this one - I’ve worn out all my sanding sticks. I don’t think that’s happened before, and I’m still only on the minor panels…
Should get some replacements next week.
It’s as if the parts have distorted after coming out of the mould. I can spring them into position, but…come on this is a £60+ newly tooled kit. Not good.
Is it possible to spring them into position and then warm them with a hot air gun to stress relieve them, or would that end up worse?Should get some replacements next week.
It’s as if the parts have distorted after coming out of the mould. I can spring them into position, but…come on this is a £60+ newly tooled kit. Not good.
MBBlat said:
dr_gn said:
No idea - I started watching some build videos on YouTube, but they’re in about 400 parts, so I couldn’t be bothered to finish them.
Florey models did a 5 part build series and didn’t seem to find the problems your experiencing The amount of waffle that seems to happen in certain, usually British or Australian, YouTubers to stretch a simple build into a multi part series is amazing. The Yanks and Eastern Europeans seem to be able to convey the same build in one or two videos.
I suppose I could have got an early or pre-production version - I’ve not seen anyone else have issues with faulty windscreens either for example.
Hopefully you can see the issues with mine fairly clearly from the photos I’ve posted.
CanAm said:
dr_gn said:
Airfix just announced a new-tool 1:24 Spitfire for 2022. I hope there’s something smaller as well.
£94.99 though…just within my voucher budget
And it's a Mk.IXc £94.99 though…just within my voucher budget
Edited by dr_gn on Sunday 9th January 12:14
 If it's as good as the computer renderings, it should be pretty good.
I think we'd all like to see you have a go at this one, with no holds barred when it comes to extras.
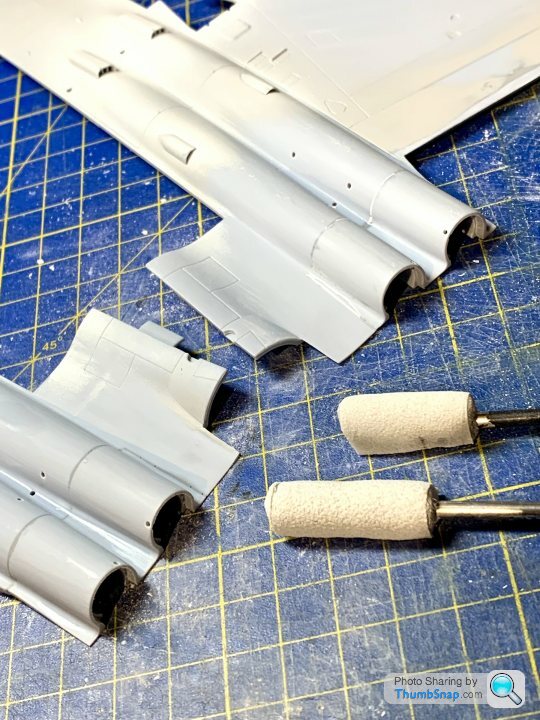
New consignment of sanding sticks arrived today, so was able to start blending the filler between the exhaust inserts and the wings. I also made some intake sanders from Tamiya sanding sponge glued to stainless tubes. They worked on these too:
After a guide coat, only a few small gaps remained. Still needs some plastic card sticking to various edges to get the exhaust ends fitting well.
I decided to strip the intake paint and start again. The IPA also strips filler, so I had to re-daub the gaps again. Hopefully this time around, I can get a run-free finish:
Got the intakes flatted again:

But for some reason a guide coat still showed some imperfections, so more work needed.
Then the exhaust inserts. Re-scribed all the panel lines that were lost during correcting the fit. Used Dymo tape as a guide as usual. I’m glad that the central trough between the fairings is covered - tricky to scribe in there.

I offset the new scribing a fraction into new plastic:

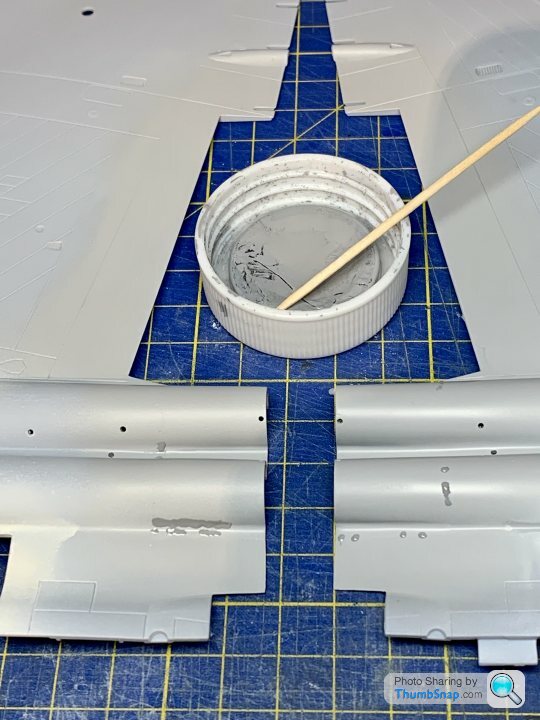
After a coat of primer, a few dots showed up along the filler, so put some surfacer on with a cocktail stick:

I’ll flat that back tomorrow, re-scribe the lines to keep them sharp, then -hopefully - a final coat of white primer.
I hope after all that there should indeed be panel lines there! It certainly looked a bit bland all smooth.
But for some reason a guide coat still showed some imperfections, so more work needed.
Then the exhaust inserts. Re-scribed all the panel lines that were lost during correcting the fit. Used Dymo tape as a guide as usual. I’m glad that the central trough between the fairings is covered - tricky to scribe in there.
I offset the new scribing a fraction into new plastic:
After a coat of primer, a few dots showed up along the filler, so put some surfacer on with a cocktail stick:
I’ll flat that back tomorrow, re-scribe the lines to keep them sharp, then -hopefully - a final coat of white primer.
I hope after all that there should indeed be panel lines there! It certainly looked a bit bland all smooth.
Another day, another session of filling sink marks. This time between the engine bulge pairs at the trailing edge of the wings:

Hopefully nearing the end of intake fettling. I’ve used white Milliput to try and eliminate the remaining depressions around the nose of the splitters:

Also put some surfacer along the missile joint line:

Hopefully at some point soon, everything will come together one day, and I can get some camo on it.
Hopefully nearing the end of intake fettling. I’ve used white Milliput to try and eliminate the remaining depressions around the nose of the splitters:
Also put some surfacer along the missile joint line:
Hopefully at some point soon, everything will come together one day, and I can get some camo on it.
Gassing Station | Scale Models | Top of Page | What's New | My Stuff