Airfix 1:72 Vulcan B.2
Discussion


dr_gn said:
I wasn’t too happy with the bomb bay/spar assembly weathering, so I’ve stripped it back to bare plastic and will have another go.
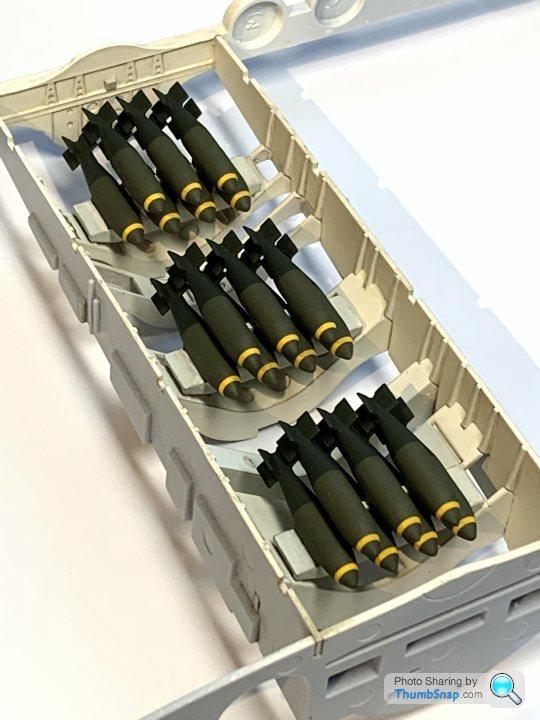
Also today, painted the 1000lb bombs in two-tone green, one for the bomb, one for the tail cone and fins:
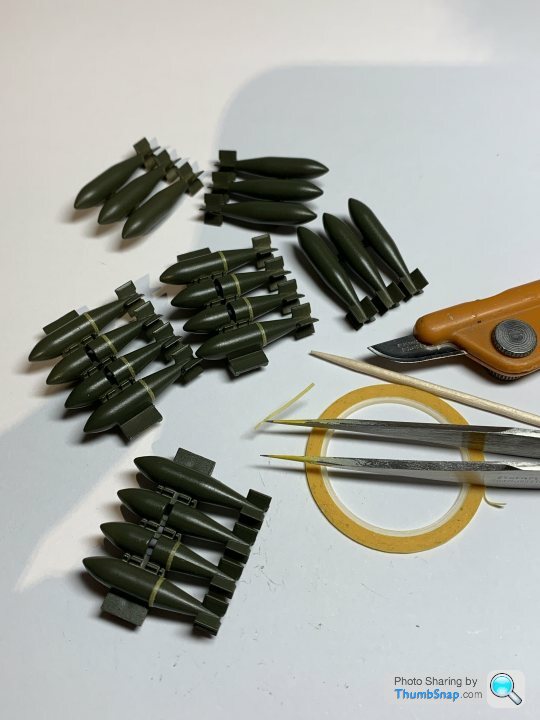
Took a lot of tedious masking, and the off-white structures are still to be done. I hope I’ve not used the same green on both parts…
I Initially looked at this post and wondered what you had circled next to the tweezers Also today, painted the 1000lb bombs in two-tone green, one for the bomb, one for the tail cone and fins:
Took a lot of tedious masking, and the off-white structures are still to be done. I hope I’ve not used the same green on both parts…

Trevatanus said:
dr_gn said:
I wasn’t too happy with the bomb bay/spar assembly weathering, so I’ve stripped it back to bare plastic and will have another go.
Also today, painted the 1000lb bombs in two-tone green, one for the bomb, one for the tail cone and fins:
Took a lot of tedious masking, and the off-white structures are still to be done. I hope I’ve not used the same green on both parts…
I Initially looked at this post and wondered what you had circled next to the tweezers Also today, painted the 1000lb bombs in two-tone green, one for the bomb, one for the tail cone and fins:
Took a lot of tedious masking, and the off-white structures are still to be done. I hope I’ve not used the same green on both parts…
Edited by dr_gn on Tuesday 21st December 11:25
Newarch said:
This is amazing, especially the level of work required even for quite small parts of the set. I must get an airbrush and have a go with some of my modest kit hoard (if you can call three or four kits a hoard).
I think the best advice would be to build a few models and hand paint everything. Vallejo model colour brushes nicely, especially if you apply it in slightly thinned coats with a good quality brush.Airbrushing can give a better finish, and you can get good effects like mottling and pre-shading, so long as everything is adjusted properly and the paint thinned etc etc. The downsides are that it’s a pretty big outlay for a good setup (airbrush, compressor, extraction, mask etc), it’s a new skill to learn, time consuming because of the masking usually required, and you can very easily end up frustrated. Of course if you’re after the best possible result, then go ahead.
I’ve always thought this guy’s videos are inspirational for hand painting and using basic modelling tools:
https://m.youtube.com/watch?v=oGZ4XKwBHVY
It would be good to do a “group build” where the rules are hand painting only, and no aftermarket details allowed (and a time limit!). Like the above really. I don’t think anyone could argue that his finished model doesn’t look incredibly good, never mind considering the fairly basic tools and materials he uses?
dr_gn said:
I think the best advice would be to build a few models and hand paint everything. Vallejo model colour brushes nicely, especially if you apply it in slightly thinned coats with a good quality brush.
Airbrushing can give a better finish, and you can get good effects like mottling and pre-shading, so long as everything is adjusted properly and the paint thinned etc etc. The downsides are that it’s a pretty big outlay for a good setup (airbrush, compressor, extraction, mask etc), it’s a new skill to learn, time consuming because of the masking usually required, and you can very easily end up frustrated. Of course if you’re after the best possible result, then go ahead.
I’ve always thought this guy’s videos are inspirational for hand painting and using basic modelling tools:
https://m.youtube.com/watch?v=oGZ4XKwBHVY
It would be good to do a “group build” where the rules are hand painting only, and no aftermarket details allowed (and a time limit!). Like the above really. I don’t think anyone could argue that his finished model doesn’t look incredibly good, never mind considering the fairly basic tools and materials he uses?
I am pretty handy at brush painting models and figures, and use a few styles depending on the look I am going for. It was the professional airbrush finish I was interested in, although I accept this would take practice and patience to make it worthwhile.Airbrushing can give a better finish, and you can get good effects like mottling and pre-shading, so long as everything is adjusted properly and the paint thinned etc etc. The downsides are that it’s a pretty big outlay for a good setup (airbrush, compressor, extraction, mask etc), it’s a new skill to learn, time consuming because of the masking usually required, and you can very easily end up frustrated. Of course if you’re after the best possible result, then go ahead.
I’ve always thought this guy’s videos are inspirational for hand painting and using basic modelling tools:
https://m.youtube.com/watch?v=oGZ4XKwBHVY
It would be good to do a “group build” where the rules are hand painting only, and no aftermarket details allowed (and a time limit!). Like the above really. I don’t think anyone could argue that his finished model doesn’t look incredibly good, never mind considering the fairly basic tools and materials he uses?
On the subject of kit, can you use a general purpose compressor or do you need a proper airbrush compressor? I have some experience of spray painting vehicles but never used an airbrush before.

Newarch said:
dr_gn said:
I think the best advice would be to build a few models and hand paint everything. Vallejo model colour brushes nicely, especially if you apply it in slightly thinned coats with a good quality brush.
Airbrushing can give a better finish, and you can get good effects like mottling and pre-shading, so long as everything is adjusted properly and the paint thinned etc etc. The downsides are that it’s a pretty big outlay for a good setup (airbrush, compressor, extraction, mask etc), it’s a new skill to learn, time consuming because of the masking usually required, and you can very easily end up frustrated. Of course if you’re after the best possible result, then go ahead.
I’ve always thought this guy’s videos are inspirational for hand painting and using basic modelling tools:
https://m.youtube.com/watch?v=oGZ4XKwBHVY
It would be good to do a “group build” where the rules are hand painting only, and no aftermarket details allowed (and a time limit!). Like the above really. I don’t think anyone could argue that his finished model doesn’t look incredibly good, never mind considering the fairly basic tools and materials he uses?
I am pretty handy at brush painting models and figures, and use a few styles depending on the look I am going for. It was the professional airbrush finish I was interested in, although I accept this would take practice and patience to make it worthwhile.Airbrushing can give a better finish, and you can get good effects like mottling and pre-shading, so long as everything is adjusted properly and the paint thinned etc etc. The downsides are that it’s a pretty big outlay for a good setup (airbrush, compressor, extraction, mask etc), it’s a new skill to learn, time consuming because of the masking usually required, and you can very easily end up frustrated. Of course if you’re after the best possible result, then go ahead.
I’ve always thought this guy’s videos are inspirational for hand painting and using basic modelling tools:
https://m.youtube.com/watch?v=oGZ4XKwBHVY
It would be good to do a “group build” where the rules are hand painting only, and no aftermarket details allowed (and a time limit!). Like the above really. I don’t think anyone could argue that his finished model doesn’t look incredibly good, never mind considering the fairly basic tools and materials he uses?
On the subject of kit, can you use a general purpose compressor or do you need a proper airbrush compressor? I have some experience of spray painting vehicles but never used an airbrush before.
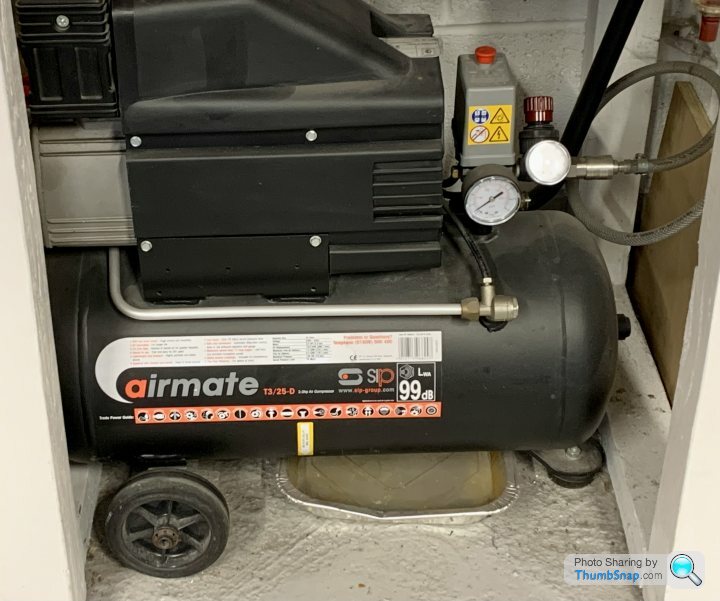
I use a garage compressor:
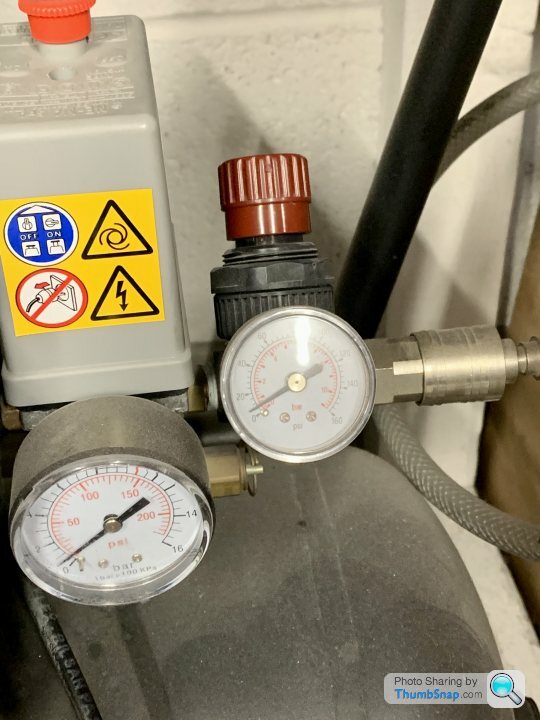
With a small regulator:
And small filter:
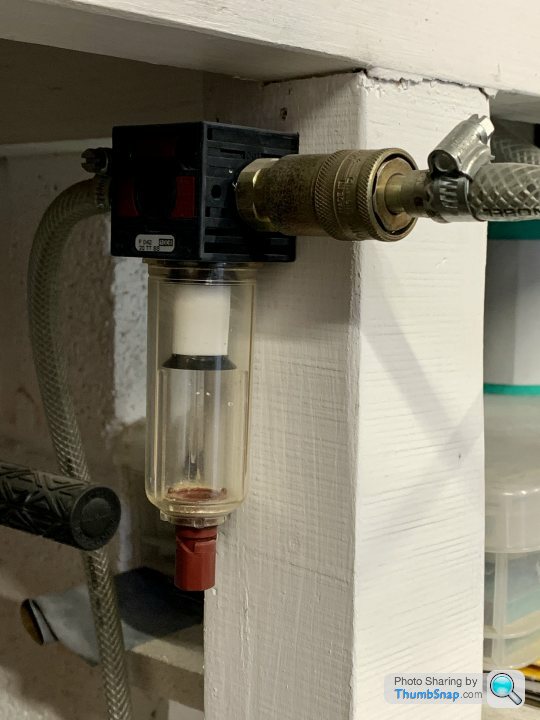
Piped to the bench to a quick-release adapter:
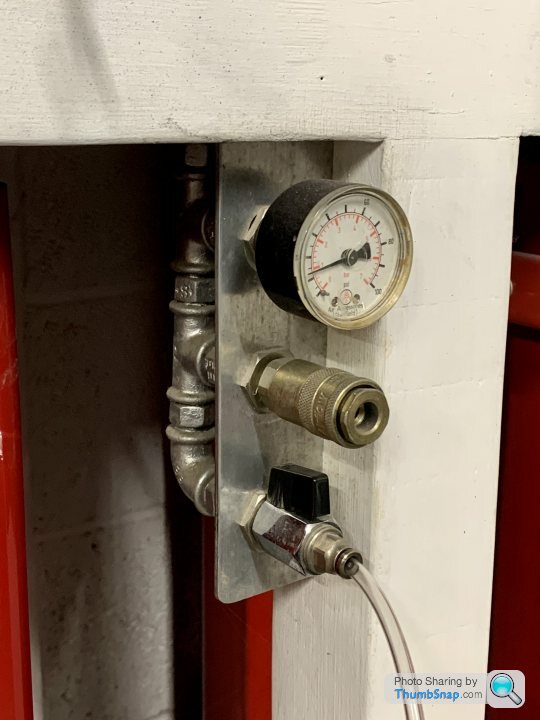
I also modified the airbrush, replacing the valve body with one which allows you to regulate the flow by turning a barrel on the input.
I always advise getting a quality airbrush, and be done with it, but others will disagree and advise getting a cheap Amazon special. If you already have a compressor etc, I would definitely go for a ‘name’ brand. It’s not like they’re thousands of pounds. End of the day the choice is yours.
dr_gn said:
Apologies, for some reason I got the impression you were a beginner.
No apologies required. I can paint, but have minimal (adult) experience of model kits so your threads and advice are most useful, not to mention highly interesting.Thanks for the pictures of your set up, my compressor is about the same size. I might get an airbrush for Christmas.
Newarch said:
dr_gn said:
Apologies, for some reason I got the impression you were a beginner.
No apologies required. I can paint, but have minimal (adult) experience of model kits so your threads and advice are most useful, not to mention highly interesting.Thanks for the pictures of your set up, my compressor is about the same size. I might get an airbrush for Christmas.
dr_gn said:
Newarch said:
dr_gn said:
Apologies, for some reason I got the impression you were a beginner.
No apologies required. I can paint, but have minimal (adult) experience of model kits so your threads and advice are most useful, not to mention highly interesting.Thanks for the pictures of your set up, my compressor is about the same size. I might get an airbrush for Christmas.
PVA’d the bombs together, after a coat of Matt:

And painted/washed the compressor/turbine faces:

The moulded-in wheel well and bomb-bay detail responded well to a dark wash and some weathering powders. I picked the boxes out with light grey, and the bottles with black. The actuator rods were painted chrome:

I dotted some chrome onto the wheel well lamps:

Followed by some PVA to represent the lenses:

It’ll set transparent, so I might give another light coat of Matt to give a frosted effect.
The large off-white areas are a pain because they show every random fibre and dust speck, which then gets highlighted even more with the weathering. At least it’s not too visible when complete. I might even strip the nearest one because it looks like half the carpet somehow got stuck to it.
And painted/washed the compressor/turbine faces:
The moulded-in wheel well and bomb-bay detail responded well to a dark wash and some weathering powders. I picked the boxes out with light grey, and the bottles with black. The actuator rods were painted chrome:
I dotted some chrome onto the wheel well lamps:
Followed by some PVA to represent the lenses:
It’ll set transparent, so I might give another light coat of Matt to give a frosted effect.
The large off-white areas are a pain because they show every random fibre and dust speck, which then gets highlighted even more with the weathering. At least it’s not too visible when complete. I might even strip the nearest one because it looks like half the carpet somehow got stuck to it.
This is amazing.
I had all sorts of Airfix 1:72 WW2 aircraft hanging from my ceiling using fishing line, when I were young back in the 70s.
Cotton wool was used to simulate smoke and fire.
I just remember always making a mess with the polystyrene cement and getting finger prints on the plastic pieces especially cockpit windows
I used to get frustrated making destroyers and throwing the mess in the bin.
My younger brother used to retrieve it and clean it all up and make it good.
That used to annoy me
Brilliant work sir, you're not a surgeon by any chance?
croyde said:
This is amazing.
I had all sorts of Airfix 1:72 WW2 aircraft hanging from my ceiling using fishing line, when I were young back in the 70s.
Cotton wool was used to simulate smoke and fire.
I just remember always making a mess with the polystyrene cement and getting finger prints on the plastic pieces especially cockpit windows
I used to get frustrated making destroyers and throwing the mess in the bin.
My younger brother used to retrieve it and clean it all up and make it good.
That used to annoy me
Brilliant work sir, you're not a surgeon by any chance?
Thanks! No, I’m not a surgeon unfortunately!I had all sorts of Airfix 1:72 WW2 aircraft hanging from my ceiling using fishing line, when I were young back in the 70s.
Cotton wool was used to simulate smoke and fire.
I just remember always making a mess with the polystyrene cement and getting finger prints on the plastic pieces especially cockpit windows
I used to get frustrated making destroyers and throwing the mess in the bin.
My younger brother used to retrieve it and clean it all up and make it good.
That used to annoy me
Brilliant work sir, you're not a surgeon by any chance?
Assembled the bomb arches into the bay, first removing paint from the mating surfaces. My modelling chisel and scalpel made light work of it:
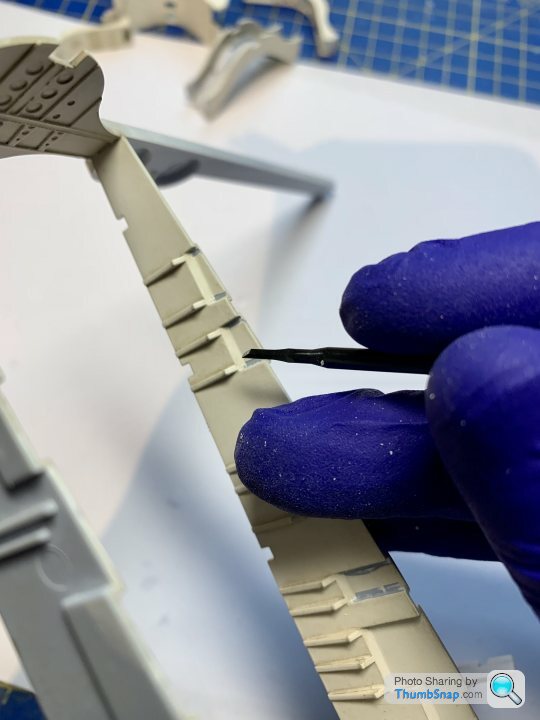

Fit was pretty good:


Couldn’t resist temporarily clipping the bomb racks in place:
So it’s just the bomb bay roof that will need finishing in the same way - once I can get the fit right:

It looks nicely detailed, but with some aftermarket resin and photo etch, it would be another level.
I decided to strip the hairy main gear roof and try again. After years of struggling, I’ve found a method of stripping acrylics and Tamiya primer in minutes, back to perfect bare plastic:
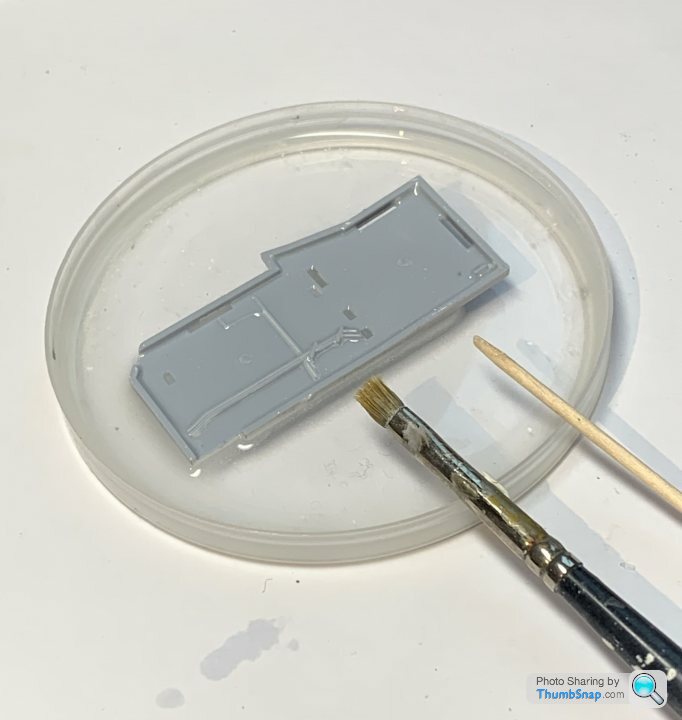
Currently re-painted and awaiting weathering.
Next up were the exhausts. They are made up of three outer pieces per engine, which of course leaves some very difficult joints to get smooth. They are slightly barrelled, I suppose the price of accuracy there is having to design them so they come out of the mould. I’m using Mr. Surfacer, which will be flatted with a curved scalpel to deal with them:
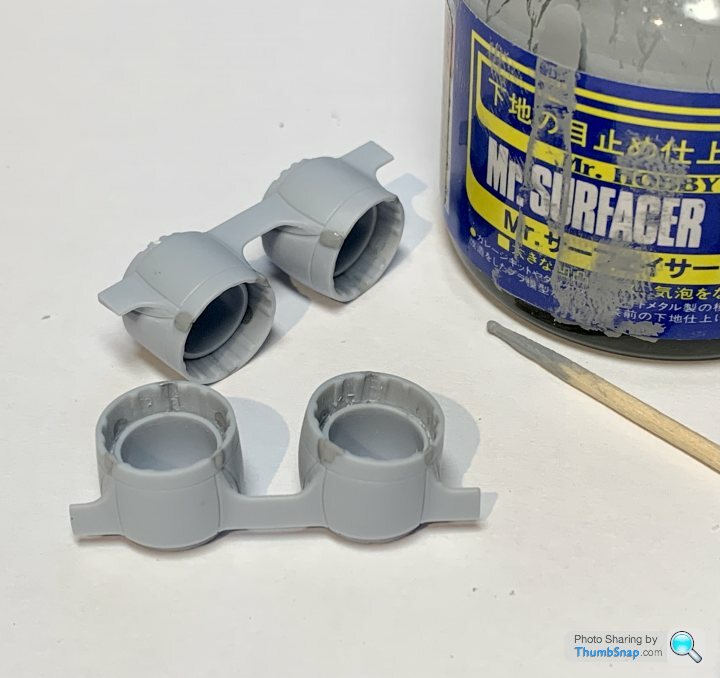
Then the intakes, which also need significant work to get the three piece assembly smooth. Not sure why a two-piece assembly wouldn’t have worked, it would be much easier to get looking right:

Finally for now, the sink marks in the upper airframe halves. I opted for Tamiya putty. Time will tell if it flats back seamlessly:


Anyway, happy Christmas all.
Fit was pretty good:
Couldn’t resist temporarily clipping the bomb racks in place:
So it’s just the bomb bay roof that will need finishing in the same way - once I can get the fit right:
It looks nicely detailed, but with some aftermarket resin and photo etch, it would be another level.
I decided to strip the hairy main gear roof and try again. After years of struggling, I’ve found a method of stripping acrylics and Tamiya primer in minutes, back to perfect bare plastic:
Currently re-painted and awaiting weathering.
Next up were the exhausts. They are made up of three outer pieces per engine, which of course leaves some very difficult joints to get smooth. They are slightly barrelled, I suppose the price of accuracy there is having to design them so they come out of the mould. I’m using Mr. Surfacer, which will be flatted with a curved scalpel to deal with them:
Then the intakes, which also need significant work to get the three piece assembly smooth. Not sure why a two-piece assembly wouldn’t have worked, it would be much easier to get looking right:
Finally for now, the sink marks in the upper airframe halves. I opted for Tamiya putty. Time will tell if it flats back seamlessly:
Anyway, happy Christmas all.
dr_gn said:
It looks nicely detailed, but with some aftermarket resin and photo etch, it would be another level.
This level is pretty damned good, but well done for sticking to your plan to build it OOB 
dr_gn said:
After years of struggling, I’ve found a method of stripping acrylics and Tamiya primer in minutes, back to perfect bare plastic:
Anyway, happy Christmas all.
Could you share this method with us?Anyway, happy Christmas all.
Many thanks for keeping us all entertained and amazed.
CanAm said:
dr_gn said:
It looks nicely detailed, but with some aftermarket resin and photo etch, it would be another level.
This level is pretty damned good, but well done for sticking to your plan to build it OOB dr_gn said:
After years of struggling, I’ve found a method of stripping acrylics and Tamiya primer in minutes, back to perfect bare plastic:
Anyway, happy Christmas all.
Could you share this method with us?Anyway, happy Christmas all.
Many thanks for keeping us all entertained and amazed.
If you soak it for an hour, then remove the paint with a cut-down brush (to make the bristles stiff) it only takes a few minutes work to completely reduce it to bare plastic. Keep the part wet while you’re doing this. It’s important to do this outside or in a well ventilated area, and follow all the safety guidelines on the bottle. Works for me, but try it at your own risk!
Assembled the wheel bays (first removing paint from the mating surfaces):


I think the diagonal tubular members are actually jacks for the main gear, so the smaller diameters might need picking out in chrome.
Spot the difference? (apart from the lamp diameters)
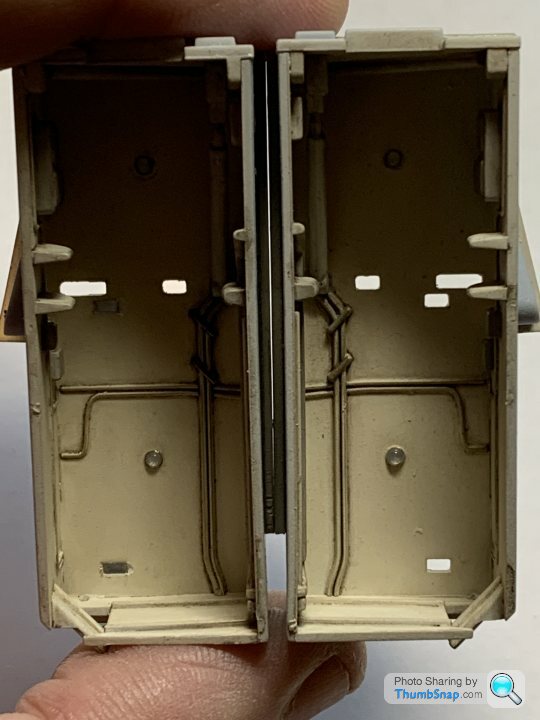
On one side the door jack locations are blind, on the other, they are through holes…
Also started flatting the filler in the wing sink marks:

This build will be delayed a bit by yesterday’s broken foot episode…

I think the diagonal tubular members are actually jacks for the main gear, so the smaller diameters might need picking out in chrome.
Spot the difference? (apart from the lamp diameters
)On one side the door jack locations are blind, on the other, they are through holes…
Also started flatting the filler in the wing sink marks:
This build will be delayed a bit by yesterday’s broken foot episode…
Gassing Station | Scale Models | Top of Page | What's New | My Stuff