Guys, I'm gonna need your help.
Discussion


.Mark said:
dr_gn said:
So far so good.
Personally, I'd paint what you've got now. Looks like there is still a bit of a gap on the stern: get rid of it now or it will bug you later!
Yes, I had noticed that - it's on the list.Personally, I'd paint what you've got now. Looks like there is still a bit of a gap on the stern: get rid of it now or it will bug you later!
dr_gn said:
Just take your time with the painting: get a good quality, wide brush for the hull and deck colours.
Keep up the good work!
Daughter is an artist - plentiful supply of brushes Keep up the good work!

There are some real fine detailing though that need to be gold - ships name in various places and other stuff. Even a 1 hair brush would probably be too big! What's the best way to tackle this? I had thought about some paint on a sponge or something and gently press it on - the detail that needs to be gold is raised obviously.
The yellow bits on my Airfix HMS Victory stern were done with a combination of dry brushing and picking out individual details with a very fine brush, and then going over the background and touching in any smudges:

As soon as you think you *might* be happy with the result - leave it at that!

That's pretty impressive - will get some practice in.
Been looking at a lot of builds on the web and there are a whole variety of different colour schemes going on. Some use lots of black, others use white here and there - none I have seen match the Airfix colour plans.
Is there a proper way to complete this or is down to preference and a bit of artistic license?
.Mark said:
That's pretty impressive - will get some practice in.
Been looking at a lot of builds on the web and there are a whole variety of different colour schemes going on. Some use lots of black, others use white here and there - none I have seen match the Airfix colour plans.
Is there a proper way to complete this or is down to preference and a bit of artistic license?
Here are some pics I took a few years back. I think the Ship has been restored over the years, and had many changes and modifications while in use, so maybe there are no definitive colours (although I think most of it is now a kind of charcoal-ish black). At the end of the day, if it looks right to you , go for it.Been looking at a lot of builds on the web and there are a whole variety of different colour schemes going on. Some use lots of black, others use white here and there - none I have seen match the Airfix colour plans.
Is there a proper way to complete this or is down to preference and a bit of artistic license?
Hope this helps.


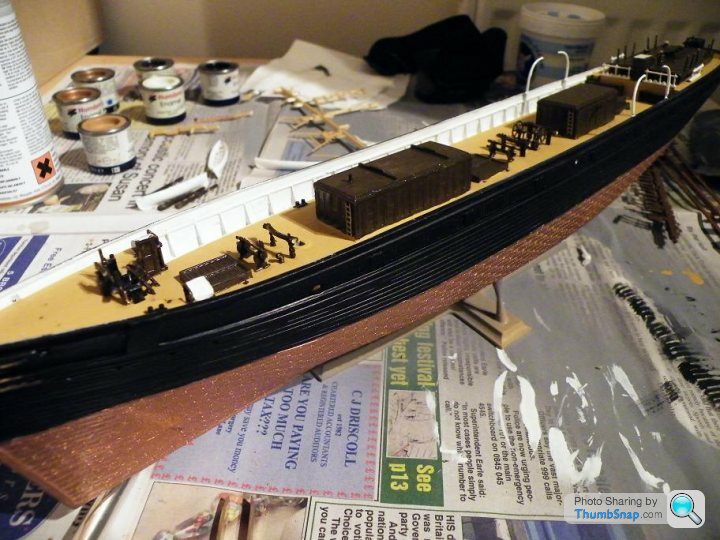
So for those of you bored enough, an update.
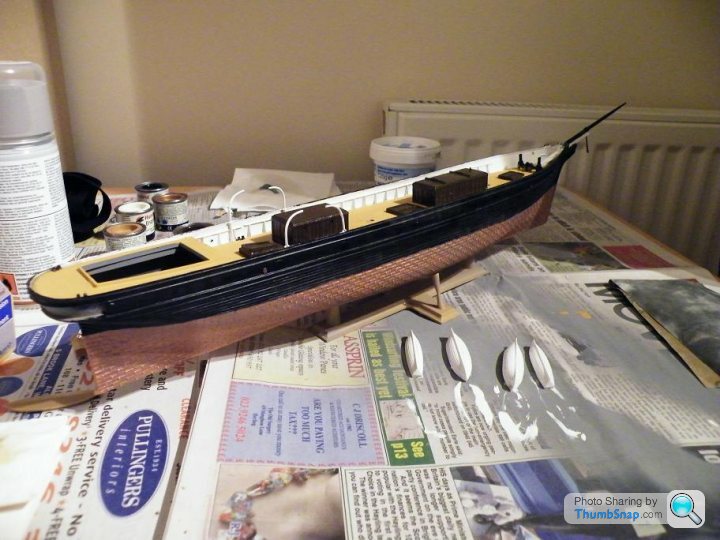
Lessons learnt so far. Have a mental walk through of the build, I wish I had painted some parts before assembly, there is plenty of touching up going on currently over painting bits I have 'gone over the lines on'. So hull is only on 1st coat, rest of deck etc. is more or less done, a few touching in here and there.
Still waiting for Airfix to send the replacement broken parts - been waiting weeks now!
Overall I am pretty pleased with it so far. Not rushing (you can tell by the dates of posts! ) but I am enjoying it.

Lessons learnt so far. Have a mental walk through of the build, I wish I had painted some parts before assembly, there is plenty of touching up going on currently over painting bits I have 'gone over the lines on'. So hull is only on 1st coat, rest of deck etc. is more or less done, a few touching in here and there.
Still waiting for Airfix to send the replacement broken parts - been waiting weeks now!
Overall I am pretty pleased with it so far. Not rushing (you can tell by the dates of posts!
) but I am enjoying it..Mark said:
So for those of you bored enough, an update.
Lessons learnt so far. Have a mental walk through of the build, I wish I had painted some parts before assembly, there is plenty of touching up going on currently over painting bits I have 'gone over the lines on'. So hull is only on 1st coat, rest of deck etc. is more or less done, a few touching in here and there.
Still waiting for Airfix to send the replacement broken parts - been waiting weeks now!
Overall I am pretty pleased with it so far. Not rushing (you can tell by the dates of posts!) but I am enjoying it.
From the photo, it looks very, very good to me. Well done.Lessons learnt so far. Have a mental walk through of the build, I wish I had painted some parts before assembly, there is plenty of touching up going on currently over painting bits I have 'gone over the lines on'. So hull is only on 1st coat, rest of deck etc. is more or less done, a few touching in here and there.
Still waiting for Airfix to send the replacement broken parts - been waiting weeks now!
Overall I am pretty pleased with it so far. Not rushing (you can tell by the dates of posts!
) but I am enjoying it.BTW regarding filler: I have recently re-discovered "Milliput", which is a 2 part filler, and can be smoothed with water (ie a suitably moistened finger). No laughing please.
dr_gn said:
From the photo, it looks very, very good to me. Well done.
BTW regarding filler: I have recently re-discovered "Milliput", which is a 2 part filler, and can be smoothed with water (ie a suitably moistened finger). No laughing please.
Thanks, very kind. BTW regarding filler: I have recently re-discovered "Milliput", which is a 2 part filler, and can be smoothed with water (ie a suitably moistened finger). No laughing please.

I did say I would get round to the filler and I should. It's just at the moment the gap is not bothering me too much. Going to a model shop later so I will look out for it.
.Mark said:
dr_gn said:
From the photo, it looks very, very good to me. Well done.
BTW regarding filler: I have recently re-discovered "Milliput", which is a 2 part filler, and can be smoothed with water (ie a suitably moistened finger). No laughing please.
Thanks, very kind. BTW regarding filler: I have recently re-discovered "Milliput", which is a 2 part filler, and can be smoothed with water (ie a suitably moistened finger). No laughing please.
I did say I would get round to the filler and I should. It's just at the moment the gap is not bothering me too much. Going to a model shop later so I will look out for it.
If the gaps aren't too noticable, I'd just leave them: sometimes trying to make things better actually makes them worse!
The gap - bcause there is only really one (so far) is at the stern where the 2 halves of hull meet at the deck. Like I say, not bothering me a great deal, but will see how many times I look at it from the corner of my eye through the build. It won't be hard to rectify even when the ship is complete.
One other suggestion: I can't see from the photos what kind of a line you have between the copper and black parts of the hull, so this might be totally irrelevant:
On my Revell version there was a very thin white demarcation line, which, on plastic that has copper plates and planks moulded on it I found almost impossible to mask and get a perfectly sharp edge (by brush painting at least). What I've done in the past in situations like this is to buy some decal film:
http://www.relishmodels.co.uk/experts-choice-white...
and cut a strip out the appropriate thickness using a ruler and scalpel. For a white line, use white paper and just apply it over the demarcation the same as you would normal decals. For a black edge, get some of the clear decal film and cut a 5mm or so strip as above, then paint it with the same black paint you used for the hull. You can then apply it with setting solution, over any smudged bits of copper. Overcoat it with a satin or matt varnish and the decal will be almost invisible. You'll then end up with a sharp edged line. It will still conform to the hull detail if you use settng solution, so might look slightly imperfect, but it will almost certainly be better than paint.

Bet you thought I'd given up!
Have added some deck stuff, but it's real fiddly, need to realign some of the guard rails and touch up where I trimmed the parts from the Sprue. Quite pleased with the dry brushing on the ladders on the deck structures but not happy with the results on the hull where the name is and intricate woodwork. Too embarrassed to show you here - any tips? Sand it gently back or use a paint stripper of some sort?
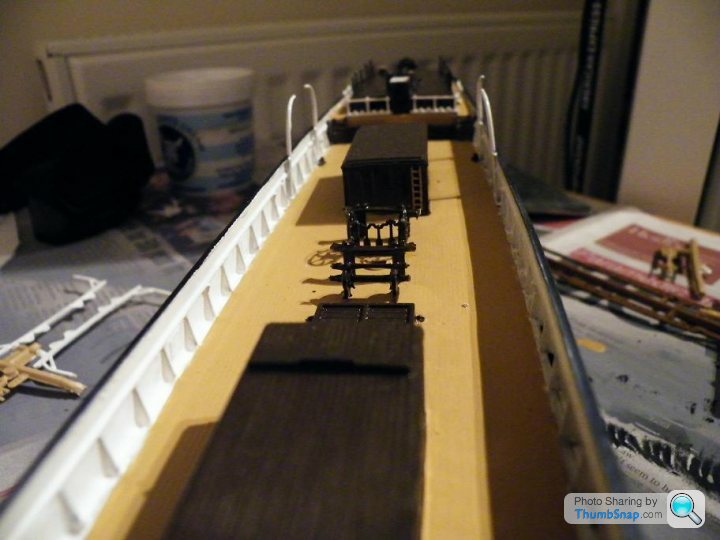
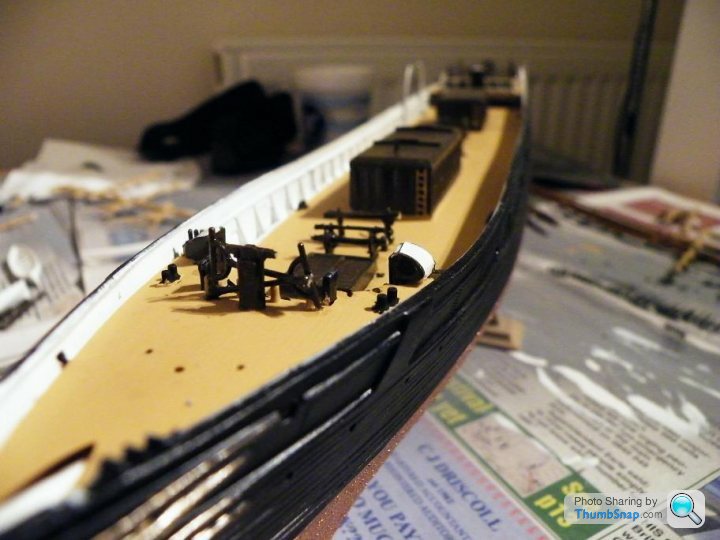
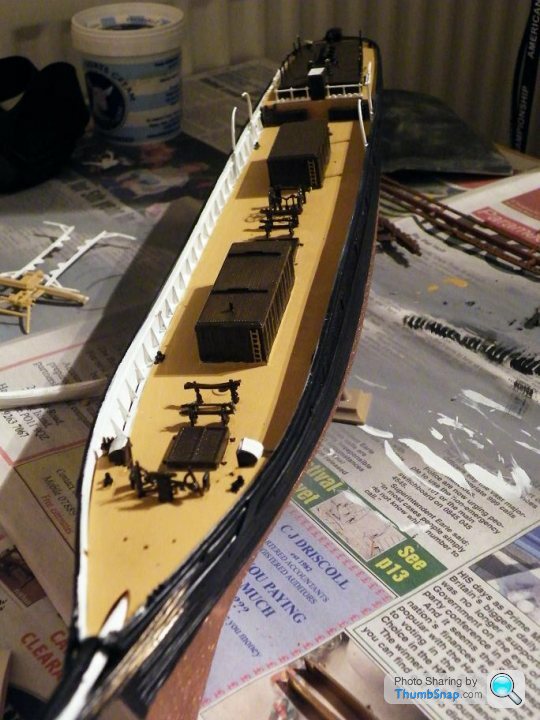
Have added some deck stuff, but it's real fiddly, need to realign some of the guard rails and touch up where I trimmed the parts from the Sprue. Quite pleased with the dry brushing on the ladders on the deck structures but not happy with the results on the hull where the name is and intricate woodwork. Too embarrassed to show you here - any tips? Sand it gently back or use a paint stripper of some sort?


dr_gn said:
Did you have too much paint on the brush?
Yeah, got too cocky. The ladders went really well so I waded in - should have known better. Noticed one side of the hull where I want to paint is quite badly deformed during moulding, that'll be the side that faces the wall I did notice it to start but now it's all painted it has brought it out.This is a grreat thread, I will be popping back to view your progress. Your making a lovely job of it and some of the tips are excellent. I have been thinking about doing a model for some time and viewing this I may end up doing one sooner rather than later.
Keep up the good work andshow us the pics lol.
Keep up the good work andshow us the pics lol.
Thanks Olly, it's the help from these guys that keep me going, some of the skill they have is immense - take a look at some of the other threads.
I am enjoying it but oddly find myself in 2 situations, first is wanting to do it all RIGHT NOW! and the second is looking at it and thinking - No, not today. Hard to find a happy medium, and when I do get going, I loose hours in it.
Glad I started though and looking forward to the end product - whenever that may surface. Although already looking for next one to do.
 Another ship? Quite fancy a go at the Titanic
Air plane? Feel I may have to 'weather' it and am no way up to that skill level!
Split Screen Camper to go with the Merc 300SL and VW Beetle I did years ago.
Decision, decisions!
I am enjoying it but oddly find myself in 2 situations, first is wanting to do it all RIGHT NOW! and the second is looking at it and thinking - No, not today. Hard to find a happy medium, and when I do get going, I loose hours in it.
Glad I started though and looking forward to the end product - whenever that may surface. Although already looking for next one to do.
Another ship? Quite fancy a go at the Titanic Air plane? Feel I may have to 'weather' it and am no way up to that skill level! Split Screen Camper to go with the Merc 300SL and VW Beetle I did years ago.Decision, decisions!
Gassing Station | Scale Models | Top of Page | What's New | My Stuff