Latest Project: Matchbox 1/32 Bf-109E-3
Discussion


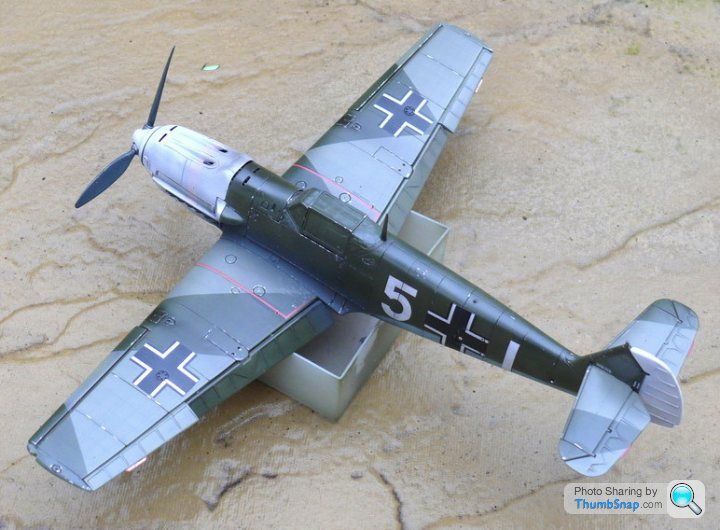
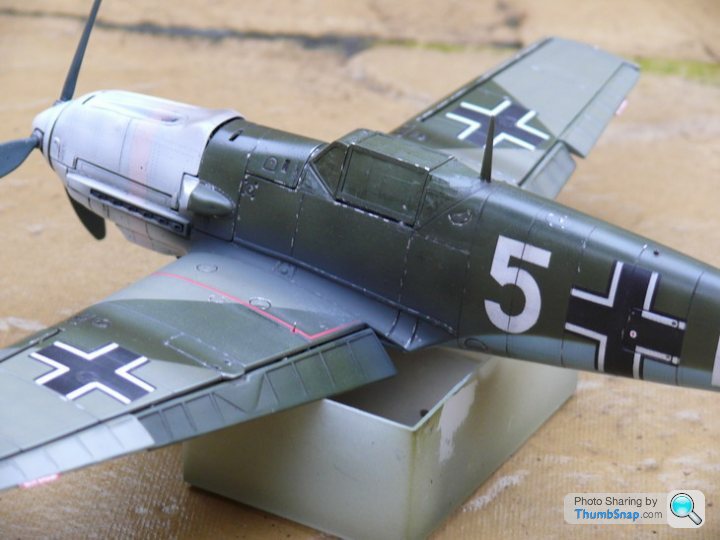
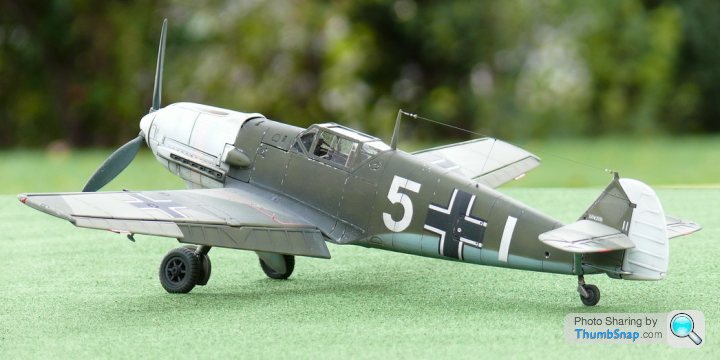
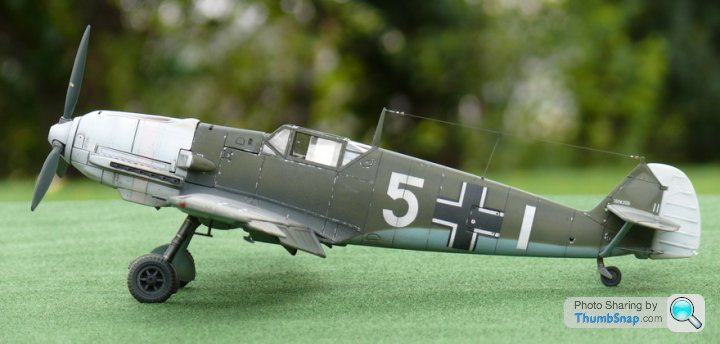
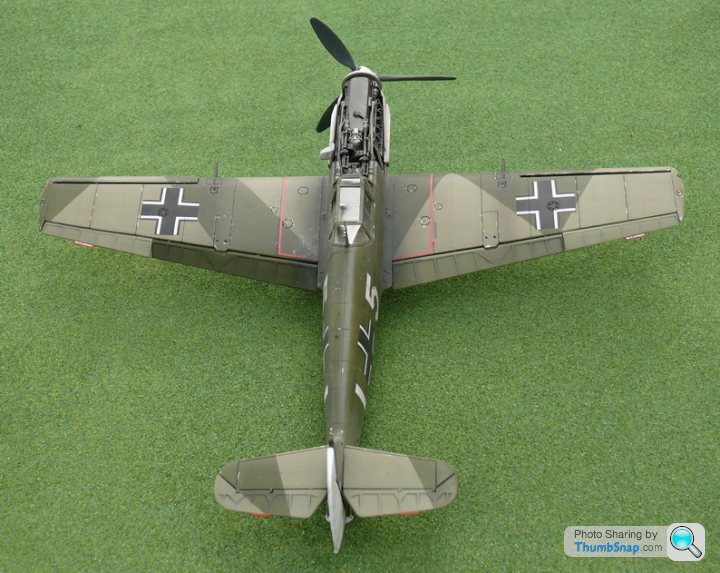
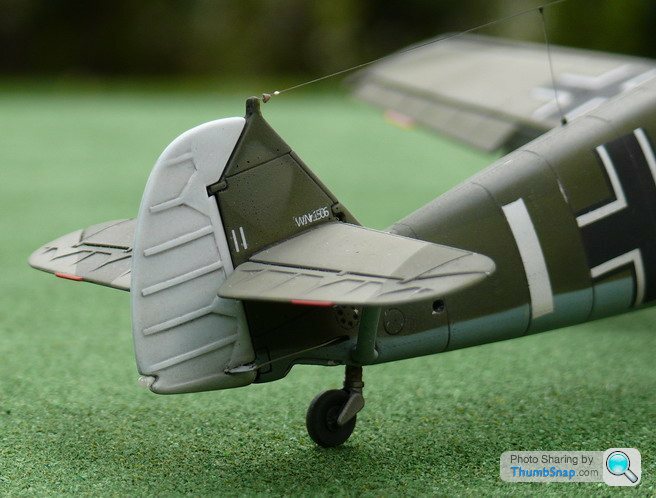
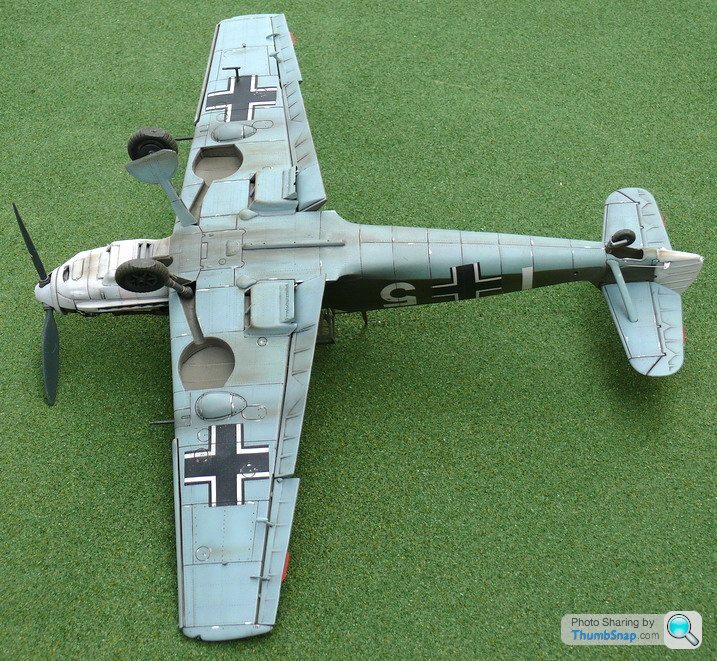
Well, for better or worse, the weathering is finished. It was always going to be the most difficult bit for me, and so it proved. I think I just about got away with it. Maybe a few too many paint chips, and the exhaust staining on the right side is a bit much, but...you live and learn! Just got to add the u/c doors, wheels and aerial I think. And of course an overall matt coat.
Edited by dr_gn on Saturday 20th November 09:44
dr_gn said:
Well, for better or worse, the weathering is finished. It was always going to be the most difficult bit for me, and so it proved. I think I just about got away with it. Maybe a few too many paint chips, and the exhaust staining on the right side is a bit much, but...you live and learn! Just got to add the u/c doors, wheels and aerial I think. And of course an overall matt coat.
For me you have it just right, as you know I don't like to see more weathering than model.Edited by dr_gn on Saturday 20th November 09:44
The look of the red stripe under the white overlay does it very well.
Bring on the finished article and feel justly proud of it!
b
Eric Mc said:
His favourite balsa filler was cellilose dope mixed with talcum powder.
Oh what a stinky mixture that was, I used it myself many times too and boy how glad I was when Squadron Modellers Putty became available.Alan would sometimes use Plastic Wood for fairings, amybe over wing cannon positions and the like and I recall he made a DF Loop Teardrop on something he made with it. (usual poor memory excuse)
Good old Milliput, what a difference it made to me.
mattmoxon said:
Looking fantastic!!
Is there going to be a diaorama with this model or is it going to sit as it is (when it is finished)?
It's looking just about OK, but thanks!Is there going to be a diaorama with this model or is it going to sit as it is (when it is finished)?
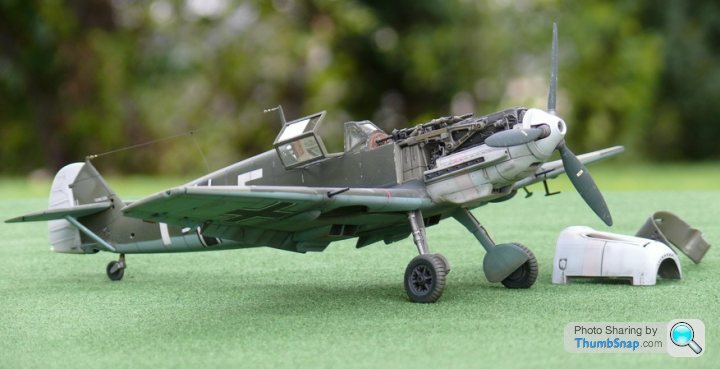
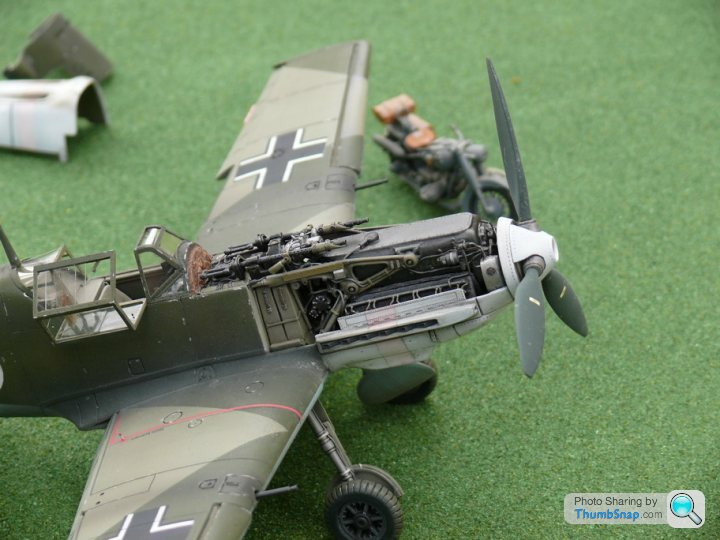
It'll probably sit on a shelf until I get around to finishing the stand for it! I should hurry up becasue the u/c geometry on '109's isn't good for sitting on smooth surfaces.
perdu said:
stick it back on that smashing jig for a while 
should hold it safely from harms way
or are you going to say you dismantled it and can't redofromstart

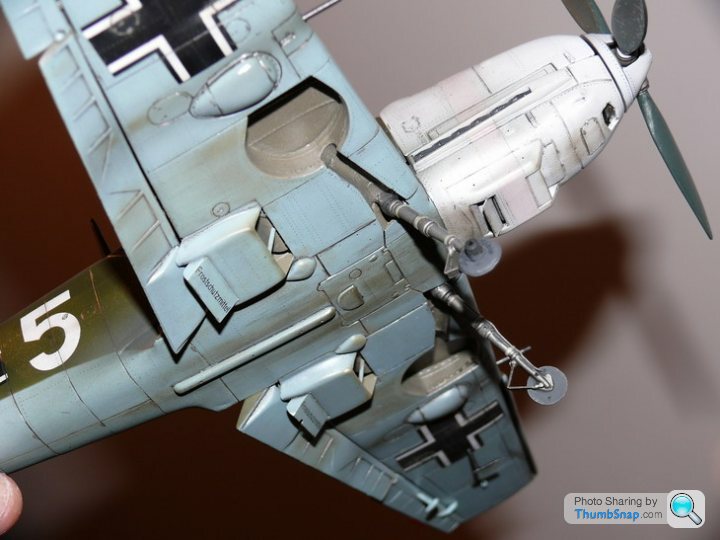
by the way I like the stencils
edited for stencilling
Yeah that jig turned out to be very useful!should hold it safely from harms way
or are you going to say you dismantled it and can't redofromstart
by the way I like the stencils
edited for stencilling
Edited by perdu on Saturday 20th November 21:33
Tomorrow is tyre flatting time. No idea how as yet: fit the wheels first and rub them on sandpaper and the legs will snap off, try to flat them before fitting and the flat angle will never be right...
Probably not much use to you, 'cos techniques for use on a highly "modelled" one like this are best by going with the flow using your own instincts but have you thought about warming/heating a surface to lower the kit onto to make the wheels take on a slight bulge at the bottom?
I did that to my Shack wheels but in fact that was much easier to control 'cos of the "90ºto the horizontal" the u/c had
The acute 109 angle would be blarry awkward TBH and it takes a lot of distortion to overcome the initial shrinking effect before a thickening shows up
maybe a tad of milliput would do and make the angle fixed but making a one off jig from stiff metal (did I just think coathanger then?)
rethink
make a jig from wire to hold an angle - then slice with Mr Swann Morton's finest to shave off a tad at a time and fix an angle, The 109 is prolly too light to impress deeply on the tyre walls. Perhaps just a slight spread...
I think both tyres would have the same amount of distortion but as always I could be very wrong
Not v'good at sums though usually fair with Jommettery
perdu said:
Probably not much use to you, 'cos techniques for use on a highly "modelled" one like this are best by going with the flow using your own instincts but have you thought about warming/heating a surface to lower the kit onto to make the wheels take on a slight bulge at the bottom?
I did that to my Shack wheels but in fact that was much easier to control 'cos of the "90ºto the horizontal" the u/c had
The acute 109 angle would be blarry awkward TBH and it takes a lot of distortion to overcome the initial shrinking effect before a thickening shows up
maybe a tad of milliput would do and make the angle fixed but making a one off jig from stiff metal (did I just think coathanger then?)
rethink
make a jig from wire to hold an angle - then slice with Mr Swann Morton's finest to shave off a tad at a time and fix an angle, The 109 is prolly too light to impress deeply on the tyre walls. Perhaps just a slight spread...
I think both tyres would have the same amount of distortion but as always I could be very wrong
Not v'good at sums though usually fair with Jommettery
Well, first off it's just going to be flats sanded (a la Airfix Sunderland), not bulged.I did that to my Shack wheels but in fact that was much easier to control 'cos of the "90ºto the horizontal" the u/c had
The acute 109 angle would be blarry awkward TBH and it takes a lot of distortion to overcome the initial shrinking effect before a thickening shows up
maybe a tad of milliput would do and make the angle fixed but making a one off jig from stiff metal (did I just think coathanger then?)
rethink
make a jig from wire to hold an angle - then slice with Mr Swann Morton's finest to shave off a tad at a time and fix an angle, The 109 is prolly too light to impress deeply on the tyre walls. Perhaps just a slight spread...
I think both tyres would have the same amount of distortion but as always I could be very wrong
Not v'good at sums though usually fair with Jommettery
I'm not good with hot surfaces.
I thought about a jig, but invariably I spend huors on things like that, only for them to fail miserably.
I think I'll dry fit the wheels, touch them on some sandpaper to get a mark, then remove the wheels and sand them by t&e. Repeat until happy.
Thanks for the ideas though - just confirms what I was thinking.
I've never really had a go at "bulging" my wheels although in the "old days" the heating on a flat surface method was the one generally proposed by the model mags.
As ever, many modellers go over the top with their "bulges". So like a lot of things in modelling, subtlety is the key.
In real life, tyre bulge varies hugely, depending on the weight of the aircraft and the air pressure in the tyres.
Of course, one could always cheat and buy a set of pre-bulged resin wheels and tyres.
Eric Mc said:
I've never really had a go at "bulging" my wheels although in the "old days" the heating on a flat surface method was the one generally proposed by the model mags.
As ever, many modellers go over the top with their "bulges". So like a lot of things in modelling, subtlety is the key.
In real life, tyre bulge varies hugely, depending on the weight of the aircraft and the air pressure in the tyres.
Of course, one could always cheat and buy a set of pre-bulged resin wheels and tyres.
Eric, Perdu,As ever, many modellers go over the top with their "bulges". So like a lot of things in modelling, subtlety is the key.
In real life, tyre bulge varies hugely, depending on the weight of the aircraft and the air pressure in the tyres.
Of course, one could always cheat and buy a set of pre-bulged resin wheels and tyres.
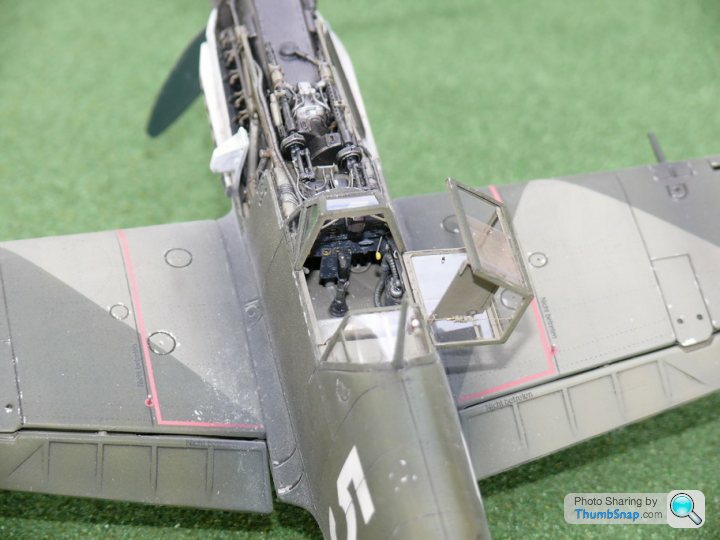
I'd already painted the Matchbox wheels (and weathered them), because they look OK and it's too easy to go and buy every aftermarket part for a model - you can even get a complete replacement resin engine and ancilliaries for some 1/32 '109 models.
In the end I went for the trial and error method just now, and it took perhaps 30 seconds per wheel to get spot on. One of those jobs that you think will be a nightmare and is in fact incredibly easy.
BTW Eric, I'd be very interested to hear how you go on with the ultrasonic cleaner. Do you dip the entire airbrush front into it, or do you dismantle it partially?
Not used it yet although there are demos available in youtube and other video sites. The demo I saw showed the brush being broken down into the major components i.e. head, two sections of body and needle.
http://www.youtube.com/watch?v=EM07_4TRxGA
http://www.youtube.com/watch?v=EM07_4TRxGA
Eric Mc said:
Not used it yet although there are demos available in youtube and other video sites. The demo I saw showed the brush being broken down into the major components i.e. head, two sections of body and needle.
http://www.youtube.com/watch?v=EM07_4TRxGA
I think one's on the Christmas list!http://www.youtube.com/watch?v=EM07_4TRxGA
perdu said:
Hmm,didn't we see the finished wheels a while ago?
I thought we had (should I have checked? A major fault of mine )
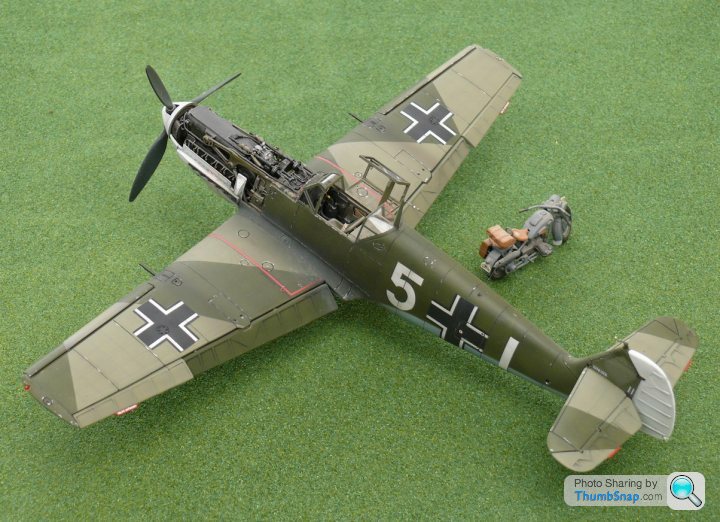
And I'm glad the worries were not borne out for you, I'm certain the model is going to be great when matted down it is already miles better than mine were
Perdu, the wheels look fine now. Finished the model about 10 mins ago. It looks OK, but of course the matt coat caused a headache becasue my old problem of the 'chalky' pale tint over everything reared its ugly head again. I ended up 'Klear'ing the engine bay, u/c legs, tyres and cannon to bring the colours back again. Also, the mottling has almost disappeared (so glad I did it twice to get it looking right I thought we had (should I have checked? A major fault of mine
)And I'm glad the worries were not borne out for you, I'm certain the model is going to be great when matted down it is already miles better than mine were
 ). Having said that, it's my best model by some margin, so I'm happy. I'll post some 'finished' pics next time I'm home in daylight!
BTW - the masking came off with no problems at all. Tamiya tape is a miracle.
Cheers.
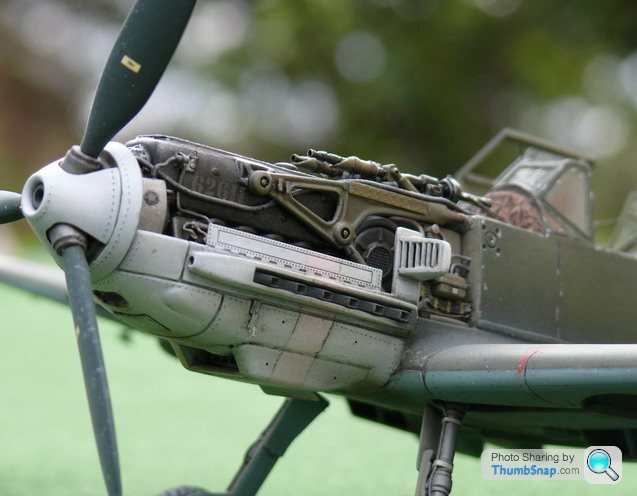
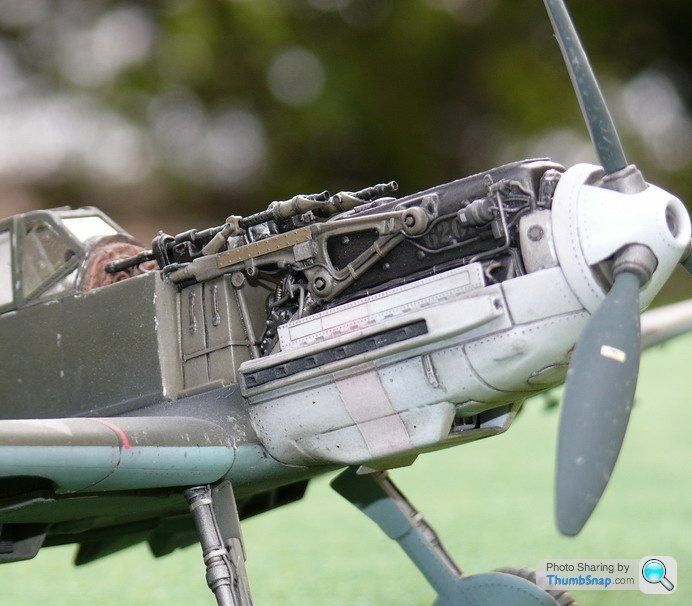
I guess this is it then: finished! It's not perfect - the 'heavy mottling' seems to have disappeared under the wethering and varnish, and the engine detail could be a bit crisper, but that's me being impatient and using too many layers of Klear/dark wash. Having said that, it's my best effort by some margin.


Thanks for watching folks - and thanks for the comments & advice throughout this thread!
Thanks for watching folks - and thanks for the comments & advice throughout this thread!
Edited by dr_gn on Thursday 25th November 15:58
Gassing Station | Scale Models | Top of Page | What's New | My Stuff