Latest Project: Matchbox 1/32 Bf-109E-3
Discussion


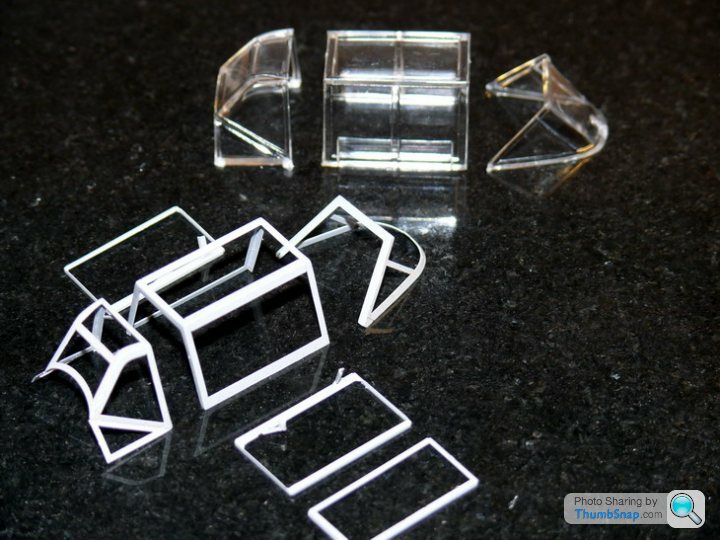
Spent a few hours part assembling the RB Productions photo-etch canopy set. Like the belts, it's another work of art; virtually the same construction as the real thing, only 32 times smaller! No comparison with the original model item. It is hinged, has a sprung tether cable (spring is 1mm diameter - you have to make it by coiling some steel wire around a drill), and the central windows slide open.
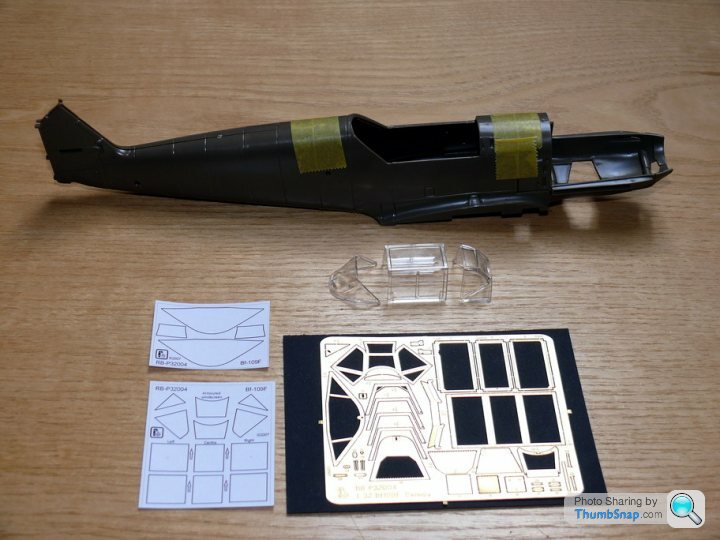
The photo-etch is brass, and since I'll have to modify the cockpit opening for it to fit (which will require some fettling and test fitting), I decided to solder it together for strength rather than glue it. Some pretty extreme soldering, but it is now a strong structure.
I'm not sure what the painting sequence should be. It's so detailled that the inner frames will have to be painted separate from the extarnal bits. How do you mask sliding windows? How to you securely fit acetate transparencies to a painted frame? Klear? PVA? There are still a few small brackets, the tether cable and the head armour to fit.
blimey that is sexy
very tempting
and hard
anything you use to glue inside that close-to-perfection canopy is likely to show
how about a very fine drop of clear varnish of the Enamel variety, given time it will dry (specially if you stir it well enough) and MAY NOT show
But every clear panel will need "fitting" and "refitting" so there're no hitches to straightforward placement
on the offchance you do get a drop of varnish visible the actual things looked very likely to show glue marks too where the edges of the glazing was.
Edited by perdu on Monday 5th April 23:43
perdu said:
blimey that is sexy
very tempting
and hard
anything you use to glue inside that close-to-perfection canopy is likely to show
how about a very fine drop of clear varnish of the Enamel variety, given time it will dry (specially if you stir it well enough) and MAY NOT show
But every clear panel will need "fitting" and "refitting" so there're no hitches to straightforward placement
on the offchance you do get a drop of varnish visible the actual things looked very likely to show glue marks too where the edges of the glazing was.
For the fixed glazing, I thought about Johnson's Klear to fix, plus then dipping the whole lot in clear as per usual practice. As for the sliding panels in the central greenhouse: no idea.very tempting
and hard
anything you use to glue inside that close-to-perfection canopy is likely to show
how about a very fine drop of clear varnish of the Enamel variety, given time it will dry (specially if you stir it well enough) and MAY NOT show
But every clear panel will need "fitting" and "refitting" so there're no hitches to straightforward placement
on the offchance you do get a drop of varnish visible the actual things looked very likely to show glue marks too where the edges of the glazing was.
Edited by perdu on Monday 5th April 23:43
Nick_F said:
Clear silicone sealant? no idea what the solvent is, so test it, but has the advantage of being endlessly removeable/repeatable and forgiving of iffy fit.
Good idea. Regading removability, bear in mind the largest of the frameworks in the picture is only about 3/4" long. Trying to remove something stuck in with silicone would be a struggle!
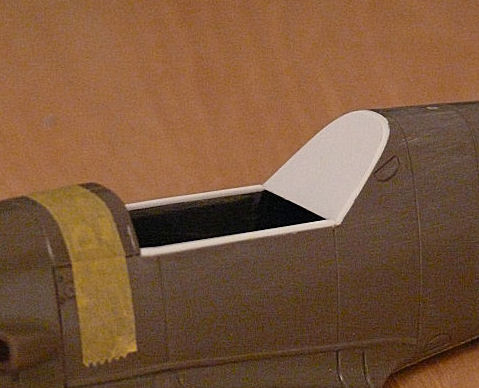
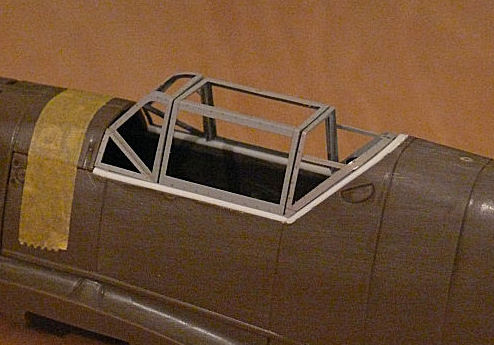
Modded the cockpit opening to suit the new Canopy. Needed 0.7mm on the rear angle deck and 0.4mm on the edges. May need some adding to the cowling in front of the windscreen, but I'll wait and see what panel gaps I need for the canopy to hinge open first.
Edited by dr_gn on Friday 9th April 21:43
I know I probably shouldnt carp, but the front join between the screeen section and the hinging canopy doesn't look parallel to me. Can it be closed up a little or if you have the hood hinged open does it will not show
on the whole I like the work you are doing the fine adjustment of the canopy fitment area is really classy
I shouldnt keep looking
there's a whole darned slippery slope out there
on the whole I like the work you are doing the fine adjustment of the canopy fitment area is really classy
I shouldnt keep looking
there's a whole darned slippery slope out there
perdu said:
I know I probably shouldnt carp, but the front join between the screeen section and the hinging canopy doesn't look parallel to me. Can it be closed up a little or if you have the hood hinged open does it will not show
on the whole I like the work you are doing the fine adjustment of the canopy fitment area is really classy
I shouldnt keep looking
there's a whole darned slippery slope out there
Perdu,on the whole I like the work you are doing the fine adjustment of the canopy fitment area is really classy
I shouldnt keep looking
there's a whole darned slippery slope out there
It is parallel, but the top right is high. The front canopy needs lowering slightly on the front right (by filing some of the cockpit side away) then it will fit properly. I didn't want to start doing this fine stuff until I actually get around to finally fitting the canopy. I just wanted to get it 'near enough' at this stage just to confirm it will indeed fit to some degree of accuracy.
The shut gaps are too big also, but I'll wait until I get the 0.4mm brass rod for the hinge pins soldered in before setting it finally. I'm thinking of assembling it with a fag paper between the frames, then removing it when its all set.
Cheers,
Edited by dr_gn on Saturday 10th April 09:26
A thin shim sounds like a good idea, but how often do you intend to let the pilot and ground crew mess inside the cockpit?
Seriously, making the "moving-ness" work too well may compromise the model
But blimey it does all look great, very!
When you do the clear parts have you tried ordinary PVA adhesive, I used to use Evostik woodworking adhesive (would you believe that even after all the time since I did my last model I still have the plastic bottle on the bookshelf behind me? )
)
I found that as the white adhesive dried it becomes almost clear and in use it disappears
I used to mix a cocktail of it too, with PVA and Stuporgoo
The superglue dried slower in mixture with the PVA and was less agressive, making far less "fuming" which is my main reason for not supergluing canopies and the drying clear of the PVA helps the adhesive to vanish and lets things like stretched sprue aerials stick to the mast and fairleads easily, my Shackleton aerials were affixed like this as were its scratch built main undercart. The mixed adhesive makes a very strong joint
Not that I would use it on clear parts even when it is less agressive
PVA is best, just in very small portions
Still I am really enjoying watching Emil come to life
Seriously, making the "moving-ness" work too well may compromise the model
But blimey it does all look great, very!
When you do the clear parts have you tried ordinary PVA adhesive, I used to use Evostik woodworking adhesive (would you believe that even after all the time since I did my last model I still have the plastic bottle on the bookshelf behind me?
)I found that as the white adhesive dried it becomes almost clear and in use it disappears
I used to mix a cocktail of it too, with PVA and Stuporgoo
The superglue dried slower in mixture with the PVA and was less agressive, making far less "fuming" which is my main reason for not supergluing canopies and the drying clear of the PVA helps the adhesive to vanish and lets things like stretched sprue aerials stick to the mast and fairleads easily, my Shackleton aerials were affixed like this as were its scratch built main undercart. The mixed adhesive makes a very strong joint
Not that I would use it on clear parts even when it is less agressive
PVA is best, just in very small portions
Still I am really enjoying watching Emil come to life
Perdu,
Thanks for the advice on sticking acetate/clear parts. I've used Evo-Stik PVA before, and I recently bought some "Formula 560 - the world's best canopy glue" (which is probably Evo-Stik PVA re-packaged and 10x the price). It apparently "bonds canopies and plastic parts to almost anything". (but knowing my luck, probably not brass). The problem is paint: I primed the brass frame with Tamiya fine surface primer, and it comes off in flakes just by peeling low tack masking tape on and off. I'm hoping matt acrylic paint will stick to it really well, and that the PVA will stick to the acrylic. The last thing I want is a bright gold interior frame and flaky glue. Won't risk cyano because of the misting. Epoxy might do the job, but would be a disaster if it smudged. Luckily only two clear parts are curved, the rest are flat panels, so shouldn't be a problem.
How many times will the canopy open? no idea because it's going on one of my aluminium stands with the u/c up (landing gear completely ruins the aesthetics of an aircraft IMHO - they were designed to fly, not drive). Why am I therefore detailing the engine and cockpit? I don't know, just seemed like a good model to practice various techniques on (it was effectively free after all). If I can open the cockpit, more of the interior will be visible - even if it's temporary.
dr_gn said:
Perdu,
Thanks for the advice on sticking acetate/clear parts. I've used Evo-Stik PVA before, and I recently bought some "Formula 560 - the world's best canopy glue" (which is probably Evo-Stik PVA re-packaged and 10x the price). It apparently "bonds canopies and plastic parts to almost anything". (but knowing my luck, probably not brass). The problem is paint: I primed the brass frame with Tamiya fine surface primer, and it comes off in flakes just by peeling low tack masking tape on and off. I'm hoping matt acrylic paint will stick to it really well, and that the PVA will stick to the acrylic. The last thing I want is a bright gold interior frame and flaky glue. Won't risk cyano because of the misting. Epoxy might do the job, but would be a disaster if it smudged. Luckily only two clear parts are curved, the rest are flat panels, so shouldn't be a problem.
How many times will the canopy open? no idea because it's going on one of my aluminium stands with the u/c up (landing gear completely ruins the aesthetics of an aircraft IMHO - they were designed to fly, not drive). Why am I therefore detailing the engine and cockpit? I don't know, just seemed like a good model to practice various techniques on (it was effectively free after all). If I can open the cockpit, more of the interior will be visible - even if it's temporary.
I think if this was my model I would forget all the cleverd!cky modern acrylics and posh aibrushesThanks for the advice on sticking acetate/clear parts. I've used Evo-Stik PVA before, and I recently bought some "Formula 560 - the world's best canopy glue" (which is probably Evo-Stik PVA re-packaged and 10x the price). It apparently "bonds canopies and plastic parts to almost anything". (but knowing my luck, probably not brass). The problem is paint: I primed the brass frame with Tamiya fine surface primer, and it comes off in flakes just by peeling low tack masking tape on and off. I'm hoping matt acrylic paint will stick to it really well, and that the PVA will stick to the acrylic. The last thing I want is a bright gold interior frame and flaky glue. Won't risk cyano because of the misting. Epoxy might do the job, but would be a disaster if it smudged. Luckily only two clear parts are curved, the rest are flat panels, so shouldn't be a problem.
How many times will the canopy open? no idea because it's going on one of my aluminium stands with the u/c up (landing gear completely ruins the aesthetics of an aircraft IMHO - they were designed to fly, not drive). Why am I therefore detailing the engine and cockpit? I don't know, just seemed like a good model to practice various techniques on (it was effectively free after all). If I can open the cockpit, more of the interior will be visible - even if it's temporary.
I'd go back to basics and first prime with a Holts zink primer (auto-paint) after either fine wet-n-dry or coarse wire wool.
Let it dry 24hrs minimum
then get a tin of Humbrol RLM grey enamel, stir like buggery and with a fine brush paint the thing
Another tack would be to spray the whole framework with clear gloss varnish before overpainting the metal. The varnish is likely to "hold together" better than a matt surfaced paint and give a finishing surface fit to overpaint
the paint that lifts does so because here's no cohesive grip between the droplets as they tend to dry in the air if they're matt finish, before landing
Glossy paints seem to spray wetter and stick alongside each other maybe cos the thinners that are part of a gloss finish are stickier
Its like learning airbrushing again, working on metals
I did some white metal parts on the Vulcan I built for my mate's shop, I needed to experiment with different primers to gbe a paintable surface
I think I used a Holts white primer eventually
The paint lifted as there was no key to the brass, not due to the paint being matt or gloss. You need to rub it down with wet and dry (that'll be fun... fibreglass pencils are also useful here), thoroughly clean it with thinners and then etch prime it. Sometimes it's easier to rub down before folding the parts especially if they aren't being soldered.
Back to what Perdu was saying with regards to how much interaction are you going to have with the canopy after the model is complete, are you going to clear coat the finished model and if so, with what? The reason I ask is that I have had some success before with securing glazing with the clear coat. I'd be tempted to paint the canopy frame and then, if using Klear, light coat of Klear, pace the glazing sections in place whilst Klear still wet and then another coat of Klear both inside and out to seal.
Back to what Perdu was saying with regards to how much interaction are you going to have with the canopy after the model is complete, are you going to clear coat the finished model and if so, with what? The reason I ask is that I have had some success before with securing glazing with the clear coat. I'd be tempted to paint the canopy frame and then, if using Klear, light coat of Klear, pace the glazing sections in place whilst Klear still wet and then another coat of Klear both inside and out to seal.
OK chaps, thanks for the advice.
First off: Brillo Pad? You must be joking! These things are tiny.
Second: regarding matt/gloss sticking to brass: I wasn't meaning that matt sticks necessarily any better than gloss. I have read an article recently on painting photo etch instrument panels which stated that acrylics stick to metals like s t to a blanket. I assumed that once 'stuck' the rough matt surface would be a good (or better) key for the PVA to secure the glazing.
I did clean the frames with detergent/tiny paint brush, followed by clutch/brake cleaner and thorough drying, but the Tamiya primer still didn't stick. Keying the surface with abrasive might just be possible, but it will be *very* difficult on something as delicate as these frames. I'll try the Holts primer as suggested and hope it doesn't react with the top coats.
The model will be coated with Vallejo Air satin varnish. I did suggest in a previous post securing the glazing with Klear, then when dry, dipping the entire canopy in Klear as usual practice for a solid canopy, then masking and painting top coats as usual. I posted that on Britmodeller too, but there were no comments, so I assumed it was a bad idea (even though I'm not sure if anyone has actually tried it).
Cheers,
First off: Brillo Pad? You must be joking! These things are tiny.
Second: regarding matt/gloss sticking to brass: I wasn't meaning that matt sticks necessarily any better than gloss. I have read an article recently on painting photo etch instrument panels which stated that acrylics stick to metals like s
t to a blanket. I assumed that once 'stuck' the rough matt surface would be a good (or better) key for the PVA to secure the glazing.I did clean the frames with detergent/tiny paint brush, followed by clutch/brake cleaner and thorough drying, but the Tamiya primer still didn't stick. Keying the surface with abrasive might just be possible, but it will be *very* difficult on something as delicate as these frames. I'll try the Holts primer as suggested and hope it doesn't react with the top coats.
The model will be coated with Vallejo Air satin varnish. I did suggest in a previous post securing the glazing with Klear, then when dry, dipping the entire canopy in Klear as usual practice for a solid canopy, then masking and painting top coats as usual. I posted that on Britmodeller too, but there were no comments, so I assumed it was a bad idea (even though I'm not sure if anyone has actually tried it).
Cheers,
I think you'll be better off stripping the canopy of paint as otherwise you're just asking for issues down the line. Grab yourself a fibreglass pencil and once all the paint is off give it a rub over with that. You need to key the surface, ideally even if you are using self etch primer, to get anything to stick to it.
With regards to sticking the glazing in, remember someone was first to try all the techniques that are used, so don;t be frightened of being a pioneer. I've used in on auto models so there isn't really any reason why it won't work in this case.
With regards to sticking the glazing in, remember someone was first to try all the techniques that are used, so don;t be frightened of being a pioneer. I've used in on auto models so there isn't really any reason why it won't work in this case.
Red Firecracker said:
I think you'll be better off stripping the canopy of paint as otherwise you're just asking for issues down the line. Grab yourself a fibreglass pencil and once all the paint is off give it a rub over with that. You need to key the surface, ideally even if you are using self etch primer, to get anything to stick to it.
With regards to sticking the glazing in, remember someone was first to try all the techniques that are used, so don;t be frightened of being a pioneer. I've used in on auto models so there isn't really any reason why it won't work in this case.
I think I'll try this sequence then:With regards to sticking the glazing in, remember someone was first to try all the techniques that are used, so don;t be frightened of being a pioneer. I've used in on auto models so there isn't really any reason why it won't work in this case.
Stripping back to brass, and roughening surface with fibreglass pen.
Priming with Etch primer.
[then apply Tamiya Surface Primer?]
Painting with RLM grey acrylic (fingers crossed it doesn't react).
PVA-ing glazing in place.
Dipping entire sub-assembly in Klear.
At least on the front and rear sections. The middle bit has 3 sliding panels, which I would like to be able to slide. Perdu - no other reason than because it's possible to slide them, and, like the hinges actually hinging, I'm pig-headed enough to want to make them work as designed! I want my money's worth!
Red Firecracker said:
Sounds like a plan.
Can you complete it far enough to prove the concept without fixing it to the model? Just thinking that if you can, the worst that can happen is that it doesn't work so it's a restrip and start again. Obviously a bit less palatable if it's fixed to the body.
Yep, it would all be done before attaching to the fuselage. Then all that remains is to mask and paint as normal.Can you complete it far enough to prove the concept without fixing it to the model? Just thinking that if you can, the worst that can happen is that it doesn't work so it's a restrip and start again. Obviously a bit less palatable if it's fixed to the body.
Gassing Station | Scale Models | Top of Page | What's New | My Stuff