Latest Project: Matchbox 1/32 Bf-109E-3
Discussion


that DOES sound like a plan
don't forget that if you use PVA to glue it to the airframe you can always retrieve any disasters by slicing the PVA away when dried, it's always softer than the associated plastic. A fine fresh scalpel blade works wonders if used sensitively
I am with you in wanting "features" to do something even if it is ONLY a model How many times did I hear that in the past) Ive been known to add an extra rail at times to make a window open or some such, even once make a hinge so A Frog Wesex tail could hinge for deck/hangar stowage.
That was NOT a pretty sight but was equally worth a try...
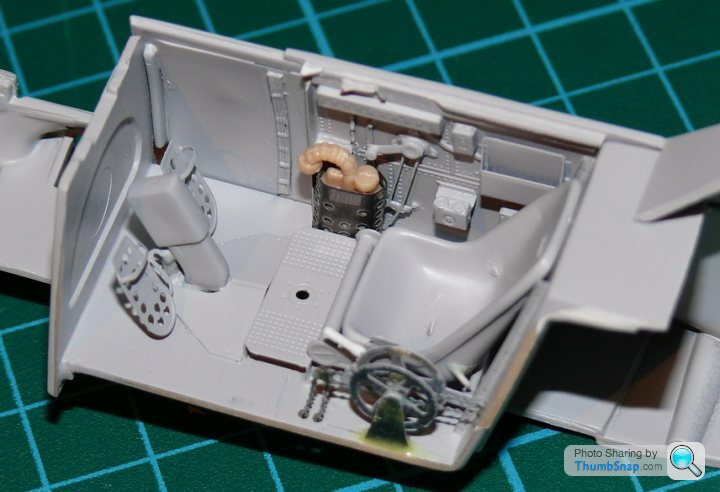
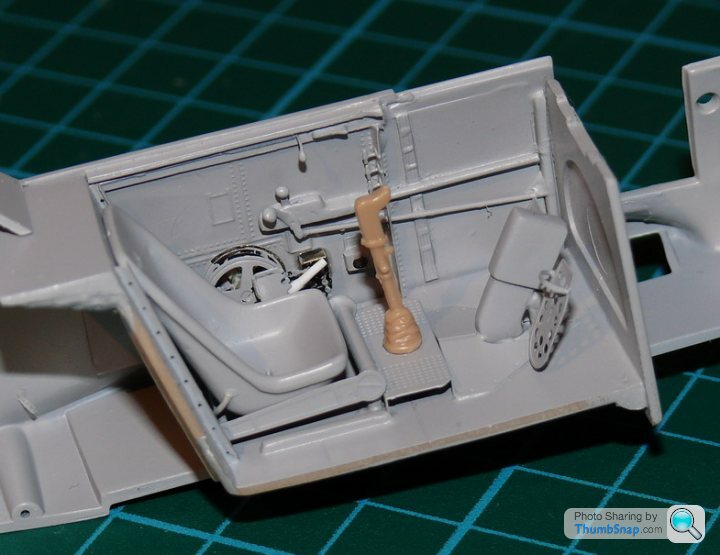
Her's some WIP in the cockpit. It's taken a fair amount of cutting and shutting to get stuff to fit, and I'm surprised that Eduard etch kits need such a lot of work to get right. Some stuff just cannot work the way they show it on the instructions. There's a fair amount of scratch-builiong in there too: you can see I've started adding lead and copper wiring in some places, and the pivots for the trim wheels are plastic rod. The knobs on the p/e levers are blobs of pva - works quite well:

For a first attempt at anything like this I'm fairly happy. The detail is there even if the exact positioning of things might be a bit out. It will look better when painted!
For a first attempt at anything like this I'm fairly happy. The detail is there even if the exact positioning of things might be a bit out. It will look better when painted!
perdu said:
lots to be proud of there
the additional parts look to give a "working machine" look to the cockpit I think you have another fine model on its way here
fettling the bits to fit is another string to a modeller's bow, versatility - r - us

Looks very nice to me
Thanks Perdu.the additional parts look to give a "working machine" look to the cockpit I think you have another fine model on its way here
fettling the bits to fit is another string to a modeller's bow, versatility - r - us
Looks very nice to me
Do you have a good way of making cable/pipe clips? I'm thinking of crushing some 0.3mm lead wire and cutting tiny strips off it to arch over the wiring/plumbing at various points.
Cheers,
dr_gn said:
Thanks Perdu.
Do you have a good way of making cable/pipe clips? I'm thinking of crushing some 0.3mm lead wire and cutting tiny strips off it to arch over the wiring/plumbing at various points.
Cheers,
Thick tinfoil, or even better, thick foil tape cut into strips? I'd imagine the clips would be flat metal so a bit of wire over the top may look a little incongruous?Do you have a good way of making cable/pipe clips? I'm thinking of crushing some 0.3mm lead wire and cutting tiny strips off it to arch over the wiring/plumbing at various points.
Cheers,
Red Firecracker said:
dr_gn said:
Thanks Perdu.
Do you have a good way of making cable/pipe clips? I'm thinking of crushing some 0.3mm lead wire and cutting tiny strips off it to arch over the wiring/plumbing at various points.
Cheers,
Thick tinfoil, or even better, thick foil tape cut into strips? I'd imagine the clips would be flat metal so a bit of wire over the top may look a little incongruous?Do you have a good way of making cable/pipe clips? I'm thinking of crushing some 0.3mm lead wire and cutting tiny strips off it to arch over the wiring/plumbing at various points.
Cheers,
dr_gn said:
Red Firecracker said:
Should have read that a bit more, shouldn't I. I'm still in the foil/tape camp though.
Fair enough, I'll try some foil.dr_gn said:
dr_gn said:
Red Firecracker said:
Should have read that a bit more, shouldn't I. I'm still in the foil/tape camp though.
Fair enough, I'll try some foil.Are they like the modern "P" clips or more like the omega sign with a loop and a flat on each side?
You know I advocated PVA glue earlier, if that stuff is applied where you want a clip, and you wait until it is drying but not set you can push it about with a pointer or fine screwdriver to a shape of your own choice. And adding a touch of cyano helps it stiffen up too
When it dries "et viola" and "sacre blèu", a clip!
apply the paint finish of choice, you dont need to make clips, you only have to make clips appear.
It will take a bit of practise, but it can be done
The eye is the judge, and much of modelling is sleight of hand. like panel lines for instance
perdu said:
dr_gn said:
dr_gn said:
Red Firecracker said:
Should have read that a bit more, shouldn't I. I'm still in the foil/tape camp though.
Fair enough, I'll try some foil.Are they like the modern "P" clips or more like the omega sign with a loop and a flat on each side?
You know I advocated PVA glue earlier, if that stuff is applied where you want a clip, and you wait until it is drying but not set you can push it about with a pointer or fine screwdriver to a shape of your own choice. And adding a touch of cyano helps it stiffen up too
When it dries "et viola" and "sacre blèu", a clip!
apply the paint finish of choice, you dont need to make clips, you only have to make clips appear.
It will take a bit of practise, but it can be done
The eye is the judge, and much of modelling is sleight of hand. like panel lines for instance
Yes 'p' clips, or straddle clips that secure a flat bunch of pipes. I thought about PVA, but assumed it would just form a blob and look a bit rubbish. I'll give your method a go tonight.
Cheers
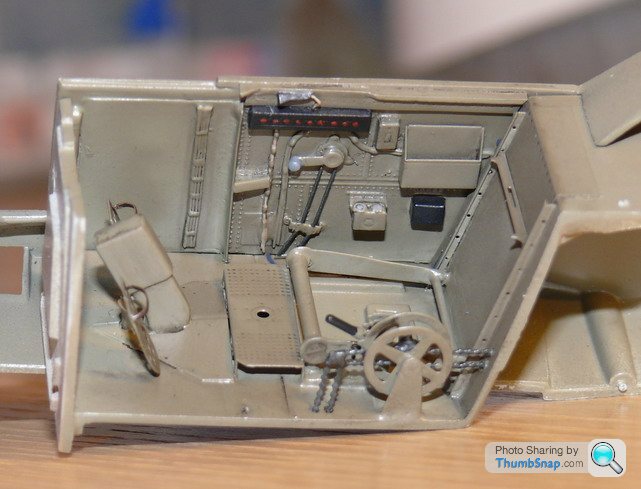
Here's some more progress with the cockpit. I repositioned the trim wheels because I found the Eduard positioning of the chains and gears was totally wrong. Just need to add a couple of wires to the port side, the oxygen lines to the central bit, and refine the oxygen regulator and joystick a bit. Then painting...
It's not turned out as well as I hoped, but I have learned a lot about how to use photo-etch and scratch-build. I hope I don't mess up the paint!
It's not turned out as well as I hoped, but I have learned a lot about how to use photo-etch and scratch-build. I hope I don't mess up the paint!
Edited by dr_gn on Thursday 22 April 08:07
dr_gn said:
Here's some more progress with the cockpit. I repositioned the trim wheels because I found the Eduard positioning of the chains and gears was totally wrong. Just need to add a couple of wires to the port side, the oxygen lines to the central bit, and refine the oxygen regulator and joystick a bit. Then painting...
It's not turned out as well as I hoped, but I have learned a lot about how to use photo-etch and scratch-build. I hope I don't mess up the paint!
And the pics? ......It's not turned out as well as I hoped, but I have learned a lot about how to use photo-etch and scratch-build. I hope I don't mess up the paint!
.Mark said:
dr_gn said:
Here's some more progress with the cockpit. I repositioned the trim wheels because I found the Eduard positioning of the chains and gears was totally wrong. Just need to add a couple of wires to the port side, the oxygen lines to the central bit, and refine the oxygen regulator and joystick a bit. Then painting...
It's not turned out as well as I hoped, but I have learned a lot about how to use photo-etch and scratch-build. I hope I don't mess up the paint!
And the pics? ......It's not turned out as well as I hoped, but I have learned a lot about how to use photo-etch and scratch-build. I hope I don't mess up the paint!
dr_gn said:
.Mark said:
dr_gn said:
Here's some more progress with the cockpit. I repositioned the trim wheels because I found the Eduard positioning of the chains and gears was totally wrong. Just need to add a couple of wires to the port side, the oxygen lines to the central bit, and refine the oxygen regulator and joystick a bit. Then painting...
It's not turned out as well as I hoped, but I have learned a lot about how to use photo-etch and scratch-build. I hope I don't mess up the paint!
And the pics? ......It's not turned out as well as I hoped, but I have learned a lot about how to use photo-etch and scratch-build. I hope I don't mess up the paint!

.Mark said:
dr_gn said:
.Mark said:
dr_gn said:
Here's some more progress with the cockpit. I repositioned the trim wheels because I found the Eduard positioning of the chains and gears was totally wrong. Just need to add a couple of wires to the port side, the oxygen lines to the central bit, and refine the oxygen regulator and joystick a bit. Then painting...
It's not turned out as well as I hoped, but I have learned a lot about how to use photo-etch and scratch-build. I hope I don't mess up the paint!
And the pics? ......It's not turned out as well as I hoped, but I have learned a lot about how to use photo-etch and scratch-build. I hope I don't mess up the paint!

It looks damned nice
well worth having a go and when you are into the detail paint stage (seen your work, so I know you will be) it will look fantastic
all the bits where hands rub the metal shiny and the bits where the paint gets discoloured and kicked about
this looks perfect for that kind of job
I am really enjoying this
and yes
'bated breath for the next phase
great
perdu said:
It looks damned nice
well worth having a go and when you are into the detail paint stage (seen your work, so I know you will be) it will look fantastic
all the bits where hands rub the metal shiny and the bits where the paint gets discoloured and kicked about
this looks perfect for that kind of job
I am really enjoying this
and yes
'bated breath for the next phase
great
Thanks Perdu,well worth having a go and when you are into the detail paint stage (seen your work, so I know you will be) it will look fantastic
all the bits where hands rub the metal shiny and the bits where the paint gets discoloured and kicked about
this looks perfect for that kind of job
I am really enjoying this
and yes
'bated breath for the next phase
great
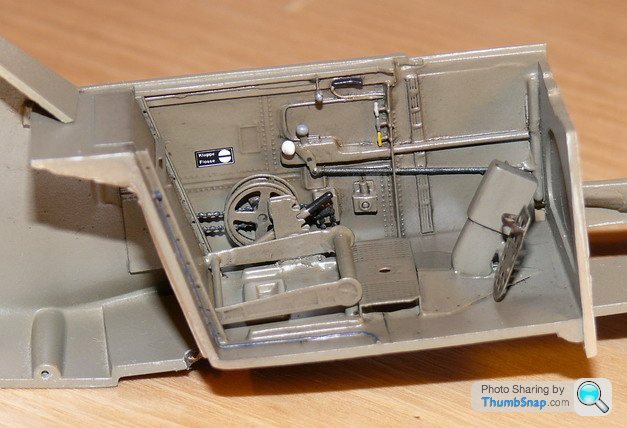
As you know I'm fairly critical of my own work, and in this case I think I made the error of too many coats of grey primer. It's dulled some of the sharp detail too much. I couldn't resist the temptaion of seeing how it all looked under one coat of paint (ie checking for gaps etc) at various stages of assembly. I should have left it until everythig was in place and then primed it and corrected any errors. Never having done detailling/scratchbuilding before I didn't know how it would turn out. You live and learn!
Cheers,
Gassing Station | Scale Models | Top of Page | What's New | My Stuff