GB: Academy : DR_GN
Discussion


Here's the resin/etch/vac vs. some of the original kit details. Not convinced the instrument panel is better overall - no raised numerals or needles:

Other stuff tonight was adding stiffeners to the flaps, and adding some detail to the wheel wells. Just needs some plumbing now and that lot's ready for paint :
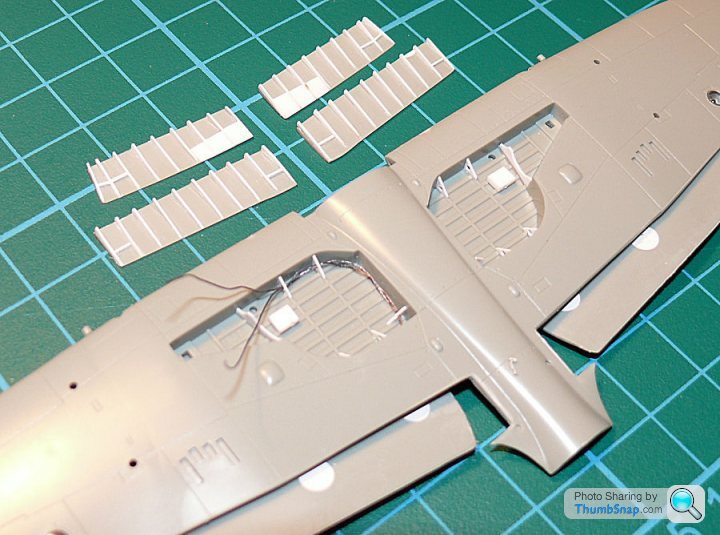
Other stuff tonight was adding stiffeners to the flaps, and adding some detail to the wheel wells. Just needs some plumbing now and that lot's ready for paint :
I still have to sit back and be amazed at the scratch building you guys do.
I know you'll say it is simple, but half the skill is knowing what to add.
Looking at that pic, tells a thousand words. I guess half the skill is having the tools to make fine enough cuts to make the shape.
BTW: Just found out tonight how easily a Windsor & Newton wash runs along the creases (even on a matt finish). and here was me using Promodellers for everything.
The_Jackal said:
I still have to sit back and be amazed at the scratch building you guys do.
I know you'll say it is simple, but half the skill is knowing what to add.
Looking at that pic, tells a thousand words. I guess half the skill is having the tools to make fine enough cuts to make the shape.
BTW: Just found out tonight how easily a Windsor & Newton wash runs along the creases (even on a matt finish). and here was me using Promodellers for everything.
Actually it's just a razor blade and a scalpel ! I know you'll say it is simple, but half the skill is knowing what to add.
Looking at that pic, tells a thousand words. I guess half the skill is having the tools to make fine enough cuts to make the shape.
BTW: Just found out tonight how easily a Windsor & Newton wash runs along the creases (even on a matt finish). and here was me using Promodellers for everything.
RE. knowing what to add - it's trial and error. I'm going to remove 4 of the triangular fillets per well, becasue they look too big compared with a photo, plus the pipework didn't look right fed through them. Same with the flaps, the large reinforcements should really be rectangular, not tapered, so I'll fill them to make them look better. It's sometimes very difficult to know if something will look right until everything is glued in place!
Just have a go. Sometimes it's better to leave alone, sometimes to add all the detail, but more often than not, just add a bit to suggest what's really there.

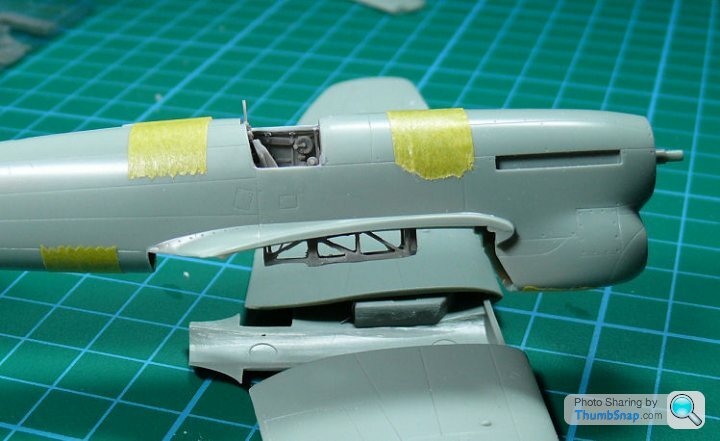
Bit more progress tonight. The original plastic wing stubs were removed and drilled out, and the 20mm cannon barrels were made out of 1mm o/d brass tube (machined metal parts always look better in real machined metal IMO):

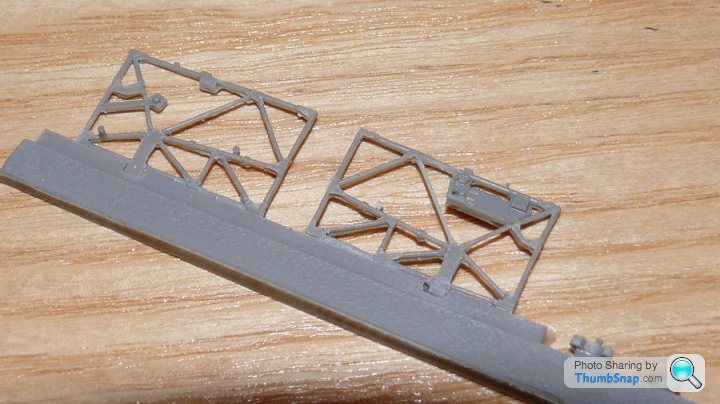
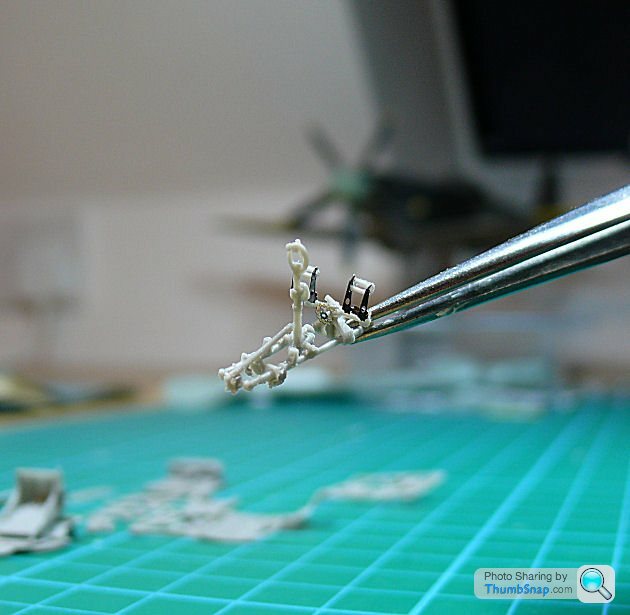
And made a start on removing flash from some of the resin cockpit spaceframe. You can see on the right one that I had to make a new tubular member out of sprue becasue the original one disintegrated when I was smoothing it with a blade. Never used resin before as a detail kit, so thought it would be a good opportunity to practice on a model I'm not too bothered about:
I thought 1:72 would be my preferred scale for future builds after the 1:32 '109, but after this Tempest I think 1:48 will be my personal preference for aircraft. I like to model mechanical detail, and 1:72 just isn't big enough, and 1:32 aircraft take up a lot of room.
This is all looking very interesting
I think I'd miss out the resin sidewall details, not convinced there is room enough to do them credit in there (Not convinced I should have done the same with polyrod in mine either)
The control units are worth while if they can be seen down there, throttle quad, radio units and u/c handles etc
Did I mention how much I like the flaps
wizzzzzard stuff
perdu said:
This is all looking very interesting
I think I'd miss out the resin sidewall details, not convinced there is room enough to do them credit in there (Not convinced I should have done the same with polyrod in mine either)
The control units are worth while if they can be seen down there, throttle quad, radio units and u/c handles etc
Did I mention how much I like the flaps
wizzzzzard stuff
Ta Perdu, it's kind of like your cockpit only cheating. I'm cutting the emergency hatch out and having it resting on the wing or on a table next to the fuselage, that way a lot more of the interior detail can be seen I reckon.I think I'd miss out the resin sidewall details, not convinced there is room enough to do them credit in there (Not convinced I should have done the same with polyrod in mine either)
The control units are worth while if they can be seen down there, throttle quad, radio units and u/c handles etc
Did I mention how much I like the flaps
wizzzzzard stuff
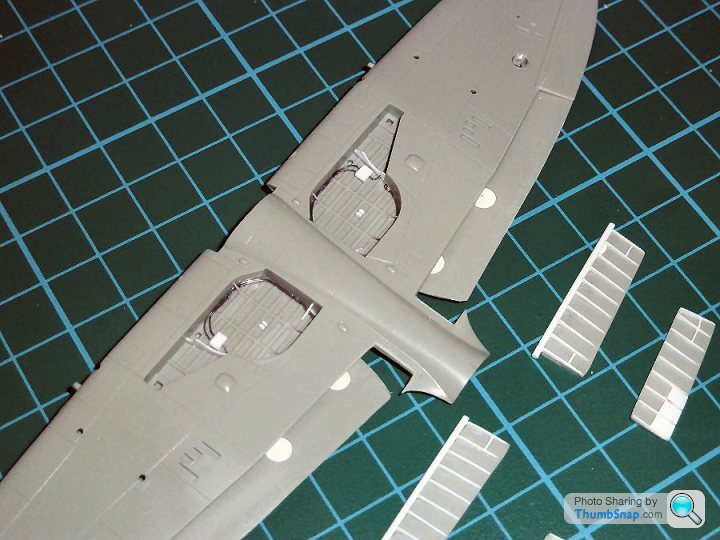
The flaps I posted weren't the latest incarnation - I wasn't happy with the filled in bits of the outboard ones, and the inner riblet spacing of the inboard ones wasn't perfectly symmetrical so I ripped all the offending riblets off and started again. Spot on now.
Finally decided on interior green for the wheel wells and flap inners. Couldn't live with silver, and I want some contrast with the u/c legs.
Not happy with the 3 bar gate things on the Academy u'c legs, they look crap. Can't do much about them really though 'cos they are a fairly integral part of the assembly. Still, all will be invisible when it's on a base I guess!
Yertis said:
Your build is very impressive Dr, as is Perdu's. Everything is so small though – no way I'm trying that! Whatever the next build theme is, I'm going to try and do it in 1/32.
Going to try assembling some resin tonight all being well. The instructions with the Resin Art kit are....shall we say vague? That, coupled with invisible parts might make this exercise a bit frustrating. Edited by Yertis on Tuesday 25th January 17:08
Can't wait to start on the 1:32 SE5a TBH !
I think the next GB (if there is one) should be 1:48, I'm convinced it'll be easier!
So I think the cockpit detail set is almost ready for assembly (somehow). This Resin Art kit is pretty s t overall. The instructions are almost non-existant, many of the components are poorly moulded, covered in flash and warped, and basically it's a nightmare. A lot of the levers and knobs I've had to make myself because they weren't on the sprues.

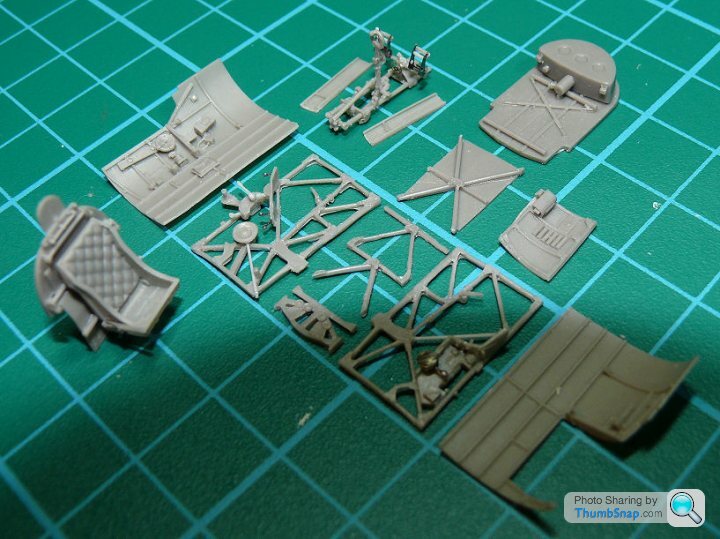

I've not been able to find a photo of a completed one yet, and it's no surprise. I seriously doubt whether anyone at Resin Art bothered to build a production kit and fit it to a model, if they had have done, they would have realised that the instructions needed re-drawing. Still, it was only £10.
t overall. The instructions are almost non-existant, many of the components are poorly moulded, covered in flash and warped, and basically it's a nightmare. A lot of the levers and knobs I've had to make myself because they weren't on the sprues.I've not been able to find a photo of a completed one yet, and it's no surprise. I seriously doubt whether anyone at Resin Art bothered to build a production kit and fit it to a model, if they had have done, they would have realised that the instructions needed re-drawing. Still, it was only £10.
tangerine_sedge said:
I look forward to seeing how all that is going to fit inside the fuselage! I dry-fitted the fuselage sides on the Revell kit, and couldn't see anything other than the pilot - hence why I didn't bother with an interior at all!
It doesn't fit inside the fuselage (it *can't* fit inside the fuselage, because it's about 5mm too deep). It doesn't even fit together to itself. It's the biggest sack of st I've ever had the misfortune to try to assemble. I cut the door away, and you can see quite a lot of the interior, but it's a monumental struggle. No way am I ever buying Resin Art s
t again.dr_gn said:
It doesn't fit inside the fuselage (it *can't* fit inside the fuselage, because it's about 5mm too deep). It doesn't even fit together to itself. It's the biggest sack of st I've ever had the misfortune to try to assemble.
I cut the door away, and you can see quite a lot of the interior, but it's a monumental struggle. No way am I ever buying Resin Art st again.
And I thought I was struggling to get the exhausts off the sprue...both of them broke in 3 t I've ever had the misfortune to try to assemble. I cut the door away, and you can see quite a lot of the interior, but it's a monumental struggle. No way am I ever buying Resin Art s
t again.
Having tried it, I'm not sold on resin detailing.
mcdjl said:
And I thought I was struggling to get the exhausts off the sprue...both of them broke in 3
Having tried it, I'm not sold on resin detailing.
Whoever designed these Resin Art kits are a bunch of fHaving tried it, I'm not sold on resin detailing.
king retards. A bit of very simple redesign would make assembly foolproof and accurate (in fact it's easier to design them to fit, than to make them not fit).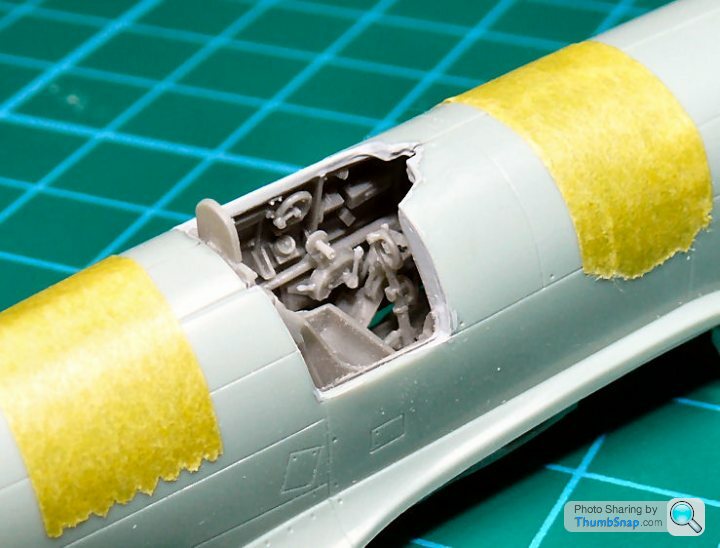
How in f
ks name is a 5mm spaceframe depth going to fit into a 2mm deep recess? Idiots. I've a good mind to send the damn thing back crushed up in a bag and ask for my money back - blatantly not fit for purpose. The quality of the resin is st too. Glad I scratch-built the flaps myself, far better quality I've absolutely no doubt.And at this stage I put it all in the box and smash it to bits.
Well, I have done, in the distant past. You've reminded me how frustrating modeling can be. I haven't got to that stage yet with this build, I've adopted the KISS principle for my return to modeling. Too much grief restoring the Quattro for more grief with a kit.
Well, I have done, in the distant past. You've reminded me how frustrating modeling can be. I haven't got to that stage yet with this build, I've adopted the KISS principle for my return to modeling. Too much grief restoring the Quattro for more grief with a kit.
Gassing Station | Scale Models | Top of Page | What's New | My Stuff