GB: Academy : DR_GN
Discussion


Thank god for that a properly talented modeller like Dr_Gn has found the same problems that I did with the Resin Arts s te. I was thinking that it was my fault.
However I was not quite as patient with my temper
£34.00 wasted.
Now consoling myself with the very nice Tamiya Swordfish...1/48 my preferred size.
te. I was thinking that it was my fault.However I was not quite as patient with my temper
£34.00 wasted.
Now consoling myself with the very nice Tamiya Swordfish...1/48 my preferred size.
Zaxxon said:
Thank god for that a properly talented modeller like Dr_Gn has found the same problems that I did with the Resin Arts ste. I was thinking that it was my fault.
However I was not quite as patient with my temper
£34.00 wasted.
Now consoling myself with the very nice Tamiya Swordfish...1/48 my preferred size.
Not properly talented, just infinitely patient. te. I was thinking that it was my fault.However I was not quite as patient with my temper
£34.00 wasted.
Now consoling myself with the very nice Tamiya Swordfish...1/48 my preferred size.
If you've scrapped the whole model (you said £34 wasted, my Resin Art kit was 'only' £10) you should get another and build it OOB, it is a nice model.
Zaxxon said:
Resin Art 2 sets, PE, Kit, spare decals and masks were £34
Will see about a OOB build, enjoying the Swordfish at the mo, and then the big one...the Wingnut Wings DVa.
Buy another and build it OOB. Will see about a OOB build, enjoying the Swordfish at the mo, and then the big one...the Wingnut Wings DVa.
As it stands you've spent £34 and have nothing to show for it. Spend £40 and you have a model, and some practice, and some bad experience you'll learn from.
Presumbly you can still use the decals and masks?

pacman1 said:
In the supermarket today, I managed to pick up some of this, another in dark grey, and one of these, all end of line, the lot for a fiver! 
Very clever, but this is you in a couple of years' time:http://www.youtube.com/watch?v=CCm1ZxDs8io
Best of luck!
dr_gn said:
pacman1 said:
In the supermarket today, I managed to pick up some of this, another in dark grey, and one of these, all end of line, the lot for a fiver!
Very clever, but this is you in a couple of years' time:http://www.youtube.com/watch?v=CCm1ZxDs8io
Best of luck!
 That's hilarious, so much uncomfortable coughing going on. And then at 3:40, "..if I can remember how these things open.. AAH there we go.."
Slow progress. I think the cockpit areas are just about ready to paint now though. I've had to severely butcher the spaceframe to fit, and many of the smaller details such as the gunsight and compass mounts were so fragile that they disintegrated just by touching them. I replaced these with stretched sprue. Same with the smaller switches and levers: thin sprue cyanoed in place and a blob of PVA to represent knobs looks far better than the detail kit stuff.
I think they tried too hard with this detail kit. The cockpit sides are good, as is the spaceframe, but there is much more detail than can be seen (let alone assembled) and much of this over-complication leads to the impossible fit within the fuselage. Totally unnecessary and totally st design (I may have mentioned that before).
Also added some plasticard features to the cockpit area so that I can finally assemble it more accurately.
Finally, cut out the rear deck of the canopy so that the resin part can be fitted flush.
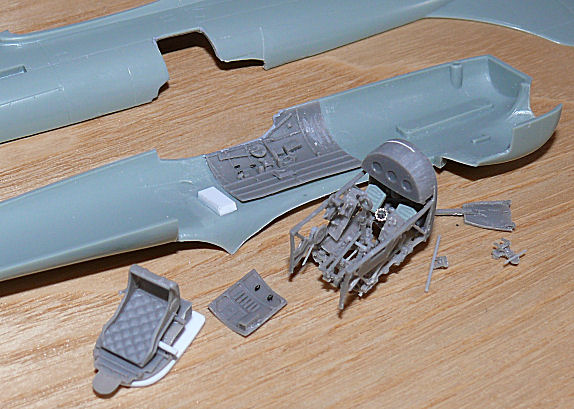
I think they tried too hard with this detail kit. The cockpit sides are good, as is the spaceframe, but there is much more detail than can be seen (let alone assembled) and much of this over-complication leads to the impossible fit within the fuselage. Totally unnecessary and totally s
t design (I may have mentioned that before).Also added some plasticard features to the cockpit area so that I can finally assemble it more accurately.
Finally, cut out the rear deck of the canopy so that the resin part can be fitted flush.
Stick with it dr, that looks very good so far! I've switched my attention to a Hasegawa 109K-4 from my dormant stock (I still bought the odd plane kit even if I got no further than the first flourish of enthusiasm) and an ageing Eduard etched interior I'd laid down at the time, it took me all of yesterday to get it together so to have got that far with a less than co-operative set that is well away from your 1/32 comfort zone is very impressive and something I'm sympathising with!!


Yertis said:
Awe-inspiring, really, considering how small it all is.
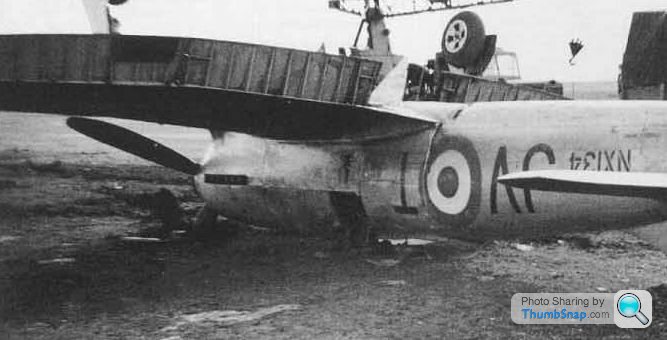
Are we sure the inner parts of the undercarriage doors are a/c grey/green?
It looks OK, but I've got the old problem of varnish: the matt varnish leaves a white residue if it's too thin, or too thick. You can see it in the creases of the seat cushion. Will have to try to resolve it somehow.Are we sure the inner parts of the undercarriage doors are a/c grey/green?
The u/c doors were apparently either silver or interior green. The instructions say silver, but I don't like the look of that, so I went for green. Simple as that really!
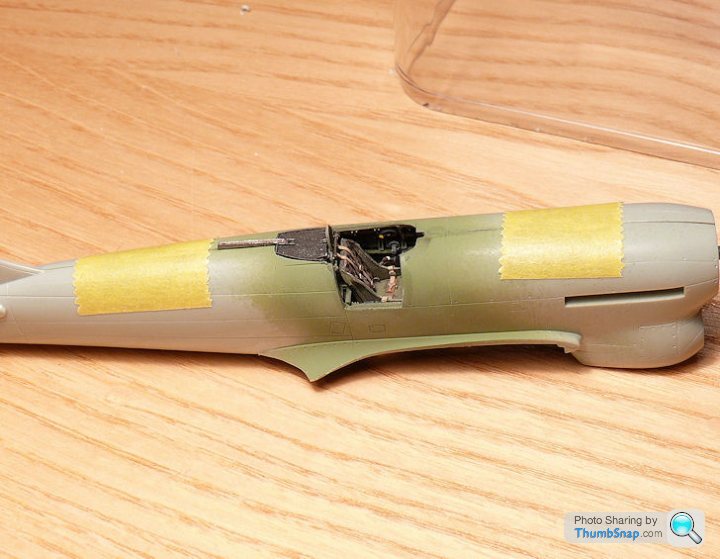
Surprising how much detail is seen when assembled - in fact everything except the rear of where the instrument panel will fit is clearly visible:


Gassing Station | Scale Models | Top of Page | What's New | My Stuff