BARGAIN BASEMENT ST - Building a budget race car
Discussion


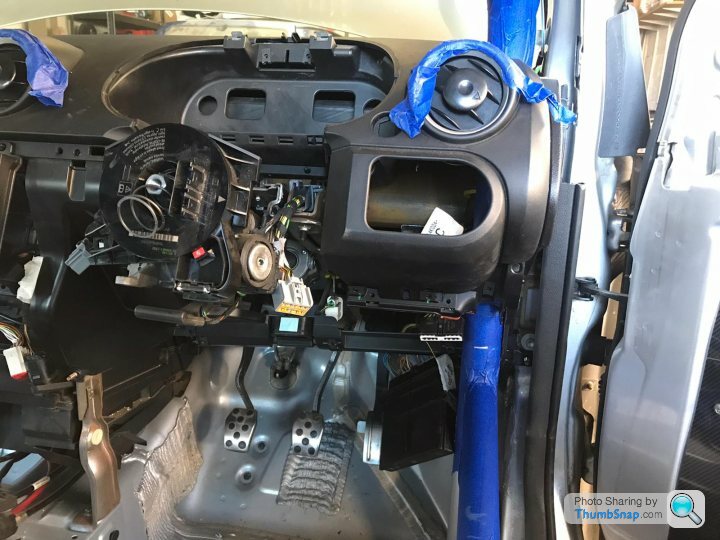
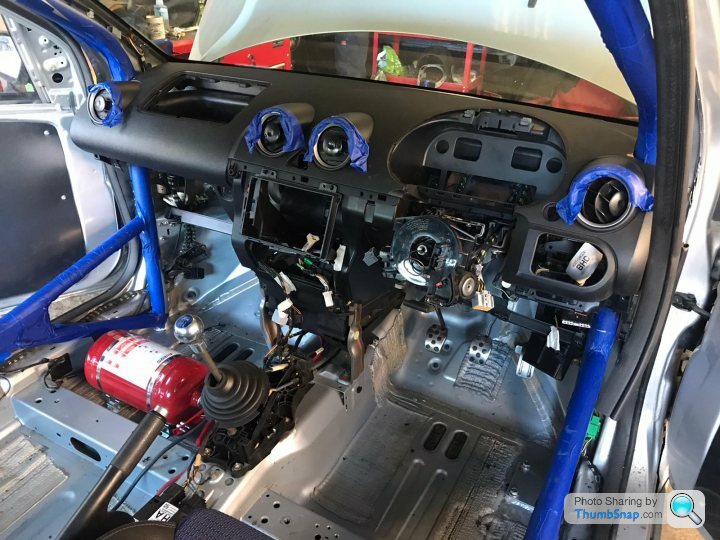
REMOVING THE DASHBOARD
The final bit of prep before roll cage fitting was the dashboard removal. The first step of this was taking out the stereo (very simple).
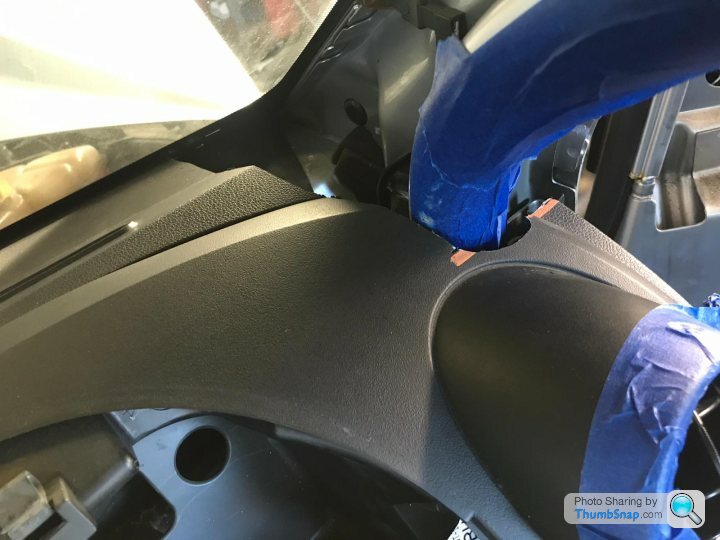
The second step was removing both of the front airbags. Disconnecting the battery, I left the car for about half an hour just to be safe and then took out the driver side airbag first.
The steering wheel cowlings come off very easily, but the mechanism for removing the airbag is very fiddly indeed. It is well worth watching a couple of videos of this first before attempting. The speedo cluster is also very simple to remove; important tip on this is that it has a 2-stage clip holding on the wiring loom. When re-fitting this later make sure you clip it through both stages... if you don’t then your engine is liable to cut out whilst doing 70mph on the motorway. Ask me how I know.
Once the driver airbag was off I did the passenger side too - this was much easier as there was no knack to it. Just remove the glovebox to get access and then remove the several bolts holding it in. The dash fascia even detaches from the airbag so you can put it neatly back on afterwards.
The centre console was next. It comes apart in several pieces and there are a number of well hidden screws. An important tip (that I didn’t know beforehand!) is that the screen heater buttons can be popped out giving access to 2 screws behind.
Be prepared to reassemble this bizarre concoction of Ford’s finest fiddly bits. I’m not sure how to describe the mechanism for the heater direction control, other than to say its a right b*stard to get back in again when refitting the dash.
These nuts are slightly hidden underneath the door seal rubbers. But once these are out - if you still can’t shift the dash then check you haven’t missed any of the bolts on the drivers side, there was at least 1 that caught me out.
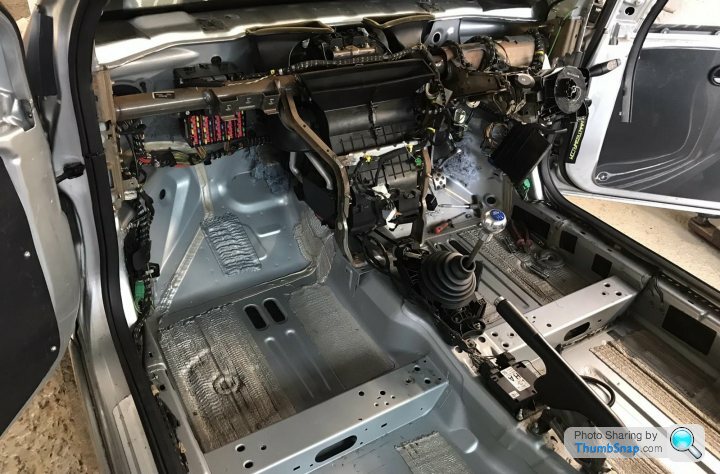
One time consuming job I hadn’t bargained for was the removal of the foam layer of insulation underneath the dash. My poor dad and his friend were lumbered with this job and it was more work than it looked. Sorry dad!
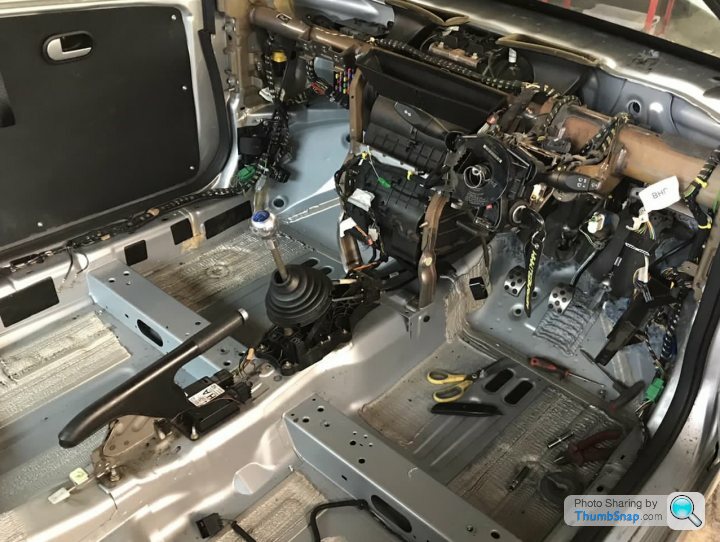
So that was the dash out. Time for roll cage fitting!
The final bit of prep before roll cage fitting was the dashboard removal. The first step of this was taking out the stereo (very simple).
The second step was removing both of the front airbags. Disconnecting the battery, I left the car for about half an hour just to be safe and then took out the driver side airbag first.
The steering wheel cowlings come off very easily, but the mechanism for removing the airbag is very fiddly indeed. It is well worth watching a couple of videos of this first before attempting. The speedo cluster is also very simple to remove; important tip on this is that it has a 2-stage clip holding on the wiring loom. When re-fitting this later make sure you clip it through both stages... if you don’t then your engine is liable to cut out whilst doing 70mph on the motorway. Ask me how I know.
Once the driver airbag was off I did the passenger side too - this was much easier as there was no knack to it. Just remove the glovebox to get access and then remove the several bolts holding it in. The dash fascia even detaches from the airbag so you can put it neatly back on afterwards.
The centre console was next. It comes apart in several pieces and there are a number of well hidden screws. An important tip (that I didn’t know beforehand!) is that the screen heater buttons can be popped out giving access to 2 screws behind.
Be prepared to reassemble this bizarre concoction of Ford’s finest fiddly bits. I’m not sure how to describe the mechanism for the heater direction control, other than to say its a right b*stard to get back in again when refitting the dash.
These nuts are slightly hidden underneath the door seal rubbers. But once these are out - if you still can’t shift the dash then check you haven’t missed any of the bolts on the drivers side, there was at least 1 that caught me out.
One time consuming job I hadn’t bargained for was the removal of the foam layer of insulation underneath the dash. My poor dad and his friend were lumbered with this job and it was more work than it looked. Sorry dad!
So that was the dash out. Time for roll cage fitting!
Edited by SparrowHawk on Wednesday 14th April 01:59
ROLL CAGE FITTING
I dropped off the car to JP Cages on a Saturday, with the plan of picking it back up again the following Saturday.
They are nice guys, and Josh who owns the company is really easy to deal with. One things for sure, they aren’t short of work! There were several cars in the workshop all having full cages fitted, one of them a full custom cage on an Impreza which looked very nice indeed.
I received a few snapshot teaser pics via social media over the following few days so I was incredibly excited to go back and pick up the car.
The rollcage is the single biggest expense on this project so I was very hopeful that I wouldn’t be disappointed. I was paying £400 for fitting, and I feel this is good value given the welding required to add substantial mounting sections into the floor. Given my limited budget, this would also be an obvious place to save some money if you are capable of doing the welding yourself to a good standard.
Next post will be of collection day.
Good advice ChevronB19. I think I'll go ahead and add the ducting, but ensure that it's easily removable in case it contravenes any regs in the future. The car will be remaining largely standard this season, with the priority being on safety and getting the car 'race legal'; without even the basic mods like manifold, full s/s exhaust system, or ECU remap etc.
I do fully intend to modify & upgrade the car further in future - so at that point will be more diligent on specific series regs and ensuring I built a car to the correct spec for my chosen series.
Rockatansky nice tip on the P-clips, handily I've got some of those already (to fix in the fire extinguisher piping). Thanks for the advice.
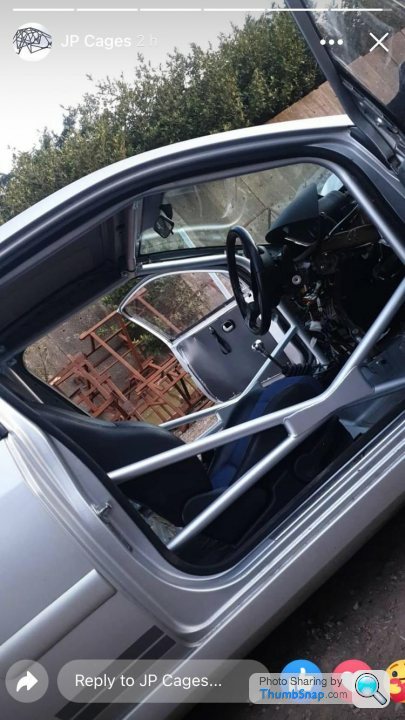
ROLL CAGE IS IN
I collected the car a week later and was very happy with the results.
The welding on the cage is superb - granted I'm not an engineer so it's only a layman's opinion, but it seems incredibly sturdy and also very neatly done.

My main reason for paying for fitting was that I wanted the additional box sections and plates to be welded to a very high standard, and I think that's what I have got.
You can always have a better roll cage. I could easily have spent twice this much on it and there would still be many ways it could have been improved. But at this very reasonable cost, I don't think I could have asked for a better result.
The harness bars are a nice touch, and the double door bars are incredibly sturdy without making it too difficult to get in and out of the car.
I'd been really torn about whether or not to order the cage with additional A-pillar supports. But if these pillars were present then I definitely would really struggle to get in and out - not a concept I'd relish after a shunt or if there was fire involved.
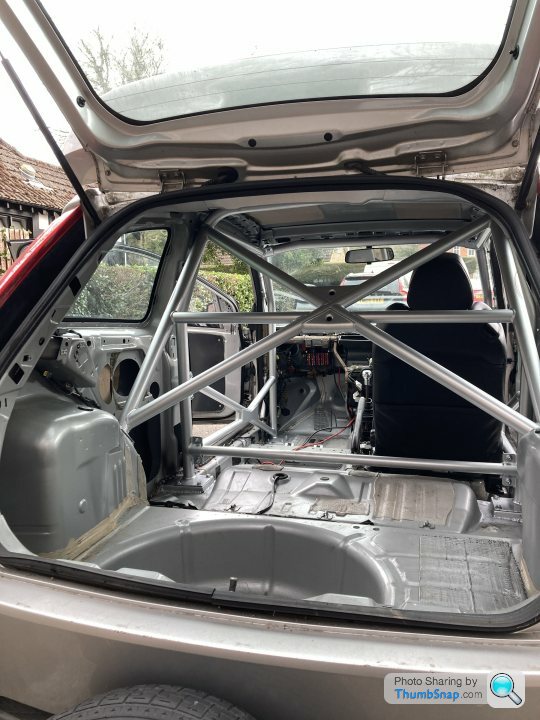
Overall I'd certainly recommend JP Cages. They were great to deal with, very honest and straight-forward; and I'm chuffed with the results. It ended up costing around £1500 ish. Money very well spent.
I collected the car a week later and was very happy with the results.
The welding on the cage is superb - granted I'm not an engineer so it's only a layman's opinion, but it seems incredibly sturdy and also very neatly done.
My main reason for paying for fitting was that I wanted the additional box sections and plates to be welded to a very high standard, and I think that's what I have got.
You can always have a better roll cage. I could easily have spent twice this much on it and there would still be many ways it could have been improved. But at this very reasonable cost, I don't think I could have asked for a better result.
The harness bars are a nice touch, and the double door bars are incredibly sturdy without making it too difficult to get in and out of the car.
I'd been really torn about whether or not to order the cage with additional A-pillar supports. But if these pillars were present then I definitely would really struggle to get in and out - not a concept I'd relish after a shunt or if there was fire involved.
Overall I'd certainly recommend JP Cages. They were great to deal with, very honest and straight-forward; and I'm chuffed with the results. It ended up costing around £1500 ish. Money very well spent.
BONNET PINS
I’d intended to use a spare set of aerocatches that I had lying around. Unfortunately on closer inspection these turned out to be some cheap eBay catches which are usually more trouble than they’re worth. So we ordered two sets of bonnet pins from Motamec.
Bolting in the stud is the easy part. Lining it up with the correct point on the bonnet and then cutting holes in the exact right location is slightly harder.
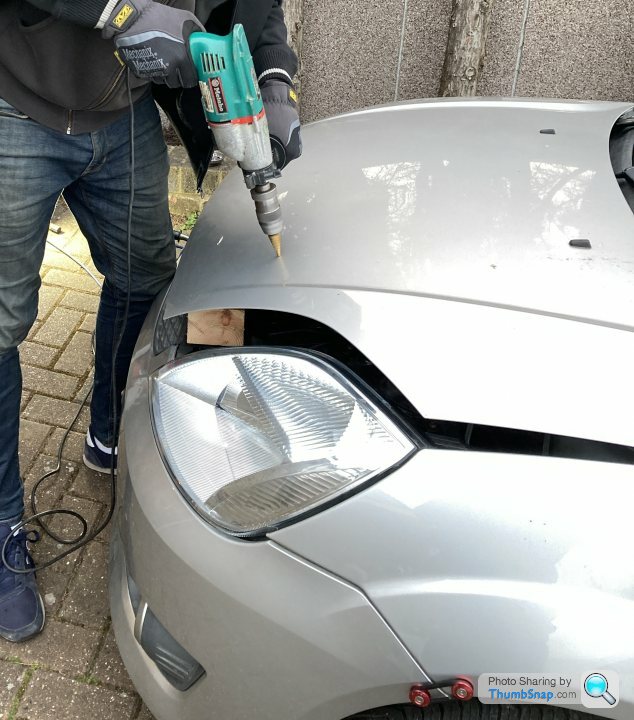
I had a quick check on eBay and found a spare silver bonnet available for just £40 which gave me a bit more confidence, and got stuck into it.
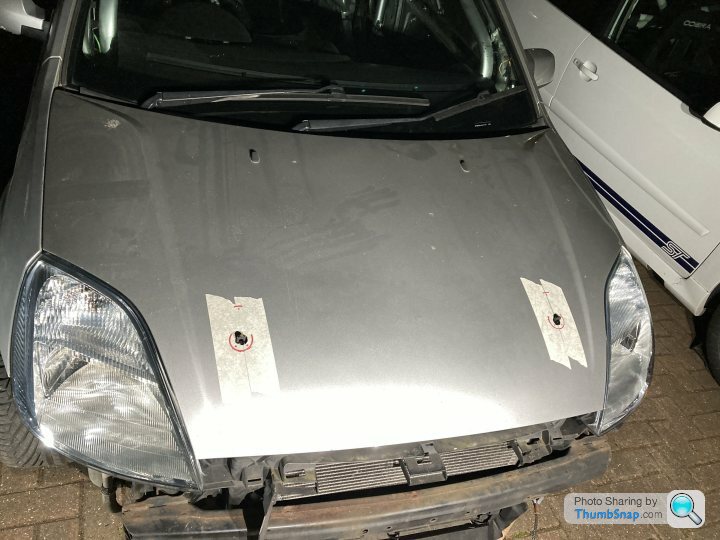
Managed to get the holes lined up pretty well. The additional screw holes were a little close for my liking but the end result seemed pretty secure.
The hardest part by far is betting the correct length/height of the studs. High enough to allow the pin through, but low enough to stop any rattling and ensure the bonnet is fully secure.

The same process was carried out at the rear. This was a bit easier perhaps because you have easier access to the other side of the stud; or perhaps because I’d learned how not to do it with the front ones first!
I might still add additional spring latches to the bonnet for added security. I’ve seen someone’s bonnet fly up at speed and the results are not pretty. Happy to hear what others have done.
I’d intended to use a spare set of aerocatches that I had lying around. Unfortunately on closer inspection these turned out to be some cheap eBay catches which are usually more trouble than they’re worth. So we ordered two sets of bonnet pins from Motamec.
Bolting in the stud is the easy part. Lining it up with the correct point on the bonnet and then cutting holes in the exact right location is slightly harder.
I had a quick check on eBay and found a spare silver bonnet available for just £40 which gave me a bit more confidence, and got stuck into it.
Managed to get the holes lined up pretty well. The additional screw holes were a little close for my liking but the end result seemed pretty secure.
The hardest part by far is betting the correct length/height of the studs. High enough to allow the pin through, but low enough to stop any rattling and ensure the bonnet is fully secure.
The same process was carried out at the rear. This was a bit easier perhaps because you have easier access to the other side of the stud; or perhaps because I’d learned how not to do it with the front ones first!
I might still add additional spring latches to the bonnet for added security. I’ve seen someone’s bonnet fly up at speed and the results are not pretty. Happy to hear what others have done.
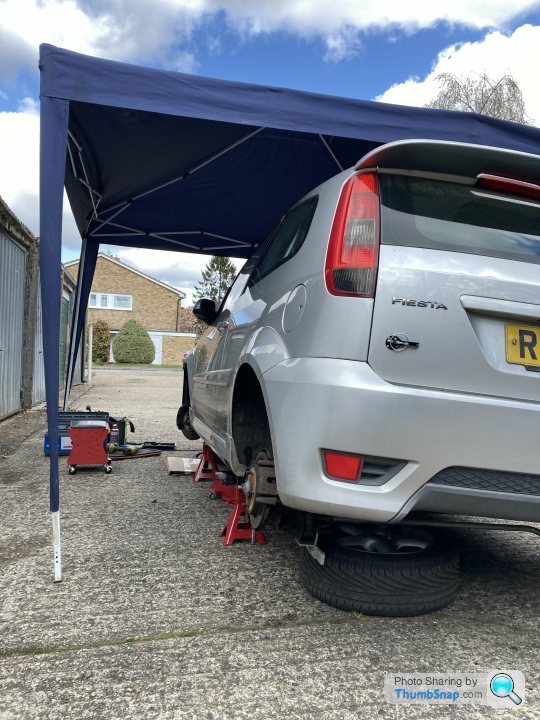
NEW BRAKES
I ordered new brakes all round. The standard calipers are perfectly adequate in these cars, and it seems like most people retain those; and I believe a number of race series rule out upgrading them. However discs pads and hoses are usually free.
I went for c-hook vented discs all round, supplied by Halo performance who were nice to deal with. I’ve run vented grooved discs on other cars and fancied a change mostly because I like the look - I’m not convinced there is much if any performance difference between the various disc types on a small 2.0 150bhp car like this.
I decided to try out these new RP-X pads by EBC. I haven’t used them before but heard good things and saw another Fiesta driver using them and winning races so they must be more than up to the job. My previous preference had been the Ferodo DS3000 front pads. But as the two were the same price I thought I’d try something new.
Went for EBC Yellowstuff for the rears. I’ve used these as front pads before and in my experience they don’t stand up to too much track abuse, I got brake fade after a while and also ended up with half the pads spread across my wheels in brake dust! But on the small rear calipers I’m hoping they’ll do fine. Not sure which pads other drivers use?

Obvious choice for the braided lines was Goodridge. I’ve used them on at least five other cars so wouldn’t change now.
Also got some new slider pins to regrease the calipers. And some race brake fluid from Millers.
With it being a reasonably high mileage car, I’d been prepared for the worst with the brakes. But I was pleasantly surprised. Nothing was damaged and there was no serious degradation on any of the components. In fact the discs I took off the front were virtually new, as were most of the pads; another good indication this car had been reasonably well looked after.
One aspect I did have an issue with was the front caliper carrier bolts. One of these was stripped on the front near side.. and I then proceeded to strip the other one too. A classic novice error I’m sure. Luckily with a bolt removal tool (Irwin Bolt-Grip) the rounded bolts did come out eventually after some treatment with the blowtorch.
The rear carriers cleaned up ok with a wire brush and some elbow grease. I’d like to come back and do this job again with a sandblaster and maybe paint them to freshen the whole lot up. But not now!
I didn’t have any issues with the rear calipers, however I did run into trouble when trying to reassemble it. I couldn’t get the rear caliper to slide on with the new pads inside - even though I had wound the piston all the way in with a piston compressor. After a lot of head scratching we noticed there is a small notch on the brake pads, which needs to line up with the notches on the piston. Not something I’d ever noticed before, but luckily this was the last issue and everything went back together nicely.
A nice rewarding job. I took the car for a little test drive and everything felt ok. The car then got a fairly good bedding in drive with gentle progressively bigger stops. The new brakes have done 50 miles now and feel great.
I ordered new brakes all round. The standard calipers are perfectly adequate in these cars, and it seems like most people retain those; and I believe a number of race series rule out upgrading them. However discs pads and hoses are usually free.
I went for c-hook vented discs all round, supplied by Halo performance who were nice to deal with. I’ve run vented grooved discs on other cars and fancied a change mostly because I like the look - I’m not convinced there is much if any performance difference between the various disc types on a small 2.0 150bhp car like this.
I decided to try out these new RP-X pads by EBC. I haven’t used them before but heard good things and saw another Fiesta driver using them and winning races so they must be more than up to the job. My previous preference had been the Ferodo DS3000 front pads. But as the two were the same price I thought I’d try something new.
Went for EBC Yellowstuff for the rears. I’ve used these as front pads before and in my experience they don’t stand up to too much track abuse, I got brake fade after a while and also ended up with half the pads spread across my wheels in brake dust! But on the small rear calipers I’m hoping they’ll do fine. Not sure which pads other drivers use?
Obvious choice for the braided lines was Goodridge. I’ve used them on at least five other cars so wouldn’t change now.
Also got some new slider pins to regrease the calipers. And some race brake fluid from Millers.
With it being a reasonably high mileage car, I’d been prepared for the worst with the brakes. But I was pleasantly surprised. Nothing was damaged and there was no serious degradation on any of the components. In fact the discs I took off the front were virtually new, as were most of the pads; another good indication this car had been reasonably well looked after.
One aspect I did have an issue with was the front caliper carrier bolts. One of these was stripped on the front near side.. and I then proceeded to strip the other one too. A classic novice error I’m sure. Luckily with a bolt removal tool (Irwin Bolt-Grip) the rounded bolts did come out eventually after some treatment with the blowtorch.
The rear carriers cleaned up ok with a wire brush and some elbow grease. I’d like to come back and do this job again with a sandblaster and maybe paint them to freshen the whole lot up. But not now!
I didn’t have any issues with the rear calipers, however I did run into trouble when trying to reassemble it. I couldn’t get the rear caliper to slide on with the new pads inside - even though I had wound the piston all the way in with a piston compressor. After a lot of head scratching we noticed there is a small notch on the brake pads, which needs to line up with the notches on the piston. Not something I’d ever noticed before, but luckily this was the last issue and everything went back together nicely.
A nice rewarding job. I took the car for a little test drive and everything felt ok. The car then got a fairly good bedding in drive with gentle progressively bigger stops. The new brakes have done 50 miles now and feel great.
PARTS ARRIVING & ODD JOBS
A couple of little updates. The seat arrived from Demon Tweeks. This was a big decision for me, whether to stick with the budget build theme - or go with something a bit more substantial.
The seat is a very important safety item. You can get perfectly good seats for £200. But just like the roll cage, it seems like an area worth spending a bit more on. I wanted a seat with adequate wrap around protection, and of course it’s always nice if you can get a slightly lighter weight material too.
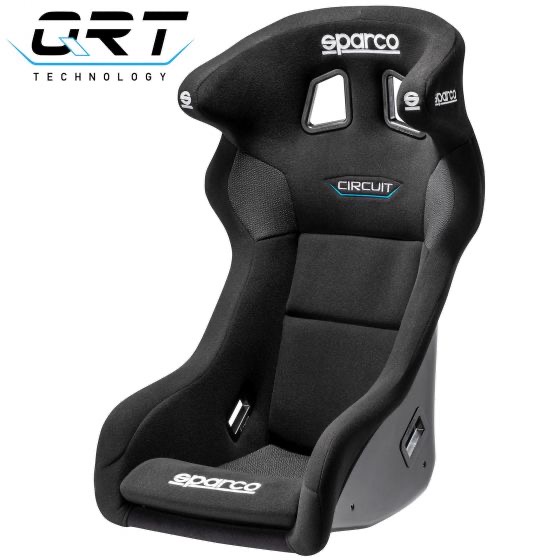
I went for the Sparco Circuit II QRT. The shell is made of fibreglass and the seat weighs in at 9.1kg which isn’t too bad for such a substantial seat. It’s comfortable and very supportive with high sides and those chunky wrap around head restraints - it certainly feels safe. It ended up costing £450.

I’d need to re-fit the dashboard first. No easy task, and something we’d be roping a mechanic friend into helping with. There was also the OMP subframe to fit, the seat mounts, and the foot plate.
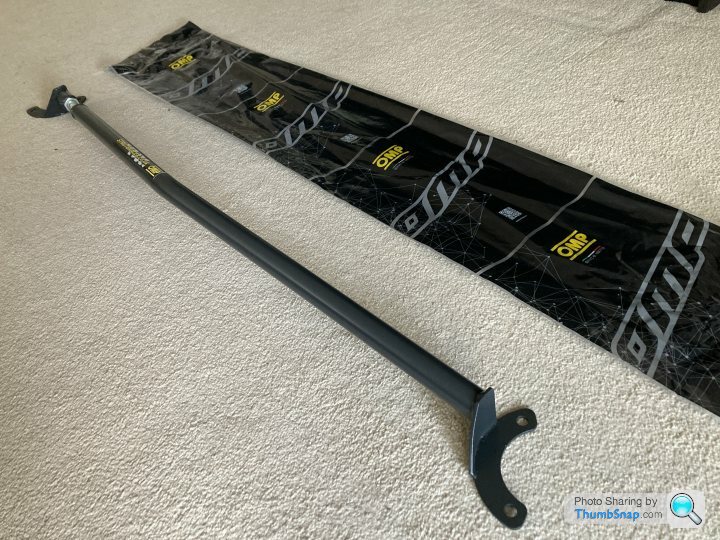
The OMP front strut brace also arrived along with the OMP (again!) steering wheel boss, and a few other smaller bits like the sun-strip & rear tow strap.
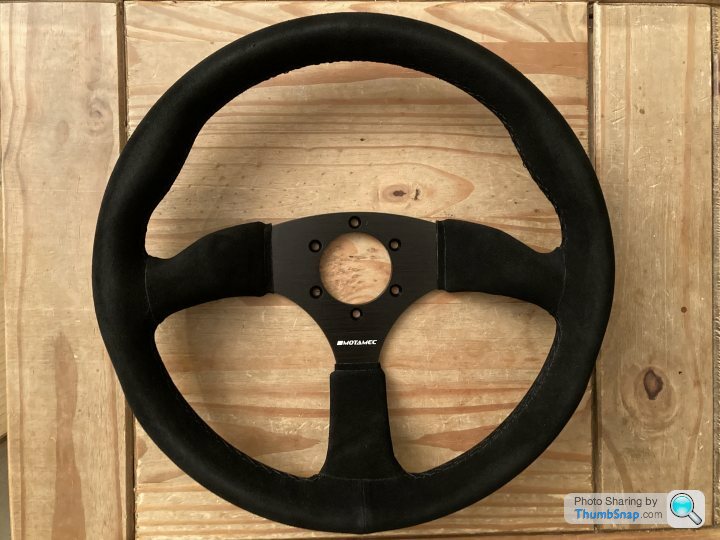
Another part to arrive was the steering wheel. Very exciting. I’d wanted to plump for a nice expensive Sparco wheel, but decided that didn’t fit with the budget theme and as it wasn’t a safety item I wasn’t budging on that one.
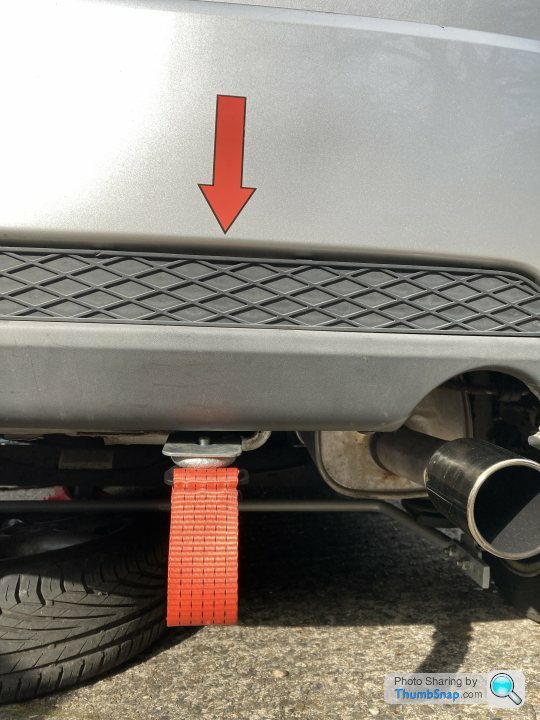
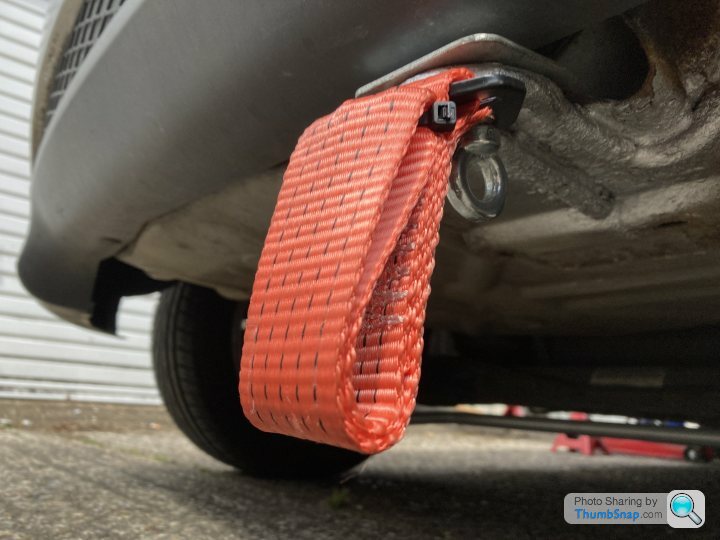
The tow strap was a nice easy bolt on part. Given that I’d already sanded down and resprayed the original tow loop, this was an obvious anchor point and the strap went on nice and securely using a harness eyebolt and plate washer.
I also did a test fit for the seat, which I’d been slightly nervous about as I’d not measured up since the cage went in - but found that it fitted neatly.

Sun-strip is another simple and satisfying job - super simple to do but very important now that the roof lining and sun visors have been taken out.
Next up is the driver compartment: seat positioning and steering wheel fitting.
A couple of little updates. The seat arrived from Demon Tweeks. This was a big decision for me, whether to stick with the budget build theme - or go with something a bit more substantial.
The seat is a very important safety item. You can get perfectly good seats for £200. But just like the roll cage, it seems like an area worth spending a bit more on. I wanted a seat with adequate wrap around protection, and of course it’s always nice if you can get a slightly lighter weight material too.
I went for the Sparco Circuit II QRT. The shell is made of fibreglass and the seat weighs in at 9.1kg which isn’t too bad for such a substantial seat. It’s comfortable and very supportive with high sides and those chunky wrap around head restraints - it certainly feels safe. It ended up costing £450.
I’d need to re-fit the dashboard first. No easy task, and something we’d be roping a mechanic friend into helping with. There was also the OMP subframe to fit, the seat mounts, and the foot plate.
The OMP front strut brace also arrived along with the OMP (again!) steering wheel boss, and a few other smaller bits like the sun-strip & rear tow strap.
Another part to arrive was the steering wheel. Very exciting. I’d wanted to plump for a nice expensive Sparco wheel, but decided that didn’t fit with the budget theme and as it wasn’t a safety item I wasn’t budging on that one.
The tow strap was a nice easy bolt on part. Given that I’d already sanded down and resprayed the original tow loop, this was an obvious anchor point and the strap went on nice and securely using a harness eyebolt and plate washer.
I also did a test fit for the seat, which I’d been slightly nervous about as I’d not measured up since the cage went in - but found that it fitted neatly.
Sun-strip is another simple and satisfying job - super simple to do but very important now that the roof lining and sun visors have been taken out.
Next up is the driver compartment: seat positioning and steering wheel fitting.
REPLACING THE DASHBOARD
This isn’t an easy job. I’d imagined getting the car back from the cage fitter, and simply slotting the dash back into place; perhaps nipping a small hole out of each side with a dremmel.
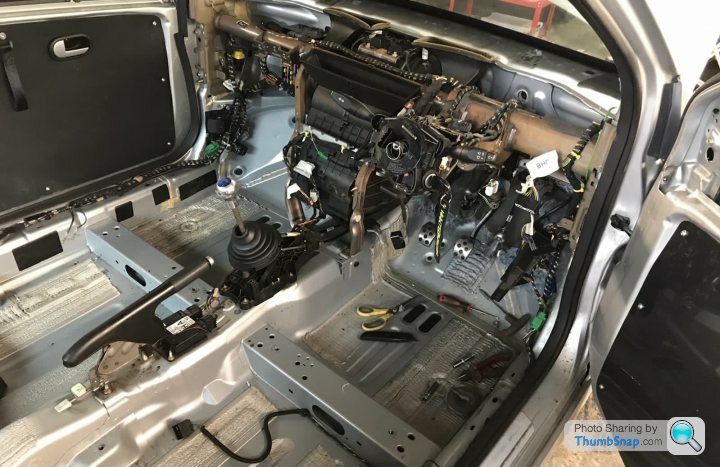
Re-fitting the dash has got to be one of the best examples how building a race car is not as easy as the pros make it look. The dash does not, does not, just slot back into place around the roll cage.
I’d known from the start that one job we’d need help with was wiring in the electrical cut-off switch and the pull cables. So we’d roped in our friend at Kent Motorsport to help.
In fact what actually happened was that we needed him to save the day with the dashboard re-fitting too. He ended up cutting the dash apart and then using soldering wizardry to effectively weld the plastic dash back together in the correct position.
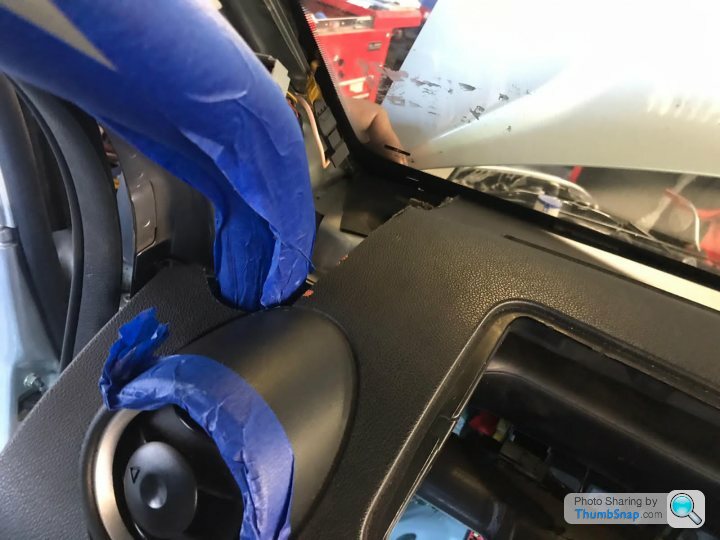
Cutting holes/slots in the correct place for the front bars was not the hardest part. The end result was very neat and tidy, I was over the moon with how they ended up.
But getting the dash back inside the cage and sitting flush with the bulkhead was an absolute nightmare. One simple answer to this is that on a professional build it’s highly likely that the windscreen would come out; either to allow for A-pillar gussets to be welded into the rollcage, or for a full interior respray after roll cage fitting. But we did not have this luxury and had to work within the small space we did have.
So an absolutely huge thank you to Kent Motorsport for taking on that additional challenge and doing a fantastic job - even though they had only agreed to helping with the pull cables/cut off switch.
I have to accept that without that help, I would have ended up cutting the dash into at least two pieces and then having to fix it back together with some concoction of bolts and brackets - which would not have looked pretty.
Instead, the end result is a dash cut perfectly to size around the cage, and fixed back in place perfectly with no rattles, no interference, and with no noticeable joins or marks. Top work.
We also test fitted the fire extinguisher and the battery. So that’ll be the next post (seat & steering wheel fitting also to come).
This isn’t an easy job. I’d imagined getting the car back from the cage fitter, and simply slotting the dash back into place; perhaps nipping a small hole out of each side with a dremmel.
Re-fitting the dash has got to be one of the best examples how building a race car is not as easy as the pros make it look. The dash does not, does not, just slot back into place around the roll cage.
I’d known from the start that one job we’d need help with was wiring in the electrical cut-off switch and the pull cables. So we’d roped in our friend at Kent Motorsport to help.
In fact what actually happened was that we needed him to save the day with the dashboard re-fitting too. He ended up cutting the dash apart and then using soldering wizardry to effectively weld the plastic dash back together in the correct position.
Cutting holes/slots in the correct place for the front bars was not the hardest part. The end result was very neat and tidy, I was over the moon with how they ended up.
But getting the dash back inside the cage and sitting flush with the bulkhead was an absolute nightmare. One simple answer to this is that on a professional build it’s highly likely that the windscreen would come out; either to allow for A-pillar gussets to be welded into the rollcage, or for a full interior respray after roll cage fitting. But we did not have this luxury and had to work within the small space we did have.
So an absolutely huge thank you to Kent Motorsport for taking on that additional challenge and doing a fantastic job - even though they had only agreed to helping with the pull cables/cut off switch.
I have to accept that without that help, I would have ended up cutting the dash into at least two pieces and then having to fix it back together with some concoction of bolts and brackets - which would not have looked pretty.
Instead, the end result is a dash cut perfectly to size around the cage, and fixed back in place perfectly with no rattles, no interference, and with no noticeable joins or marks. Top work.
We also test fitted the fire extinguisher and the battery. So that’ll be the next post (seat & steering wheel fitting also to come).
FITTING A STEERING WHEEL
Nice simple upgrade that makes a big difference to the driver experience.
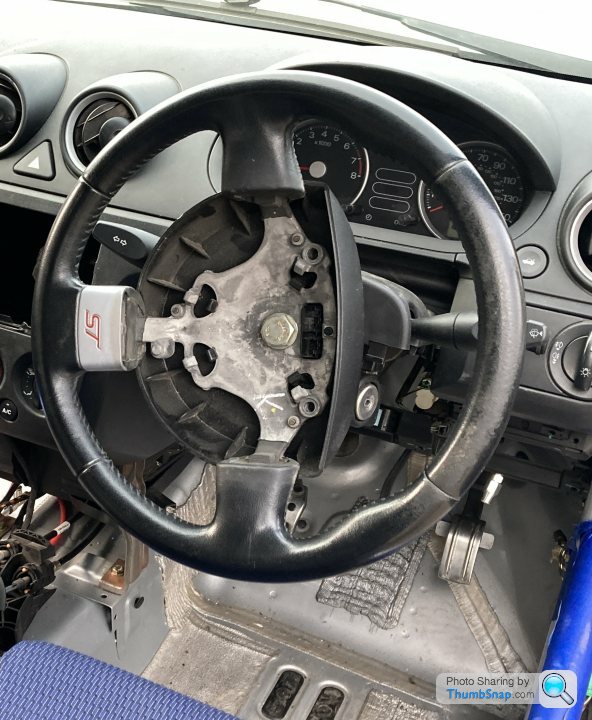
The steering wheel is very straight forward to remove. I’d already removed the airbag which is a little trickier. But the wheel itself is just one large bolt and can be removed in a few seconds.
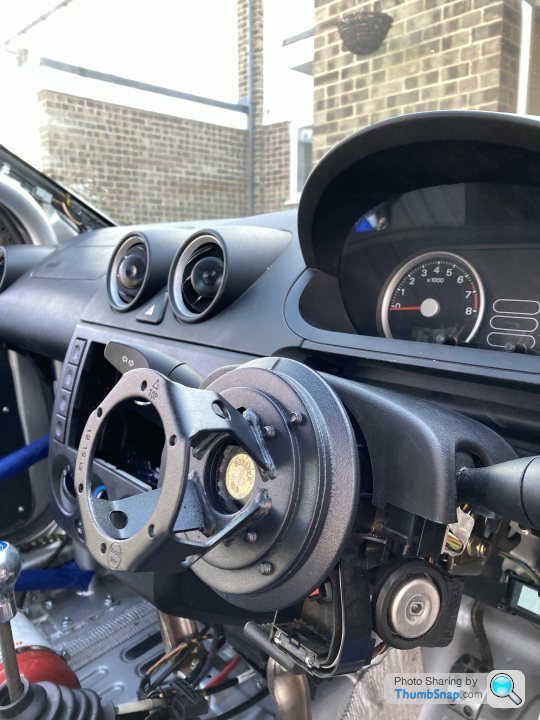
The boss supplied by OMP seems overpriced for what it is. But this isn’t a component that you can cheap out on; a poorly made pattern-part could have serious repercussions if it failed.

The boss comes with an outer rubber sleeve which sits nicely over the top. You then fix the steering wheel onto the boss with the screws provided; obviously these are the screw heads you can see when looking at the face of the wheel. It’s very simple and uncomplicated, and the hub comes with very clear assembly instructions.
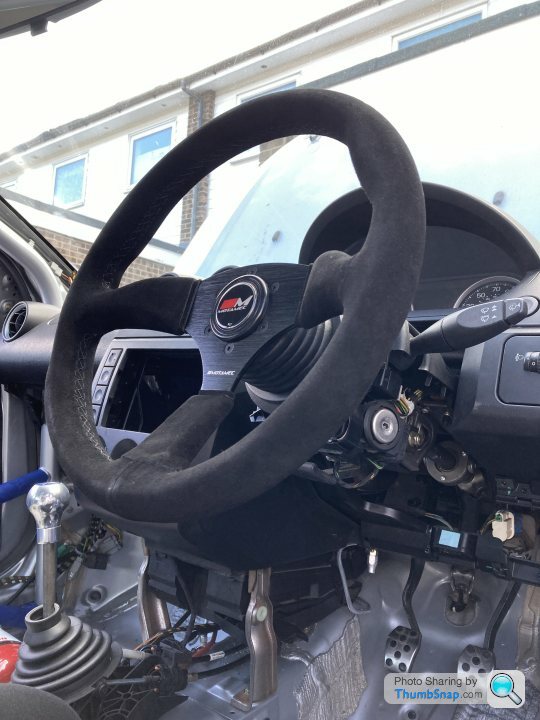
I went with the Motamec wheel as I’d been impressed with the other components they supplied such as the battery tray. I’ve previously purchased a very nice Sabelt wheel for our other Fiesta, and I must say the weight, finish & quality of this Motamec wheels seems entirely level with the Sabelt one - at less than half the price. I would recommend.
Nice simple upgrade that makes a big difference to the driver experience.
The steering wheel is very straight forward to remove. I’d already removed the airbag which is a little trickier. But the wheel itself is just one large bolt and can be removed in a few seconds.
The boss supplied by OMP seems overpriced for what it is. But this isn’t a component that you can cheap out on; a poorly made pattern-part could have serious repercussions if it failed.
The boss comes with an outer rubber sleeve which sits nicely over the top. You then fix the steering wheel onto the boss with the screws provided; obviously these are the screw heads you can see when looking at the face of the wheel. It’s very simple and uncomplicated, and the hub comes with very clear assembly instructions.
I went with the Motamec wheel as I’d been impressed with the other components they supplied such as the battery tray. I’ve previously purchased a very nice Sabelt wheel for our other Fiesta, and I must say the weight, finish & quality of this Motamec wheels seems entirely level with the Sabelt one - at less than half the price. I would recommend.
Thanks for the encouragement Sammo123. Having a single garage to work out of is definitely a help; although I can't actually fit my car inside so it's used more as a storage space and workbench area. Good luck with the BMW.
Cheers for the heads up on the rear brakes Rockatansky. Yellowstuff are a good fast road pad, and are ok on track - but not super aggressive so hopefully I won't encounter that over-braking issue? I've got a brake bias kit on my wish-list for later on in this build (not within the original £5k budget!) so I will be looking for advice on that at some point down the line.
Cheers for the heads up on the rear brakes Rockatansky. Yellowstuff are a good fast road pad, and are ok on track - but not super aggressive so hopefully I won't encounter that over-braking issue? I've got a brake bias kit on my wish-list for later on in this build (not within the original £5k budget!) so I will be looking for advice on that at some point down the line.
I appreciate the honest input 944 Man. I've spent enough years in race paddocks to hear many claims about what others are secretly doing, or what the guys at the front are doing 'differently' from the guys at the back. But there is a certain naivety about it from my perspective, because I often don't know precisely which actions/tactics are being referred to. So it's good to have one such example spelled out honestly.
Everyone has their own opinion on what constitutes 'clever interpretation of the rules' (see Adrian Newey's book; How to Build a Racing Car) versus 'cheating' (see Lance Armstrong's example of 'its not cheating if everyone is doing it'). Each to their own.
My personal view is that anyone is more than welcome to interpret the rules however they see fit.. so long as you are willing to look a scrutineer in the eye and tell them what you've done. If you can stand by your actions and argue that you think they are within the spirit of the rules then good luck to you - many a Formula1 race was won with that attitude.
But when you are going to lengths to conceal what you've done from scrutineers, and also from fellow competitors.. for me that is where the distinction is made. That is the rule I will stick rigidly to with this project. But again, each to their own!
FITTING THE RAIN LIGHT
The plan here was to wire the rain light into the existing fog light cabling, to replace the fog light - and give us a race legal rain light.

There aren’t a huge number of options for approved rain lights - although I’m sure there are if you have a much bigger budget. So I went for this standard MSA approved one, which if you shop around you can find for under £40.
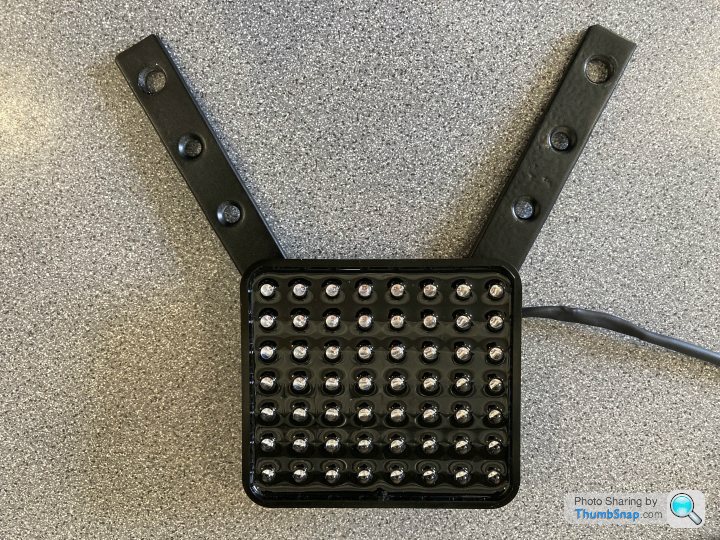
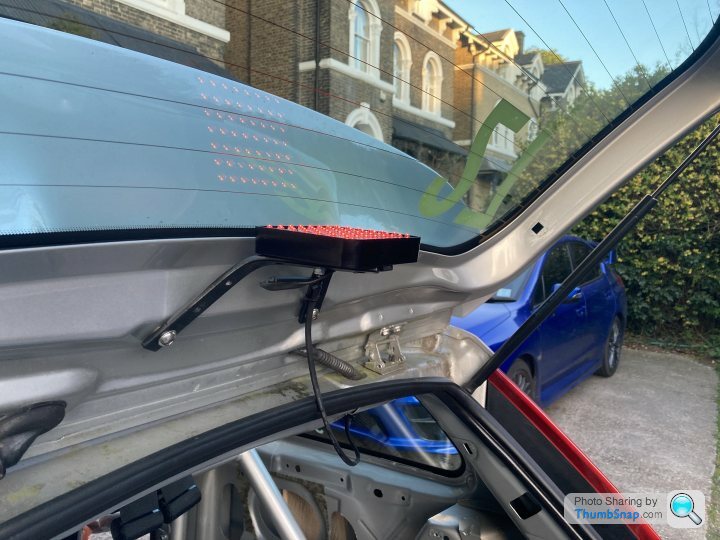
The rain light does not come with any kind of bracket. So we came up with this bracket, to fix the rain light into two redundant holes at the top of the rear hatch. The holes were blank, so we used a rivnut gun to insert a thread into these. The bracket then got a nice coat of satin black.

We then soldered on some suitable cable to the short stubby wires coming out the back of the rain light and added some heat shrink for extra protection - ready to wire into the rear light loom.
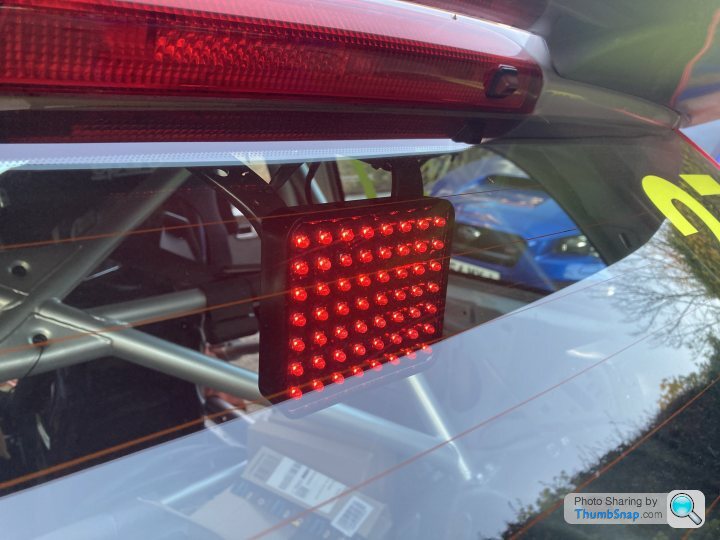
The bracket does the job really nicely, and the rain light sits perfectly in line with the glass at a distance of 2cm. There is absolutely no flex in the steel bracket, so no chance of rattling or interference against the glass.
The result is a nice clear view of the rain light through the rear glass, with a solid fixing to the car, and a nice oem style button operation using the existing fog light.
It’s all coming together.
The plan here was to wire the rain light into the existing fog light cabling, to replace the fog light - and give us a race legal rain light.
There aren’t a huge number of options for approved rain lights - although I’m sure there are if you have a much bigger budget. So I went for this standard MSA approved one, which if you shop around you can find for under £40.
The rain light does not come with any kind of bracket. So we came up with this bracket, to fix the rain light into two redundant holes at the top of the rear hatch. The holes were blank, so we used a rivnut gun to insert a thread into these. The bracket then got a nice coat of satin black.
We then soldered on some suitable cable to the short stubby wires coming out the back of the rain light and added some heat shrink for extra protection - ready to wire into the rear light loom.
The bracket does the job really nicely, and the rain light sits perfectly in line with the glass at a distance of 2cm. There is absolutely no flex in the steel bracket, so no chance of rattling or interference against the glass.
The result is a nice clear view of the rain light through the rear glass, with a solid fixing to the car, and a nice oem style button operation using the existing fog light.
It’s all coming together.
Edited by SparrowHawk on Tuesday 20th April 19:34
NEW CLUTCH
The car doesn’t need a new clutch. Or at least it didn’t feel like it really needed one.
But I’ve been caught out before and didn’t want to risk the same thing happening again. Turning up to Silverstone a few years ago in what I thought was an immaculately prepared Civic, only to find myself sheepishly limping off the circuit after only 10 laps due to total clutch failure.
I have been told by several people that I am mad to fit a standard clutch into a race car. But my reasoning is three-fold.
1. This LUK kit was incredibly reasonably priced, versus a Stage1 clutch.
2. We’ve always thoughts it’s best to have the clutch as the weak link in the transmission - as it’s much easier to have the clutch changed than to fix or repair a gearbox.
3. Our other Fiesta ST has done somewhere in the region of twenty-five trackdays, and we have only needed to change the clutch once.
I realise that racing is different from trackdays, but am very optimistic that this clutch will last well beyond this season.
Took the car to my local gearbox & clutch specialist who I’ve dealt with before and who are well regarded. They changed the clutch all-in for £350 which I think is very reasonable.
That money has obviously come out of my overall budget for racing this year, but I don’t think I’ll include it within my £5000 target budget for the build. Because I could definitely have gone to the first race weekend on the existing clutch; and because I know full well there is not £350 left in the budget!
I didn’t think to take a picture of the car getting done - or of the clutch that came out, but I did see it and it looked like it had plenty of life left in it. One fortunate thing is that the technician said the slave cylinder had started leaking slightly; a sign that the clutch would have started failing soon after.
So it’s a good job we got it done, and it gives an additional layer of confidence in the car going into the season.
SEAT IN
This was another big step in the process, with the car starting to come to life as a race car. First job was to put in the foot plate, to give myself a nice flat surface beneath the pedals.
This was easy enough, as the Motamec plate simply fixes in with 4 self-tappers and washers. However, I did need to drill 2 of the holes myself which as predicted did damage the nice black paint finish - a very odd design feature.
The next bolt-on part was the OMP seat subframe. I'd hoped that as these frames are custom made for this exact car, that I might be able to install the seat with no additional drilling or modifications. The frame goes in very easily with 4 M12 bolts (not provided!) and it looks & feels very strong once in.

On the first run I did fix the seat brackets into place on the furthest back setting on the frame. Considering the mounts were in the 'back-most' holes, they did still look very far forwards to me. I decided to crack on and try the seat in that position, and took the car for a drive. As predicted the seat was way too far forward.
This meant drilling two new holes in the frame, and two new holes in the seat brackets. Having measured my arms in the position I wanted them to be on the steering wheel, I decided on moving the holes 3 inches backwards. This gave a good driving position, but without compromising the safety of the seat anchoring.
In this new position, there was some overhang behind the frame, but the mounts were still very firmly fixed to the frame and the placement of the bolts felt very secure and was nowhere near 50% overhang.
The seat position was just about spot on, with my arms slightly bent with my hands on the steering wheel - and with my left leg not fully extended when operating the clutch pedal. I did move the front of the seat vertically down one notch, to allow my legs to straighten slightly. And that was the seat position sorted.
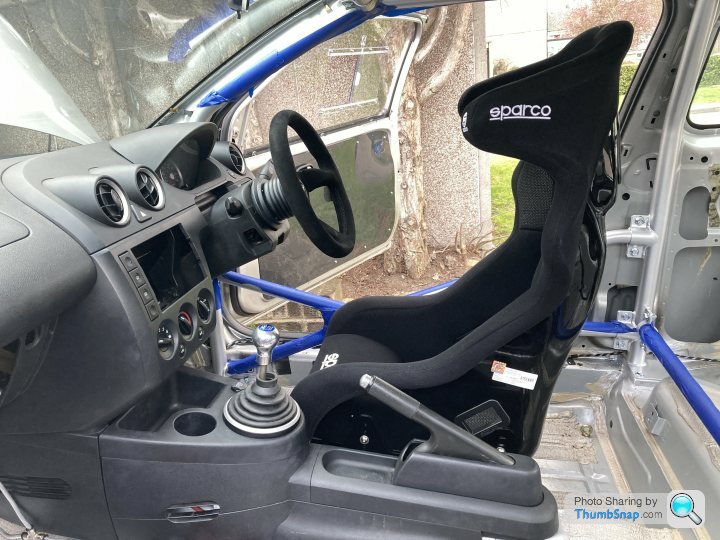
In addition to feeling very comfortable and secure, the seat also gives great support with no body movement allowed. I also really like how enclosed the seat wings are, giving a big extra layer of protection if the car is rolled. I can also get in and out fairly easily although as I said before, I'm not convinced that would be the case with an added bar in the roll cage.
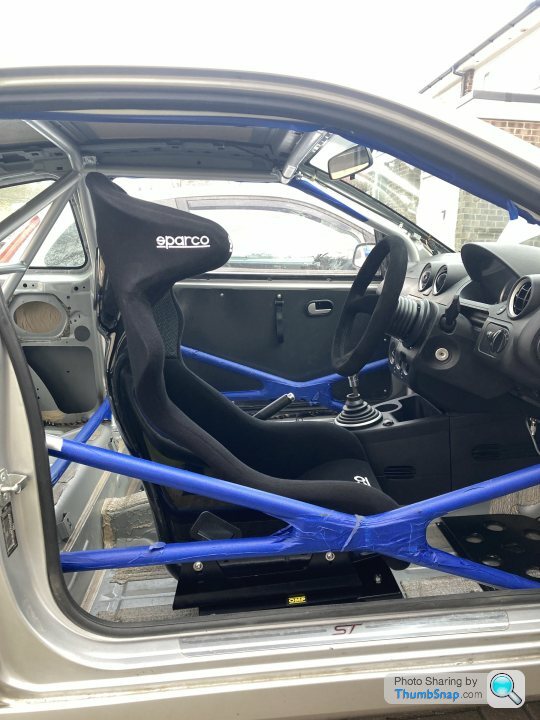
And lastly, it looks really cool. It is really starting to feel like a race car at this point.
This was another big step in the process, with the car starting to come to life as a race car. First job was to put in the foot plate, to give myself a nice flat surface beneath the pedals.
This was easy enough, as the Motamec plate simply fixes in with 4 self-tappers and washers. However, I did need to drill 2 of the holes myself which as predicted did damage the nice black paint finish - a very odd design feature.
The next bolt-on part was the OMP seat subframe. I'd hoped that as these frames are custom made for this exact car, that I might be able to install the seat with no additional drilling or modifications. The frame goes in very easily with 4 M12 bolts (not provided!) and it looks & feels very strong once in.
On the first run I did fix the seat brackets into place on the furthest back setting on the frame. Considering the mounts were in the 'back-most' holes, they did still look very far forwards to me. I decided to crack on and try the seat in that position, and took the car for a drive. As predicted the seat was way too far forward.
This meant drilling two new holes in the frame, and two new holes in the seat brackets. Having measured my arms in the position I wanted them to be on the steering wheel, I decided on moving the holes 3 inches backwards. This gave a good driving position, but without compromising the safety of the seat anchoring.
In this new position, there was some overhang behind the frame, but the mounts were still very firmly fixed to the frame and the placement of the bolts felt very secure and was nowhere near 50% overhang.
The seat position was just about spot on, with my arms slightly bent with my hands on the steering wheel - and with my left leg not fully extended when operating the clutch pedal. I did move the front of the seat vertically down one notch, to allow my legs to straighten slightly. And that was the seat position sorted.
In addition to feeling very comfortable and secure, the seat also gives great support with no body movement allowed. I also really like how enclosed the seat wings are, giving a big extra layer of protection if the car is rolled. I can also get in and out fairly easily although as I said before, I'm not convinced that would be the case with an added bar in the roll cage.
And lastly, it looks really cool. It is really starting to feel like a race car at this point.
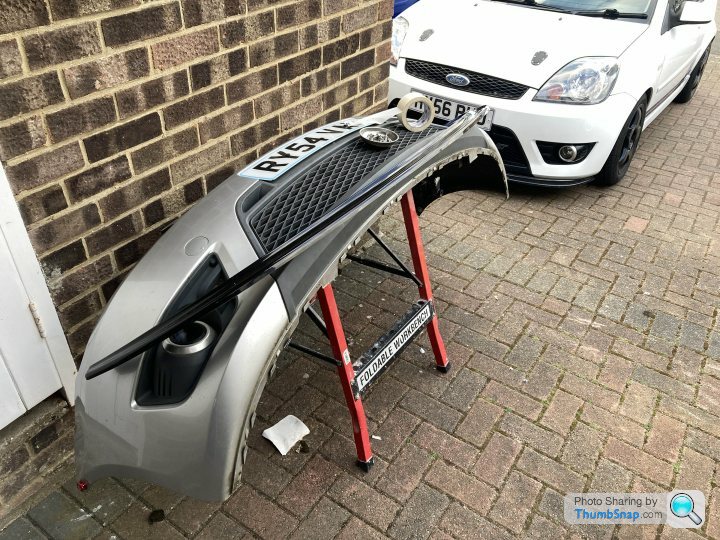
FRONT SPLITTER
The guys at TRC make really nice parts. They are marketed more as styling parts, but I’m convinced having a small splitter must give some aero improvement.
As luck would have it, we’ve already installed one of these on our trackday Fiesta. So it was a case of copying that.
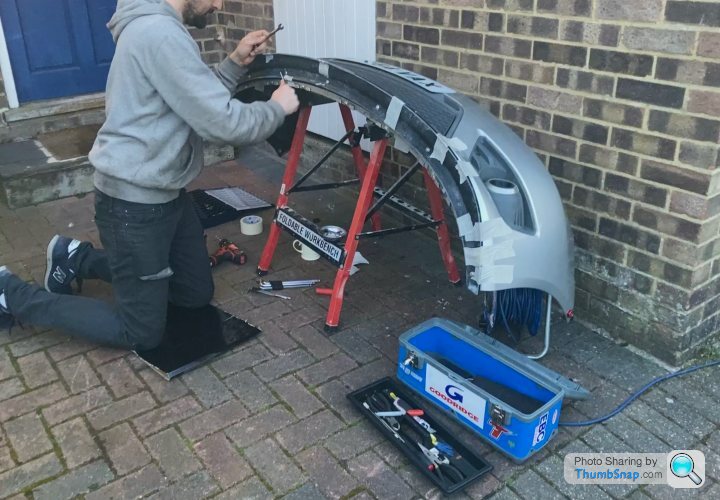
I lined up the lip to match the location of the one on our other car, and used a lot of masking tape to hold it firmly in place. A little bit of heat gun helped to smooth it into place.
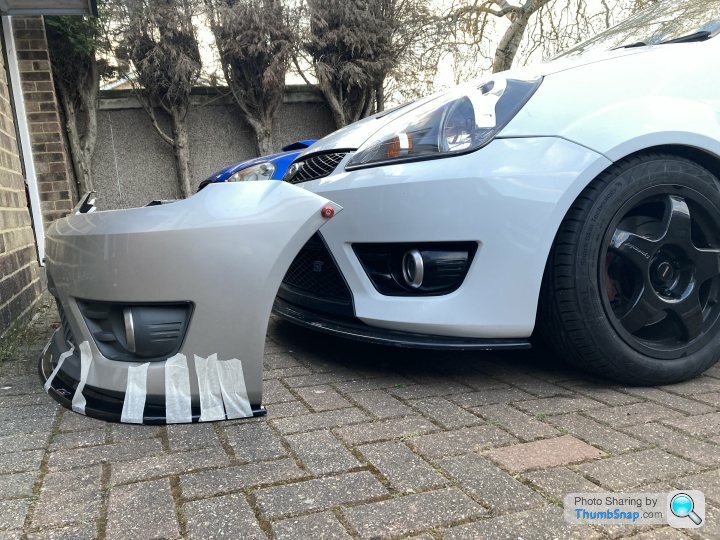
The lip is supplied with exactly the right hardware and is also pre-drilled with 10 holes in the correct location. Drilling through the plastic bumper is super easy, and the lip lined up spot on first time.
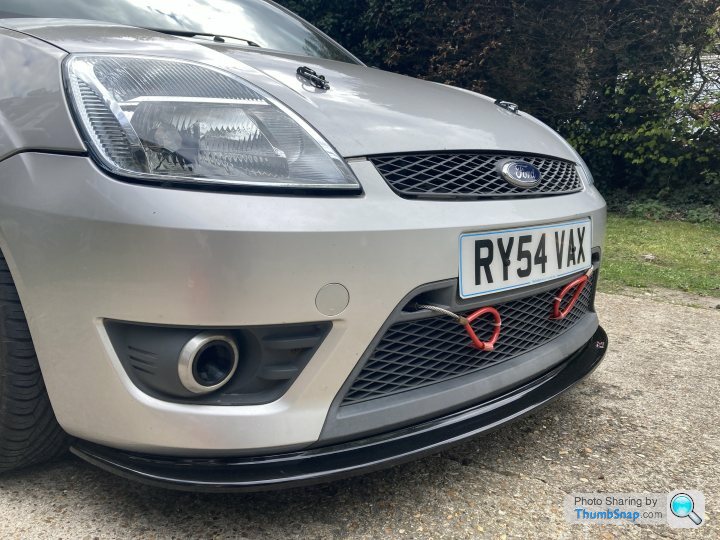
It looks good. I’ve got nothing to back up my claim that a small splitter like this really aids grip in any meaningful way - but it just seems like it should be on there.
I’ve seen lots of more comprehensive lip spoilers on other Fiesta race cars, and will be happy to hear suggestions on better solutions - so this might be an area to revisit later down the line.
The guys at TRC make really nice parts. They are marketed more as styling parts, but I’m convinced having a small splitter must give some aero improvement.
As luck would have it, we’ve already installed one of these on our trackday Fiesta. So it was a case of copying that.
I lined up the lip to match the location of the one on our other car, and used a lot of masking tape to hold it firmly in place. A little bit of heat gun helped to smooth it into place.
The lip is supplied with exactly the right hardware and is also pre-drilled with 10 holes in the correct location. Drilling through the plastic bumper is super easy, and the lip lined up spot on first time.
It looks good. I’ve got nothing to back up my claim that a small splitter like this really aids grip in any meaningful way - but it just seems like it should be on there.
I’ve seen lots of more comprehensive lip spoilers on other Fiesta race cars, and will be happy to hear suggestions on better solutions - so this might be an area to revisit later down the line.
FIRE EXTINGUISHER
We opted for the RRS kit from Tegiwa. It came with full installation kit, was FIA approved, a decent capacity, and a fair price.
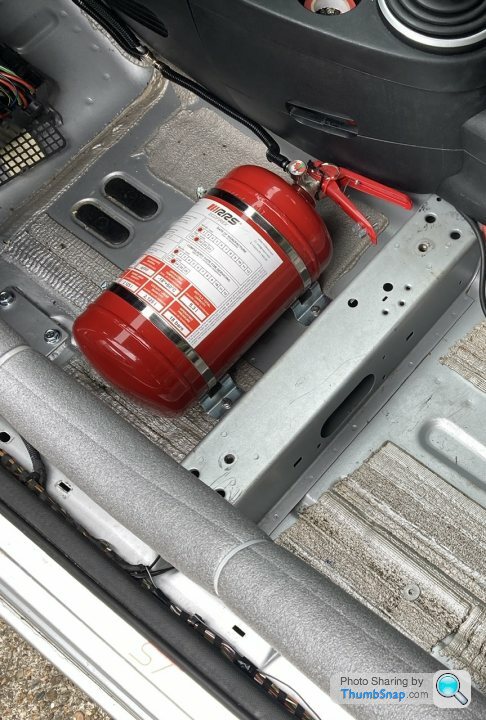
The bracket is a simple case of drilling through the floor and bolting it down. Depending on where you locate it, it might need captive threads added in because there is a box section right underneath the passenger seat.
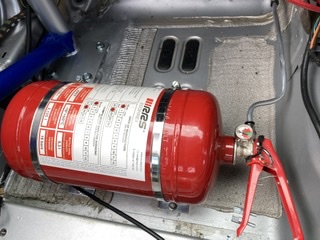
The metal piping supplied is pretty good and bends nicely into place. They don’t supply any protection for the pipes so we got some plastic conduit stuff for that.
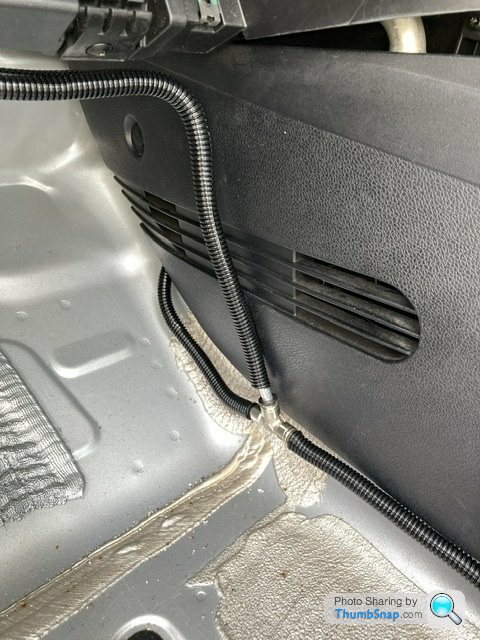
This T-piece was inserted so that one pipe could be routed towards the driver; with a nozzle pointing towards the driver’s lap, and the other pipe routed off through the bulkhead and into the engine bay.

Once inside the engine bay there is one nozzle pointing at the electrical box and a second one pointing at the new terminals where the original battery was.
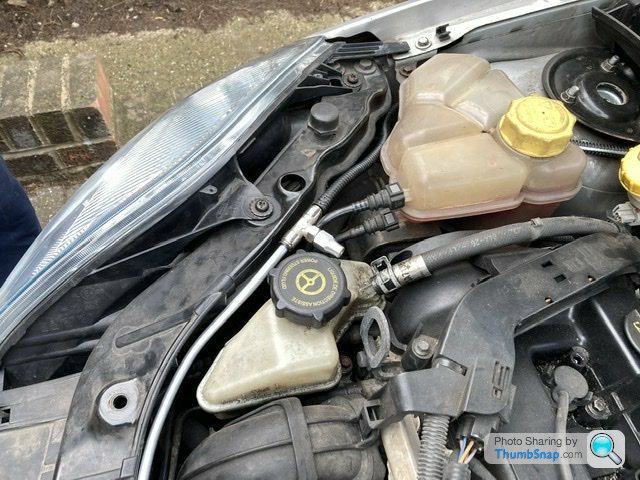
The pipe then continues along the front of the engine bay with a further nozzle pointing at the front of the engine, and another pointing at the side of the engine.

The final nozzle points at the hot bits - at the back of the engine.
We opted for the RRS kit from Tegiwa. It came with full installation kit, was FIA approved, a decent capacity, and a fair price.
The bracket is a simple case of drilling through the floor and bolting it down. Depending on where you locate it, it might need captive threads added in because there is a box section right underneath the passenger seat.
The metal piping supplied is pretty good and bends nicely into place. They don’t supply any protection for the pipes so we got some plastic conduit stuff for that.
This T-piece was inserted so that one pipe could be routed towards the driver; with a nozzle pointing towards the driver’s lap, and the other pipe routed off through the bulkhead and into the engine bay.
Once inside the engine bay there is one nozzle pointing at the electrical box and a second one pointing at the new terminals where the original battery was.
The pipe then continues along the front of the engine bay with a further nozzle pointing at the front of the engine, and another pointing at the side of the engine.
The final nozzle points at the hot bits - at the back of the engine.
DASH CONSOLE
When coming up with the plan for this car, the dash console was the first job I earmarked for my Dad. He's got a great eye for detail, and I knew he'd nail it. The dash console needs to provide space for an engine kill-switch, and a pull-chord for the driver to operate the fire extinguisher from the driver's seat.
The vacant stereo space is the obvious place to house those pull-cables. But there is no off-the-shelf piece of kit for this job and for this car. So we'd need to make our own.
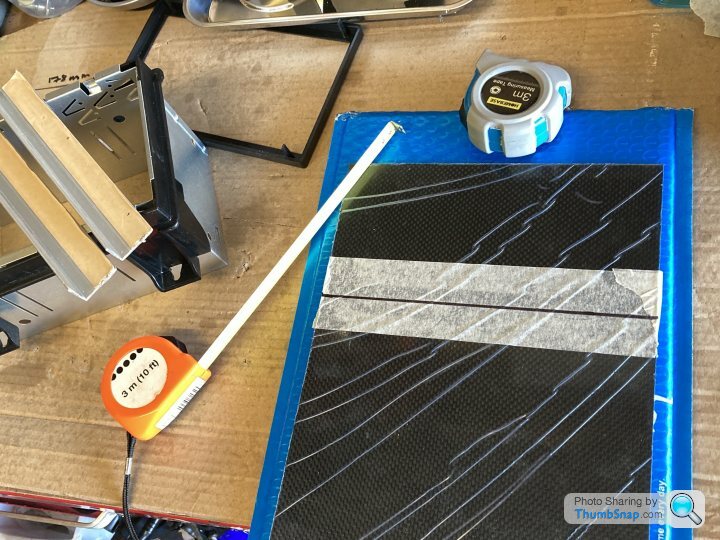
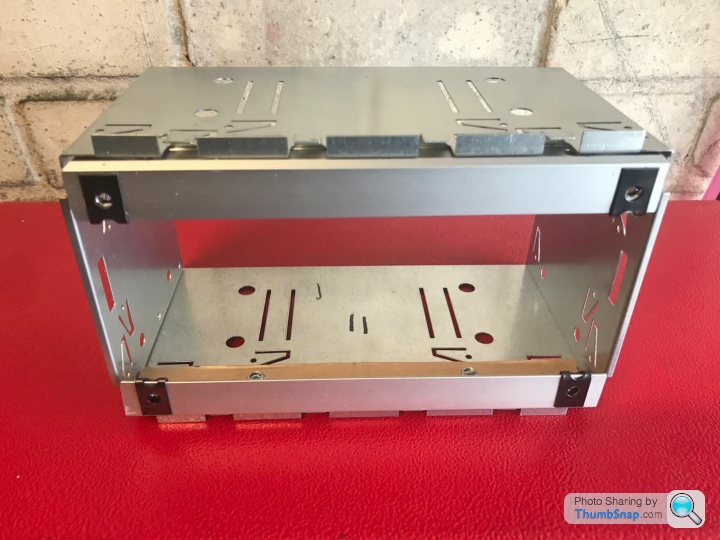
He started by buying a sheet of carbon fibre, to act as the fascia. And getting hold of a new stereo cage, to act as an anchor point, along woth some aluminium strips to hold it all together.
He then measured up and cut the carbon fibre to size. The aluminium was then fixed to the front of the stereo cage, using the original fixings from this area of the dashboard.
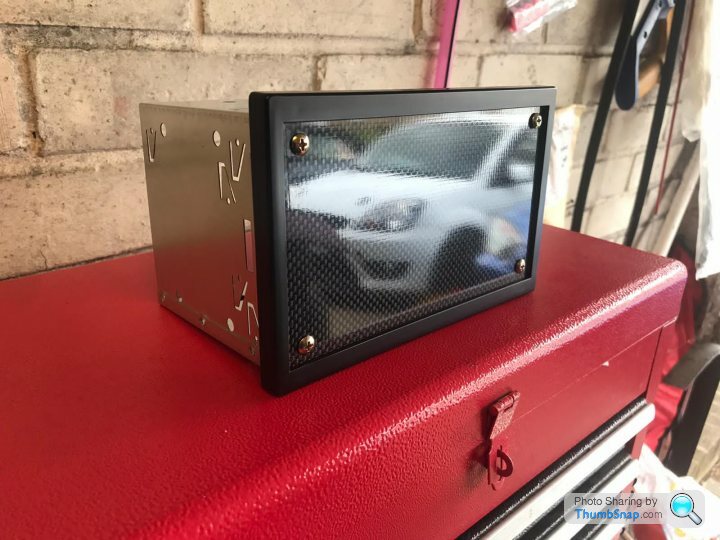
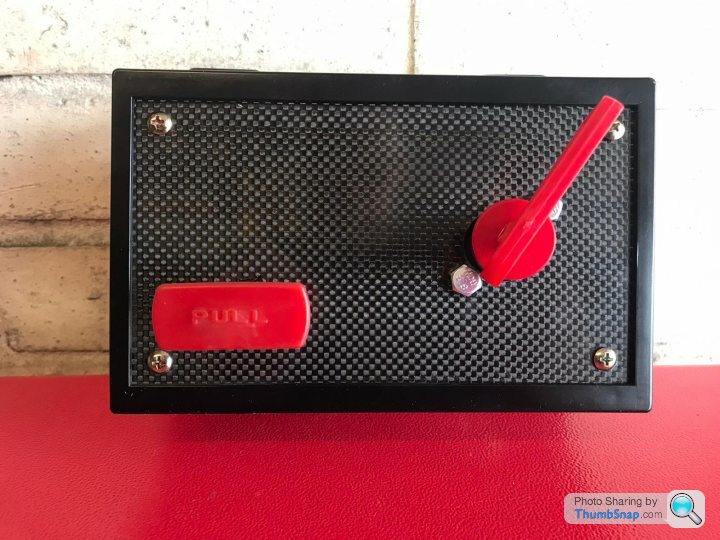
The carbon fibre was then fixed to the aluminium with screws, which we later upgraded to cap heads. We then fixed the original stereo plastic surround back onto the stereo cage, giving a really nice neat finish. Looking very tidy!
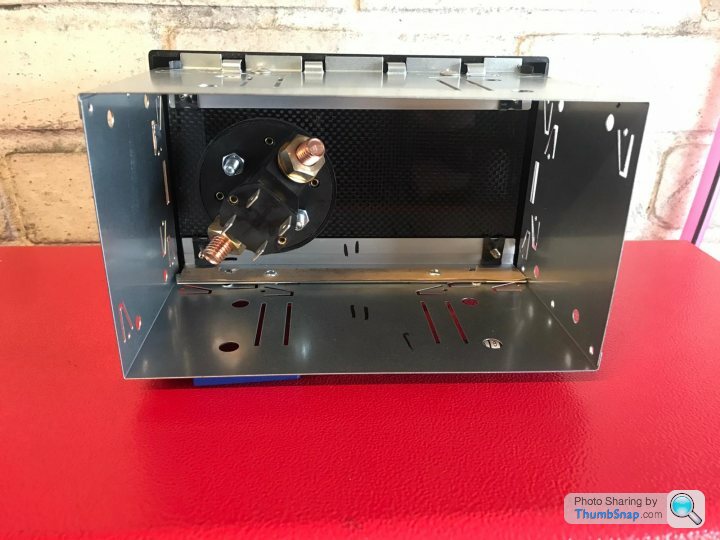
He then cut a hole for the kill switch. The kill switch was bought from Demon Tweeks. It is an FIA approved switch and cost around £50.
An additional hole was cut for the fire extinguisher pull-cable that would also be housed on the console. Both are easily reachable from the driver's seat when strapped in with a harness.

This is a shot of the cables being routed from the rear of the kill switch. I am very glad to have had my Dad working on this aspect, as I'd spent a lot of time reading 'installation guides' and 'how-to' instructions for this job.. and I just didn't feel confident doing it. I am sure that a complete novice could do this job; but when the safety of the car and the reliability of the car were both so tightly wound up in one job, I felt it needed more experienced hands.

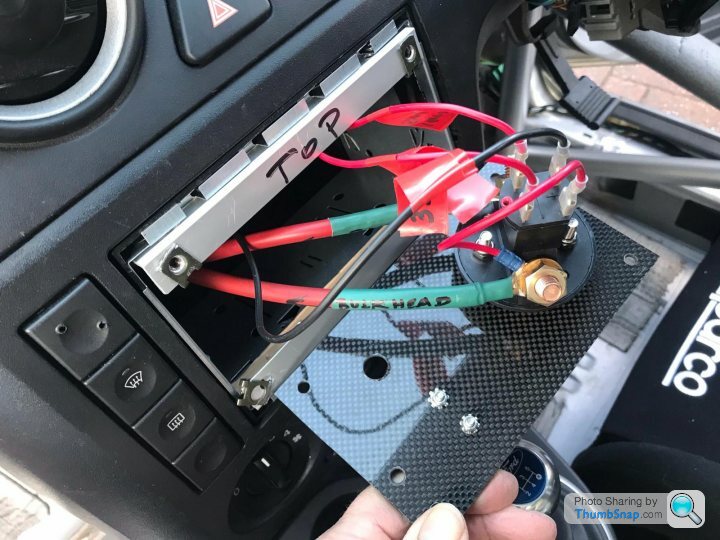
The stereo cage went in nicely as you'd expect, and the cabling was attached as below. Sorry this photo isn't very clear, but hopefully you get the general idea. I'll go into more detail on the cabling in a later post, as this was a huge learning curve for me - which included at least 2 occasions where the car would not start.
As a final flurry Dad also whipped up a little bracket to hold the bowden cable coming through the fascia, keeping things looking very tidy indeed. That cable will of course be routed to the outside of the car; as will the second fire extinguisher pull-cable - so that they can both be accessed by a marshal in order to operate the extinguisher or cut all of the electrics to the car.
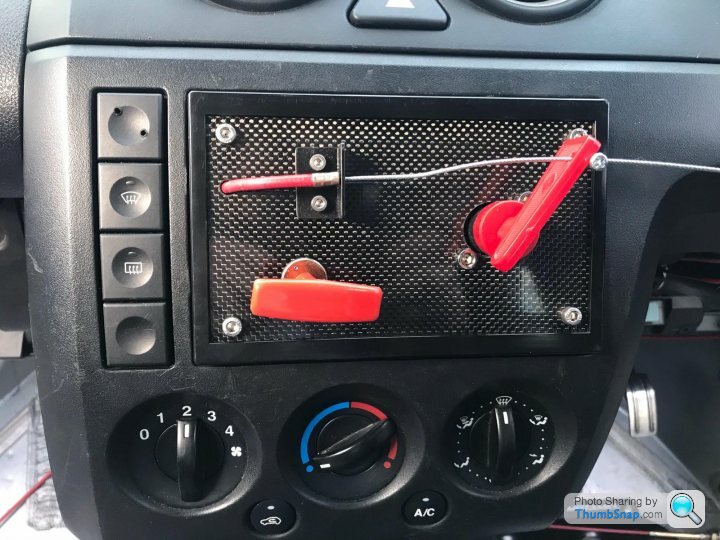
I'm over the moon with the result, which looks like it was professionally made and installed. Seriously top job by my Dad.
Installation of the pull-cables is another separate job that'll be coming up in another post - as is the rather complicated job of routing in the electrical cut-off switch.
When coming up with the plan for this car, the dash console was the first job I earmarked for my Dad. He's got a great eye for detail, and I knew he'd nail it. The dash console needs to provide space for an engine kill-switch, and a pull-chord for the driver to operate the fire extinguisher from the driver's seat.
The vacant stereo space is the obvious place to house those pull-cables. But there is no off-the-shelf piece of kit for this job and for this car. So we'd need to make our own.
He started by buying a sheet of carbon fibre, to act as the fascia. And getting hold of a new stereo cage, to act as an anchor point, along woth some aluminium strips to hold it all together.
He then measured up and cut the carbon fibre to size. The aluminium was then fixed to the front of the stereo cage, using the original fixings from this area of the dashboard.
The carbon fibre was then fixed to the aluminium with screws, which we later upgraded to cap heads. We then fixed the original stereo plastic surround back onto the stereo cage, giving a really nice neat finish. Looking very tidy!
He then cut a hole for the kill switch. The kill switch was bought from Demon Tweeks. It is an FIA approved switch and cost around £50.
An additional hole was cut for the fire extinguisher pull-cable that would also be housed on the console. Both are easily reachable from the driver's seat when strapped in with a harness.
This is a shot of the cables being routed from the rear of the kill switch. I am very glad to have had my Dad working on this aspect, as I'd spent a lot of time reading 'installation guides' and 'how-to' instructions for this job.. and I just didn't feel confident doing it. I am sure that a complete novice could do this job; but when the safety of the car and the reliability of the car were both so tightly wound up in one job, I felt it needed more experienced hands.
The stereo cage went in nicely as you'd expect, and the cabling was attached as below. Sorry this photo isn't very clear, but hopefully you get the general idea. I'll go into more detail on the cabling in a later post, as this was a huge learning curve for me - which included at least 2 occasions where the car would not start.
As a final flurry Dad also whipped up a little bracket to hold the bowden cable coming through the fascia, keeping things looking very tidy indeed. That cable will of course be routed to the outside of the car; as will the second fire extinguisher pull-cable - so that they can both be accessed by a marshal in order to operate the extinguisher or cut all of the electrics to the car.
I'm over the moon with the result, which looks like it was professionally made and installed. Seriously top job by my Dad.
Installation of the pull-cables is another separate job that'll be coming up in another post - as is the rather complicated job of routing in the electrical cut-off switch.
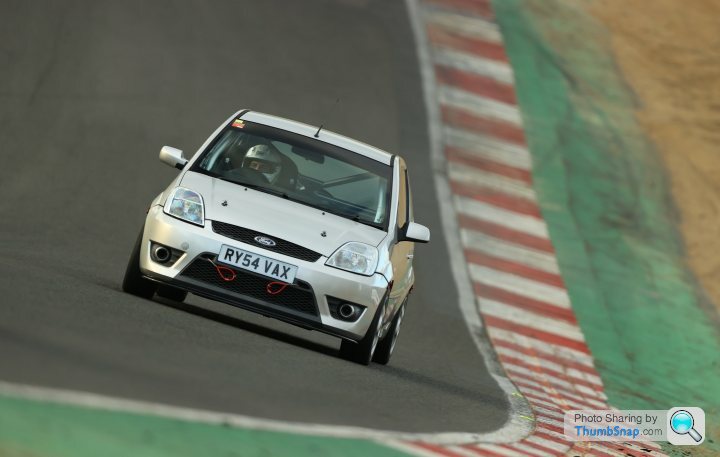
TRACK SHAKEDOWN
Well time has gotten away from us, and in the run up to the first race of the season.. the car isn’t quite finished!
We were still very confident that we’d get all of the pull-cables and electrics finished with help from our friends as Kent Motorsport. But with regards to the suspension; it just wasn’t going to get done in time.
The car felt pretty tight. The Eibach springs had dropped the ride height slightly, the new top mounts and struts meant the car now felt accurate (if a little bit leany), and the rear anti-roll bar kept things tidy at the rear. We decided to do a shakedown at Brands Hatch to see what the car was like on this suspension setup - and if it ran ok then we’d enter it into the first race weekend on the current setup.
The evening sessions at Brands are excellent for us, as we’re nearby and can bomb down there straight from work if needs be. You usually get at least 2-2.5 hours of track time. We only wanted about thirty or forty minutes to see how the car felt.
I was pretty excited to get out on track in the car we’d put together. It was great from the first lap. We ran the car on the old set of R888R’s and they were spot on for it. The car felt light. The engine and gearbox were all good and power delivery was smooth with reasonable top end grunt.
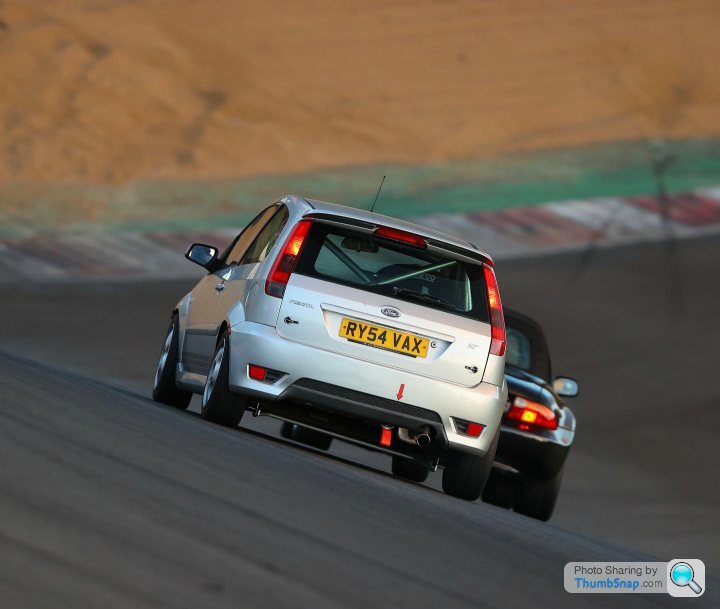
The steering felt ok but definitely needed a flush out with some new fluid. Clutch was good. Brakes were very good, lots of bite from those new front RP-X pads.
My only real criticism of the car was that, as predicted, it leaned a lot in the fast corners. Particularly paddock hill bend. But considering the car was not running coilover suspension I thought it handled pretty well.

I was expecting the car to be good fun, and I knew from driving it on the road that it hadn’t lost too many horsepower over the not inconsiderable mileage it had covered. But it was actually quicker than I’d been expecting. Not fast! But quicker than I’d expected.
It had performed well. The decision was made to enter it into the first race meeting at Lydden Hill the following weekend.
Well time has gotten away from us, and in the run up to the first race of the season.. the car isn’t quite finished!
We were still very confident that we’d get all of the pull-cables and electrics finished with help from our friends as Kent Motorsport. But with regards to the suspension; it just wasn’t going to get done in time.
The car felt pretty tight. The Eibach springs had dropped the ride height slightly, the new top mounts and struts meant the car now felt accurate (if a little bit leany), and the rear anti-roll bar kept things tidy at the rear. We decided to do a shakedown at Brands Hatch to see what the car was like on this suspension setup - and if it ran ok then we’d enter it into the first race weekend on the current setup.
The evening sessions at Brands are excellent for us, as we’re nearby and can bomb down there straight from work if needs be. You usually get at least 2-2.5 hours of track time. We only wanted about thirty or forty minutes to see how the car felt.
I was pretty excited to get out on track in the car we’d put together. It was great from the first lap. We ran the car on the old set of R888R’s and they were spot on for it. The car felt light. The engine and gearbox were all good and power delivery was smooth with reasonable top end grunt.
The steering felt ok but definitely needed a flush out with some new fluid. Clutch was good. Brakes were very good, lots of bite from those new front RP-X pads.
My only real criticism of the car was that, as predicted, it leaned a lot in the fast corners. Particularly paddock hill bend. But considering the car was not running coilover suspension I thought it handled pretty well.
I was expecting the car to be good fun, and I knew from driving it on the road that it hadn’t lost too many horsepower over the not inconsiderable mileage it had covered. But it was actually quicker than I’d been expecting. Not fast! But quicker than I’d expected.
It had performed well. The decision was made to enter it into the first race meeting at Lydden Hill the following weekend.
Edited by SparrowHawk on Wednesday 28th April 11:14
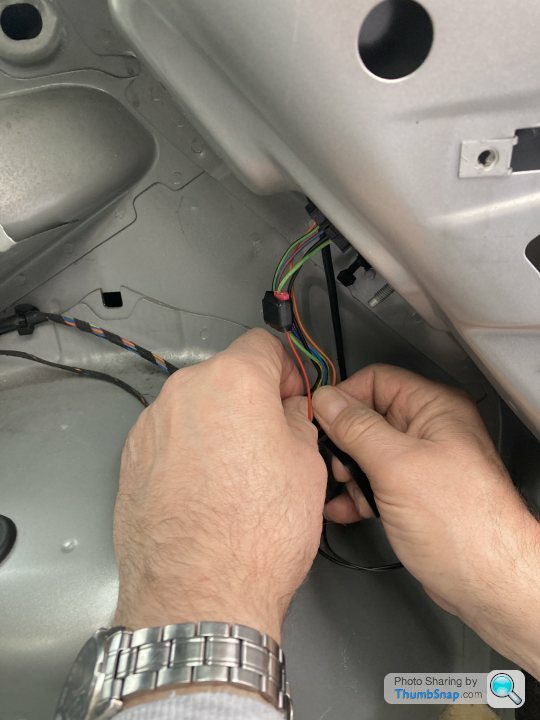
CUT OFF CABLES & ELECTRICS
The final job before the car would be race legal.
We needed to arrange the electrics so that the electrical cut off switch was wired into the circuit. We’d also need to relocate the battery into the cabin. And then finally, route both of the pull-cables to outside of the car; one for the cut-off switch and one for the fire extinguisher.
Although relocating the battery is not mandatory it is a good idea for several reasons. It creates a lot more room in the engine bay, very handy for working on the car generally and especially handy when you’re planning to install a power steering relocation kit. And it also helps distribute weight more evenly.
We already had the Motamec battery tray, and opted for a Yuasa race battery. These are very reasonably priced, and come with the security of a well-known brand name.
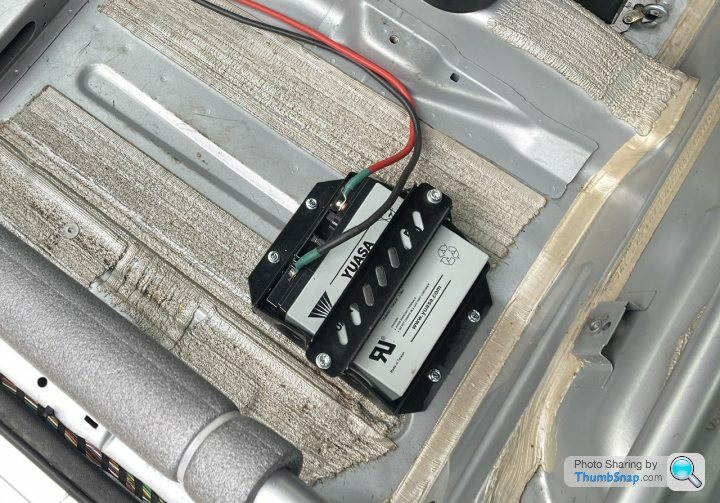
The battery was installed with the same process as the fire extinguisher. Adding four bolts through the floor, with two of these requiring captive thread riv nuts due to the box section underneath the floor. We had some confusion over the required placement of the battery. One scrutineer informed us that it MUST be located aft of the passenger seat. But we clarified (as far as we know) that this is only in the case of rally cars, where a co-driver or passenger may be present. So we located ours where the passenger seat had been.
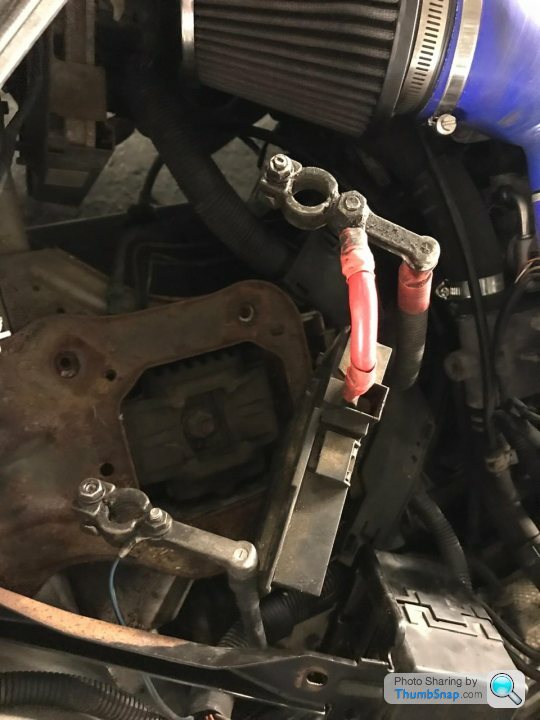
The battery left behind more than just a hole in the engine bay. It had also been the mounting point for this section of the wiring harness (probably not the correct terminology). This was the point at which I was very much beyond my skill set and feeling out of my depth on the build, and was the job that we had called on Kent Motorsport to help us with. If someone were to ask me which part of the build I’d recommend seeking professional assistance with, this would be in. Obviously it’s also a good idea to have a pro build or install your roll cage. But with the electrics, it would be very easy for a novice to make a mistake leaving their car non-working, unreliable, or even dangerous.
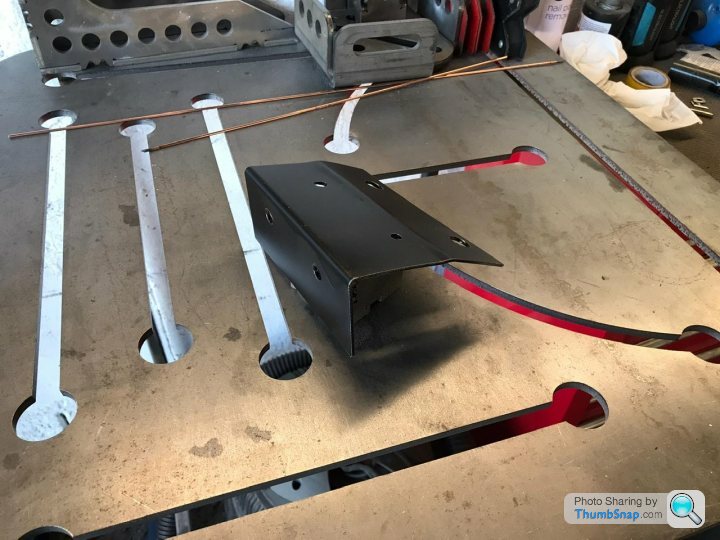
The guys whipped up this bracket to act as an anchor point, and earthing point, and to house this part of the original harness.
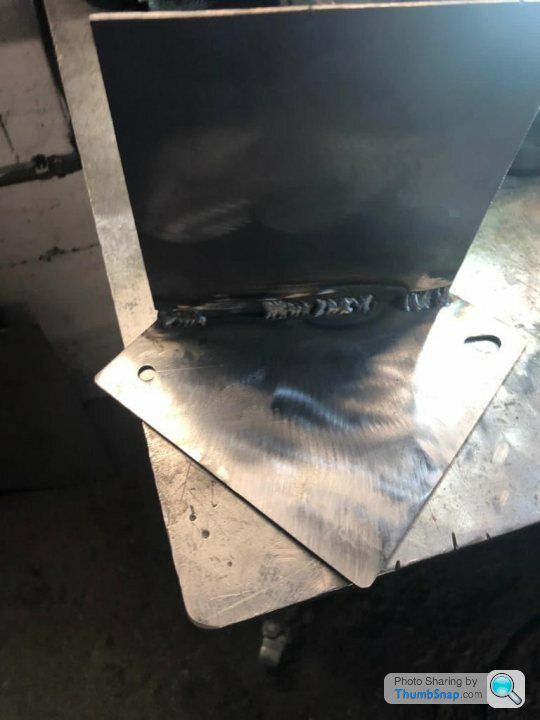
The sections were welded together and then given a nice coat of satin black. Once fitted in place it would be the point at which our new battery cables met the rest of the car.
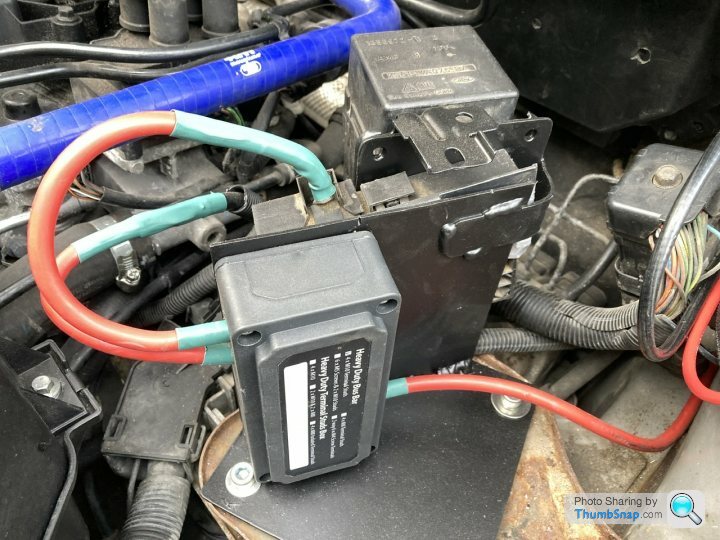
Once the bracket was in place a new terminal box was installed. This solution was perhaps a little over-engineered, but it would do the job safely and reliably. We were very pleased to utilise the experience and expertise of the guys, to get this important job done right.
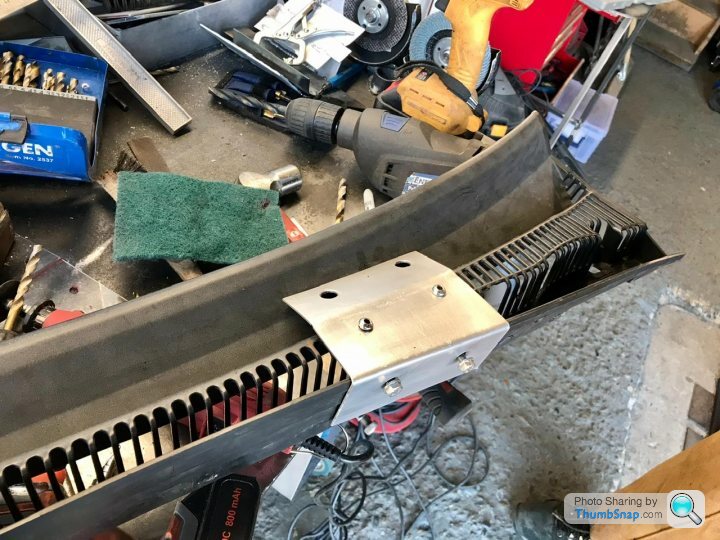
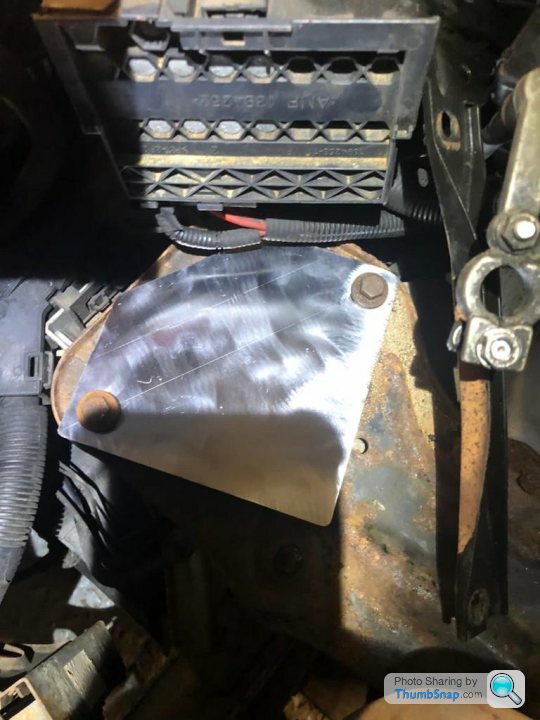
Whilst they were at it, they fabricated a similarly tasty bracket for the pull cables. Which would be housed up on the scuttle panel. On other cars I’ve seen the pull cables simply poking through the scuttle; I’m sure this is perfectly functional but it doesn’t always look very tidy, and I would be nervous of having such an important safety feature not securely fixed down.
This bracket was then also painted in satin black to match our other brackets and new parts. We had intended to do this job ourselves, but in truth time got the better of us. We had literally just a couple of days before the first race - and we were not going to get it all done in time. So a big thank you to Kent Motorsport for helping us over the line.
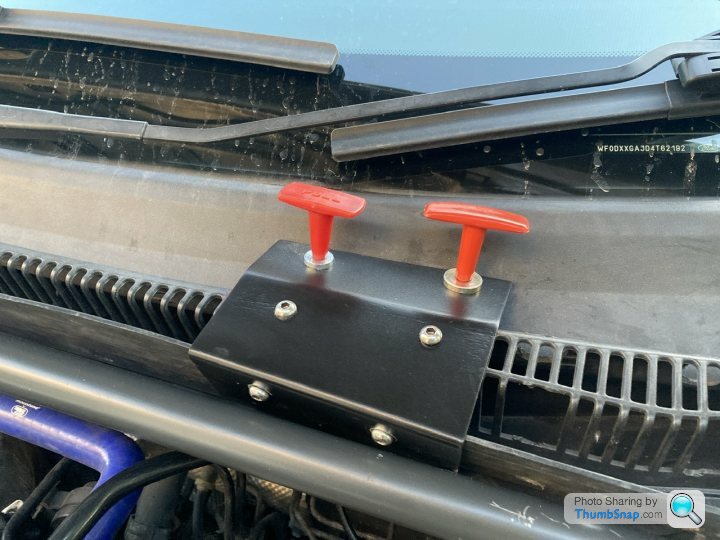
Installed on the car, we then threaded both of the pull-cables through the new bracket, and they were routed through the bulkhead and fitted to the electrical cut-off switch and fire extinguisher inside the cabin.
The last of the mandatory safety features had been installed. The car was now race legal - and the end was in sight!
The final job before the car would be race legal.
We needed to arrange the electrics so that the electrical cut off switch was wired into the circuit. We’d also need to relocate the battery into the cabin. And then finally, route both of the pull-cables to outside of the car; one for the cut-off switch and one for the fire extinguisher.
Although relocating the battery is not mandatory it is a good idea for several reasons. It creates a lot more room in the engine bay, very handy for working on the car generally and especially handy when you’re planning to install a power steering relocation kit. And it also helps distribute weight more evenly.
We already had the Motamec battery tray, and opted for a Yuasa race battery. These are very reasonably priced, and come with the security of a well-known brand name.
The battery was installed with the same process as the fire extinguisher. Adding four bolts through the floor, with two of these requiring captive thread riv nuts due to the box section underneath the floor. We had some confusion over the required placement of the battery. One scrutineer informed us that it MUST be located aft of the passenger seat. But we clarified (as far as we know) that this is only in the case of rally cars, where a co-driver or passenger may be present. So we located ours where the passenger seat had been.
The battery left behind more than just a hole in the engine bay. It had also been the mounting point for this section of the wiring harness (probably not the correct terminology). This was the point at which I was very much beyond my skill set and feeling out of my depth on the build, and was the job that we had called on Kent Motorsport to help us with. If someone were to ask me which part of the build I’d recommend seeking professional assistance with, this would be in. Obviously it’s also a good idea to have a pro build or install your roll cage. But with the electrics, it would be very easy for a novice to make a mistake leaving their car non-working, unreliable, or even dangerous.
The guys whipped up this bracket to act as an anchor point, and earthing point, and to house this part of the original harness.
The sections were welded together and then given a nice coat of satin black. Once fitted in place it would be the point at which our new battery cables met the rest of the car.
Once the bracket was in place a new terminal box was installed. This solution was perhaps a little over-engineered, but it would do the job safely and reliably. We were very pleased to utilise the experience and expertise of the guys, to get this important job done right.
Whilst they were at it, they fabricated a similarly tasty bracket for the pull cables. Which would be housed up on the scuttle panel. On other cars I’ve seen the pull cables simply poking through the scuttle; I’m sure this is perfectly functional but it doesn’t always look very tidy, and I would be nervous of having such an important safety feature not securely fixed down.
This bracket was then also painted in satin black to match our other brackets and new parts. We had intended to do this job ourselves, but in truth time got the better of us. We had literally just a couple of days before the first race - and we were not going to get it all done in time. So a big thank you to Kent Motorsport for helping us over the line.
Installed on the car, we then threaded both of the pull-cables through the new bracket, and they were routed through the bulkhead and fitted to the electrical cut-off switch and fire extinguisher inside the cabin.
The last of the mandatory safety features had been installed. The car was now race legal - and the end was in sight!
FINAL ODD JOBS
Although the car was now race legal, there were still a few odd jobs to attend to before we headed to our first race meeting.
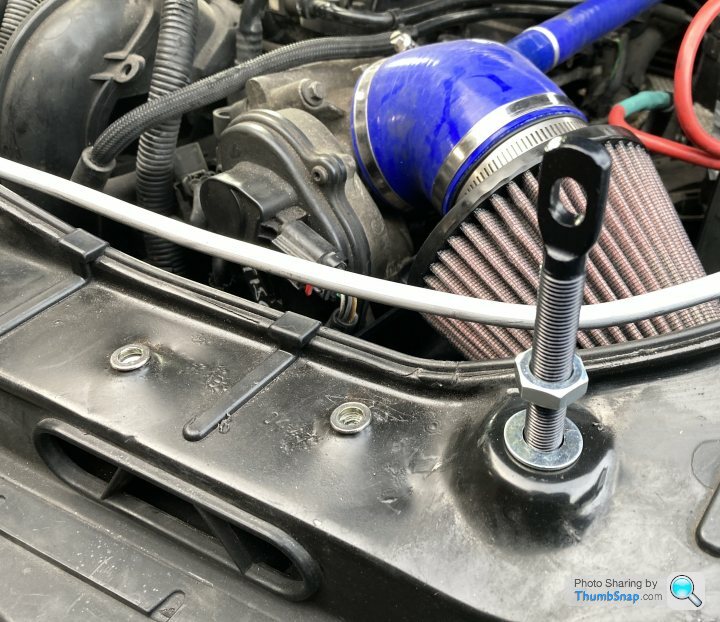
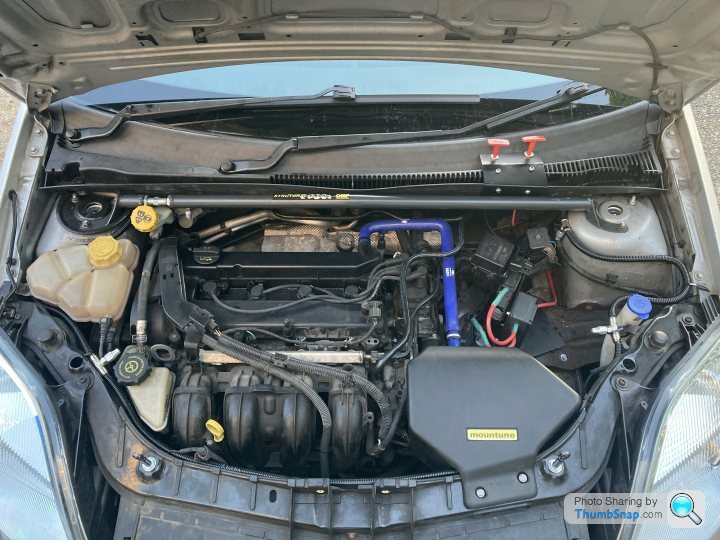
The engine bay was all now nice and tidy, and the final piece of the puzzle in that area was a front strut brace. These add a nice bit of rigidity, holding the tops of the suspension struts firmly apart and reducing movement. Especially important for us as we were still running stock suspension struts and needed all the help we could get to reduce body roll. I also finally got the Mountune cold air box fitted around the induction intake.
Next up we decided to remove the fog light and add a bend into the bracket. The light was parallel with the glass, which looked very neat.. but meant that the light was facing upwards at about a 30 degree angle.
So adding a bend meant that the fog light now faced directly backwards giving far better visibility for any cars behind.
Another small but important modification is the rear view mirror. The standard mirror is too small, and does not allow you to see both behind you and through the rear quarter windows.
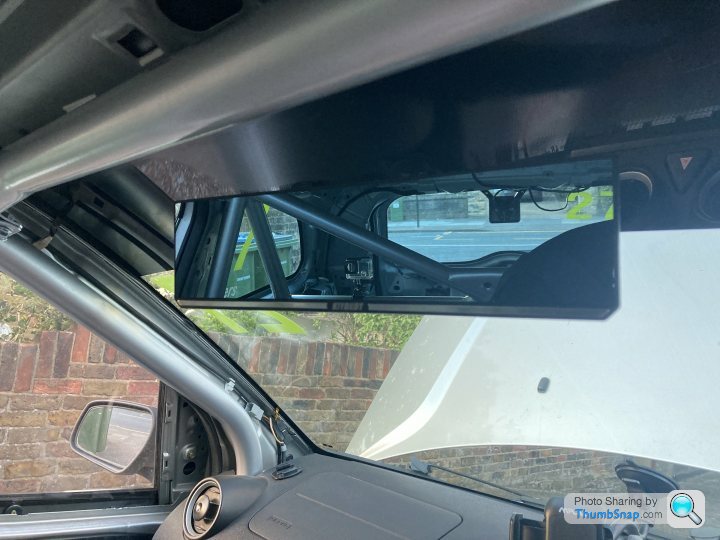
These widescreen mirrors give a wider field of vision whilst also adding anti-glare too. You can get concave/convex mirrors to give an even wider field of vision, but I find those distort distances too much and make it difficult to judge how close another car is to you.
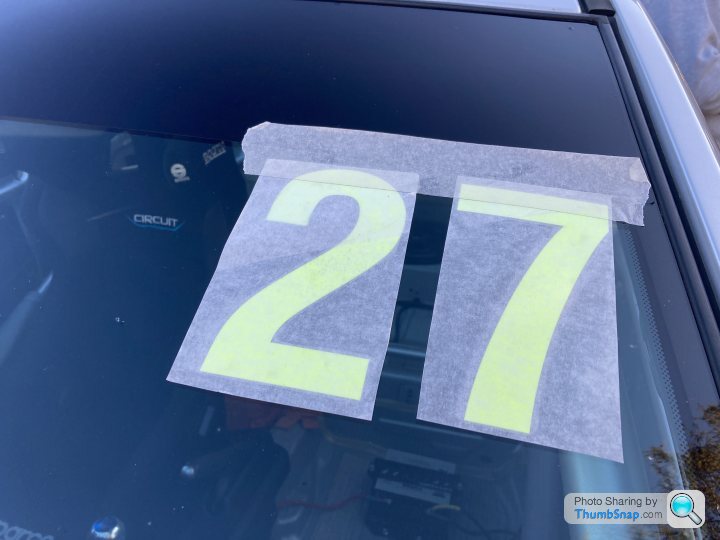
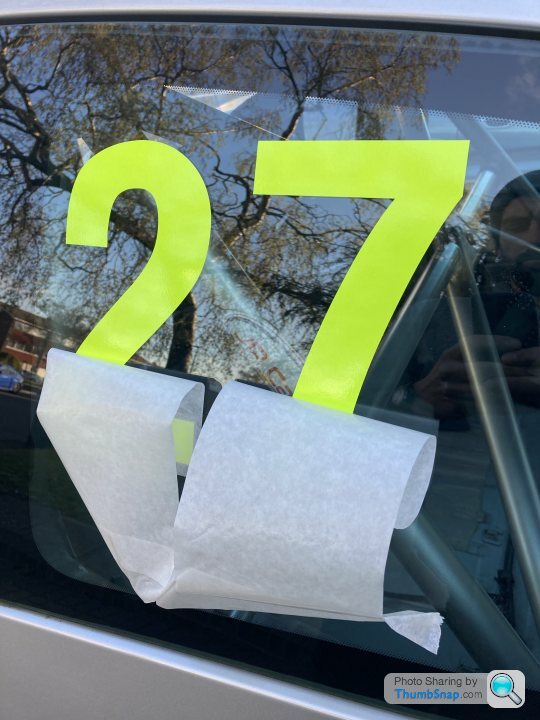
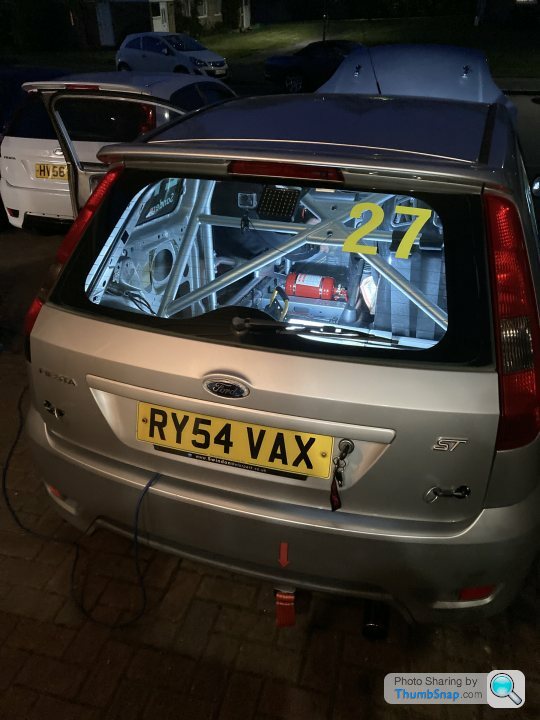
Another final job was getting our race numbers on the car. They come in regulation sizes, larger on the side windows, and slightly smaller on the front and rear screen. Only a little job, but another of the very satisfying ones to do and to tick off! No sponsors as yet, but we'll do our best to pick up a little support throughout the season to help keep the car ticking over.
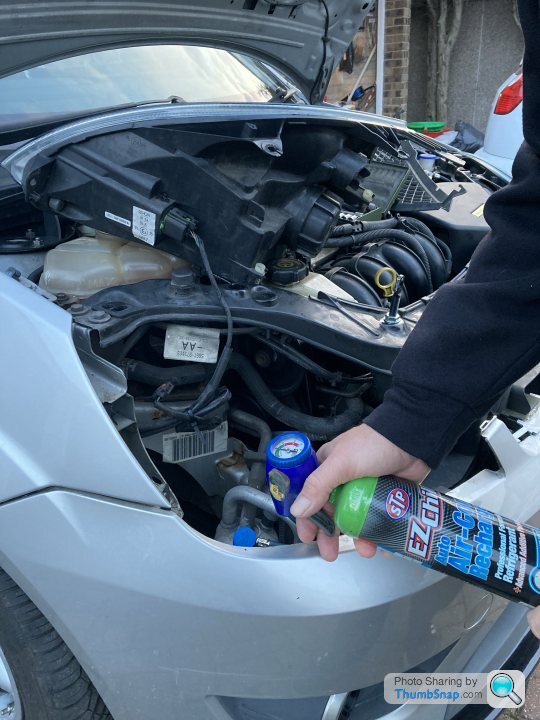
We have not yet removed the air conditioning system. This adds up to a fair amount of weight, so I intend to take it all out at some point. But for now it remains.. so we also did a quick air con gas top-up to try to help keep things cool at what was forecast to be a sunny race weekend ahead.
Having a very solid mounting point for an onboard camera is vital. Stewards can also be very hot on ensuring you have a secondary fixing in place. So we mounted a Go Pro onto the roll cage with a roll-cage specific mount; and an additional tether to ensure the camera couldn't become loose and fly around the cabin.

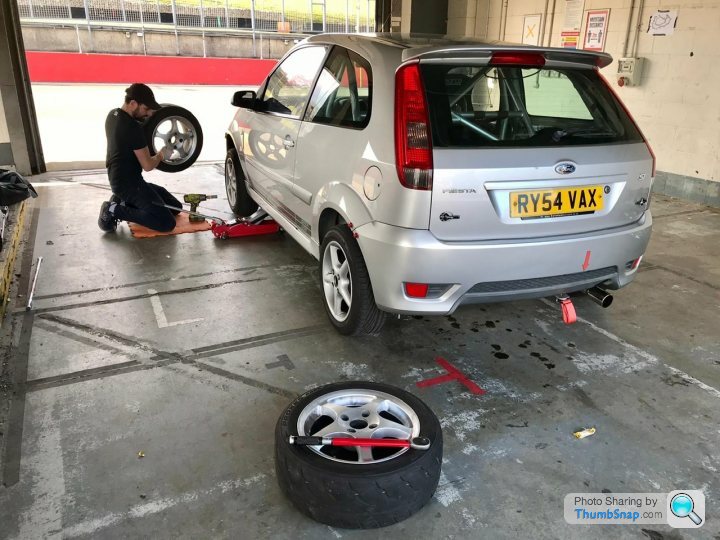
As always, it turned into a late one and we worked into the night to get the car ready ticking off various last minute bits, and also doing a final oil change. I would be driving the race car down to Lydden (no trailer!) so everything had to be checked and double checked on Thursday night before I headed off on Friday after work.

I'd be bundling a survival kit into the back of the race car.. a one-man tent, sleeping bag, and some essentials; and then heading down on Friday to camp overnight in the paddock. Not very glamourous, but all part of the appeal of racing for me having spent most of my childhood weekends in and around race paddocks.
I wouldn't be going full Malle-Moto style though. My dad would be driving down on Saturday morning, with some tools and a set of spare wheels/tyres in the car. We were also hoping that Kent Motorsport might head down to give an added layer of support and very welcome guidance.
Time to find out whether we'd built a peach or a lemon.
Although the car was now race legal, there were still a few odd jobs to attend to before we headed to our first race meeting.
The engine bay was all now nice and tidy, and the final piece of the puzzle in that area was a front strut brace. These add a nice bit of rigidity, holding the tops of the suspension struts firmly apart and reducing movement. Especially important for us as we were still running stock suspension struts and needed all the help we could get to reduce body roll. I also finally got the Mountune cold air box fitted around the induction intake.
Next up we decided to remove the fog light and add a bend into the bracket. The light was parallel with the glass, which looked very neat.. but meant that the light was facing upwards at about a 30 degree angle.
So adding a bend meant that the fog light now faced directly backwards giving far better visibility for any cars behind.
Another small but important modification is the rear view mirror. The standard mirror is too small, and does not allow you to see both behind you and through the rear quarter windows.
These widescreen mirrors give a wider field of vision whilst also adding anti-glare too. You can get concave/convex mirrors to give an even wider field of vision, but I find those distort distances too much and make it difficult to judge how close another car is to you.
Another final job was getting our race numbers on the car. They come in regulation sizes, larger on the side windows, and slightly smaller on the front and rear screen. Only a little job, but another of the very satisfying ones to do and to tick off! No sponsors as yet, but we'll do our best to pick up a little support throughout the season to help keep the car ticking over.
We have not yet removed the air conditioning system. This adds up to a fair amount of weight, so I intend to take it all out at some point. But for now it remains.. so we also did a quick air con gas top-up to try to help keep things cool at what was forecast to be a sunny race weekend ahead.
Having a very solid mounting point for an onboard camera is vital. Stewards can also be very hot on ensuring you have a secondary fixing in place. So we mounted a Go Pro onto the roll cage with a roll-cage specific mount; and an additional tether to ensure the camera couldn't become loose and fly around the cabin.
As always, it turned into a late one and we worked into the night to get the car ready ticking off various last minute bits, and also doing a final oil change. I would be driving the race car down to Lydden (no trailer!) so everything had to be checked and double checked on Thursday night before I headed off on Friday after work.
I'd be bundling a survival kit into the back of the race car.. a one-man tent, sleeping bag, and some essentials; and then heading down on Friday to camp overnight in the paddock. Not very glamourous, but all part of the appeal of racing for me having spent most of my childhood weekends in and around race paddocks.
I wouldn't be going full Malle-Moto style though. My dad would be driving down on Saturday morning, with some tools and a set of spare wheels/tyres in the car. We were also hoping that Kent Motorsport might head down to give an added layer of support and very welcome guidance.
Time to find out whether we'd built a peach or a lemon.
Edited by SparrowHawk on Monday 26th April 15:57
Gassing Station | UK Club Motorsport | Top of Page | What's New | My Stuff