BARGAIN BASEMENT ST - Building a budget race car
Discussion


FOLLOW US ON INSTAGRAM
Curating these posts takes a bit of time, whereas boshing some pics on social media only takes a few seconds.
So if you like this thread, you can also follow it on Instagram too - where we post more pics of the car and much more regular updates on build progress.
@SPARROWHAWK.RACING
We’re not on Facebook. Not cool enough for that.
COILOVER CHOICE
This has been the only choice I've really agonised over during the build.
With other major purchases (eg. rollcage or race seat) I've been very clear on what I wanted and which options best suited by needs and my budget. But with the coilover choice, I just can't make my mind up.
When building a car like this I think it's important to build it the way you want it. Not to focus too much on things like future re-sale value. This is a budget racecar and I'm unlikely to ever sell it, so I don't need to worry about which coilovers will be most appealing to a new owner. But I do need to future proof the car to make sure it remains fit for purpose and can race in the series I may want to race in.
The ideal scenario would be to fit AST coilovers. They seem to be almost unanimously agreed to be the best choice on this platform of car; and they are used by the BRSCC Fiesta Championship. They would also keep the car eligible for my current series (and Class) in CMMC Tin Tops.
However, the price of the AST's is an eye-watering £4,261.
This isn't just a lot, its almost what the entire rest of the project has cost me so far! Someone racing one of these cars at the front of their field, told me that the AST's are worth the money. So I have seriously thought about it.
Now that I have built the car and taken it racing, I am no longer restricting myself to that strict £5K target budget. I'm happy to spend more as and when I feel like it, to increase the cars performance and enjoy driving and racing it more.
But, if I was going to spend £4,261 on suspension then I probably would have also spent a thousand pounds more on the rollcage, another few hundred quid on an even better seat, and so on. I have built a relatively 'budget' car and so to throw over four grand at the suspension now just doesn't make sense.. even if it would help me race in the Fiesta Championship next year.

So for now I'm keeping within the more reasonable price range of circa £800-£1200 for coilovers.
Top of my shopping list at the moment are Gaz Gold coilovers. The main thing going for them; numerous people have told me these are the best all-rounder coilovers for racing. Everyone from MX-5 racers to Escort owners and MG club members seem to recommend these.
At £1,100 the main thing against the Gaz Golds for me, is that they do not come with the adjustable topmounts included; those will cost a further £200 on top. The other thing going against them is that I don't know them as I've never used them before. But that's not much of a worry, given the absolutely countless good things you will hear from anyone who uses them.
My other main contender is the BC Racing RM or BR series.
The BC Racing coilovers are superb. We have them on our trackday Fiesta. They are track oriented, have 30 way adjustable damping - and in terms of value, these come WITH the camber adjustable topmounts included; making them very good value in my opinion.
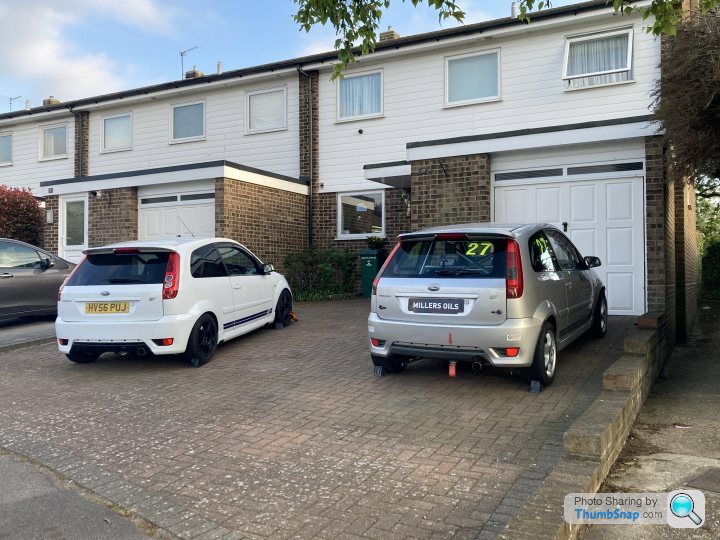
The main thing going in favour of the BC Racing coilovers is that we have these fitted on our other trackday Fiesta. I have done thousands of laps of driving in a Fiesta with these coilovers, at tracks all over the country. For this reason I feel very confident they will give me what I want, I know how they perform and how to adjust them, and I also know they won't let me down.
So I'm very torn between these two choices.
I'm running out of time to make a decision, as they'll take a while to arrive and will then also need fitting and setting up. So any input from fellow PHers very welcome!
This has been the only choice I've really agonised over during the build.
With other major purchases (eg. rollcage or race seat) I've been very clear on what I wanted and which options best suited by needs and my budget. But with the coilover choice, I just can't make my mind up.
When building a car like this I think it's important to build it the way you want it. Not to focus too much on things like future re-sale value. This is a budget racecar and I'm unlikely to ever sell it, so I don't need to worry about which coilovers will be most appealing to a new owner. But I do need to future proof the car to make sure it remains fit for purpose and can race in the series I may want to race in.
The ideal scenario would be to fit AST coilovers. They seem to be almost unanimously agreed to be the best choice on this platform of car; and they are used by the BRSCC Fiesta Championship. They would also keep the car eligible for my current series (and Class) in CMMC Tin Tops.
However, the price of the AST's is an eye-watering £4,261.
This isn't just a lot, its almost what the entire rest of the project has cost me so far! Someone racing one of these cars at the front of their field, told me that the AST's are worth the money. So I have seriously thought about it.
Now that I have built the car and taken it racing, I am no longer restricting myself to that strict £5K target budget. I'm happy to spend more as and when I feel like it, to increase the cars performance and enjoy driving and racing it more.
But, if I was going to spend £4,261 on suspension then I probably would have also spent a thousand pounds more on the rollcage, another few hundred quid on an even better seat, and so on. I have built a relatively 'budget' car and so to throw over four grand at the suspension now just doesn't make sense.. even if it would help me race in the Fiesta Championship next year.
So for now I'm keeping within the more reasonable price range of circa £800-£1200 for coilovers.
Top of my shopping list at the moment are Gaz Gold coilovers. The main thing going for them; numerous people have told me these are the best all-rounder coilovers for racing. Everyone from MX-5 racers to Escort owners and MG club members seem to recommend these.
At £1,100 the main thing against the Gaz Golds for me, is that they do not come with the adjustable topmounts included; those will cost a further £200 on top. The other thing going against them is that I don't know them as I've never used them before. But that's not much of a worry, given the absolutely countless good things you will hear from anyone who uses them.
My other main contender is the BC Racing RM or BR series.
The BC Racing coilovers are superb. We have them on our trackday Fiesta. They are track oriented, have 30 way adjustable damping - and in terms of value, these come WITH the camber adjustable topmounts included; making them very good value in my opinion.
The main thing going in favour of the BC Racing coilovers is that we have these fitted on our other trackday Fiesta. I have done thousands of laps of driving in a Fiesta with these coilovers, at tracks all over the country. For this reason I feel very confident they will give me what I want, I know how they perform and how to adjust them, and I also know they won't let me down.
So I'm very torn between these two choices.
I'm running out of time to make a decision, as they'll take a while to arrive and will then also need fitting and setting up. So any input from fellow PHers very welcome!
SparrowHawk said:
COILOVER CHOICE
This has been the only choice I've really agonised over during the build.
With other major purchases (eg. rollcage or race seat) I've been very clear on what I wanted and which options best suited by needs and my budget. But with the coilover choice, I just can't make my mind up.
When building a car like this I think it's important to build it the way you want it. Not to focus too much on things like future re-sale value. This is a budget racecar and I'm unlikely to ever sell it, so I don't need to worry about which coilovers will be most appealing to a new owner. But I do need to future proof the car to make sure it remains fit for purpose and can race in the series I may want to race in.
The ideal scenario would be to fit AST coilovers. They seem to be almost unanimously agreed to be the best choice on this platform of car; and they are used by the BRSCC Fiesta Championship. They would also keep the car eligible for my current series (and Class) in CMMC Tin Tops.
However, the price of the AST's is an eye-watering £4,261.
This isn't just a lot, its almost what the entire rest of the project has cost me so far! Someone racing one of these cars at the front of their field, told me that the AST's are worth the money. So I have seriously thought about it.
Now that I have built the car and taken it racing, I am no longer restricting myself to that strict £5K target budget. I'm happy to spend more as and when I feel like it, to increase the cars performance and enjoy driving and racing it more.
But, if I was going to spend £4,261 on suspension then I probably would have also spent a thousand pounds more on the rollcage, another few hundred quid on an even better seat, and so on. I have built a relatively 'budget' car and so to throw over four grand at the suspension now just doesn't make sense.. even if it would help me race in the Fiesta Championship next year.
So for now I'm keeping within the more reasonable price range of circa £800-£1200 for coilovers.
Top of my shopping list at the moment are Gaz Gold coilovers. The main thing going for them; numerous people have told me these are the best all-rounder coilovers for racing. Everyone from MX-5 racers to Escort owners and MG club members seem to recommend these.
At £1,100 the main thing against the Gaz Golds for me, is that they do not come with the adjustable topmounts included; those will cost a further £200 on top. The other thing going against them is that I don't know them as I've never used them before. But that's not much of a worry, given the absolutely countless good things you will hear from anyone who uses them.
My other main contender is the BC Racing RM or BR series.
The BC Racing coilovers are superb. We have them on our trackday Fiesta. They are track oriented, have 30 way adjustable damping - and in terms of value, these come WITH the camber adjustable topmounts included; making them very good value in my opinion.
The main thing going in favour of the BC Racing coilovers is that we have these fitted on our other trackday Fiesta. I have done thousands of laps of driving in a Fiesta with these coilovers, at tracks all over the country. For this reason I feel very confident they will give me what I want, I know how they perform and how to adjust them, and I also know they won't let me down.
So I'm very torn between these two choices.
I'm running out of time to make a decision, as they'll take a while to arrive and will then also need fitting and setting up. So any input from fellow PHers very welcome!
That is very weird... I came on here this morning to ask you what you had done with the suspension, if I had missed it, because I couldn't see it in the thread!This has been the only choice I've really agonised over during the build.
With other major purchases (eg. rollcage or race seat) I've been very clear on what I wanted and which options best suited by needs and my budget. But with the coilover choice, I just can't make my mind up.
When building a car like this I think it's important to build it the way you want it. Not to focus too much on things like future re-sale value. This is a budget racecar and I'm unlikely to ever sell it, so I don't need to worry about which coilovers will be most appealing to a new owner. But I do need to future proof the car to make sure it remains fit for purpose and can race in the series I may want to race in.
The ideal scenario would be to fit AST coilovers. They seem to be almost unanimously agreed to be the best choice on this platform of car; and they are used by the BRSCC Fiesta Championship. They would also keep the car eligible for my current series (and Class) in CMMC Tin Tops.
However, the price of the AST's is an eye-watering £4,261.
This isn't just a lot, its almost what the entire rest of the project has cost me so far! Someone racing one of these cars at the front of their field, told me that the AST's are worth the money. So I have seriously thought about it.
Now that I have built the car and taken it racing, I am no longer restricting myself to that strict £5K target budget. I'm happy to spend more as and when I feel like it, to increase the cars performance and enjoy driving and racing it more.
But, if I was going to spend £4,261 on suspension then I probably would have also spent a thousand pounds more on the rollcage, another few hundred quid on an even better seat, and so on. I have built a relatively 'budget' car and so to throw over four grand at the suspension now just doesn't make sense.. even if it would help me race in the Fiesta Championship next year.
So for now I'm keeping within the more reasonable price range of circa £800-£1200 for coilovers.
Top of my shopping list at the moment are Gaz Gold coilovers. The main thing going for them; numerous people have told me these are the best all-rounder coilovers for racing. Everyone from MX-5 racers to Escort owners and MG club members seem to recommend these.
At £1,100 the main thing against the Gaz Golds for me, is that they do not come with the adjustable topmounts included; those will cost a further £200 on top. The other thing going against them is that I don't know them as I've never used them before. But that's not much of a worry, given the absolutely countless good things you will hear from anyone who uses them.
My other main contender is the BC Racing RM or BR series.
The BC Racing coilovers are superb. We have them on our trackday Fiesta. They are track oriented, have 30 way adjustable damping - and in terms of value, these come WITH the camber adjustable topmounts included; making them very good value in my opinion.
The main thing going in favour of the BC Racing coilovers is that we have these fitted on our other trackday Fiesta. I have done thousands of laps of driving in a Fiesta with these coilovers, at tracks all over the country. For this reason I feel very confident they will give me what I want, I know how they perform and how to adjust them, and I also know they won't let me down.
So I'm very torn between these two choices.
I'm running out of time to make a decision, as they'll take a while to arrive and will then also need fitting and setting up. So any input from fellow PHers very welcome!
Then I find this...

Sorry, I can't offer any useful input, but I am on the look out for springs and dampers, maybe coil covers, for my trackway Fiesta ST. So, I'll be watching the responses with interest.
This has been a great journey - I was thinking it was going to be a bit of cheap fun, but not too serious, with the last-minute tyres and just about hanging in there on wet days - But the finale from Brands was gripping - Very well written up too.
MOT failure to class leader... Well done!

MOT failure to class leader... Well done!
This has been a great thread to read, nice work- methodical and logical. Congratulations on sticking to the budget- probably the hardest thing to do!
I've just had my Gaz units rebuilt and have not taken the car out yet so can't comment on performance, what I can say is the service from the company was very good. I dropped them in to Gaz (Basildon) and 3 days and £214 later they were rebuilt, dyno'd and supplied 2 new springs to my request. Having good support is always important IMO.
I've just had my Gaz units rebuilt and have not taken the car out yet so can't comment on performance, what I can say is the service from the company was very good. I dropped them in to Gaz (Basildon) and 3 days and £214 later they were rebuilt, dyno'd and supplied 2 new springs to my request. Having good support is always important IMO.
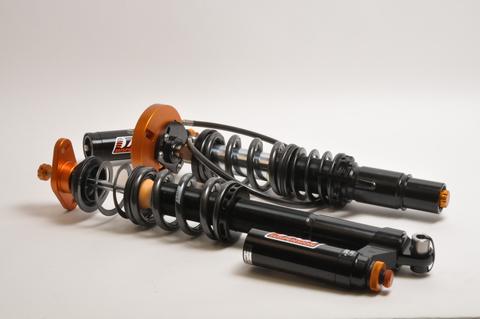
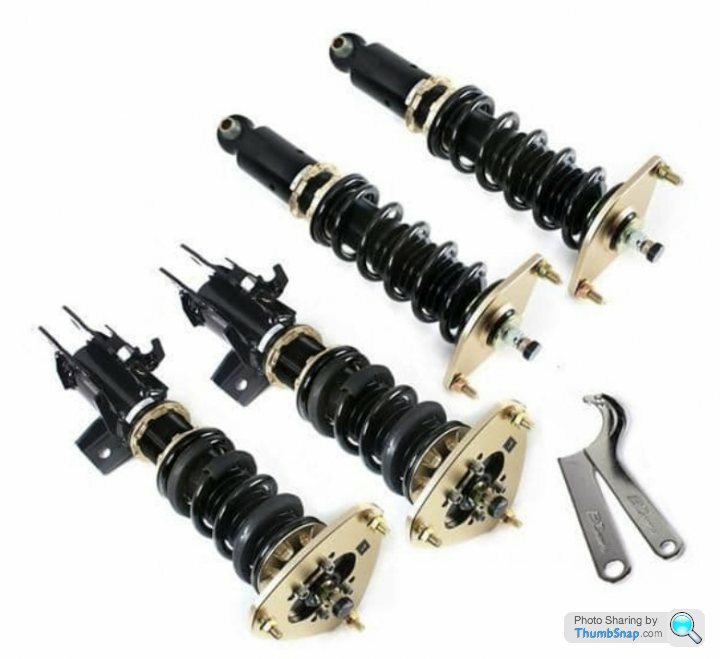
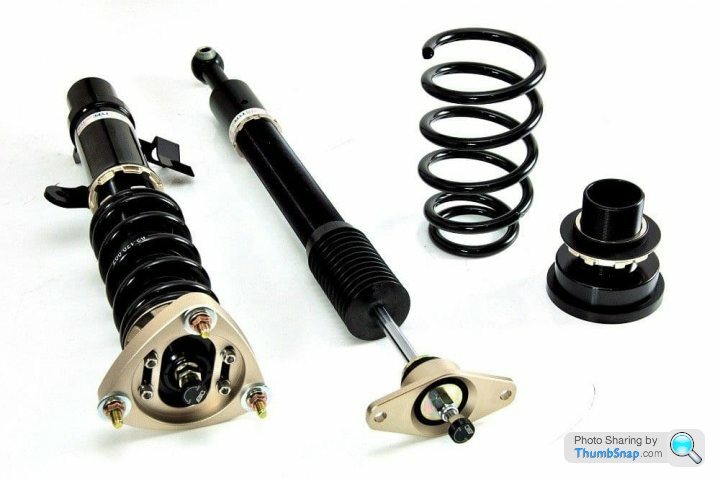
COILOVER CHOICE MADE
After narrowing my options down to just two choices, my decision was made for me.
I had fully intended to go with Gaz Golds, until I found out the wait times. I appreciate that these coilovers are all made to order, and I knew that Gaz would not be able to send me a set (especialy with custom spring rates) within a week or two.
However, I was not prepared for the 3-4 MONTH wait time predicted by the dealer I spoke to. Again, I understand that these are made to order, but 4 months is longer than it takes some people to complete a house purchase. In fact some people have built a house in less time than that! So waiting potentially until the season was almost over was not only surprising, it was also not an option.
So my decision was made easy. BC Racing; a good price - a known quantity to me - with custom spring rates available - topmounts included - made to order within 3 weeks.. these were definitely the best option for me.
There are quite a few variations available. I have opted for:
"BC Racing BR Type RA Coilovers with solid top mounts and custom spring rate of 8/6"
There are several outlets you can order them from, all of whom offer a similar 5-10% discount over ordering direct from the wholesaler. The BC Racing wholesaler was very honest and said they cannot offer discounts because they have to leave the discounts for the resellers; he then listed a few of the resellers for me which I thought was pretty decent of him, and I chose Kam Racing.
At £850 including delivery and a custom spring rate, I think they offer good value.
Should also add for those who have a real gripe with incorrect use of the term 'coilover' that I understand that on a Fiesta only the front units are technically coilovers, as the rears are still shocks plus adjustable springs. But lets be honest, we all know what we mean by coilovers.
Thanks for the suggestions and feedback I've received on here and on Instagram, its really useful - especially from more experienced racers.
One piece of feedback I received was that the BC Racing coilover is more of a 'trackday coilover' than a 'race coilover'. This point got me thinking, as it's something that's been said to me about other aspects, like tyre choice, and even oil choice. What I don't understand is the big distinction people make between those two uses.
I get the main point; that over the course of a 15 or 20 minute sprint race, you put your car through hell. And in that respect people would argue that you need the most extreme and the most capable parts on your car. But the question that raises for me is, how are trackdays any less punishing on my car or its components?
On an average race weekend I'll complete a 20 minute qualifying session, and 2 x 15 minute races. That means the car will be under maximum stress and the components under maximum duress for approximately 50 minutes.
Now in my years of doing trackdays, I cannot think of 1 single time where I've punished my trackday car for as little as 50 minutes. My point is that trackdays are hugely hard on your car. Looking at my laptimes (let's pretend for a moment that its within the rules to time yourself at trackdays) I am driving consistently as hard and fast on those trackdays as I am on a race day. I put the trackday car through hell! And that means I'm doing the same to its coilovers, its tyres, its fluids, and everything else. If anything, given that sessions on track are just as long as a 15minute race.. and I'm doing 6, 8, 10 sessions on a full trackday; I'd argue that trackday use is far harder on a car than race use.
A bit of a tangent, but its something that has puzzled me for a few years now, why people make such a distinction between the two different formats. Perhaps I'll understand it better once I'm a seasoned racer. For me, both are incredibly hard on your car, and both deserve equal caution, and equal investment in the right parts. The BC Coilovers on our trackday Fiesta have been absolutely superb for many years now, covering hundreds of laps at many different circuits, giving excellent performance and no issues. So they're going on the race car too!
Hopefully I don't end up eating humble pie again, like I did when I went against advice to buy a proper race spec clutch.
Edited by SparrowHawk on Friday 2nd July 10:02
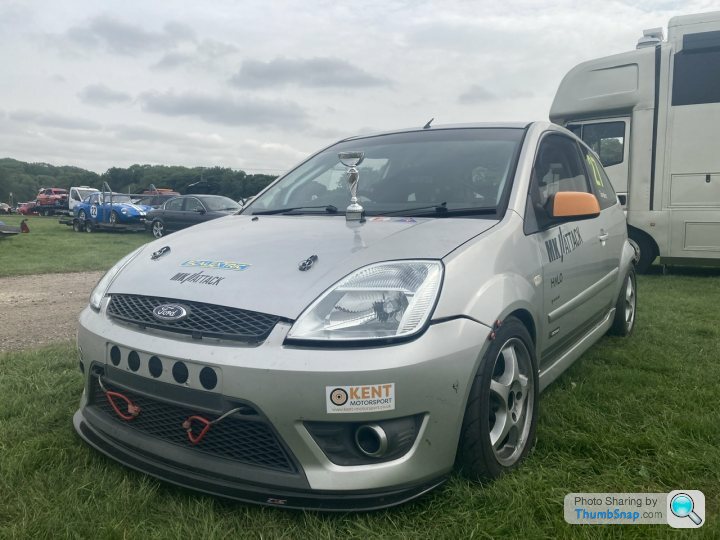
10 LESSONS LEARNED - AND WHAT WOULD I DO DIFFERENTLY NEXT TIME?
The aim of the project was to build a race-ready car within a certain budget, but there were a few additional ambitions. Learning some new skills, getting my hands dirty, trying some mechanical jobs I'd not done before, gaining confidence to do more work on my own cars, spending some quality time with my dad, and maybe even winning the odd race (in class) if possible.
We feel pretty happy to have achieved pretty much all of those aims over the course of the past 6-12 months.
But alongside the positive lessons learned, there were also a few failures and therefore a few tougher lessons learned. I've tried to summarise these here. It may perhaps be helpful for any other amateurs starting a similar project - or might simply act as a nice 'told you so' moment for some of those reading this thread!
1. DO NOT RACE ON OLD TYRES
One of the best lessons I learned was the importance of starting the season on a fresh set of rubber. Race tyres do not need to be mega expensive. I could have bought myself a full set of brand new NS2-R semi slicks for a little over £200. Instead I opted to attend my first race weekend with the car wearing a set of knackered R888's, and almost lost 2 races as a result - not to mention nearly losing control of the car several times.
Tyres are right up there with the most important aspects of your car - so don't scrimp. Start your build by ordering a fresh set so that you know exactly what you're working with. And if you have the budget, get a second set of wheels with some wet tyres too.
2. DON'T SCRIMP ON YOUR CLUTCH
This was a tough one because (thus far) it's the only mistake that's directly cost us, both out on the race track AND in the wallet. When planning the build I decided that a new replacement clutch was a good use of money, because although the clutch appeared to be fine I would certainly end up changing it at some point - so why not change it at the start. The issue was, I went against advice to fit a high performance clutch. That advice came from a fellow racer, and also from the clutch centre doing the work. But I knew better. This resulted in me having an oem LUK clutch kit fitted; and subsequently frying the clutch after just 4 races.
It might be a stretch to say the clutch failure cost me a class win, but it certainly was a big factor. At Brands Hatch I was several seconds ahead of my main rival, when I started to feel the clutch slipping on the straight. As the gap closed I lost my composure and fried the clutch even more! So by the time we entered the last 2 laps I lost almost all drive in fifth gear, and then fourth gear. That meant I conceded the lead, and limped around the final lap and a half, nursing the car home in 2nd place
As I type this I'm waiting for a performance clutch kit to land on my doorstep, and the car is booked in (again) for a clutch replacement in 2 days time. This time with an uprated clutch designed for race use and capable of taking more punishment. All in all the poor decision has probably cost me around £300-400 of wasted costs, money which I could have spent on a shiny new exhaust manifold - not to mention the time taken to go and get the replacement done. Perhaps clutch replacement is a job worth learning to do yourself?
3. ORDER YOUR SUSPENSION FIRST
I've waffled on about suspension a lot on this thread, so I won't do the same again. Simply put, suspension should really be one of the main priorities (second to safety gear and maybe tyres) when you are planning your build. Because I was building the car on a budget I put off choosing and buying the race suspension for far too long - meaning I actually showed up to the first couple of race meetings with standard road suspension. Not the best idea. And now that I have ordered new coilovers, I am sat waiting weeks and weeks for them to arrive. If I did this build again, I'd order the coilovers first - alongside the roll cage.
4. ROLL CAGE FITTING DOES NOT INCLUDE PREP WORK
When you drop off your car to have a full race cage fitted, you will need to have the car fully stripped already. I had envisaged just taking out the seats, carpets, and roof lining. But in fact the fitter will almost certainly expect you to remove the dashboard too, and all of the sound proofing and matting that is behind the dash. In my car this was a big job. It was not a couple of hours of work pulling things out, it was complicated and time consuming. This was a lesson learned the hard way as I wasn't actually able to do this in time and had to rely on someone else coming in at the last minute to finish off the strip down; which didn't go down well!
5. TRY YOUR SEAT BEFORE YOU BUY IT
The race seat is a big investment. As a crucial piece of safety equipment, it's likely you'll spend a fair bit of money on it. I chose my seat based on the quality, and on the price; it was the most expensive and highest rated seat I could afford. But what I didn't do was make time to go and see it or sit in it before I bought it. This is easier said than done, as not many shops stock this type of item. But your comfort in the car is important, so if the seat is too small or it makes you uncomfortable, that could well affect your performance on track. So ideally, try before you buy. I've ended up with an absolutely superb seat, but one that is slightly too small for me.
6. FUNCTION OVER FORM
There were one or two things I bought that I didn't need. Doing the process again I'd save myself a hundred quid or so and not buy doorcards - they're not necessary on a race car and you could spend that money on some new bushes or an anti roll bar instead. Likewise I bought a very expensive steering wheel, but later opted for a much less expensive but almost identical one that does just the same job and has just the same build quality, giving me another hundred quid to spend on lubricants. Save money by buying good quality parts at a good price, do not waste money paying for a name. So long as the parts are high quality, who cares what logo they carry.
7. PEOPLE WILL GIVE YOU ADVICE IF YOU ASK
Although this build might not seem too complex to many people, for me it was a big undertaking and a bit of a step into the unknown. What really helped me was how helpful people were, often complete strangers. Any time I needed advice, on a new part, on how to do something, about which grade of something to use, I asked. Whether it was on forums, on instagram, at a race meeting, or by emailing suppliers directly. And almost without fail people responded and gave me advice or an answer.
One of the best things about motorsport is the likeminded people you meet. And that counts for the build process too. Plenty of people took 2 minutes out of their day to respond to a quick message on instagram, or to give advice about a part I was ordering. That goes a long way and helps keep your confidence up. There are a lot of people out there who know a lot more than you do, so don't be afraid to ask.
8. SOME ADVICE IS WORTH PAYING FOR
There are plenty of people who will do absolutely every aspect of a race car build themselves. I'd have liked to do that myself. But there are a couple of areas where I knew my limits. Therefore, rather than have a go at everything myself there are some areas where I accepted that a professional not only knows better, but will also do a better job.
Areas we decided it was better to pay a professional are: roll-cage fitting; clutch fitting; bracket fabrication; suspension set up & geometry.
These are all things I could potentially have taught myself to do. But not only would the learning process have been time consuming and costly, I could also have ended up making mistakes and even compromising on safety. In hindsight I wish I had budgeted for professional advice on suspension/setup sooner. A day spent at Kent Motorsport having the car setup properly may possibly be the best money I end up spending throughout the whole build process.
When you pay someone else to do something, you are not admitting defeat. Sometimes it is just the best course of action. And although I have baulked at some of the prices I've been quoted for various jobs, I've realised that you are not just paying a professional for their time; you're also paying for their years of knowledge, expertise, specialist equipment, and overheads. So if a price seems high, think about just how much money all of those things cost that professional to accumulate over many years.
9. THE BEST BANG FOR BUCK IS PAYING FOR SEAT TIME AND TUITION
I can confidently say that the best investment I've made is not in any car-part or upgrade. The hours I've spent bashing around tracks around the country have helped me far more than any handling upgrade or performance part. Learning car control, learning the circuits, learning your limits, learning the limits of your car. These are immensely valuable, and only need cost a hundred quid or two.
With the possible exception of tyres (see point 1 above!) there is no modification you can do to your car that will make you faster than spending a day with a professional driver. A full stainless steel exhaust system on a Fiesta ST is approximately £1000. The same amount of money will pay for a FULL DAY of tuition with a current British Touring Car driver. Ask yourself honestly, which one of those options will make the most difference out on track?
10. REMEMBER IT'S ALL JUST FOR FUN
I caught myself getting angry a few times during this process. Losing tools, finding a job much harder than it looked online, trying to do something I simply wasn't capable of, parts arriving the day after the weekend I'd set aside to do that job!
The reality is, if you're building a budget race car and taking on a lot of the work yourself, you're doing all of this for fun. The building, the prep, the racing. There's no paycheque or career at the end of it. It's all just for fun. So its worthwhile keeping that top of mind along the way. When things don't work out, there is no world championship at stake.
Just enjoy it.
DELIVERY
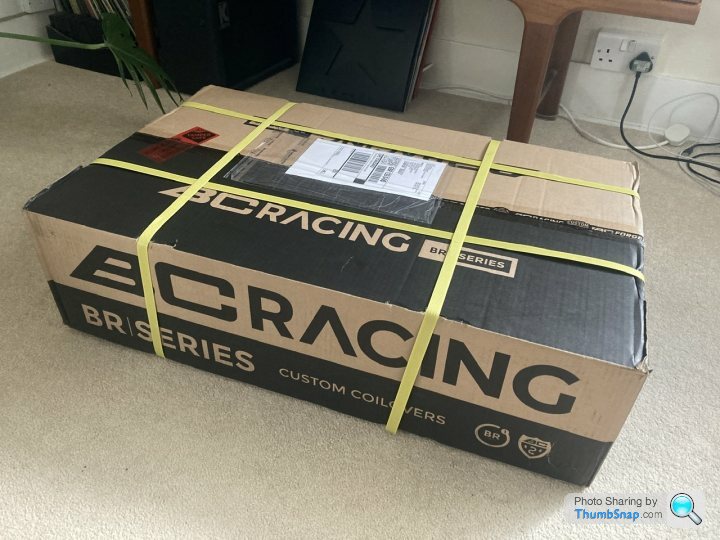
As promised these showed up within 3 weeks of ordering. I think it was Just over 2 weeks, not too bad considering they take longer to arrive when you order a custom spring rate.
We had considered getting Kent Motorsport to fit them. But decided this was an important job for us to tackle ourselves. We will get the professionals to set them up for us after they’re fitted.
Build quality on the coilovers is superb. Next job is getting the old set out, and then putting these in.
FITTING COILOVERS
This took a bit of time, but it was one of the most rewarding aspects of this entire process.
We had an offer from our sponsor Kent Motorsport, to fit the coilovers, cut out the suspension turrets, and do full geo/alignment + corner-weighting for a very reasonable price.
But we decided to go ahead with the fitting ourselves; and then rely on the professionals for the final setup at the end. It was important to me to do this bit myself.
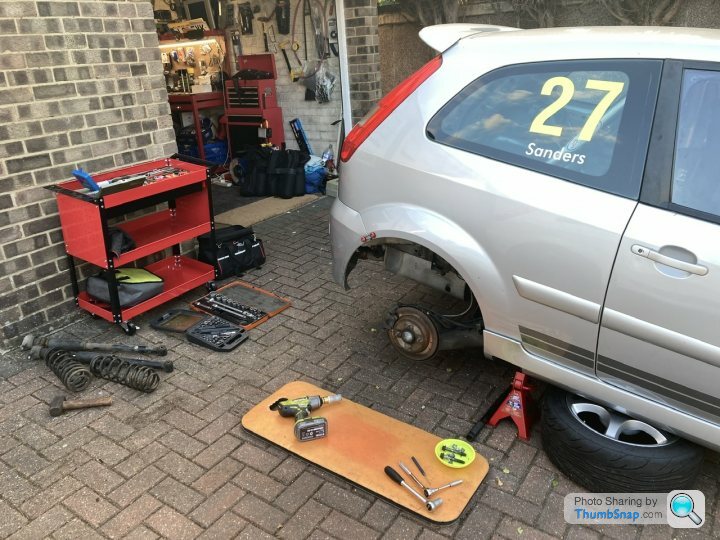
We tackled the job over 3 separate days to fit around work in the daytime. I’m reliably informed a professional could do the fitting in one afternoon (plus additional time for setup). In total I’d say it took us about 18 hours to fit them!!
But it was time very well spent, it was another great opportunity to learn more about the car, learn about setup, and to gain new confidence in working on the car myself. I also got to use some new tools and whack stuff really hard with a big hammer. All good stuff.

We tackled the rear suspension first. Removing the stock struts & springs is really easy, basically a case of removing the wheels, undoing a few bolts, and dropping the rear beam down. The Rear ARB gets in the way a bit, so in hindsight I’d recommend removing this completely and then reinstalling afterwards.
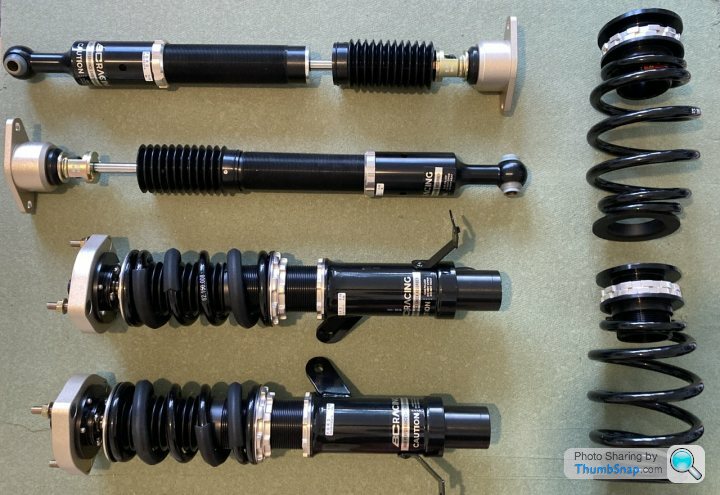
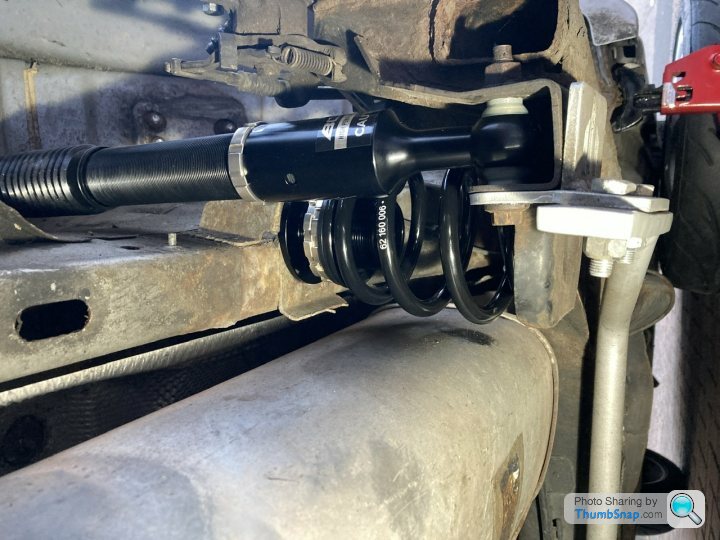
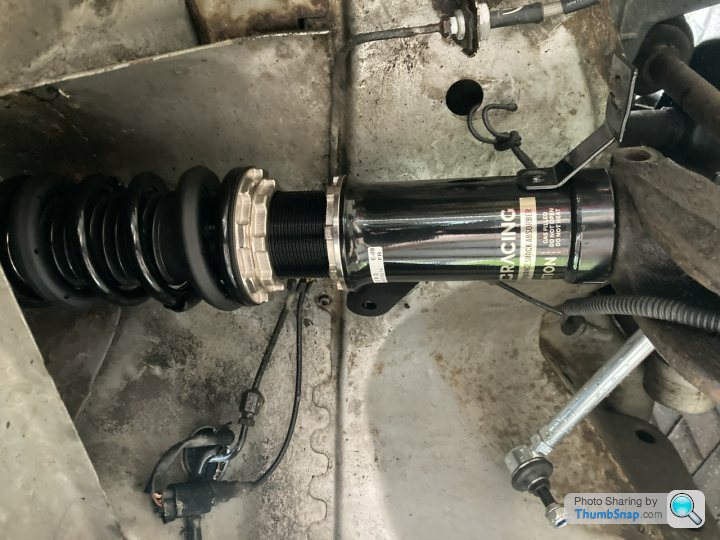
The rear struts come out with just two bolts at the top & one at the bottom – really easy to remove and just as easy to replace the new units. The new struts & springs were set to match the same heights as the BC Racing coilovers on our other Fiesta; and are a direct fit into the rear of the car.
It all bolted back up again really nicely, and genuinely was as straightforward as it looks online.
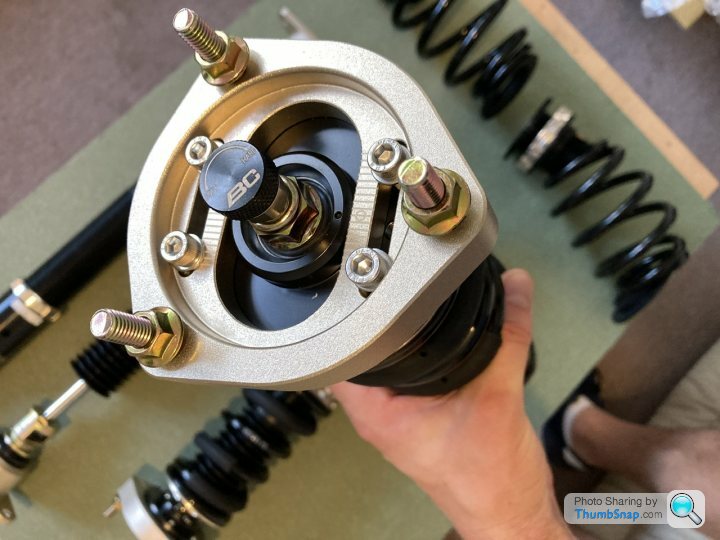
The fronts were tackled over two more evenings – with the added complication of having to drill large holes at the top of the suspension mounting point in order to give access to the adjustable topmounts. In terms of advice and lessons learned, I’d say use a hole-cutter. It is extremely tough steel and not easy to cut with a dremel etc.
We measured the holes previously cut on our other car, which measured 70mm across. We had invested in a 70mm hole cutter (two in fact – just in case!) and decided that our best hope of getting the hole to align precisely where we needed it, was to create wooden guides to act as a centre.
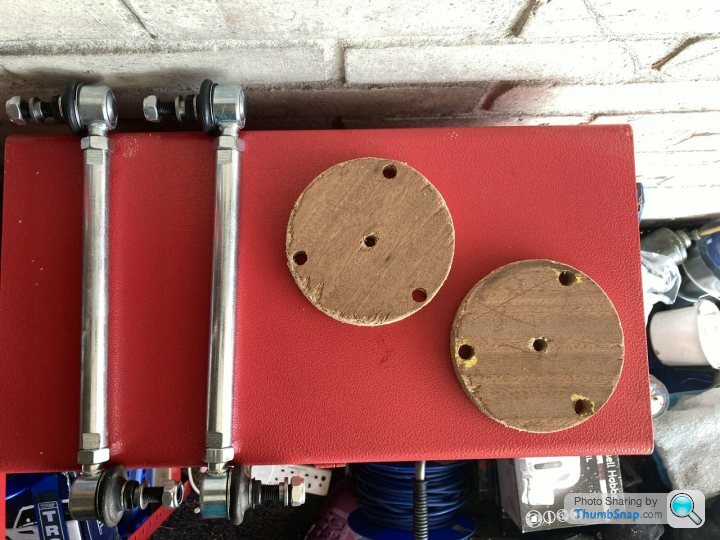
Dad knocked up a couple of these wooden guides to bolt under the turrets before drilling, with a pilot hole intended to help guide the hole cutter and locate the 70mm hole accurately between the three fixing holes. The main risk was if we cut the hole too wide or off-centre, we risked cutting the metal too thin around the fixing holes and reducing the security of the strut into the body of the car.
We removed the bonnet entirely to give proper access, and also the wipers and plastic cowlings beneath the windscreen, then removed the front wheels, and the front struts. There is a really good walk-through guide on Youtube for removing the struts, on a channel called Autodoc. It’s a reasonably straight forward process, much easier than getting the struts back in again!
Once it was all removed we took the opportunity to also remove and replace the droplinks. A couple of months back I actually fitted brand new droplinks and suspension struts, so it was odd taking these out again.. but its good to have spares. These new adjustable droplinks went in, again set to match the same ones in our other car. The wooden guides were then bolted securely in place and the cutting began.
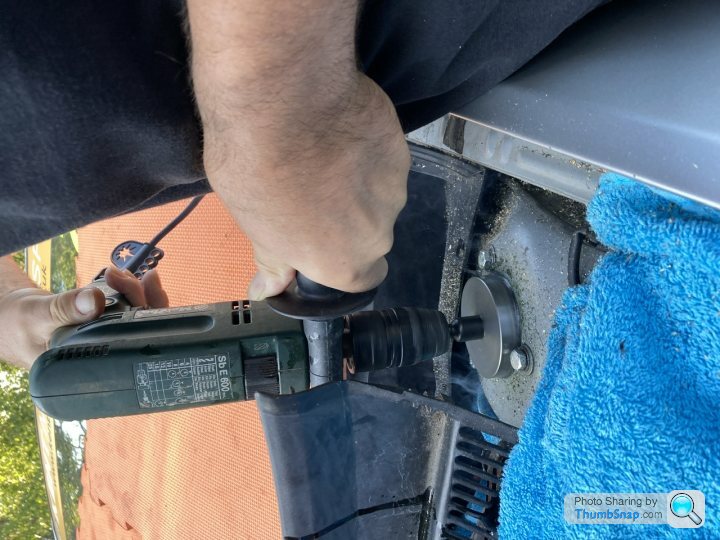
The holes located quite nicely, and the guides definitely worked. We landed up dead centre on one of the turrets, and 2mm or so off-centre on the other. Fortunately, this did not compromise the strength of the fixing holes, and of course there is also a strut brace going in over the top of the holes anyway adding significant support.
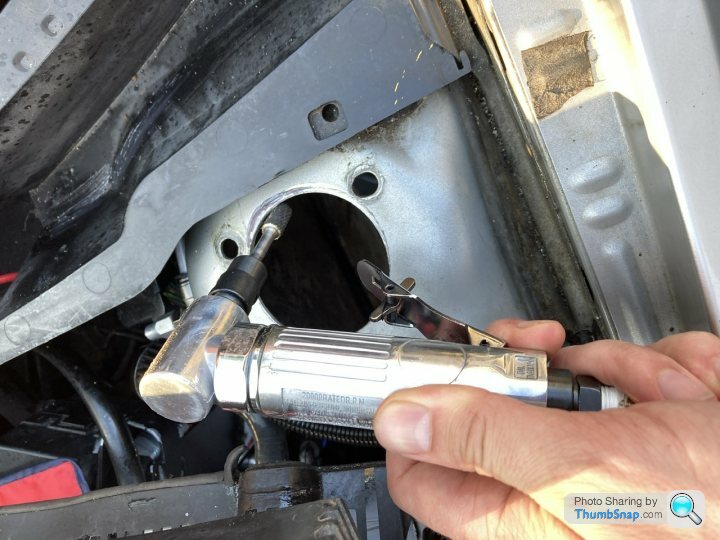
We test fitted the front coilovers and found that the side which was 2mm off-centre didn’t give us 100% access to the topmounts – so we used a dremmel tool to widen the hole by another mm or so. After touching up the area with paint, we then bolted both front coilovers in place. That was the first really tricky part done.
Re-fitting is the next tricky part. No matter how easy it looks on Youtube, getting the bottom of the suspension strut to relocate into the hub assembly is not easy! Ideally you really want the car on a ramp for this, with a transmission jack underneath the hub. Rolling around on your back, trying to use a trolley jack to lift the wobbly hub upwards, is not a fun way to do it. In the end I decided to remove the brake calipers, brackets, and discs to make the hubs less unwieldy.
One strut went in after quite a few thumps with a lump hammer. The other side did not want to go in. It took a few attempts, and a couple of tea-breaks to calm down.. but eventually I gave up trying to finesse the strut into the hub and just ‘sent it’. Brute force won out, and the coilover was eventually seated properly into the hub.
I’d recommend buying replacement pinch bolts before starting this job. The large bolts that clamp the bottom of the strut into place have taken a real pounding on my car and were quite rounded. I’d wrongly expected to get new ones in the coilover kit, so for a few quid it’s probably worth knowing you’ve got fresh ones to go on the car that can be torqued up to the correct setting without rounding off. I luckily had another Fiesta ST parked next to me on the driveway, so jacked it up and ‘borrowed’ a spare bolt.
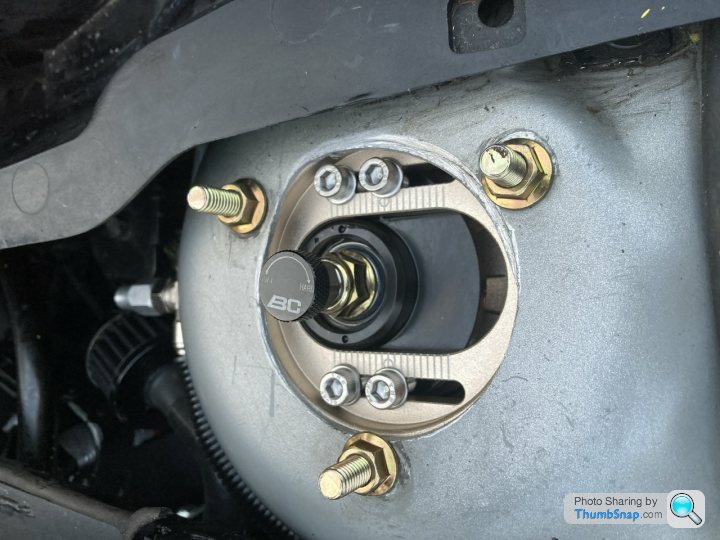
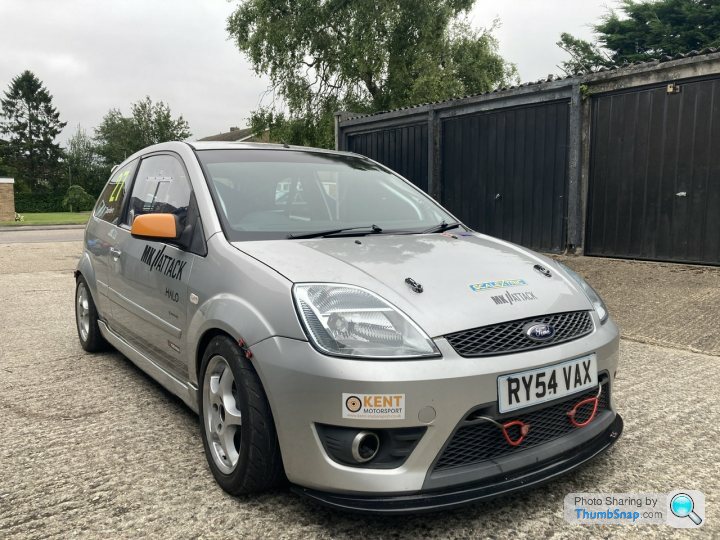
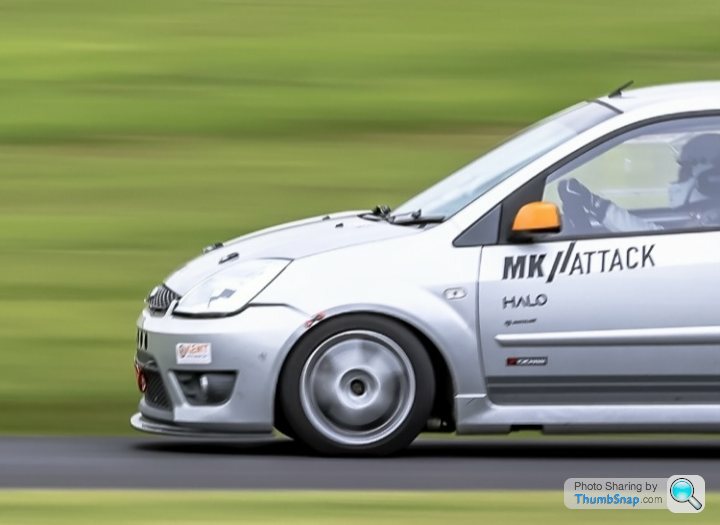
The new (much shorter) droplinks bolted into place fairly easily and rest of the car went back together no problem at all. We had set the adjustable topmounts to match our other car, which on the white car gives us 3 degrees of negative camber at the front. Once the car was dropped down this camber was very visible, and along with the significant drop in ride height, meant that the car FINALLY looked like a racing car. I think the cool kids call it stance.

This had been one of the most rewarding jobs so far. I’m not sure if anyone is reading this, as I realise I’ve just waffled on for about 1,000 words about a job that would take some people just an hour or two. But it really was a lot of fun, and had been one of the main steps I’d been looking forward to when planning this build. After a quick test drive all seemed to be ok, and I could feel a huge difference in the responsiveness of the car and its ability to turn in and remain planted through bends.
The car is going to Kent Motorsport tomorrow for alignment and final tweaks. I’ll also get some photos of the car then with its final ride height and stance.
I’m expecting a significant improvement in overall performance, and pace, when next out on track. So here’s hoping the trip up to Cadwell Park this weekend returns some good results.
This took a bit of time, but it was one of the most rewarding aspects of this entire process.
We had an offer from our sponsor Kent Motorsport, to fit the coilovers, cut out the suspension turrets, and do full geo/alignment + corner-weighting for a very reasonable price.
But we decided to go ahead with the fitting ourselves; and then rely on the professionals for the final setup at the end. It was important to me to do this bit myself.
We tackled the job over 3 separate days to fit around work in the daytime. I’m reliably informed a professional could do the fitting in one afternoon (plus additional time for setup). In total I’d say it took us about 18 hours to fit them!!
But it was time very well spent, it was another great opportunity to learn more about the car, learn about setup, and to gain new confidence in working on the car myself. I also got to use some new tools and whack stuff really hard with a big hammer. All good stuff.
We tackled the rear suspension first. Removing the stock struts & springs is really easy, basically a case of removing the wheels, undoing a few bolts, and dropping the rear beam down. The Rear ARB gets in the way a bit, so in hindsight I’d recommend removing this completely and then reinstalling afterwards.
The rear struts come out with just two bolts at the top & one at the bottom – really easy to remove and just as easy to replace the new units. The new struts & springs were set to match the same heights as the BC Racing coilovers on our other Fiesta; and are a direct fit into the rear of the car.
It all bolted back up again really nicely, and genuinely was as straightforward as it looks online.
The fronts were tackled over two more evenings – with the added complication of having to drill large holes at the top of the suspension mounting point in order to give access to the adjustable topmounts. In terms of advice and lessons learned, I’d say use a hole-cutter. It is extremely tough steel and not easy to cut with a dremel etc.
We measured the holes previously cut on our other car, which measured 70mm across. We had invested in a 70mm hole cutter (two in fact – just in case!) and decided that our best hope of getting the hole to align precisely where we needed it, was to create wooden guides to act as a centre.
Dad knocked up a couple of these wooden guides to bolt under the turrets before drilling, with a pilot hole intended to help guide the hole cutter and locate the 70mm hole accurately between the three fixing holes. The main risk was if we cut the hole too wide or off-centre, we risked cutting the metal too thin around the fixing holes and reducing the security of the strut into the body of the car.
We removed the bonnet entirely to give proper access, and also the wipers and plastic cowlings beneath the windscreen, then removed the front wheels, and the front struts. There is a really good walk-through guide on Youtube for removing the struts, on a channel called Autodoc. It’s a reasonably straight forward process, much easier than getting the struts back in again!
Once it was all removed we took the opportunity to also remove and replace the droplinks. A couple of months back I actually fitted brand new droplinks and suspension struts, so it was odd taking these out again.. but its good to have spares. These new adjustable droplinks went in, again set to match the same ones in our other car. The wooden guides were then bolted securely in place and the cutting began.
The holes located quite nicely, and the guides definitely worked. We landed up dead centre on one of the turrets, and 2mm or so off-centre on the other. Fortunately, this did not compromise the strength of the fixing holes, and of course there is also a strut brace going in over the top of the holes anyway adding significant support.
We test fitted the front coilovers and found that the side which was 2mm off-centre didn’t give us 100% access to the topmounts – so we used a dremmel tool to widen the hole by another mm or so. After touching up the area with paint, we then bolted both front coilovers in place. That was the first really tricky part done.
Re-fitting is the next tricky part. No matter how easy it looks on Youtube, getting the bottom of the suspension strut to relocate into the hub assembly is not easy! Ideally you really want the car on a ramp for this, with a transmission jack underneath the hub. Rolling around on your back, trying to use a trolley jack to lift the wobbly hub upwards, is not a fun way to do it. In the end I decided to remove the brake calipers, brackets, and discs to make the hubs less unwieldy.
One strut went in after quite a few thumps with a lump hammer. The other side did not want to go in. It took a few attempts, and a couple of tea-breaks to calm down.. but eventually I gave up trying to finesse the strut into the hub and just ‘sent it’. Brute force won out, and the coilover was eventually seated properly into the hub.
I’d recommend buying replacement pinch bolts before starting this job. The large bolts that clamp the bottom of the strut into place have taken a real pounding on my car and were quite rounded. I’d wrongly expected to get new ones in the coilover kit, so for a few quid it’s probably worth knowing you’ve got fresh ones to go on the car that can be torqued up to the correct setting without rounding off. I luckily had another Fiesta ST parked next to me on the driveway, so jacked it up and ‘borrowed’ a spare bolt.
The new (much shorter) droplinks bolted into place fairly easily and rest of the car went back together no problem at all. We had set the adjustable topmounts to match our other car, which on the white car gives us 3 degrees of negative camber at the front. Once the car was dropped down this camber was very visible, and along with the significant drop in ride height, meant that the car FINALLY looked like a racing car. I think the cool kids call it stance.
This had been one of the most rewarding jobs so far. I’m not sure if anyone is reading this, as I realise I’ve just waffled on for about 1,000 words about a job that would take some people just an hour or two. But it really was a lot of fun, and had been one of the main steps I’d been looking forward to when planning this build. After a quick test drive all seemed to be ok, and I could feel a huge difference in the responsiveness of the car and its ability to turn in and remain planted through bends.
The car is going to Kent Motorsport tomorrow for alignment and final tweaks. I’ll also get some photos of the car then with its final ride height and stance.
I’m expecting a significant improvement in overall performance, and pace, when next out on track. So here’s hoping the trip up to Cadwell Park this weekend returns some good results.
GEOMETRY + SETUP
The car was at Kent Motorsport yesterday for race geo and a final once over.

Yaser is an expert in suspension setup, and spent a good deal of time ensuring everything was as it should be.
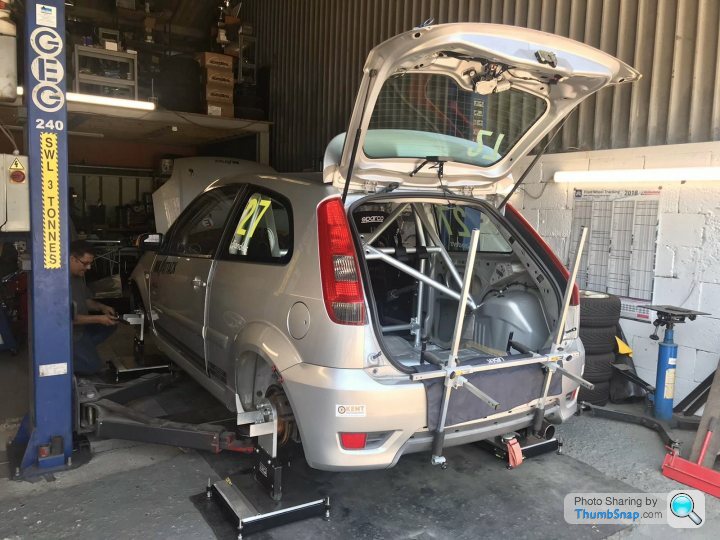
The car required a good deal of adjustment in toe and camber. We had aimed to install the new coilovers with 3 degrees of camber at the front by copying the topmounts settings on our other car. But once measured properly we found we were way out.

The car is now set accurately with 3 degrees camber and the perfect amount of toe, and some positive rake.
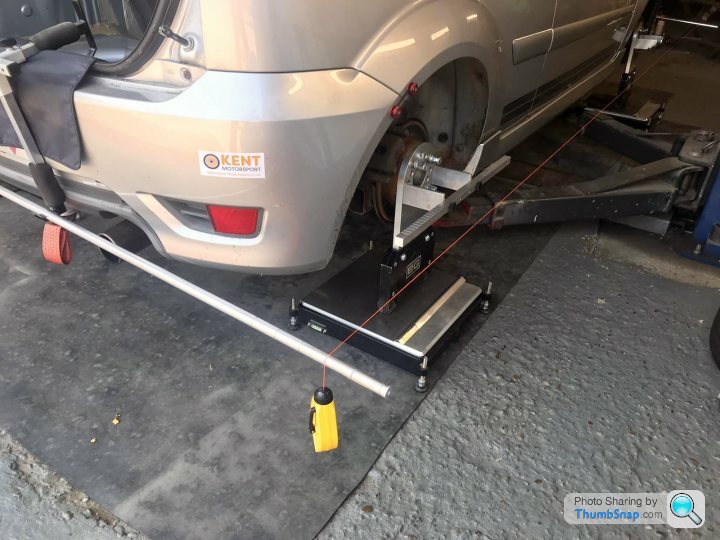
We have not messed about much with the ride height, and may come back and spend another afternoon on this and to do proper corner-weighting soon.
The car feels mega, can’t wait to get it on track this weekend at the next round of CMMC Tintops - at Cadwell Park.
The car was at Kent Motorsport yesterday for race geo and a final once over.
Yaser is an expert in suspension setup, and spent a good deal of time ensuring everything was as it should be.
The car required a good deal of adjustment in toe and camber. We had aimed to install the new coilovers with 3 degrees of camber at the front by copying the topmounts settings on our other car. But once measured properly we found we were way out.
The car is now set accurately with 3 degrees camber and the perfect amount of toe, and some positive rake.
We have not messed about much with the ride height, and may come back and spend another afternoon on this and to do proper corner-weighting soon.
The car feels mega, can’t wait to get it on track this weekend at the next round of CMMC Tintops - at Cadwell Park.
OP I for one really enjoy your writing style in the mail bread so far.
Although when reading your post about fitting laminate he coilovers and
“you just ‘sent it’. Brute force won out’ has just caused me to spit a bit of beer over my burger and resulted in a bit of a disparaging look from the group on the next table.
Some work friends and I were looking at going to Caldwell to watch. It would have been nice to see the car close up.
Unfortunately as the weather looks absolute dog turd we have decided against it (watch it be dry and sunny now) good luck with the weekend. I hope you have some good wets and a decent tent if your camping.
Best of luck.
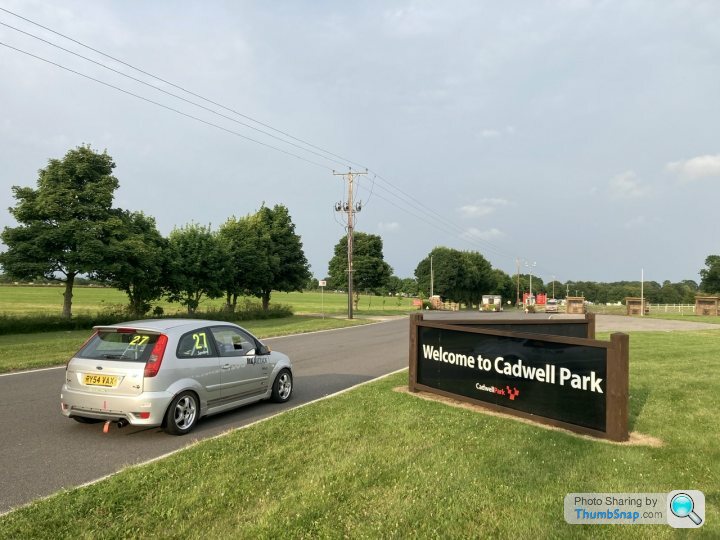
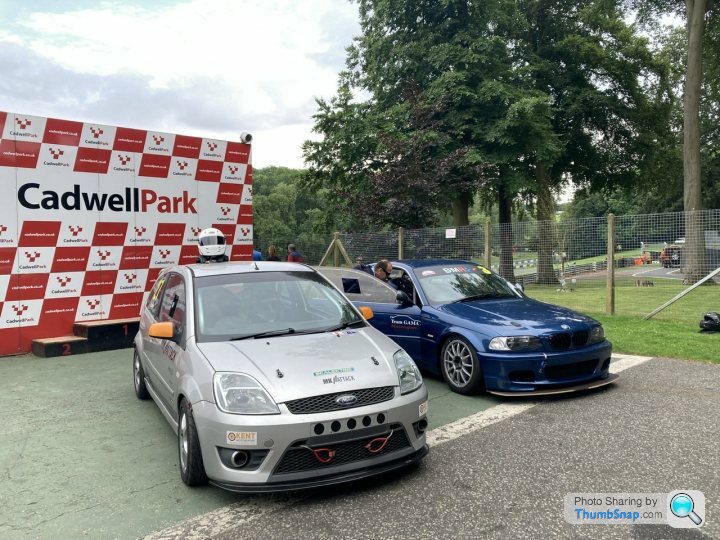
CADWELL PREP
It’s a long way to Cadwell Park. That statement seems to apply regardless of where you’re from in the UK. Does anyone actually live near Cadwell Park?
Given that I’d chosen to race in the CMMC SOUTHERN series I was pretty surprised to see Cadwell on the calendar at the start of the season - and half intended to give it a miss.
But as the weekend got closer I couldn’t resist putting my name down, given that it’s arguably the most challenging and most rewarding circuit in the country. It also gave us a reason to get the car ‘finished’ and ready for the next round.
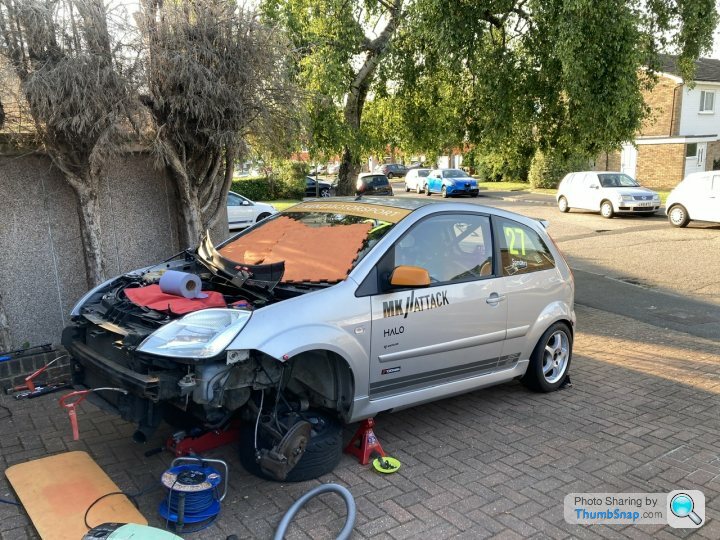
The next couple of weeks leading up to the weekend were manic. With the car at last getting it’s long overdue suspension upgrades (see previous post), finally having the alignment done, alongside also going for a new uprated clutch, and also having a new windscreen fitted too!
As mentioned previously, I made a really duff call when I insisted on installing a standard specification clutch during the build. This decision came back to haunt me at Brands Hatch when the clutch completely overheated in the second race and ended my challenge for the class win (although I’d arguably still have been beaten on outright pace anyway).
Having scratched my head for a while after that race, we’ve decided I must have been accidentally riding the clutch during that race; as a standard clutch really should be capable of taking that kind of abuse from a standard power engine.
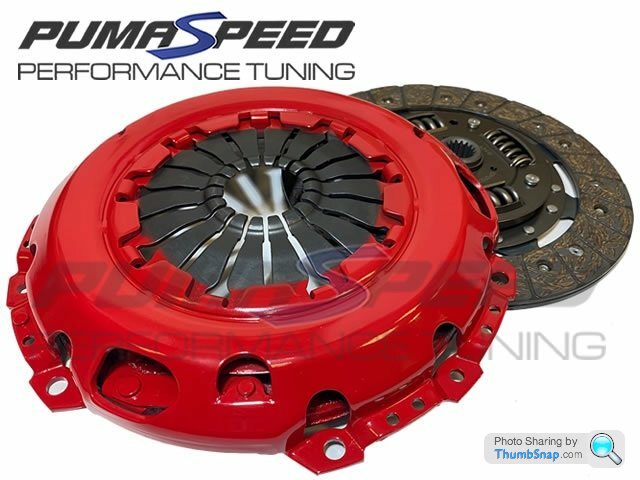
Either way, it would be nothing short of stupidity to fit the same clutch again. So this time around I opted for the uprated clutch from Pumaspeed, which has a 10% larger surface area and is certified to 230 BHP. Should be fine in our little tin can then.
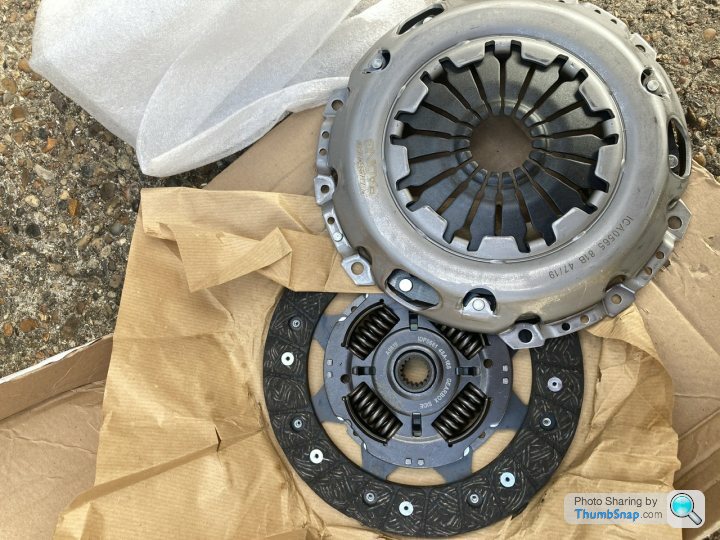
As you can see from the pic, the kit didn’t look quite how they advertised it to me online. I pinged Pumaspeed a message about this, and they replied something along the lines of ‘we forgot to paint your one’.
Lee Clutch Centre fitted the new clutch at a very reasonable price, as they’d only just fitted the last one! The technician just about managed to stop himself saying ‘I told you so’ as I asked him what he thought of the new clutch kit I’d supplied, although I’m pretty sure that was what he was thinking, along with ‘this muppet has no idea what he’s doing’.
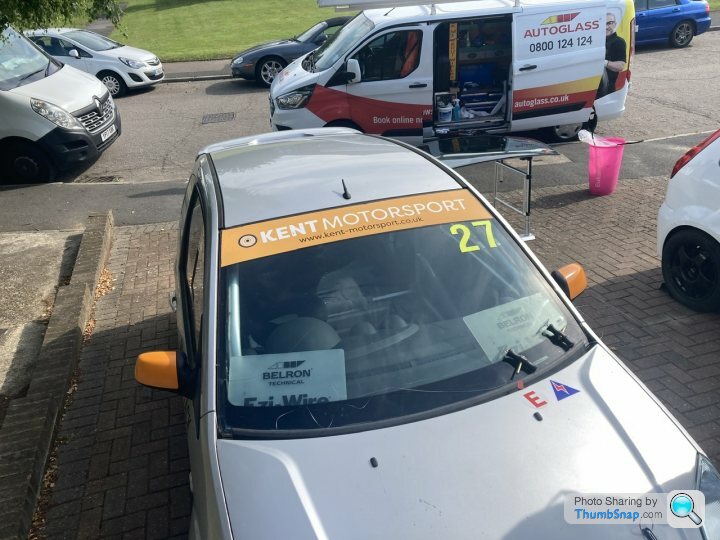
The windscreen was badly cracked after a fellow racer, who shall remain nameless, took an optimistically wide line at Brands Hatch and then pebble-dashed the front of my car with gravel. These things happen in racing, but in the heat of the moment you find yourself comically shouting expletives as if the gravel has been fired at you on purpose.
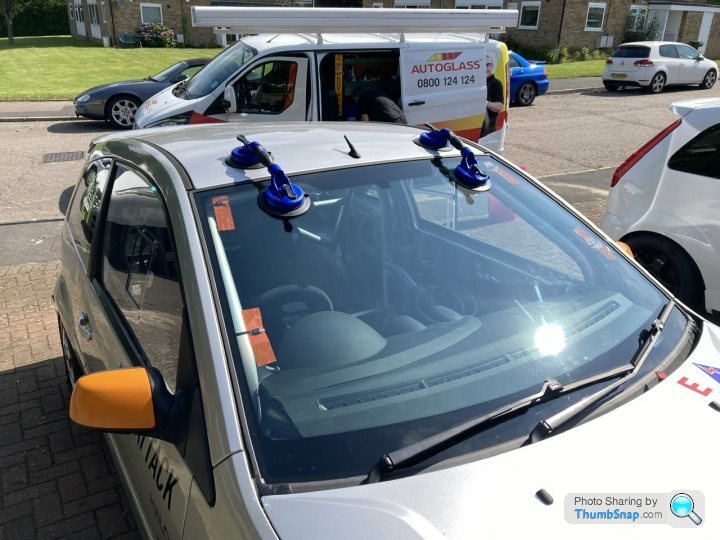
The new screen went in - and I found another advantage to having a road legal and fully insured racing car. Only a small excess to pay for my shiny new heated windscreen to be fitted. Let’s see how long this one lasts!
We did a thorough spanner check on the car, and Kent Motorsport did likewise after finishing the car’s alignment. So after a quick wash it was ready for race weekend.
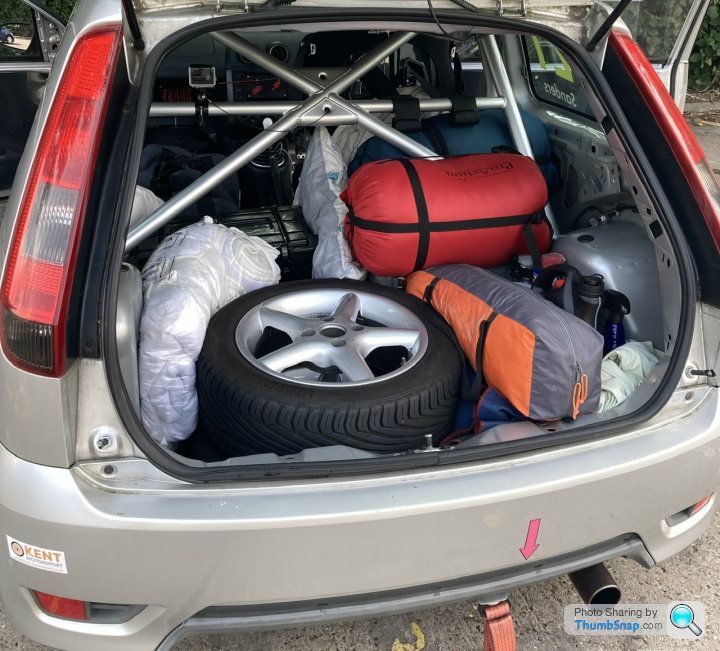
I got the tent, a bag of tools, stash of supplies, and a couple of wet tyres (for luck) into the race car.. and set off on my own for my first Malle Moto race weekend at Cadwell Park.
It’s a long way to Cadwell Park. That statement seems to apply regardless of where you’re from in the UK. Does anyone actually live near Cadwell Park?
Given that I’d chosen to race in the CMMC SOUTHERN series I was pretty surprised to see Cadwell on the calendar at the start of the season - and half intended to give it a miss.
But as the weekend got closer I couldn’t resist putting my name down, given that it’s arguably the most challenging and most rewarding circuit in the country. It also gave us a reason to get the car ‘finished’ and ready for the next round.
The next couple of weeks leading up to the weekend were manic. With the car at last getting it’s long overdue suspension upgrades (see previous post), finally having the alignment done, alongside also going for a new uprated clutch, and also having a new windscreen fitted too!
As mentioned previously, I made a really duff call when I insisted on installing a standard specification clutch during the build. This decision came back to haunt me at Brands Hatch when the clutch completely overheated in the second race and ended my challenge for the class win (although I’d arguably still have been beaten on outright pace anyway).
Having scratched my head for a while after that race, we’ve decided I must have been accidentally riding the clutch during that race; as a standard clutch really should be capable of taking that kind of abuse from a standard power engine.
Either way, it would be nothing short of stupidity to fit the same clutch again. So this time around I opted for the uprated clutch from Pumaspeed, which has a 10% larger surface area and is certified to 230 BHP. Should be fine in our little tin can then.
As you can see from the pic, the kit didn’t look quite how they advertised it to me online. I pinged Pumaspeed a message about this, and they replied something along the lines of ‘we forgot to paint your one’.
Lee Clutch Centre fitted the new clutch at a very reasonable price, as they’d only just fitted the last one! The technician just about managed to stop himself saying ‘I told you so’ as I asked him what he thought of the new clutch kit I’d supplied, although I’m pretty sure that was what he was thinking, along with ‘this muppet has no idea what he’s doing’.
The windscreen was badly cracked after a fellow racer, who shall remain nameless, took an optimistically wide line at Brands Hatch and then pebble-dashed the front of my car with gravel. These things happen in racing, but in the heat of the moment you find yourself comically shouting expletives as if the gravel has been fired at you on purpose.
The new screen went in - and I found another advantage to having a road legal and fully insured racing car. Only a small excess to pay for my shiny new heated windscreen to be fitted. Let’s see how long this one lasts!
We did a thorough spanner check on the car, and Kent Motorsport did likewise after finishing the car’s alignment. So after a quick wash it was ready for race weekend.
I got the tent, a bag of tools, stash of supplies, and a couple of wet tyres (for luck) into the race car.. and set off on my own for my first Malle Moto race weekend at Cadwell Park.
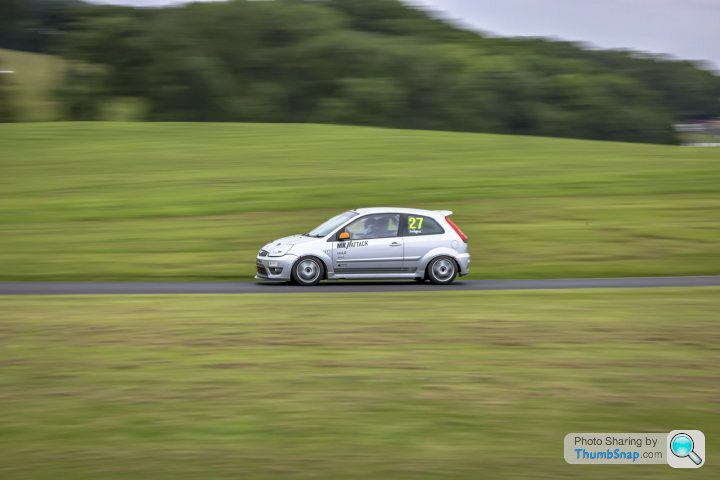
CADWELL RACE WEEKEND
It was worth the long drive up. The car was faultless on the 4 hour journey to the circuit.
It now has a much firmer ride, but with the suspension set to it softest damping setting the car was still perfectly useable on the road. If anything the harsh noise from the track tyres is more uncomfortable.
Cadwell is a special track. Arriving while it was still light, I pitched up my tent next to some of the other TinTops and then found that the clubhouse was still open and serving hot food; now that’s nice to find after a long drive.
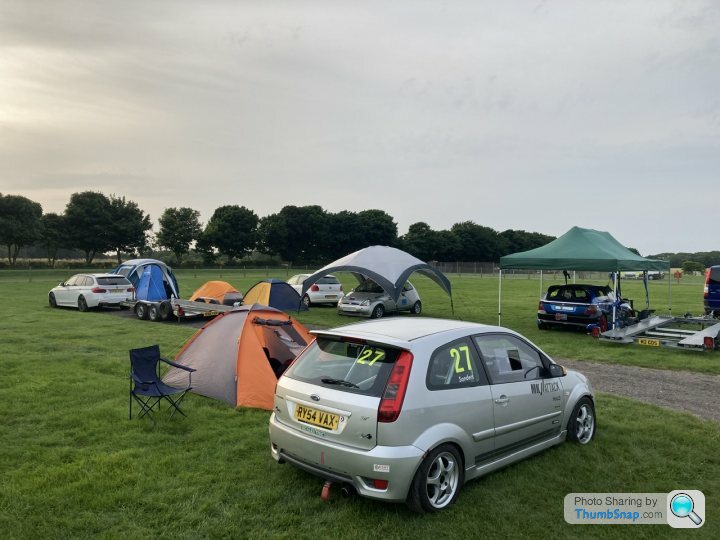
After getting pitched up and grabbing a bite to eat there was just time to do a walk of the circuit before it got dark. This track is just different from other circuits. I guess it’s not hard to put your finger on why - the mixture of fast straights alongside really twisty technical sections, alongside big changes in elevation, and the added fun of a couple of sections disappearing off into the trees.. it really does feel like a mini-Nurburgring.. just like everyone says it does.

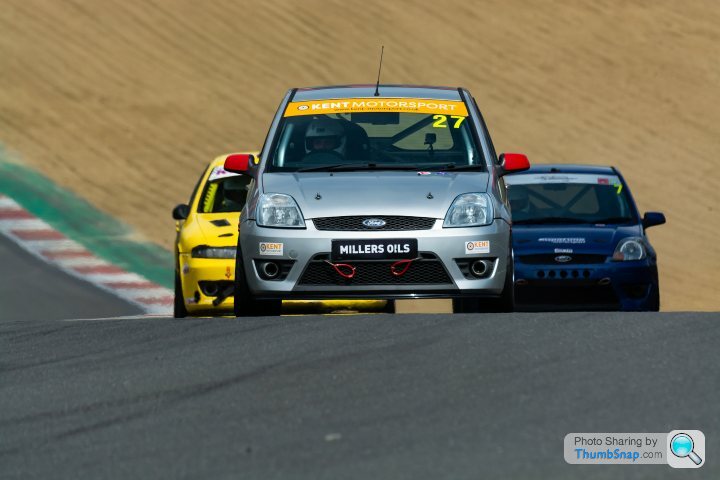
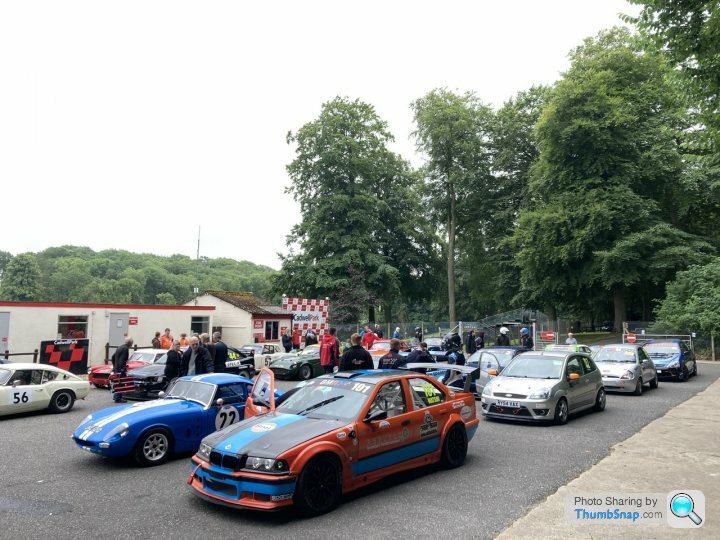
The next morning we were qualifying in a large group with a real mix of machinery. Everything from the big super saloons to the lovely Classic Challenge cars that we’d previously raced with at Brands GP.
As quali started I decided to just get a few slow and steady laps in to warm the car up and re-learn the circuit. After a cautious session, including finding fluid out on the tarmac, I managed a fastest lap of 2:00:00. This is not a very quick time, but I knew I had seconds to take off that time during the race.
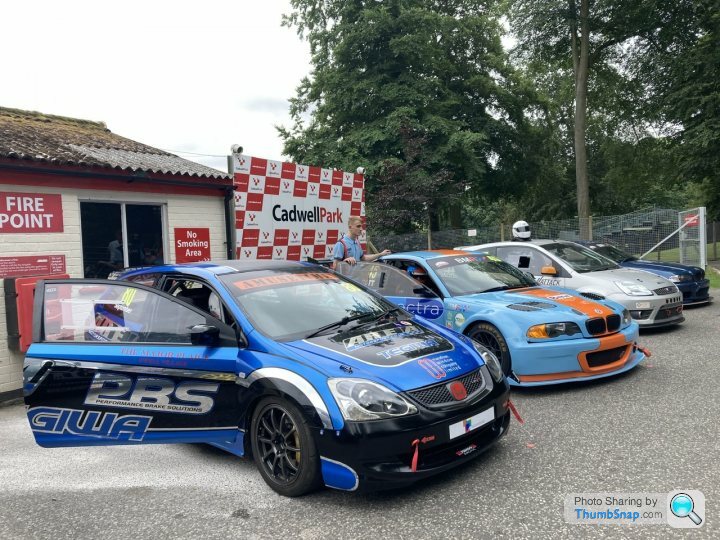
Looking at the lap-times it turned out my closest competitor would be car No.3, the Class D BMW 330. I’d be lining up next to him in Race1 and made it my goal to stay in front on lap 1 and then see what happened.
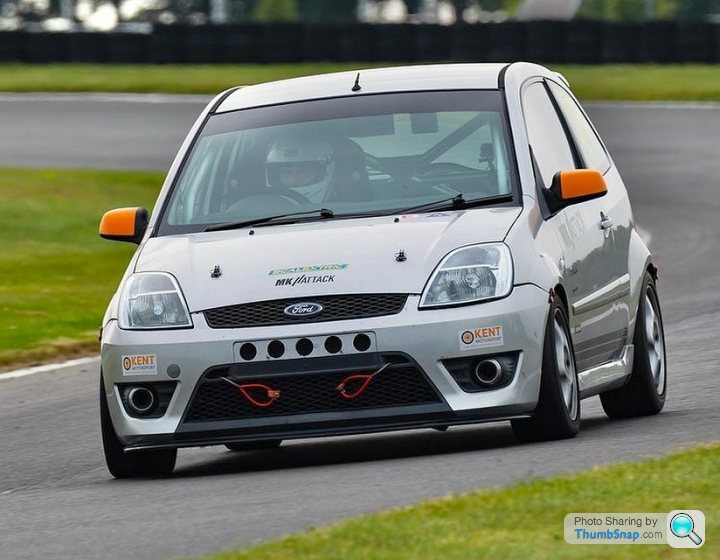
The car performed well on circuit and I could really feel the transformation in the handling. It turned in much better, held its line without wanting to under steer, and we seemed to have almost eliminated the body roll that had been a nightmare at Brands GP.
In Race1 the rolling start went well and we kept pace with the cars in front. The BMW came storming past through turn1, a really nice move considering we were on cold tyres.
Through turn2 and into Park Straight I managed to get a really good run and kept on the BMWs tail up the hill. I saw my chance in the huge braking zone before Chris Curve and went down the inside and took the place back.
My tyres seemed to get up to temperature really quickly and I pulled a couple of seconds gap over the next lap or two. I had ideas of keeping up with the red Puma which had joined us in the Invitation Class, but he was much quicker than anticipated and disappeared ahead, chasing Gideon in his well-sorted Civic Type-R.
More through luck than judgment, and probably a little foolhardiness, I managed to eek out a bit of space and the next few laps I remained fairly comfortably ahead of my rival.
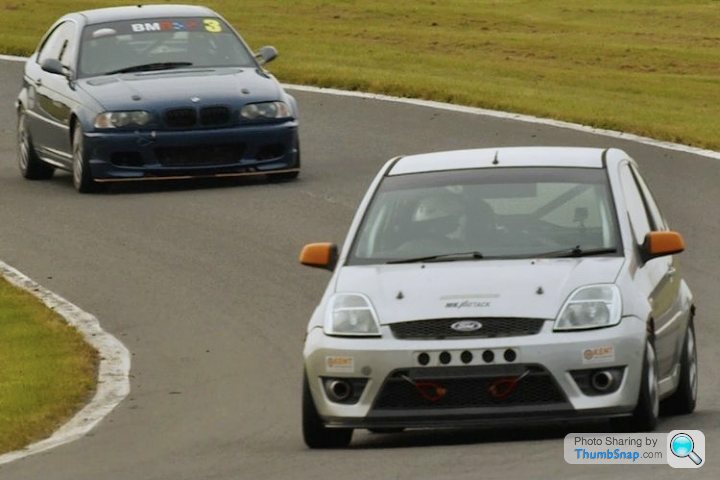
But this soon changed as the BMW got up to speed. Lap after lap I could see him appearing over The Mountain behind me closer and closer each time, and by the last few laps of the race he was right with me again.
We had a great battle to the wire with him filling my mirrors and the little Fiesta just about held out to make it across the line ahead! One more lap and I think he would have got me.
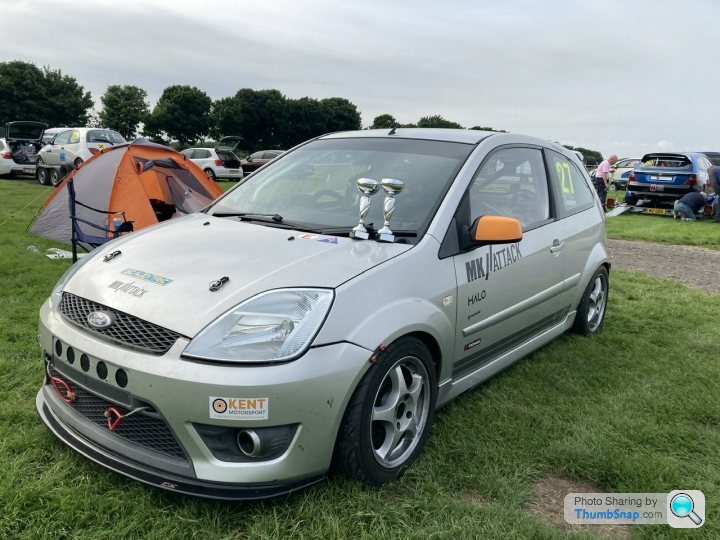
It was a great feeling to finish ahead of one of the Super Saloons. Although we were in different classes it just goes to show you can always have a great race with whoever happens to be around you on track. And it was good to rack up another class win, despite the thin field - a wins a win!
Race2 almost went the same way. But after managing the gap for a number of laps that big BMW grill was again filling my mirrors. I couldn’t block him any longer and he came cruising past on Park Straight in the second half of the race. I couldn’t keep up after that and he actually beat me by a good few seconds in the end, a really good drive. I’d thoroughly enjoyed the battle.
In the end I had half an eye on my journey home as I brought the car across the finish line - in one piece! I’d managed a best lap of 1:55. A huge improvement on my qualifying time, and not a bad lap time for a car that would be driving the long journey home on the public roads.
The weekend had been a last minute decision, and I was very glad I went. It was a shame not to have a bigger field of cars, I think we ran with 9 cars in the end.
But we went there for 2 class wins and that’s what we got so can’t complain! The car was mega, and most importantly it was good fun. And I also got to do my first proper Malle Moto race - on my own with no help and managed to get home safe in one piece.
A 350mile round trip, plus a full day of racing, and the car didn’t skip a beat.
It was worth the long drive up. The car was faultless on the 4 hour journey to the circuit.
It now has a much firmer ride, but with the suspension set to it softest damping setting the car was still perfectly useable on the road. If anything the harsh noise from the track tyres is more uncomfortable.
Cadwell is a special track. Arriving while it was still light, I pitched up my tent next to some of the other TinTops and then found that the clubhouse was still open and serving hot food; now that’s nice to find after a long drive.
After getting pitched up and grabbing a bite to eat there was just time to do a walk of the circuit before it got dark. This track is just different from other circuits. I guess it’s not hard to put your finger on why - the mixture of fast straights alongside really twisty technical sections, alongside big changes in elevation, and the added fun of a couple of sections disappearing off into the trees.. it really does feel like a mini-Nurburgring.. just like everyone says it does.
The next morning we were qualifying in a large group with a real mix of machinery. Everything from the big super saloons to the lovely Classic Challenge cars that we’d previously raced with at Brands GP.
As quali started I decided to just get a few slow and steady laps in to warm the car up and re-learn the circuit. After a cautious session, including finding fluid out on the tarmac, I managed a fastest lap of 2:00:00. This is not a very quick time, but I knew I had seconds to take off that time during the race.
Looking at the lap-times it turned out my closest competitor would be car No.3, the Class D BMW 330. I’d be lining up next to him in Race1 and made it my goal to stay in front on lap 1 and then see what happened.
The car performed well on circuit and I could really feel the transformation in the handling. It turned in much better, held its line without wanting to under steer, and we seemed to have almost eliminated the body roll that had been a nightmare at Brands GP.
In Race1 the rolling start went well and we kept pace with the cars in front. The BMW came storming past through turn1, a really nice move considering we were on cold tyres.
Through turn2 and into Park Straight I managed to get a really good run and kept on the BMWs tail up the hill. I saw my chance in the huge braking zone before Chris Curve and went down the inside and took the place back.
My tyres seemed to get up to temperature really quickly and I pulled a couple of seconds gap over the next lap or two. I had ideas of keeping up with the red Puma which had joined us in the Invitation Class, but he was much quicker than anticipated and disappeared ahead, chasing Gideon in his well-sorted Civic Type-R.
More through luck than judgment, and probably a little foolhardiness, I managed to eek out a bit of space and the next few laps I remained fairly comfortably ahead of my rival.
But this soon changed as the BMW got up to speed. Lap after lap I could see him appearing over The Mountain behind me closer and closer each time, and by the last few laps of the race he was right with me again.
We had a great battle to the wire with him filling my mirrors and the little Fiesta just about held out to make it across the line ahead! One more lap and I think he would have got me.
It was a great feeling to finish ahead of one of the Super Saloons. Although we were in different classes it just goes to show you can always have a great race with whoever happens to be around you on track. And it was good to rack up another class win, despite the thin field - a wins a win!
Race2 almost went the same way. But after managing the gap for a number of laps that big BMW grill was again filling my mirrors. I couldn’t block him any longer and he came cruising past on Park Straight in the second half of the race. I couldn’t keep up after that and he actually beat me by a good few seconds in the end, a really good drive. I’d thoroughly enjoyed the battle.
In the end I had half an eye on my journey home as I brought the car across the finish line - in one piece! I’d managed a best lap of 1:55. A huge improvement on my qualifying time, and not a bad lap time for a car that would be driving the long journey home on the public roads.
The weekend had been a last minute decision, and I was very glad I went. It was a shame not to have a bigger field of cars, I think we ran with 9 cars in the end.
But we went there for 2 class wins and that’s what we got so can’t complain! The car was mega, and most importantly it was good fun. And I also got to do my first proper Malle Moto race - on my own with no help and managed to get home safe in one piece.
A 350mile round trip, plus a full day of racing, and the car didn’t skip a beat.
Edited by SparrowHawk on Wednesday 4th August 11:22
COOLING
When we first built the car I must admit I didn’t put too much thought into cooling.
In terms of engine cooling I already knew the week link was the power steering - and that we’d be fitting a relocation kit to counter that issue. But the engine itself is fairly bulletproof on these cars and doesn’t tend to need additional cooling.
And with regards to cooling in the driver compartment; the car came with air con installed, so I figured I’d keep this in place so that the cockpit would remain cool enough.

In the end, we opted to add some further ventilation at the front, by removing the number plate and cutting cooling holes in the front bumper to increase air flow in the engine compartment. Temperatures have remained under control and we’ve had no issues.
However, the same cannot be said for inside the drivers compartment. The air con does work; but once the car is up to temperature and being run at full speed during a race - the air conditioning simply does not work. Temperatures sky rocket, and within 15 minutes it feels like an oven in there.
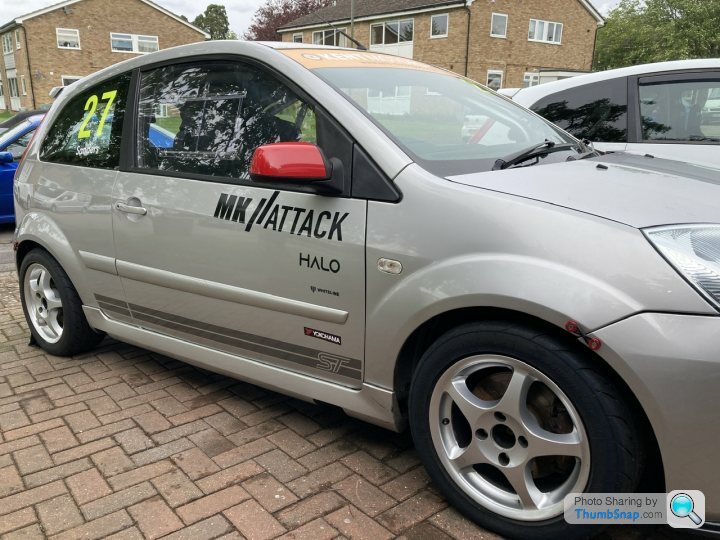
We did opt for the sliding window attachment on our polycarbonate driver side window. But this just doesn’t add enough ventilation to keep temperatures under control; air just doesn’t seem to come in through the window. There is not enough flow.
So seeking added airflow in the cabin we’ve opted to drill further vent holes in the rear hatch. With an MK|Attack cooling plate keeping things looking tidy. I’m hoping that this will draw more air through the front vents and the drivers window.
In addition to these vent holes, it’s clear that we need more air coming in through the front of the car. So I’m looking at the options there. I’ve noticed some people add a small vent into the polycarbonate windows on their A-pillar, with a hose directing air onto the driver.
I’m also considering taking more drastic measures and cutting the roof to install a TRS air scoop. This feels like overkill on a small budget race car. But I need to do something.
If anyone can share experiences of having / fitting a roof scoop like this I’d be all ears.

Hopefully we’ll have sorted something in time for our next race. Which incidentally will be in the Modified Fords series at FORD POWER LIVE on Sunday 19th September at Brands Hatch.
When we first built the car I must admit I didn’t put too much thought into cooling.
In terms of engine cooling I already knew the week link was the power steering - and that we’d be fitting a relocation kit to counter that issue. But the engine itself is fairly bulletproof on these cars and doesn’t tend to need additional cooling.
And with regards to cooling in the driver compartment; the car came with air con installed, so I figured I’d keep this in place so that the cockpit would remain cool enough.
In the end, we opted to add some further ventilation at the front, by removing the number plate and cutting cooling holes in the front bumper to increase air flow in the engine compartment. Temperatures have remained under control and we’ve had no issues.
However, the same cannot be said for inside the drivers compartment. The air con does work; but once the car is up to temperature and being run at full speed during a race - the air conditioning simply does not work. Temperatures sky rocket, and within 15 minutes it feels like an oven in there.
We did opt for the sliding window attachment on our polycarbonate driver side window. But this just doesn’t add enough ventilation to keep temperatures under control; air just doesn’t seem to come in through the window. There is not enough flow.
So seeking added airflow in the cabin we’ve opted to drill further vent holes in the rear hatch. With an MK|Attack cooling plate keeping things looking tidy. I’m hoping that this will draw more air through the front vents and the drivers window.
In addition to these vent holes, it’s clear that we need more air coming in through the front of the car. So I’m looking at the options there. I’ve noticed some people add a small vent into the polycarbonate windows on their A-pillar, with a hose directing air onto the driver.
I’m also considering taking more drastic measures and cutting the roof to install a TRS air scoop. This feels like overkill on a small budget race car. But I need to do something.
If anyone can share experiences of having / fitting a roof scoop like this I’d be all ears.
Hopefully we’ll have sorted something in time for our next race. Which incidentally will be in the Modified Fords series at FORD POWER LIVE on Sunday 19th September at Brands Hatch.
Edited by SparrowHawk on Tuesday 31st August 16:48
SparrowHawk said:
COOLING
When we first built the car I must admit I didn’t put too much thought into cooling.
In terms of engine cooling I already knew the week link was the power steering - and that we’d be fitting a relocation kit to counter that issue. But the engine itself is fairly bulletproof on these cars and doesn’t tend to need additional cooling.
And with regards to cooling in the driver compartment; the car came with air con installed, so I figured I’d keep this in place so that the cockpit would remain cool enough.
In the end, we opted to add some further ventilation at the front, by removing the number plate and cutting cooling holes in the front bumper to increase air flow in the engine compartment. Temperatures have remained under control and we’ve had no issues.
However, the same cannot be said for inside the drivers compartment. The air con does work; but once the car is up to temperature and being run at full speed during a race - the air conditioning simply does not work. Temperatures sky rocket, and within 15 minutes it feels like an oven in there.
We did opt for the sliding window attachment on our polycarbonate driver side window. But this just doesn’t add enough ventilation to keep temperatures under control; air just doesn’t seem to come in through the window. There is not enough flow.
So seeking added airflow in the cabin we’ve opted to drill further vent holes in the rear hatch. With an MK|Attack cooling plate keeping things looking tidy. I’m hoping that this will draw more air through the front vents and the drivers window.
In addition to these vent holes, it’s clear that we need more air coming in through the front of the car. So I’m looking at the options there. I’ve noticed some people add a small vent into the polycarbonate windows on their A-pillar, with a hose directing air onto the driver.
I’m also considering taking more drastic measures and cutting the roof to install a TRS air scoop. This feels like overkill on a small budget race car. But I need to do something.
If anyone can share experiences of having / fitting a roof scoop like this I’d be all ears.
Hopefully we’ll have sorted something in time for our next race. Which incidentally will be in the Modified Fords series at FORD POWER LIVE on Sunday 19th September at Brands Hatch.
I understood that AC turns off under full throttle/power, so it is unlikely it will ever come on on circuit.When we first built the car I must admit I didn’t put too much thought into cooling.
In terms of engine cooling I already knew the week link was the power steering - and that we’d be fitting a relocation kit to counter that issue. But the engine itself is fairly bulletproof on these cars and doesn’t tend to need additional cooling.
And with regards to cooling in the driver compartment; the car came with air con installed, so I figured I’d keep this in place so that the cockpit would remain cool enough.
In the end, we opted to add some further ventilation at the front, by removing the number plate and cutting cooling holes in the front bumper to increase air flow in the engine compartment. Temperatures have remained under control and we’ve had no issues.
However, the same cannot be said for inside the drivers compartment. The air con does work; but once the car is up to temperature and being run at full speed during a race - the air conditioning simply does not work. Temperatures sky rocket, and within 15 minutes it feels like an oven in there.
We did opt for the sliding window attachment on our polycarbonate driver side window. But this just doesn’t add enough ventilation to keep temperatures under control; air just doesn’t seem to come in through the window. There is not enough flow.
So seeking added airflow in the cabin we’ve opted to drill further vent holes in the rear hatch. With an MK|Attack cooling plate keeping things looking tidy. I’m hoping that this will draw more air through the front vents and the drivers window.
In addition to these vent holes, it’s clear that we need more air coming in through the front of the car. So I’m looking at the options there. I’ve noticed some people add a small vent into the polycarbonate windows on their A-pillar, with a hose directing air onto the driver.
I’m also considering taking more drastic measures and cutting the roof to install a TRS air scoop. This feels like overkill on a small budget race car. But I need to do something.
If anyone can share experiences of having / fitting a roof scoop like this I’d be all ears.
Hopefully we’ll have sorted something in time for our next race. Which incidentally will be in the Modified Fords series at FORD POWER LIVE on Sunday 19th September at Brands Hatch.
Edited by SparrowHawk on Tuesday 31st August 16:48
Regarding the PAS. Mine leaked, like they all do. I did a lot of reading on line and saw everything from the fluid is boiling to the return line is too short. Everybody goes for the remote option, but that seems to have become the default because it is required for the Cosworth manifold.
I measured my fluid temperature after sessions on track and it was ~150 deg C, PAS fluid boils at ~600 deg C. The return line on the remote system is shorter than the standard system because it is more direct.
What nobody considers is what ever the fluid is doing in the tank, it should not make it out of the tank period.
I upgraded the o-ring on the cap to 26mm ID x 4mm cross section and the leak is fixed. It cost £2.34.
It is a very tight fit when first installed, but a little lubrication and it fits.
Gassing Station | UK Club Motorsport | Top of Page | What's New | My Stuff